Search the Community
Showing results for tags 'car'.
-
Well, well... It's almost half of the 2025! This year's Speed Champions was amazing! All F1 cars, F&F and also amazing summer's release! Just whoa! Let's start discussion about 2026 cars!
-
 "You are now entering the Blacktron sector! This is the absolute limit of the Classic Space quadrant! You have been warned!" ...sorry about that. Had to get the legal stuff out of the way first! Anyway: Blacktron long-range fighter "Buzzard" Above is the two copies of the Blacktron XL-15, which are now dubbed the "Buzzard" type starfighter. So back in January of 2023, I decided to convert the XL-15 spaceship from the film "Lightyear" into original Blacktron colors. The blue became yellow, and white was turned to black, with all the trans-green removed. I added laser blasters under the wings where some technic pins are and put a different control tile in the cockpit. I was thinking about building a second ship, but then again, getting some of the parts from Bricklink was a total pain due to extremely low quantities in the needed color. (I'm talking about you, 3 x 3 wedge plate in yellow!) Thankfully, I bought one too many of both kinds of the yellow 12 x 3 wedge plates, as they are very rare as well with only one store selling four of each kind in the USA, which made making the second one easier later on. Blacktron command vessel "Executor" In addition to the two Buzzards, I wanted a Blacktron capitol ship. I had no ideas of my own ship, so I spent most of the afternoon of 10/5/23 taking Benny's beloved spaceship from The Lego Movie and corrupting it into a twisted, evil version. I revamped the nose, removed the expanding wing assembly and snub fighters. Of course I then recolored it almost exclusively in black and yellow. (some gray was unavoidable!) I armed it with a turret on the top rear where the sensor array once was, and put the commanders office below where the wing mechanism used to be. To keep with the one-word naming scheme of the original Blacktron, I borrowed the name of Darth Vader's Super Star Destroyer, decreeing this ship the Blacktron Executor. I struggled to think of an engine flame color that fit OG Blacktron, but eventually trans-light blue was selected. Since the wings don't extend anymore, I added a third section for figures with a turret on top in their place. The rear-most section lifts away, but the rest of the roof sections are supposed to fold open. The ship seats seven troops and 1 commander. Blacktron cargo transporter "Vendetta" The Blacktron Vendetta is finally finished! I combined the Renegade with a new cockpit modified from the Blacktron Cruiser GWP, with added parts from a free Rebrickable MOC's instructions for a Cruiser / Renegade adapter . The cargo pod is reverse engineered and modified from one posted in a Brickset article. You can view the Rebrickable MOC by user Brickstertwo here while the Brickset article about modifying 10355 is here. The rear of the vessel. I changed the engines flames from trans-red to trans-light blue to match the rest of my fleet. Same thing with the yellow technic wheels becoming light bluish gray. The cockpit seats one mini-figure, and has two laser cannons just outside the canopy. The removable cargo pod is inspired by one in a Brickset article from late December of last year. It works beautifully with the ship's drop mechanism. The top lifts open on a hinge so you can put cargo inside. Blacktron two-man snub fighter "Avalanche" These ships are Blacktron 1 versions of a classic Star Wars speeder design is mostly taken from set 75204 - Sandspeeder, with portions taken from other snow-based versions of the type as well. All this is wrapped up in a new black and yellow paint job with a trans-yellow windscreen from 75414 - The Force Burner Snowspeeder. I call this ship type the Avalanche class snub fighter, and they will be going with my heavily modified Renegade set and the rest of my Blacktron 1 MOD's. Rear view of the two ships. This type of short-range fighter is usually assigned in massive quantities to defend critical planets with Blacktron bases on them, whereas the much more capable and deadly Buzzard type is usually for capitol ship escort duty, and can take on much bigger vessels with only a dozen or so fighters. The inside seats two figures. Blacktron armored ground transporter "Marauder" The 2021 Star Wars set 75311 (Imperial Armored Marauder) has been transformed into a Blacktron 1 version, complete with revised guns instead of those annoying flick-fire things. I couldn't use space seats inside this one, but there are plenty (four) 2x2 modified tiles with just enough room for air-tanks in the model... at least I hope that will be the case! The rear of the hover-vessel with the laser turrets rotated. There are eight total opening hatches on the all four sides and top to place figures / store cargo. One figure sits in the rotating rear turret, two troopers sit in the main body of the vehicle, while the last fig sits in the drivers seat. Blacktron giant robot "Destructor" For this model, I used parts and ideas from the Eternals line's "In Arishem's Shadow" set 76155 (body / head / upper legs / upper arms) along with claw from the old Agents 2.0' "Robot Attack" set 8970. The lower legs and laser arm are (modified) holdovers from the "Build Better Bricks" Iron Giant instructions. (I need to fix the laser arm's elbow joint but I keep forgetting!) Blacktron "Shadow Runner" space car Recently, while I was on my Blacktron kick, I decided I needed a vehicle for the commander. So, after a few false starts with other models, I dusted off this old TRON Legacy Light Runner model and went to town modifying it. The model originally was made five years ago (was 2018 really that long ago?!?), and is based off the two-seater TRON set 21314 MOD that was made by BrickBrosUK and posted on Brickset here. The name Shadow Runner is a play on the Light-based vehicles from TRON. Blacktron minifigs 1x commander 4x officers 19x troopers 1x robot (E.D.G.A.R.) (Thanks to my brother for giving me ~10 of his unwanted Blacktron torsos from the old GWP that were purchased from Pick-A-Brick back in 2023.) Blacktron robot "E.D.G.A.R." This model is recolored and modified from the E.R.I.C. robot from set 76831 - Zurg Battle - from the Pixar film Lightyear. I call this one E.D.G.A.R. which stands for: Electronic Data Gathering / Assimilating Robot Blacktron space base "Outpost 13" This sandwich-looking model was built from an 2002 Alpha Team set 4795 (Ogel Underwater base and AT sub) but heavily modified to fit into the Blacktron I theme. I had to fill in the spots where the flexible plastic "window' pieces were, replace the skull logo with the upside-down Tri-Force logo of Blacktron I, find ways to make the model almost totally "air tight", and add on a radar dish instead of a harpoon gun. I also made the building a lot deeper - about eight studs. The rear of the model. I took out the fancy spinning wall of the original set and replaced it with a bank of windows. The radar installation and it's tower are my own design. As on the original set, the logo folds down, where it can be used as a ramp. Also as on the original set, the MOD folds open to access the inside details. Special shout out to Jon Mo who designed the brick built Blacktron logo I used on my model (thanks also goes to EliteGuard01 for finding that logo design and recommending it to me). The inside was very hard to figure out, as most space furniture is for me. I decided on six computer stations and a desk for the commander. Another source of trouble was to make the building open cleanly and close without holes. The original set struggled with this, and it failed miserably - however I feel I managed to fix that issue. Inside of the rear with the commander's desk front and center. Blacktron hover tank "Havok" I modified 25 year old Star Wars set 7155 (Trade Federation AAT) into Blacktron I colors. Before that, the original set was very much a mess of too many colors, but now these two look elegant and refined in my opinion. Here is the rear of one of the tanks with turret rotated. The hatch is opened with control details visible and barrel elevated. Thoughts? Snub fighter added 1/21/26
 -
Hello Speed Champions and City fans, It was my entry to Bricklink Designer Program Series 3 and 4. It has received many kind comments and support, but unfortunately it has not been selected, therefore I decided to make the instructions available here: https://rebrickable.com/mocs/MOC-177592/_TLG_/school-bus I always loved American style school buses, therefore I decided to design one to Bricklink Designer Program Series 3. It is not actually based on a real one, but it contains many typical details: the black bumper rails and STOP arms on the sides, the crossing arm, the side and rear doors, the rearview and crossover mirrors, the mudguards, the warning lights etc.. The roof assembly can be removed as one piece and in this case the internal details are visible: there is a driver seat with steering wheel, dashboard, gear shift, passenger seats and even a fire extinguisher. It is 8 studs wide, studless build in minifigure scale and fits perfectly to Speed Champions cars or to a LEGO City. There are many working details: the front and rear doors, the STOP arms, the crossing arm and windshield wipers. I wanted to create a clean build and tried to fill every unnecessary gaps and hide unnecessary studs, therefore some tricky, but legal build techniques are used. The set includes three minifigures: a driver, a school girl with a pen and backpack and a school boy with a brick built backpack. The model has space for 17 minifigures: one driver and 16 passengers. If the passengers are kids with short, rigid legs, then they can stand on the seats. The building instructions guidelines have been followed. It is built from the palette "BDP Series 3", so there are some color and part restrictions. The color "Bright Light Orange" would be a bit more authentic, but the available parts are restricted, therefore I decided to use "Yellow" and I am satisfied with the result. The STOP sign is very rare part and it is not available in this palette, therefore it is replaced by a simple, white, circular sign with a sticker. The door 43967 is also not available in yellow, therefore it is replaced by a brick built one, however, in this case I was able to add some extra details: a black door handle, bottom window and red lights. I hope you like my design, I appreciate any feedback. Thanks for visiting, _TLG_ School Bus - Bricklink Designer Program 3 - 01 by László Torma, on Flickr School Bus - Bricklink Designer Program 3 - 02 by László Torma, on Flickr School Bus - Bricklink Designer Program 3 - 03 by László Torma, on Flickr School Bus - Bricklink Designer Program 3 - 04 by László Torma, on Flickr School Bus - Bricklink Designer Program 3 - 05 by László Torma, on Flickr School Bus - Bricklink Designer Program 3 - 06 by László Torma, on Flickr School Bus - Bricklink Designer Program 3 - 07 by László Torma, on Flickr School Bus - Bricklink Designer Program 3 - 08 by László Torma, on Flickr School Bus - Bricklink Designer Program 3 - 09 by László Torma, on Flickr School Bus - Bricklink Designer Program 3 - 10 by László Torma, on Flickr
-
Hello! I’m starting a new topic where I’ll post cars in the SpeedChampion series sizes, including those from this series :) A few years ago I started buying Lego for my child, then I started buying Lego for myself))) ...and among the sets there were wonderful cars - different cool ones, 6stud wide. Then there were several 8wide models and now... This year I decided to organize the “collection” a little, allocated a separate shelf for it and will try to talk a little about the cars :) I've already shown my modified Citroen from the IndianaJones set (I'll have to add a couple of photos to this post), but today we're talking about a different model. I had a Bugatti 75878 :) Over time it was disassembled into parts. Beautiful - isn't it? :) Since it is better to have all cars in the same scale, the Chiron was restored in sizes 8stud. The side brand line was taken almost as in the source code, because I haven’t come up with anything that looks better, and I haven’t seen anything among MOC's. But the front and rear parts have been changed. I didn’t bother much about the back anymore. The main goal was optics, at first I assembled it in full width, but still cut it down to make it more like the original :) With my nose I had to go through several options and settled on this one. This is probably the best part I have :) I still have the part with the radiator grille sticker from the kit, but it is already quite shabby and will look sloppy :) It might be better to use another part of the windsscreen, but this one has side windows that are close to vertical, so it will be like that. We managed to fit a 16-cylinder engine into the base (there is a small camber angle in each half). In general, the result is in front of you :) Thank you all for your attention! Write what you think in the comments :)
-
I have a new car model to share. Designed on commission in December, parts for this first generation MX5 arrived over the last couple of weeks and it has come together nicely. Less exotic than my last vehicle at this scale (Ferrari LMP1), it nevertheless features lots of pleasing functions and detail. (Click any image for the full Flickr set.) The doors open, as does the rear boot and front bonnet, and the pop-up headlights can be raised and lowered. Fitting in the functioning headlights was particularly challenging given the limited space between the hood, front wheels, radiator, and angled front bumper. Under the hood is the 1.6L four cylinder engine, which can be removed with a little effort (i.e. after detaching the radiator and front bumper). The most challenging aspect of the build though, and the most satisfying to see in the brick, is the detailed transmission running from the engine through the center of the chassis to the rear axle. Also included is an exhaust line running from the engine to the muffler at the rear. There is only one plate thickness between the top of the center console inside the car, and the transmission line underneath, so connecting the two halves of the chassis in a sturdy manner around this cavity was critical. Inside the car are the two seats, which can be tilted forwards to access the limited luggage space behind; a center console with handbrake and gear lever; and the dashboard with radio, air vents, and adjustable steering column. The windshield is attached by mixel ball joints, which, with the inwards angle set on the A-pillars, limits the rearwards tilt to the desired angle. One other detail worth mentioning is the iconic tail-light design, which uses 1x1 taps to angle out the outer set of lights. Although built to commission, the design is not exclusive to the customer, so I will be able to offer instructions through my website (www.bm-mocs.com) just as soon as I can find time to make them. (I will be rather busy for the next few weeks with another commissioned project). This particular model was based on a specific MX5, but it should not be hard to modify to different colours and configurations. Anyway, let me know what you think.
-
Well 2024 LEGO Speed Champions released 2 last cars (F40 & NASCAR) so came time to discuss about 2025. Somewhere in internet I read LEGO go all in F1 cars in 2025. What's your thoughts?
-
 Plymouth Barracuda 1970 Description: -1 Buggy motor -Servo motor for steering and steering wheel -Small power supply -Detailed interior Now on Lego Ideas! https://ideas.lego.com/projects/30f3a1a7-6e1f-422d-9fbb-3dde7a5937e8 All the photos on the link: https://bricksafe.com/pages/Michael217/plymouth-barracuda-1970 Join my group in VK: https://vk.com/legomusclegarage
 -
 Not so nice weather outside, and also idea came already yesterday. In fact, that some development of one old MOC. Now I wnated to make more functional. In fact, main upgrade and function will be steering. The name will be >=< First mocups. There is also suspension integrated. That is another function. My old original inspirational idea
 -
Overall I'm quite pleased with it, wanted to brick build the 1979 Kremer Racing livery but that's difficult to get right, so went with Martini livery instead. Just got reminded that this looks like Autobot Jazz too. Thanks for viewing :) KMPMOCS
-
 Hi! I built a telescopic tracked car, that can extend in two directions to overcome obstacles ? Have a look and subscribe to my channel, if you want more videos like that (building instructions available). Thanks!
 -
 Hello to everyone, I am here with the new Lego MOC - 1969 Mercedes-Benz 280SL. I revised a few of the original designs. Some of the important ones are that the side mirrors continue without breaking the oval line at the place where the door exits. Updating the engine as 6 cylinders. Just like the upper part of the hood looks more smoothly oval, with more smooth lines. Please do not withhold your vote on the ideas below link if you like https://ideas.lego.com/projects/91827469-0cb7-4029-98e8-14e1a01af1f4 For all photos, you can check my flickr address. https://www.flickr.com/photos/hasskabal/albums/72157713991355321 Thanks Everyone,
 -
Do you remember when Mega Bloks had a Universal license from five years ago? They've released the station wagon from 'Minions' back in 2015. I recreated this using actual LEGO! Now with the new LEGO Minions sets, this car would make a great addition! Download Link: http://www.brickshelf.com/gallery/TheScooterGuy/Stud-io/Station-Wagon/minions_station_wagon_studio.io
-
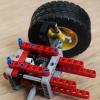
 Hi there, While building a small rc car using a RIM 55982 (18 x 14) I needed a way to lock the wheels to be able to drive it with a motor. Almost started drilling holes ..... and then, after removing the tire, it turned out there is a little notch inside the wheel. Looks like it is a space for a tiny piece of plastic to slide in, to lock the axle to the wheel. Exactly what I'm looking for! Have I missed something? Is there a LEGO part that fits this notch and locks the wheel? Or should I make it myself. https://drive.google.com/file/d/1UgLxSAbwba1zWIg1YRPNkqPdqAq3pMu7/view?usp=sharing
 -
Wasn't able to use the SC wheels because it would make the front too tall and also create collision between tyres and underside of the headlight area. Can't build in red too as the 36841 bracket doesn't exist in red yet. Due to the lockdown I ran short of cut slope pcs to build accurate side air intakes, and the rear diffuser needs some improvement that hopefully can happen once it's buildable in red. Thanks for viewing :) KMPMOCS
-
Hello everyone! First I have to say, that I'm new here and this is my first MOC ever, so it's not as good as I imagined it to be. It's a bit inspired by Crowkillers model 42083 B Model Bugatti Formula 1 Race Car, but most of it are my own ideas. Let's start with a photo! Functions: - Full independent double wishbone suspension - Steering - Fake V8 Engine & RWD - Openable engine hood All the parts are from Chiron 42083 set, as it is the only set I own. I am pretty proud of how it looks, apart from the front suspension. It doesn't look how I wanted it to be, but it's all because of lack of experience and time. There's no gearbox, because I have absolutely zero experience with that and I didn't want to waste a week on that. But maybe in next version... who knows :) I especially like the front wing, which in my opinion is an improvement over Crowkiller's version. Let me know guys what you think!
-
The LEGO Agents have a new vehicle for their fight against Dr. Inferno! The Turbo Pursuit Vehicle is high powered and high speed. Ready to take to the streets and chase down the criminal element. Finally built some more Agents, I loved this theme when it came out and bought a lot of the sets. I built this a while ago and while there is nothing wrong with it, it is not what I was aiming for with the original idea. So I took a photo before I took it apart and started a new thing.
-
Hello everyone, This is my first post and I am eager to share with you my interpretation of the Incredibile from the Incredibles movies. The Incredibles is one of my favourite movies and I have always been a fan of Mr. Incredibles sleek superhero car. We got a version of this as a Juniors set as well as a model in the LEGO Incredibles videogame, but I wasn't satisfied with that design. I found that it didn't really capture the overall feel of the car even if many of the details were correct. My design is fundamentally different than the one in the videogame. Some noticeable differences are the shape of the 'i' symbol on the front, the height of the side panels of the car, as well as the jet booster on the back and I also came up with a unique way of capturing the shape of the headlights. Photo 2020-04-22, 7 30 23 PM by Mr. Dufresne, on Flickr My goal with this build was to keep curves as smooth and continuous as possible. Photo 2020-04-22, 7 31 04 PM by Mr. Dufresne, on Flickr An important detail for me to include was the tapering of the car towards the back, I have always found this to be an iconic part of the shape. The back wheels are actually set in from the sides one more stud than the front wheels. Photo 2020-04-22, 7 32 09 PM by Mr. Dufresne, on Flickr I took some liberty here with having the base of the 'i' flare out, but I think that this really works well when translating it to LEGO and it allowed me to create the front grill using the sloped grill pieces. Photo 2020-04-22, 7 32 46 PM by Mr. Dufresne, on Flickr I knew once I found this black turbine piece in my collection that it was the piece I wanted to use although it was a bit of a hassle getting it attached to the rest of the car. I also really like how the modified piece in the middle there forms a sort of cowling around the turbine. Unfortunately I wasn't able to add the little wings on the side rocket pods because all the solutions I came up with took away too much from the shaping of the back. Photo 2020-04-22, 7 33 00 PM by Mr. Dufresne, on Flickr With all my car builds I like to include an interior with seating for at least two minifigures. I also included in here the screen Mr. Incredible has, which I always remembered was green, and a control panel for some of the gadgets. There is also some seating in the back however it is only tall enough back there for the Jack-Jack figure to fit. Photo 2020-04-22, 7 34 14 PM by Mr. Dufresne, on Flickr Thank you for checking out my MOC, any thoughts or suggestions are much appreciated!
-
 The MOC is finished and put into the entry topic. Instruction is finished too, the free download link is: Rebrickable link of MOC-42447 porsche 944 gulf This is my first time using the Studio, so apology and please let me know if you feel the instruction is hard to follow. Video: Some render pics: Some real built pics: (More pics here) Together with 42093: Hope you like it! ================================================================================================================================== Original post: Looking at so many topics so far, this will be an epic contest in the tech contest history! And I know there are already many Porsches under building now, still I want to add one more: A Porsche 944. Here is my progress so far: My plan is focus on the exterior look first. After finish that, will try to figure out if I can create a chassis with suspension or not. As to the color scheme, I prefer a pure dark azure version. However, due to lack of some azure parts, will end up a gulf scheme, like: Hope you like it and happy building!
 -
Sometimes all the pieces seem to fall into place...I wouldn't know, this was another brain-bending build. The interior is mostly hollow for now, and I need to nudge some parts into place, but it's 99% done. I think only a few stickers would be needed; vents on the sloped nose, headlights, and the Ginetta logos. Ginetta Akula by Henchmen4Hire, on Flickr
-
Hi, i hereby present some pics of Batmans moms car... would she still be alive/undead. Just for fun. I gave up trying to upload all the pics from Flickr and present them here: Lady Bats Car Have fun!
.jpg.1ec62cd899722d94bc4909d13fe5fa26.jpg)
-
Second attempt for contest. This won't be technically outstanding, also not so rigid, but definately different (I hope, this will count as technic)
-
Hello everyone, After one month of designing, building and creating instructions, I will present you my custom LEGO Technic sports cars for the car transporter! Red car: 686 Parts, V6 fake engine, HOG, Openable doors! The full gallery for the red one can you found here on bricksafe. Green car: 755 Parts, V8 fake engine, HOG, Openable doors! The full gallery for the green one can you found here on bricksafe. Yellow car: 723 Parts, V10 fake engine, HOG, Openable doors! The full gallery for the yellow one can you found here on bricksafe. The general objective was to make three cars with different colors and appearance, in addition to the existing two cars (corvette and blue car). In this way, the car transporter can be fully loaded. I also have made instructions for the cars, so it's easy to rebuild them. Many more images, more information, the instructions and part lists can you found here on my rebrickable profile. I hope you like the cars and the heavy loaded Car Transporter!
-
 Hello! I'm Bogdan Kazak, I'm new here. I want to introduce you to my very old model. Built from an old lego technic - a Subaru Impreza WRX STI in the hatchback that Ken Block had once ridden Thank you for watching!
 -
This is inspired by the Rothmans livery. The stickers are from Speed Champions Ford Fiesta set, would love to have dark blue mudguards but they are very rare at the moment, and unfortunately those inverted slopes aren't available in dark blue. Thanks for viewing :) KMPMOCS
-
I built 2 pickup alternates from Creator Expert sets. The first one is from the 10265 Mustang set, and to keep within the theme and time period I decided to go for a Ford F100 from 1970. The model includes steering by HoG, opening bonnet, doors and tailgate, a detailed interior and engine. Once done I thought why not try to build a pickup model from the 10252 Volkswagen Beetle too? So that's just what I did with this vintage American pickup truck somewhere from the 1930's. It has similar features as the 10265 alternate except for the steering function, which was not possible. Some pictures: Pickup trucks from 10252 and 10265 by Nathanael Kuipers, on Flickr 10265 Pickup Truck by Nathanael Kuipers, on Flickr Pickup Truck guts by Nathanael Kuipers, on Flickr 10252 Vintage pickup truck by Nathanael Kuipers, on Flickr 10252 Pickup truck rear by Nathanael Kuipers, on Flickr More information and pictures for model 10252 and 10265 at NKubate.com. In case you want to build your own copy building instructions are available at Rebrickable.com


.thumb.png.a3b5e17a7221332a720aa1625db98c1f.png)