Search the Community
Showing results for tags 'speedchampions'.
-
Posting the photos and build details first, the story comes later Speedchampions Scale Nissan 180sx type S Speed Champions-scale Nissan 180SX Type S. Mismatched body panels. Custom body kit. Built using worn and weathered LEGO parts for a rough, well-used look. Broken taillight (explained in the story and real car photos). Mismatched headlights. Functional pop-up headlights. Opening hood. Detailed turbocharged engine. Sometimes I don’t choose what to build—it chooses me. I’ve been building JDM cars in LEGO for years, and I rarely plan my next project. Usually, I see a car, instantly fall in love with it, and then I just have to recreate it. Back in June, I was lucky enough to visit Japan. On my last night in Tokyo, while walking around Shibuya, I came across this incredible Nissan 180SX. The mismatched body panels, drift style, aggressive body kit... it had so much character that I couldn’t just walk past it. The owner was standing next to it, so I asked if it was his. It was. I told him that I don’t actually own or drive a JDM car, but that I build them in LEGO. We chatted for a while, exchanged Instagram accounts, and right in the middle of our conversation everyone’s phones suddenly went off with an earthquake warning. (Funny enough, I never actually felt the earthquake!) Before leaving, I took a lot of reference photos of his car. He even invited me to a local car meet, but sadly it was my last night in Tokyo and I had to decline. When I got back home, I knew exactly what my next project had to be. This is my recreation of はーと’s 180SX in LEGO Speed Champions scale. I tried to capture every little detail as faithfully as possible. And here’s the promise I made him: I’m going to build two copies. One for my own collection... and one to hand-deliver to はーと the next time I return to Japan. Some cars are more than just cars. Some become memories. Car owner Instagram https://www.instagram.com/ollx5to/
-
Finally it's here! After a bit of rework i can finally present you my newest Lego Speed Champions scale MOC! Instructions are available from Rebrickable: https://reb.li/m/268061
-
Inspired by Drift missile cars No hood. No bumpers. No respect for perfection. Just a chassis built to take hits and keep sliding. Working Pop-ups Front camber dialed. Mismatch wheels, unpainted panel. Twin-turbo swap fully exposed. Intercooler out. Nothing hidden. Full cage. Bucket seats. Hydro locked. NOS ready. This isn’t clean. This isn’t pretty. This is a car you throw sideways without thinking twice, exactly what a real drift missile is about
-
Hello Speed Champions and City fans, It was my entry to Bricklink Designer Program Series 3 and 4. It has received many kind comments and support, but unfortunately it has not been selected, therefore I decided to make the instructions available here: https://rebrickable.com/mocs/MOC-177592/_TLG_/school-bus I always loved American style school buses, therefore I decided to design one to Bricklink Designer Program Series 3. It is not actually based on a real one, but it contains many typical details: the black bumper rails and STOP arms on the sides, the crossing arm, the side and rear doors, the rearview and crossover mirrors, the mudguards, the warning lights etc.. The roof assembly can be removed as one piece and in this case the internal details are visible: there is a driver seat with steering wheel, dashboard, gear shift, passenger seats and even a fire extinguisher. It is 8 studs wide, studless build in minifigure scale and fits perfectly to Speed Champions cars or to a LEGO City. There are many working details: the front and rear doors, the STOP arms, the crossing arm and windshield wipers. I wanted to create a clean build and tried to fill every unnecessary gaps and hide unnecessary studs, therefore some tricky, but legal build techniques are used. The set includes three minifigures: a driver, a school girl with a pen and backpack and a school boy with a brick built backpack. The model has space for 17 minifigures: one driver and 16 passengers. If the passengers are kids with short, rigid legs, then they can stand on the seats. The building instructions guidelines have been followed. It is built from the palette "BDP Series 3", so there are some color and part restrictions. The color "Bright Light Orange" would be a bit more authentic, but the available parts are restricted, therefore I decided to use "Yellow" and I am satisfied with the result. The STOP sign is very rare part and it is not available in this palette, therefore it is replaced by a simple, white, circular sign with a sticker. The door 43967 is also not available in yellow, therefore it is replaced by a brick built one, however, in this case I was able to add some extra details: a black door handle, bottom window and red lights. I hope you like my design, I appreciate any feedback. Thanks for visiting, _TLG_ School Bus - Bricklink Designer Program 3 - 01 by László Torma, on Flickr School Bus - Bricklink Designer Program 3 - 02 by László Torma, on Flickr School Bus - Bricklink Designer Program 3 - 03 by László Torma, on Flickr School Bus - Bricklink Designer Program 3 - 04 by László Torma, on Flickr School Bus - Bricklink Designer Program 3 - 05 by László Torma, on Flickr School Bus - Bricklink Designer Program 3 - 06 by László Torma, on Flickr School Bus - Bricklink Designer Program 3 - 07 by László Torma, on Flickr School Bus - Bricklink Designer Program 3 - 08 by László Torma, on Flickr School Bus - Bricklink Designer Program 3 - 09 by László Torma, on Flickr School Bus - Bricklink Designer Program 3 - 10 by László Torma, on Flickr
-
Hello! I’m starting a new topic where I’ll post cars in the SpeedChampion series sizes, including those from this series :) A few years ago I started buying Lego for my child, then I started buying Lego for myself))) ...and among the sets there were wonderful cars - different cool ones, 6stud wide. Then there were several 8wide models and now... This year I decided to organize the “collection” a little, allocated a separate shelf for it and will try to talk a little about the cars :) I've already shown my modified Citroen from the IndianaJones set (I'll have to add a couple of photos to this post), but today we're talking about a different model. I had a Bugatti 75878 :) Over time it was disassembled into parts. Beautiful - isn't it? :) Since it is better to have all cars in the same scale, the Chiron was restored in sizes 8stud. The side brand line was taken almost as in the source code, because I haven’t come up with anything that looks better, and I haven’t seen anything among MOC's. But the front and rear parts have been changed. I didn’t bother much about the back anymore. The main goal was optics, at first I assembled it in full width, but still cut it down to make it more like the original :) With my nose I had to go through several options and settled on this one. This is probably the best part I have :) I still have the part with the radiator grille sticker from the kit, but it is already quite shabby and will look sloppy :) It might be better to use another part of the windsscreen, but this one has side windows that are close to vertical, so it will be like that. We managed to fit a 16-cylinder engine into the base (there is a small camber angle in each half). In general, the result is in front of you :) Thank you all for your attention! Write what you think in the comments :)
-
New moc is here! And this time i decided to build something truly unique, a Yamaha OX99-11 prototype. FEATURES 1 minifigure fit inside Link to instructions: https://reb.li/m/251315
-
 Decided to do something special and bring this Crown Vic interceptor into my collection! Have fun building your own police chases! FEATURES 3 minifigures fit inside Cheap model ] FREE INSTRUCTIONS: https://reb.li/m/240760 VIDEO REVIEW OF THE MODEL:
 -
I will let the pictures do the talking >>> + a video tutorial how to build one Yourself http://www.youtube.com/watch?v=www.youtube.com/watch?v=va26M29tGCE Thanks for watching! #keeponbricking !!!
-
Whats your favourite Speedchampions set?
-
Ive built a vw beetle minifig scale, just ordered all the parts so will post pics when i get to build it for real, but am having difficulty with joining the roof parts, the scale is great but am needing thin plates to join them, are there such pieces? images from bluerender can be found at this link https://rebrickable.com/mocs/MOC-13350/bamsham363/vw-beetle-revision/#comments its almost 100% complete however im about 1/2 a flat out on getting a minifig in with hair, bald hes fine, its now bugging me, as doesnt look so good if raised one thin higher...im sure ill get there but its at that stage where its bugging me, and wishing lego could invent a new piece, so all help comments would be appreciated.
-
8-wide Lamborghini Aventador LP700-4 Thanks for viewing :)KMP www.instagram.com/kmpmocs
-
My latest MOC, an 8-wide Porsche 917K. Studio file available for sale on Rebrickable : https://rebrickable.com/mocs/MOC-30893/KMPMOCS/porsche-917k/#bi Thanks for viewing :) KMP
-
Hello Ferrari and Speed Champions fans, Ferrari Testarossa is a legendary supercar of 1980s. It is a two-door coupé from 1986 and it is the red version of the car from the TV series Miami Vice as the used Lego windscreen is not available with white decoration. Almost 10,000 Testarossas, 512 TRs, and F512 Ms were produced, making it one of the most-produced Ferrari models, despite its high price and exotic design. Building instructions are available on the following links: https://rebrickable.com/mocs/MOC-57875/_TLG_/ferrari-testarossa/ https://www.mocsmarket.com/lego-mocs/lego-instructions-ferrari-testarossa/ UPDATE: Oct, 2021 - This MOC is available as kit too :) : https://mocsmaker.com/product/custom-building-kit-tr-84/ It is a studless build in the new, 8 studs wide Speed Champions style. I wanted to create a sleek model which is as accurate as possible in this small scale. I minimized the use of stickers to keep the flexibility of the used parts in further builds. (Third picture shows the model without any stickers.) My intent was to keep the width-length-height ratio of the real car and this size makes it possible. The model contains lots of details: for example the emblematic side intakes with the bottom black stripe, the turn signal lights on the sides, the side-view mirrors, the front grill with the head lights, the iconic rear side with the vehicle registration plate. Maybe the most challenging one was the interior where the seat assemblies hold side panels too. I tried to fill every unecessary gaps and therefore some tricky build techniques are used. The model has space for two minifigures. I suggest to use small hairs. Without the seats minifigures with bigger hairs can be used too if they are leaned back. Thanks for visiting, _TLG_ FerrariTestarossa_byTLG_01 by László Torma, on Flickr FerrariTestarossa_byTLG_02 by László Torma, on Flickr FerrariTestarossa_byTLG_03 by László Torma, on Flickr FerrariTestarossa_byTLG_04 by László Torma, on Flickr FerrariTestarossa_byTLG_05 by László Torma, on Flickr FerrariTestarossa_byTLG_06 by László Torma, on Flickr FerrariTestarossa_byTLG_07 by László Torma, on Flickr FerrariTestarossa_byTLG_08 by László Torma, on Flickr
-
This is inspired by the Rothmans livery. The stickers are from Speed Champions Ford Fiesta set, would love to have dark blue mudguards but they are very rare at the moment, and unfortunately those inverted slopes aren't available in dark blue. Thanks for viewing :) KMPMOCS
-
Hello Speed Champions fans, my son asked me to build a white Audi R8. Both of us like the Speed Champions sets, therefore I choosen this scale. If you like it, you can support it on Lego Ideas: https://ideas.lego.com/projects/ead4242e-8bae-440d-930d-0c840d86ce5f It is a studless build from standard lego elements and modified City wheels are used instead of Speed Champions ones to keep the height to length ratio more realistic similarly to my earlier ideas. The front of this car is iconic and it was a real challenge to recreate it in this small size. I made lots of versions and I think the actual one with a tricky solution is the best. I tried more solutions to the black side blades too, the actual one was inspired by "LEGO Audi R8 instructions (MOC #96)" by "Jerry Builds Bricks" on Youtube, however I modifed it a bit as I wanted tilted blades similarly to the real ones. Only one sticker is used which is the Audi logo on the front as I'm generally not a fan of the parts with stickers, because of the lack of flexibility in using them with other builds. The set includes the minifigure shown on the main picture on the Lego Ideas. It comes form the set 75873 but with red helmet. I have added a rear wing to make the car more dynamic. It differs from the custom Audi wings, but I think it fits to the style of the car and to the side mirrors. Audi_R8-04 by László Torma, on Flickr Audi_R8-05 by László Torma, on Flickr Audi_R8-02 by László Torma, on Flickr Audi_R8-03 by László Torma, on Flickr
-
Hello Magnum, Ferrari and Speed Champions fans, this targa topped 1984 Ferrari 308GTSi Quattrovalvole (pictures 1 and 6) was made famous by the television series Magnum, p.i. in which the series' lead, Thomas Magnum (Tom Selleck) drove the car around Oahu for eight seasons while on his investigations, from 1980 to 1988. Several 308 GTS cars were used, a new one for each season, most being auctioned off after filming and all with the license plate ROBIN 1. The berlinetta version of this model is called Ferrari 308GTB Quattrovalvole (pictures 2-5 and 7-8). The design inspiration of this model came from a Ferrari 308 Matchbox which I received as a child. Building instructions are available on the following links: https://rebrickable.com/mocs/MOC-64110/_TLG_/magnum-pi-ferrari-308-gts-gtb-quattrovalvole/#details or https://www.mocsmarket.com/lego-mocs/instructions-moc-magnum-p-i-ferrari-308-gts-gtb-quattrovalvole/ They are a studless builds in the new, 8 studs wide Speed Champions style. I wanted to create a sleek models which are as accurate as possible in this small scale. Only two stickers are used per model: the rectangular Ferrari logo, and the vehicle registration plate, to keep the flexibility of the used parts in further builds. My intent was to keep the width-length-height ratio of the real car and this size makes it possible. The models contain lots of details: for example the emblematic air vents on the hood (black on GTS and red on GTB), the front bumper with the turn signal lights, the tilted front grill, the rear three quarter window with black cover, the turn signal lights on the front side, the black stripe on the sides, the side-view mirrors, the tiltable seats etc.. Maybe the most challenging one was the iconic rear side with the vehicle registration plate, here there is a half stud offset. I tried to fill every unecessary gaps and therefore some tricky build techniques are used. The model has space for two minifigures. I suggest to use small hairs. Without the seats and the two interior tan tiles minifigures with bigger hairs can be used too if they are leaned back. Thanks for visiting, _TLG_ Magnum's car 01 - INSTRUCTIONS by László Torma, on Flickr Ferrari 308 GTB Q. 02 - INSTRUCTIONS by László Torma, on Flickr Ferrari 308 GTB Q. 03 - INSTRUCTIONS by László Torma, on Flickr Ferrari 308 GTB Q. 04 - INSTRUCTIONS by László Torma, on Flickr Ferrari 308 GTB Q. 05 - INSTRUCTIONS by László Torma, on Flickr Magnum's car 06 - INSTRUCTIONS by László Torma, on Flickr Ferrari 308 GTB Q. 07 - INSTRUCTIONS by László Torma, on Flickr Ferrari 308 GTB Q. 08 - INSTRUCTIONS by László Torma, on Flickr
-
Wasn't able to use the SC wheels because it would make the front too tall and also create collision between tyres and underside of the headlight area. Can't build in red too as the 36841 bracket doesn't exist in red yet. Due to the lockdown I ran short of cut slope pcs to build accurate side air intakes, and the rear diffuser needs some improvement that hopefully can happen once it's buildable in red. Thanks for viewing :) KMPMOCS
-
I usually spend my time in the Technic Forum, but during a couple of Zoom meetings, I built this little LMP (LeMans Prototype) car in Octan colors to go with some of the other 8 wide Speed Champions cars. Free instructions at Rebrickable if you want to build your own. And in all white, before I decided it needed a little color.
-
Hello Corvette and Speed Champions fans, the Chevrolet Corvette C4 car, colloquially known as the 'Vette, is a two-door, two-passenger sports car manufactured and marketed by Chevrolet across more than 60 years of production and eight design generations. The fourth-generation was the first complete redesign of the Corvette since 1963 and it is known for its sleek look. It was produced from 1983 to 1996. The model was inspired by one of my favorite Matchbox as a child, the color scheme was inspired by cyberpunk and destopian movies. Building instructions are available on the following links: https://rebrickable.com/mocs/MOC-85021/_TLG_/corvette-c4-skull-edition It is a studless build in the new, 8 studs wide Speed Champions style. I wanted to create a sleek model which is as accurate as possible in this small scale. I prefer to minimize the use of stickers to keep the flexibility of the used parts in further builds, and therefore this model include only one standard Lego vehicle registration plate sticker. My intent was to keep the width-length-height ratio of the real car and this size makes it possible. The model contains lots of details: for example the hood decoration, the gray bottom part, the glass hatchback, the side-view mirrors, the tiltable seats etc.. Maybe the most challenging one was the iconic rear side with the vehicle registration plate, here there is a half stud offset. I tried to fill every unnecessary gaps and therefore some tricky build techniques are used. The model has space for two minifigures. I suggest to use small hairs. Without the seats minifigures with bigger hairs can be used too if they are leaned back. Vette C4, Skull e. - Instructions 01 by László Torma, on Flickr Vette C4, Skull e. - Instructions 02 by László Torma, on Flickr Vette C4, Skull e. - Instructions 03 by László Torma, on Flickr Vette C4, Skull e. - Instructions 04 by László Torma, on Flickr Vette C4, Skull e. - Instructions 05 by László Torma, on Flickr Vette C4, Skull e. - Instructions 06 by László Torma, on Flickr
-
My first MOC in a long time, based on set 75899: The result: Suggestions / feedback is always welcome! More pics and future mocs can be found on my website: http://ndrmini.com/p...-laferrari-moc/
-
Hello! My second version of this Climbing monster has improvements: Enough room for a minifig custom stickers to mimic the exact look Now it has an engine inside custom 3D printed rims that are exact replicas of the original car (printed by XTR Lego Cars ) There is also an alternative set of wheels do mimic the old Gran Turismo Look of this car (Also custom 3D printed)
-
Hello Speed Champions fans, Black Arrow is a ficticious hypercar which was designed for a "Hypercar building contest" hosted by sfh_bricks on Instagram. I tried to design something really cool inspired by the cyberpunk culture. Building instructions are available on the following links: https://rebrickable.com/mocs/MOC-119144/_TLG_/black-arrow-hypercar-concept It is a studless build in the new, 8 studs wide Speed Champions style. Some rules had to be followed: only certain types of car bases, wheels, fenders and windscreen are allowed, cockpit have to be closed, fixed dimensions (wheelbase, width, and maximum length), build must fit a full minifig with helmet. I prefer the brick built solutions to keep the flexibility of the used parts in further builds, and therefore stickers are not used. My intent was to keep the build smooth and to add lots of details: for example the air intakes, the rear wing, the side view mirrors etc. . Maybe the most challenging one was the double headlight. I tried to fill every unnecessary gaps and therefore some tricky build techniques are used. There are two versions of the front assembly : 1) the double headlight version which is a bit more extreme and 2) the simple headlight version which is more solid and sturdy. The model has space for one minifigure. I suggest to use a helmet or small hair. Thanks for visiting, _TLG_ Black Arrow 01 by László Torma, on Flickr Black Arrow 02 by László Torma, on Flickr Black Arrow 03 by László Torma, on Flickr Black Arrow 04 by László Torma, on Flickr Black Arrow 05 by László Torma, on Flickr Black Arrow 06 by László Torma, on Flickr Black Arrow 08 by László Torma, on Flickr Black Arrow 07 by László Torma, on Flickr
-
 Hi! Who remembers this monster on the Gran Turismo video games?This thing costs 1 or 2 million, but it flies!! Almost 1000HP on a 900Kg car. As usual, I like to make "not-normal" cars, this Suzuki Gran Vitara is everything except normal. I tried to make the most smooth and studless as possible with the maximum details possible, I use stickers from other Speed Champions sets and did some custom ones myself, however, unlike what Lego usually does on the Speed Champions Sets, instead used stickers/prints (which I consider a cheat) I brick-built the vents, front grill and the "headlights" I did some weird angles, including the cockpit that is angled/hinged in order to make the shape of this car close to the real thing.
 -
My 3RD alternative for set 76912. This time i used ONLY parts included in 76912 to build a legendary pickup truck - GMC Syclone. FREE INSTRUCTIONS: reb.li/m/122376 (WARNING THIS BUILD USES SPARE PARTS FROM THE SET)
-
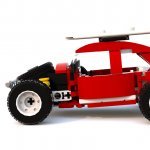
After my rusty train, I was wondering if I can give the same treatment to a car. I wanted to build a beetle for so long, but I don't wanna copy other's work, and also wanted to make some weird stuff, it's a kinda trademark that I have :P After Several hours of designing, I came out with this Baja Rat Rod based on a Beetle The suspension and steering are fully articulated and posable, but they won't work as real suspension/steering, considered this more like an action figure that you can do some dynamic poses to take some cool photos. Even though most of the car is gone, I tried to keep the recognizable beetle profile.