Search the Community
Showing results for tags 'classic'.
-
The Galaxy Starship Carrier is my latest Classic Space-inspired submission to Series 11 of the Bricklink Designer Program. When I began to design this submission, I wanted to make sure that whatever I came up with was as true in look and build to Classic Lego Space sets from the late 1970s through to the start of Futuron. You can support this BDP Series 11 submission through the link: https://www.bricklink.com/v3/designer-program/series-11/4943/Galaxy-Starship-Carrier
-
A GWP for later this year has been announced on r/LegoLeak, and I was able to find out a bit more information about it from u/FluffySky6. Based on the description, it sounds like a remake of 6048. Discussion of this set:
-
I have a friend from my job who drives a black VW Beetle and knows I build LEGO models. She asked if I could build a model of her car for her or her to own, and I said yes. I then took my digital Herbie model I recreated from a Rebrickable MOC's video instructions and recolored it into an almost entirely black scheme. You can see the original Rebrickable MOC that I modified here. The vehicle can seat 1 figure at the wheel. The rear of the car. Thoughts?
-
 Hi Guys! I'm happy to present you my (first) alternate model of the Mercedes G500 (set 42177) into a classic Defender 90! A classic Defender has been on my todo list for a long time, I have tried it with set 42110 as well, but certain details just did not work out (oversized fender pieces relative to wheels), but with the G500 set I finally went for it as the parts are quite okay for making the iconic details of this model. Due to the orange color, the model was heavily inspired by modern variants in classic shape, such as the Heritage version, which does exist in almost exactly this color. Let me take you through the design process as well, but to start off, here's a video to showcase all the features! Features 4-link live axle suspension on both axles all wheel drive with central and rear differential lock 3+R gearbox in an H pattern working inline 4 piston engine working steering wheel and HoG openable doors with functional locks, including the rear clean interior with seats and classic benches in the rear section numerous accessories such as roof rack, reflectors, toolbox, cans, ladder, spare wheel, snorkel, spade and axe Design process Bodywork As already usual for me with these kind of models, the design started with the bodywork to see whether it is possible to make a good looking model using the parts of the source set. This was done in Studio to be able to easily build in the air. Certain parts were key, such as the trapezoid panels to be able to make the hood (actually I already suspected this possibility when I heard about the G-class as it has a similar hood shape). Then I tried the front face / lights / grille. Luckily the source set has an unusually high number of 1x2 grille tiles, just enough to make the entire large grille (which had to become even width because of the 1x2 part). Also, enough clear parts to make the light cluster, even the luxury of choosing from 2x2 and 3x3 dishes, somehow the smaller ones looked better for me, but they are actually exchangeable. Next was the fenders. This was critical, since the Defender has a distinct shape of fenders, with angles / curved shape that are different from the 4x6 angled beam used in the G500, so using those parts was out of the question. Also, the set did not have enough 112.5 degree angled connectors, which would have been perfect for the job, so I had to resort to different technique to make the angle. Luckily, there were just enough black connectors in the set, which could be used with some tricky mounting points. Another key detail was the curved slope running through the sides; to see whether there's enough material for that and whether it can all be connected firmly to the rest of the body. Especially the door are was tricky, where I also had to pay attention to allow it to close easily. The new angled connectors also came in handy to add that small but important detail to the side windows, which is best seen on the rear view. So slowly the sides and front got together, and using the curved black panels, I just managed to put together a convincing roof shape too. Last I made the rear door/windows, where I also managed to model those little side windows while allowing the door to be openable. At first I did not want to bother with door locks, I did not find them very convincing on the A model, but then I saw that all alternate builds do it, so I thought I had to give it a try, and I am happy I did. I tried to make a more realistic and smooth mechanism than the A model, and I stumbled upon a simple way that opens by pushing the handle down. It works like a charm, and I managed to replicate it for the rear door too. Chassis, drivetrain, suspension Once the body was looking nice and the dimensions were known, I started thinking about the internals. First the suspension. The rear suspension was the part in the A model which was the most underwhelming for me. Even though there is a ton of space at this scale, the linkage geometry is just unrealistic; it even binds up if there is no weight on it because of too much constraints (triangulated upper links plus a Panhard rod constraining the axle at different heights is just physically impossible). The use of that new suspension arm feels out of place, a simple parallel 4-link with long 9L links and the Panhard rod could have been much simpler and realistic at the same time. Another thing I don't like there is the chassis rail geometry and the spring mounting. The chassis rails are unrealistically tall along with the springs which end up being in the middle of the trunk. Again, I was thinking, at this large scale, in a manual model, it should be possible to make something more realistic. So that's what I aimed for, if even with the part restrictions of the set. In a chassis with live axles squeezing in the 3x19 frame is a bit more difficult as longitudinal space is a luxury because the axles need more space, but it turned out to be just okay. So I aimed for a solid but slim / flat chassis railing that does not protrude into the bed area in the rear. As for the suspension linkage, I used the short ones on the front, and for the rear, I used longer ones to allow the lower ones to pass under the frame. I also moved the springs out to keep the bed clean. In this model I did not aim for long travel anyway, as I wanted to keep the body lowered on the wheels, to look more realistic, unlike the overly lifter G500. I mean it's nice to have that long travel, but when it comes at the cost of obscuring both the chassis / spring geometry and the fenders at the same time, then something does not feel right. I think the core of the problem is using these short springs all the time instead of bringing back longer softer ones. With these short ones it's not possible to build live axles with realistic geometry unless the spring ends up in the middle of the chassis / trunk, which is no good. Once the suspension geometry was sorted, I moved onto the drivetrain / gearbox. The most challenging part. To make something true to the real world model, I definitely wanted an H pattern gearbox with a reverse gear. On one hand the availability of the new 12T clutch gear in the set made this possible, as it allows to move one of the 4 gears out of the connected gear-train and reverse it without effecting the others. On the downside, the set is quite short on various gear sizes (no 24T and 8T gears typically used in 3+ speed gearboxes), so actually making the 3-speed part was more difficult, I had to use a longer train of gears which made things harder to route and brace, caused some weird friction issues as well, and also I used up most of the gears in the set. The inclusion of a central differential with lock also complicated things, so I just settled from a bottom operated lock, as in case of the rear axle anyways. Another difficulty with a 3+R gearbox in an H pattern is where to put the reverse gear. The problem with the more obvious / favorable 1-2-3-R positions is that the reverse gear gets opposite to the 3rd gear, which means it will naturally become similar speed as the 3rd gear, which is unrealistic. So I went with the R-1-2-3 pattern, which allows the reverse gear to be similar speed as the 1st gear which is realistic. On top of all, the HoG steering axle also had to pass through the chassis. Luckily, I could avoid routing it through the middle, colliding with the gearbox, rather on the side instead. This is because the steering is based on a linkage, as in case of real live axles, which is actuated from one side (where the steering wheel is) to the other. It turned out, that I had free space on the right side of the gearbox, which was lucky, because then I could put the steering wheel and the HoG routing to the right side, which is just a good match for the Defender being an English brand (interestingly, mirroring the gearbox would not work because then the H pattern would also get mirrored which would be unrealistic for the gear sequence). In the end I ran out of gears, so I had to use some tricky linkages to get the steering wheel move. I even had to resort to using the 20T clutch gear on a friction pin, which works okay when using the HoG and it moves the steering wheel in the cabin, but the steering wheel could not be used to steer the model (though can be fixed by swapping that green gear to a proper 20T one). An interesting thing about the build is that the actual gearbox submodule turned out the be a single piece dropped in between the chassis frames. Interior and accessories The final touches were the interior, and some extra accessories to make the model more interesting, less plain. As for the interior, besides the usual front seats, I definitely wanted to make sideways benches in the rear section. Luckily enough, there was enough DBG material to make these happen. As for the extras, an obvious one was the spare wheel and the roof rack, but I also added a ladder on the side, making sure that it (and the spare wheel) still allows the rear door to open. I also took some inspiration from the Icons Defender to mount some tools (spade and axe) to the hood, and add a toolbox and some cans on the top. Also a simple snorkel mountable to the A pillar. Here are some photos to showcase it in real life. More images are available on Bricksafe. Building instructions are available on Rebrickable. Let me know how you like it! Cheers, Viktor
 -
 In the continuation of my Star Trek Classic dioramas of NCC-1701interior, I recently created the Emergency Manual Monitor. A room which is added to the first in order to create a larger set as it appears in season two of the classic series. Now I'm waiting for the Trekkies to give me their impressions See more on my website.
 -
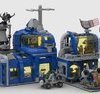
Based on the Lego Road Show large rocket display, this 4 level base has 4 vehicle garages on the lower level, 4 Spacehip hangars on the top level, and a 2 story high airlock rooms on the mid section. The mid section is divided on 8 rooms on 2 levels which can be used as barracs, sickbays, labs, communication centers. At the center of the top level, is a launch silo with a manned rocket. 4300+ pieces, all Classic Space parts. More images here: https://www.facebook.com/groups/1421271881962817 link Happy Base-ember!
-
 Please support my fully functional walking Wind-up Robot. I'm posting this to the Technic forum, because it is actually a LEGO Technic/Mindstorms creation. The Classic bricks are only on the outside. I built this for Christmas 2016. It gave out presents to all our friends and family. The product of two months work! The sleigh is driven by two NXT motors (controlled by EV3) and Rudolph's legs are powered by a PF M motor. Santa Claus has an incorporated pneumatic system using two pistons, a pump powered by a PF L motor and an EV3 motor which opens and closes the pneumatic valves. The video shows a case where Santa rejects a naughty kid and, in the end, doesn't give him the present. I hope you enjoy the video as much as I enjoyed building. Merry Christmas !!!
 -
 This model is revamped version of set 41134 (Heartlake Performance School) with parts of set 10217 (Diagon Alley) and a heavily modified version of the truck from set 75972 (Dorado Showdown) thrown together to make this classical styled bank. The time-frame is set in the mid to late Roaring Twenties, when gangsters like Al Capone ruled Chicago's speakeasies and bank robbers such as Bonnie & Clyde ran rampant across the USA. (Of course, the law was always at their heels, and eventually justice was served.) This is the fourth version, which is set to replace my Gringotts bank model, which has become a sore spot on my layout as it's just too small. As before, this bank features a fancy entrance with Greek columns going up and creating a balcony on the second and third floors. The model features a detailed interior, and is open-able like a dollhouse to provide access to the inside. Also, the black 1 x 4 brick above the front door should have this BANK print on it. The rear of the bank has a second story fireplace flue. The model is open-able like a dollhouse to provide access to the inside, as you can see by the hinges on this side. Inside the front half and on the lower floor, we have two tellers desk with spots for four customers total. The upper floor features counting desks, along with half of the the money-filled vault. The lower floor on the back half features a staircase to the upper floor, a controlled access point to the behind-the-scenes part of the bank and the bank managers desk. The upper floor features the other half of the vault with the rest of the $14,800 in hundred dollar bills. (I transferred all the green bricks into 1x2 plates, then times by 100 to get that number.) This model was partially inspired by 2019 Overwatch set 75972 (Dorado Shwodown) which I reverse engineered from a picture last week into the front half of the truck seen here. The rear of the truck. The rear double-doors open to stash valuables, the roof section comes off, and the driving compartment seats one mini-figure. Thank you for looking at these models. Any comments, be they helpful, quizzical, or critical are welcome at any time. Thanks again for reading!
 -
hi there, i just finished the "Rocket 69" from Fallout 4, since that really is one inspiring design they pulled off with this one hope you like it! Rocket 69 from Fallout 4 by Ron Dayes, auf Flickr Fallout 4 69 top view.lxf by Ron Dayes, auf Flickr Fallout 4 Rocket 69 back view.lxf by Ron Dayes, auf Flickr Fallout 4 Rocket 69 side view.lxf by Ron Dayes, auf Flickr cheers!
-
Get ready to blast off into the unknown vastness of outer space! This model was inspired by set 3831, (Rocket Ride, from the 2008 Spongebob line) albeit with a pointier nose cone, and gray color scheme. The model now has a enlarged engine section with longer tail fins and four more engines, along with a crew of two humans and a robot helper. One of the human astronauts can even be seated in the fold-open cockpit. (The below story line is 100% fiction.) This ship is the forerunner for all of the other Lego space ships: in 1969, this crucial piece of history launched from LegoLand Space Port for a mission to the moon. This was very soon after the failed 1965 launch of 801-series Space Rocket, which killed the the brave crew of Kat Aclysm: female rocket science genius and designer of the experimental ship, and Abraham "Abe" Normal, the best test pilot in the academy. Their deaths at the Samsonite launch pad were not in vain though, as the newly founded LegoLand Aero-Space Authority (renamed Classic Space Command in 1978) rebuilt their reputation as the premier brick-built space agency by launching the "Innovator", also known as LL002 which in early August 1969 made history as the first mini figure - built object on the moon! This rocket and it's crew (Bill Fold, Penny Wise, and S1L-V3R the robot) made history with their two days on the moon's surface, providing the foundations for the Classic Space Moon-base series of missions. The model without the figures The model now has a enlarged engine section with longer tail fins and four more engines. The rocket features an opening section to get at the interior which now only consists of the cockpit. The model was too weak in real life when the whole thing opened up, so I was forced to solidify every section to keep it from falling apart. The trans-clear windscreen part should have this print. The crew of this fateful mission was commander Bill Fold and scientist Penny Wise, along with their robot helper S1L-V3R. (nicknamed Silver) The robot is inspired by the robot customer in the 2007 set number 4981 (another Spongebob set called The Chum Bucket), while the astronauts were inspired by the Sandy Cheeks mini-figure in set 3831. The mini-figures should feature this torso print. MISSION NOTES: Here is the inspirational set 3831, courtesy of Brickset... ...and here is the original real life version of the rocket. The LDD file for the updated rocket itself is here. As usual, comments, questions, complaints and suggestions are welcome! EDIT 6/24/17: LDD file and pictures updated for the larger and now multi-engine rocket.
-
Behold! The Dark Knights oldest and goofiest/awesome vehicle! I helped my friends brother build this awhile ago and mn I think it looks pretty cool. Enjoy! Whirly Bat (joint MOC) by Total BrickMaster, on Flickr Whirly Bat (joint MOC) by Total BrickMaster, on Flickr
-
Hello Everyone I would like to discuss a point that many adult Lego plane enthusiasts probably think about. What is better the old classic smaller planes of the past, or the new large and more realistic planes of today. I am going to try to give an unbiased opinion because I have had many smaller planes as a child. In my Opinion the older classic planes are better for airports in city layouts because they are smaller and allow for realistic size airports and runways. They are also great because they use few specialized parts. On the other hand the new larger planes are much more realistic and allow for more play inside with over 15 seats in most of them. They are also better for layouts purely dedicated to the airport. It allows for massive and impressive airports.They are also more fun for smaller children who think bigger is always better. This is only my opinion. Share yours below and provide an opinion. Thank you in advance.
-
Greetings fellow members! I´m an Attorney-at-Law living in in Honduras which is located in Central America. I have played with LEGO´s since childhood, and now, as an adult, I want to start a collection of classic LEGO sets. Looking forward to learn a lot from this community. Kind regards,
-
My version of the famous bug, Wip, as never satisfied, so keep on updating This is based on my real build beetle moc, all comments welcome, old rear end. rally version (i believe this is Gulf oil racing colours) classic version
-
Hey guys, Long time no see! I thought I would pop back in and share my latest castle project! It's a re-imagining of the classic Black Falcon's Fortress from the 80s! And if you are like me and think it's time LEGO brought back some classic castle stuff please go give it some support on LEGO Ideas! Black Falcon's Fortress. by Mark E., on Flickr Black Falcon's Fortress. by Mark E., on Flickr Black Falcon's Fortress. by Mark E., on Flickr
-
 The classic 1967 Ford Eleanor GT500 was a fearsome beast in its day, with a 428 cubic inch big block rippling the pavement courtesy of an astounding 355 horsepower. It's also the car made famous as "Eleanor," Steve McQueen's awesome ride in the original 1974 movie Gone In Sixty Seconds. With so much heritage to this classic car, I knew this build had to reflect that hardcore stance and styling everyone grew to love. 1967 Eleanor Mustang- let’s drive by lachlan cameron, on Flickr In an attempt to stay true to the mechanics and design, I began with the classic live axle rear suspension and an inboard suspension style in the front with Ackerman steering and torsion bar. 1967 Eleanor Mustang- Chrome engine block, gold pistons, red chrome wheels - by lachlan cameron, on Flickr I threw my new red chrome rims on the car just for a quick photo with lots of bling :) 1967 Eleanor Mustang by lachlan cameron, on Flickr The car also sports front and rear headlights, motorized hood and trunk, 2 XL motors for drive, 1 servo motor for steering, 2 Buwizz batteries in the trunk, a chrome V8 engine block with gold pistons, working fan and blower, snap back doors. 1967 Eleanor Mustang by lachlan cameron, on Flickr I did try to follow the shape of the car closely, as you can see in the overlay below: 1967 Eleanor Mustang by lachlan cameron, on Flickr After so many new challenges on this car I'm fairly satisfied with the outcome. So sit back, grab a cuppa and check the video! And as always - a huge thanks to my brother @DugaldIC , @KD123 & @technic_addict for their support throughout this build.
 -
An Italian Classic Together with Gabriele Zannotti aka zanna I've been working on a scale model of a FIAT 500 for almost two years now. I've actually already made a topic on EB a while ago but the model has improved a lot since then and we also took some cool pictures of the real life model so I decided it would be appropriate to post a new thread. The model As it stands right now the model is made of 1210 pieces and has plenty of details and features to offer. The boot which is located at the front can be opened revealing the fuel tank, a toolbox and an actual spare tyre. The bonnet in the back is decorated with several custom decals depicting the various cooling vents as well as the license plate and additional details. It can be opened which allows you to see the detailed 500cc straight twin engine. Furthermore, the doors can be opened and the front seats tilted forward allowing you to access the rear seat bench. On sunny days you can also swap out the closed sun-roof for the opened variant. Boot details The rear end Openable doors and hatches The engine bay Dashboard details Foldable seats Open roof Thanks for checking out our topic. Additional images can be found in both Gabriele's flickr page and mine. Our model is still very much a work in progress and we keep improving the build and adding new details. We've actually uploaded our model to LEGO Ideas and it has already surpassed 7.5k but your support would be greatly appreciated so we can meet the 10k goal in time.
-
https://ideascdn.lego.com/community/projects/bf2/fd2/5379251-o_1cbfnmj3r1q3tfpo1ijnmj19cds-NHSISQ5XhODY0w-thumbnail-full.jpg So I started a Lego Ideas Project. I have no idea if this is gonna make it. I thought of all my Mocs the oldtimers would be the most suitable for Ideas. Special thanks to Mahjqa for helping with photographing and photo-shopping. - Link Removed - Please support, vote and share if you like. Thanks for looking!
-
Hello, I have for sale (1) Lego Limited Edition 60th Anniversary House set. The set is new sealed although the left circle seal is peeling which is apparently a very common problem with the sets. Please PM me with serious offers if you are interested. I am willing to ship internationally but I have never shipped international before so allow me extra days to fill out forms properly. I am also willing to trade this set for the original 326 Cottage set from 1965, but I would let it with instructions and preferably the box. Thanks, -RailCo
-
Hello, I am a new AFOL and I am really excited about my first alternative build :-) http://20180301_151403 http://20180301_151443 http://20180301_151520 http://20180301_151631 http://20180301_151704 Original from back of the box: http://20180301_161101 I hope you will like it :-)
-
Hi all. I'd like to share a MOC I made over a year ago which I only just got around to photographing recently. Our fearless heroine on long range patrol, will she make it back? 919 CS Spaceship Right Side v1 by Magma Xenoliths, on Flickr Of course she will! Classic Space Welcome Home - Front On by Magma Xenoliths, on Flickr Close up Classic Space Welcome Home - Close Up by Magma Xenoliths, on Flickr Angle shot of base Welcome Home - Left Side by Magma Xenoliths, on Flickr And I also had a bit of fun with photoediting... so here is an attempt at some box art. 919 CS Spaceship Left Side Box Art by Magma Xenoliths, on Flickr And here is a photo of the various sides of the spaceship itself: CS Spaceship Multiple Views by Magma Xenoliths, on Flickr I had a lot of fun building this. I wanted to do something with the new trans yellow windscreens (well new at the time anyway!) and built that area... and then built the engine... and then had to figure out how to connect them together! I like how sleek it ended up. I confess to swooshing it a few times... ;-) I also played around with greebling on the underside and that turned out to be surprisingly tricky to do, my hat is off to those people who make it look effortless. I referred to it as 919 mainly because it is closest to 918 -"One Man Spaceship", which is the largest Classic Space ship I had as a kid. But I didn't set out to make an update to 918... I just wanted to build a Classic Space ship... :-) Larger resolution pics available on flickr for those who like that kind of thing. Hope you enjoy, thanks for looking.
-
 Hello, World! Over the past seven (7) years, I had hand-built about four dozen microcontroller development boards (like what is used for the "programmable brick"), like "Arduino", but I have expanded way beyond Arduino. LEGO Classic Large Brick Box (10698) Using my LEGO Classic elements, purchased in January 2017, is it possible to add mechanisms to make my MOCs "animated"? I am still a newbie at LEGO and I don't know where to search for my answer. My previous Google searches gave the outcomes focused on train projects. I did see some stuff at Lego.com that might work, but I have no real clue if that's what I'm looking for. Because I could not find what I'm looking for, I'm guessing that LEGO is purposely discouraging my MOC idea to promote the EV3. I'm not planning on building complex MOCs, such as a walking robot, however, I would like to build something with 5VDC stepper motors and the needed gears, such as a robotic arm with calipers. I may only need the "accessories" as I can purchase the stepper motors, locally. What I've seen online, are stepper motors already attached to accessories. Though I can build what I want without using any LEGO elements, I just know to know if it is possible to use my LEGO Classic elements in a way to act like a Mindstorms product. Linux Development By the way, I am GNU/Linux developer with almost 20 years of GNU/Linux experiences and almost 28 of programming in C. I am just wondering, if my own technical skills can be used to invent unique LEGO MOCs that are animated under a GNU/Linux environment. I desperate need inspiration to build MOCs, too! Thanks for Reading! By now, after reading my posts, one could probably guess that I want to build my own, specialized MOCs, which is true! I'm one that is not gifted with money and I do know LEGO products are expensive, so in the event I do buy another LEGO product, I want it to be a "main ingredient" to my MOC projects. Thanks for Reading and Have a Nice Day!
 -
Hello, World! As a veteran computer programmer, I tend to start off my (often boring) posts with "Hello, World", despite being a retired webmaster and blogger. Which Forum do I post my Hybrid Classic - City Police posts? My primary LEGO theme is Classic. My secondary LEGO theme is City with the sub-theme, Police. I could not find the "Classic" forum; maybe because I am still a new user in Eurobricks and have not written the required 10 (or so) posts. Presently, my LEGO photos are posted in my LEGO DeviantArt gallery; I haven't yet discovered how to "hotlink" the photos into Eurobricks since photo hosting isn't allowed. My DeviantArt site is "primary" into receiving 99% of my digital art posts (the remaining 1% are my profile photos and backgrounds). My plan is to soon include my radio scanner ("Police Radio") hobby with my newly founded LEGO hobby. Since I am still learning LEGO Classic, itself, I plan to include my three City Police minifigs. (My real-life radio equipment were made in Japan!) My "CyberSecurity" interests may be part of my LEGO Classic - City Police hybrid posts! Though it is only an idea, it is an idea I am thinking of doing. Thanks for Reading! As usual, I am and was never known to write numerous posts within a short timeline. I tend to write a couple or a few posts, in which the content of each post, varies between mid-range to huge. Most of my posts take some time to write because of the arthritis that is inside my hands; I have to frequently take breaks when writing every post. Thanks for Reading and Have a Nice Day!
-
done with these projects, maybe putting them on vignettes, if I have the time. CS Small Car Classic Space Motorcycle
-
Hi everyone :) Below are mocs of 2 of my favourite cars, '69 and '05 Mustang Hope you guys like it ! Thanks & Regards, KMP www.facebook.com/kmpmocs