Search the Community
Showing results for tags 'auto'.
-
Hello, Meet my prison bus! While not a direct copy of a specific model, it is packed with cool vintage style. It looks right at home alongside Speed Champions cars and can star in any LEGO City scene. It’s now submitted to the Bricklink Designer Program (BDP) Series 11, you can find my submissions here: https://www.bricklink.com/v3/designer-program/series-11/main.page?page=1&s=tlg I've added loads of authentic details, like multiple side-view mirrors, license plates, headlights, turn signals, and more. The real showstopper is the clean, brick-built front mudguard and hood, it's what makes this vehicle truly unique. The set includes 3 minifigures and various accessories, offering plenty of play features: Openable front door Openable rear door Openable interior barred door Removable roof for easy access to the interior I hope you enjoy this set. Many thanks for your support and feedback! Thanks for visiting, _TLG_
-
Hello, More than just a truck, it’s a rolling home for rockstars, the Flame Tourer the "big brother" of my Flame Monster is back for BDP Series 11: https://www.bricklink.com/v3/designer-program/series-11/main.page?page=1&s=tlg This project was inspired by a favorite childhood toy, a 57 Chevy Matchbox car with an iconic flame pattern. While the truck is a modern long hauler, it carries that classic spirit through its unique brick built decoration. It is part of the same team as my Flame Monster project and they even share a custom team logo. The set fits perfectly with Speed Champions cars and can be a great addition to any LEGO City. Just add a crowd and let the show begin! I have added many authentic details like a front bumper with integrated lights and a custom Flame Tourer license plate. The front also features a custom grille logo that matches the one on the Flame Monster. The most striking feature is the brick-built flame job that covers both the truck and the trailer. The set includes 4 minifigures. You get the veteran driver in his brown jacket and Hawaiian shirt plus the three band members. The cool lead singer has short orange hair, the drummer wears shades and the keyboardist has brown hair. They all wear matching black outfits with a cool bulldog logo on their shirts. Play features and details: Detailed interiors: Both the truck and the trailer have removable roofs for easy access Driver cabin: The truck includes a dedicated sleeper area for the driver Mobile home: The trailer is fully equipped with a sofa, bunk beds, a small kitchen and a bathroom Mobile stage: The trailer and its lower compartment store all the stage components and musical instruments Stage backdrop: The rear door of the trailer can be used as a backdrop for the show Extra storage: A lower compartment with a folding accordion door holds the rest of the gear Functional doors: All doors are fully operational to make the play experience even better Update for Series 11: Optimized build: The total part count was significantly reduced from 1625 to 1499 elements Refined stage: Some stage details have been redesigned for a cleaner look New outfits: The band members received updated black outfits New branding: The truck now features the shared team logo and a Flame Tourer license plate I hope you enjoy this set. Many thanks for your support and feedback! Thanks for visiting, _TLG_
-
Hello, Meet my monster truck, a blast from the past inspired by my favorite childhood toy: a '57 Chevy Matchbox car. It's not a copy of any real truck, but it's packed with cool vintage style. It looks right at home with Speed Champions cars and can star in any LEGO City scen, just add a crowd and let the show begin! It’s now submitted to the Bricklink Designer Program (BDP) Series 11: https://www.bricklink.com/v3/designer-program/series-11/4408/Flame-Monster ( and I have submitted two other vehicles too and a castle, you can find all of them here: https://www.bricklink.com/v3/designer-program/series-11/main.page?page=1&s=tlg ) I've added loads of authentic details, like a front bumper with lights and a license plate, headlights, turn signals, a custom grille logo, and more. But the real showstopper is the brick-built flame job, it's what makes this truck truly unique. The set includes 1 minifigure and a spare wheel, and offers plenty of play features: • Working steering (via a wheel under the truck bed, see Image 4) with +/-20 degrees of turn • Openable tailgate (see Image 7) • Pivoting rear axle that mimics suspension. For display, tilt it onto its spare wheel for a cool, dynamic pose (see Image 1). • Removable roof for easy access to the single-seat cabin (see Image 7) The connections of the two flame elements to the exhausts are loose, so they are intended for display purposes only. I hope you enjoy this set. Many thanks for your support and feedback! Thanks for visiting, _TLG_
-
Hello Speed Champions and City fans, It was my entry to Bricklink Designer Program Series 3 and 4. It has received many kind comments and support, but unfortunately it has not been selected, therefore I decided to make the instructions available here: https://rebrickable.com/mocs/MOC-177592/_TLG_/school-bus I always loved American style school buses, therefore I decided to design one to Bricklink Designer Program Series 3. It is not actually based on a real one, but it contains many typical details: the black bumper rails and STOP arms on the sides, the crossing arm, the side and rear doors, the rearview and crossover mirrors, the mudguards, the warning lights etc.. The roof assembly can be removed as one piece and in this case the internal details are visible: there is a driver seat with steering wheel, dashboard, gear shift, passenger seats and even a fire extinguisher. It is 8 studs wide, studless build in minifigure scale and fits perfectly to Speed Champions cars or to a LEGO City. There are many working details: the front and rear doors, the STOP arms, the crossing arm and windshield wipers. I wanted to create a clean build and tried to fill every unnecessary gaps and hide unnecessary studs, therefore some tricky, but legal build techniques are used. The set includes three minifigures: a driver, a school girl with a pen and backpack and a school boy with a brick built backpack. The model has space for 17 minifigures: one driver and 16 passengers. If the passengers are kids with short, rigid legs, then they can stand on the seats. The building instructions guidelines have been followed. It is built from the palette "BDP Series 3", so there are some color and part restrictions. The color "Bright Light Orange" would be a bit more authentic, but the available parts are restricted, therefore I decided to use "Yellow" and I am satisfied with the result. The STOP sign is very rare part and it is not available in this palette, therefore it is replaced by a simple, white, circular sign with a sticker. The door 43967 is also not available in yellow, therefore it is replaced by a brick built one, however, in this case I was able to add some extra details: a black door handle, bottom window and red lights. I hope you like my design, I appreciate any feedback. Thanks for visiting, _TLG_ School Bus - Bricklink Designer Program 3 - 01 by László Torma, on Flickr School Bus - Bricklink Designer Program 3 - 02 by László Torma, on Flickr School Bus - Bricklink Designer Program 3 - 03 by László Torma, on Flickr School Bus - Bricklink Designer Program 3 - 04 by László Torma, on Flickr School Bus - Bricklink Designer Program 3 - 05 by László Torma, on Flickr School Bus - Bricklink Designer Program 3 - 06 by László Torma, on Flickr School Bus - Bricklink Designer Program 3 - 07 by László Torma, on Flickr School Bus - Bricklink Designer Program 3 - 08 by László Torma, on Flickr School Bus - Bricklink Designer Program 3 - 09 by László Torma, on Flickr School Bus - Bricklink Designer Program 3 - 10 by László Torma, on Flickr
-
Hi Everyone, Just wanted to share our Auto Garage MOC. I really wanted to build a nice service station/ auto garage for the kids and town so I decided to build the entire structure on an X-Large Baseplate. The use of the x-large baseplate meant I could really go large and wide giving the kids a chance to really get in a play easily. The fun (and toughest) part about this build was to get the wide custom Garage Doors working and folding with Technics. The Gas Pumps were also a fun little build, needed to keep them small and minimal to leave space for cars to move in and out. Here's a full overview video of the Auto Garage MOC Hope everyone enjoys it. UPDATE: We've just uploaded a Step-by-Step Tutorial of the Garage Doors used in the MOC.
-
Hammerhead is a popular rest stop for those traveling west from the Crown City, Insomnia. Unfortunately for Prince Noctis and company, their car didn't quite make it forcing them to push it the rest of the way. ~~~~ Thank you to everyone who helped me finish this MOC up. Your input was invaluable.
-
I thought this might be useful for new builders out there. Car Butts by Henchmen4Hire, on Flickr This is a look at how I built the rears on these 8-wide cars. To start, I messed around until I got a versatile template that let me build in all directions. It was simple in the end, the black [Brackets] attach to the [1x1 Brick with side stud], which rests on the Speed Champions [Mudguard]. The two grey [Modified plate with side studs] let me add tiles or whatever to smooth the trunk lid area. After adding a plate to the [brackets], facing the sides of the car, the length from plate-to-plate is 7 studs wide, so you can use [jumper plates] to neatly fill the space and create interesting designs. Everything can be as flush or as staggered as you want. For example, the plates going towards the sides of the car can be flush with the body, or you can add [slopes] to add a$$- I mean, to add mass. lol I'm sure another SNOT brick or plate can be added to build upsidedown too (maybe to add greeble to the undercarriage?), I haven't needed to yet though. This could possibly also work for the car's nose, though I tend to use one-off builds there because I like leaving space for an engine. There you go, hope it helps. Feel free to share your techniques for building cars! Maybe we can make this some kind of encyclopedia for making kickass cars.
-
(this is my first post, so if there's something wrong, please help me) Hi, I'm relatively new with this MOC thing, but I decided to try something about a car I know very well and love: the Fiat 500L. Let's start with some little tips and and story: "born" in 1968 this model of 500 is called "L", where the L stands for lusso (luxury), because this version has some beter refinitions, like chromed bumper reinforcement, moquette, an heater and some other tecnic improvements. The MOC has very similar dimensions to the green Mini Coper Creator kit, and comes with openable doors and hoods, front seats are reclinable and djustable,and the roof is not openable but it can be sustituted with an open version I'm posting here this MOC because I'd like to collect some fedbacks and advices about the building, and if you find this MOC good enough, or if you love it like I do, you can also vote it on Lego IDEAS here: https://ideas.lego.com/projects/13656e47-8f4b-4813-a138-f240f0909681 I'll appreciate every tip you can give to better this model. I'm also working on a 500R version and a 500 Jolly version, and I will post them sooner. in the meantime,thank you for watching!
-
Hello, let's start the race! It is my own hypercar concept with a minifigure. I reused some details of my earlier idea called "Hypercar concept 1", but I wanted to build this car even more dynamic. It is a studless model built from standard LEGO elements. The overall size is similar to the Speed Champions sets, but the wheels are from City sets as I wanted to keep the height to length ratio closer to the real sports cars. If you like this car, please share and support it on Lego Ideas: https://ideas.lego.com/projects/146d40fc-49de-4af5-8173-4c73892a003e Many thanks! Street racer 01 by László Torma, on Flickr Street racer 04 by László Torma, on Flickr
-
 ---------------Detectar idiomaAfrikáansAlbanésAlemánAmáricoÁrabeArmenioAzerbaiyanoBengalíBielorrusoBirmanoBosnioBúlgaroCanarésCatalánCebuanoChecoChino (simplificado)Chino (tradicional)CingalésCoreanoCorsoCriollo haitianoCroataDanésEslovacoEslovenoEspañolEsperantoEstonioEuskeraFinésFrancésFrisón occidentalGaélico escocésGalésGallegoGeorgianoGriegoGuyaratíHausaHawaianoHebreoHindiHmongHúngaroIgboIndonesioInglésIrlandésIslandésItalianoJaponésJavanésJemerKazajoKirguísKurdoLaoLatínLetónLituanoLuxemburguésMacedonioMalayalamMalayoMalgacheMaltésMaoríMaratíMongolNeerlandésNepalíNoruegoNyanjaPanyabíPastúnPersaPolacoPortuguésRumanoRusoSamoanoSerbioShonaSindhiSomalíSotho meridionalSuajiliSuecoSundanésTagaloTailandésTamilTayikoTeluguTurcoUcranianoUrduUzbekoVietnamitaXhosaYidisYorubaZulúEspañol The first thing to say that I do not know if the bottom base is the set 8445, is not the same as I would like it to look like it is more handsome, and I modified some parts like the direction (more elongated 1 more stud ), the mudguards, the cockpit, the pick, the front spoiler, the driver's seat, the rear spoiler, the color and some other details. The orange color is like the car of Fernando Alonso although that color I also use it the first one I made of the two was the white one but I did not combine it and I made another one in orange
 -
Baby Porsche or VW Beetle tuning? This is a fictitious race car, I hope you like it :) You can support it on Lego Ideas: https://ideas.lego.com/projects/68cb5ef6-6e2c-40fc-9dca-0e4b7f3fe64a It is a studless build in Speed Champions scale, but with City wheels. I used only standard LEGO elements, the slopes with stickers are part of the set called 1968 Ford Mustang. Baby Porsche 01 by László Torma, on Flickr Baby Porsche 02 by László Torma, on Flickr Baby Porsche 03 by László Torma, on Flickr
-
Hello Speed Champions fans, my son asked me to build a white Audi R8. Both of us like the Speed Champions sets, therefore I choosen this scale. If you like it, you can support it on Lego Ideas: https://ideas.lego.com/projects/ead4242e-8bae-440d-930d-0c840d86ce5f It is a studless build from standard lego elements and modified City wheels are used instead of Speed Champions ones to keep the height to length ratio more realistic similarly to my earlier ideas. The front of this car is iconic and it was a real challenge to recreate it in this small size. I made lots of versions and I think the actual one with a tricky solution is the best. I tried more solutions to the black side blades too, the actual one was inspired by "LEGO Audi R8 instructions (MOC #96)" by "Jerry Builds Bricks" on Youtube, however I modifed it a bit as I wanted tilted blades similarly to the real ones. Only one sticker is used which is the Audi logo on the front as I'm generally not a fan of the parts with stickers, because of the lack of flexibility in using them with other builds. The set includes the minifigure shown on the main picture on the Lego Ideas. It comes form the set 75873 but with red helmet. I have added a rear wing to make the car more dynamic. It differs from the custom Audi wings, but I think it fits to the style of the car and to the side mirrors. Audi_R8-04 by László Torma, on Flickr Audi_R8-05 by László Torma, on Flickr Audi_R8-02 by László Torma, on Flickr Audi_R8-03 by László Torma, on Flickr
-
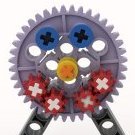 Hi for those interested I have put the build instructions for my "smoothly switching automatic 2 speed gearbox" on rebrickable: https://rebrickable.com/mocs/MOC-51030/TechnicBrickPower/smoothly-switching-2-speed-automatic-geabrbox/ Here's the video about it:
 -
 Hello. When building models from Lego systems for a child tires of, switching to technic. I'll start with the last built model - a small minivan for minifigures. It was not possible to completely get rid of unnecessary colors - there are not enought details, or in others models. The car has a steering control output in the windshield, opening doors and trunk lid, a interrior from the system :)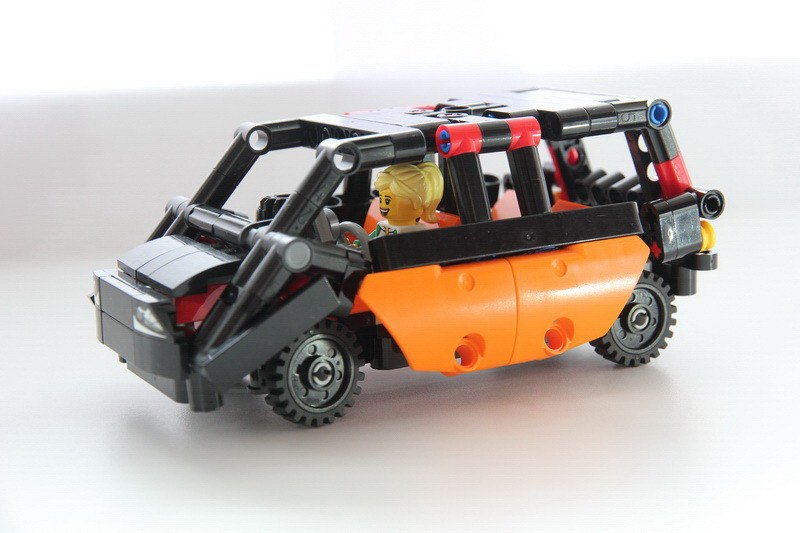
-
Hello, feel the speed! It is my own hypercar concept inspired by real hyper and supercars. It is a 6 studs wide, studless model built from standard LEGO elements. The overall size is similar to the Speed Champions sets, but the wheels are from City sets as I wanted to keep the height to length ratio closer to the real sports cars. It can be combined with my other MOC Hybrid Truck which will be available on LEGO IDEAS soon too. If you like this car, please share and support the it on LEGO IDEAS: https://ideas.lego.com/projects/44e6dbbf-734f-4b38-84c7-2075b09495bb Many thanks! LEGO Hypercar concept1-02 by László Torma, on Flickr LEGO Hypercar concept1-01 by László Torma, on Flickr LEGO Hypercar concept1-03 by László Torma, on Flickr
-
Hello Speed Champions fans, Trabant 601 is a legendary car of Eastern and Central Europe. This is its studless model in Speed Champions scale. If you like it, please keep alive this project and support on Lego Ideas to become a real set (only 3 supporters are missing in the next hours to reach the first milestone): https://ideas.lego.com/projects/77b0428c-c46c-47b0-984c-1fd7c97a2948 I wanted to create a relatively accurate model, and some details were challenging in this small size. Firstly I needed smaller wheels than my other builds in this scale, the size of the actual ones are equal to the Mini Cooper (Lego 75894) ones. It was clear too that the City mudgards will not fit to this size, therefore I created a brickbuilt one. The connection of the wheels are tricky a bit which helps to keep the room between the wheels and the mudguard proportional. I wanted to create an accurate front, and I added simple white stickers to the direction indicator lamps to keep the orange parts visible on the front only. The most common colors of this car are the light blue and white (broken white). I decided to use white pieces as the roof element of Mini Cooper (part 6018101) is ideal as hood and roof, and I have this item only in this color. The rear of the car is a bit tricky too as I wanted tilted lights similarly to the real ones. The back lights could be red transparent elements, but I was not able to buy them in that color. I had to buy some elements of "brick, modified, 6191" to the sides too, and it was available only with "Nitro" stickers, but my son said that these stickers are cool, so I kept them. I wanted to use as less stickers as possible as I don't really like them, because they restrain the applicability the stickered elements in different builds. There is picture without the "Nitro" sticker and an other one without any stickers. The set includes a minifigure with a baseball hat and with an additinal red helmet. Trabant 601 by László Torma, on Flickr 02 Trabant 601 by László Torma, on Flickr 03 Trabant 601 by László Torma, on Flickr 04 Trabant 601 by László Torma, on Flickr 05 Trabant 601 by László Torma, on Flickr 06 Trabant 601 without Nitro sticker by László Torma, on Flickr 07 Trabant 601 without any stickers by László Torma, on Flickr My other Speed Champions scale model in "LEGO Town" forum is the Audi R8:
-
Hello :) Topic for placing in one place my self-made products 8pin wide in the scale of Speed Champions. Pleasand viewing! I will be glad to comments with wishes and criticism :)
-
A realistic model of the famous Dodge Challenger from the 70s. It made appearance in blockbusters like Fast and Furious and most recently - Mad Max.
-
Hello Speed Champions fans, Black Arrow is a ficticious hypercar which was designed for a "Hypercar building contest" hosted by sfh_bricks on Instagram. I tried to design something really cool inspired by the cyberpunk culture. Building instructions are available on the following links: https://rebrickable.com/mocs/MOC-119144/_TLG_/black-arrow-hypercar-concept It is a studless build in the new, 8 studs wide Speed Champions style. Some rules had to be followed: only certain types of car bases, wheels, fenders and windscreen are allowed, cockpit have to be closed, fixed dimensions (wheelbase, width, and maximum length), build must fit a full minifig with helmet. I prefer the brick built solutions to keep the flexibility of the used parts in further builds, and therefore stickers are not used. My intent was to keep the build smooth and to add lots of details: for example the air intakes, the rear wing, the side view mirrors etc. . Maybe the most challenging one was the double headlight. I tried to fill every unnecessary gaps and therefore some tricky build techniques are used. There are two versions of the front assembly : 1) the double headlight version which is a bit more extreme and 2) the simple headlight version which is more solid and sturdy. The model has space for one minifigure. I suggest to use a helmet or small hair. Thanks for visiting, _TLG_ Black Arrow 01 by László Torma, on Flickr Black Arrow 02 by László Torma, on Flickr Black Arrow 03 by László Torma, on Flickr Black Arrow 04 by László Torma, on Flickr Black Arrow 05 by László Torma, on Flickr Black Arrow 06 by László Torma, on Flickr Black Arrow 08 by László Torma, on Flickr Black Arrow 07 by László Torma, on Flickr
-
Hello. I am glad to present you my new project for LEGO Ideas. my model :) I like to build trucks on a scale of about 1:64. Previously, they were mostly single models, but now I plan to add some environment to them. One of the first ideas was to build an automated truck assembly line. The assembly takes place in several stages: at the first stage, a suspension is added to the truck frame, at the second - wheels and engine with transmission, the third stage adds the assembled cabin, and at the fourth stage, glazing and fastening of additional equipment takes place. Next, the finished model is checked, and you can send it to a car dealership. Well, or add some module for cargo :) Trucks can be assembled with different cab and rim colors. As for the assembly line itself, it is automated. The staff only monitors the process. I will be glad to see your comments with reviews, and thank you for your attention!
-
Hello Lamborghini and Speed Champions fans, The Lamborghini Diablo is a high-performance mid-engine sports car built by Italian automobile manufacturer Lamborghini between 1990 and 2001. It is the first production Lamborghini capable of attaining a top speed in excess of 320 kilometres per hour (200 mph). Building instructions are available on the following links: It is a studless build in the new, 8 studs wide Speed Champions style. I wanted to create a clean model which is as accurate as possible in this small scale. I prefer the brick built solutions to keep the flexibility of the used parts in further builds, and therefore only one Lamborghini logo sticker and a standard vehicle registration plate sticker are used. My intent was to keep the width-length-height ratio of the real car and this size makes it possible. The model contains lots of details: for example the emblematic taillights, the side air intakes, the side view mirrors and rear details with the double exhausts etc... Maybe the most challenging one was the hood tilt and some half stud offsets in the inside structure. I tried to fill every unnecessary gaps and therefore some tricky build techniques are used. The model has space for two minifigures with helmets or small hairs. Thanks for visiting, _TLG_ Lamborghini Diablo - Instructions 1 by László Torma, on Flickr Lamborghini Diablo - Instructions 2 by László Torma, on Flickr Lamborghini Diablo - Instructions 3 by László Torma, on Flickr Lamborghini Diablo - Instructions 4 by László Torma, on Flickr Lamborghini Diablo - Instructions 5 by László Torma, on Flickr Lamborghini Diablo - Instructions 6 by László Torma, on Flickr Lamborghini Diablo - Instructions 7 by László Torma, on Flickr
-
Hello Lotus, James Bond and Speed Champions fans, The Lotus Esprit S1 is a sports car built by Lotus Cars from 1976 to 1978 at their Hethel, England factory. It has a rear mid-engine, rear-wheel-drive layout and it was featured in the 1977 James Bond film The Spy Who Loved Me, where a car famously converted into a submarine after a road chase. The car used in the underwater scenes is nick-named "Wet Nellie". Building instructions are available on the following link: https://rebrickable.com/mocs/MOC-178962/_TLG_/lotus-esprit-s1-007-james-bond-submarine-conversion It is a studless build in the new, 8 studs wide Speed Champions style. I wanted to create a clean model which is as accurate as possible in this small scale. I prefer the brick built solutions to keep the flexibility of the used parts in further builds, and therefore only two vehicle registration plate stickers are used. My intent was to keep the width-length-height ratio of the real car and this size makes it possible. The model contains lots of details: for example the black stripes on the sides, door handles, detailed tail lights etc.. Maybe the most challenging one was the front and the front bumper with brick built headlights. I tried to fill every unnecessary gaps and therefore some tricky build techniques are used. The car can be converted to submarine. The model has space for two minifigures with helmets or small hairs. Thanks for visiting, _TLG_ Lotus Esprit S1 - James Bond - Instructions 01 by László Torma, on Flickr Lotus Esprit S1 - James Bond - Instructions 02 by László Torma, on Flickr Lotus Esprit S1 - James Bond - Instructions 03 by László Torma, on Flickr Lotus Esprit S1 - James Bond - Instructions 04 by László Torma, on Flickr Lotus Esprit S1 - James Bond - Instructions 05 by László Torma, on Flickr Lotus Esprit S1 - James Bond - Instructions 06 by László Torma, on Flickr Lotus Esprit S1 - James Bond - Instructions 07 by László Torma, on Flickr Lotus Esprit S1 - James Bond - Instructions 08 by László Torma, on Flickr Lotus Esprit S1 - James Bond - Instructions 09 by László Torma, on Flickr Lotus Esprit S1 - James Bond - Instructions 10 by László Torma, on Flickr Lotus Esprit S1 - James Bond - Instructions 11 by László Torma, on Flickr
-
Hello Corvette and Speed Champions fans, The Chevrolet Corvette (C3) is the third generation of the Corvette sports car that was produced from 1967 until 1982 by Chevrolet for the 1968 to 1982 model years. Engines and chassis components were mostly carried over from the previous generation, but the body and interior were new. It set new sales records with 53,807 produced for the 1979 model year. Building instructions are available on the following link: https://rebrickable.com/mocs/MOC-176144/_TLG_/corvette-c3-stingray It is a studless build in the new, 8 studs wide Speed Champions style. I wanted to create a clean model which is as accurate as possible in this small scale. I prefer the brick built solutions to keep the flexibility of the used parts in further builds, and therefore only two vehicle registration plate stickers are used. My intent was to keep the width-length-height ratio of the real car and this size makes it possible. The model contains lots of details: for example the front bumper, the emblematic side grills, the side view mirrors, the embedded tail lights, the fuel cap etc... I tried to fill every unnecessary gaps and therefore some tricky build techniques are used. The instructions includes some modification ideas, for example front blinker and alternate side grill, see picture 6, and luggage rack, see picture 5. The model has space for two minifigures with helmets or small hairs. Thanks for visiting, _TLG_ Corvette C3 - instructions 01 by László Torma, on Flickr Corvette C3 - instructions 02 by László Torma, on Flickr Corvette C3 - instructions 03 by László Torma, on Flickr Corvette C3 - instructions 04 by László Torma, on Flickr Corvette C3 - instructions 05 by László Torma, on Flickr Corvette C3 - instructions 06 by László Torma, on Flickr Corvette C3 - instructions 07 by László Torma, on Flickr Corvette C3 - instructions 08 by László Torma, on Flickr Corvette C3 - instructions 09 by László Torma, on Flickr Corvette C3 - instructions 10 by László Torma, on Flickr Corvette C3 - instructions 11 by László Torma, on Flickr
-
Hello Chevy and Speed Champions fans, The 1957 Chevrolet is a car that was introduced by Chevrolet in September 1956 for the 1957 model year. It was available in three series models: the upscale Bel Air, the mid-range Two-Ten, and the One-Fifty. It is a popular and sought after classic car. Its image has been frequently used in toys, graphics, music, movies, and television. The '57 Chevy, as it is often known, is an auto icon. This model is based on one of my favorite Matchbox as a child. Building instructions are available on the following links: https://rebrickable.com/mocs/MOC-87788/_TLG_/57-chevy-matchbox-version It is a studless model in the new, 8 studs wide Speed Champions style, and it is an update of my earlier design, because some new parts have become available since the first release which was in 2021, therefore I was able to build a cleaner, less pixelated flame decoration. The use of stickers is minimized to keep the flexibility of the used parts in further builds, therefore only two standard vehicle registration plate stickers are used. My intent was to keep the width-length-height ratio of the real car and this size makes it possible. I wanted to build the model as accurate as possible in this small scale, therefore it contains lots of details: for example the brick built flame decoration, the emblematic front bumper with the vehicle registration plate and front lights, the side view mirrors and the rearview mirror, the tiltable seats etc.. Maybe the most challenging one was the brick built number on the trunk. I tried to fill every unecessary gaps and therefore some tricky build techniques are used. The model has space for two minifigures on the front seats. There are some space before the rear seats too, but it is enough only for a minifigure without legs Thanks for visiting, _TLG_ '57 Chevy (update 2024) - INSTRUCTIONS 1 by László Torma, on Flickr '57 Chevy (update 2024) - INSTRUCTIONS 2 by László Torma, on Flickr
-
Hello Ferrari and Speed Champions fans, the Ferrari F40 (tipo F120) is a mid-engine, rear-wheel drive sports car engineered by Nicola Materazzi with styling by Pininfarina. It was built from 1987 to 1992, with the LM and GTE race car versions continuing production until 1994 and 1996 respectively. As the successor to the 288 GTO (also engineered by Materazzi), it was designed to celebrate Ferrari's 40th anniversary and was the last Ferrari automobile personally approved by Enzo Ferrari. At the time it was Ferrari's fastest, most powerful, and most expensive car for sale. Building instructions are available on the following links: https://rebrickable.com/mocs/MOC-99799/_TLG_/ferrari-f40 https://www.mocsmarket.com/lego-mocs/ferrari-f40-building-instructions/ It is a studless build in the new, 8 studs wide Speed Champions style. I wanted to create a sleek model which is as accurate as possible in this small scale. I prefer the brick built solutions to keep the flexibility of the used parts in further builds, and therefore only Ferrari logo stickers are used. (If you preferred a better shaping instead of a real rear side grill, then 2pcs of parts 61409 could replaced by 2pcs of tiles and some additional stickers, see the picture 3.) My intent was to keep the width-length-height ratio of the real car and this size makes it possible. The model contains lots of details: for example the emblematic front, hood , side and rear intakes, the narrow black line on the front and sides, the front turn signals, the side view mirrors etc... Maybe the most challenging one was the iconic rear side with the vehicle registration plate and the rear spoiler, here there is a half stud offset. I tried to fill every unnecessary gaps and therefore some tricky build techniques are used. The model has space for one minifigure. I suggest to use small or middle sized hair. Thanks for visiting, _TLG_ Ferrari F40 - instructions 1 by László Torma, on Flickr Ferrari F40 - instructions 2 by László Torma, on Flickr Ferrari F40 - instructions 3 by László Torma, on Flickr Ferrari F40 - instructions 4 by László Torma, on Flickr Ferrari F40 - instructions 5 by László Torma, on Flickr Ferrari F40 - instructions 6 by László Torma, on Flickr Ferrari F40 - instructions 7 by László Torma, on Flickr Ferrari F40 - instructions 8 by László Torma, on Flickr Ferrari F40 - instructions 9 by László Torma, on Flickr