Search the Community
Showing results for tags 'vintage'.
-
 I liked the January 2026 LEGO Gift With Purchase (set 40913 - Vintage Parade Car) when it was revealed but I didn't like it enough to spend two hundred bucks to get it. So, I waited until instructions came out, made as much as I could digitally, (while keeping track of the 29 parts not in LDD) and modified it a little bit in a scant few places. This is one of the two color schemes I decided to build the 1950s-style sports car in - the other has parts still coming to me in the mail. Here we see the front view of the car with it's owner. The rear of the car. The model can seat two figures inside, as in the original GWP set. The second car is in tan and light gray. I also changed the seat colors to black so they stood out more. As for other possible colors: I was faced with multiple paint job options for bodywork and trim that are buildable in real life while redesigning it, which I narrowed down to those listed as follows below (in no particular order): Dark Blue / white - the original from the set, and a very classy color scheme Black / white - also classy, but kind of looks like a police car Orange / white - very snazzy, but perhaps a bit too bright for a '50s car Red / light gray - while it's nice, the taillights really blend into the bodywork with this one Blue / light gray - my brother really likes this one tan / light gray - a bit bland Twenty-nine parts in twelve part types are missing from each car, but I assure you they are all buildable in real life! Thoughts? EDIT: Tan car added 2/14/26
 -
Not really a MOC but an adaptation to that 30's car that come out in an exclusive Superman set There are some differences from that set and, most important, done using only bricks I already own Hope you appreciate my effort
-
When I saw the pictures of this train in @HoMa:s Lego Trains Book. I simply couldn't resist the temptation (particularly not after having seen TLGs miserable train news for 2018 ...) So I built it myself. A true pleasure with a very high degree of satisfaction. And another beautiful contribution to my train collection: A big praise to Holger for this very nice MOC which wakes many train memories back in the years when I grew up in Switzerland. This train is a 9V version with a total of four 9V motors mounted on the first two coaches. The interiors of the locomotive are therefore empty, i.e. no PF stuff. The Be 6/8 is built in Reddish Brown to match the colours of the Swedish iron ore train with the Dm3 and the Da locomotives. In addition, it is adapted to the challenges of the 9V Extreme layout, in particular the humps at the level transitions. And the rods by Trained Bricks really put the dot over the i ... PS: Imagine - a Swedish iron ore train together with a Swiss Crocodile in the midst of the Swiss Alps - goose bumps all over again ...
-
There has been some rumors that I am not capable to make new quizzes. This is NOT true! I come back with new quizzes. For warm-up, let's stick to 4.5v battery wagons again! After the successful quiz N1: which was followed with a new item on bricklink: https://www.bricklink.com/v2/catalog/catalogitem.page?P=x488c03&idColor=5 now again: what do you find uncommon in this photo? I have told the answer to few friends. Please do not spoil. If you know the answer, you can pm me then I comment that you know the answer so that people can think about this photo for few days. There are gonna be harder quizzes, so prepare for them! ;-) :-) Have fun.
-
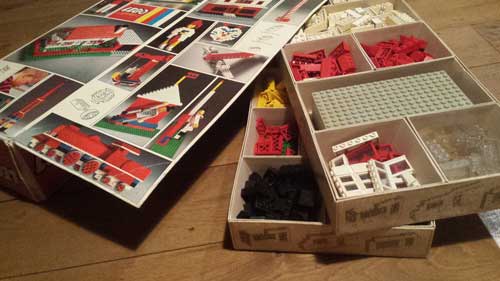
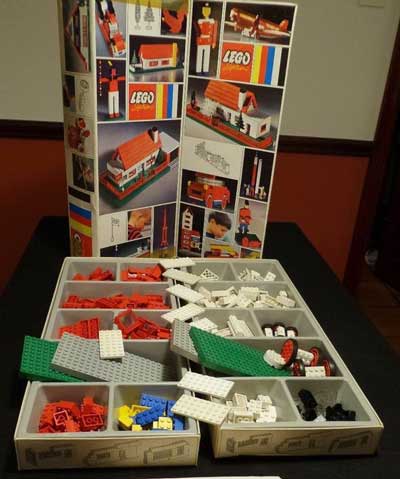
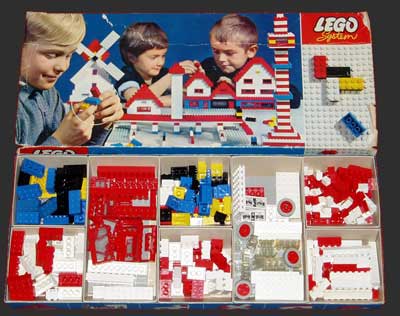
Hello, I own a 070 universal building set from 1967 or so (photo1), but this one has cardboard inlays instead of the plastic ones you can commonly find (photo2). Does anyone has an idea whether it is an older type, or some transition box? I cannot find more info on this. Except: the set 050 from 1964 has similar inlays (photo3)... Thanks for helping me out!
-
My version of the famous bug, Wip, as never satisfied, so keep on updating This is based on my real build beetle moc, all comments welcome, old rear end. rally version (i believe this is Gulf oil racing colours) classic version
-
https://ideascdn.lego.com/community/projects/bf2/fd2/5379251-o_1cbfnmj3r1q3tfpo1ijnmj19cds-NHSISQ5XhODY0w-thumbnail-full.jpg So I started a Lego Ideas Project. I have no idea if this is gonna make it. I thought of all my Mocs the oldtimers would be the most suitable for Ideas. Special thanks to Mahjqa for helping with photographing and photo-shopping. - Link Removed - Please support, vote and share if you like. Thanks for looking!
-
Fill 'Er Up! A while back I presented the Bugatti Type 35 Grand Prix pictured being unearthed in an elderly farmer’s barn. This time the little Bugatti is ready to be "fueled up" in a period gas station. Back in the twenties gasoline was sold in quite simple shacks, at times they were drugstores, at times they were pharmacies. What it's sure the early gas stations were very different from modernist or art déco ones. Recently Blocks magazine featured my Bugatti in haystack with step by step building instructions (below) and few days ago I uploaded the pics on my flickr photostream. So if you can't buy a classic racecar you can build it from LEGO! Thanks for stopping by!
-
This bank was originally designed for the Western theme as a two story open-backed model. I then decided it would look better as a regular town model and thus I added a rear half and third floor. The model opens like a dollhouse on a hinge, and locks shut on a Technic pin, just like most of my buildings. The more modern-looking truck model is a modified version of the 2014 set 76015, Doc Ock Truck Heist, with the bulk of the changes inspired by Flickr user eurotrash48903, or Eurotrash as he is known he on EurobBricks. The truck is already built in real life, but it is included in the LDD file as well. When the building is built in real life as well, I will update this thread with pictures of it in real bricks instead of in digital screenshots. The bank should feature printed 1 x 1 letter tiles in various spots: the top of the building below the clock should say "1892" while just above the front door should be the word "BANK". Inside the building on the lower floor is the three teller windows and loan officers desk. The middle floor features three counting tables and tow vaults. (those vaults are the same as the one in set 10217, Diagon Alley) The upper floor features the bank manager's office with filing cabinets and three chairs. The rear of the building. This truck was inspired by Eurotrash and his own MOD of the set to be 7 wide. I didn't change it quite as much as him, but I did follow his lead in several spot, such as shortening the frame by 2 studs and getting rid of the ridiculously over-sized original wheels. The roof and front have been strengthened and a door added to the rear, as their was none before. One mini-figure can sit in the drivers seat. The LDD file for the both bank and truck is included in this link here. As usual, comments, questions and complaints are welcome.
-
 Hi guys! Another digital scale model! Alfa Romeo 33/3 from the early '70. This model is totally RC, with an XL motor for the traction, a servo for the steer, battery pack and IR receiver; fake V8 engine, indipendent suspension. The scale is +/- 1:8. If some of you want to build it, here it is the link with the LDD file: https://rebrickable.com/mocs/MOC-6980/zazavolley/alfa-romeo-33-3/ "The Alfa Romeo 33/3 made its debut in 1969 at the 12 Hours of Sebring. The engine was enlarged to 2998 cc (183ci) with 400 hp (298 kW), which put the 33/3 in the same class as the Porsche 908 and the Ferrari 312P. The chassis was now a monocoque. The new car did poorly at Sebring and Alfa did not take part in Le Mans after Lucien Bianchi's death in a practice session. The car took a couple of wins in smaller competitions but overall the 1969 season was not a successful one, and Alfa Romeo was placed seventh in the 1969 International Championship for Makes. In 1971 the Alfa Romeo racing effort was finally successful. Rolf Stommelen and Nanni Galli won their class at the 1000km Buenos Aires (followed by De Adamich and Pescarolo), before taking another class win (and second overall) at Sebring. De Adamich and Pescarolo later won outright at the 1000km Brands Hatch, a significant result against the "invincible" 917s. They then took a class win at Monza (where Alfa Romeo took the three podium slots in the prototype class) and another one at Spa. At the Targa Florio, Vaccarella and Hezemans won outright, followed by teammates De Adamich and Gijs Van Lennep. Hezemans and Vaccarella won their class at Zeltweg, and De Adamich and Ronnie Peterson won overall at Watkins Glen. Alfa Romeo finished the season second place in the championship. In 1972 the 5 litre Group 5 Sports Cars were banned and the 3 litre cars of Alfa Romeo, Ferrari and Matra, redesignated as Group 5 Sports Cars, competed together for outright victories." Wikipedia
 -
It`s Christmas Time and we all know that Santa will be super busy this Time of the Year. Sure,we all know that Christmas is about Traditions and so is Santa,but this Year he decided it`s Time to upgrade his Mode of Transportation.Thanks to Animal Right Activists he had to retire his Fleet of Reindeers and had to whip up a modern Sled Replacement that is still tricked out with all the Christmas Magic. Well and here it is,Santa`s new Truck. It is based on a Ford Model AA with Dual Axles and a large Truck Bed to have enough Rom for all the Presents. 20161203_120613 by Christian Weber, auf Flickr 20161203_120628 by Christian Weber, auf Flickr 20161203_120641 by Christian Weber, auf Flickr 20161203_120658 by Christian Weber, auf Flickr 20161203_120705 by Christian Weber, auf Flickr 20161203_120722 by Christian Weber, auf Flickr 20161203_120738 by Christian Weber, auf Flickr 20161203_120807 by Christian Weber, auf Flickr 20161203_120926 by Christian Weber, auf Flickr It started as a rough Idea on LDD and developed into this Model.The colorful Design is intentional and so i incorporated red and white as the main Colors but added small gold and green Touches to fit in the Christmas Theme. The Front End,the Cabin and the Truck Bed are all in different Width in Studs and so i connected each witch Technic Pins. I tried to put in some Details like an Engine,a Drive Shaft and some Exhausts so it doesn`t look too bland on the Underside. The Truckbed is loaded with various Gifts (mainly taken from Adventcalendars and similar Builds) and is decorated with Lightstrings and golden Chains. Without the Presents,the Part Count is at roughly 190 Pieces. I really hope you all like my newest MOC,feel free to leave a Comment... Happy 2nd Advent.
-
 I think it is about time for me to show what i have build for this contest. Please let me introduce the Volvo BM LM 620 front loader, a great old school front loader from the late seven tees. These pictures is only early wip, the entire machine is already finished. The rest will be uploaded as soon as possible... Plase feel free to comment and tell me what you think. Just added some more WIP pictures.. http://www.moc-pages.../moc.php/432762
 -
 Hello Everyone This is a pretty broad topic but I am looking for town (mostly vehicles, and construction sets along with small buildings), and also trains (12v and 9v era). If anyone has extras of these that they do not and have them at a REASONABLE price (I mean reasonable). Please either reply to this topic or preferably pm me. I am trying to build with older sets just because they are personally better looking and I am a collector of trains. Cheers, -RailCo
 -
Hello fellow Eurobrickers, I'd like to introduce my Lego Ideas project to you: https://ideas.lego.com/projects/155763 Meet The Fiat Bartoletti Race transporter from the fifties. This is definitely a car i would like to see in an official Legoset Your support is more than welcome ;-) Best Regards from Holland Startbrickingtoday (Michel)
-
This is my newest lego set i bought and filmed yesterday and tried some vintage to my video . Hope you guys like it .
-
 1:21Lego Forbidden Island 6270 Timelapse Review by JackyWackySmacky 7 views19 hours ago Classic 1989 Forbidden Island review. Hope you enjoy, and I will gladly accept any suggestions/constructive criticism.
 -
Year: 1990 Number of pieces: 183 Number of minifigs: 5 Price: 23$ Thanks for watching!
-
I know this is probably a long-shot, but I am very interested in buying a wooden LEGO duck toy like the one below. I would like to find one in very good condition, with most of the original paint and the LEGO decal. An example like the one below would be good for me. If you have one you would like to sell, or you know someone who might be able to help, please let me know. I'm looking for this duck because I recently purchased a photo from eBay that appears to show a child playing with the same exact pull-toy. (See 2nd picture.) It would be nice to have the actual duck to display along with it.
-
Fill 'er up! My latest build is a jump into the glory days of gas stations, when full service and free oil changes were the rule and the local station was a gathering place for neighbors. My brick-built gas station is inspired to the Shell one located in Tucson (Arizona) and it’s packed with every details you’d expect to find. It showcases an elegant Art Déco architecture completed with curved corners, a tower in the middle, a red outline all around the station and the inevitable Shell writing on top. The build is three in one: the diner on the left, the garage/workshop on the right and the fully-equipped store located in the middle of the building. A look at the back of the station reveals the three locations with many details and the different characters. Outside there are two period gas pump with a beautiful Lego shell on top under a curved canopy. All around you can find tanks, signs, tyres and other stuff. To complete the work I've built a red stepside pick-up truck, a tan Hot Rod and a reddish-brown roadster with some troubles (it's housed in the garage indeed). It was on my wishlist long since and finally I've found the time to built it as I had in my mind. I'm sorry for posting my gas station here with a little delay Thanks for stopping by. More pics and info: flickr
-
 Hey! Here I am with another little F1 car, this time from the 1985-1990 period. Its made of 450 parts, it does have steering and its aerodynamics are realistic. It was a lot of fun to build with all the SNOT. I hope you like it!
 -
Hi everyone You may have seen my MOC modular buildings on here recently, The Queen Bricktoria and Brick Square Post Office. For my new project I've decided to build something completely different. This is also my first ever entry as a Lego Ideas project. "A roaring fire and a full head of steam, the old traction engine is ready for work!" I have created a scene set some time during the early 20th century. Farmers are working in the fields with their steam traction engine, affectionately known as "The Old Workhorse". The model includes a detailed mini fig scale traction engine, a wagon and various other accessories and mini builds. THE TRACTION ENGINE The main feature of the model is the traction engine itself. I've used a classic green and red livery with polished brass lining and details. There are several interesting parts used to create this engine including paint roller handles and mini fig syringes used to create the piping around the boiler and inside the cab. A system of cogs ensures that the flywheel spins around as the traction engine is pushed forward. A detailed cab interior includes steering wheel, controls and a firebox door that can be opened and closed to reveal the burning fire inside. The front wheel axle can be pivoted left and right. THE WAGON I've also included a wagon/trailer that can be coupled to the back of the traction engine and used to carry the various accessories included with the model. The sides of the wagon can be dropped down to provide loading access for the mini figs. There is space at the front of the wagon to hold tools and mini fig accessories. MINIFIGURES & OTHER ACCESSORIES Included with the model are 2 mini figs, a dog, a rat and several mini builds including tree stumps, logs and rocks. These are all designed to be carried and towed in the wagon. THE FINISHED MODEL The overall model contains 480 pieces. Here is a shot of The Old Workhorse, steaming past the buildings in my MOC modular street. LEGO IDEAS As mentioned earlier this is my first entry as a Lego Ideas project. If you like what you see then I really would be so grateful if you could please support my project on Lego Ideas, and help The Old Workhorse to gather steam. https://ideas.lego.com/projects/2a2ec583-9836-4868-8dc7-6b3bb0a2fe80 Thank you very much for taking the time to read this and I hope you like the model. Feel free to let me know what you think. If you'd like to see more pictures, there are many more on my Flickr page. Edit: I've added a new brick built version of the model on page 2 of this topic.
-
Hi all! Recently I cooked up something unusual. What happens when you put together the new and the old? Pieces and ideas, that is? I have never owned any of the droids or even been into Space sets and whatnot, so wasn't infatuated with these three classic buggers until I picked them up very recently. I also own UFO droids, but those aren't as charismatic or distinctive. By combining mostly vintage Lego pieces and sneaking in a few new ones, I made a custom "VHS" trio complete with printed stands to resemble the CMF series. One thing to note: times have changed, and so has the trio's purpose... First: the white Exploriens Droid. Enemies will not be walking - heavy hammer does the talking! Second: Insectoids Droid. The menacing cannon's electromagnetic, the enemies better be very athletic! Third: Spyrius Droid. Tracking foes with recon bot, slashing them with plasma sword! That's it, folks! Weaponizing the trio was not my aim, but it just so happened that everything fell into place this way. Cheers, and comments are welcome!
-
A quick review of the 2002 LEGO Star Wars set "Final Duel II" (# 7201). This model features three minifigures: Luke Skywalker, an Imperial Officer, and a stormtrooper.
-
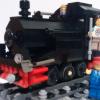
Black vintage car M20 building instructions Parts list
-
Dark red vintage car building instructions Parts list