Search the Community
Showing results for tags 'train'.
-
-Mini.thumb.jpg.03594ed3626ab4a4b625a32af4d03d5f.jpg) (Click to skip to the post with the latest photos) The Backstory: For years I've wanted to be able to display my 12v collection at shows/exhibitions/libraries or wherever, but the wiring is a challenge - I reckon on my last full layout there was 250 to 300 feet (75-90 metres) of the stuff, which on a static layout is one thing, but one built in modules for transport is a challenge. Three or four months ago I came up with a solution (more on that below) and the dreaming started. After much playing in Bluebrick, and nostalgic posts appearing here about older era trains, I settled on a plan. I still had a bunch of my old blue track from the 4.5v era, but no motors. Off we go to Bricklink then! The Layout So, here's the plan. Ten years ago I had a small portable layout on 4 modules, each 3x5 baseplates, and over the years have simply added more of these. Following my Bricklink spree, I now have 2 working 4.5v motors, so rebuilt the loco from set 183 and I have the loco from 7720 in progress. These 2 will feature on the 4.5v loop below, which is 3 of those modules. Next to the 4.5v loop will be the showpiece, the main 12v loops. 12v Lower by andyglascott, on Flickr And on the right of the layout will be the 9v loops. Unlike the other 2 eras, I will have 9v track left over, so this is likely to be expanded in due course, particularly as @michaelgale releases motors, power supply etc. 9v Loops by andyglascott, on Flickr Lastly, there will be another 12v loop, elevated, which will run across the back of all three eras. 12v Upper by andyglascott, on Flickr Putting all of those together looks like this (the white baseplates are roughly where the mountains, tunnels etc will be for the elevated sections. The green and grey sections are simply so I could keep track of where the 3x5 modules were to try and avoid having curves/points on more than one module. When it all comes together, in most likely a couple of years, I'll be able to run 6 trains at a time. Whole Layout by andyglascott, on Flickr The Beginning After all the planning, and clearing away of my last (incomplete) layout, I've finally started building the first module, part of the 4.5v loop. I decided to start here as this will be the quickest era to build, and to a large extent, each era can also be displayed as a stand-alone smaller layout. These three modules will be countryside/farmland, and the trains will reflect the farming side of it when they get built. Module 01 Pic 02 by andyglascott, on Flickr The 12v Wiring The solution that I've come up with is fairly simple, but does involve taking a drill to some baseplates.... At each of the 12v points or signals I'll drill a small hole through the baseplate and the wood for each module, thread the wire through and attach either the original Lego plugs or a quick connect/release plug/connector so that when the layout is set up I'll use already measured lengths of wire to go from that point to the control panels, which will be on their own module. This is going to be a heck of a journey, and build, I'll post updates from time to time, particularly at landmark moments such as completing an "era". I always said, growing up, I was keeping my Lego for my kids. It was really only an excuse, and I'm really glad I didn't sell my old blue track even though I didn't, for years, think I'd use it. Sadly my original 4.5v motors, battery boxes, lights and even signals are long gone, but I was only 7 or 8 when I got 7720....
(Click to skip to the post with the latest photos) The Backstory: For years I've wanted to be able to display my 12v collection at shows/exhibitions/libraries or wherever, but the wiring is a challenge - I reckon on my last full layout there was 250 to 300 feet (75-90 metres) of the stuff, which on a static layout is one thing, but one built in modules for transport is a challenge. Three or four months ago I came up with a solution (more on that below) and the dreaming started. After much playing in Bluebrick, and nostalgic posts appearing here about older era trains, I settled on a plan. I still had a bunch of my old blue track from the 4.5v era, but no motors. Off we go to Bricklink then! The Layout So, here's the plan. Ten years ago I had a small portable layout on 4 modules, each 3x5 baseplates, and over the years have simply added more of these. Following my Bricklink spree, I now have 2 working 4.5v motors, so rebuilt the loco from set 183 and I have the loco from 7720 in progress. These 2 will feature on the 4.5v loop below, which is 3 of those modules. Next to the 4.5v loop will be the showpiece, the main 12v loops. 12v Lower by andyglascott, on Flickr And on the right of the layout will be the 9v loops. Unlike the other 2 eras, I will have 9v track left over, so this is likely to be expanded in due course, particularly as @michaelgale releases motors, power supply etc. 9v Loops by andyglascott, on Flickr Lastly, there will be another 12v loop, elevated, which will run across the back of all three eras. 12v Upper by andyglascott, on Flickr Putting all of those together looks like this (the white baseplates are roughly where the mountains, tunnels etc will be for the elevated sections. The green and grey sections are simply so I could keep track of where the 3x5 modules were to try and avoid having curves/points on more than one module. When it all comes together, in most likely a couple of years, I'll be able to run 6 trains at a time. Whole Layout by andyglascott, on Flickr The Beginning After all the planning, and clearing away of my last (incomplete) layout, I've finally started building the first module, part of the 4.5v loop. I decided to start here as this will be the quickest era to build, and to a large extent, each era can also be displayed as a stand-alone smaller layout. These three modules will be countryside/farmland, and the trains will reflect the farming side of it when they get built. Module 01 Pic 02 by andyglascott, on Flickr The 12v Wiring The solution that I've come up with is fairly simple, but does involve taking a drill to some baseplates.... At each of the 12v points or signals I'll drill a small hole through the baseplate and the wood for each module, thread the wire through and attach either the original Lego plugs or a quick connect/release plug/connector so that when the layout is set up I'll use already measured lengths of wire to go from that point to the control panels, which will be on their own module. This is going to be a heck of a journey, and build, I'll post updates from time to time, particularly at landmark moments such as completing an "era". I always said, growing up, I was keeping my Lego for my kids. It was really only an excuse, and I'm really glad I didn't sell my old blue track even though I didn't, for years, think I'd use it. Sadly my original 4.5v motors, battery boxes, lights and even signals are long gone, but I was only 7 or 8 when I got 7720.... -
Hi everyone, I present to you my second version of the Renfe S-130 like Ferro-Friki did some time ago. I wanted to remake this train that I made first in 2018 with not the best result so I now made this version in 7 studs. LEGO Renfe S-130 DEF [MOC] by Imanol, en Flickr The set is heavily detailed even in the rear of the power cars and end cars LEGO Renfe S-130 Testeros Interiores [MOC] by Imanol, en Flickr I have made a reduced train set of only 7 cars instead of the 11 that has in real life but it has one of each of the different cars that form the real train with detailed interiors. First the "Preferente" end and "Preferente" LEGO Renfe S-130 Lateral Extremo Preferente [MOC] by Imanol, en Flickr LEGO Renfe S-130 Lateral Preferente [MOC] by Imanol, en Flickr The interiors of "Preferente" cars LEGO Renfe S-130 Interior Preferente [MOC] by Imanol, en Flickr The "Preferente" adapted car and it´s interior LEGO Renfe S-130 Lateral Preferente PMR [MOC] by Imanol, en Flickr LEGO Renfe S-130 Interior Preferente PMR [MOC] by Imanol, en Flickr The cafe car and it´s interior LEGO Renfe S-130 Lateral Cafeteria [MOC] by Imanol, en Flickr LEGO Renfe S-130 Interior cafeteria [MOC] by Imanol, en Flickr And the Turista cars which are the same as preferente but with 2+2 seating arrangement LEGO Renfe S-130 Lateral Remolques Turista [MOC] by Imanol, en Flickr LEGO Renfe S-130 Lateral Remolques Turista [MOC] by Imanol, en Flickr And now that I presented it I want to ask for help to build it as it will be my first lego train in real life. The car coupling mechanism that I have installed is only for aesthetical purposes and will not work in real life. Another problem is that i have seen many models in which all of the rear of the locomotive or power car pivots and I don´t know if it could be necesary to do in this case. Lastly I want to know how to motorize it, being so long I would suppose I would need the two power cars to provide power but I don´t know. Anyway, I hope you enjoy this project as much as I enjoyed designing it
-
Hi there! This is my debut publication and let me present to you this Swiss Electric Locomotive, reproduced as faithfully as possible from the SBB Be 4/6 locomotive. This is a minifig-scale model. The model has a removable roof. Inside the model are: two electric motors, transformer, tools (4 pieces), compressor (x2) and a tool suitcase. The set includes a figure of a train driver with a briefcase: Inside the cab Front view New design of pantograph - first variant: ... and second variant: The first variant is not pretty enough, but it allows the pantograph to fold. The second variant is more elegant and plausible, but does not allow the pantograph to fully add up. This model can be motorized with the 1x 8809 and 2 x88013 Powered Up kit. Model info: Length: 50 cm (45 studs), Width: 9 cm (6/7 studs). Total parts: 1140. If you like this model, you can support it on LEGO IDEAS Thank you for your attention! I hope you enjoy this locomotive!
.thumb.jpg.2591aed2a8c1883a12eab08e25d2d586.jpg)
-
Presenting another of my Danish State Railways’ (DSB) trains redesigned to 8-wide and digitally rendered (with a bonus livery)... DSB IC3 The Danish State Railways’ (DSB) highly successful and innovative InterCity 3 aka IC3 passenger train was co-developed by Siemens -Duewag in Germany and ABB Scandia in Denmark. The train is operated by DSB in Denmark and Sweden, by Renfe Operadora in Spain and by Israel Railways in Israel. Amtrak in the USA and Via Rail in Canada have tested the train in the past. A trainset consists of three units; two diesel motor units (Litra MFA and Litra MFB) and one intermediary unit (Litra FF). Up to five trainsets can be coupled together. 96 trainset were built for DSB from 1989 to 1991. All are still in service today. My model: Original white and red livery used from 1989 to 2002. Fictionally named “Jørgen Vig” with the crest of Billund added. Scale: 1:48 Length: 157 studs (MFA: 55 – FF: 47 – MFB 55) or approx. 122 cm Width: 8 studs Bricks: 2.948 (MFA: 1.040 – FF: 861 – MFB 1.047) Locomotion: 2 x 9v or 2 x PF/PUP train motors Power: 9v, 2 x LEGO AAA battery boxes or 2 x BuWizz battery boxes Control: 9v, PUP, SBrick, PFx Brick or BuWizz Designed: 2022 Conversion of my 7-wide model from 2017 to 8-wide with more accurate dimensions. Very high setting render from Stud.io with custom decals added in the PartDesigner tool. Its able to navigate R40 but looks rather silly doing so: Interior with seats for 83 minifigs: Decorative side design for the bogies - a combination of parts and the molded decorative side for train motors: The coupling part can be change to a Liftarm Thin 1x7 (BL#32065) when combining several trainsets. Technique used for the sliding doors: Removing the 1 x 4 Tile as shown enables the door to slide open as a play feature. The fixed outer doors are a necessary part of the construction otherwise the very long body breaks too easily due to the roof being removable. However, they are designed to be rebuilt open when needed and the trainset stationary on display: The trainset is (fictionally) named Jørgen Vig with the crest of Billund added: Free building instructions: Option 1: https://open-l-gauge.eu/dsb-ic3/ Option 2: https://snakebyte.dk/lego/instructions/trains/diesel_engines/dsb_ic3_(8_wide)/index.php Bonus livery: Livery when Amtrak tested the IC3 Flexliner DMU (Diesel Multiple Unit ) in 1997:
-
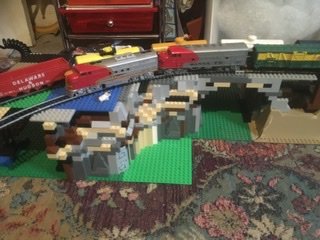
 Nine small 1950s freight cars of seven designs. Each was built to a length of about 16-18 studs per car with two bogies per vehicle. (Originally they had just two fixed axles when originally built, but this was recently fixed to be more prototypical for American freight cars.) The whole train going into a tunnel. These freight cars are (Left to Right): - cattle car - boxcars (x2) - flatcar with bulldozer load - Octan petroleum tankers (x2) - flatcar with load of rails - bathtub gondola with coal load - caboose This livestock car was heavily inspired by the one in 2014 CITY set 60052 but with a roof for more realism. I can now understand why LEGO left it open top in the set, but I managed to make it work. The roof (which was designed with the same look as the boxcars) is even removable and the ramps fold down so you can take out the cow. These two identical boxcars were inspired by set 7597 from the 2010 Toy Story 3 line. They were expanded in length and had the roof trapdoor removed. Here we see a small 1950s-looking bulldozer on a flatcar. The construction equipment was inspired by CITY set 60140, except in yellow with 46 technic links as the caterpillar tracks instead of red with rubber one-piece tracks. Other things such as headlights and gears (for the treads) were added, and the blade was shortened in width by two studs. These two oil tanker cars came from my own imagination, and are made in Octan livery. This is an older MOC of a flatcar loaded with rails updated to have bogies instead of two fixed wheels. This bathtub gondola with a load of coal is entirely my own design. This caboose model is slightly inspired build-wise by the Katy Caboose (as in, "The Caboose who got Loose" from the children's book) model I copied in late 2021 from @zephyr1934's MOC. Thoughts? EDIT: Post updated 12/14/25 with two new freight cars and revised first picture - bathtub gondola and flat car with rail load are now added!
 -
The Frisco 1522 loco is a 1926 oil burning 4-8-2 "Mountain" type, (4 leading, 8 drivers, 2 trailing) that was made surplus in 1951, donated to the Museum of Transportation (in St. Louis, Missouri) in 1959, and restored to working order in 1988 by the St. Louis Steam Train Association (SLSTA) for it's excursion career. It's new lease on life lasted until 2002 when rising insurance costs made the engine enter it's second retirement, which will be probably be forever. When the engine was running in it's second career, the SLSTA had four train cars (one of these MOC's is a fictional fifth car to beef up the train's length) in it's excursion support role. They carried parts, tools, merchandise to sell, and crew members not on duty. After re-retirement of the 1522, most of the cars were eventually sold to Milwaukee Road 261 organization and were renamed and repainted into a different paint scheme more suited to that group. This may not be the best interpretation of the Frisco 1522, but it seems to be the one of the few I've seen built out of Lego. The model you see here has been my dream ever since I was 5 or six years old and rode behind the steamer on one of it's last public trips. (I don't remember much of the trip, but I do remember the sense of awe and respect for the power of steam after seeing the loco pull past us on it's journey back to the museum and into what looks to be permanent retirement.) The rear of the (newly remade in 7 wide) locomotive. The cab walls on both model and real engine have the name of the railroad (Frisco) on it's side, while the number of the loco (1522) is on the tender sides. Inside the cab. I chose the classic printed slope with the knobs and gauges seen here a throwback to my first train MOC from the early 2000's. One half of this baggage car (named 'Black Gold' after a train the 1522 used to pull) housed tools, spare parts, lubricants and a fire hose or getting water for the loco, among many other things. The other half (usually closest to the engine) had the souvenir shop with shelves and tables for fundraising merchandise selling. The car is now repainted and named 'Golden Valley'. It has been used with Milwaukee Road 261. The 'Firefly' was the crew car. It was also named after a train the 1522 used to pull. The car has been sold to be used with Milwaukee Road 261. It sits in storage currently. This coach is NOT based on any SLSTA car. It was added to the train to beef it up to normal amount of five passenger cars. It is named 'Meteor' after an actual Frisco train like the others just to look accurate. The diner-lounge 'Chouteau Club' wasn't owned by the St. Louis Steam Train Association (SLSTA), but by a private individual who was a member of the club. It now is stored / owned by Illinois Transit Assembly in Madison, Illinois, sidelined by side sill rust. The 'Bluebonnet' was a business car and brought up the rear of the train. It was also named after a train the 1522 used to pull. The car has been sold to be used with Milwaukee Road 261. It has been renamed back to it's first name of 'Milwaukee' and repainted into the proper colors for that railroad. The real engine is publicly displayed at the Museum of Transportation in St. Louis, Missouri. The Lego model of the loco is sitting on the front of the loco, just above the cowcatcher. This official Frisco 1522 website gave me invaluable info and pictures of the excursion cars and the loco itself. This page in particular was very helpful in getting the window amount / spacing / 'look' of the excursion cars right. NOTE: Yes, I had a thread made in 2016 for the loco only. That thread was last updated in 2017, and I didn't want to mess with the moderators by bumping it. Thus, this new thread was created. I hope that was ok! EDIT: 11/26/25: Revised real world photos added with fifth passenger car and remade 7-wide steam loco + tender.
-
It has been a long time goal of mine to build this beautiful train with LEGO. After working on it for a long time, I have finally finished it. To see 70+ pictures and a detailed tour, please see Via Rail Canada - The Canadian I'd love to hear any feedback, comments, questions, or criticisms. It's a big set, so let's tackle it one car at a time. :) If you like it, please support on LEGO Ideas if you believe it would make a great official set.
-
 Hello everybody, I am glad to introduce you my last big project : a pneumatic steam locomotive ! I think it's one of the firsts pneumatic locomotives, using only Lego parts. First of all, the YouTube video and some photos: The idea with this model is to replace the steam of a real Locomotive by compressed air, and this for as much functions as possible. Here are the main functions : Movement of the train : Using 4 pistons, 2 on the sides, and 2 inside, the train can move forward. It works like a classic LPE, with 2 pistons shifted 90° from the others. 4 pistons consume a lot of air, but they guarantee enough power to move the whole train. To make the rotation smooth, a free wheel is hidden inside the boiler part of the locomotive. Its rotation is 25 times faster than the wheels of the train (40t/8t x2). The train isn't moving very fast because the pneumatic elements aren't modified. However, it's fast enough to make it interesting to look at the connecting rods and wheels moving. The breaks : On a real locomotive, compressed air is produced by a compressor (powered by steam) and is used to press some brake shoes against the wheels. Here, the same technique is used : a small piston is filled with compressed air, and thanks to some rods, brakes shoes are pressed against the wheels. It's cool but...it's not enough. Plastic against plastic isn't very efficient to stop the train's movement. Therefore, another rod is connected to the brake system and press another brake shoe against the free wheel. Because its rotation is faster (and therefore, with a low torque), it's is way easier to stop it. The Whistle : A system that I love in this locomotive is the whistle. Currently there isn't any whistle produced by Lego that could be used in the locomotive, so I had to think a little for finding something working. This whistle is activated by a switch in the cabin. The Cabin : Nothing much to say except that in contains 3 switches for the 3 main functions (whistle, wheel movement and brakes). There is also a pressure gauge showing the pressure coming from pumps. The train moves with a minimum of 1 bar. A 2-2.5 bars, the movement is faster. The air supply : There are several possibilities for the train : we can directly pump with Lego pumps, or store the air into 6 to 8 airtanks or produce the air with Lego motors and small pumps. For instance I use 4 pumps side by side, linked to some air tanks, but I don't what the final model should work. Maybe some motors and pumps could be cool ? The design : The hard part was to make the boiler of the locomotive. It's a little hard to make cylinders with Lego technic parts but, with flex axles passing through Technic beams, I managed to make something satisfying. Some details are visible on the locomotive, I tried to make it look a little crowded like a real locomotive with fake air/sand tanks, fake compressors and mechanical elements. It's probably possible to make it look better, but for instance I am happy with it. The rails are "homemade" with Lego bricks. The locomotive is too big of course to work on Lego railtracks. The wheels aren't perfectly flat so the train is "blocked" in position inside the rails. Therefore, the train can move foward cur cannot go out of the railtracks (which is great for a train). Finally, as a bonus functions, there are some bumpers at the front and back of the locomotive to imitate the real bumpers used to absorb small chocs on a Locomotive. That's it for now, I hope the model is interesting to you and if that's the case, don't hesitate to support it on Lego Ideas ! Click Here to support :) If you have any question or comment, please reply to the post, I'll be glad to discuss with you !
 -
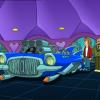
Hello everyone on eurobricks.com! I honestly don't remember if I already registered here and posted this. :) If so, please notice me. Want to start with this old work, I made one day on vacation some years ago. Skull was based on slightly modified creation by "Choking Hazards" and train base was modified Maersk train base if I remember correctly. The rest is straight from my sick mind. :) Train is PF-motorised, with lights (particularly in skull's eyes). Other pictures under
-
 Here is my other Via Rail train, The Corridor. To see more pictures, please see Via Rail Canada - The Corridor. I'd love to hear any feedback, comments, questions, or criticisms. It's a big set, so let's tackle it one car at a time. :) If you like it, please support on LEGO Ideas if you believe it would make a great official set.
 -
My Version of a Siemens Taurus, the paint scheme is based on the "Wiener Lokalbahnen". I based the Front on the excellent design by Flickr user Thomas Nessler, albeit adapting it to a 6-wide version. Siemens Taurus by Henrik S, auf Flickr Siemens Taurus by Henrik S, auf Flickr
-
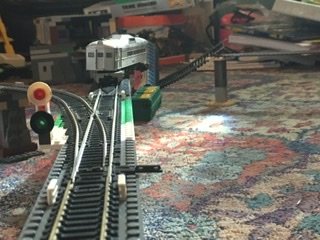
This weekend I challenged myself to upgrade a 9 volt train motor with powered up functionality. The result can be seen in the attached pics. I discovered that the train motor only needs 2 wires connected to the hub to actually run , only the 2 PWM signal wires. , or pin 1 and 2 on the connector. This enabled me to used the other 4 wires for power transfer from the wheels to a bridge rectifier and a 7809 voltage regulator before feeding it back into the hub. The track is powered from the switch port of the 12 V speed regulator. which puts out 16 volt.
-
Hello im looking into designing a custom pull-back or clockwork motor for a LEGO Armoured train that I plan on building. The front unit is going to be articulated to the rest of the train using hinge pieces and similar to Talgo rolling stock. The only issue is building the custom motor to power the train. Where on the train should the motor be built at? And what gear ratios should I use to make it work? important things to note is that I don’t have proper train wheels and I use certain technic pieces that work on the tracks, so the cars ride a little lower than regular trains would Also, I believe that Custom Rail Vehicles was a term I created for this topic, if I’m wrong, tell me please
-
Here is my armoured locomotive, Eternal Night. She is built to haul the White Lion Railways leaders private train, Eternity. She is capable of operating in space as well. both turrets rotate 360 degrees and fire. The plow is pretty strong and can take out some strong magnetics toys connected together with no damage . She is able to take curves quite well as well.
-
Does anyone ever combine their LEGO bricks with scale electric trains? I’ve found them to be compatible for track structures for 1/87th scale systems as well as structures such as elevated rail stations and bridges I’ve also used Legos as the base for a moc up of a section of track in Columbus, Ohio where a derailment occurred back In 2012 for something I was doing
-
The whole Merrimac River Runner passenger train, headed up by Baldwin RF-16 "shark-nose" A +B diesels number 3701 with assistance provided by 4-8-4 "Northern" steam engine number 2980. The name of this train is a play off the Missouri River Runner, a real train that Amtrak runs from Kansas City to St. Louis. The Meramec River is a body of water that runs next to the real world 12-inch gauge Wabash Frisco & Pacific, so I switched the name to the Meramec River Runner. Never mind the fact the Missouri Pacific used to run on the roadbed the WFP now uses up from the 1850's until about the 1940's, when it was rerouted to it's current alignment and abandoned the old one to the eventual WFP use from the late '50's to today. These Baldwin diesel RF-16-like locos were inspired by set 10020, (Santa Fe Super Chief) for most of the basic body work and and fellow Eurobricks user @Legownz for the knife-like Sharknose front end. (Thank you for that ingenious design!) The cab and booster units feature no interior details because I have no need for such items on my layout.. that and retrofitting all my trains with inside details would be quite costly. The rear of each of the locos feature doorways to the next engine compartment, and / or the passenger train itself. This 7-wide steam loco began life as a 2-8-4 Berkshire type built by @Plastic_Goth and purchased from Rebrickable a seen here. I upped the wheel count by another leading axle, making it into a 4-8-4 Northern-type from the original 2-8-4 Berkshire. The pistons are entirely my own work, as is the complete tender. The coal tender will have the letters WFP on the side, standing for Wabash Frisco & Pacific, while the cab will feature the number 2980 on both sides. This is a scrambled homage to real world WFP 4-8-2 engine 928, which is so strong, it's pulled every piece of rolling stock the railroad owns -at one time- with ease! The inside of the cab features two gauges and the firebox door. This is all the interior the whole train features. Combination baggage and passenger car three identical passenger coaches for the train The observation car of the Meramec River Runner. (This car is to become fully enclosed soon, with a wraparound rear window provided by two of this piece.) Any thoughts, comments, or complaints? EDIT 5/11/21: Added 4-8-4 steam loco to this post. Real life pictures coming soon.
-
Hello does anyone have any advice on designing armoured trains that can operate at high speeds or are built to launch ICBMs? I’m trying to think of the next MOC I should do regarding armoured rail vehicles
-
Would it be possible to design a cable propelled rail system such as a funicular railway or a system such as the BART Oakland Airport Connector using LEGOs? Has anyone had success in doing so? Also included are the cable cars of San Francisco as long as they are moved by a cable. could the roller coaster tracks work for a more modern cable system?
-
What if Lego created a line of road baseplates with train tracks embedded in them? What type of sections would everyone like to see? the ones I can think of now are: single track: straight segments curve segments Junctions crossings slopes. Double track: straight segments curve segments junction segments crossover segments crossings slopes. general: sections where track is are either red or green in color for public transport only sections where track is are same as rest of street for mixed traffic Sections where there is interlaced track should be included such as special points and other areas for such track there should also be areas where the tracks transition to normal LEGO rails as well
-
This moc is of an armoured locomotive I built at one point its based off of the train from Kabaneri of the iron fortress in design and it’s turrets do rotate and fire
-
Hello, all! Today I bring you my latest creation, a 4-8-2 mountain type based off of Frisco's 1500 class. I have been able to fall more in love with Frisco locomotives as I've been helping take part in cosmetically restore the Frisco 1501 located in Rolla, Missouri. Not only that, but my great grandfather was one of the engineers of the 1501 before it was retired. Some history of the locomotive: “Steam locomotive 1501 was once part of a proud stable of thirty such engines on the Frisco Railway system. Built in 1923, the handsome modern machine was the pride of the fleet until dieselization of the system in the late 1940s. The 1501 was part of an initial order for fifteen locomotives placed with the Baldwin Locomotive Works in Eddystone, Pennsylvania in 1923. The order was the Frisco's response to delays in passenger service due to the tortuous Ozark territory west of St. Louis. The oil-buring locomotives were a type nicknamed "Mountain", which has a wheel arrangement of four lead or pilot wheels, eight driving wheels, and two trailing wheels under the cab (4-8-2).” Down below you can see the progress of the locomotive from the very beginning. I decided to update this as to help show the final product.
-
Hello Lego train fans, (I repost here the work I have done on a pneumatic locomotive. I really don't know where to post since my MOC belongs to Technic category and Train category. So I post it here too. Of course here maybe we can talk more about the design and reproduction of the details of the locomotive. If this other post is too much, I am sorry that I posted in two places (and moderators could remove it), but I think it's understandable why I did this. Anyways !) I am glad to introduce you my last big project : a pneumatic steam locomotive ! I think it's one of the firsts pneumatic locomotives, using only Lego parts. I love trains as much as you do on this forum probably, so I hope some steam lovers will enjoy the model ;) The model is based on a Mikado type locomotive, from the mid 20th century. It especially copy the design of 141R french locomotives (even they were apparently built in USA, for France). First of all, the YouTube video and some photos: The idea with this model is to replace the steam of a real Locomotive by compressed air, and this for as much functions as possible. Here are the main functions : Movement of the train : Using 4 pistons, 2 on the sides, and 2 inside, the train can move forward. It works like a classic LPE, with 2 pistons shifted 90° from the others. 4 pistons consume a lot of air, but they guarantee enough power to move the whole train. To make the rotation smooth, a free wheel is hidden inside the boiler part of the locomotive. Its rotation is 25 times faster than the wheels of the train (40t/8t x2). The train isn't moving very fast because the pneumatic elements aren't modified. However, it's fast enough to make it interesting to look at the connecting rods and wheels moving. The breaks : On a real locomotive, compressed air is produced by a compressor (powered by steam) and is used to press some brake shoes against the wheels. Here, the same technique is used : a small piston is filled with compressed air, and thanks to some rods, brakes shoes are pressed against the wheels. It's cool but...it's not enough. Plastic against plastic isn't very efficient to stop the train's movement. Therefore, another rod is connected to the brake system and press another brake shoe against the free wheel. Because its rotation is faster (and therefore, with a low torque), it's is way easier to stop it. The Whistle : A system that I love in this locomotive is the whistle. Currently there isn't any whistle produced by Lego that could be used in the locomotive, so I had to think a little for finding something working. I can give you more details if you want but I used some lego parts that are empty inside and have a small aperture. By blowing air on these parts, we can produce a noise that is a little similar to a whistle noise. This whistle is activated by a switch in the cabin. The Cabin : Nothing much to say except that in contains 3 switches for the 3 main functions (whistle, wheel movement and brakes). There is also a pressure gauge showing the pressure coming from pumps. The train moves with a minimum of 1 bar. A 2-2.5 bars, the movement is faster. The air supply : There are several possibilities for the train : we can directly pump with Lego pumps, or store the air into 6 to 8 airtanks or produce the air with Lego motors and small pumps. For instance I use 4 pumps side by side, linked to some air tanks, but I don't what the final model should work. Maybe some motors and pumps could be cool ? The design : The hard part was to make the boiler of the locomotive. It's a little hard to make cylinders with Lego technic parts but, with flex axles passing through Technic beams, I managed to make something satisfying. Some details are visible on the locomotive, I tried to make it look a little crowded like a real locomotive with fake air/sand tanks, fake compressors and mechanical elements. It's probably possible to make it look better, but for instance I am happy with it. The rails are "homemade" with Lego bricks. The locomotive is too big of course to work on Lego railtracks. The wheels aren't perfectly flat so the train is "blocked" in position inside the rails. Therefore, the train can move foward cur cannot go out of the railtracks (which is great for a train). Finally, as a bonus functions, there are some bumpers at the front and back of the locomotive to imitate the real bumpers used to absorb small chocs on a Locomotive. That's it for now, I hope the model is interesting to you and if that's the case, don't hesitate to support it on Lego Ideas ! Click here to support on Lego Ideas If you have any question or comment, please reply to the post, I'll be glad to discuss with you !
-
I have for a long time, wanted to share some pictures from my LEGO city/train layout, but as you all know, a LEGO city is never completely finished, so now I choose to share anyway. The project started in 2015 where I found interest for LEGO again as an AFOL, and started collecting trains, primarily 9V. Over time I have been able to make this layout. There are still things missing in the city, empty building space next to the gas station, and the Modular houses must also be changed to custom buildings at some point. I am also still missing to finish the harbor area, but it will probably come later I don't know if the windturbine should stand there, but for now it does. 1 by SpinX125, on Flickr 2 by SpinX125, on Flickr 3 by SpinX125, on Flickr 4 by SpinX125, on Flickr 5 by SpinX125, on Flickr 6 by SpinX125, on Flickr 7 by SpinX125, on Flickr 8 by SpinX125, on Flickr 9 by SpinX125, on Flickr 10 by SpinX125, on Flickr 11 by SpinX125, on Flickr 12 by SpinX125, on Flickr 13 by SpinX125, on Flickr 14 by SpinX125, on Flickr More pictures: https://www.flickr.com/photos/137767198@N08/albums/72157713834197663 In some areas I have found inspiration from other builders and therefore credit must be given to them. Inspiration found at: Roundhouse and turntable - Rasmus Fachmann / Byggepladen https://www.flickr.com/photos/fachmann/ DSB trains and wagons - Dennis Tomsen / Byggepladen https://www.flickr.com/photos/93468412@N08 Instructions for DSB trains and wagons - Knud Albrechtsen / Byggepladen http://www.snakebyte.dk/lego/instructions/trains/index.php Container crane at the harbor - JANGBRiCKS / Youtube https://www.youtube.com/watch?v=Ey26n7V-uOU Container Ship - JANGBRiCKS / Youtube https://www.youtube.com/watch?v=rXzuxsVGA3M
-
This is my LEGO version of the Kyushu Line JR800 Shinkansen, made of 5.959 pieces, having a length of 2,74m (9ft) and weights 4,302kg (9.484 pounds) in total and is my first train MOC. The 800 Series, designed by Mr. Eiji Mitooka, is considered the only "Japanese" shinkansen as it's concept represents the beauty of Japanese arts and crafts, and has two engines and four wagons. The train went in service in 2009 and is considered the second fastest of the 3 JR Kyushu types of Shinkansen services (the rest are Mizuho and Tsubame, from the fastest to slowest). Update 09.05.22 (The Previous Content can be found within the hidden content area, at the bottom of this post) You can find more pictures on my FlickR and enjoy it on the following video;
-
Hello fellow EB members Here I have made a Tearoom which has been converted from a former signal box and railway carriage still moored at the station platform. A flimsy excuse to make a railway carriage which has been on my to do list for quite some time. Tearooms and very popular and common in the UK and you can get more than just tea! Anyway a few pics and the link to flickr; The usual link to flickr: here Enjoy!

.jpg.0f1e2a30948a73b2270ce858547d25e3.jpg)