Search the Community
Showing results for tags 'mclaren'.
-
Well, well... It's almost half of the 2025! This year's Speed Champions was amazing! All F1 cars, F&F and also amazing summer's release! Just whoa! Let's start discussion about 2026 cars!
-
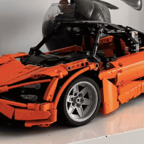
 I know it’s a bit early But while we wait for the set to be released… I don’t like the cylinder parts much anymore, so I intend to modify the engine. Judging from the photos we’ve seen, the engine is connected through the two connector blocks and apparently nowhere else. I’ve tried to make a new engine of the same size but of the kind I prefer, and with an attempt at a fake split turbo. Assuming there is a bit of space above where one connector block would be, the spinning ‘compressor wheel’ would be visible from the slot in the bodywork. Depending on the clearance beneath the engine, there’s a geared solution that would make the ‘compressor’ spin faster, and a rubber band solution that takes up less space. How bad it it? Suggestions?
 -
 Hello everyone, I want to introduce the new project I have been working on for about the past month, a manual 1:10 scale McLaren MP4-12C Spider. I plan for the finished model to be white, but I do not have most of my collection with me in lockdown so there are a lot of working colors still. The features will be: -Independent suspension -Steering with HOG and working steering wheel -Fake V8 engine connected through rear wheels -Butterfly doors -Convertible roof -Raised and lowered rear wing I am attempting to make a semi-modular chassis. Removing 8 pins and 2 axles allows the cabin + roof mechanism to detach from the rolling chassis. Convertible roof: This is only the folding roof and does not include the deck lid yet. Roof mechanism Butterfly doors: The doors are operated through the same HOG as the steering by utilizing a distribution-type gearbox ahead of the front axle. Butterfly doors I would appreciate people's opinions on whether this gearbox function is worthwhile keeping, or should I simply run the doors to individual gears that will be located under the hood. Using the transmission gears does introduce significant backlash into the system, but I do like the simplicity of one external gear for all three functions, which was the original goal. Additionally do people have ideas on where the best place is to put the control gear for the roof? Somewhere on the rear of the car? If I remove the gearbox at the front I would probably be able to place that gear under the hood as well. I have also gone back and forth on the door design. I'm very happy with the function and range of motion, but the looks don't really match the real car yet so that might require some further work. Other comments and questions are always appreciated too! Thanks!
 -
Hi all, Here is my mod of 75892 so that its 8 studs wide. I think it definitely looks better like this compare to the set. Here are some pictures! I couldn't figure out how to attach the window piece so I left it out, and there are supposed to be 1 x 1 tiles as rear view mirrors. I hope you like it! Now on rebrickable: https://rebrickable.com/mocs/MOC-30930/Commander_Cody/mclaren-senna-8-wide-mod/#comments
-
Hello, feel the speed! It is my own hypercar concept inspired by real hyper and supercars. It is a 6 studs wide, studless model built from standard LEGO elements. The overall size is similar to the Speed Champions sets, but the wheels are from City sets as I wanted to keep the height to length ratio closer to the real sports cars. It can be combined with my other MOC Hybrid Truck which will be available on LEGO IDEAS soon too. If you like this car, please share and support the it on LEGO IDEAS: https://ideas.lego.com/projects/44e6dbbf-734f-4b38-84c7-2075b09495bb Many thanks! LEGO Hypercar concept1-02 by László Torma, on Flickr LEGO Hypercar concept1-01 by László Torma, on Flickr LEGO Hypercar concept1-03 by László Torma, on Flickr
-
[MOC] Formula 1 (Lego McLaren Senna 75892) Lego McLaren Senna 75892 MOC - Formula 1
-
This is my first try at making a tread and posting pictures, so I hope I do it right. It all started with me making a very oldschool 2015 Sauber car out of ancient lego I found in a tray in the basement. 20190310_161317 by Martin Hansen, on Flickr Later lego started making real versions of F1 cars and I remade my 2015 Sauber. 20190310_161340 by Martin Hansen, on Flickr 20190310_161434 by Martin Hansen, on Flickr Then during the 2018 season I started making all of the teams cars and I finally finished the project, right in time for the 2019 season to begin next week The cars were made with parts available to me and might not be the perfect match, but they are good enough for me. All 10 cars 20190310_161801 by Martin Hansen, on Flickr Mecedes. I made some changes mainly removing some green, which I feel are not "of the right shade" url=https://flic.kr/p/24vFQut][/url]20190310_161821 by Martin Hansen, on Flickr 20190310_161842 by Martin Hansen, on Flickr Ferrari. Is the official one, I think. 20190310_161900 by Martin Hansen, on Flickr 20190310_161913 by Martin Hansen, on Flickr Red bull 20190310_161944 by Martin Hansen, on Flickr 20190310_161957 by Martin Hansen, on Flickr Renault 20190310_162054 by Martin Hansen, on Flickr 20190310_162104 by Martin Hansen, on Flickr Haas 20190310_162117 by Martin Hansen, on Flickr 20190310_162126 by Martin Hansen, on Flickr Mclaren 20190310_162525 by Martin Hansen, on Flickr 20190310_162536 by Martin Hansen, on Flickr Force India 20190310_162756 by Martin Hansen, on Flickr 20190310_162810 by Martin Hansen, on Flickr Sauber 20190310_162819 by Martin Hansen, on Flickr 20190310_162831 by Martin Hansen, on Flickr Toro rosso 20190310_162851 by Martin Hansen, on Flickr 20190310_162910 by Martin Hansen, on Flickr Williams 20190310_162920 by Martin Hansen, on Flickr 20190310_162928 by Martin Hansen, on Flickr On the grid. 20190310_162039 by Martin Hansen, on Flickr 20190310_162617 by Martin Hansen, on Flickr 20190310_163022 by Martin Hansen, on Flickr All of them 20190310_163203 by Martin Hansen, on Flickr Some cars are a bit dusty, it was a long season and some was done way before others. I hope you will enjoy them.
-
I looked at the McLaren F1 model and the pilot figurine for a long time and still couldn't come to terms with their size :) Since it is not possible to enlarge the figure, we had to make the car smaller :) Since I disassembled the official model, I modeled two cars in the Studio for before/after comparison. A couple more photos with stickers How do you like the idea and execution? :)
-
 Hello everyone, now in 2025, Chevrolet expands the iconic Corvette C8 family with the brand-new ZR1 including the most powerful V8 for a street-legal series car ever produced by a car-manufacturer. I decided to bring those 1064 raw American Horsepower in a new 1:8 scale Supercar to you. This ZR1 is made with 3646 pieces only from the inventory of the set 42172 McLaren P1 as a pure B-model. Additional parts outside the set are not required to build and play. Let's see it from all angles: Summary of Functions & Features included independent suspension in front and back steering with working custom-built steering wheel openable doors with locking system openable engine-cover removeable rear-section openable trunk with overnight-bag V8-Engine with moving pistons sequential 7+N speed transmission gearbox new stepper-mechanism for switching gears implemented limiter for gear positions in the stepper open windows in bottom to view gears and stepper detailed interior and design modular building with separate premium PDF-files fits all Supercars in 1:8 scale measures (all parts closed) 57.8cm x 26.5cm x 15cm Impressions from the Renderfarm Impressions from Somewhere V8-Engine & Gearbox With the ZR1, Chevrolet brings back the iconic splitted rear-window that is fairly replicated in the model. The rear covers the V8-Engine with moving pistons and a sequential transmission gearbox with shifter-drums that can be watched working through the window. The replica of the V8 is connected through the gearbox directly to the rear differential. The ZR1 also implements a transmission gearbox with 7 different speeds and a neutral position. The higher a gear is selected, the lower and smoother the pistons of the V8 are running. Different speeds of the gearbox are noticeable when driving the car around. The engine-cover with the splitted rear-window is openable to catch a better view to the V8 and the sequential 7+N speed transmission gearbox. Once the cover has been opened, the rear-section is completely removeable to allow a clean view inside the back of the model to marvel at all of the technical aspects. Gear-Shifter & Limiter With respect to the given inventory I developed a new stepper mechanism for shifting gears using the new 8T stepper gears. This mechanism is placed inside the middle console of the car and can be activated with just a tap of your finger. The stepper is able to sequential shift through 7 different speeds (+neutral) in the gearbox. Moving the stepper upwards shifts the gears down (from 7 over 1 to N). Moving the stepper downwards shifts the gears up (from N over 1 to 7). The stepper mechanism implements a built-in limiter above the 7th gear and below the neutral position. Those limiter prevents the gears from overfloating and stops the movement of the shifter-drums in the gearbox. With this limitations the different gear positions are countable to always know which gear is actually selected in the model. It's a bit hard to explain though, let's see this stepper mechanism in action: Openable Doors Both doors of the model can be opened to get access inside the cockpit. For both doors there is a locking-system with rubber-bands implemented that let the doors snaps-in automatically and hold them in closed position. More Model Details As for a worth 1:8 scale car, the model has smooth independent suspension in front and back and front-axle steering with a working steering wheel. Some printed parts from the P1 donor set are reused in the build. The underbody of the car is very clean with open windows to see the gears spinning and the stepper-mechanism working. The overnight-bag is back! It's not only available in the P1, but comes in the ZR1 as well. The model features an openable trunk with a large space to fit the bag inside. Let's see all the cool functions of the Corvette ZR1 shortly in motion: Instructions & building process For those who wants to build a own version, here are some insights into the building process. Carefully tested digital premium instructions for this model comes with three separate PDF-files with high quality images and building steps. Uncommon building techniques and geometry tricks are used to ensure an unforgettable and satisfying building experience. Building the ZR1 starts with the sequential gearbox and parts of the stepper mechanism, which was the most complex part of the model to design. It is very important to align the universal-joints and the shifter-drums properly during the build. Please follow the instructions carefully. The first PDF with 290 pages continues building the rear-suspension and then attached to the model. Frames and structural elements are added to make the model solid. The working V8 becomes attached and connected to the rear differential through the gearbox. After adding seats and parts of the interior, the second instruction file with 332 pages takes over. The handsome bright-light orange color joins the build to assemble the characteristic 'hips' with air-intakes. The second file continues building the complete front-suspension with steering and then attached to the model. The roof becomes attached and the entire front with the headlights will be finished soon. More parts are added to form characteristic lines, getting closer to a worth looking Corvette ZR1 model. The third and last PDF let you build the removeable rear-section, the doors and the engine-cover separately on 250 pages before they are added to the final model. After 872 total pages of joyful building, your Corvette ZR1 is finished and ready to drive onto your shelf. The ZR1 in 2025 Actually this car exists and is now available by Chevrolet. According to the online configurator, the used color is called "Competition Yellow". It was a huge challenge to design this car only with pre-images. Final Note The ZR1 is my 20th B-model so far and it comes as the biggest and most complex one I've ever done. Thanks to all fans and people around me making such a big project possible again. Thanks to the LDraw community for providing parts in no time. I totally felt in love with the bright-light orange color that is so freaky close to the original ZR1's skin. From the first unboxing of the P1 up to the final images, it was a great pleasure to work with this kind of plastic and for me personally one of the best LEGO Technic experiences I've ever had. Let's see finally all 3 alternate models in 1:8 scale I made in one pic: Thanks for the attention. The ones who are interested in building their own model can follow the link to the instructions: Link to instructions
 -
Are you still waiting for your McLaren P1 to arrive? Are you looking for new cars for your 42098 Car Transporter? It's now your chance to build 2 models with free instructions to extend your 15-stud wide car palette. Each McLaren shares the same parts for the chassis, but uses different colors for the bodywork. They are identical, but they are also different :) Both models, the lime green version as well the orange version, are available for free. Functions & Features realistic openable scissor-doors HoG-steering from middle console working V8-engine fits on the 42098 Car Transporter fits 15-stud car series comes in orange and/or lime Some Impressions DoorsScissor doors for this model can be opened in a realistic way up to 65 degrees. 42098 Car Transporter Both McLaren fits other 15-studs wide cars in the Technic theme. All these cars are in the same scale and can be transported with the 42098 Car Transporter. If you're looking for another car to transport by your 42098 and to extend your car series, those McLaren might be a good choice for you. Real car Build your own in lime green - build your own in orange - build both cars for free! Complete parts list and premium instructions (PDF) available for everyone. Explore the lime green version here Explore the orange version here
-
 This is my second alternative build of McLaren F1 42141. This time I was inspired by Dakar rally and I made a version of Sebastien Loeb's Prodrive RX Hunter. This is the 2022 version and just like all my Technic model based on a real car; I invested a lot of effort into making it as close as possible to the real counterpart. I was able to reproduce the position of the engine, The curved shaped roof, doors and even the spare tire!Functions:- Independent suspension in all wheels- V6 fake engine (located inside the cabin just like the real car!)- HoG steering- Opening doors (Butterfly doors)I am no good at stickers but I made a basic sticker sheet that I am including as optional.Can't wait for the Audi RS Q e-tron???Don't worry! This one will keep you busy. Instructions on rebrickable as always: https://rebrickable.com/mocs/MOC-152876/A_Great_Builder/prodrive-brx-hunter/#details
 -
Hi, guys! I know that, there is February yet and we're before March release, but let's start new topic! So, at first I want to say that 2023 wave is amazing. New brand, new mudguards, new windscreens! Whoah! And there are my speculation/cars I want to see in Speed Champions 2024: ~ Porsche 911 GT2 RS Clubsport 25 ~ Porsche Taycan ~ Audi e-tron GT ~ BMW M6 ~ BMW M4 GT3 & BMW M3 1991 ~ Ferrari 499p LMH ~ Ford Focus RS 2021 ~ Honda Civic Type R ~ Cadillac LMDH What do you think about my cars? What cars would you like to see? Show your speculation/wishlist.
-
Hi folks, I'm happy to present my 42141 alternate build, which seems to be the first alternate model of McLaren Formula 1 released so far. Instructions can be found as usual on rebrickable. This Crash Team Racer Fun-Kart is an alternate build of set 42141 McLaren Formula 1 from 2022. No other parts are required to build this model. The model uses 3 spare parts that are included in the set 42141, with a total parts count of 1257. Keep in mind that the set 42141 McLaren Formula 1 comes in different versions with different sticker sheets that do not affect the build of this alternate model. If you own any of the set 42141 McLaren Formula 1, you can completely build this Crash Team Racer alternate model without any restriction. What is a Crash Team Racer? This Kart is driven by the character Crash Bandicoot in the 1999 video game Crash Team Racing and Crash Nitro Kart as competitor to the very popular Mario-Kart games. In 2019, the game Crash Team Racing Nitro Fueled was released as remastered version for next-gen consoles, where this Kart appears again in better quality. You'll find renderings from the video game at the end of this article. Functions & Features smooth independent suspension in front and back steering with working steering wheel piston engine driven by differential through rear axle custom built engine block detailed design with many fun to play 39cm x 29cm x 19cm Impressions Testdriver Schorch seems very happy with the finished model... The giant exhaust pipes with flames are easy removable for a more common look... Custom built engine Because the standard engine parts won't fit at the scale of this alternate model, the highlight of this build is the custom made engine block, which works pretty well with a nice sound. Instructions The premium instructions for this Crash Team Racer comes with 258 pages of high quality images and steps to ensure a challenging but satisfying building experience with many cool building solutions. Instructions can be found on rebrickable. Following are some example pages of the instructions: Racer from the video game Have fun with this Crash Team Racer alternate build.
-
 After many years of work, I am proud to present my take on the McLaren 720s in 1:10 scale. Lego 1:10 McLaren 720s by @tiledfloor, on Flickr It took 4 different iterations of chassis to get to this final version. I started this project with (almost) no experience in Technic MOCs, so I expected this to be the case. The first version was in 1:10 scale, had an 8-speed gearbox (which couldn't shift reliably), was wobbly as could be, and looked abhorring. The second version was in 1:8, -for some reason I thought that my first technic MOC could be THAT large without encountering many problems- I quickly realized how wrong I was. The building process was infinitely harder than in 1:10 due to the required stability and stiffness and added connections between components. This version had a really unique mechanism that I hadn't seen anywhere else though: adjustable drive modes, thanks to small linear actuators controlling the stiffness and travel of the shock absorbers. (you can find a video of the mechanism in action here:) Suspension with adjustable stiffness by @tiledfloor, on Flickr This version also had remote door controls, but after many problems regarding part count, sturdiness etc. I quickly realized that 1:10 was a better suited building scale for me. And so came the final two iterations, the first was almost a 1:1 copy of Dirk Klijn's mp4-12c, but after completing the chassis, I dismantled it to create one that allowed me to add a couple more functions, but I can safely say Dirk's model was the one that inspired me and taught me the most throughout my journey, along with Bruno Jensen's P1 and Charbel's 720s. And the final one was the one that I was finally satisfied with… Lego 1:10 McLaren 720s by @tiledfloor, on Flickr I wanted it to be completely modular, meaning that every single mechanism could be separated from all of the surrounding components. This was the most difficult part of the building and designing process. To achieve this, I settled on a transverse 4-speed sequential gearbox (IIRC, it was borrowed from Charbel’s 8 speed design), a custom made v8 which would sit as low as possible to allow for some detailing on top. The most difficult part of the chassis was the one-piece carbon monocoque also present in the real deal. Lego 1:10 McLaren 720s by @tiledfloor, on Flickr It had to be stiff, allow for two functions to pass through it (gear shifting and active aerodynamics), and still fbe as close to the real McLaren as possible form-wise. Lego 1:10 McLaren 720s by @tiledfloor, on Flickr The modularity also presented many problems mainly relating to the longitudinal stiffness, and I must admit, I wasn’t able to solve all of them, which resulted in a chassis that bends a bit when the suspensions are activated. Though overall it does generally behave as a single-piece chassis, and driving it around feels stable. Lego 1:10 McLaren 720s by @tiledfloor, on Flickr The rear axle is perhaps the most compact, stable and best looking part of the chassis imo. Lego 1:10 McLaren 720s by @tiledfloor, on Flickr After the chassis came the bodywork. It has many, many, MANY illegal connections that bend and induce torsion in long beams and panels. But overall, I am actually quite happy with the way the body turned out. The lines are as smooth as I find reasonably possible in this scale, and the proportions are mostly accurate. The car sits as low as I wanted it to, and has many of the original curves and lines that make the car recognizable imo. (most importantly, it passes my “squint test”, where if I squint hard enough it is indistinguishable from a photo of a real 720s.) :) Here is a rundown of the functions present in my model: -independent suspension on both axles -steering wheel/HOG with an acceptable turning radius -folding display in front of the steering wheel -adjustable seat recline on both seats -opening hood (half) and doors (though the doors require a bit of a wiggle to get them to sit right) -airbrake connected to steering -fake v8 -4 speed sequential gearbox controlled from the cabin (via turning a knob) -modular chassis -modular bodywork Lego 1:10 McLaren 720s by @tiledfloor, on Flickr The rear was very difficult to recreate due to the many intersecting curves and the large space the active airbrake mechanism takes up, but it’s the part of the body that I’m most happy about. Lego 1:10 McLaren 720s by @tiledfloor, on Flickr here you can see the airbrake in action, notice that the front wheels are in a “steered” position and that the spoiler is raised compared to the previous photos. And a final shot of the rear: Lego 1:10 McLaren 720s by @tiledfloor, on Flickr I am going to upload a video showcasing the functions whenever I can, in the meantime here is my bricksafe for a couple more photos: https://bricksafe.com/pages/tiledfloor/mclaren-720s-110- I eagerly await any and all constructive criticism. With this being my first full technic MOC, as well as my first scale model, there are plenty of things I can learn from you guys. Thanks!
 -
Hi folks, I want to present my latest alternate build for 2021 to complete my lineup of 2021 alternates - the McLaren 600LT Spider made from 42123 McLaren Senna GTR. Instructions are available on rebrickable Follow this link for more content and other builds. Rebuild the 42123 McLaren Senna GTR into another McLaren - the McLaren 600LT Spider. As an alternate build, this McLaren 600LT Spider uses only pieces from the 42123 main set (Senna GTR). Other parts or spare parts are not required. Parts with stickers applied can be reused without any problem. The McLaren 600LT Spider uses 754 parts (more than 90%) from the set 42123 McLaren Senna GTR. Functions & Features realistic openable scissor-doors HoG-steering working V8-engine fits on the 42098 Car Transporter Impressions made for 42098 Car Transporter With 15 studs wide, this alternate model fits other mid-sized cars in the Technic-theme since 2019, like 42093 Corvette, the new 42137 Porsche or 42138 Ford Mustang Shelby GT. All these cars can be transported by the 42098 Car Transporter and this McLaren 600LT Spider fits this scale as well. If you're looking for another car to transport by 42098, this McLaren is the right joice. Instructions With 154 pages, the instructions for this McLaren 600LT Spider comes with high quality images and steps that are easy to follow for a satisfying building experience. Here are three example pages of the premium instructions: The real car The McLaren 600LT Spider is more common in lime green or orange and can be build in this color as well. Here is an example of the real car (for the american market) that fits this alternate build most: Have fun with this McLaren 600LT Spider alternate build.
-
 Go-kart - McLaren Senna 75892 Alternative Build Free Building Instructions: https://rebrickable.com/mocs/MOC-69512/makushima/go-kart-75892 Lego McLaren Senna 75892 MOC - Go-kart (Free Building Instructions) by makushima
 -
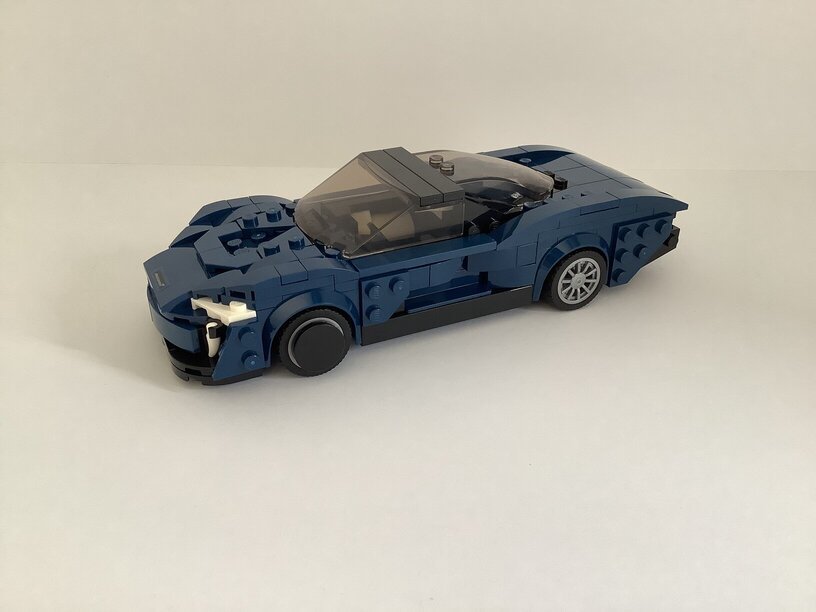
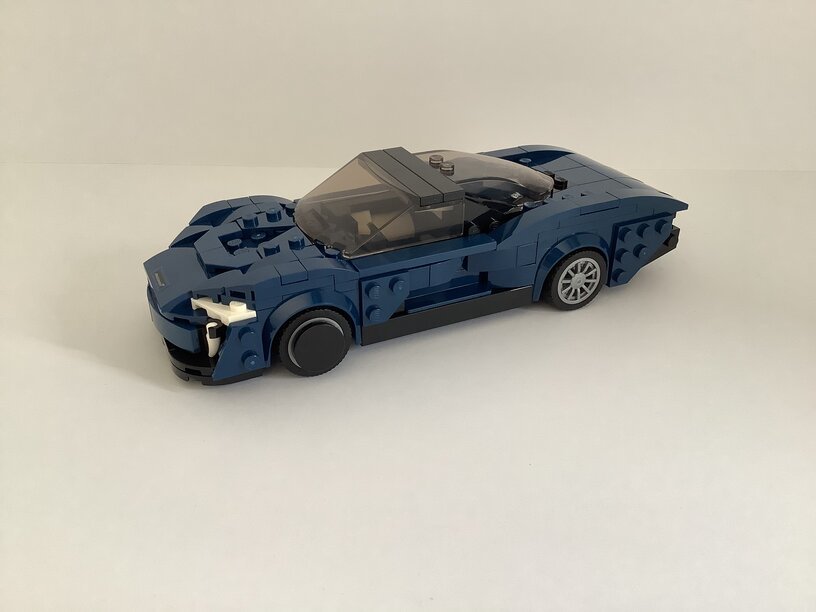
Hi everyone, I thought I’d share my first ever speed champion based Moc which is a Mclaren Speedtail. Massive fan of speed champions and I hadn’t considered making my own models but the wait for new sets is taking forever, so I decided to build my own! I chose to do the Speedtail because I think it’s very unique and will pair nicely with the upcoming elva. It has taken me about 2 weeks from planning to completion which is pretty good as that included the wait of 3 bricklink orders. For the colour choice I went with dark blue because a bright colour wouldn’t really suit the model, and I am happy with how it looks currently. I can’t seem to add any more pictures so I would appreciate some help on how I could add more. *don’t know why ones duplicated everytime I try and delete it, it comes back Looking forward to what everyone thinks! image of the back: https://ibb.co/JQpx2DR

-
 I got the 42123 McLaren and decided to build a rc version of it. Here is my actual step: It has got no suspension but positive caster angle at the front. 😊
 -
 I got my 42123 a month or so ago and while it's a very awesome set out of the boy I knew I had to give it a proper differential. Here's how I did it in LDD: In order to preserve the original engine position the differential is moved back one stud: A pair of 8 tooth gears transfer the power from wheels to the differential: And while I was at it, I also made the steering work using 8 and 24 tooth gears: I plan to make a detailed HOW:TO video tomorrow, so stay tuned. Meanwhile you can download the LDD here: https://bricksafe.com/files/Zblj/42123-differential-and-working-steering-wheel-mod/42123 Differential and Working Steering Wheel MOD.lxf
 -
 Hey! I have to say that this is my first lego supercar, as i'm more used to trial trucks and trophy trucks. I worked on this one for about three months and the goal was to get a supercar over 1kg, wich I barely passed. First, some overall pictures of the car. Yea, I know, i've got some pretty bad panel gaps around the rear wheels and the whole back of the car isn't too great but it actually was built for the functions. Moving on to the manual functions the car has: Opening hood revealing the RTC system (locking) Opening butterfly doors Opening engine bay cover (locking) +the whole rear lifting in 2 sections to provide access to the BuWizz (large one is also locking) One huge challenge was to get a curved roof at such a small scale, wich you can see in more detail here: It's also fully suspended, front is independent with MacPherson and rear is pendular. I guess I could've squeezed something independent in the rear too but it was too little space and I was running out of time. Functions powered by BuWizz (wich is located behind the rear axle) Drive with an L motor, working V8 engine Steering with an M motor, working steering wheel Linear 2-speed gearbox integrated in the chassis powered by an M motor Here's a little game: Try to find all the motors in the car. Also, I would like to know what do you think about it.
 -
Hey, here are some awesome alternate builds I've created with the 2017 LEGO Speed Champions 75880 McLaren 720s set! pick up futuristic truck sportscar Thanks for watching!
-
Thought I'd collect my growing series of six-wide builds into one place as my feed on Flickr is getting pretty dense. I'd struggled to get the Speed Champions cars proportioned to my liking (I ended up with slightly outrageous 10-wide P1 prototypes), meanwhile my Flickr feed has a continuous drizzle of inspiring builds done around the slightly smaller City Scale fenders and tires. Somehow this scale just works. While there are a good many builders on Flickr working at this scale and all their work inspires in some way, I would like to call out ER0L, Tom Netherton and Adrian Barbour aka BrickMonkey in particular as their approaches, shared designs and instructions went a long way to kick-starting this series of building for me. I've adopted the techniques they honed which has given me a great platform to come up with some of my own tricks. Also, there's sort of an easter-egg in all of them; rather than filling the inner spaces of the chassis with big bricks a la Speed Champions, I like to tuck in plate-built details like engines and chassis structures. These are all up on Flickr > Prototyp with plenty of photos of each if you'd like to check them out more closely. Will update here with new builds from time to time. Hakosuka and McLaren instructions are available at Rebrickable: https://rebrickable.com/users/prototyp/mocs/ 1972 Datsun 510 A cooler version of my college car (if I weren't so broke the and had actually hopped up my Dime); fat MiniLites tucked into some flares, front and rear skirt work, and a twin-cam engine swap under the hood. Nissan Skyline KCG10 '72 Early work on the 510 ended up developing into the even cooler, lower, sleeker, meaner Skyline GTR "Hakosuka" McLaren P1 Unrelated in every way to TLG's Speed Champions P1; very long, very low, very curvy... Even the color is opposite. Particularly proud of the trick nose build and that TT wing plate as a rear diffuser (which, interestingly enough the new 720S Speed Champions model also uses) Built up in some colorways. Ferrari 458 Italia Distantly-related to BrickMonkey's 'chibi' style Ferrari 458 caricature. Like the McLaren, this one is also quite long and low. There's a plate-built V8 tucked in the mid-rear, too. (will need to build this one in more colors, too) Honda NSX Type R Adapted from Tom Netherton's Acura NSX with a new nose, new tail, and a v6 under the rear glass. Ford Mustang GT350 Another Tom Netherton-based build. His work on the nose and side panels is fantastic stuff. I reworked chassis to move the whole roof/cockpit area back a stud in order to play up the long-hood coupe proportions. Under the hood is just enough space for a hint of plate-built V8 and the GT's strut-tower cross brace. The tail is extended and incorporates a custom exhaust and diffuser setup. Porsche 935 '77 This MOC started out as a build of a 911 street car but got sidetracked by the desire to make something a little more outrageous (and to use the Speed Champions fender/tire combo). The turbofan wheel covers and front suspension camber are small design and technique triumphs. Some good bones here for a series of stickered replicas. And yes, there's a turbocharged, air-cooled flat 6 engine under the rear hood, too.
-
 Hi, I would like to present my latest MOC: The McLaren 675 LT Spider It is a full RC model with the following functions: - independent suspension on all wheels - butterfly doors - RC drive (2x L-motor) - RC steering (1x servo motor) - RC spoiler (1x M-motor) - RC convertible roof (1x M-motor) A video of the model can be found on Youtube: Instructions for both the red and a white version are available from my website: This model was built in commission, which I have to thank my client for, because I otherwise I would have dismissed this challenge as too ambitious. I always had the ambition of making a car with a convertible roof, but I always shied away from it since I had no idea how to make such a feature. Then to make a convertible roof that is remote controlled and has a an extra pivotpoint in the roof itself I would never have tried. I am quite pleased to see that the old adagium still holds: 'You can build anything from Lego' Comments and questions are welcome as usual, Leg godt, Jeroen
 -
IMHO the Speed Champions line is one of the best lines Lego has created in a long time. I've always been a gearhead, and seeing nice race cars in minifig scale was maybe the best thing that came came from TLG in 2015. I got the whole line, and despite I would have a really hard time to say which is the best (though the F14 T & Scuderia Ferrari Truck set is a top contender), one "theme" that caught my eye were the F1 cars. Both the Ferrari F14 T and the McLaren MP4-29 are gorgeous, so I started thinking about expanding my fleet. First I looked at previous Lego offerings, and was fortunate to find a pristine 2009 Ferrari Truck (#8185). The truck is great but those huge knobby tires on the F1 were an eye sore. Without much trouble I was able to mod it to "proper" slick tires, and IMO it looks much better now: With that done, I got tempted to make more cars. Not actual representations of current F1 cars but models that could pass as a decent Lego F1 cars in minifig scale. After a few orders from BL for the parts needed, this is what I came up with: I tried to make them in scale to the official Lego models and after an evening of building I think they came out half decent. Here's the whole fleet: Of course some stickers would make a world of difference, and I do fancy the idea of making a custom set. However, I bet that those who assembled the Speed Racers sets will agree with me that making a whole sticker sheet would NOT be something easy to do. Maybe the alternative would be to make stickers for "test cars", which would have a lot less logos to apply, but I would like to see proper race cars, in all their racing colors glory. So I'll have to think about this some more. Still, I can say that we have a lot to build in terms of F1 cars. I was a bit disappointed that there won't be more official F1 cars in 2016, but since we'll have a 917K (already en route ) Lego is forgiven.
-
 Hello All This topic is purposed to get thoughts and feedback, on my first fully motorized moc. Originally built to celebrate 1 year since I bought my first technic set. Here is a link to the video https://www.youtube....h?v=g2Zh_J4vwsQ if you like what you see please subscribe and like the video. I'm currently building an MKII version which will be a vast improvement, and instructions will be available for free, though I might limit the amount of people who can view the instructions. It will feature a motorized 4 speed gearbox, the famous p1 spoiler, mclaren style butterfly doors, a working v8 and huge turning circle. It will also have a re-worked and more sleeker body shape than the first version, thus making it more realistic. Unfortunately, I don't have any photos of the MKII chassis, but I will be uploading some soon. I will be updating this discussion with progress of the MKII version soon. Here are some photos of the MKI (original version)