Search the Community
Showing results for tags 'bus'.
-
 Model of Fairfax Connector's 2008 Orion VII NG (07.503) transit bus. The model features motorized drive, steering, and pneumatically operated passenger doors. It also has an opening engine door to access a removable Cummins ISL engine model. Functions/features: Drive Steering Working steering wheel Pneumatic passenger doors Opening engine door Cummins ISL engine model (removable) Fairfax Connector, the transit agency serving Fairfax County, VA with service to Washington, D.C., operated an extensive fleet of Orion transit buses throughout its history. The fleet began in 1985 with a fleet of Orion I buses, with more units joining the fleet through the early 1990s. By the late 1990s, the agency began acquiring Orion V buses of various lengths. In 2008, Fairfax Connector acquired 26 32ft-long Orion VII buses (model 07.503) numbered 9770-9795, of which inspired my model. Throughout much of their service life, the low 9770s were assigned to West Ox Division while the remainder were assigned to Reston, notably serving the Reston Internal Bus Service (RIBS) routes. Unfortunately, the final active units of this series were retired recently at the time of writing, as this series of buses have been fully replaced by 2024 and 2025 Gillig Low Floor 29’ buses. On a trip to the DMV (DC/Maryland/Virginia) area in March 2025, I had the opportunity to ride bus #9789 on the RIBS 1 route, and I included video clips from that ride in the beginning of my video. I decided to build a model of Fairfax Connector’s Orion VII NG primarily for the aesthetics: Fairfax Connector uses a multi-color livery with yellow in the front, red in the rear and a white curved stripe down the middle. All my previous bus models had a primarily white livery, with either a simple stripe livery or a stickered livery. I decided that my challenge for this model is to design the entire livery using only LEGO elements, with stickers only used for the logos, fleet numbers, and destination signs. The building process began in Stud.io, designing the bodywork in System pieces with a mix of regular and SNOT building. Thanks to the variety of colors introduced for many System elements in recent years, some of them as recent as this year (e.g. part 73230 in yellow), I was able to put together a livery that uses wedge pieces extensively to model the white curved stripe. On some of their buses, particularly the older ones (e.g. these and the 2007-09 New Flyer D40LFRs), the livery even extends onto the roof. Thanks to a Google Earth capture of the Reston Town Center, where the RIBS routes originate and terminate, I was able to get a view of the roof of the bus to model the livery on the roof. There are unfortunately very few clear photos of the roof of these buses, so my design is probably still approximate, but still I really liked the result especially when viewed from afar. The chassis came next after designing the bodywork. I initially wanted to do the entire chassis in dark bluish gray as the real-life bus has a gray floor, but I figured since I have much more black Technic pieces than DBG (and because all my previous bus models had a black Technic chassis and frame), I decided to do it in black. A challenge here was packing all the electronic components in. Due to limited space, I had a single Power Functions L Motor connected directly to a 28T heavy duty differential via a 12:28 reduction. I was worried whether this would be enough torque for the model, so I tried to avoid using more pieces than necessary throughout the build. Fitting the PF rechargeable battery box and the SBrick into the chassis was particularly challenging, as the front half of the chassis is low floor. I ended up squeezing them in on either side of the Cummins ISL engine model, and there was just enough space for it to fit between that and the body panels. The Cummins ISL engine model was taken directly from my New Flyer D60HF model, but connected to the drivetrain with an 8T gear instead of 16T. I initially thought of keeping it permanently affixed to the chassis due to the electronic components packed tightly around it, but fortunately I found just enough room to insert a few removable 3L pins to easily secure and dismount the engine model. The front portion of the chassis, which is low floor, turned out surprisingly sturdy even at only 2 studs thick. I think what helped was using plenty of reinforcing elements like part 3167, which kept the layers tightly bound here. This is much better than my first bus model, my New Flyer XD60, where the low floor section was 3 studs thick on average. The chassis still protrudes where the front axle and PF Servo Motor for steering are located; I initially thought of placing the servo in the roof frame and transferring its drive down via a vertical axle, but I didn’t want there to be too much play in the steering mechanism. While designing the chassis, a challenge was making sure to always include attachment points for the bodywork, including the SNOT sections, to create a seamless fit with no interference once the bodywork is installed. My original plan for the pneumatic functions was to make the passenger doors and engine door openable pneumatically via remote control. Even though the real bus has the engine door opened manually, I figured this would avoid having to find space for a separate manual opening mechanism. However, there ended up being just enough space behind the SBrick to include an axle that can be pushed to open the engine door ajar, just like on my previous Orion V model. This meant both pneumatic functions could be used for the passenger doors, but I wanted to have a single pneumatic circuit instead of two separate ones for the two doors like on my New Flyer D60HF model. My original plan was to have two PF L Motors each control a valve and control a single compressor through differentials. However, seeing that the front and rear doors often do not open at the same time on North American buses (especially if the rear door is push-to-open or only opens when a motion sensor detects an exiting passenger) I decided to make them openable separately by switching valves for the front/rear doors. The compressor and the valve for open/close is driven by a PF L motor, while a PF M Motor switches two additional valves that control whether air flow goes to the front or rear door. A challenge was making sure all the pneumatic hoses were routed correctly; the front door’s pneumatic cylinder retracts to open the door, while the rear door’s cylinder extends to open it as the rear door on Fairfax Connector’s Orion VII NG buses open outwards (though most agencies I’ve seen has it open inwards like the front door). I also decided to use all pre-cut lengths of pneumatic hoses to make things easier when I make the instructions, as on my New Flyer D60HF model, the instructions has the user cut hoses to specific centimeter lengths. Overall, I am impressed by how this MOC turned out, especially with the fully brick-built livery. It looks seamless from afar, although I do wish LEGO made more wedge pieces without studs as the finish is a bit stud-heavy. This also meant I could not include stickers for the Fairfax Connector phone number and website URL printed above the windows of Fairfax Connector buses, as those would end up passing over a few studs. Nevertheless, I managed to capture all the major details, such as the slightly curved front end and the uniquely shaped rear grille. The model also performed pretty well; although the drivetrain could perhaps use more gear reduction, its setup was also very efficient so it was quite fast when driving without feeling underpowered. I’m a bit sad that I didn’t finish the model before the last units were retired, but at least I managed to capture one of Fairfax Connector’s most iconic vehicles of the 2000s in all its glory in a LEGO version. Video: Photos:
 -
I know I had just finished a bus model (the Orion V 05.505 model), but I figured why not get started on my next one 😂 so here it is: a 2008 Orion VII NG (07.503) bus operated by Fairfax Connector in Fairfax County, VA. This will be my first model of a DMV (DC/Maryland/Virginia) region bus. I took the above photo of bus 9777 in August 2022, right after BrickFair VA that year. At the time, a good portion of them were used on the RIBS (Reston Internal Bus Service) routes; their numbers continue to dwindle as newer 2024 Gillig Low Floor 29' buses enter service to replace them. A year ago, I had the opportunity to ride bus 9789: If I can fit it into my schedule, I plan to go to the NJ Historic Bus Festival again this September. Last year I brought my New Flyer D60HF model there, and since it's an articulated bus, I separated it at the articulation joint and packed the two halves side by side in a duffel bag, which narrowly fit the size constraints of an airline carry-on. For this year's event, I plan to bring this model and the Orion V I just completed; since both are ~1:18 models of 32' buses, I should be able to pack both into a carry-on duffel bag like I did last year. My plan is to first design the model in Stud.io, then wait until after Brickworld Chicago in June to start the building process. I will likely need parts from my New Flyer D60HF model, which I am planning on displaying at Brickworld, so I am waiting after Brickworld when I can disassemble that model to have the parts to build this one. After the bus festival, I plan to save it for display at Brickworld Chicago 2027. The tentative list of functions are: Drive Steering with working steering wheel Pneumatic doors (most likely synced) Wheelchair ramp (?) Cummins ISL engine model with moving pistons Opening engine door (perhaps pneumatic, fed from the same pneumatic circuit that feeds the doors opening) Since most of my bus models thus far have had pretty much the same core functions (drive, steering, opening doors), I want to add another function here that have not been incorporated into previous bus MOCs. A wheelchair ramp may still be quite challenging to add at this scale, but I could probably use the doors' pneumatic circuit to power another cylinder that can open/close the engine door. While they're typically opened manually on real buses, my recent Orion V model demonstrated that it's pretty difficult to include a functional handle at this scale that does not look out of proportion (I resorted to using an axle that you can push on from behind it to open it slightly). So I could probably add a valve that can direct the compressor to opening/closing the engine door. Another challenge I gave myself this time is to design the entire livery using LEGO pieces, i.e. no stickers. I'm pretty impressed with the results so far, but still it's not the smoothest curve (as the white stripe between the yellow front/red rear on Fairfax Connector buses is very well rounded). Still, I feel that using LEGO pieces to achieve is preferable to using stickers, like many official sets are doing these days. This will also be my first bus model to not be primarily white for the livery - it will really get me to be creative with piece usage, and the model already contains a combination of normal brick/plate stacking and SNOT building, especially where the livery is made using wedge plates/tiles. As of right now the wheels look a bit small to me, but the height seems pretty similar to my New Flyer D60HF model (which uses the same tires) so it may just be a matter of perspective as the model really only has one body panel and the doors designed as of right now. Below I've attached some Stud.io screenshots so far. Let me know what you think!
-
 42175 Bus Model Info Size: 48L x 18W x 13H cm Weight: 1070 g Parts: 1189 Video Features Opening doors with pneumatics Separate cylinder for front and rear doors HOG steering Opening roof hatches Opening trunk Working 6l engine Instruction: https://rebrickable.com/mocs/MOC-271418/paave/42175-bus
 -
Hello, Meet my prison bus! While not a direct copy of a specific model, it is packed with cool vintage style. It looks right at home alongside Speed Champions cars and can star in any LEGO City scene. It’s now submitted to the Bricklink Designer Program (BDP) Series 11, you can find my submissions here: https://www.bricklink.com/v3/designer-program/series-11/main.page?page=1&s=tlg I've added loads of authentic details, like multiple side-view mirrors, license plates, headlights, turn signals, and more. The real showstopper is the clean, brick-built front mudguard and hood, it's what makes this vehicle truly unique. The set includes 3 minifigures and various accessories, offering plenty of play features: Openable front door Openable rear door Openable interior barred door Removable roof for easy access to the interior I hope you enjoy this set. Many thanks for your support and feedback! Thanks for visiting, _TLG_
-
Model of a Westchester County Bee-Line 2005 Orion V (05.505) transit bus. The model uses Power Functions IR remote control for motorized drive, steering, and opening doors. It also includes a Detroit Diesel Series 50 engine behind an openable engine door. Functions/features: Drive Steering Working steering wheel Motorized passenger doors Opening engine door Detroit Diesel Series 50 engine model (removable) Instructions available on Rebrickable: https://rebrickable.com/mocs/MOC-265143/JLiu15/2005-orion-v-05505-bee-line-bus/#details The Bee-Line System, the public transit agency in Westchester County, NY, ordered 21 Orion V (05.505) buses in 2005 numbered 116-136. This order of the 05.505 model, which is 32ft long and 96in wide, succeeded buses 101-115 from 2002 and are the last of this model ever built. At the beginning of their service life, buses 116-129 were operated by Liberty Lines Transit, Inc. while 130-136 were operated by P.T.L.A. Enterprise for routes 16, 18, and 31. The first retirements occurred in 2016, with the first four units (116-119) retiring and two of PTLA’s buses (135 and 136) transferring to Liberty Lines. In 2021, PTLA’s 131-134 were scrapped, and Liberty Lines’ 120-123 were transferred to PTLA to fill the gap. In early 2024, all remaining buses (124-127 and 129) were transferred to PTLA while all other units in the series were retired. These five buses are still active at the time of writing. My model depicts bus 124. When I decided to attend Brickworld Chicago 2026, I wanted to display a smaller bus model next to my New Flyer D60HF model from last year. I had already been wanting to build an Orion V bus model for a while, such as a 2000 05.501 model (40ft long and 102in wide) in Potomac and Rappahannock Transportation Commission livery. However, seeing that Bee-Line is also quite famous for their Orion V buses, especially being one of the last operators of Orion V buses today (they also have a few 2008 05.501 suburban models numbered in the 800s still in operation), I decided to do it in the Bee-Line livery. From the start, I knew that a challenge would be the livery, since their livery includes diagonal stripes that would not translate as well to LEGO pieces. Unlike my previous bus models, I actually started with the bodywork this time in Stud.io, then built the Technic chassis around that. This meant fewer changes to the chassis to attach the bodywork, a revision that was often needed for my prior bus MOCs. I designed the livery to have the horizontal stripes done using LEGO bricks and plates, and I found LEGO blue and bright light orange to match their livery quite well. The diagonal stripes, which continues onto the roof, I decided to make using custom stickers. I first got the idea for this MOC in mid-February; by mid-March, I had a bodywork designed in Stud.io. This was followed by designing the chassis, and in early April I began the building process starting with the chassis. The shorter length of the bus meant that the build had to be compact, but there was enough room in the chassis to fit a PF L motor for propulsion, a PF Servo motor for steering, and a PF AA battery box. Because my PF Rechargeable battery box and SBrick are still in my New Flyer D60HF model, I used PF IR control for this model. In fact, it is my first time using IR control in a MOC since 2020! I was initially concerned whether a single PF L motor would be enough torque, but given that my Airport Crash Tender MOC from 2017 was even larger in terms of dimensions and did fine with a single PF L motor geared 1:3 and then 14:20 at the differential, I decided that the same gearing in the drivetrain was sufficient. It also helped keep the rear stepwell area compact, as the drive motor sits directly adjacent of the stepwell and two L motors may have taken up too much room there. One of my favorite parts about this model is the inclusion of a Detroit Diesel Series 50 engine model connected to the drivetrain, as that is the engine the real-life bus uses (their 2008 units use the Cummins ISL instead). For this, I ordered some sand green Technic pieces to capture the iconic Alpine Green that Detroit Diesel engines are painted in. A notable difference between Detroit Diesel Series 50 and Cummins powered Orion V buses is that those powered by the Series 50 omit the middle seat in the rearmost row due to the larger size of the engine. This meant that I was able to keep the cylinders exposed on my model, so you could see the pistons moving even without removing the engine model from the chassis. The doors use a different mechanism from my previous bus models. On the real-life Orion V, the door leaves protrude significantly from the body when open. A mini linear actuator here would have 3 studs of travel, leaving the door leaves flush with the body when open. I went for one fewer stud of travel range, and used a linkage mechanism driven by a worm gear. The mechanism performed flawlessly despite my initial concerns; I was worried this setup would be more likely to jam when opening and closing. Both the front and rear doors use a PF M motor and a 24T clutch gear is used on each to prevent the motor from stalling when the doors are fully opened/closed. The steering mechanism is set up similar to that of my New Flyer D60HF model, and likewise, a working steering wheel is connected to it. The doors’ motors and the PF IR receivers were placed in the roof, attached to a Technic frame; I was able to blend the IR receivers in almost seamlessly with the rest of the roof, which is largely made using 8x16 tiles. I am overall satisfied with how this MOC turned out, and in some ways, it looks even more realistic than my New Flyer D60HF model. I like how I captured the shaping of the driver’s side windshield, which is sloped to reduce glare for the driver. While there is a slight shade difference between LEGO pieces and the colors printed onto the stickers, from a distance the livery still looks pretty seamless, especially the side stripes. I had fun making the video as well - I also included a few video clips of the real bus taken by Kyle Garcia, a friend of mine on the East Coast. I’m also glad I finished the model while the real bus is still in active service, as I wouldn’t be surprised if the last 5 remaining units are due for retirement very soon. Video: Photos: Brickworld Chicago Photos:
-
Hello Speed Champions and City fans, It was my entry to Bricklink Designer Program Series 3 and 4. It has received many kind comments and support, but unfortunately it has not been selected, therefore I decided to make the instructions available here: https://rebrickable.com/mocs/MOC-177592/_TLG_/school-bus I always loved American style school buses, therefore I decided to design one to Bricklink Designer Program Series 3. It is not actually based on a real one, but it contains many typical details: the black bumper rails and STOP arms on the sides, the crossing arm, the side and rear doors, the rearview and crossover mirrors, the mudguards, the warning lights etc.. The roof assembly can be removed as one piece and in this case the internal details are visible: there is a driver seat with steering wheel, dashboard, gear shift, passenger seats and even a fire extinguisher. It is 8 studs wide, studless build in minifigure scale and fits perfectly to Speed Champions cars or to a LEGO City. There are many working details: the front and rear doors, the STOP arms, the crossing arm and windshield wipers. I wanted to create a clean build and tried to fill every unnecessary gaps and hide unnecessary studs, therefore some tricky, but legal build techniques are used. The set includes three minifigures: a driver, a school girl with a pen and backpack and a school boy with a brick built backpack. The model has space for 17 minifigures: one driver and 16 passengers. If the passengers are kids with short, rigid legs, then they can stand on the seats. The building instructions guidelines have been followed. It is built from the palette "BDP Series 3", so there are some color and part restrictions. The color "Bright Light Orange" would be a bit more authentic, but the available parts are restricted, therefore I decided to use "Yellow" and I am satisfied with the result. The STOP sign is very rare part and it is not available in this palette, therefore it is replaced by a simple, white, circular sign with a sticker. The door 43967 is also not available in yellow, therefore it is replaced by a brick built one, however, in this case I was able to add some extra details: a black door handle, bottom window and red lights. I hope you like my design, I appreciate any feedback. Thanks for visiting, _TLG_ School Bus - Bricklink Designer Program 3 - 01 by László Torma, on Flickr School Bus - Bricklink Designer Program 3 - 02 by László Torma, on Flickr School Bus - Bricklink Designer Program 3 - 03 by László Torma, on Flickr School Bus - Bricklink Designer Program 3 - 04 by László Torma, on Flickr School Bus - Bricklink Designer Program 3 - 05 by László Torma, on Flickr School Bus - Bricklink Designer Program 3 - 06 by László Torma, on Flickr School Bus - Bricklink Designer Program 3 - 07 by László Torma, on Flickr School Bus - Bricklink Designer Program 3 - 08 by László Torma, on Flickr School Bus - Bricklink Designer Program 3 - 09 by László Torma, on Flickr School Bus - Bricklink Designer Program 3 - 10 by László Torma, on Flickr
-
My fifth bus model will be smaller than my previous ones. It maintains the same scale, but the model is of a shorter bus - a 32ft Orion V (model 05.505) operated by the Bee-Line System in Westchester County, New York. The above photo was taken by Elyse Horvath in January 2023. I decided to model a shorter bus this time because I plan to bring two bus models to Brickworld Chicago this year, one of which is my New Flyer D60HF model. Because I have already used a lot of my white System pieces on that model, I could build this model without having to order as many pieces. It also guarantees that I have enough space to display both MOCs with a good view of both, as display space can be pretty limited at Brickworld Chicago. My original plan prior to signing up for Brickworld was to disassemble my New Flyer D60HF model and have most of the pieces needed to model a PRTC OmniRide 40ft Orion V (model 05.501), which I saw at the NJ bus festival last fall. The tentative list of functions are: Drive (with single PF XL motor or two PF L motors) Steering with working steering wheel Opening doors (pneumatic?) Detroit Diesel Series 50 engine model (removable) Opening engine door I had considered powering the model with BuWizz 2.0, but my BuWizz has been having issues recently, mostly with there being a delay from when a command is sent from the app and when the motor responds. Because of this, I may just end up using PF IR receivers, which I have not used in a MOC for many years now. Unlike my previous bus models, I am starting from the bodywork this time in the Stud.io build. This should reduce the need for last minute revisions to the chassis to accommodate the body panels. As of right now, the Stud.io model largely consists of partially built body panels with the front/rear axles and engine model to mark their locations. By being a smaller bus model, it also serves as a challenge in building compact as there is less interior space to hold all the mechanisms. The livery will be mostly brick-built, as it is largely just two side stripes, but the diagonal section I plan to use custom stickers since it gives it a much cleaner finish than solutions using LEGO pieces, even though I try to avoid custom stickers unless necessary. The left and right side views, as of right now: One of the things I've been most satisfied about so far is the front windshield design. The Orion V has a slanted driver's side window to reduce glare, and since using LEGO window pieces becomes more impractical when building at larger scale, I wanted to have the windshield be outlined in a way that clearly shows how it appears on the real bus. Thankfully, it was not as complicated as I thought, and I really like the way it turned out. Once I have most of the bodywork designed, I could then probably begin designing the chassis and begin the building process from there.
-
Hi everyone ! Here is my first MOC, not built yet bust just made with LDD. It is taken from this real bus that has worked all around Milan in 80's years. Well, it is quite a big model but thanks to the big size I could make the opening doors and the steering wheel. It has 4 seats at the back, 3 on the right side (where there are doors), 6 seats on the left side and one driver seat. Before building it I wanted to make the roof opening. Every suggestion is welcomed !
-
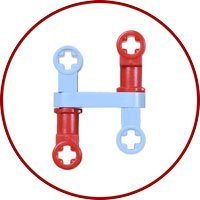 Hi! This is my first (maybe second) post on this forum, but I've been following it for quite a long time now. I started building with Lego Technic about five years ago and now I would like to share with you the video of my latest creation which is this Motorized Bus. This model features: Drive, powered by two L-motors Steering, powered by a Servo Motor Opening front and back doors powered by two M-motors It also has a very detailed fake V6 engine in the back. I started building this model about a year ago. My spare time is rather limited since I'm a student, and I've been working on other projects as well, but there's still a lot of work behind this creation. The doors were the most challenging things to build and it took a very long time to get them right, I've rebuilt that mechanism at least five times. It was also very hard to make a mechanism that would fit under the roof of the bus and not be visible through the windows. Well, now it's finally finished and I'm quite happy with the end result so I hope you like it too and enjoy watching my video!
 -
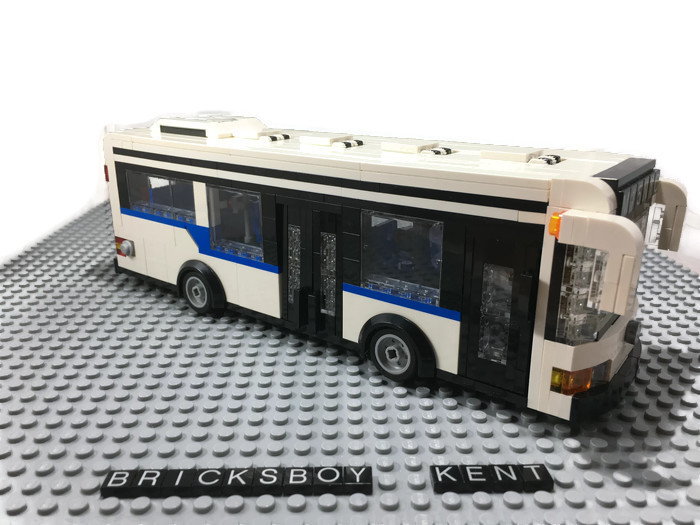
My model is a city bus with New York City MTA livery. I have put more detail on this model comparing to the lego buses in current or past city sets. The reason to build this bus is to provide Lego fans specially to kids to have a Lego bus with the more realistic look. Bus is a popular vehicle type among children. I remember when I was a child, I always wanted to own a great looking lego bus. I believe I am not the only one who has same wish. I submit the project to LEGO Ideas. More pictures can be seen in the Lego Ideas link. I also uploaded the tutorial video to Youtube. I hope you like it and support my project. Thanks you :) Lego Ideas Link Youtube tutorial link My other MOC models: [MOC] New York City Police (NYPD) Car [MOC] Lego Mini Cooper [MOC] Japan Tokyo Taxi vol.1 東京無線タクシー [MOC] Ice Cream Truck [MOC] LEGO California Highway Patrol [MOC] LEGO Police Car [MOC] Police Motorcycle [MOC] New York City Taxi / Cab [MOC] LEGO NYC News Stand [MOC] New York City Transit Bus [MOC] Newspaper Rack [MOC] Coke/Beverage Cooler Initial D AE86 Racer AC Transit Bus AC Transit Bus Short Version Ice Cream Van
-
This is the prototype Streetdeck double decker bus for KMB, Hong Kong. It also is the first Streetdeck in Hong Kong. Wrightbus Gemini All buses
-
First off, I would like to say that, no, I am not terrible at maths! All shall be explained! (Sorry, this may be quite a lot of reading!) The Back Story: First aspect: Some weeks ago, I was having a general look for sets that might be of interest to me. I stumbled upon a very good deal on the Lego City Bus Station (Set no. 60154). I decided in a spur of the moment purchase to pick up 2 sets, with no real plan… That’s what sowed the seed! Second aspect: In the not so distant past, I had purchased a huge Lego haul from eBay containing many train set items and accessories. In amongst this, was an incomplete copy of the Lego Freight Rail Runner (Set no. 4564) – (maybe 80% complete) – at the time I didn’t really know what to do with it. Over time I harvested the 9V motor, wheels, couplings, bogie plates, wagon parts and straight track – basically all the good stuff! Now, I’m a big fan of seeing people doing set combining! I have never seen anyone attempt something like this! (Correct me if I’m wrong!) The Hypothesis: “Is it feasible to make a decent looking locomotive of any kind, combining Sets 60154 and 4564? – Using minimal significant other parts, but in cases where necessary only using parts I currently have, and not resorting to ordering things. The locomotive should ideally use Power Functions with 2 motors, lights are not necessary. Also, the finished model should be sturdy, strong, and able to be played with by children.” Answer, Was It Possible? Yes, and in my opinion, it turned out rather well. What I attempted to build was a massively simplified Class 37, with much artistic licence! Here is the finished product: Thus, the idea for “60154 + 4564 = 37?” was born! What do you think? Any questions, thoughts, or criticism will be much appreciated. Regards, James :)
-
 Inspired by the Speed Champions cars. Last year I built a car showroom to show them off. Al's Autos is built on 3 large baseplates. On the left baseplate the blue and white sign has doubled sided brick plate writing and rotates on a Technic turntable. The showroom has a roller door entry behind the office on the left. It is fully tiled inside and lit with PF LEDs. On the right baseplate the brown turntable also rotates on a Technic turntable. The footpath is designed to match up to the Modular footpaths. My own creation cars are a Pick Up truck with removable Camper. A Ford GT40 reverse engineered from a LEGO YouTube movie. The black Pontiac is a KITT replica and has a working red LED scanner in the front. Next was a service centre / workshop for the showroom.The back section is a parts department. On the right are two service bays. The front one has a working Technic pneumatic hoist. Also PF LED lighting. The shipping containers can fit a Speed Champions car or spare parts. To keep the cars clean I next built a car wash. This has a working Technic based linear actuator to move the brushes back and forward over the car. So after a long day. It's off to the Drive In movies. The diner has a projection room, kitchen, counter, seating and toilet. My own creation cars are two NYPD police cars with working light bars. A yellow NY taxi. The two Porsche 911's are modified with brick headlights and door handles. The ambulance has working LED light bars, headlights and taillights One day I will get around to doing close up and interior photos.
 -
Hello all In Germany and in most of Europe, these green buses connect Cities on international lines. For me the most interesting thing was the colour, since normally long distance buses tend to be white or a not so eye-catching colour. The prototype is a Neoplan Skyliner, because I like the shape of those buses. There are only a handfull of this type operating for FlixBus since Neoplan buses are generally more comfortable than other buses and used for charter service. To build my model I used blueprints to macht the shape, especially of the dark stripe with the windows. You also may spot some bricks which I coverd with coloured paper since some bricks don't exist (yet) in lime. My bus also has a passive steering, so that you could play with it. But now for the pictures, can you spot the driver and the red mug? Side3 by StefanEris, auf Flickr Front by StefanEris, auf Flickr Side1 by StefanEris, auf Flickr Side2 by StefanEris, auf Flickr Feel free to comment. Stefan
-
 New LEGO/ Lego MOC, VW T1 BUS (VW Camper Van) Is still 10 grain width, the new version is not based on the past version of the upgrade, I refer to a large number of original drawings and objects, re design details, body length, internal structure, and customized manual spraying (silver effect) parts. The new version of the T1 will be a series of my design, I will be based on this chassis for a variety of T1 modified car design (such as: pickups, SUVs, racing cars, trailers and so on, of course, will also consider the static model). T1 is a classic, multi-purpose models, it is worth pondering, I hope there will be more based on the design of the personal style of the modified car appears, I will always maintain this series of drawings sharing. The current version is 1.1, the design will be updated at any time, with the design of the trailer will be released, welcome to communicate with me through MocPages, Sina (Weibo) and other social platforms. http://weibo.com/moonein http://www.moc-pages.com/moc.php/438905 https://rebrickable.com/mocs/MOC-8059/moonein/rcpf-vw-t1-camper-vanvw-t1-bus-10-wide/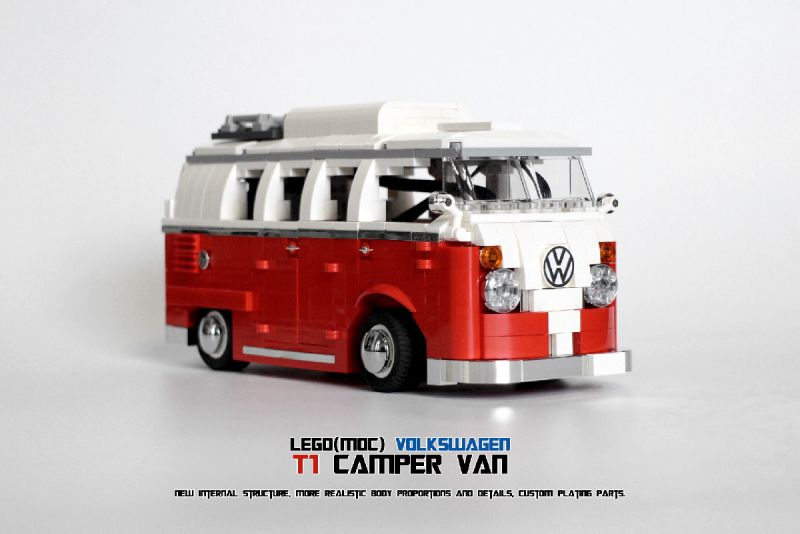
-
Hello fellow City friends, I've just finished a Volkswagen T3 camping edition "Westfalia", "Caravelle CL" and a standard. The scale used is 1/42 and regarded by myself as minifig/city scale, for it uses 1,70m for a minifig being 5 vertical studs high (including head pin). It frankly wont fit any minifigs properly, since its 5,6 studs wide (1,80m) and i needed a lot of interiour structure for the roof and windows to stay in place In some renders i used non-transparts windows to give better contrast (bluerender aint good with trans! ). Critique and feedback always welcome, feel free to enjoy the pics Cheers, Ron. New lands.... by Ron Dayes, auf Flickr T3 Westfalia side view by Ron Dayes, auf Flickr T3 Westfalia back view by Ron Dayes, auf Flickr T3 Standard by Ron Dayes, auf Flickr T3 Caravelle Cl by Ron Dayes, auf Flickr
-
Hi everyone! My newest creation is remote controlled! It's a bus and it's my fifth tiny RC at minifig scale! Hope you like it! My previous RCs on Youtube: , , , Of course I visited the intercity bus station with a camera and the bus again, as I did recently! The type of the bus is Ikarus, but only the body is Ikarus, the engine and chassis is Scania. That's why you see the word 'Scania' on the front. It's possible to travel by it in Hungary. At the area, where I live, the bus company has I guess three of them. So we have more chance to catch it, than to catch . If you read the technical things below, you will see, that it has some disadvatages. But I like it very much and I'm really satisfied with the body! It has some crazy building techniques in every directions. As far as I know, they are my own inventions. Maybe they are already exist, but I didn't know them. My favourite detailes are the headlights, the taillights, the upside-down windows near the gear rack, the covering method of the destination screen and the air conditioner. Technical detailes: It is more difficult to build a bus at this scale, than a truck. For example at a the truck we can use five stud wide frame, and after that we can cover it by tiles, so it won't be too wide. But for a bus we have to use panels to make the windows, they are 1 stud wide on both sides, so if we want to stay in 6 studs, the frame can be only 4 stud wide. And Technic prefers the odd numbers... It's not good if the driven wheels leave the ground, so the rear wheels are not completely fixed. Looks like, if I make something better, something becomes worse. It's the first time, that I used servo motor for steering. The steering features are better, the frame is worse. Below you can see an image without the body. You may notice, that there is an arch in the frame, like a bridge. The AAA battery box is at the back, and its weight causes this deformation. Furthermore there's no possibility to fix the body by studs after the servo motor. Therefore the mudguards touched the rear wheels. I had to raise the rear part of the body by half plate. It causes some deformation, too And finally I have to tell you in secret, that the servo motor moves the gear rack on a little bit longer distance, what the inner things allow. So the motor twists the frame. You can see it in the video at . Therefore one of the front wheels sometimes leaves the ground.And almost all of the weight is on the driven wheels, so sometimes the bus wants to go straight ahead, instead of turning. But it's very rear. And finally you can see the small piece of pneumatic hose, which holds the window in upside-down position. The base and the top of the window panel has a different thickness. It depends on its position, in which height the more space in the body is. If I use the window on a normal way, the gear rack pushes it out, during steering. All in all it looks cool and works well, so I'm happy with the result of my fifth attempt! More pictures: http://www.moc-pages.com/moc.php/425778 Thanks for visitnig!
-
So, some photos attached make this obvious - it's based on the WrightBus New Bus for London. It's currently on the Lego Idea's site at https://ideas.lego.com/projects/154570/ - I'd be grateful of support to get this to the next stages. Comments and thoughts always appreciated, too :) Key features: Opening front and centre doors An open rear platform for minifigs to jump on and off A removable roof to access the top deck to place minifigs inside A removable portion top deck to allow access to the bottom deck Blank destination panels for customisation within the end pack Two staircases for top deck access "Push Bell" and grab poles on the lower deck for minifigs to stop the bus https://flic.kr/s/aHskEj6J68 has some images: NBFL-01-2000px NBFL-02-2000px NBFL-03-2000px[/url NBFL-04-2000px NBFL-05-2000px NBFL-06-2000px NBFL-07-2000px NBFL-08-2000px NBFL-09-2000px NBFL-10-2000px NBFL-12-2000px NBFL-13-2000px NBFL-14-2000px NBFL-15-2000px NBFL-16-2000px
-
-
ayy mates what do you guys think about the new summer 2017 city lego sets like whats your favorite theme from this wave and whats your favorite set and what do you think in general?
-
-blank
-
After the T3, i had to go further back in the models origin - to the more popular "T1", also known as "hippie bus" or "Bulli" (called in germany) Enjoy, feel the vibes and peace! The front HIPPEEEY BUS! by Ron Dayes, auf Flickr the back end - in this case the one of the T3, but its practically the same, just that i put round headlights on the T1 where as in here there are the cheese slopes. VW T3 update by Ron Dayes, auf Flickr
-
 Welcome, I'd like to present a bus Solaris Urbino 12 IV. Specifications Scale 1:15 Length 103s / width 23s / height 27s (83/18/22 cm) Weight: 5,4 kg Front suspension: Independent, double-wishbone Rear suspension: Live axle Suspension with kneeling system RWD 2-speed gearbox AA+AAA Battery Boxes 7 motors Functions Driving - 2XLs Steering - L Opening doors - M Kneeling system - L + Servo Changing gears - M LED headlights Working steering wheel History Some time ago I decided to build a bus. I chose Solaris, beacuse it's a polish concern, which is producing buses and trams. I started building in mid-Febraury, and I finished it few days ago. Chassis The biggest challenge was to construct a strong chassis. We need to remember that it's a low-floor bus. The drive motors and the gearbox are (like the real one) located veritically on the left, behind the rear axle. It's causing big stress and I had to overcome it by the chassis. It consist of 3 parts: at the bottom there is a floor 2s thick, built from panels 5x11 and frames; at the top there are beams 3x3s on each side of the bus, they are built from liftarms. These two elements are combined by 7 rungs. The construction of the chassis is similar to the hulls of ships and planes. Drivetrain The bus is driven by 2 XLs. Gearbox ratio: I - 12,6:1 II - 4,2:1 The gearbox is built from frames, using 2 gear 24, 1 gear 12 and 1 gear 36. The gears are changed by M motor and mini linear actuator. The biggest problem was to lead the drive from gearbox to the axle. It is the weakest point of the bus - 2 universal joints, connected to the gearbox and to the axle, under a load break. Steering For steering I used L motor with reduction 14,4:1. It propels the gear rack 1x13 and also the steering wheel. Suspension Front suspension is independent with 2 yellow 6.5L absorbers per wheel. Rear is live axle. It has 1 grey and 5 yellow 6.5L absorbers (1 grey and 2 yellow for the right side and 3 yellow for the left side). Opening doors + kneeling system The doors are opened by M motor, reducted by 40:1. The drive is transmitted by liftarms used as links. The kneeling system is realised by 2 medium pneumatic cylinders. The pneumatic wires are connected only from one side, so the bus can rise using the absorbers. L motor drives the compressor and servo opens the valve with reduction 3:1. These 3 motors are electrically coupled, so in each door there is a gear with clucth. Thanks to that, the compressor doesn't stop at any time. The most wanted photos :) From the top From the bottom Some photos Gallery
 -
 So my friend Eric built a 24 Hours of LeMons race van from a 91 VW Vanagon and a 2.5 subaru legacy motor. I helped out with making the Polizei decals but overall it was a sweet deal for me because all I really had to do was show up and drive. It was my first LeMons race and my first time on a track in an actual road race, and it was FUN. If you haven't heard of the series, check it out here... http://www.24hoursoflemons.com/ Our van even got some great press on roadkill.com... http://www.roadkill.com/lemons-sears-pointless-vans/ http://www.roadkill.com/sears-point-lemons-winners/ Anyway, my friend spent a lot of money and hours building this awesome van so I wanted to do something nice to thank him for his hard work so I made him a LEGO version of our van to say thanks. Obviously this box is just a mock up, but I did make these designs into an actual box using a LEGO box I turned inside out and covered with some large photo prints from my 13x19 printer...I just forgot to take a picture of it before giving it to him. Since I knew he'd appreciate building it, I made the van into a kit with instructions made from photos since making actual quality instructions is a huge pain in the megablocks... http://odometer.org/polizei/ I really like the minifig fez as an aircleaner... Overall I'm super happy with how it came out, it was my first attempt at a larger vehicle and I think it worked out well. I did cheat a bit with the black decals to make a wider grill, but I figured if TLG can use a sticker for the middle divider on the split window of their VW bus, then I can get away with that. Here's some pics of the real van in action...
 -
A scene from one of the greatest comedy movies of all time Who's Singin' Over There? (Ko to tamo peva). The film tells a story about a group of passengers traveling by bus to Belgrade but on their way there they come across many problems, such as this shaky bridge the bus should drive over. I've also made the Moc into a project over at Lego Ideas, so if anyone would like to support it you can do that here: https://ideas.lego.com/projects/83f13efc-9885-48cf-9ebd-3abc197234fe Thanks in advance! 1 by legomanijak, on Flickr 2 by legomanijak, on Flickr 3 by legomanijak, on Flickr 4 by legomanijak, on Flickr 5 by legomanijak, on Flickr 6 by legomanijak, on Flickr 7 by legomanijak, on Flickr 8 by legomanijak, on Flickr 9 by legomanijak, on Flickr 11 by legomanijak, on Flickr