Search the Community
Showing results for tags 'moc'.
-
 Model of a Westchester County Bee-Line 2005 Orion V (05.505) transit bus. The model uses Power Functions IR remote control for motorized drive, steering, and opening doors. It also includes a Detroit Diesel Series 50 engine behind an openable engine door. Functions/features: Drive Steering Working steering wheel Motorized passenger doors Opening engine door Detroit Diesel Series 50 engine model (removable) Instructions available on Rebrickable: https://rebrickable.com/mocs/MOC-265143/JLiu15/2005-orion-v-05505-bee-line-bus/#details The Bee-Line System, the public transit agency in Westchester County, NY, ordered 21 Orion V (05.505) buses in 2005 numbered 116-136. This order of the 05.505 model, which is 32ft long and 96in wide, succeeded buses 101-115 from 2002 and are the last of this model ever built. At the beginning of their service life, buses 116-129 were operated by Liberty Lines Transit, Inc. while 130-136 were operated by P.T.L.A. Enterprise for routes 16, 18, and 31. The first retirements occurred in 2016, with the first four units (116-119) retiring and two of PTLA’s buses (135 and 136) transferring to Liberty Lines. In 2021, PTLA’s 131-134 were scrapped, and Liberty Lines’ 120-123 were transferred to PTLA to fill the gap. In early 2024, all remaining buses (124-127 and 129) were transferred to PTLA while all other units in the series were retired. These five buses are still active at the time of writing. My model depicts bus 124. When I decided to attend Brickworld Chicago 2026, I wanted to display a smaller bus model next to my New Flyer D60HF model from last year. I had already been wanting to build an Orion V bus model for a while, such as a 2000 05.501 model (40ft long and 102in wide) in Potomac and Rappahannock Transportation Commission livery. However, seeing that Bee-Line is also quite famous for their Orion V buses, especially being one of the last operators of Orion V buses today (they also have a few 2008 05.501 suburban models numbered in the 800s still in operation), I decided to do it in the Bee-Line livery. From the start, I knew that a challenge would be the livery, since their livery includes diagonal stripes that would not translate as well to LEGO pieces. Unlike my previous bus models, I actually started with the bodywork this time in Stud.io, then built the Technic chassis around that. This meant fewer changes to the chassis to attach the bodywork, a revision that was often needed for my prior bus MOCs. I designed the livery to have the horizontal stripes done using LEGO bricks and plates, and I found LEGO blue and bright light orange to match their livery quite well. The diagonal stripes, which continues onto the roof, I decided to make using custom stickers. I first got the idea for this MOC in mid-February; by mid-March, I had a bodywork designed in Stud.io. This was followed by designing the chassis, and in early April I began the building process starting with the chassis. The shorter length of the bus meant that the build had to be compact, but there was enough room in the chassis to fit a PF L motor for propulsion, a PF Servo motor for steering, and a PF AA battery box. Because my PF Rechargeable battery box and SBrick are still in my New Flyer D60HF model, I used PF IR control for this model. In fact, it is my first time using IR control in a MOC since 2020! I was initially concerned whether a single PF L motor would be enough torque, but given that my Airport Crash Tender MOC from 2017 was even larger in terms of dimensions and did fine with a single PF L motor geared 1:3 and then 14:20 at the differential, I decided that the same gearing in the drivetrain was sufficient. It also helped keep the rear stepwell area compact, as the drive motor sits directly adjacent of the stepwell and two L motors may have taken up too much room there. One of my favorite parts about this model is the inclusion of a Detroit Diesel Series 50 engine model connected to the drivetrain, as that is the engine the real-life bus uses (their 2008 units use the Cummins ISL instead). For this, I ordered some sand green Technic pieces to capture the iconic Alpine Green that Detroit Diesel engines are painted in. A notable difference between Detroit Diesel Series 50 and Cummins powered Orion V buses is that those powered by the Series 50 omit the middle seat in the rearmost row due to the larger size of the engine. This meant that I was able to keep the cylinders exposed on my model, so you could see the pistons moving even without removing the engine model from the chassis. The doors use a different mechanism from my previous bus models. On the real-life Orion V, the door leaves protrude significantly from the body when open. A mini linear actuator here would have 3 studs of travel, leaving the door leaves flush with the body when open. I went for one fewer stud of travel range, and used a linkage mechanism driven by a worm gear. The mechanism performed flawlessly despite my initial concerns; I was worried this setup would be more likely to jam when opening and closing. Both the front and rear doors use a PF M motor and a 24T clutch gear is used on each to prevent the motor from stalling when the doors are fully opened/closed. The steering mechanism is set up similar to that of my New Flyer D60HF model, and likewise, a working steering wheel is connected to it. The doors’ motors and the PF IR receivers were placed in the roof, attached to a Technic frame; I was able to blend the IR receivers in almost seamlessly with the rest of the roof, which is largely made using 8x16 tiles. I am overall satisfied with how this MOC turned out, and in some ways, it looks even more realistic than my New Flyer D60HF model. I like how I captured the shaping of the driver’s side windshield, which is sloped to reduce glare for the driver. While there is a slight shade difference between LEGO pieces and the colors printed onto the stickers, from a distance the livery still looks pretty seamless, especially the side stripes. I had fun making the video as well - I also included a few video clips of the real bus taken by Kyle Garcia, a friend of mine on the East Coast. I’m also glad I finished the model while the real bus is still in active service, as I wouldn’t be surprised if the last 5 remaining units are due for retirement very soon. Video: Photos:
 -
Hi fellow builders My third MOC here on Eurobricks is a minifig scaled model of the brand new SAR helicopter in Norway. The Leonardo AW 101 is a magnificent machine! I start off with some important information. I built this MOC based on a model i found on Lego Ideas. The creator SimonSchepp published six pictures of his grey army version of this helicopter, and I used these with the intention of making a similar model. The result is a helicopter that looks similar, but is probably built very differently. With only six pictures available It was really difficult to figure out how to build this thing. But I think it turnes out nice, and I learned a lot along the way. Hope you like it. Minifigs deserve only the best, and the AW 101 is state of the art. You can hoist the patients in to the helicopter. The crew has lots of medical equipment available for treating patients. The helicopter flies fast and safe in all kinds of weather conditions. Fully decorated cabin, similar to the layout in the real helicopter. Size does matter, and this thing is big. Fully decorated cockpit, with collective and cyclic. I know there should to room for 2 pilots. But to maintain playability, I could only fit in one seat. The godfather of helicopters, Igor Sikorsky, deserves som credit. Any comment or questions is much appreciated. Thank you for your time. Keep building :-)
-
The ultimate Imperial Shuttle Lego MOC: The Sienar T-4a Lambda Class. Two years of meticulous building, design, redesign and re-build - and now she's finally here! 3 different sets of instructions have been prepared for this ship - and every buyer will have access to all 3 models - available on Rebrickable. The Imperial Lambda Class Shuttle, 5420 parts. These elegant transports were the workhorse of the Empire; initially used for transporting Imperial officials and officers around the galaxy - and in later days as these shuttles became more common, they were often used as simple troop transports and even light cargo ships. Lord Vader himself was known to use a Lambda Class Shuttle - and this was also the same design as the famous Shuttle Tydirium, which was stolen by the Rebels and used to transport the Endor strike team in Return of the Jedi. There are various floor-plans out there for this ship, but I chose the official design which makes most sense to me + it was the layout used in the "Incredible Cross Sections" book which featured this ship. It's as close as I could get it whilst using Lego, although you will have to allow me some 'poetic license' here and there :) I've also designed an "empty" display version, with no interior and 4817, perfect just for display or modding with your own interior design! ...and then, there's the Emperor's private shuttle, which I'll be posting separately There's a choice of 2 display stands for showing the ship in flight mode - both are FREE downloads available on my Rebrickable page. Lastly, I’d just like to add that personally, this was always more than just a Lego creation. It's a Lego brick-built replica of what is, to me, the single most elegant and beautiful ship in all of Star Wars. This is something that I've dreamed of making since I was a kid in the 70's - and now it's time to share it with others.
-
"Masterpiece" Spending so much time at the Age of Steam Roundhouse Museum, one will really begin to appreciate everything in their collection, not to mention the facility itself. Everything from the extraordinary to mundane will find its way into your mind and heart. I must admit that in my years of steam locomotive research and enjoyment, the Nickel Plate 700's did not strike me. For whatever reason, they just didn't click with me. I'm not sure what it was, but obviously, that's changed now. Cale and I modeled 765 way back in 2017 when we were still figuring out Brick Model Railroader. It took some convincing, but we eventually decided that Nickel Plate Road 765 would be our first collaborative steam locomotive model. We had a running model that needed some adjustment, but quickly became disinterested in the project due to external factors. We were never quite happy with where we left this project, and vowed to each other that we would return to the model some day to do it again, properly. Several years later, in late October 2021, and on a whim, I laid out a scaled wheelbase in stud.io, just to see what it would look like. I left the file alone for a couple more months until the Holiday season of 2021. I began thinking about a Nickel Plate Berkshire running around a Christmas tree, inspired by the amazing "Travel Refreshed" speculative project: https://www.youtube.com/watch?v=h2mU6jVcv4w&ab_channel=FortWayneRailroadHistoricalSociety This set my mind racing with thoughts of the late 1940's when large mainline superpower led "hotshot manifest" trains through the heart of America. If there was ever a perfect depiction of postwar steam railroading, it was this, and the Nickel Plate Road was the poster child. The Nickel Plate Road connected the farms of the Midwest in St. Louis and Chicago to Buffalo in the east. The road took a fast, level route along the southern edge of the great lakes. A direct competitor to the New York Central, it was purchased by the Vanderbilts in an effort to remove competition. As such, the line was never optimized and operated with older and slower equipment. The Nickel Plate was purchased by Oris and Mantis Van Sweringen, brothers from Cleveland who had controlling interests of several other roads including the Chesapeake & Ohio, Wheeling & Lake Erie, Pere Marquette, Erie, and more. The "Vans" would lead efforts to completely transform the Nickel Plate into the powerhouse bridge road it is remembered as today. One of those efforts included the creation of the Advisory Mechanical Committee (AMC), which served as a design bureau for the roads under control of the Vans. One of the first projects for the AMC was the design of the C&O T-1 class 2-10-4 engines, the largest two cylinder steam locomotives when built. Continuing in efforts to rejuvenate the Nickel Plate, president John Bernet assigned AMC officer William Black the task of designing a super-power locomotive. The result was the Nickel Plate S class of 2-8-4, built by ALCO Schenectady in 1934. The AMC, capitalizing on their winning formula for the T-1, maintained the factor of adhesion just above 4 while scaling down the rest of the locomotive: eliminating the fifth pair of 69" drivers and creating a locomotive with 70% of the tractive effort and 70% of the weight. Unbeknownst to Bernet, Black, and the AMC, they had just captured lightning in a bottle. To truly appreciate why the 700's were such good locomotives, the operating mentality of the Nickel Plate must be understood. The road was a masterpiece of engineering, maintaining a very flat right of way along the mainline, running shorter but faster trains handling bridge traffic over the line. Operating conditions like these coupled with the high-horsepower 700s, there has hardly been a more perfect match of locomotive and railroad. The Berkshires were so effective and loved, the Nickel Plate laughed away EMD diesel demonstrators multiple times until the end of steam in 1958. Even still, several of these locomotives were stored serviceable in anticipation of a traffic spike that never occurred. 763, part of the third batch of Berkshires in total (S-2 class) and second batch from Lima (Works #8671), was one of these locomotives. Officially retired a few years after the end of steam, it stayed in Conneaut, Ohio until 1966 when it was purchased by the Virginia Museum of Transportation in Roanoke, Virginia. 763 remained in Roanoke for several years until it was towed to New Jersey for inspection to pull the American Freedom Train, but other locomotives were selected., and 763 returned to Roanoke. Ohio Central and Age of Steam founder Jerry Jacobson purchased the locomotive from the museum in 2007, returning the engine home to Ohio. It is currently stored inside the Age of Steam Roundhouse Museum in stall 4, a regular favorite part of any regular public tour. All that to say: I never expected to have such a deep, genuine understanding and appreciation for these engines. It says a lot when someone can connect with a piece of machinery in such a way, and gain understanding of its purpose and reason for existing. The 700s were truly magnificent machines. So, in deciding that I was going to model one of these amazing locomotives, I began working in stud.io, and over the course of several months, I came up with what must have been at least a dozen iterations of the rough shape of the engine solely to achieve "the look." With 765 currently operating and with countless fans of the locomotives, the 700's are well recognized and people are going to be able to pick out the details, so any model of one has to be done properly. Once I had the correct shape and proportions, I filled in gaps and rebuilt section after section until I had a completed digital model in June of this year. By then, I had just seen 765 operate in person for the second time and was feeling inspired, so work on the custom wheels and connecting rods progressed alongside. Refining, trial, failure, adjustment, and testing continued until December 2022 when I completed the physical model. Naturally, I had to model 763 specifically, being the preserved example at Age of Steam. Under the hood this model is identical to my Mohawk: a pair of Power Functions L motors geared 1:1 driving the third axle, each operating from its own Power Functions IR receiver, and powered by a Tenergy 7.4v 2200 mAh battery. 763 operates smoothly and without issue thanks to the drive train design and high-quality printing of the wheels, rods, and valve gear. Drivers and trailing wheels designed by me and printed by Rob Hendrix, all rods and valve gear designed by me and printed through Shapeways. All artwork was faithfully recreated by Cale Leiphart. Decals printed by OKBrickWorks and UV printed number boards and bearing caps are from Richard Glatter. Thank you all for your help with this project. Having completed and published Buffalo Creek & Gauley 13, Morehead & North Fork 12, and now Nickel Plate Road 763, my Age of Steam collection grows. Those who know me personally understand that I'm not one to brag about my work. However, I feel I must say that I think I've outdone myself with this model. I would say this is the most new, ground-up design of locomotive I have built in a while. I've achieved detail and accuracy that I haven't seen on even some traditional scale models, and it all works together to make 763 perhaps my best model yet. A masterpiece of a masterpiece, if you will. As 2022 winds down, I'm elated to publish this locomotive and check it off the list. As I mentioned earlier this year, I've had a lot in progress recently so wrapping something up feels fantastic. There's a bit more in store for the immediate future, but we'll get to that later. As always, thanks for reading, and thanks to everyone for their support of my work through comments, questions, and compliments. It is always sincerely appreciated and I am thankful to be a part of such a fun community. More photos here: Video here: Merry Christmas and Happy Holidays, Glenn Holland
-
Decided to take inspiration from fellow builders and put all my past & future builds into one thread, so I wouldn't feel bad about having to create new threads everytime I had something new to upload. The first pictures are the builds that got me started back in 2017, and ones at the bottom are the more recent mocs that I've made. Jaguar XJR-12 Completed in January 2021 McLaren Senna Completed in January 2021 Lexus LFA Modification of an earlier version that I built back in 2019 Bentley Mulliner Bacalar Completed in February 2021 Koenigsegg Jesko Absolut Completed in February 2021
-
Poor ship. I have to say, I am not a huge fan of its looks. It is like an UPS truck, or a beat-down cab in poorer part of the city. Gets the job done and offers just minimal creature comforts. On top of that this particular ship had no easy life either. If I had to write all the accidents it had I'd basically describe half or more of the story of the Mandalorian show, so to avoid spoilers - go watch it yourself. For now just believe me: Millennium Falcon had really easy and nice life compared to the Razor Crest. I did not plan to build it initially, but Brickvault guys asked me one time if I would and I agreed. After all this is quite a small ship, right? And boxy, easy shape, right? So I'll just do a month or maybe month-and-half detour from my plan, riiight? Oh boy. This aged like milk. We talked in May and, uh, I am not done yet, but more on that later :D This one-and-half month detour took half of the year, almost 5k pieces and was far harder than I expected it would be. Once again, an angular thing proves to be far more difficult in LEGO than a curved one. Got a tiny angle wrong and everything falls apart. And the size? Just about 70 studs. Yeah. There goes "quite a small ship". Btw, would you consider it an UCS or minifig scale, considering it is... kinda... both? So what do we have here? 5k pieces, a bit over 3 kilos of mass, plenty of features, internal frame strong enough to do this: https://photos.google.com/share/AF1QipP6ZbI-UJ09F5vPPMEbTkF1L9q2EZkMnegT8EbEC4fFMUba0WqZii3KR3Pcg_Waag/photo/AF1QipOPONHBr-6ATUGQnvs1n3uJr-Gy7C0HCNvY79DY?key=MmRXMFNjTFVIU3Rmekg3UTZqOUhvTEY1MzB3TUxB I had some fun at, uh, "temporary local beach" (on quite a high floor!) ...and on the Levitating Plate: All the hatches open: there are also additional hatches to access interior details. Truth to be told, access is not great. This is not really a play model because it is so heavy, but you can adjust stuff inside. The cockpit seats three, front seat folds for easy access to the back row: ...and of course there's plenty of space for Mando's quarries: So, why is it not done yet? I probably got the roof angle wrong. Actually, I definitely got it wrong. But is it a big deal? What do you think? Should I just proceed with instructions "as-is" or would like to see this updated? Or maybe you actually like this slightly slanted roof section? Instructions will be available on brickvault when complete, and there's a nice preorder for reduced price for now: https://www.brickvault.toys/products/razorcrest ------------------------------------------------------------ Razor Crest Update #1! I believe that's final design. Roof is now properly flattened, while still retaining minscule but noticeable wing angle, section behind the cockpit has been changed for better shape, and engines were updated thanks to ScottishDave's input on Eurobricks. Now I need to update the studio model (not too hard, should be few hours at worst) and I can get to making instructions. In the meantime, Brickvault will commence their internal review to ensure there are no flaws in the model, parts lists or instructions. I'd like to thank everyone who preordered, commented and liked - fantastic support from you all! Stay tuned for future updates! Thanks for viewing! EDIT: The instructions are released - to be found on brickvault.toys !
-
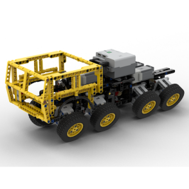 I decided to do this thread because I am tired to open new ones again and again, so enough speaking about me lets go for the almost MOCs. It seems that we are on dumpers time because I am working on this massive small truck. It will be very simple, only 2 axles steering and bed tipping but I had some problems... the angle and weigh of the bed due the lack of room when the steering work, bed itself also was a problem with technic parts and the scheme color will be a imposible to solve problem at least for the real MOC. I think I do not have to say which the truck is.
 -
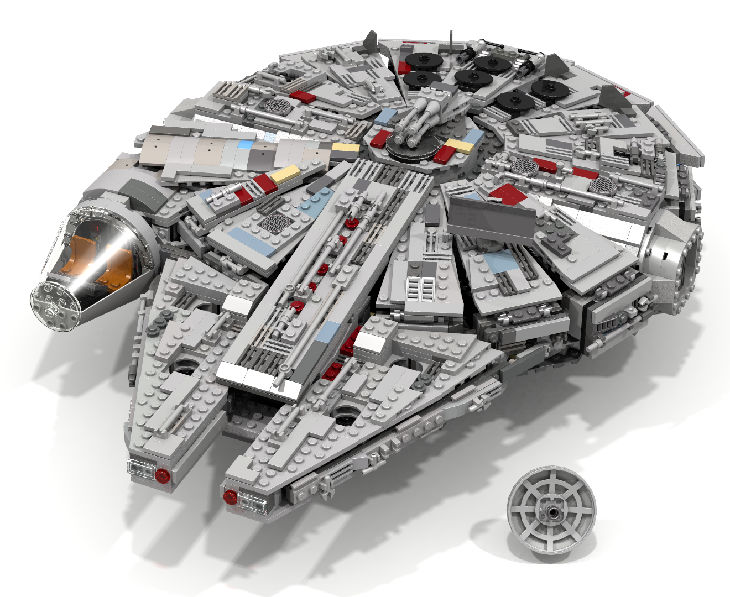
 A from the ground up build of the play scale Millennium Falcon pulling inspiration from 7965, 75105, Dario Del Frate and many other custom Falcon's online with interior. Including LDD File for your enjoyment. About a year ago I came across Dario Del Frate's beautiful mod of the 7965 Millennium Falcon and I immediately wanted to make my own. Unfortunately at the time he had not put up any instructions on how to build his and I am not the greatest at reverse engineering so I decided to start from scratch. Pulling from the original 7965, Dario's Falcon and various other custom falcons and sources/blue prints online to come up with what I have to show today, with a few little mods/design upgrades that pulled from the new 75105 Millennium Falcon for the Force Awakens. I also added both satellite dishes for your preference. So this is what I have currently, solely built inside LDD and unfortunately I don't have the cash at the moment to start ordering the pieces and building it. Also I'd love to see if it can be improved upon before I do decide to pull the trigger on building it so I give this to the world and all you great Lego designers in hopes that you would like to improve on it and/or build your own if you have the pieces to build it in real life and let me know how it holds up. Mostly I'm just happy to see what releasing it out into the wild brings back until I can build it myself. Linked (at the bottom) is the Moc Pages Site where you can see more images and download the LDD .lxf file that you can use however you wish.. mod it, fix it, change it, totally rebuild it. I would love to see what you do with it. Cheers all, enjoy! Happy New Year!! MOC PAGES LINK FOR MORE PICTURES AND LDD FILE: http://www.mocpages.com/moc.php/423507 IMGUR Album: http://imgur.com/gallery/25EPG Check out Dario's Falcon that sparked the beginning of this project here: http://www.mocpages.com/moc.php/390350
-
Hello everyone, this is my MOC of USS Constitution. I estimate it to be between 5-7000 pieces. I will eventually rig the ship fully as well as add minifigs and longboats. I am currently working on the Guerriere for a battle diorama. If anyone has any feedback or changes I should make, plea feel free to let me know. more photos at Uss constitution - Imgur
-
 Hi Eurobricks forum, This is my submission to the Bricklink Designer Program Series 7: The Medieval Construction Site, if you like the build please support it here: https://www.bricklink.com/v3/designer-program/series-7/2296/Medieval-Construction-Site I designed this wanting to add something unique to the world of Castle, and wanting to delight Castle fans. We have many excellent castles, large and small. There are also many excellent cathedral MOCS, but typically they are more suited for expos, and too large for the average builder or fan. I have been working on this Medieval Stonemasons/ Construction Site concept for several years, hoping it would be a good centerpiece for many different medieval towns. Back in BDP 6 I wrote an article for Brickset about the design process: https://brickset.com/article/114150 As for scale, the scale was set to the Medieval Town Square. As regard the Lion Knights Castle (which feels more like a keep) - Cathedrals were often the same height as smaller castles at their nave. For example the Tower of London is 27m, Burg Eltz 35m, and Chartres Cathedral is 37m. I hope you like the build, please vote!
 -
It's finally finished! Luas full length Luas is the tram here in Dublin, and I've been wanting to build one for a long time. I started about a year ago, when I got the general concept for the cars figured out, but then abandoned it for a while. Sometimes the inspiration just isn't there... Anyway, over the past few weeks I figured out the cabin, the connections between the sections, improved the doors, which required a different way of doing the roof.... One thing I decided right at the start is that I wanted to do the micro-stripe yellow above the purple. The first idea was to use brackets (1x2/2x2 and 1x2/2x4) and you can still see those in the middle section. Luas middle section However for the outer sections I had to change the concept, as the plate part of the brackets got in the way of the sideways built doors. I ended up using flags, but getting enough of them in yellow and in the old mold (the clip is slightly different in the newer ones, and unfortunately Bricklink doesn't differentiate) was not easy. It's powered by a 9V train motor in the middle and it can manage the tight curves: Luas inside curve It does have a bit of an overhang, so don't park close to the tracks ;-) Figuring out the shape of the 'dressed up' bogies was not easy, despite the simplicity of the final design. Getting the bodie shape around them was even harder. The connectors between sections were another headache that's gone through umpteen different designs. In reality they're an accordion-type structure which is impossible in Lego. So I needed something that would keep the sections close on the straights, and would allow the tram to go around standard curves without showing a big ugly gap. For transport it also had to be easy to take the sections apart and for reliable running the connection has to have some flex when the track isn't perfectly level. I managed to do all of that:
-
Hello Speed Champions and City fans, It was my entry to Bricklink Designer Program Series 3 and 4. It has received many kind comments and support, but unfortunately it has not been selected, therefore I decided to make the instructions available here: https://rebrickable.com/mocs/MOC-177592/_TLG_/school-bus I always loved American style school buses, therefore I decided to design one to Bricklink Designer Program Series 3. It is not actually based on a real one, but it contains many typical details: the black bumper rails and STOP arms on the sides, the crossing arm, the side and rear doors, the rearview and crossover mirrors, the mudguards, the warning lights etc.. The roof assembly can be removed as one piece and in this case the internal details are visible: there is a driver seat with steering wheel, dashboard, gear shift, passenger seats and even a fire extinguisher. It is 8 studs wide, studless build in minifigure scale and fits perfectly to Speed Champions cars or to a LEGO City. There are many working details: the front and rear doors, the STOP arms, the crossing arm and windshield wipers. I wanted to create a clean build and tried to fill every unnecessary gaps and hide unnecessary studs, therefore some tricky, but legal build techniques are used. The set includes three minifigures: a driver, a school girl with a pen and backpack and a school boy with a brick built backpack. The model has space for 17 minifigures: one driver and 16 passengers. If the passengers are kids with short, rigid legs, then they can stand on the seats. The building instructions guidelines have been followed. It is built from the palette "BDP Series 3", so there are some color and part restrictions. The color "Bright Light Orange" would be a bit more authentic, but the available parts are restricted, therefore I decided to use "Yellow" and I am satisfied with the result. The STOP sign is very rare part and it is not available in this palette, therefore it is replaced by a simple, white, circular sign with a sticker. The door 43967 is also not available in yellow, therefore it is replaced by a brick built one, however, in this case I was able to add some extra details: a black door handle, bottom window and red lights. I hope you like my design, I appreciate any feedback. Thanks for visiting, _TLG_ School Bus - Bricklink Designer Program 3 - 01 by László Torma, on Flickr School Bus - Bricklink Designer Program 3 - 02 by László Torma, on Flickr School Bus - Bricklink Designer Program 3 - 03 by László Torma, on Flickr School Bus - Bricklink Designer Program 3 - 04 by László Torma, on Flickr School Bus - Bricklink Designer Program 3 - 05 by László Torma, on Flickr School Bus - Bricklink Designer Program 3 - 06 by László Torma, on Flickr School Bus - Bricklink Designer Program 3 - 07 by László Torma, on Flickr School Bus - Bricklink Designer Program 3 - 08 by László Torma, on Flickr School Bus - Bricklink Designer Program 3 - 09 by László Torma, on Flickr School Bus - Bricklink Designer Program 3 - 10 by László Torma, on Flickr
-
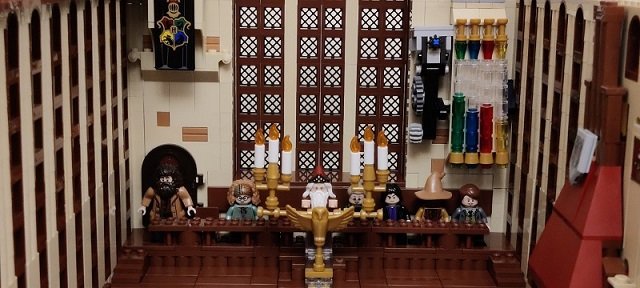
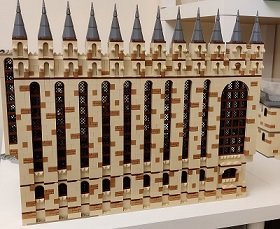
Hello everyone and thank you for accepting me in the site! After being away from the hobby for nearly 20 years, as if by chance I ended up rekindling the flame for LEGO once again. Over the past year and a half I have been working from home and I have been looking for new way to entertain myself. Accidentally I saw that the Harry Potter line had been revived over the last couple of years, so I decided to collect it as I was a huge HP fan as a child and building stuff after work seemed like a good way to relax while listening to some jazz. One thing let to another and as of a month or so now I have been building a full Hogwarts Castle MOC in quite an ambitious scale too, as it turns out. Like I said, I have been away from the hobby for quite some time, but it is great to see that unlike the 90s, nowadays it is quite easy to share with people and find like-minded souls for any passion you might have. Being an AFOL now and easily being considered somewhat of a boomer (lol), being out there is somewhat new to me, but nevertheless to make this process easier, I have made a YouTube channel and an Instagram where I am documenting my progress and various difficulties I happen to encounter while building and designing. So for anyone who might be interested, any kind of opinions, comments and feedback are more than welcome! Looking forward to delving into the LEGO hobby once again and finding new friends within the community! Thank you _______________ Edit: Nov 2022 Hello all, wanted to share some nice pictures of the current state of the castle for those of you that don't follow me on Instagram. Really appreciate if you follow me on You Tube and Instagram. Really helps a lot. Thanks for all the feedback! https://www.youtube.com/@Uniqueorn https://www.instagram.com/uniqueorn_lego/

-
Here’s a love letter to one of my favorite ships of the Age: the absolutely terrific Téméraire-class 3rd rates by Jacques Noël-Sané. Without doubt this is my main inspiration for L’Anubis - god of the Underworld. The main obstacle for building larger ships in theme-scale is obviously the age old question: to prefab hull or not? Building the lower hull to Fer Maiden that mates up w/ the prefabs taught me a few ways to do a brickbuilt hull that can at least live in the same universe as them. That gave me the confidence to try this. I then used Fer Maiden’s dimensions to get a theme-scale equation and have my 3rd rate at 70x18 studs along her gun deck. Total width at her waterline is slightly more due to the SNOT curved slopes. Anyway, enough of that - I know you want the goods. This is still very much a work in progress with some gaps and test techniques so bear with me! I feel like you guys enjoy seeing a bit more of the process. This project has been progressing super quickly thus far (surprisingly) but I will really need to build her in real life and the instructions are going to take a massive effort.
-
I thought it would be fun to have a thread just for sharing really awesome MOCs that other people created. I know looking at awesome stuff helps to get me inspired. My first ever Lego Space set was Starfleet Voyager. One really awesome Lego builder, Chris Giddens, created TWO remakes of this set that are both amazing! The first one is here: His more recent one is here: Two of my other favorite MOCs are by Peter Moris as part of his Classic Space Evolved set. This first one is remake of the Twin Starfire, a ridiculous set from the 80s that he made awesome: The other one I really like of his is his radical remake of FX Star Patroller, which is a mashup with the Mospeada Legioss & Tread (also known as the Robotech Alpha and Beta fighters):
-
UPDATE - March 2023 - INSTRUCTIONS are still available via PayPal donation - just let me know or write me a mail to boonatix@gmail.com :) Prevously: Working on the instructions is close to the finish... WIP - Instructions by Brickmasta on Flickr UPDATE - FINISHED on 22nd of April The Batwing - Front by Brickmasta on Flickr See the Album with details and more: https://www.flickr.c...th/13973416094/ ----------------------------------- I would like to present my current WIP to you all and love to get some feedback on it As soon as I saw the first Trailer for "The Lego Movie" I was in shock... a childhood dream coming true. With so many awesome creations in it. And one was standing out the first time I saw it: "The Batwing". I immediately knew that I needed to build this asap. Even though I just came back out of the dark ages by end of last year and was very fresh to all the building processes, parts and stuff... I thought It can't be that hard with having the model right in front of me on the screen. But it wouldn't be as easy as I thought... I researched all the internet for more pictures / trailers, fortunately there was more released with special scenes and stuff for this Batwing. I did frame by frame analysis and took a whole lot of screenshots, scratching my head how and where to start. I had the best material of one of the turbines, so I just got to work on one of those! But then I was kind of lost... not enough details, not enough shots of the Batwing. And then somebody on Flickr linked me a video to the Lego Movie Videogame. Woah! There was actually a building process you could unlock in there for it. I had to get the game, started gaming until I was able to unlock this plan and rebuild it over and over to see how they did it. And got to the point where I finally started with one of the wings! The Batwing - WIP #003 by Brickmasta at Flickr And the first challenge occured and I knew it would not be that simple / as easy as I hoped. The wing consists of 4 sections. And each section basically just featured 1 connector, making the whole wing completely unstable, bending and nearly breaking apart. That did not look good. So I got to understand that I won't be able to do a 1:1 true copy of it. The physics in the movie and the videogame are just easier / different because there is no real physics So I got to work again and tried and tried and thought and planned... and found a solution! First step was to double and exchange the connections for each section: The Batwing - WIP #004 by Brickmasta at Flickr But that was not quite enough and after some more thinking I had another idea, so I took the shot and gave the second wing a try with new elements in it and a stabilizer under the wing, connecting the sections and holding them together... and it worked out! "The Batwing" is going to be huge...! That is my progress so far. I am now starting to work on the cockpit and will try out the connections from wing to cockpit asap because I have a feeling they also won't hold up that good... each wing weighs around 260gr wich is around 0,6 pounds. That is quite a lot to be held together by slim Lego connectors. Lets see how this will work out then Let me know what you think! Appreciate every comment and input
-
Never really happy with my former 8-wide design this is what I ended up with after reworking it digitally with what ended up as a near-total overhaul DSB Litra EA The Danish State Railways' (DSB) first electric locomotive was built by Henschel & Sohn in Kassel, Germany (the first two) and Scandia, Denmark (the remaining ones). 22 were built in total from 1984 to 1992. 1 was scrapped. 16 were sold to Bulgaria and Romania from 2007 to 2010 and 4 to Bulmarket in Bulgaria in 2021. The last remaining one (EA 3004) was transferred to The Danish Railway Museum in 2020. Wiki here and irl photo here. My model: DSB "modern" red & black livery used in the 1980s. Scale: 1:46 Length: 52 studs from buffer to buffer Width: 8 1/3 studs Bricks: 1.132 Weight: 1.042g excl. batteri box Locomotion: 2 L-motors (PF or PU) Power: BuWizz 2.0/3.0 or 1 AAA PF/PU battery box Control: BuWizz, PU or SBrick Designed: 2023 Redesigned: 2025 It still has the fictional serial number EA 3024 and is named 'O K Kristiansen' Very high setting render from Stud.io with custom decals done in the PartDesigner tool. Access through the removable roof to a fairly correct interior with ample room for the different locomotion, power and control options (2 x PF L-motors and 1 x BuWizz 2.0 battery box shown): 2-axled bogie design with molded MS Train Wheels from HA Bricks which are slightly larger (by one plate) than LEGO standard Train Wheels: The somewhat complex undercarriage The ubiquitous PF L-motor design originally created by Duq used in many of my models with upgearing from 20 to 12 teeth with a ratio of 5:3....more speed, less power: The design is done and the real model is currently waiting for a few essential new parts to be built and then thorough testing awaits
-
Hi everyone, I present to you my second version of the Renfe S-130 like Ferro-Friki did some time ago. I wanted to remake this train that I made first in 2018 with not the best result so I now made this version in 7 studs. LEGO Renfe S-130 DEF [MOC] by Imanol, en Flickr The set is heavily detailed even in the rear of the power cars and end cars LEGO Renfe S-130 Testeros Interiores [MOC] by Imanol, en Flickr I have made a reduced train set of only 7 cars instead of the 11 that has in real life but it has one of each of the different cars that form the real train with detailed interiors. First the "Preferente" end and "Preferente" LEGO Renfe S-130 Lateral Extremo Preferente [MOC] by Imanol, en Flickr LEGO Renfe S-130 Lateral Preferente [MOC] by Imanol, en Flickr The interiors of "Preferente" cars LEGO Renfe S-130 Interior Preferente [MOC] by Imanol, en Flickr The "Preferente" adapted car and it´s interior LEGO Renfe S-130 Lateral Preferente PMR [MOC] by Imanol, en Flickr LEGO Renfe S-130 Interior Preferente PMR [MOC] by Imanol, en Flickr The cafe car and it´s interior LEGO Renfe S-130 Lateral Cafeteria [MOC] by Imanol, en Flickr LEGO Renfe S-130 Interior cafeteria [MOC] by Imanol, en Flickr And the Turista cars which are the same as preferente but with 2+2 seating arrangement LEGO Renfe S-130 Lateral Remolques Turista [MOC] by Imanol, en Flickr LEGO Renfe S-130 Lateral Remolques Turista [MOC] by Imanol, en Flickr And now that I presented it I want to ask for help to build it as it will be my first lego train in real life. The car coupling mechanism that I have installed is only for aesthetical purposes and will not work in real life. Another problem is that i have seen many models in which all of the rear of the locomotive or power car pivots and I don´t know if it could be necesary to do in this case. Lastly I want to know how to motorize it, being so long I would suppose I would need the two power cars to provide power but I don´t know. Anyway, I hope you enjoy this project as much as I enjoyed designing it
-
Hello I recently bought the Rogue One imperial Battlepack - mainly for the Death Troopers - but was a bit disappointed with the generic non-canon walker that was included so I decided to see if I could re-use the parts to make something a bit more pleasing. That was the plan but in the end I went off-course and ended up using only a few of the parts from the battle pack - and plenty more from Bricklink. The result was this Microfighter scale AT-ST complete with driver borrowed for a larger set. Vital statistics are: 84 pieces, 6 studs wide, about 10 high - depending on how the legs are posed - and about 8 long. I'm fairly happy with how it turned out, it stands up OK and can be posed with the legs 'walking' though it's a little front heavy. The head is mounted on a mixels ball joint so it's got a little range of motion and the stud shooter cannons can be raised and lowered too. The legs and lower assembly are quite straightforward but the head section has a lot of SNOT going on with 6 brackets holding the thing together. It was definitely the hardest part to do. It's nearly all LBGrey and DBGrey but I got a bored of that and put some sand yellow bits in to break it up - tonally they are between the two greys so you can get a bit of subtlety in the shading but it may not be to everyone's taste, I may change them to regular grey. The driver also has a couple trans green plates in front to mimic the cockpit displays, just for another bit of colour. Scale-wise, it's a bit taller than most Microfighters but within the bounds and it doesn't look too out of place in the range - I don't have the AT-DP to compare it to but I do have AT-AT... Yes, I know it's all kinds of wrong but it sort of works.. That's all, comments welcome. I'll post the .LXF once I've brought it up to date with how the actual model turned out. cheers J
-
Welcome aboard the little narrowboat! Hi everyone! Haven't been very active lately, but I do lurk . Anyway, after 2 years! I've finished another custom modular building, my thirteenth! This model began from wanting to have a modular that you can easily interact with. My models have rarely had much motion, so I wanted to have a go! I chose to build a lock because I love all kinds of infrastructure and because I could come with with a nice industrial cityscape, something I had wanted to build for a while. Coming up with a good layout was quite difficult because there are a few limiting factors. You need to connect to other modulars on either side with a continuous pavement, while having to go over the canal, leaving enough clearance for the boats and leaving space under for the mechanism. Finding a reliable and compact mechanism took a lot of work. I ended up with a design with design four vertical worm gears that activate an axle lift with bushes. It can get jammed from time to time, hence why the gears are easily accessible. Mechanism: If you want to take a closer look at it, I have the CAD uploaded to Mecabricks. I take suggestions as to how to make the mecahnism simpler, because it's currently quite gear-heavy. Interiors: The ground floor of the building has a little ticket shop in front and the exposed mechanism for the lock behind, so both minifigures and builders can access it! If you've seen my models previously, you know interiors is something I can struggle with, especially when I have too much room to work with. This is probably my favourite interior of mine. It's a cosy cinema, with a camera build I'm quite proud of. The grandpa and kid seem to be playing a Lego version of Casablanca. I wonder if it's a reference to anything... Finally, under the roof, there is a bit of a cluttered mess. This area is accessed via a retractable ladder from the cinema, so it's only natural things get forgotten up here! I quite like the candle build here. I've also always wanted to add cobwebs to a modular, but never had the space to do it! Architecturally, it takes cues from industrial architecture in England (such as the Camden Lock, the Birmingham Canals...), America (such as the Distillery District in Toronto) and especially architecture from the Hanseatic cities in northern Europe (Speicherstadt in Hamburg, Lübeck..., the first being a major inspiration), but as usual, I get the gist of the building without copying exact details from the reference material. I've uploaded the model to the Bricklink Designer Program. This is the fourth time I've tried it without much luck, so I'm not too hopeful, but we'll see! I was already designing this when the oportunity came up, so I thought, might as well! I genuinely think this would be a great product. The techniques are interesting, and the end result is sturdy. A modular with as little building as this would not get released as an official model, but maybe through this program it might! Hope you like it.
-
Hello! Today I would like to present my first foray into the city theme. This truck started out as a load for a planned train (rolling highway), but I also wanted to know: can I build a trruck that can be driven by remote control? Without hiding the electronics in a Container box.... Yes, I can! The little one is fully roadworthy: 1x Cicuit Cube HUB, 1x Circuit Cube motor as drive motor and 1x CaDa MicroMotor for the steering (here the PF plug had to be exchanged for a Circuit Cube plug, soldering skills helpful). And because it's nicer: front/rear light in the truck ;-) A matching semi-trailer was also built, of course with a prototype. I like the north of Europe, so I often see the semi-trailers of the Freja haulage company and my daughter is also called Freja (only in the German spelling). So it was obvious which haulage company would serve as a role model for me. And the logo was a great snot job: approx. 200 parts per logo.... The trailer has a retractable/extendable pillar, operated by hand via a gear wheel at the front. It's hardly noticeable there and could also be a ventilation detail... I also built a manual version of the truck with “Hand of God” control: no soldering, just drive, no foeign parts required.... .... and with twin tires. I'm still missing them on the RC version and have fallen victim to the lack of space. And because only pictures of moving trucks are boring: I have created a (attention, longer^^) video of the development and with many detailed explanations (but in german, sorry) : have fun watching it: I hope you have as much fun watching the photos / videos and reading here as I had building ;-) Thomas / Ts__
-
I wanted to share some images of a tunnel facade I've been working on. It is for a standalone display in my home, and built to fit the Cargo Train 60198. Tunnel clearance They are built as a pair. Some colours need changing out, will pick those up next time I am using bricklink. I'm not sure about the keystone, but the left version will do for now. Tunnel front facade The rounded effect is created using 1x2 rounded plates as seen below. In terms of alignment, this will result in the tunnel having an odd-count stud width, as an even-count messes with the radius. While I have not tried it, this theoretically means it will work at any odd-count width, so you could boost the width if you had wider trains, or wanted to place it at a curve. Consequently, you will need to offset the entire structure by one half-stud. Tunnel backend
-
Hi there! This is my debut publication and let me present to you this Swiss Electric Locomotive, reproduced as faithfully as possible from the SBB Be 4/6 locomotive. This is a minifig-scale model. The model has a removable roof. Inside the model are: two electric motors, transformer, tools (4 pieces), compressor (x2) and a tool suitcase. The set includes a figure of a train driver with a briefcase: Inside the cab Front view New design of pantograph - first variant: ... and second variant: The first variant is not pretty enough, but it allows the pantograph to fold. The second variant is more elegant and plausible, but does not allow the pantograph to fully add up. This model can be motorized with the 1x 8809 and 2 x88013 Powered Up kit. Model info: Length: 50 cm (45 studs), Width: 9 cm (6/7 studs). Total parts: 1140. If you like this model, you can support it on LEGO IDEAS Thank you for your attention! I hope you enjoy this locomotive!
.thumb.jpg.2591aed2a8c1883a12eab08e25d2d586.jpg)
-
Presenting another of my Danish State Railways’ (DSB) trains redesigned to 8-wide and digitally rendered (with a bonus livery)... DSB IC3 The Danish State Railways’ (DSB) highly successful and innovative InterCity 3 aka IC3 passenger train was co-developed by Siemens -Duewag in Germany and ABB Scandia in Denmark. The train is operated by DSB in Denmark and Sweden, by Renfe Operadora in Spain and by Israel Railways in Israel. Amtrak in the USA and Via Rail in Canada have tested the train in the past. A trainset consists of three units; two diesel motor units (Litra MFA and Litra MFB) and one intermediary unit (Litra FF). Up to five trainsets can be coupled together. 96 trainset were built for DSB from 1989 to 1991. All are still in service today. My model: Original white and red livery used from 1989 to 2002. Fictionally named “Jørgen Vig” with the crest of Billund added. Scale: 1:48 Length: 157 studs (MFA: 55 – FF: 47 – MFB 55) or approx. 122 cm Width: 8 studs Bricks: 2.948 (MFA: 1.040 – FF: 861 – MFB 1.047) Locomotion: 2 x 9v or 2 x PF/PUP train motors Power: 9v, 2 x LEGO AAA battery boxes or 2 x BuWizz battery boxes Control: 9v, PUP, SBrick, PFx Brick or BuWizz Designed: 2022 Conversion of my 7-wide model from 2017 to 8-wide with more accurate dimensions. Very high setting render from Stud.io with custom decals added in the PartDesigner tool. Its able to navigate R40 but looks rather silly doing so: Interior with seats for 83 minifigs: Decorative side design for the bogies - a combination of parts and the molded decorative side for train motors: The coupling part can be change to a Liftarm Thin 1x7 (BL#32065) when combining several trainsets. Technique used for the sliding doors: Removing the 1 x 4 Tile as shown enables the door to slide open as a play feature. The fixed outer doors are a necessary part of the construction otherwise the very long body breaks too easily due to the roof being removable. However, they are designed to be rebuilt open when needed and the trainset stationary on display: The trainset is (fictionally) named Jørgen Vig with the crest of Billund added: Free building instructions: Option 1: https://open-l-gauge.eu/dsb-ic3/ Option 2: https://snakebyte.dk/lego/instructions/trains/diesel_engines/dsb_ic3_(8_wide)/index.php Bonus livery: Livery when Amtrak tested the IC3 Flexliner DMU (Diesel Multiple Unit ) in 1997:
-
 I've been working on this build since '7680 The Twilight' set came out in 2008. It started out as just modding the set to give it some interior, and slowly evolved with the continuous advances to LDD. Building this was the driving force behind designing my minifig scaled Delta-7, because I wanted to ensure that it would fit inside like in the show. I've gone through countless revisions to my design, even as far as starting from scratch at least 3 times. With every redesign came more research and I learned more and more about the design of this ship. I learned about a lot of things that never made it into the show. Things like that this ship actually has 3 levels to it, and that it uses an elevator to get between them. That they used 2 distinct 3D models of the ship and would switch between them during episodes, etc. It has been a long journey, but I'm finally happy enough with my design to share it. So into the details; Currently the ship sits at a total of 11,259pcs, measuring in at 102 studs (81.6cm) long by 132 studs (105.6cm) wide, by 37 studs (29.6cm) height (landed) or 84 studs (67.2cm) height (both outriggers extended). In other words, this thing is pretty big, still not as big as the Ghost, but it is the same length as the UCS Millenium Falcon. While I did find images and video of the majority of the interior I sacrificed a few of the unseen rooms in lieu of having more structure to hold the whole thing together. I did however keep all of the main areas, this includes the cockpit, cargo hold, connecting hallway and the boarding area. Comparing my build to the official Lego set. Here is a comparison between my Twilight, the UCS Millenium Falcon and my Ghost. As well as some comparisons with some of the official images that used to be on StarWars.com, I couldn't get the angles exactly right, but they're close enough to compare. And as a final note, I am currently in the process of building this monster, I have been slowly gathering pieces for the last few years, I have about 80% of the total pieces required, though I'm sure I'll have to make some modifications as I go. I will be posting updates as I go, but for now, here are my bins of parts, please forgive the unsorted disaster that they are currently in.


.jpg.0f1e2a30948a73b2270ce858547d25e3.jpg)