Search the Community
Showing results for tags 'small'.
-
Good day! Sometimes I make MOCs that don't deserve a topic, or simply have WIP concepts that I don't publish . This will serve as a place where I post my WIP creations that may end being a MOC , and small sized MOCs which are too simple to post a video or create a topic.
-
 So this was a quick, fun project. I gave myself the weekend to build the smallest RC car I could. My goal was 4 studs. This seemed reasonable since a battery box and SBrick are both 4 studs wide. With the width set in place, I quickly realized that making two connected parts would be the way to go so the model naturally became a camper van/RV with a trailer. The main car holds 2 micromotors and the trailer has 1 old-style battery box with the SBrick directly on top. More photo's here. Assembly photos are here. PS: I must also thank Mbmc as some of his micro RC MOCs were a good inspiration for this project.
 -
DEAR LEGO STAR WARS FANS!!!! If you have found your way to this account, you are either interested in the world of LEGO Micro-building... or you just clicked on a wrong link somewhere and are now very surprised to be surrounded by these tiny marvels of creations... or not. If the former is true then, welcome. In 2011 I received my first STAR WARS Advent Calendar for Christmas, and was blown away by the sheer ingenuity and accuracy capturing the looks of iconic ships in truly micro form. Naturally, I had to have a go myself! I built a few... I was pleased... I built some more... and here we are nearly 6 years later, and I am still building them. I began by reading my first LEGO STAR WARS Visual Dictionary (DK) and building a micro of EVERY SINGLE SET IN THE BOOK! With that now exhausted, I moved onto the 2014 edition with more sets... I built all of those too. So now I just build a micro of every new star wars set that has, is, or will come out since 2014, amongst other iconic and less well-known ships from STAR WARS 'non-canon' such as the Old Republic, Freemaker Adventures, Yoda chronicles to name but a few. With a back catalogue of over 270 mini micros and counting, this truly is the World's largest Encyclopaedia of STAR WARS micro kits. Enjoy! -- JamesArts It would mean a lot to me as a budding MOC builder if you checked out my flickr: https://www.flickr.com/photos/151467275@N04/albums and my YouTube Channel (JamesArts Bricks UK): https://www.youtube.com/channel/UCmYOMZz6DyvM1euY2qrRfpA/featured?disable_polymer=1
-
Hi all, this time I'd like to show you something that is a bit different. It is more a study, or an experiment than a real model. It's is a very small narrow gauge locomotive, inspired by an hand-made creation of Mr. Akio Inoue (who is a famous live steam builder in Japan). The locomotive is depicted on Mr. Mori Iroshi site, which is of great inspiration to me. There's also a Youtube channel (simply search AKUBI LR on Google, you''l find it immediately). Let's say it is a mix between a DEKI-3 and a Rhatische-Bahn GE 2/2 162. Once it was yellow, now it has RhB colors. It's a bit "Japanese" since it has a super-deformed body, it is more tall than long. "Power" (HA HA HA ) is coming from a 9v micromotor mounted upside-down, and there's a working headlight. It needs a battery car to work. I use it on black narrow-gauge Lego curved track, but I recently discovered that LEMAX track has the same gauge and offers straight tracks (no switches, sorry ). It is sloooooooooooooooooooow! I hope you like this little,nerdish thing! It's name is PKZIP (like the file compression archiver for DOS PCs of the past)
-
Transformable combat robot - tiny one. This is my first MOC :)

-
 This is a very small, robust, reliable and easy to maintain buggy. It is ideal for letting your kids play with all day. The design goal was to make a robust car as small and simple as possible. This means most of all no suspension system since that would require the use of CV joints. They are known to break and while they work nicely in LEGO super cars that you carefully push around the floor, it does not work with kids trying to race and crash their RC cars. CV joints will break. Of course it is possible to create a LEGO RC car with suspension and even four wheel drive/steering, but then you end up with LEGO’s own RC Crawler. The goal was to keep it small, simple and robust. One of the problems I encountered when letting kids play with the RC cars all day is that the axles in the differential tend to slip and move out. I hence build a differential assembly in which the axles are completely locked in and cannot move. The worst thing that could still happen is that a wheel comes off which is easy to fix. The car uses only one L-Motor and is pretty fast for that. The turning radius is very tight and the car is just fun to drive. The differential makes it perfect to drive around tight corners. The heavy battery pack is right on top of the back axle, giving it the best friction. Well, it does not accelerate like an F1, but it might still make a small difference. Building instructions, LXF, and further information are available.
 -

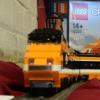
[MOC] Full Lego Technic locomotive - in 1:22,5 scale
Paperinik77pk posted a topic in LEGO Train Tech
Hi all, these days I'm working a lot with Lego Technic, since I've bought some parts to experiment a bit this new world. I'm used to build old Lego Technic from the 80's and 90's...but these new sets are very very complex, and require a lot of time to figure out where and how to put a certain part. So , back to the Stud.io I started designing again...and came out with this thing: It's similar to old steam trams, to the GE 2/2 and HGE 2/2 locomotives, to some service railway cars...to the alternate 7720 model. Oh, well...it's a box and it's similar to all those boxy things! Dimensions are 13/14 stu...holes, units? for width and 25 for body lenght. Both buffers add an additional 6 studs to overall lenght. I'd say it is a small 1:22,5 locomotive, like my old yellow shunter with PuP. Since I'm still not so much able to recreate details such as doors and ladders...I simply avoided them. Pantograph is designed to use a rubber band for the moment - it could be nice to make it foldable with some gears! At least the body is self-consistent and can easily be removed. The battery is fixed on the central upper part of the body, right in the middle to increase weight on all 4 traction wheels. Rods are somewhat triangular and quite strange, but they're strong! Other kinds of rod arrangements can be done. Using a normal gear transmission could also avoid rods at all. The boxy body gives me the internal space to experiment for transmissions and motors. This chassis probably will change a zillion of times like the one of my XXL locomotives. In the picture above, you can see the possibility to have the double gauge solution (left axle is L-Gauge and right axle is configured for 45mm G-Gauge track). The gear you can see in the middle of left axle shows the possibility to implement a cog railway system using Lego flexible track. I sincerely do not know if the 45mm cog tracks could work with a Lego gear - so let's limit the cog solution to original Lego track It can become also a fancy Tram locomotive, like the "Gamba De Legn" ("Wooden Leg") used in Milan for many, many years. But for this one - I'm still struggling to create a proper, working engine. I've seen few full Technic locomotives, but it's really fun to build them! I hope you like it!!! Ciao, Davide -
 About two black ages ago I came up with a mechanism to add steering to very small models, and I worked on two models based on it. I have never been able to finish them to my satisfaction, and I'm realizing the current black age I'm in will probably last until retirement, or at least until I get a bigger living space, so I'm posting what I have now. I should probably have posted about the mechanisms years ago, but I wanted to have some neat models to show off with it too so I never did. Last time I searched around the web for anyone else who had shown the mechanism off I didn't find anything, so I don't think it's a well known thing. Here's an album with pictures it this post: https://imgur.com/a/ixZOK0s Overview of the two mechanisms. Vertical and horizontal variants of the small mechanism on the left and bigger one on the right: Small mechanism with vertical axle: Same mechanism with horizontal axle: Here's the bigger mechanism with vertical axle: Here's a WIP wheeled excavator based on the smaller mechanism. The bottom right picture is another control scheme I was exploring. I'm mostly satisfied with the model, it's only the arm and bucket I don't like. Here's a bigger WIP model. This one uses very tightly packed pneumatics. It's missing the cab and arm, but I'm otherwise pretty happy with what I've got. I was never satisfied with the arms I managed to build. They were either too bulky or too fragile. This model feels very nice to roll around on the desk, it has some a weight and grounding that the smaller one lacks, and the turning is pretty satisfying too, even though it can't exactly turn on a dime. Lastly, here's a half scale model of the 8049. Lacking fenders, seat, lights and the trailer. I would like to get the two excavators finished one day so I can have them hanging out under my monitor, but my hobbies have shifted to electronics and plants, and I'm lacking in desk space anyway. Maybe one day though :-) Hopefully these mechanisms can help you in your builds! As a bonus, here's my collection of all technic excavators, except for the Liebherr, which I'm hoping to find used for cheap. Note the blue excavator from the 8888 idea book! If imgur decides to stop hosting the pictures, contact me on BL where I have the same username and I'll get them hosted somewhere else.
 -
My second MOC :) Nano transformer from human type to crab robot

-
 Hi Guys! I would like to present you my latest build. Not usual small excavator truck. The target was to create small excavator truck with as many functions as possible. I wanted to build truck with 8 functions, to use all IR ports, but in this small scale, I only manage to put 5 and I put 3 functions to Dump truck in same scale. It was quite hard to put all functionality to such a small body, but the result is worth it. It has 5 PF controlled functions: 4x2 driving, steering with great steering radius, rotating platform, controlling beam and controlling bucket. Is very well playable and It can dig a sand/brick and it is enough powerful to take itself out of the ground. It's robust enough to survive young child play. More info about Dump truck can be found on my blog lego.tomashubik.com Some photos: More photos and indo are here: Excavator truck Dump truck VIDEO COMMING SOON...
 -
 Good day. This used to be one of my prototypes for the e formula competition. But after making the chassis I decided to put a BuWizz in . Backstory: "This is one of the best known racing cars on Xalax , developed by Axos Industries. Stabilized Zirum Crystals' energy is used to power it , obtaining constant and (almost) infinitely lasting power. It has a turbo system to increase the output speed." Real statistics: -2x m-motors for drive , with a 3:1 gear ratio -1x m-motor for return to center steering -BuWizz Using (underestimated now) m-motors , it picks up quite high speeds and is a lot of fun to drive around ,even in normal BuWizz mode. Here is a LDD model -> download A quick preview of what to expect whe the full video is finished: https://www.youtube.com/watch?v=GaVM6J2oFvI
 -
Just a little thing. Mashed the Sebulba's Podracer planet series set with some other parts lying around to create a custom swoop for him, so he's not lying around going unused. :P
-
Welp, back onto 1/15 scale Made this little thingy in about 12 hours after Madoca's small supercar popped up in my YT recommended. BRICKSHELF (whenever uploaded) As with my Mini Nitro Menace, this year's Corvette wheelbase was taken as a base - should be compatible with the transporter truck - and so the build began. Of course, drive&steering has been done a million times already so this needed a cherry on top - the roof was what I was looking for. Making a chassis was dead easy with the slim wheels and by motorising each rear wheel independently, the need for a differential was eliminated. Thanks to the placement of the BuWizz in between the rear wheels, steering and roof motors could now populate the central tunnel and be hidden under the black 3x11 curved panels giving the interior a "cleaner" look. Now, bodywork ain't my strongest point, but I wanted it to be ferrari RED. This meant working with a very small inventory (for me) most of which you can see on the car Of course ricer butterfly doors were made to make it look cooler than it is. Have a nice weekend, Cya)
-
Hi there, I'd like to present a MOC I've been working on from time to time since a few months: It's a small RC buggy, something I'm missing from Lego: Pictures show the V2 model. An interactive 360° view of the V1 model (with different rear axle) is available here: http://pub.clusterd.net/lego/technic/mocs/buggy/ Steering: PF Servo motor Propulsion: PF L motor (geared up 28z => 20z => 12z which is good enough to drive on office carpet and short distances on thicker carpets with fresh batteries, it works great on smooth surfaces; 36z => 12z => 12z also works, but requires more power and works best on a smooth surface; RWD) I initially used it with a AAA battery box and V2 IR receiver (not shown in the V2 pictures above, where it will be fixed to the rear spoiler, the V1 model had it at a slightly different location), but the AA battery box also fits - though it looks not as good due to different mount points, and it will also be heavier then. I assume it will also work with the LiPo box and SBrick and I can - since a few weeks - confirm that it also works with a BuWizz, but then it's more something for outdoor areas, as it gets pretty quick in fast and ludicrous modes. I created the main chassis of the V1 model of this buggy during a long evening/night and added most of the body parts the following day or days, don't remember exactly. The stickers are from the 8048 set and IMO fit the buggy theme great. Steering is also from 8048. It's fun to drive around and it can also take some hits. I took inspiration (mainly for the rear shock mounting and general setup) and motivation (I wanted to have something about as small as this) mainly from this video on YT: ...and some other videos about small RC buggies. The creator's buggy itself is also roughly based on the MOC (video and instructions for V1 model) of someone else. Instead of (re)building this one, I created my own - also because I didn't have a Buggy motor at that time. I also created a V3 model. It's slightly bigger, has front lights (using PF LEDs) and uses bigger wheels but shows some deficiencies of the design: The rear axle tends to tear itself apart in this model on rough surfaces, making the gears slip. I assume this is due to the bigger wheels used in the V3 model. I use some additional axles with stop and bushes now to hold the rear axle together for a longer time. I assume this maybe could be fixed by using a frame around the two axle holes that shouldn't move apart. When doing tight turns the V3 also lifts one of the front wheels - the one on the same side as the gear that sits on the drive axle. If someone has a good explanation for this, I'd be grateful. I suspect the softer shocks compared to V2.
-
 Hi, I would like to present my newest creation – off-road truck Gaz 66. It is my interpretation of small, old and very popular truck, which has a lot of off-road capability. Someone can ask why next similar small scale off road truck? I would say I like this type of vehicles, the scale and challenges they bring. And with every build I try to test something new, which I wasn't try before. Here the main goal was to go below standard for those wheels width of the model - 15 studs and prepare narrower axles than standard - 11 studs ones. Which I did. Gaz 66 has 13 studs width body with 9 studs (from rim to rim) front axle - stereed and driven. Thanks to that size of the body is more proportional to used wheels. And you can also use tractor tires provided with cargo for even better effect (you can see such modification in real Gaz 66 on one of polish off-road YT channel - LINK). I also tried to add as many details related to real truck as possible, in this scale, I hope there are here some fan of original Gaz 66 and they will recognise some elements I added. Below you can find video and list of features and details. Enjoy. Instructions: LINK General details scale: 1:20 dimensions LxWxH: 30x10,5x12,5cm weight: 946g Features: RC front axle steering (C+ L motor) RC 4x4 drive (C+ L motor) RC winch with place to lock the hook (C+ L motor) 4-link live axle suspension for all 4 wheels three studs ground clearance (with "KrAZ" tires) openable doors and easy access to spare tire working V8 engine with fan located in cabin, plus grill via which working engine can be watched detailed two seats cabin powered by Buwizz 3.0 but also prepared to be powered by standard C+ Hub can operate with "KrAZ" tires included in cargo Photos: LINK My Gaz 66 is powered by Buwizz 3.0, but there is no problem to use standard C+ Lego battery box: Internals of the MOC, so drivetrain connected with V8 engine, steering and the winch:
 -
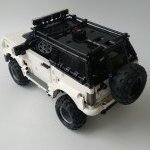 Designed model is based on the Ford Bronco revealed in 2020. During creation of this model, modular build concept is used to simplify the building process by splitting the overall process on three stages. Follow me on Instagram @anton.kablash Instruction you can download here: Ford Bronco InstructionDimensions: 16 x 38 x 19 studWeight: 738 gFunctions: HoG (detachable) Working steering wheel in the cab Front independent suspension Rear 3 link suspension Working engine Openable doors, hood, trunk Detailed exterior and interior Adjustable seats Modular building More photos in the Ford Bronco Album
 -
If you're familiar with this one of a kind band I probably don't need to introduce this mini build to you... Added also the missiles that can be folded out for some serious 'moose action'. Intro to 19/2000 (minus logo, of course) A blatant crossover attempt - just for fun & giggles... Nothing huge or complex but still a fun little build for fans of the band. Free instructions available @ rebrickable.com Thanks & have fun!
-
With the 30th Anniversary of Space Shuttle Challenger's explosion this year, I've decided to put various sizes of the official Space Shuttle models in a row! From the left to right as follows: 1682 Space Shuttle (Small) 6339 Shuttle Launch Pad (Small) 60080 Spaceport (Medium) 10231 Shuttle Expedition/10213 Shuttle Adventure (Large) 7470 Space Shuttle Discovery (Large) 8480 FOS Light Space Shuttle (Extra Large) Which size do you prefer the most?
-
Boxcab Shunter Hi guys, I've just finished a new Power Functions boxcab locomotive. I hope you guys like it. It was my first ever Power Functions MOC and I think it came out quite well. Here are the specs length: 16 bricks (with couplings) hight: 11 plates colour: yellow motor: PF train motor battery box: AAA weight: 314,1 gram But without further ado, Here are some pictures of it! Front view side view Motor How I hid the battery box And how I hid the reciever the only problem is that it doesn't have any wagons... And I have zero idea about what to build for it. I thought about some giant boat trailer or a flatbed but I scrapped those ideas. Bye
-
 Since the new Arocs relased with new suspension parts and a great idea for the rear axle I was thinking, why not also make small scale truck trial machines/races with 62,4mm wheels as a reference point. I think this translates to roughly 1:13 scale. Because this is a smaller scale the models should be easier to build with less parts and more structualy rigid I think a max of 2 x XL, 3x L or 4x M motors should be enough at this scale... What do you guys think? Wanna debate, maybe even set up some guidelines and build something? P.S. click here for some axle ideas at this scale
 -
I actually built his MOC towards the end of the summer, but I have only just found the time to document it. It is a small building built to the Usonian Style. The Usonian Style House was first designed in mid thirties by American Architect Frank Llloyd Wright. They were designed to control costs during the economic depression, Wrights Usonian houses had no attics, no basements, little ornamentation and utilised open plan living. I hope you like my attempt, more images on my Flickr. LEGO Usonian Style House by Chris Brown, on Flickr LEGO Usonian Style House by Chris Brown, on Flickr LEGO Usonian Style House by Chris Brown, on Flickr LEGO Usonian Style House by Chris Brown, on Flickr LEGO Usonian Style House by Chris Brown, on Flickr
-
Hello Everyone I would like to discuss a point that many adult Lego plane enthusiasts probably think about. What is better the old classic smaller planes of the past, or the new large and more realistic planes of today. I am going to try to give an unbiased opinion because I have had many smaller planes as a child. In my Opinion the older classic planes are better for airports in city layouts because they are smaller and allow for realistic size airports and runways. They are also great because they use few specialized parts. On the other hand the new larger planes are much more realistic and allow for more play inside with over 15 seats in most of them. They are also better for layouts purely dedicated to the airport. It allows for massive and impressive airports.They are also more fun for smaller children who think bigger is always better. This is only my opinion. Share yours below and provide an opinion. Thank you in advance.
-
It is a small book shop/library shelving area where all the books are made of 1x2 flat pieces placed individually which fell out about three times causing problems. To keep those in when not showing it to people or getting photos I cimply placed some spare bricks in front of them. https://docs.google.com/folderview?id=0B0LIffC6GUIYaHIzQXVicVJWcTQ&usp=docslist_api
-
http://imageupload.co.uk/images/2015/04/06/imagee92d9.jpg http://imageupload.co.uk/images/2015/04/06/imagea9415.jpg the pull back motor uses the one the creator set with the blue boat, cargo helicopter and one other I forgot about.
-
Hey everyone! I've finally decided to start my own thread, rather than piggy-back someone else's. Frankly, I need help with this: https://www.flickr.c...157643245649484 I'm trying my hand at remaking the classic 7760, with full PF components (lights too!) for a while now, but have hit a wall. The problem lies with the cab windows, and my current solution looks terrible in real bricks... So, I threw together an LDD moc up of what I currently have, and earnestly hope that you can provide me with something insightful! http://www.brickshel...ry.cgi?f=554681 Thanks in advance, ~M_slug357~