Search the Community
Showing results for tags 'pf'.
-
 BrickController2 is an Android and iOS application that allows you to control your Lego models using a compatible gamepad. It supports the following devices: - SBrick - BuWizz 1-2 - BuWizz 3 (basic support) - Lego Powered-Up devices: Boost, PUP HUB and Technic HUB (or Control+) - PF infrared (on Android devices having infrared emitter). Features: - Multiple profiles for a single creation - Multiple motor (or output) assignment to a single controller event - Different types of devices can be used at the same time - The same motor (or output) can be assigned to multiple controller events - Different joystick characteristic settings - Different button modes: normal button, simple toggle, ping-pong toggle, carousel toggle, ... - Train mode on joysticks - Normal and servo mode for the new Control+ motors - Sequences (like for flashing light) BrickController 2 on the Google Play Store: BrickController2 android BrickController 2 is also available on the Apple App Store. BrickController2 iOS Video tutorial created by @kbalage (many thanks for this): And another great video by @kbalage: Older versions: BrickController Android application. It lets you to control Lego creations via Lego infra-red, SBrick and BuWizz V1 and V2 using any Android compatible game controller: Current version: BrickController 0.6 User guide: BrickController User Guide Minimum system requirement: Android 4.4 and bluetooth low energy support on the phone (or tablet) Video on the older SBrickController application:
 -
 42099 Servo-motor steer: https://reb.li/m/168188 M-motor steer: https://reb.li/m/168028 ------------------------------------------------------------------------------------------------------------------------------------------- 42100 Coming soon ------------------------------------------------------------------------------------------------------------------------------------------- 42109 - L-motor steer: https://rebrickable.com/mocs/MOC-84883/nguyengiangoc/42109-pf-conversion-l-motor-steer/ - Servo-motor steer: https://rebrickable.com/mocs/MOC-84884/nguyengiangoc/42109-pf-conversion-servo-motor-steer/ ------------------------------------------------------------------------------------------------------------------------------------------- 42114 Instruction: https://reb.li/m/85933 ------------------------------------------------------------------------------------------------------------------------------------------- 42124 My free mods: - L-motor steer: https://rebrickable.com/mocs/MOC-84954/nguyengiangoc/42124-pf-conversion-l-motor-steer/ - Servo-motor steer: https://rebrickable.com/mocs/MOC-84955/nguyengiangoc/42124-pf-conversion-servo-motor-steer/ ------------------------------------------------------------------------------------------------------------------------------------------- 42129 My free mods: - L-motor steer: https://rebrickable.com/mocs/MOC-84984/nguyengiangoc/42129-pf-conversion-l-motor-steer/ - Servo-motor steer: https://rebrickable.com/mocs/MOC-85004/nguyengiangoc/42129-pf-conversion-servo-motor-steer/#details ------------------------------------------------------------------------------------------------------------------------------------------- 42131 Instrucion: https://reb.li/m/92919 ------------------------------------------------------------------------------------------------------------------------------------------- 42140 Instruction: https://reb.li/m/204737 ------------------------------------------------------------------------------------------------------------------------------------------- 42160 L-motor steer: https://reb.li/m/161275 M-motor steer: https://reb.li/m/166820 ------------------------------------------------------------------------------------------------------------------------------------------- 42176 Servo-motor steer: https://reb.li/m/200987 M-motor steer: https://reb.li/m/200981 ------------------------------------------------------------------------------------------------------------------------------------------- 42214 Instrucion: https://reb.li/m/252230
 -

GBC General Discussion
Jim posted a topic in LEGO Technic, Mindstorms, Model Team and Scale Modeling
Great Ball Contraption (GBC) - General Discussion and Index This is a topic used for GBC general conversation, questions, hints, tips, etc. This first post will be used to maintain an Index of GBCs here on Eurobricks or other websites. Eurobricks topics LEGO GBC 8 + Building Instructions (5 modules - 2 motors) New Akiyuki GBC Instruction Index Other sources Greatballcontraption.com -
 Soon after I've got my 42100, I decided to use it for making something epic and funny. So, after a month of work I've made this "movie" which tells a story about the last battle between old and new. Don't take it too serious, just have fun! P.S. Moral of the story is that the winner hasn't won at all. Cos' all the fallen gained an ability to be revived into different models and live forever, but the winner will stay useless and untouched. :)
 -
A few of you, e.g. @Toastie regretted we removed the PF connectors from our Power Brick for the control buttons. To overcome that modification, we just released a small PF power box that allows you to run your PF devices from the power grid; you no longer need a PF battery box and replace / recharge batteries. We tried to keep it as simple and small as possible. There are two PF connectors; they both provide 9V power (GND and 9V pin) and full motor power (C1 and C2 pin): one connector provides clockwise motor power, the other counterclockwise motor power. You can control the motor power by adding an IR receiver and use your PF remotes. You can connect multiple motors spinning in the same direction by stacking the PF cables. It comes with an 9V/2A power adapter. We can provide the adapter with a US, EU, UK or AU plug. You can see it in action on the video below: It's currently available in our US/International webshop, it's going to become available in our European bricklink shop in the near future. Let us know what you think!
-
Hi there, I'd like to present a MOC I've been working on from time to time since a few months: It's a small RC buggy, something I'm missing from Lego: Pictures show the V2 model. An interactive 360° view of the V1 model (with different rear axle) is available here: http://pub.clusterd.net/lego/technic/mocs/buggy/ Steering: PF Servo motor Propulsion: PF L motor (geared up 28z => 20z => 12z which is good enough to drive on office carpet and short distances on thicker carpets with fresh batteries, it works great on smooth surfaces; 36z => 12z => 12z also works, but requires more power and works best on a smooth surface; RWD) I initially used it with a AAA battery box and V2 IR receiver (not shown in the V2 pictures above, where it will be fixed to the rear spoiler, the V1 model had it at a slightly different location), but the AA battery box also fits - though it looks not as good due to different mount points, and it will also be heavier then. I assume it will also work with the LiPo box and SBrick and I can - since a few weeks - confirm that it also works with a BuWizz, but then it's more something for outdoor areas, as it gets pretty quick in fast and ludicrous modes. I created the main chassis of the V1 model of this buggy during a long evening/night and added most of the body parts the following day or days, don't remember exactly. The stickers are from the 8048 set and IMO fit the buggy theme great. Steering is also from 8048. It's fun to drive around and it can also take some hits. I took inspiration (mainly for the rear shock mounting and general setup) and motivation (I wanted to have something about as small as this) mainly from this video on YT: ...and some other videos about small RC buggies. The creator's buggy itself is also roughly based on the MOC (video and instructions for V1 model) of someone else. Instead of (re)building this one, I created my own - also because I didn't have a Buggy motor at that time. I also created a V3 model. It's slightly bigger, has front lights (using PF LEDs) and uses bigger wheels but shows some deficiencies of the design: The rear axle tends to tear itself apart in this model on rough surfaces, making the gears slip. I assume this is due to the bigger wheels used in the V3 model. I use some additional axles with stop and bushes now to hold the rear axle together for a longer time. I assume this maybe could be fixed by using a frame around the two axle holes that shouldn't move apart. When doing tight turns the V3 also lifts one of the front wheels - the one on the same side as the gear that sits on the drive axle. If someone has a good explanation for this, I'd be grateful. I suspect the softer shocks compared to V2.
-
 Hello all! I know, there already exists a topic about 42110 MODs. But, considering I plan to rebuild the whole car (except exterior) - it really would be better to separate my posts in a new topic (I agree with @Nazgarot). So, for now, I just copy what I posted in 42110 - Land Rover Defender - MODs and Improvements. The actual progress is: - completed front part of the frame (it's stiff enough even without any other part of the body attached): - McPherson suspension and front differential module mounts on that frame and is easily detachable (also McPherson struts include new cv-joints from 42099): - front suspension is built with caster and KPI angles: - engine is built from 4 PF XL-motors coupled together (output gear ratio is 20:36), also it's equipped with one-way clutch (it's built years ago by @nicjasno): - given that drive shaft of the engine has half-stud offset in vertical direction, here is an "offset remover": All modules assembled look like this: And, of course, a video of the short test: This module has some little issues (at first, I need to improve stiffness of the suspension's struts - under load they bend a little bit inward, but it doesn't affect all the process of a drive), but it has a really stiff frame and it's a good start point. You can find more photos on Flickr. About the question why I decided to use XL-motors: XL-s have the biggest torque among all Lego motors (according to the @Philo's page). Buggy-motor has higher rpms, but lower torque (and it's much more expensive and bigger than XL). It's not good choice for heavy vehicles. L-motors are more compact, but, again, if you compare torque/rpm ratio among all of the motors - XLs are the best imho. I tested this setup (4 XLs) two years ago at local fest: This model hadn't any gearbox and was pretty heavy. But, as you can see, the car accelerated easily, than acceleration stopped and speed was constant - only because of low max RPMs of the XLs. Theese motors have very good potential even without gearbox. L-motors are too weak for such acceleration of heavy models. Considering I plan to add a gearbox to this rebuilt Defender - it has to be fast and powerfull))
 -
 Last year, korea did lego exhibition called "Brickorea 2019". And we had a race as a sub-event. Rule One car for one person Can possable use just lego set. not only moc. Any shape allowed If model can move forward. width is limited to max 30cm(circuit width is 50cm). no limit in length. If model use PF system, only 2 channel is allowed per car. Sbrick, Buwizz, and other none-lego motor or batterybox is not allowed. 9V buggy motor and other remote contol system before PF is not allowed. If model use PU or C+ as control method, driver can use brickcontroller2 for contol. Ranking method Racing(racing time) 50% design(voted by competition participant) 50% Circuit rayout. It was a round trip course. not normal racing circuit. All yellow cone is obstacle. That charactor in middle of course is not obstacle. Originally is obstacle but removed. All cone sticked use tape. Even fastiest car chash to cone with full speed it is safe. Car list 1st winner. msk6003(me!)'s 'Porterleghini Muerlcierlago' Original is Hyundai's porter truck. One picture is worth a thousand words. Type - PF Used - 2 Train motor, 1 Servo motor 2nd winner. Fried Kim(새우튀김무영 in korean)'s 'White gold' Type - Powered up Used - 2 PU M motor 3rd winner. Bluebox(파란상자 in korean)'s 'Ladybug chased by wasp' Wheel on front bumper is working as roller for following track wall. Type - Powered up Used - 2 PU M motor Design winner. Nomingi(노민기 in korean)'s 'Lizard' This model is 'walking' with 4 leg. Even can't moving properly but enough for attracting other people. Type - Control + Used - 2 C+ XL motor Crescent_cho(초월 in korean) This car is originally designed for soccer competition but it canceld. Type - Powered up Used - 2 PU M motor Byeolgom(별에서온곰돌 in korean)'s 'Slapdash' Type - Powered up Used - 2 PU M motor ParticleS's 'Two wheel' He bought 76112 batmobile but want to try something different. Type - Powered up Used - 2 PU M motor Ggureogi(꾸러기 in korean)'s 'Banggu-cha' This is 42070 which converted to old korean-style disinfection car. Smoke from car is mini humidifier. Type - PF Used - 1 XL motor, 1 M motor Rumix(루믹스 in korean) Type - PF Used - 1 L motor, 1 Servo motor. Olive(올리브 in korean)'s 'I like bath' This is pretty fast and very good-looking car. Type - PF Used - 1 L motor, 1 Servo motor Macgyver(맥가이버 in korean) Type - PF Used - 2 L motor Hyung Jun Jin(육포공장 in korean)'s 'Artist Jin's secret dietary life' He is korean lego community 'Brickinside' 's lego ambassador. Type - PF Used - 2 L motor Vant(반트 in korean) That QR coad is linked to his instagram. He is normally create lego art but doing first try to technic this time. Type - Control + Used - 1 C+ XL motor, 1 C+ L motor Car under this sentence is made by korea technic team 'DASAN'. First 3 car is body changed 42099. Onepeace(원피스 in korean) Type - Control+ Used - 2 C+ XL motor, 1 C+ L motor Kimkamza(신봉동찐감자 in korean)'s 'Kamza car' Type - Control+ Used - 2 C+ XL motor, 1 C+ L motor Love like spring rain(사랑봄비 in korean) Type - Control+ Used - 2 C+ XL motor, 1 C+ L motor Kwonsu Shin(소원희인아빠 in korean)'s 'Dumper' Type - PF Used - 1 XL motor, 1 Servo motor, 1 L motor for dump function Kwonsu Shin's junior Type - PF Used - 2 L motor ETC Picture with all participant and there own car. Top low(from left to right) Wani kim(competition host and main admin of Brickinside), Rumix, Macgyver, Olive, Vant, Crescent_cho, Onepeace, ParticleS, Love like spring rain, Kimkamza Bottom low(from left to right) Kwonsu Shin, Byeolgom, Ggureogi, Hyung Jun Jin, msk6003, Fried Kim, Bluebox, Nomingi Top 3 winner with there own car and aword. msk6003(1st), Fried Kim(2nd), Bluebox(3rd)
 -
Hello! This is my first design which modelling a real one. (to have some fun: free to guess, what was the original) Width: 7 studs and 1 plate, Length : 50 studs Drive: 2 PF m motor. (3 axle bogies, 2 driven) First step: final version (?) of the base with some details:
-
We got our control buttons out! You can see them in action in the video below. We got a fair amount of feedback on our initial design of the control buttons. One to the main requests that came up was the possibility to use the buttons in combination with our nControl™ software. That was not part of the initial plan and the buttons were not designed for that. However, there are indeed applications where it makes sense to link the buttons to the software. Now that we have a web interface this would, for example, allow you to control the layout with the buttons but monitor it on a tablet. As such we decided to redesign the control buttons so the same buttons can be used: in a stand-alone way like our initial design in combination with nControl™ through a WiFi or USB link with the computer running the software (the buttons are ready for that, but the WiFi/USB brick still have to be finalized) Another major question was how many buttons could be linked into a control panel. The limiting factor is the power consumption of the buttons and that’s tricky because the power consumption depends on the type of button and how it’s used. The original power brick also had two PF1.0 connectors but as The LEGO Group is moving towards PF2.0/PU that doesn’t make much sense anymore. As such we redesigned the power brick: remove the PF1.0 connectors add a power sensor that drives a variable color LED. The color of the LED will change in function of the power consumption: green > red > red blinking. The following bricks / buttons are currently available: power brick servo motor control button for switches, boom barrier, decouplers, monorail switches. light control button for traffic lights and level crossing lights. The next step will be to create: WiFi Brick or USB brick to link the control panel with nControl™ a ‘Throttle Button’ to pilot the trains. This would control the trains through nControl™ and support our WiFi controller, LEGO PU controller and SBrick. Let us know what you think!
-
 Welp, back onto 1/15 scale Made this little thingy in about 12 hours after Madoca's small supercar popped up in my YT recommended. BRICKSHELF (whenever uploaded) As with my Mini Nitro Menace, this year's Corvette wheelbase was taken as a base - should be compatible with the transporter truck - and so the build began. Of course, drive&steering has been done a million times already so this needed a cherry on top - the roof was what I was looking for. Making a chassis was dead easy with the slim wheels and by motorising each rear wheel independently, the need for a differential was eliminated. Thanks to the placement of the BuWizz in between the rear wheels, steering and roof motors could now populate the central tunnel and be hidden under the black 3x11 curved panels giving the interior a "cleaner" look. Now, bodywork ain't my strongest point, but I wanted it to be ferrari RED. This meant working with a very small inventory (for me) most of which you can see on the car Of course ricer butterfly doors were made to make it look cooler than it is. Have a nice weekend, Cya)
 -
 Can someone clarify small question about PF L motors and V1 reciver? I know, that 2 PF L motors on one channel of V1 reciver are underperfoming. So here is the question. if i put 2 recivers in model, one purely for servo and second for motors, where each L motor use its own channel, does they would reach their proper speed, and would such combination safe for hard-coupled motors? I'm trying to make rc 42077, and have only V1 recivers and regular AA battery box. Thus question above. Or what is better for model of such scale and weight - 2 L motors, 1 XL or 2 XL motors?
 -
I've always enjoyed the off-centre-cab shape of the classic 7760, so no sooner had I bodged my own PF-9V battery connector then I started to build one. There ended up being very little in common with the original set other than the overall body/cab shape, but anyway. The colour scheme was dictated by A: my existing parts collection, because I'm a student and don't like buying things, and B: an attempt at what this loco would look like if the British Rail Civil Engineers had used one. I quite like using this grey-yellow-black livery on locomotives, because the black around the windows and doors make them stand out against the bodywork. The handrails either side of the cab don't really make sense, but the only LBG 1x1s I had available are either horizontal clips or headlight bricks, so I put them there anyway. The cab is actually fairly open inside, but there isn't really an interior unless you count lots of wires... The front bonnet ended up held in place by gravity and friction rather than stud connections; this makes it very easy to open in order to detach the battery from the connector, which is the only way to turn the model off! With the cab removed as well, we can see there really is just a big bundle of cables in there. The receiver is only half poking out into the rear bonnet, but signal reception is still fine. In building this model I stole plenty of parts from my 20T Brake Van (and yet still didn't have enough LBG 1x1 & 1x2 bricks, hence why the cab sides are so messy). This meant it needed rebuilding, and I'm actually happier with it now - it's lost the handrails, but the yellow banding is a lot more consistent around the ends. Finally, the loco with its short works train of a bogie flat, a general purpose crane and the brake van. And, as ever, the Bricksafe folder containing the photos and LDD file can be found here: https://bricksafe.com/pages/Collet22/7760-inspired-shunter. Thank you for reading; what do you think?
-
 Hello everyone, I was trying to figure the below down on my own browsing forums, searching for answers, reading a lot of articles from last 2 years however I did not find strict answers to my questions. I am sorry if some answers were already posted here and I did not find them. As I am about to spend some serious money (for me personally as I am not rich) on Lego Technic and I want to be able to create custom machines later I feel like I HAVE TO decide between Power Functions and Powered Up. 1. Is (or will) Powered Up system be customizable using Lego official App or 3rd party app? Will I be able to use Power Up motors and customize them into different than original machine so it works? 2. Should I even be coinsidering Powered Up systems for future and creating custom machines? 3. Is Power Functions a better choice for now and for future for creating custom machines? Is it easier to customize controls? 4. Are there any news or leaks that Lego will allow to customize controls of new Powered Up motors? 5. Is Power Functions better for building custom machines than Powered Up? 6. Does BuWizz or Bricks going to support and customize Powered Up? I am sorry, it all feels so overwhelming as for a beginning person that has limited budget and needs to pick carefully and plan everything ahead.
 -
Do you think it is a good idea to buy fake chinese pf motors. I bought two fake buggy motors and large motors. If you want the link, send me a private message. Thanks
-
Good Day everyone! After completing MPATEV-01 (video&LDD file coming soon) and not able to progress on Saber, decided to build something from my bucket list. And there was 8258 B. After a somewhat boring build process the final result was not very satisfying, so my first idea was to motorise it. However keeping the model as it is would be extremely boring, so the whole chassis and rear part were dismantled, leaving only the front, bonnet and hoods . Next a 4X4 (AWD probably but you've been clickbaited mwahahah ) with open diffs was made. No reduction from the XL motor but the one in-between driveshaft and diffs. On front there are two gray (old gray - undetermined type) springs and on the rear a leaf axle out of 9l links (idea by ZBLJ). Of course that horrendously enormous fake motor was kicked out and substituted with a cute mini V8. Interior is as crude as the original but now with even less foot space and a switch under the dashboard. Steering through M motor and hockey spring combo, M motor-powered winch controlled with the LBG connector on dashboard. For power I opted for a "classic" PF receiver and custom wired 9V battery neatly fixed with a net in the bed. Overall not the best performance but it's quick yet (relatively) powerful. Front winch is detacheable to improve climbing angle (approximately 50 degrees maximum). I haven't named it a MOD because most of it was made from zero, and the N2 is because this is a successor to one of my early RC MOCs - pickup N1 https://www.eurobricks.com/forum/index.php?/forums/topic/127500-moc-4x4-off-road-pickup-n1/ (my imitation of 9398 as I couldn't afford one and still can't) LDD file DOWNLOAD Video: (sorry it's 30° outside, batteries died and I ain't frying myself 2 times for some offroading outside ) Have a nice weekend, Cya later!
-
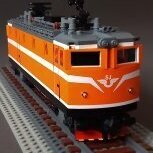 As regular readers of this forum well know, I have an interest in onboard remote decoupling, see for example my (old) article in Railbricks. Recently I updated the decoupling bogie design to be more mechanically robust, to have wheels with lower rolling resistance and (hopefully) to look better. With the deoupling bogie ready I needed a new locomotive to try it in....so I designed a new locomotive around the bits and pieces needed…. This time I decided to make a build solely with bricks already "in stock"....hence not the normal shopping rounds on bricklink. I found the german Vossloh locomotives and liked their light grey / green livery which also matched my available bricks and elements. The green cab really cried for white decals so I used some Danish DSB that I already had….. But DSB + Vossloh is not a combination from real-life, as far as I know, so please see this as a product of my own imagination… The locomotive is quite full of PF Components: Battery box, IR receiver, M-motor + gearing for driving the mini actuator plus a regular train motor for propulsion.
 -
 Let me introduce my latest build: Truck with concrete pump Introduction I got the inspiration for this kind of truck very long ago from this spectacular build from Waler: http://www.brickshelf.com/cgi-bin/gallery.cgi?f=558238 . It was one of the first builds I saw when my dark age ended and I kept returning to it ever since. I knew I had to build my own when the time is right. I tried it once already (not published) in smaller scale 3 years ago but I wasn't skilled enough, the scale was wrong and I lacked the parts. I hope it is better this time. I also knew that I want to build it with very different features, Waller's truck if fully RC and I have found out that I prefer single motor and gearbox and steering and drive. IMGP5397 Features & build The list of features I wanted to implement were clear from the begining - full suspension, one motor for 6 functions, 3-section pneumatic arm, gearbox with two way switches and modular build. I wanted similar build/experience like Arocs so I have borrowed few features from it, most important is the way how the 3 modules (front axles with cabin and "crane", central gearbox, rear axles) are connected together. So I took the size of the gear box and its attachment points from Arocs and made my own one within the limits. Later I had to drop the 6th output that was supposed to drive some sort of lever ("pump") inside of the hopper because of complexity. The first iteration of the gearbox was quite fine, but it struggled when the long outriggers were hood on it because I have used clutch gear before the whole gearbox. That was major flaw so I had rebuild it again (almost) from scratch and even managed to add second penumatic pump to it. Each function is proteced either by white clutch gear, rubber band or LA clutch. The gearbox is powered by one L-motor which is powerfull enough to drive everything. Concrete pump gearbox There are two switches on either side between the axles, on right there is switch for spreading outriggers and extending front ones, on left there is switch for lowering them and for pneumatic pump. Switch for arm rotation is under the turntable. The X-style outriggeres are as close to each other as possible. The problem is that the gears for the 4 mLA that spread outriggers have to turn in opposite direction on left/right side AND in opposite direction on front/rear side as well. You can probably see more from picture above. IMGP5404 IMGP5401 Rear axles are build in similar way like on arocs, the difference is that the springs are serured much better and there is build-in 1:3 reduction. Front axles are live axles with ackerman geometry and different steering angle. I'm really happy how they turned out, the spring is mounted to lower suspension arm so I was left with more space on chasis. The steering angle is very high at the cost of force required to steer. It is necessary to drive by one hand and steer by other one, the model is very heavy and steering at place is not very convenient. Rear axles are connected to V8 engine under the cabin. IMGP5414 The cabin can tilt to reveal engine. there are two seats (of course in blue), dahsboard, gear stick and two pedals inside. I have also added screen wipers and all mirrors. Arm is 3 sections. This was real science to make it as long as possible and light so the pistons can lift it. I have moved the pistons that operate 2nd and third section to opposite direction of the arm. This prooved very effective as it allowed me to make both sections at least 10 studs longer. I also wanted tubbing as nice as possible and thick tube for concrete as well. IMGP5406 IMGP5409 Full gallery: https://flic.kr/s/aHskUypnbW Video Instructions Yea, they are on the way
 -
 Hi everyone, I would like to present my latest creation to you: A lego technic helicopter inspired by the Eurocopter EC135, in particular the police version. The eurocopter is an iconic helicopter which is widely used by police, fire and ambulance services and for executive transport worldwide. In fact I see these fly over my city almost every day The model presented here is not a very identical copy of the real machine, because I always like to be a bit free with the styling. As a matter of fact this model is in the end more of a display model than something to play with. When I started this project I aimed for a relatively small and compact package with some PF comonents inside and A goodlooking bodywork. I think I found the right ballance between panels flex axles and connectors. - Dimensions: 47x13x22 Studs -Weight: 750 g -Rotor span: 47 studs -White and Dark Azure collor scheme -easy accessible PF AAA battery box -Motorized main rotor and tail rotor powered by a PF M motor -Clutch gears for safety -Tiltable rotor blades powered by a PF M motor -Controlled using a standard PF remote controller Designing the tail (rotor) was probaly the biggest nightmare of this model. All the curved shapes and angles made it very hard to put it together. On top of that, a driven axle had to be placed inside as well. The solotion regarding the tail rotor I came up with was to use a rubber band. I tried using gears as well but it turned out too bulky and very ugly. Another challenge was the Dark Azure collor scheme. Not many parts are available in this collor so that was a huge limitation as well, but in the end it looks much better then most other collors would on this model. And at last a shot together with my Audi RS1 which, despite being built in different scales, look very nice on the shelf next to each other. Also special thanks to everyone here on the forum who helped me with the design on my WIP topic. I won't make instructions for this model, but for my current WIP I will. Comments, feedback and questions are as usual highly appreciated!
 -
For the last couple of years I've been secretly working on something different than my previous cars and trucks. This here - I present to you Boxer - Infantry fighting vehicle. It's the same scale as my other car MOCs. But boy oh boy - it is a beast compared to those tiny cars. This one here is larger than the famous Abrams tank in real life. So imagine that this one here is like a heavy duty truck. Full with as many details as I could possibly find in the internet. It may sound silly that I mention it so, but... those military vehicle details, especially when it comes to the interior details and gadgets, those pictures are very hard to find. Probably for a good and secure reason, so - can't really blame anyone for that. Would love to see one of these up close in person. Some day, maybe. Till then - enjoy this one. Hope you like it, couse I sure do :) Oh, did I mention? It has all wheels double spring suspension, all wheels drive with PF (2 x XL) and 2 x front axle steering (1 x M). See full album on my flickr account
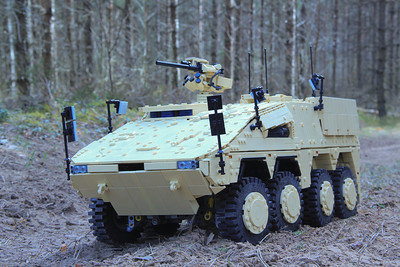
-
Just began another baja/ trophy-truck project, the other 2 (or 3) being ”canceled”. I managed to put 2x L motors and 1x servo motor, both Power Functions; it also has positive caster-angle, independent suspension in front and solid axle suspension on the rear, (at least) semi-detachable body and the headlights can be be lit (there are 4 pin-holes for installing lights). Heavily modified version of this
-
 Hello all, I have recently built a model that might actually deserve a post. This is a working, running (albeit only on R104 curves) 1:48 scale model of the Pennsylvania Railroad Q2 duplex. PF or PU motors power all five driving axles, and the design uses no third party parts besides #11 drivers. See the video for a more detailed description.
 -
 I again wanted to go big on this build. Like BIG. So I went 1:16 scale the best I could. I started with an existing design from a failed build. The plan is to have 2 PF-L motors for the drive, PF-XL for the boom, and PF-M for the rest. Please note that I'm almost done with the build, but I am making minor adjustments to the build to help with function and/or weight support. I will be posting here to "show my work" of sorts and get feedback. I have been busy catching up on other things and building the excavator. (not much free time for posting/commenting on here) This was the first version of the bottom: And the start of the upper: It was looking good, sort of, I had to redo all of it as I add the battery boxes and arms it had a weak structure and was "clunky" in functions. I have remade all of the above and will post more in the morning to not have too many pics in a single post.
 -
 Hi Yes, again but with a lot new features! This Toyota Hilux 4WD / Pickup Truck in its most basic version with a simple cab and the largest possible cargo area is a typical workhorse One more extra body will be in the end;) You can use youtube autotranlastion functions to understand something:) Or just watch review and test drives. Common specs Solid axles Front suspension 4 link Rear suspension 3 link Openable doors, bonnet, tailgate 2-seater saloon LED front lights (option) Removable pickup bed and cab Wheels: 62-68 mm Power functions chassis Control: PF IR / Smart Brick (SBrick) / BuWizz Drive: PF XL motor, 4x4 transmission with axle differentials and rear auto-lock Steering: PF Servo motor Control+ chassis control: Control+ (Powered UP) / BuWizz 3.0 PRO drive: Control+ L motor, 4x4 transmission with axle differentials and rear auto-lock Steering: Control + L motor FACELIFT The exterior has been slightly redesigned and optimized, including the use of new elements and techniques that have appeared in recent years. However, I haven't given up on some simple and solid tech-style solutions in favor of smoother slicker solutions like in the Back to the Future Extra Detail version. The doors now have latch locks, since the old locks on the small cab cannot be implemented. The number of basic system elements has been reduced - now the front bumper is made in a technic style with a small nuance - the mounting of the lights in the bumper is illegal and orange tile parts can fall out and get lost. The interior uses a new steering wheel with a diameter of 4 (for PF cersion). If you do not have one, use the old one with 3. In order to prevent using boring monochromatic paints, retro-style colored stripes are added. You can refuse them in favor of plain assemblies. Initially, there are two color options - white and black. Maybe there will be other colors in the future! I believe you can build red, orange and blue versions with minor mods. CHASSIS: PF and C+ The chassis in PF version still runs on Power Function elements, despite the fact that they have already been discontinued by LEGO in favor of the new Powered Up - Control +. Power Functions are quite common among fans, in the secondary market, as well as in the market for third-party parts and electrics, which, at relatively low prices, makes the model affordable for assembly with low budget. On the results of operation, a number of important improvements have been made to chassis: A fairly common reinforced differential of a new type was used. This diff has a larger gearing of 12-28 versus the old 20-28, giving the model more torque at the price of speed. This is important when using larger wheels, both 68mm and 75mm. But more importantly, the new differential significantly decrease load the universal joints. When using standard 62 mm wheels and standard power, the cardans held the load well, however, with the increase in wheels and especially when using third-party more powerful power sources like BuWizz, the cardans could break. The new differential partially removes the problem, but if you modify the model by installing larger wheels that are more tenacious and using more powerful power sources, I advise you to also buy steel universal joints. In general, you can get by with the old differentials, but with standard 62mm wheels and standard power. By the way, in the rear axle drive, instead of a cardan, a reinforced new CV joint is now used. The second important point is the redesigned front axle mount to increase the front clearance by 0.5 STUD. This update is linked to the first improvement. For larger wheels, you need to mount the axle further from the frame. Moreover, during the operation of the front suspension, the longitudinal displacement of the axle is significantly reduced due to the longer levers and the angle of their attachment. Due to the use of a new steering servo differential, the motor had to be reversed And finally, new function! Rear differential with automatic locking in case of diagonal misalignment of the rear axle. Significantly increased off-road performance of the model will make you happy! The locking mechanism prevents loss of grip during diagonal hanging. The mechanism uses an orange wave shift clutch. The idea was adopted from idea of @Madoca 1977 . The rear axle design can also be used with older type differentials. In addition, you can build a simple and reliable old axle without a lock (but with a new differential), in case you need simple construction. Finally, I decided to upgrade to the new Control+ / Powered UP LEGO motor system. It was a matter of time, because new original PF elements are harder and expensive to find. This is especially true for the SERVO motor. New LEGO fans usually have Control+ elements only. First of all, C+ «bad» for its dimensions: all motors are larger in size. The 4 port HUB is severely limited by the layout of the model due to its large size and weight. Installing a hub in a model of my size while saving the interior will negatively affect the weight distribution and off-road performance of the model. Specifically, in this model, the Hub will be difficult to hide behind seats without adding a body cover. In the end, a compromise solution was made - to place the unit inside the cabin as low as possible. I had to sacrifice seats, but I managed to leave the backs and the instrument panel with the steering wheel. If you do not open the doors, you may not even notice that half of the cabin is occupied by the hub. Therefore, from the outside, the model looks like a regular PF. It should be noted that due to the low location of the hub, it was necessary to make the frame as thin as possible at the point of attachment of the block, which negatively affected the torsional rigidity of the frame. However, the HUB is integrated into the frame in such a way that it is an element of rigidity, and at the same time is quickly removable for battery replacement. The drive motor is now located behind the cab, flush with the luggage compartment floor. Using a flatter motor (instead of XL) now allows different main gear ratios 12-20 (standard), 16-16, 20-12, (even 8-24 and 24-8). On the PF chassis, only non-alternative 24-24. Due to the transferase shifted back, the lengths of the drive cardans have changed. The bending of the front cardans has decreased, which unloads a little. However, this low location of the lead motor made it impossible to use reinforced CV joint like in new PF chassis. In general, the weight distribution of the C + chassis is more successful compared to the PF, which is noticeable when driving on uneven surfaces and uphills. The steering L motor is mounted directly on the front axle. The front axle and its connection to the frame are made new. Control app You cannot use the existing profiles in the Control+ app to control the model (the profile from 42124 buggy has a limited steering angle) so you need to use the LEGO Powered UP app, BuWizz app, Brickcontroller2 (only with a gamepad) or Controlz (recommended): Android version. iOS temporary unavailable. The model is still modular, which makes it easy to assemble, disassemble, repair and modify. OLD BODIES You can use new chassis with old bodies and vice versa. May require minimal modifications. if possible, I will modify previous models to the level of this in terms of body and chassis. More about previous Crew Cab and X-tra cab BTTF: AUSTRALIA MOD Any aussies here? A custom tray, bumper, roof rack and snorkel available as mods. Australians will especially like these accessories. See pictures below: Could you count number of storages here? Accessories include: - Chrome Headlights (Designed by NikolayFX and borrowed from EXTRA DETAILED BTTF Toyota Truck) - Power Bumper (You can get it for free here) - Custom Tray (Inspired by Australian manufacturers) - Roof Rack (2 versions) - Snorkel (2 versions) - Fuel Cans (Big and Small) BONUS In the end I've promised one more body - kind of Dakar Rally Offroader Body is 100% alternate of 42093 LEGO Technic Chevrolet Corvette. You only need a chassis from Hilux (PF/C+). This Instruction is free. thanks @FX6000 for Instructions and cool renders Thank you and happy building more photos https://bricksafe.com/pages/rm8/toyota-hilux-single-cab-pfc-4x4- https://bricksafe.com/pages/rm8/-toyota-hilux-single-cab-pfc-4x4--custom-australia https://bricksafe.com/pages/rm8/rally-off-roader--alterante-body-from-42093-chevrolet-corvette my rebrickable account Chassis Bodies Mods MEGA PACK (7 in 1)
-
 Hi, I hesitated if I even should post this MOC here since it is so simple but at the end here I am. I created this truck mostly to have some fun outdoors. It has minimal amount of features and its main goal is to drive over not so pleasant terrain, like sand, mud, snow and even quite deep water. And I can do that without fears, that drivetrain will jamm, gears will skip, motors will get wet and at the end I won't have desire to clean all this mess up. I also very like the closing mechanism of "differentials" covers. It is simple, effective, works like a charm and has satisfying click when closing. This Truck is also testing ground for a couple of solutions I wanted to try out, like drive shafts connected to the axles at the angle, steering controlled by rod or way of suspension for both front and rear axles. Nevertheless please enjoy the video, use the instruction and check some details below if you want to know more. Instructions: https://rebrickable.com/mocs/MOC-136120/keymaker/trial-truck-6x6-rc/#details Some details and main functions: dimensions LxWxH: 37,5x13x15cm weight: 1132g 6x6 drive (3xPF L motors) steering (PF servo) suspension on all axles completely secure bottom of the truck with panels easy access to all "differentials" via openable covers Couple of highlights why this truck can be fun to build and to play with: Drivetrain - it is very solid, so you won't hear skipping gears, if wheels aren't spinning, then you either broke some part or stalled motors. It is also super easy to use different gear ratio or different number (1/2/3), type (M/L/XL) or even technology of motors (PF/C+). What is more, removing all electronics takes only couple of minutes and truck is ready to taking the shower to clean all evidence of you off-road madness Construction - it is very rigid and solid, you can lift it up by almost any part of the frame and body Off-Road Design - all gears are protected so you don't have to be afraid that they will jamm due to sand, mud, snow, stones etc. And even if something get inside "differentials", it is super easy to open covers and clean this up. Last but definitely not the least - ability to drive through deep water - UP TO 8CM! It over half of the height of the truck. 8cm of water and your electronics is still safe. Internals of the truck: P.S. I know it is rather ugly, but it brings fun! :)



.thumb.jpg.19742e89790e473128572b8d3969c36d.jpg)