
Search the Community
Showing results for tags 'steering'.
-
 I am curious how 6x6 would steer around a corner, especially with a setup like this (9398 with a third axle). All axles steered. https://docs.google.com/drawings/d/1bjoUXNip6BhAR0IJl7YnxdkfHIhLlTnRuSM0FVikprY/edit?usp=sharing The Google Drawing above explains what I am visualizing. how do I calculate the ideal angle for the wheels to turn at Ackerman-style? Do other 6x6, 8x8 vehicles address this? With 8x8 it would be even worse without readjusting the wheel steering properly.
 -
Please Help me! I am making a LEGO truck, and I was wondering whether it is possible to build a vehicle with two suspensions like this. : 1. https://www.youtube.com/watch?v=b_bN7rFMjaw 2. http://sariel.pl/2010/11/steered-suspension-for-heavy-trucks/ Firstly, would it work if I have two of these style of suspensions and; Secondly, would it work if i have them without shock absorbers to return the wheels level in reference to the vehicle. Thanks, BuildSnapPost.
-
 It seems like all of my MOCs are being finished during the month of March. I present a Large Scale version of the Kalmar 180-9 forklift. I started this MOC last July, and after completing a number of other distractions, it's done. I'm please with the result. All pictures may be found on Flickr. The MOC features: Dual Stage Lift, PF L Forklift Tilt, PF M Steering, PF Servo Drive, PF XL Opening Doors Removable bodywork The lift is able to move three AA PF battery boxes (~600grams) to the height of 39 studs. Much more at thirdwigg.com. Photo Photo 2 Lift Chassis Open Enjoy, and happy building.
 -
Hi, I'm getting the parts together for the Avtoros Shaman 8x8 MOC https://rebrickable.com/mocs/MOC-5360/Madoca1977/avtoros-shaman-8x8/#info It requires 8 of the 11949 Technic, Steering Wheel Hub Holder with 2 Pin Holes and 2 Ball Joint Arms. https://www.bricklink.com/v2/catalog/catalogitem.page?P=11949#T=P&C=86 The current price of these on BrickLink is around €12 each, and has risen sharply in the past few months. I was wondering if it would be possible to use the 23801 Technic, Steering Wheel Hub Holder with 2 Pin Holes and 2 Axle Holes and two Axle Towballs. It looks like it would work based on the models in LDD. Has anyone tried this on a model? Here is an example of how they are used in the Shaman build:
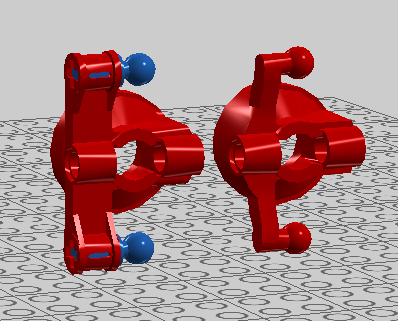
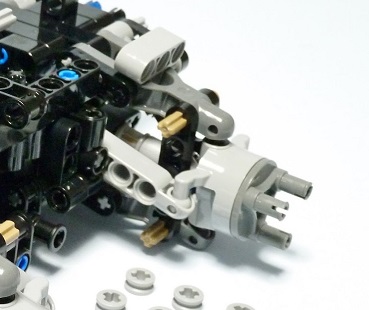
-
[MOC] Unimog 437
Thirdwigg posted a topic in LEGO Technic, Mindstorms, Model Team and Scale Modeling
I guess you could say I couldn't make up my mind about the kind of Unimog I wanted to make next. So I decided to make a platform that would support multiple versions. Features: Interchangeable platform Long and short wheelbase options Standard and Doka cabs, removable Manual control PF control (drop in) Front and rear suspension Steering 4x4 with I-4 fake motor Opening doors and hood Tipper bed options Feel free to check out thirdwigg.com to learn more about the build. Manual SWB with tipper bed. Manual LWB Doka with tipper bed. Power Functions (XL drive, Servo steering) LWB with cover. Manual LWB with canvas bed showing the suspension travel. You can find more pictures on my flickr. I have been adding instructions for the various versions here, and more will be added over the coming weeks. Someday I'll make a camper, because, everyone needs a camper. This was a fun project, and I loved the way it turned out. I have the LWB on my desk right now, and I keep getting distracted from work. I hope to add additional options for the system at some point, and will take other suggestions for versions to add. Hope you enjoy. -
 This is ASSAULT3R, a Lego Mindstorms EV3 Assault Vehicle. After getting a second Lego EV3 set, I knew that I had to build something awesome. Features RWD and Steering Ultrasonic Sensor Infrared Sensor Two Color Sensors Dual Ball Shooters Gullwing Doors Detailed Interior and Exterior The ASSAULT3R's front sports red lights that will strike fear in enemies and their machines. Its dual ball shooters will shoot a total of six Lego balls, three for each side, high or low. That's twice the weaponry used by EV3RSTORM. The gullwing doors allow easy access for operators and it makes the ASSAULT3R look futuristic yet sinister. I had a lot of fun building this, and I'm very happy with the result. And of course, here are some photos as always.
 -
-kpia.thumb.png.a265cddff9575859eea3a4d2aad663c2.png) Please suport my project on Lego Ideas. https://ideas.lego.com/projects/bc17ae38-b3e7-4cb2-b804-401e0bcc7aef Power functions: 3x L-motor 1x IR Receiver 1x IR Remote Control 1x AAA Battery Box 1x Control Switch 1x Extension Wire Description All openable doors. Model have fake motor V6. Color: Black and Yellow Number of Pieces: 800-100 Thank you very much for your support! Military version: Hägglunds BV 206s
Please suport my project on Lego Ideas. https://ideas.lego.com/projects/bc17ae38-b3e7-4cb2-b804-401e0bcc7aef Power functions: 3x L-motor 1x IR Receiver 1x IR Remote Control 1x AAA Battery Box 1x Control Switch 1x Extension Wire Description All openable doors. Model have fake motor V6. Color: Black and Yellow Number of Pieces: 800-100 Thank you very much for your support! Military version: Hägglunds BV 206s -
 Hello everyone! This time the challenge was to create a steering mechanism with suspension as small and compact as possible. Together with some other techniques and the usage of a technic chassis, this humvee was born! And i will share the concept of the mechanism: More photos https://www.flickr.com/photos/27805688@N05/ If anyone wants, ill upload an LDD file later.
 -
So yet again, I have set myself up for disappointment by entering the 2017 Rebrick Technic challenge. My future BMW motor cycle is a streetfighter concept that has dual single sided swingarms with suspension, and steering on the front. Much more at Thirdwigg.com. Full picture album can be found on Flickr. com.
-
My dream Porsche lives in the spirit of the 914 and the 924: A compact, lightweight, mass-market, rear-wheel-drive sports car. It has a long hood, short overhangs, and a roofline that alludes to Porsches of today and yesterday. Much more at thirdwigg.com, and the full Flickr gallery may be seen here. Features: Boxer 4 Engine with optional Boxer 6 Engine Rear Wheel Drive 6 Speed short throw manual transmission Limited slip differential Front short/long arm wishbone Steering geometry (caster, ackerman) Rear short/long arm suspension Tilt steering wheel Opening doors Opening hood Internal roll cage The two engine options And the Chassis Hope you all enjoy, and good luck to all the contestants.
-
Here we go, another refuse truck. Features: drive steering 2 cylinder motor opening doors tilting cab opening hopper bin lift compaction cycle extraction plate Video is . Much more at thirdwigg.com.
-
How to Motorize the Mars Rover I am looking for some suggestions. My daughter is building the Mars Rover set (go here for the details: http://www.eurobricks.com/forum/index.php?showtopic=98222) for a presentation at school and I told her I would help make it operate by remote control with one of the power function kits. Problem is that it is a lot more complex than I thought. (I have no experience at the expert level building. (No building the rover is not part of the project, she is doing it as an additional part of her presentation on Rovers). I think I can maybe get it moving with a remote, receiver and simple motor attached to one wheel, but I do not have any idea how to do the steering and don’t know how to move any of the other functions (camera, antenna, robotic arm). see So, to steer, I use a servo? How do I operate the other things, more servos? And to move things slowly, do I need complex gearing? (I was looking at the SBrick which might work. I saw a few designed steering racks and chassis on Ebay, some simple, some pretty complex. Would I be better off buying another set that has a chassis and steering and drive designed to work with motors and then build it and adapt the Rover to it? Any suggestions to help me figure out what I need to do and what to buy to easily make this work would be much appreciated. Thanks!
-
[MOC] Small Supercar
Jurss posted a topic in LEGO Technic, Mindstorms, Model Team and Scale Modeling
Everything started with front axle, where wheel steering center is at wheel center. As it is almost impossible with existing parts, had to "cheat" and create something like multilink. As there was chassis, built some body on it -
Some projects just take a long time to complete. The Audi allroad is finally complete, and since it took so long to come together, I took it apart yesterday. I guess I was a little more motivated by the disassembly, than by the assembly. More information is at thirdwigg.com. A video can be found , but keep your expectations low.Features: All wheel drive Steering by PF Servo Three speed transmission Drive by three PF L motors All wheel independent suspension Roof rack for all your toys Enjoy, and happy building.
-
 Hi there, I'm ready to submit an order for some spare parts but I can't understand the difference between two parts that seem almost identical to me: I'm referring to #2738 and #32195b, Technic, Steering Arm 6.5 x 2 with Towball Socket Squared. The first one older and is named Un-Chamfered, the second one is relatively newer and is named Chamfered. https://www.bricklink.com/v2/catalog/catalogitem.page?P=2738&name=Technic, Steering Arm 6.5 x 2 with Towball Socket Squared, Un-Chamfered&category=[Technic, Steering]#T=S&O={"cond":"N","rpp":"500"} http://www.bricklink.com/v2/catalog/catalogitem.page?P=32195b&name=Technic, Steering Arm 6.5 x 2 with Towball Socket Rounded, Chamfered&category=[Technic, Steering]#T=S&O={"cond":"N","rpp":"500"} Which is the difference? When building a MOC, are they interchangeable? Thanks in advance.
 -
Hi all. I'm asking for some advices from experts. I am into lego technic "standard" constructions from a few years, now I want to enter in the world of modding and make some custom creations. I love electric models, speed and the "mechanical engineering" behind LTechnic. I also know the existence of SBrick and I love the idea and I want to support them. Then i think that a good start can be the motorization of an existing model, adapting it to power function, engine, steering and SBrick. I am thinking about buying the 42037 Off Roader or maybe the 42039 LeMans Race Car. I have an old (10-15 years old) offroader, I can disassemble it and get some parts from it, mabye. So I think I'm going to buy: - SBrick - XL Engine (I know it's a bit overpowered but I want to create a speedy car and reuse the engine for future creations) - Servomotor - Power Functions - 42037: Formula Off Roader OR 42039: 24 Hours Race Car Is it a good way to start? I need something else important?
-
 I was wondering if these parts: Could connect with this part: I want to know if we can use these wheel hubs for smaller wheels that don't have those 3-pin connections, such as these:
 -
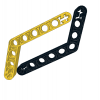 Hi, I'm pretty sure this is Negative Akerman steering geometry. If your know how to fix this problem please speak up! Here are some more pictures of the steering setup. Thanks for your help!
 -
 Camellia Café presents a special designed SERVO JEEP model being controlled by Camellia Café Servo motor controller with ARM technology. ' This JEEP is a Full time or Part time four wheel drive car with shrink function and Servo running model. Front wheels and rear wheels are driven by two individual LEGO motors. When both motors are active, it is a full time four wheel drive car. When either is active, it is a part time four wheel drive car. The speed can be adjusted in a large range and with good accuracy via our motor controller. With an addition motor, the car body is able to shrink for easy parking, and extend to get spacious inner space. When using a mobile phone and Camellia JEEP APP, your children could control SERVO JEEP remotely. No matter turning, running back or running uphill, SERVO JEEP is mobile and powerful. In the SERVO mode, SERVO JEEP can run in a precise distance at a preset value. This plays a key role in autopilot and auto parking. The steering motor can be controlled with 5 degrees at minimum. Front differential and rear differential are used. Front wheels driven motor and rear wheels driven motor. Front wheels use double wishbone suspension. Steering system With an addition motor, the car body is able to shrink for easy parking, and extend to get spacious inner space. 40th LEGO Technic nameplate. Without car cover cloth. The car body cover. Open the front cover to see the front engine. Front engine - 6 cylinders V type. Rear engine - 2 cylinders V type. Rear of JEEP. Car lights: Daytime running light, Foglight, High beam and Red lights for break. Please enjoy Camellia Café servo motor controller and drive SERVO JEEP model. And make you own car at home. http://www.camellia.xin/models/servojeep.html
 -
 Hi folks, This is not for purists. Contains modified and non-LEGO parts. My urge to build a super fast LEGO RC Car often stopped at the stage where the body needed to be build. Seeing all the great designs on forums like this, it somewhat discouraged me building my own. Besides the fact that these bodies come with some weight and will not hold a crash a higher speeds, I had to come up with something else. As a result of an earlier project (building a fast LEGO boat) a had some damaged LEGO Hulls (54779). Since a car body works basically the same as boat hull (but 180 degrees rotated), I thought I'd give it a try. Have a look at the result in the YT video. It works fine. Gives strength to the car, the aerodynamics work well for good driving stability and it is not that ugly :) Called it The LBOW (Lego Boat On Wheels). Included standard RC components: ESC, brushless motor, 3s Lipo battery, digital steering servo and .... a Gyro. Resulted in a very fast RC Car. Theoretically this should be able to reach 100 km/h. Speed test will follow (need to find a good track first). For those trying to do similar things, I'd strongly recommend to add the Gyroscope to your car. It prevents the car from breaking out at higher speeds. Very useful.
 -
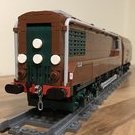 One of the questions that pops up here on a fairly regular basis concerns the maximum distance between axles without binding or derailment becoming an issue. On a couple of occasions I have mentioned the Castering Effect and it's possible application to the LEGO railway world. Having raised the possibility I thought I should find out for myself what use it might be and to see whether I could harness this effect and see what it might be made to do. And so I set about building myself some prototype vehicles and a test track and got to work. This is the test vehicle I designed. It's a bit of a "parts bin special" but it does the trick. In the light of the lessons learned the test vehicle design was changed slightly and then retested. There is still much more work to be done with more prototypes and testing, but I'm hoping to come out with some sort of working MOC at the end of this process. I appreciate that there is rarely anything new under the sun and that I'm probably just replicating someone else's work. Comments welcomed as always. **EDIT** By the way, those black boxes are video links.
 -
So most everyone i've seen likes to add drive to their front axles. I'm having trouble building a dead front axle for my truck. I'm no good at steering geometry either. Here's what i've come up with so far. Right now it works for what it is, but could use improvement. If anyone has any ideas or links, please share. I'll try to add some pics.
-
I have been working on this project for what seems like forever. I'm happy to have it done. The full gallery can be found here. Much more at thirdwigg.com. Full Lift With TLG Balloon Tires Chassis
-
 Hello, I was watching Nicjasno's videos and some questions arosed. Let's say I have front SLA double wishbone suspension, no drive, lower arm is 6 studs long, upper arm is 5 studs long, there is a kingpin inclination and caster angle. I want to have ackermann steering and avoid bump steer. Where should I put the steering arm and how long should it be for steering rack ahead of front axle or behind it? Should it be 6 studs long when it is closer to the lower arm and 5 studs long when closer to the upper one? And another situation - let's say I have multilink suspension - two angled upper links and two angled bottom links, bottom ones are longer, there is also a kingpin inclination and caster angle, no drive. The question remains the same I will appreciate your advice ! Thank you in advance.
 -
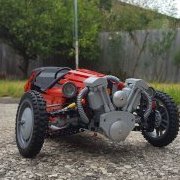 Well overdue for a Delorean MOC, to make it stick out from the bunch I've packed some Technic into it as with all my builds. Full independant suspention with working steering. The Doors open up the steering wheel works, all the fun stuff. There is about 1 beam width of suspention travel And a engine under the cover. 33% bigger than the real one, It might make it to 88mph now. I'm quite proud of the front end, It's probably one of the most complex ive made. I remeber seeing the concept of a virtual Pivot steering,Sariel's I belive, and though it could be expanded on to include suspention, just never got around to trying it. So thanks Sariel. Underside Steering and suspention there is a chanel on the underside runing the entire length of the car that would be perfect for a HOG steering shaft to come out under the rear bumper, I just can't figure out a way to connect it up to the steering gears without fauling the mechanism. If you have an idea on how to, I'd love to hear it. I've now realised the poster is missing part of the car, The rear wheel should be between Marty's legs By some amazing stroke of luck all of it can be build in LDD, just need to connect one 5beam to the 1.5 pin in the steering and to bend the hood down ~2degrees
