Search the Community
Showing results for tags 'rc'.
-
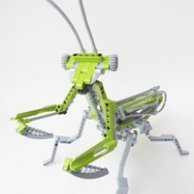
Let´s start with brand new model for the LEGO Technic Challenge. A 29 cm tall figure of American astronaut with moving wrists, elbows and shoulders. The helmet is equipped with two PF lights and both arms are operated by PF M motors. The model is remote controlled and powered by rechargeable LEGO battery.
-
Hi Eurobrickers! I'm back with the new MOC - this time it's a new Mammoet SK 6000 crane! Current configutation is Mammoet SK6000 + Mammoet SK350 Fixed jib (which is compatible in real life) Original ring crane was just recently released by Mammoet in Netherlads! This is fan work. For built used only open source resources from WEB! Ok, also this MOC was built with unofficial consulting with Mammoet engineers, because it was a lack of the info in WEB, so I have to ask some thiings to match the real masterpiece crane. UPD: I was invited to the real crane's world presentation on last (or prevois) Friday to the Netherlads with my Crane MOC to show it at the mass media day near the real SK6000! Unfortunately I was on vacation that time and lost this once in a lifetime chance.. How it works: Centered counterweight is fixed and non movable, around it there are two train racks (imne are almost 180 degrees), so the crane is rotating arong the ballast. Real SK6000 does not have it, but from SK350 I took the jib which was surprisely fix and not luffing - it has no adjustments. Machine is able to lift 6000 tons and lift 2000 tons at the lenght of the footbal field from the basis !! The main feature of this crane is that it does not use winch to operate the boom - it uses special mechanism with chain, so I implemented this also :) Please enjoy the video first: Built with genuine Lego technic parts + 3rd party strings + 2 BuWizzBrick 's. I refused using trixbrix curved rails because found a solution with genuine lego parts. The model has 7500 parts which makes it the biggest MOC in my career! It has 8 L motors for smooth operating, powered by two buwizzes. Crane weights 8,3 Kg excluding power sources (battery boxes) and counterweights!! And the height is about 2.3-2.4 meters. More images are available: https://bricksafe.com/pages/Aleh/mammoetsk6000 Building instructions already available. Built took 1760 steps, which required a lot of effort to prepare it. https://rebrickable.com/mocs/MOC-195537/OleJka/mammoet-sk6000/#details
-
Hello! Today I would like to present my first foray into the city theme. This truck started out as a load for a planned train (rolling highway), but I also wanted to know: can I build a trruck that can be driven by remote control? Without hiding the electronics in a Container box.... Yes, I can! The little one is fully roadworthy: 1x Cicuit Cube HUB, 1x Circuit Cube motor as drive motor and 1x CaDa MicroMotor for the steering (here the PF plug had to be exchanged for a Circuit Cube plug, soldering skills helpful). And because it's nicer: front/rear light in the truck ;-) A matching semi-trailer was also built, of course with a prototype. I like the north of Europe, so I often see the semi-trailers of the Freja haulage company and my daughter is also called Freja (only in the German spelling). So it was obvious which haulage company would serve as a role model for me. And the logo was a great snot job: approx. 200 parts per logo.... The trailer has a retractable/extendable pillar, operated by hand via a gear wheel at the front. It's hardly noticeable there and could also be a ventilation detail... I also built a manual version of the truck with “Hand of God” control: no soldering, just drive, no foeign parts required.... .... and with twin tires. I'm still missing them on the RC version and have fallen victim to the lack of space. And because only pictures of moving trucks are boring: I have created a (attention, longer^^) video of the development and with many detailed explanations (but in german, sorry) : have fun watching it: I hope you have as much fun watching the photos / videos and reading here as I had building ;-) Thomas / Ts__
-
.thumb.png.116032e930e483fb4ebbfdc62183bd34.png) Instructions are on Rebrickable under the name '4WD RC Race Buggy + BuWizz MOD. This includes instructions for the PoweredUp version and as a bonus instructions and a parts list for the BuWizz version.The instructions are on Rebrickable under the name '4WD RC Race Buggy + BuWizz MOD'. In addition to the instructions for the basic PoweredUp version, the instruction files of this MOC include - as a bonus - a parts list and instructions for the BuWizz version, which uses 2 x BuWizz 3.0 Pro + 4 x BuWizz Motor. -- The parts list for the BuWizz version differs from the inventory listed in this MOC. -- The list of LEGO-parts (.csv) and the list of other parts used (.pdf) for the BuWizz version can also be found here and here respectively. This model uses the following 3rd party parts: 2 x BuWizz 3.0 Pro+ 2 x BuWizz Motor (1 BuWizz and 2 motors in one pack, so you need 2 packs) 2 x Aluminium Metal Beam Bearing Block liftarm compatible with Lego Technic 2 x Traxxas Model#1985 PTFE-coated Washer, 5x8x0.5mm (they come in packs of 20, so you need 1 pack) 4 x RC4WD Tires Dick Cepek Mud Country 1.9 (they come in packs of 2, so you need 2 packs) 4 x 1.9 Foams RC Tire Foam Inserts Black 4pcs (4 pieces in one pack, so you need 1 pack) Hi, It's been a while, but a year ago I got my hands on the Audi RS Q e-tron set with the new yellow differential gears and the new wheel hubs for the strong (RC-capable) CV-joints. I also got 2 Buwizz 3 units and 4 Buwizz motors (their buggy motor remake) and with the hubs and diffs from the Audi I could finally continue a concept that I have working on every now and then over the past few winters. The idea was to create an off-roader with ruggedness and capabilities even better then my Greyhound 4WD RC Buggy and Make a build with an easily detachable body, just like with real RC cars Make the Buwizzes easily removable, so you can use them for other models Make it easy to reconnect the steering ball joints if impact caused them to detach Obtain a direct connection between the wheel hubs in the steering setup, without slack The wheelbase is 3 studs shorter and the track-width 2 studs narrower compared to the Greyhound. The roof top is also 2 studs lower. All in all I strived for a little bit more of a race look. One of the ideas that I started with (about 3 years back), was a setup with 9L steering links that are positioned with a small angle, such that they are actually a little too short (about 0.8%), which gives them a nicely tight fit. When you use them at both the front and rear side of the steering setup, this won't introduce any toe-in or toe-out. With this setup any rotation in one wheel hub translates to immediate rotation of the other wheel hub, without any slack. I also wanted to use 4 Buwizz motors to make the whole thing capable. At a certain stage I had a setup with the old wheel hubs and the new RC-capable CV joints, but I could only make that work for a RWD model, not for 4WD. With the new differentials and the new wheel hubs from the Audi RS Q e-tron I could revert to 4WD and I could finally complete this project. Still, getting the max out of 4 Buwizz motors turns out to be challenging. The main problem I ran into: the axle driving the rear differential melted and also caused the 5x7 frame around the differential to deform. I had to resort to 3rd party metal beams with ball bearings to avoid overheating of the axles driving the differentials (Aluminium Metal Beam Bearing Block liftarm compatible with Lego Technic). This works great! I also ran into the issue that the output axles of the differentials worked themselves out of the bevel gears inside the diff and started skipping, gradually carving a hole in the bevel gears. The problem was that the drive shafts had too much play in them. This I could resolve by adding a support halfway the drive shaft, which locks up the CV-joint exiting the differential (see image). In this image you also see the LBG #1 connectors that prevent the steering links from detaching. When they do detach, you only need to temporarily remove the connector to put them back. The next issue was that the big yellow gear attached to the differential house disconnected form the differential house under heavy load. That caused the differential to skip and to carve into the parts bracing it. To resolve this I've added a thin washer from Traxxas between the gear-side of the differential and the parts bracing it (Traxxas Model#1985 PTFE-coated Washer, 5x8x0.5mm). That avoids the differential house from disconnecting without causing any added friction. Finally, I've added RC crawler tires from RC4WD (RC4WD Tires Dick Cepek Mud Country 1.9). They are from much softer rubber than LEGO tires and for that reason they have much better grip and they absorb a lot beating. That also reduces the chances of having an entire wheel coming off, which never happened to me with these tires. Only when I crashed. These tires come with soft foam inserts. For my purpose, I replaced the included inserts with bigger ones (1.9 Foams RC Tire Foam Inserts Black 4pcs), to get a little more pressure in the tires. That makes them more suitable for racing.
Instructions are on Rebrickable under the name '4WD RC Race Buggy + BuWizz MOD. This includes instructions for the PoweredUp version and as a bonus instructions and a parts list for the BuWizz version.The instructions are on Rebrickable under the name '4WD RC Race Buggy + BuWizz MOD'. In addition to the instructions for the basic PoweredUp version, the instruction files of this MOC include - as a bonus - a parts list and instructions for the BuWizz version, which uses 2 x BuWizz 3.0 Pro + 4 x BuWizz Motor. -- The parts list for the BuWizz version differs from the inventory listed in this MOC. -- The list of LEGO-parts (.csv) and the list of other parts used (.pdf) for the BuWizz version can also be found here and here respectively. This model uses the following 3rd party parts: 2 x BuWizz 3.0 Pro+ 2 x BuWizz Motor (1 BuWizz and 2 motors in one pack, so you need 2 packs) 2 x Aluminium Metal Beam Bearing Block liftarm compatible with Lego Technic 2 x Traxxas Model#1985 PTFE-coated Washer, 5x8x0.5mm (they come in packs of 20, so you need 1 pack) 4 x RC4WD Tires Dick Cepek Mud Country 1.9 (they come in packs of 2, so you need 2 packs) 4 x 1.9 Foams RC Tire Foam Inserts Black 4pcs (4 pieces in one pack, so you need 1 pack) Hi, It's been a while, but a year ago I got my hands on the Audi RS Q e-tron set with the new yellow differential gears and the new wheel hubs for the strong (RC-capable) CV-joints. I also got 2 Buwizz 3 units and 4 Buwizz motors (their buggy motor remake) and with the hubs and diffs from the Audi I could finally continue a concept that I have working on every now and then over the past few winters. The idea was to create an off-roader with ruggedness and capabilities even better then my Greyhound 4WD RC Buggy and Make a build with an easily detachable body, just like with real RC cars Make the Buwizzes easily removable, so you can use them for other models Make it easy to reconnect the steering ball joints if impact caused them to detach Obtain a direct connection between the wheel hubs in the steering setup, without slack The wheelbase is 3 studs shorter and the track-width 2 studs narrower compared to the Greyhound. The roof top is also 2 studs lower. All in all I strived for a little bit more of a race look. One of the ideas that I started with (about 3 years back), was a setup with 9L steering links that are positioned with a small angle, such that they are actually a little too short (about 0.8%), which gives them a nicely tight fit. When you use them at both the front and rear side of the steering setup, this won't introduce any toe-in or toe-out. With this setup any rotation in one wheel hub translates to immediate rotation of the other wheel hub, without any slack. I also wanted to use 4 Buwizz motors to make the whole thing capable. At a certain stage I had a setup with the old wheel hubs and the new RC-capable CV joints, but I could only make that work for a RWD model, not for 4WD. With the new differentials and the new wheel hubs from the Audi RS Q e-tron I could revert to 4WD and I could finally complete this project. Still, getting the max out of 4 Buwizz motors turns out to be challenging. The main problem I ran into: the axle driving the rear differential melted and also caused the 5x7 frame around the differential to deform. I had to resort to 3rd party metal beams with ball bearings to avoid overheating of the axles driving the differentials (Aluminium Metal Beam Bearing Block liftarm compatible with Lego Technic). This works great! I also ran into the issue that the output axles of the differentials worked themselves out of the bevel gears inside the diff and started skipping, gradually carving a hole in the bevel gears. The problem was that the drive shafts had too much play in them. This I could resolve by adding a support halfway the drive shaft, which locks up the CV-joint exiting the differential (see image). In this image you also see the LBG #1 connectors that prevent the steering links from detaching. When they do detach, you only need to temporarily remove the connector to put them back. The next issue was that the big yellow gear attached to the differential house disconnected form the differential house under heavy load. That caused the differential to skip and to carve into the parts bracing it. To resolve this I've added a thin washer from Traxxas between the gear-side of the differential and the parts bracing it (Traxxas Model#1985 PTFE-coated Washer, 5x8x0.5mm). That avoids the differential house from disconnecting without causing any added friction. Finally, I've added RC crawler tires from RC4WD (RC4WD Tires Dick Cepek Mud Country 1.9). They are from much softer rubber than LEGO tires and for that reason they have much better grip and they absorb a lot beating. That also reduces the chances of having an entire wheel coming off, which never happened to me with these tires. Only when I crashed. These tires come with soft foam inserts. For my purpose, I replaced the included inserts with bigger ones (1.9 Foams RC Tire Foam Inserts Black 4pcs), to get a little more pressure in the tires. That makes them more suitable for racing. -
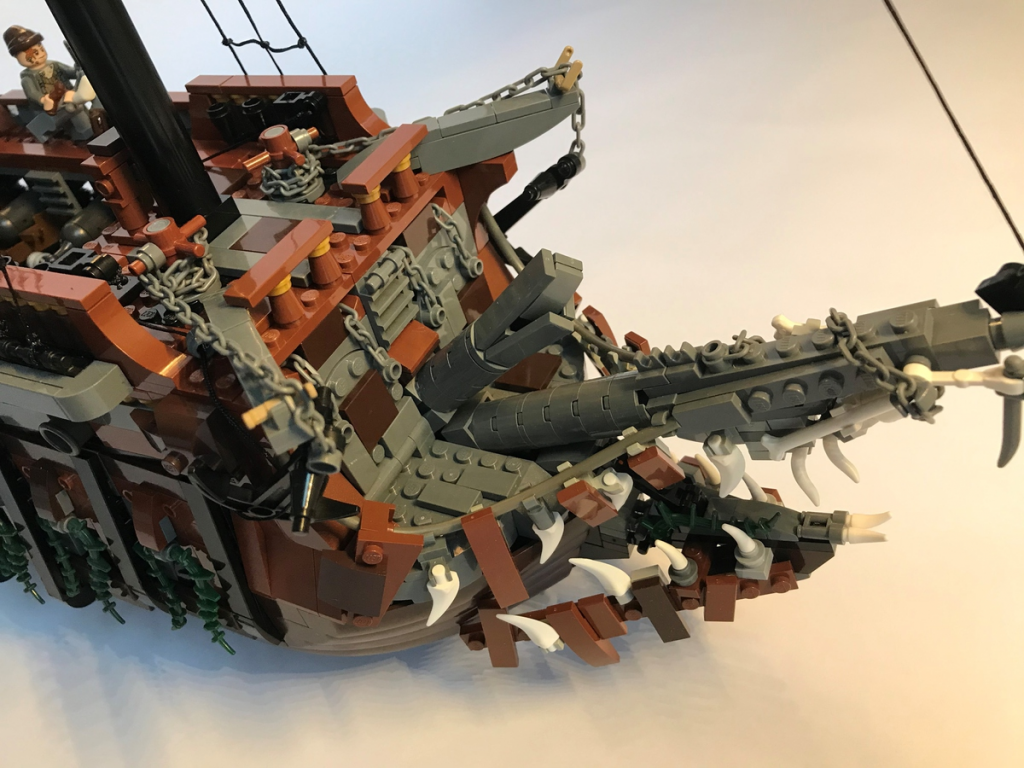
 Ahoy, seamates! I have started my LEGO-Ideas Project 2-3 months ago and now I want to present it to the specific lego pirates community! Would be nice to get your suppport but even more I am looking for some advice what I can improve on it. SUPPORT NOW Please take a look on the ideas website or at my flickr https://flic.kr/s/aHsmMnLn6a for more fotos! Here is the text from ideas: Welcome on board of The Rolling Dutchman! Since I have been a child I always wanted to control my LEGO Red Beard Runner without pushing it around and now my dream has come true. I have build a motorized Version of the famous Flying Dutchman which is my favorite pirate ship, too. I have seen the original swedish Vasa which has given the idea for the Dutchman with its marvelous bow and stern. So I managed to combine them with my own creative ideas into this "rolling" Dutchman! Please have a look at the features in the video and the pictures! Video: Update 2: Thanks for your 1k supports so far! I have worked on the main picture a bit and now added a picture of the crew and one showing the functions as well. Update 1: New rotten Sails! (Picture 7+8+Video still with the first sails) Motorized Features: Rolling movement caused by waves (1. M-Motor) Two motorized triple-barrelled chasers in the bow (1. M-Motor) Motorized steering with simoultaneously rotating ship´s wheel, rudder and steering mechanism (S-Motor) Motorized movement for- and backward (L-Motor) Motorized sail trim with turning capstan and changing sail position of all square sails (M-Motor) All features can be controlled by rc-control via 4 channels and two receivers All features use the Power-Function System but could easily be adapted to the new Control+ System which can lead to advanced handling of the functions The battery box can slide out easily to switch on/off and change batteries General Features: Minifigures: Davy Jones, Jack Sparrow, Elizabeth, Bill Turner, Barbossa and more. (I am not familiar with the movies in english so I would like to ask you to tell me the names in the comments section!) Two decks with cannons (one side the lower deck is closed to store the motors) The two tripple-barreld chasers can manually slide backwards and then the gun ports can be closed Removable deck at the stern to take out the steering wheel Removable lower balcony´s on both sides Handmade sails Two functional anchors Upper cabin minifigure size with Jack stealing the heart (illuminated) Lower cabin with Davy Jones organ (illuminated) Two torches at the stern (illuminated) The capstan can be removed The ship is based on the sturdy hull parts, the complete 2 lower rows of bricks can be removed with the steering and driving wheels to use it as "normal" push forward ship or display model The main mast and the mizzen are both slightly tilted backwards Correct rigging and sails due to the movies The ropes between the masts can be removed easily to take them apart for transport It would be an honor to receive your support. Aye! I have to thank my friend J-H to help me with some motorization problems and a special thanks to my girlfriend for not freaking out! Thanks, yours Störtebricker from Hamburg, Germany SUPPORT NOW
-
RC Car Toy Story
Leviathan posted a topic in LEGO Technic, Mindstorms, Model Team and Scale Modeling
Hi everyone, Here is my last original creation : The RC Car from Toy story movie ! I would like to make a RC car controlled by smartphone and easily recognizable by young people (and older one too...) Features : RWD by 2 L motors Steering by 1 Servo motor Controlled by 1 Sbrick (or 1 Buwizz without bbox) Independent suspensions External switch for power supply Some nice colors I used 2 pythagoriciens triplets to improve chasis stiffness. The car is divided in 3 modules : front, motors and rear In the picture below you can see red bush on 4l axle with stop. It's the switch to power up or down the battery box. I used Anto's buggy motorisation : http:// http://www.techlug.fr/Forum/viewtopic.php?f=5&t=11544 but il replaced 8t by 24t. HD photos gallery : https://www.flickr.com/photos/147164115@N07/albums/72157713497548457 Building instructions are available : https://rebrickable.com/mocs/MOC-39835 I added 3x3 lime dish for the eyes on 3D model : I hope you'll like it, See you soon ! -
 After reading several topics on Eurobricks, today, for the first time, I present an MOC on the forum. Do not hesitate to notify me if I made mistakes in my presentation. This MOC is a kind of tracked machine-gun Tank. It is powered by 2 BuWizz (one in the body, the other in the turret). Motorization: one RC per track with each a gearbox with 2 speeds. The two gearboxes are synchronized and controlled by a motor L. Orientation of the turret by motor M. Lifting of the "gun" by motor L. The firing mechanism uses 2 XL motors. Some pictures : Overview : Char Jaune Lego 001 by Laurent Lesellier, sur Flickr Char Jaune Lego 002 by Laurent Lesellier, sur Flickr Char Jaune Lego 001 by Laurent Lesellier, sur Flickr Char Jaune Lego 003 by Laurent Lesellier, sur Flickr The body : Char Jaune Lego 005 by Laurent Lesellier, sur Flickr Char Jaune Lego 006 by Laurent Lesellier, sur Flickr On-board ammunitions (105 rounds) At around 6 shots per second, the magazine empties in 17 seconds! it's very fast ! Char Jaune Lego 004 by Laurent Lesellier, sur Flickr Photo of a charger, there are 15 in the magazine: Char Jaune Lego 008 by Laurent Lesellier, sur Flickr For the video, you can watch the video on my wife's Facebook account. If you like it, you can like, comment and share! This will give me a few points for the contest organized by BuWizz. The subject of the competition is how to play with Lego during the lockdown due to the coronavirus! I propose an idea with playmobil! Do you like it? Thanks for reading. Do not hesitate to comment.
 -
Hello I'd like to present my small-scale RC semi truck. It has PF Servo, XL motor and sbrick mounted in the cab/frame and the battery is neatly mounted in the trailer that also has a two-stage ramp driven by single L motor and Technic strings. The cables go through the hole in trailer saddle (big turntable) to connect sbrick with battery and ramp motor with sbrick at the back of sleeping cab. Full gallery: https://imgur.com/a/2uPHku There is an alternate configuration for potential standalone/without trailer use: Hope you'll like it :)
-
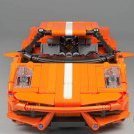
 Thought I'd create a thread to just post WIPs of my MOCs, or neat mechanisms. Finished: Generic Muscle Car
 -
 Hello All, It has been ages since I shared something on here, even though I visit daily to see everyone else's builds. However, 'recent events' have given me more time to build. I haven't been idle these last couple of years, but nothing I made rose to the level of sharing. The following buggy has four unrestricted 5292 motors, at 12.6 volts, going to the rear wheels and only weighs 1400 g. This makes it hard to handle for the inexperienced driver. The rubber bands on the rear control arms keep the ball sockets from coming apart. The lower arms are different from the upper ones due to the change in position of the joints on the swing arm through the suspension cycle. This also creates a rather nice camber curve. I also discovered a weakness in the stiff springs. The upper mount will shear off of the side of the shock body if it is used. Many of my shocks have stress fractures there. I've got to clean the thing up now, it is covered in mud. I wonder who did that. Question, concerns, comments, or relevant war stories? v/r Andy
 -
 Hello, here's a thing I've been working on and off for some time now. Started off a as drift car in 1/11th scale, but then just flowed down into a simple street tuner build. Itasha definition from Wikipedia - In Japan, an itasha is a car decorated with images of fictional characters of anime, manga, or video games. Features: Openable scissor doors, bonnet and boot NOS and TV screen in the boot Interior with steering wheel, bucket seats, "rollcage" and audio system. "Engine cover" with turbo and honeycomb airfilter RC via BuWizz Drive with 2x buggy motors from fastest output Steering with m-motor Custom graphics of C.C. from Code Geass (linked in my signature) as well as sparco, koni and buwizz "sponsor" decals Sorry for crappy photos, only have smartphone at hand. I'll try to film it driving indoors or sneak into the building's hallway today or tomorrow. Cya!
 -
Powered by BuWizz V1. Drive: 1x M-motor. Steering: 1x M-motor Video: WIP photos:
-
 EDIT 08/22 - CURRENT STATE : Here is a truck I just made (well, it actually took me several days) while being confined. I don't like to take apart my sets on display to MOC so I had to do with just a bunch of spare part I had, hence the strange color scheme and some questionable building technics and aesthetic choices (for example, I didn't had anything to make the front radiator grill so i had to improvise...) I wanted to make an American style Truck, inspired by the 5571, 5591, 8285 and more recently 42078, and remote controlled so I can have a little fun with it. Please don't be to harsh, this is my first Technic MOC that didn't end at the prototype status. The original goal was to test my new Buwizz but I finally used only original Lego PF element, because I rather use a physical remote than a smartphone. It is powered by a L motor (with the drivetrain as follow : Motor---16T / 16T---20T / differential / 20T--20T / differential) ) and steered with a servo, with a decent speed and a good steering lock. The IR receiver and standard AA battery box are housed in the back of the cab, and the latest can slide up for replacement by tilting the foldable spoiler forward. The spoiler can also be folded all the way down to make the cabin roof flat. The doors can be opened and the hood can be lifted, even though there is no fake engine underneath because that's where I furst intended to put the Buwizz. (Actually there is still enough room for it so I could convert the truck to a Buwizz model and remove all the biggest section of the cab for a more lightweight truck. :-) I could also run an axle under the cabin to the engine compartment and run a fake engine from the exposed 16T gear... A lot of work, thoughts, trial and errors went into the building of this truck, so I hope you will enjoy it as much as I do. There is still A LOT room for improvement, but unfortunately I was limited by the parts I had. Almost all of my grey and black liftarms and technic connectors whereused in the process ! I am not entirely satisfied by the roof of the cabin in the IR receiver area, which is a bit messy, and I really wish I had DBG curved panel for the sides instead of LBG ones. And of course, I wish I could replace the ugly black plate at the front with a proper truck grill. I also have to add a fifth wheel, as it is not able to pull anything in this configuration. It should be easy anyway, as I have a lot of mounting option at the rear (the black panel is only there for aesthetic purpose). I just have to figure out something with the parts i have left... In the end I like very much how it turned out though, and I may consider a bricklink order to fix the aforementioned issues once the lock-down is over. In the mean time, any comment and suggestion for improvement is welcome ! :-) EDIT : now with a running fake engine !
 -
 Hello all here is my latest build, inspired by the Traxxas X-MAXX 8s remote controlled car. The idea was to build a car as "compact" as possible while using 8 buggy motors, 2 for each wheel to give it decent power, as you might notice the buggy motors are at a 90 degree angle from each other, this is to prevent them sticking out the front and back, the chassis needed tall shock towers anyway so it was a nice fit. The front suspension and steering is built fairly sturdy, however crashing with this power, you can brace all you like, it is just going to break as you can see in the video.. The newer type cv-joints are used at the motor end, but since i did not want to use the new hub with its reduction, i used the "old" cv joints with the hubs, and yes, it does "eat" the joints and/or the hubs when something is not sitting correctly. the front has a dampener, a large thin pneumatic actuator, normally hidden by a panel, it is shared with both sides and does.. very little.. but is was fun to integrate. The front springs are from the 8420 motorcycle, adjustable in stiffness, but less stiff them most people imagine them to be, these just seems to fit the build, sadly i didn't have more yellow ones for the rear. The steering uses 2 servos, not only to give it more torque for steering, but also to help reduce the slack from the gear rack to the 12z gear, The two 12z gears on the rack are both offset by 1 tooth, but against each other, the long axle going to the servo's are under a bit of stress but nothing serious, it really helps reducing the slack on the steering. To further prevent slack from the hubs they are steered with the front links and stabilized the rear links, the next picture shows the 2 gears on the same rack (car is upside down), you can also see the imprint of a 5L axle from the bumper on the 5x7 frame after a crash.. The rear suspension has the same drive setup, but since it is more fixed and less likely to get damaged in a crash, it never destroyed any joints or hubs, here i also integrated dampener in the form of small pneumatic actuator on each side, which again.. do very little.. but was fun to integrate, it also has a torsion bar going from one axle to the other to prevent body roll, let's just say it was fun to integrate :) The grey springs are the exact same as the yellow ones, but these come off the Lego 8369 rc "dirt crusher" set, i happened to have these 4 spring, considered to get 2 more yellow ones, then i saw the price.. and went with mismatched colors.. so please forgive me i cheaped out... The body started out as a crawler body, and got heavily modified, extended in every way, added 4 seats for Technic figures and a new color scheme, It is fully detachable with 5 pins. The front and rear lights are in the chassis but they line up perfectly with the translucent bricks on the body, making it easy to get to the buwizz for charging or turning them on. The video and pictures have some inconsistencies in them, i know.. but i have had 3 horrible crashes, that required rebuilds plus some roadside repairs here and there, some i forgot to give the proper fix later on.. shooting the video took me a bit longer because of the same reason, i need to practice my driving skill... or not go to a skatepark when it is wet... or just not build in overkill mode... Thanks for reading! if you have questions or comments, feel free to ask of course! Marx.
 -
Hi there guys !!! How's everyone? It's been so long ! I had another pretty long dark age plus some kind of "lego creative block" , plus i got into developing videogames last year so i've been quite busy. Recently a friend of mine got me into lego again and somehow that creative block went off also thanks to the purchase of a buwizz :) I've always been quite obsessed by motorbikes and finally with a buwizz i could give them the look i wanted and mainly not run after them I've made two different ones both have something special: The first one is inspired by the 90's look of Honda's dirtbikes and in ludicrous mode it is honestly the fastest lego vehicle i've ever made. In the video it's running on "slow" mode. It works the same way other lego bikes used to work but instead of moving an added weight i've figured out that moving the battery alone is enough to make the bike lean left or right. In the next days I'll shoot a proper video somewhere else where i've got more space to drive it in ludicrous https://youtu.be/o7YUIS2ne7Q The second bike is "better" in a way, it only requires an L motor, it can run on pure power functions while still being enjoyable, it's enough removing the fake fuel tank and attaching the PF reciver. This one is pretty fast as well when running in ludicrous and overall it's a lot of fun :) I will take a video of this one too as soon as i have the chance https://youtu.be/-D2Kf-bZz0Y I really hope you guys will like them Bikes are not so common to see , it's kinda time to start making them :D if anyone is interested in the 3D files i'll happily share them
-
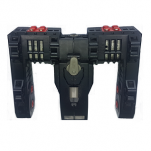
 Now for something completely different: A Spyder from the future - the Turbo Racer's AMC Ultra - and its opponent - the Police Interceptor MM Falcon PS (both based on @rm8's chassis for his AWD prototype) Now you can play Outrun - but for real! UPDATE: This series of RC cars will get updated in the future with new additions. UPDATE2: It was time for a logo and here it is (might be subject to change)
 -
Hi there, I'd like to present a MOC I've been working on from time to time since a few months: It's a small RC buggy, something I'm missing from Lego: Pictures show the V2 model. An interactive 360° view of the V1 model (with different rear axle) is available here: http://pub.clusterd.net/lego/technic/mocs/buggy/ Steering: PF Servo motor Propulsion: PF L motor (geared up 28z => 20z => 12z which is good enough to drive on office carpet and short distances on thicker carpets with fresh batteries, it works great on smooth surfaces; 36z => 12z => 12z also works, but requires more power and works best on a smooth surface; RWD) I initially used it with a AAA battery box and V2 IR receiver (not shown in the V2 pictures above, where it will be fixed to the rear spoiler, the V1 model had it at a slightly different location), but the AA battery box also fits - though it looks not as good due to different mount points, and it will also be heavier then. I assume it will also work with the LiPo box and SBrick and I can - since a few weeks - confirm that it also works with a BuWizz, but then it's more something for outdoor areas, as it gets pretty quick in fast and ludicrous modes. I created the main chassis of the V1 model of this buggy during a long evening/night and added most of the body parts the following day or days, don't remember exactly. The stickers are from the 8048 set and IMO fit the buggy theme great. Steering is also from 8048. It's fun to drive around and it can also take some hits. I took inspiration (mainly for the rear shock mounting and general setup) and motivation (I wanted to have something about as small as this) mainly from this video on YT: ...and some other videos about small RC buggies. The creator's buggy itself is also roughly based on the MOC (video and instructions for V1 model) of someone else. Instead of (re)building this one, I created my own - also because I didn't have a Buggy motor at that time. I also created a V3 model. It's slightly bigger, has front lights (using PF LEDs) and uses bigger wheels but shows some deficiencies of the design: The rear axle tends to tear itself apart in this model on rough surfaces, making the gears slip. I assume this is due to the bigger wheels used in the V3 model. I use some additional axles with stop and bushes now to hold the rear axle together for a longer time. I assume this maybe could be fixed by using a frame around the two axle holes that shouldn't move apart. When doing tight turns the V3 also lifts one of the front wheels - the one on the same side as the gear that sits on the drive axle. If someone has a good explanation for this, I'd be grateful. I suspect the softer shocks compared to V2.
-
 Hello everyone, my name is NABLACK and this is my first post. This Porsche Tiger tank is from an anime called Girls und Panzer. It's mostly a normal Porsche Tiger but with a function to boost the performance. And to achieve that "boosted performance" in my Lego Porsche Tiger, I stupidly put 12 PF L motors into it. I got a lot of inspiration from Sariel's Tiger XL and Tommy Styrvoky's Tiger (P), and a lot of thanks and respect to them. Maybe there's too much Tiger tanks around there, but since I was planning to achieve a different feature, I think it would be fine to have another. Hope you will enjoy this. Specifiction: Scale: 1/18 Weight: 2.57kg (5.67lbs) Length(without barrel): 37.5cm (14.8in) Width: 19cm (7.5in) Height: 17cm (6.7in) Suspension: Oscillationg Bogies Power Source: Buwizz 2.0 x3 Propulsion: PF L motor x12 Gear Ratio: 1:1.667 Top Speed: 5km/h (3.1Mi/h) Other Electronic Parts: PF M motor x1 for turret rotation; PF M motor x1 for gun tilting; a pair of LED light Parts that's not original Lego: Buwizz 2.0 x3; Stainless steel axle x10; Stickers _DSC9262 by NABLACKS, on Flickr _DSC9265 by NABLACKS, on Flickr _DSC9283 by NABLACKS, on Flickr _DSC9290 by NABLACKS, on Flickr _DSC9282 by NABLACKS, on Flickr _DSC9297 by NABLACKS, on Flickr _DSC9301 by NABLACKS, on Flickr _DSC9302 by NABLACKS, on Flickr _DSC9449 by NABLACKS, on Flickr _DSC9479 by NABLACKS, on Flickr Visit flickr for more photos
 -
 Good people of Eurobricks, let me give you my first take on the planetary hubs: Please excuse me for the lenght of the video, it's meant to show the developement stage by stage. I had big expectations towards the new hubs, since they've been announced. I realised, these hubs will solve the problem of the stress on drivetrains, yet will raise a new challenge. Due to the increased torque on the wheels, the frame (chassis) and the bracing of the suspension will be the new weak link. A wanted to have a finalized rig to the date of the release of the hubs. The backbone of the design came from a five years old chassis concept, it was a non motorized chassis: To mimic the geometry of the new hub, I've used the old ones with some extension, so it can be easily swapped, when time comes: The concept of the chassis came together quite well, thanks to using techniques well practiced in my early years. But there was still a long time till the release of the new hubs. Driven by curiosity, I've planted two PF XL motors in the middle of the chassis, making them drive two axles each. One for the front axles, one for the rear ones. No additional gearing has been added, the motors were connected straight to the differentials. Of course it had to be tested, hat's the part around one minute into the video: https://youtu.be/PGQpUrOS-NQ?t=59 Came with a surprisingly satisfying result, despite the usage of the old cv's and hubs, yet it was understandably far from being a "crawler" it meant to be. Also at this point I was short of claas tyres, so I've used some similar size rc tyres on the front 4. Got the tyres eventually, still a lot of time till the hubs coming though. As the final design was gonna use 4 buggy motors, time came to make the change: Same principals, like with the XL motors: No gearing added (slow output used), 2 motors drive the front, other 2 for the rear axles. Now feeding that much buggy motors would require 4 buwizzes. Or one well sized rc lipo that can comfortably supply 2 sbricks. 4 buwizzes cost about 400-450 pounds, while the lipo comes for 30 pounds. Any question? At this stage (still no new hubs) it was an obvious, yet pretty crazy idea to hit the tarmac. So I did. That's what you see at 2:16 in the video: https://youtu.be/PGQpUrOS-NQ?t=136 I had a lot of trouble that day with the bluetooth connection, brought a head on crash int o a container. It was heart-, but no plastic breaking. Finally the hubs came by the post and the picture got full. I've also planted another servo for steering (2 in total now) Indoor durability test at 3:27 https://youtu.be/PGQpUrOS-NQ?t=207 Climbing test (60 degrees) at 4:18 https://youtu.be/PGQpUrOS-NQ?t=257 Hereby I apologize for the dark enviroment at this recording Peek on the suspension at 3:12 https://youtu.be/PGQpUrOS-NQ?t=191 Lego should not be used outdoors... ahm, okay... Outdoor test from 4:55 in the video. https://youtu.be/PGQpUrOS-NQ?t=295 I came to the verdict, that the new hubs worth their money. In a usage that abusive, you see in the video the hub-cv connection definitelly require some lubrication. I've been using silicone oil and no downside appeared so far. Here is the difference it makes: That's it so far, a little spoiler at the end of the video. Hope it's gonna catch some expert eyes...
 -
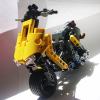
Good Day. Got inspired to build this after an in-game motorcycle from Honkai impact 3rd Original idea was to use 2x XL motors, but it was boring af. Next obvious step were buggy motors - allowing an approximate speed of 10km/h. It could probably pick up a higher speed with BuWizz 2.0's Ludicrous mode, but fast mode of BW v1.0 is enough to topple the bike over when taking high-speed turns. Unfortunately it does require "training wheels" to ride straight, as it would lean on one side without those after taking a curve without those. The bike does feature rear axle suspension, and small wheels have shocks as well. "01" stickers reused from MPATEV, "police" from 42047. Design-wise it belong to the same "universe" as my spaceship and racers - an Axos Police bike used to patrol within city high-speed tunnels and surface operations. Video&photos, C&C very welcome and appreciated))) Cya later!
-
 Hello everyone! Before I start I want to wish all of you to stay healthy, survive and win the disease! Today at my birthday I decided to share with you my latest MOC. This is a brand new Liebherr LR 11000. From the previous model, it took only some boom sections and proportions. The chassis and superstructure built from nothing and were rebuild several times. Below please let me share with you some dry specifications of the model: - Crane is about 2 meter high - weights 5 kg - requires at least 5 big battery boxes for been fully operated - can be managed by 3 sBrick units. - has 10 PF motors (4 are in the chassis) - Has 9 pneumatic cylinders + a pump - Has a full-size V6 diesel fake engine like the real crane - Has 6 winches, 3 of them are installed to the boom like in the real crane, but none of the motors are on the booms. - Crane is able to assemble and disassemble back from horizontal to working condition without any human help. - Has 4 pneumatic features, three of them are operated from the cabin, two of them are operated from the operators work seat Now is hte time for it's features: - Driving and steering - one XL motor per each track. Torgue increased 1:25 - Slewing by 2 M motors - L Motor for SA Frame winch - L Motor for the Main boom winch - M motor for the luffing jib winch - M motor for the secondary hook winch - L motor for the main hook winches - Pneumatically adjustable operators cabin - Pneumatically adjustable derrick counterweight horizontally - Pneumatically adjustable derrick counterweight vertically - Pneumatically rising chassis for (dis)assemble. - L motor for the pump and V6 engine - Individual Sbrick custom profile - 3 Pair of lights: - Front LED - Cab LED - Main hook winches LED Here is the link to photos, I'll post some directly here: https://bricksafe.com/pages/Aleh/2020-lego-liebher-lr-11000 Bonus: Here is the performance of the superstructure stability without boom and without counterweight(!), only one battery box insalled for fotors activity. Boxes are full with batteries (24 pcs) Easy to fix the front suspension: https://bricksafe.com/files/Aleh/2020-lego-liebher-lr-11000/IMG_2983.jpeg/800x600.jpg 1,5 kg load. Please enjoy and feel free to ask any questions.
 -
Hi there as nobody else yet presented a PF mod of the 42109 car (@ozacek?), I gave it a try yesterday afternoon/evening and did a quick & dirty PF mod. The result is a replica that's not totally identical in all details but comes very close to the original from the outside with considerable changes on the chassis. Differences: * Very obvious, the colors, but that was not important for the intended task. Initially I wanted to build it in red and black, but soon switched to orange and black and later just ignored the colors to save time when searching the needed parts - I have two many models built ATM and hence am low on some essential parts in the initially desired colors. The upcoming digital model(s) will use (a) more pleasing color combination(s). * The beam connecting both sides of the cockpit was moved 1 stud forward and was constructed differently to hold the PF AA battery box in place * As I couldn't find a position for the PF Servo motor that is low enough that the hood can be closed as much as in the original 42109, I used a 1 x 9 bent liftarm to fix the hood at an elevated position, imitating the look of a huge hood scoop. This way the hood is kept shut very tightly btw. * I used curved 11 x 3 panels with 2 pin holes for the side skirts, as I find them visually more pleasing then what was used in the original 42109. * The chassis is somewhat different: Instead of 11 x 7 frames I used 7 x 5 frames as I don't have 11 x 7 frames yet; 8L axles with stop for each rear wheel - so the axles can't be pulled out, but the wheels can still get loose, though I haven't seen this yet during driving and some other minor differences. The car doesn't use a differential but drives each rear wheel with a single PF L motor. Power Functions parts used: * 2 x PF L motor * 1 x PF Servo motor * 1 x PF IR V2 receiver - optional (not needed with BuWizz) * 1 x PF IR remote control - optional (not needed with BuWizz) * 1 x PF AA battery box - optional (not needed with BuWizz) [* 1 x PF control switch - actually not really needed, if the drive lines are set up in a way that both PF L motors can run in the same direction (not needed with BuWizz)] I.e. the PF equipment that came with the 9398 - not that I have one. Enough talking/writing, here are three shots, digital model(s) will come later: Using a BuWizz instead of the PF remote control equipment saves a lot of space and weight and will make this car faster. So far I haven't used it with fresh AA batteries but only with used AA batteries and a BuWizz and even in normal mode the car seems to be quicker, not to speak of fast and ludicrous modes, where the wheels start slipping on carpet and laminate floor when going backwards at full speed in fast mode or both ways at full speed in ludicrous mode.
-
Hello everyone! I´m really happy to present you my next MOC, the Milka truck, which is my 6th remote controlled vehicle at minifig scale! I have built it between December 2018 and March 2019. I have already shown it on two Lego events in Germany, there is an article about it on Zusammengebaut and there is a video on Youtube, in which I am interviewed. It is in German, so if you understand it, it is worth to watch it! Unfortunately I have found only now the time to make some pictures and an own video: The video is a new record from me. It contains the most visual effects among my other videos. I was very happy during the making of it, because last time I have made only rarely videos. It was nice to spend a time again with the camera. It took a little bit longer, as I planned. Because of the complexity I had to record some parts not only once and it was very time consuming to create some scenes on the computer. I´m really proud of the result, hope you will like it, too. Till now it is the most simple and most difficult tiny RC from me at the same time. Simple, because the technic costruction inside is very compact. Difficult, because the modelling of the Scania front and the letters of the word “Milka” meant a really big challenge for me. Now you can find the electric parts just simply near each other in the truck, and the chassis is under the electric parts. It is only 3 studs high. Earlier in the same vehicles you could find 3 pairs of gears, which brought the power from the motor to the wheels. Now it is only 2 pairs. The servo motor for the steering is exactly there, where we need to have it. It can steers the wheels directly, without any long and big construction. The original plane was that I put the receiver or the battery box in the trailer, but finally I found a place for all the parts in the truck. For the chassis I have used a lot of half liftarms and small pieces of rigid hoses. They are very good here, because I can cut them in for example 1 or 1,5 stud long pieces, too. In the truck the battery box is exactly over the driven wheels, so the truck can go very reliable on terrains, which are unfriendly. I mean, it can go up to the pedestrian area in a Lego City and it can destroy everything. The whole truck contains approx. 1020 parts. Most of the bricks are in the body. You can read the world “Milka” on the sides four times, but all the four sides are different. It is changing, how I could fit the side panels, what kind of other parts they have to hold, or how many place I had in the truck near the motors or the other things. During the designing of the cabin, I was afraid, that it will be ugly with the big white panel on the top, but finally I think, it´s ok. If you would like to see and try the truck in real life, visit the Bricky Way 2020 Lego exhibition in Györ, Hungary. It´s not far from Vienna. 7-8 March, 2020! Facebook: https://www.facebook.com/brickyway These are the infos, which I wanted to share you about my newest creation. Hope you like it! :)
-
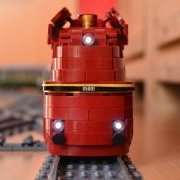
 This model balances on two wheels and the driver leans to tip the bike over to steer.
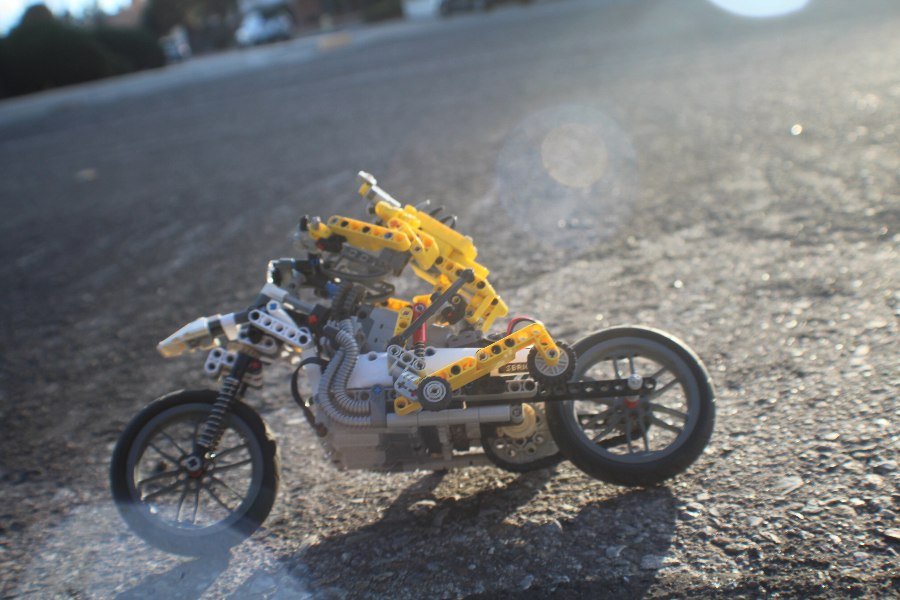
-
Volvo H9X Specification of the excavator Length 60s / width 31s / height 20s (47/24,5/16 cm) - without excavator arm Max dimensions of excavator arm: 60x35 cm(length x width) Weight: 3637 g Front suspension: none Rear suspension: none AWD Steered both axles Power - 2x 8878 BB 3x M 4xL 2x XL 3x Servo Specification of the trailer Length 55s / width 25s / height 17s (44/20/13,5 cm) Weight: 1398 g Power: 1x 8881 BB 1x XL Functions Driving - 2x XL Steering - M Gearbox - M Lifting the blade - M Excavator rotation - L Movement of the arm - 3L + 3 Servos Lifting the trailer's tipping bed - XL Today, I want to present wheeled excavator Volvo H9X with trailer. Model was built for Lego contest „Build the construction machines of the future”. Later it received many improvements… In short: it is wheeled excavator without operator’s cabin. I didn’t pattern the model on any real machine. As a scale I took Claas’s wheels. For driving there are two XL motors, which drive the 4 wheels, through two-speed gearbox. First gear ratio is 5:1, and second 1,8:1. The gears are changed by M motor and two 1x7 racks. Both axles are steered by M motor with gear ratio 3:1. In the front there are blade, driven by another M motor. In the upper part of the excavator there are three comperssors for three pnematic functions. First, which drives the four big pnematic cylinders, consists of L motor and two pnematic pumps. Next two compressors are the same (L motor + one pump) and they drive the pneumatic cylinders for moving second section of the arm and the bucket. The valves are steered by three Servos. For excavator rotation I used L motor with gear ratio 155:1. In the front there are double Led lights, powered by a switch. The trailer is a simple liftarm construction. The bed is tipped by one linear actuator driven by XL motor. It is powered by switch, because of lack of free channels on the IR receivers. Gallery