Search the Community
Showing results for tags 'Power Functions'.
-
 I've created an Arduino shield to control Lego Power Functions: An Arduino is a small, programmable microcontroller with lots of I/O (input/output) pins. It can be programmed from a computer, and it can interface with various devices. An Arduino shield is a circuit board that mounts onto the top of an Arduino to give it extra functionality. It is powered from a Power Functions plug, and has 3 channels that can be controlled via bluetooth, or programmed with the Arduino. See the kickstarter for more info: http://kck.st/1KqXFFV, and if you want one, please consider backing it. I will post some images of it in various models if you guys like it. What are your opinions on it, or do you have any improvements to suggest?
 -
 My new monorail, which began with Masao Hidaka's idea on LEGO Ideas, now has faster trains and a larger layout. - The trains now use PF Train motors, 2 per train, with belt drives. This is a much simpler transmission than the previous trains that used gears. - The train bogies are of Technic construction. - Powered by PF LiPo battery with PF IR Receiver control, S-Brick compatible. - Flashing lights in proportion to speed. - Junction with PF Servo Motor and rack system. - Speed is now up to 0.95m/s averaged over 10 laps of the 12-metre circuit. Full details and discussion here (and scroll down) Mark
 -
My new monorail, which began with Masao Hidaka's idea on LEGO Ideas, now has faster trains and a larger layout. - The trains now use PF Train motors, 2 per train. - Powered by PF LiPo battery with PF IR Receiver control. - Speed is now up to 0.95m/s averaged over 10 laps of the 12-metre circuit. Full details and discussion here (and scroll down) Mark
-
 18 Volt Drill Master LEGO conversion [WIP] BY Boxerlego Introduction Hi, This is my latest LEGO custom motor project but its not the only one I'm working on I just bought this 18v drill today for the intention of modifying it for LEGO use. My previous drill motor project I only modify an old 18V drill motor to fit with LEGO but this time around I've a new 18V drill motor with a fresh 18 volt battery pack and I'm going to try to fit with LEGO. The nice thing about this is I got that power drill with an 18v battery pack along with charger for a great deal of $16, the original sale price was $35. My first 18v drill motor project had tons of problems to over come and for a long time at first the motor was not even able to be power with LEGO 9V PF system. This was a major problem for me and ultimately I didn't quite know enough on how to drive a DC motors with electronics. So I moved on to my next motor project which was a stepper motor and was more efficient that it could be driven with the LEGO V1 PF system. This was a good step up but it wasn't quite as powerful as the drill motor can be. It didn't take long for me to figure out how to drive a motor with electronics, there are lots of good YouTube videos out there that got me started but ultimately how to properly drive this 18v drill motor with LEGO was still far from perfect. My first motor driver had several mistakes however LEGO was able to still make it work but still those problems needed to be understood and corrected so I can make improvements and make it work better. I will spare all the details here and I will just say that in 2014 I learned tons about how to properly drive motors and more efficiently. Which brings me to my other motor project the upgraded XL motor I'm working on, which is reaching the final stages and that is building the motor driver. This motor driver here for the XL motor MOD is absolutely the best one I made yet. You wont believe what I was able to with this motor driver or maybe you will . I will just say that this motor driver here I made works from the regular 7-9 volts the LEGO Battery box can supply but however the XL motor mod has a switching DC power supply that can step up the 7-9 volts from the battery box to 12 volts for this XL motor mod to work off of. Overall this topic will mainly be about the 18v drill motor LEGO conversion so to start it off I want to show a video time line of some my previous projects with my first drill motor. Video Time Line Think this is either going to work or not please feel free to comment on the matter. I hope everything works out well
 -
My first project on the LEGO Ideas site is an Inductive Charging System for Power Functions LiPo batteries for Trains, Technic and Mindstorms. The project concept enables a train LiPo battery to be charged without manual intervention. The train stops over the charging coil. The charging coil would sit between the rails, powered from the standard charger. The receiving coil would be held between the bogies of a wagon, plugged into the charging port of the LiPo battery. The device would be compatible with use for Technic, Mindstorms and other themes, so that a robot could return to a charging station and charge itself. It might be possible for the charging and receiving coils to be two of the same device, minimising cost. This would bring LEGO products up to date with the charging of mobile phones and tablets. It may be a key technology to enable more development of Power Functions trains because it would make it easier to run them at shows. Please add your support to the project. We have 90 supporters so far, which is good for a technological project (as opposed to a populist project). Let's see if we can reach over 100 supporters, perhaps 150 in April! Even if the LEGO Ideas route is not the best route, your support adds weight to the case for pursuing another route, such as third party production or crowd funding. Thanks, Mark
-
 Now for something silly. I was planning a stairs GBC module for our upcoming LUG event season. It got morphed into a stress reliever or stress creator depending on how you look at whack a mole. YouTube Video: (I needed something quick for my Jar Jar photo a day project.) Day 111 of 365: Whack a Jar Jar Binks by dr_spock_888, on Flickr
 -
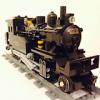 Hi all, Apologies if something like this has been done already, but I couldn't find anything quite like it. I thought it might be a good idea to start a thread to share ideas about the best ways of squeezing Power Functions into small spaces. I occasionaly come across images where I think 'oh, that's a good way of fitting that in' but usually I've stumbled across it by chance and the reference is never there when I need it. So if you have any images of your own MOCs, or somebody elses (try to give credit of course), share them here. As a start, I found this video by a youtube user names Zanthera quite useful in the past, but tenders can make things a lot easier for steam loco builders: Anyone know of any really clever tank engines or small shunters?
 -
Ever wonder how much power you're actually getting out of your locomotives? Commander Wolf and I did! Of course there's Philo's motor characteristics page, but that only tells you the motor power ratings under the load he tested with, under his conditions. We wanted to see how much drawbar power we were actually getting, particularly with Power Functions locomotives. Here's our setup: A string is attached to a pin inserted where the magnet would normally go on the locomotive. The string is attached to a weight, which dangles off the balcony into the floor below (a 3-meter drop). Here's what we tested: AGEIR Power source: PF rechargeable battery Motor: 71427 gearmotor 2096 Power source: 2-cell 20C Lithium-Ion battery (custom) Motor: 2x PF M motor Baggage Car 999 Power source: Wall wart Motor: 2x 9V train motor HH1000 Power source: AA battery box with Eneloops Motor: 2x PF M motor U30 Power source: AA battery box with Eneloops Motor: 2x PF L motor We did two tests. Traction Test We ran each locomotive at top speed. If it moved the weight, we increased the weight until it no longer moved, then recorded the result. We then divided the max weight pulled by the weight of the locomotive to get an effective traction ratio (for 2096, we divided by the weight of the center powered section only). Unfortunately, since our weight was made up of two battery boxes, the minimum granularity in our measurement was the weight of a AA battery. Results: The locomotives with the PF train wheel, as well as the 9V motor unit, all had about the same traction ratio, from 0.25 to 0.27. No. 2096 had a much higher ratio of 0.337. I'll note that 2096 uses the large drive wheels with custom O-ring tires, rather than the official rubber band. Some locomotives had different traction ratios going forward and going backward. Power Test In this test, we fixed the weight at 98g. We then measured how long it took each locomotive to raise the weight a fixed distance. From this we could calculate the power output by each locomotive against that particular load: mass of weight (kg) * acceleration of gravity (m/s^2) * distance (m) / time (s) Results: Note the high values for 2096 and the baggage car -- this is due to their high top speed (large drivers on 2096, speedy 9V motor on the baggage car -- we ran the 9V motors at top speed). We ran the test on our top three winners with 2 more AA batteries of weight: Note that the power ratings for 2096 and U30 went up more than the power rating of the baggage car did. Interpretation: PF motors can continue to haul heavy loads at decent speeds, whereas 9V motors are gradually slowed by the addition of more weight. How much is 98 grams of load equivalent to though? The bonus round: Measuring Rolling Resistance We hooked up some unpowered rolling stock to the weight, and increased the weight until they began to move. Turns out the normal 9V wheelsets, lightly lubricated, have neglible resistance. The weight of a single 2x4 brick was sufficient to move a piece of 2-axle rolling stock. Of course, there are things with a lot more rolling resistance: - Commander Wolf's PRR T1: 52 grams worth of resistance - The entire rake of P54 cars (3 total): 32 grams worth of resistance Conclusions Effective traction is about the same regardless of your power source. If you want more pulling power, increase the weight of your locomotive ... or try to find some tires with more traction. U30 weighs 1020 grams and could lift ~ 250 grams. 9V train motors produce a huge amount of power ... if you want to go really fast. For pulling heavy loads at more sedate speeds, use the PF motors. We haven't tested the 9V train motors at a lower speed, but observational evidence suggests that their effective pulling power is drastically reduced at lower speeds. The rolling resistance of lubricated stock wheelsets is almost nothing compared to much lower than the rolling resistance of technic axles. Be prepared to fight lots of resistance if you make custom rolling stock that doesn't use the stock wheelsets. Until next time!
-
 A few month's ago I've build Batman's Bat Hunter. It's not an official Batman vehicle Last week I've made some pictures of it (I am/was very busy with other LEGO mocs) I've created this MOC in 1,5 day. Short description of the moc: Batman use the Bat Hunter for keeping Gotham City safe. The Bat Hunter is a fast vehicle for patrolling around Gotham City. When riding the Bat Hunter, the wings are moving. The Bat Hunter is remote controlled by one PF medium motor, and for steering one PF medium motor. Some pictures: 01_Bat_Hunter by LegoMathijs, on Flickr I've used the IR receiver as cabin. 05_Bat_Hunter_backside_view by LegoMathijs, on Flickr Backside of the Bat Hunter 04_Bat_Hunter by LegoMathijs, on Flickr 02_Bat_Hunter by LegoMathijs, on Flickr More pictures at my Flickr photostream: https://www.flickr.c...157650266117900
 -
Have any of you ever had issues with signal interference when controlling your trains? Today I had 60051 and 60052 set up in a classroom environment. I had checked everything at home and all worked fine. (Worked fine at home afterwards also.) Batteries were fully charged (Lego rechargeable) and new batteries in the controller. But during the session signals to the trains were either not getting through or were very significantly delayed. Other (possibly) relevant information: There were a lot of laptops in the room (not close to the trains) but all were off or at least closed and therefore in sleep mode. There are about 6 double fluorescent tube lights on the ceiling and there was wifi in the room. Any suggestions as to probable causes and potential solutions greatly appreciated.
-
I'm wondering if the PF IR receiver can "see" signals through transparent pieces, particularly trans-clear. I presume it does, but I want to make sure. I'd check on my own, but all my PF parts are at school in Illinois and I'm home in New York for the holidays. I'm hoping it works, otherwise I've got some major design changes to make on an upcoming project. Anyways, has anyone tried this or can someone test it quickly? I'd greatly appreciate it! Apologies if this is a repeat thread, I searched for the topic prior to posting. -Matt
-
 RC driving and steering. All wheel drive and Live axle suspension Lifted with Mickey Thompson tires: Internals More on my Flickr Youtube video (I know doesn't work in some countries, you can find it on flickr too)
 -
 Well, I've got a bunch of ideas and other random things, as I am building more often, so rather than make a dedicated thread for every off the cuff thing or proof of concept I turn out, I'm just going to compile it here. The first item is a proof of concept chassis for a Gottwald crane, which I meant to be an AK-912, but there are many different models that have a similar chassis, including the AMK-1000, and the AK-680. It's a WIP, but I have other projects I want to finish first, so I made this, and am currently working on an LDD file. Once that file is finished, this thing will be taken apart, so I can use the pieces for other projects, and once I am ready to give this my all, I will use the LDD file to rebuild it. Gottwald AK-912 chassis. by Saberwing007, on Flickr The model is meant to be like an official set, like 42043, meaning one motor, and no RC. The chassi has a V-12 engine, like the real thing, and 8 wheel drive, with a single middle differential. I found that given how far apart the axles are, a differential is required between the 2 sets of driven axles. The different angle between the steering axles is achieved by a diagonal beam, which is very effective. There is almost no backlash, and the axles are in sync automatically. Also, due to how it works, the axles are set to the correct angle relative to each other automatically, due to how it is built, without any calculations. Another picture of the front unit: Gottwald AK-912 chassis. by Saberwing007, on Flickr In addition, the chassis can be separated into three parts, like the real thing. Seperate by Saberwing007, on Flickr Although the steering on the front and rear units works well, it's connecting the two that has proven problematic. I blame lack of stiffness in the middle reversing linkage, and using friction pins for every steering connection. But, for now, this is finished. I will get back to it later, I don't know how much later, though.
 -
Today, I found a video from our good friend Sariel about a new, Lego compatible motor system called RCBRICKS, from a startup of the same name. These motors look quite unlike PF motors, and seem to be based off of high torque hobby servo motors, and as such are quite capable. Watch the video for more information. (It's in Polish, but the subtitles are just fine, and in English.) Here are the Pros and Cons, as far as I can see: Pro: Lots of power Highly responsive Great range Should be relatively inexpensive. Compatible with any kind of RC gear. Con: Not compatible with Lego PF system in any way. RC receivers and transmitters are expensive. Questionable battery choice. Motors are entirely new shapes, and not readily compatible with the system, meaning that they are not drop in replacements Unproven startup. Receivers and batteries are not Lego compatible. I don't know, they sound okay, but the thing is, what most people have problems with is either the power supply, or receivers of the Lego PF system, and not the motors. While I think it is a valiant attempt to rectify the Lego systems short range, I don't think they are going about it the right way. I am also kind of dubious about the idea of using a USB batter pack for this, as it is not really Lego compatible, and has to be awkwardly rubber banded in place. It would be preferable if there were a way to go from RC standard to LPF standard, as having all new motors might alienate people who just want a drop in PF receiver replacement, like SBrick. What do you guys think?
-
 I need suggestion with my car. I have images below of what I have so far. A few questions. What springs should I use. Hard or soft? What wheels or tires? And I need ideas on how to complete it. So far my axle has working steering and a driveshaft connected. I don't know what to do next as I am a new technic builder. If any more information or pictures are needed please tell me :) Images: http://imgur.com/a/QbhXw
 -
 Hey, i would love to share my latest Creation with you guys. Its been a while since my last MOC, but i took the time to build something cool. It is definitely one of my best so far. And for the first time i decided to provide detailed instruction for this MOC. What are the functions of the ZlL E134 Truck: First of all, i used 2x SBricks and 2x 88000 Battery Packs. 2 XL Motos for propulsion 2 L Motors for steering 1 M Motor for gear change (2 speed transmission) 1 LED on the roof (there is a lot of space to use more LED) a working 12 Zylinder Fake Engine behind the cabin. 2965 Parts , about 3,4 Kg. There is still room for improvements. Under the hood is enough space to put in what ever you want. The whole Bodywork can be removed very easy. (modular design) But as always, a short video can show you the Model in action. Instruction: https://rebrickable....nkmad-max-desig Thanks to Madoka for the inspiration with his Tatra 813 Truck. Great work as always.
 -
 They call those who ride them "rednecks". But while you may ponder whether the setup like this is an overkill or not, a pickup mounted on 10' wheels is a thing to remember no matter the circumstances. Features: ► forward/reverse drive ► separately-driven L6 turbocharged Diesel engine with moving pistons and cooling fan ► steering ► differential and gearing for speed ► simplified cockpit with steering wheel and IR-receiver seats. ► opening cab doors and hood ► exhaust stack ► details such as radiator with grille, front and rear lights, bull bar and reinforced bumpers, roof rack with extra floodlights, rear view mirrors, desert safety flag and fenders 42030 C-model, uses more than 80% of set's parts (loose assumption). 42 studs long and heavy. Despite its weight and only one XL motor as means of propulsion, it has a quite decent speed - it picks up (pun intended) a huge momentum - and an impressive turning radius. Engine is separately powered by L motor. Steering is much like in a video game, where both reverse and brakes are controlled by the same button. Unsuspected bonus: by accident, the bed is perfectly shaped to hold the RC control unit which consists of two RC pilots with a standard RC-car additions. The set's M motor lies dormant, waiting to be used on some extra function I can't currently come up with. It'd be hard to craft the instructions in LDD, but I'll try one day.
 -
 This is a very small, robust, reliable and easy to maintain buggy. It is ideal for letting your kids play with all day. The design goal was to make a robust car as small and simple as possible. This means most of all no suspension system since that would require the use of CV joints. They are known to break and while they work nicely in LEGO super cars that you carefully push around the floor, it does not work with kids trying to race and crash their RC cars. CV joints will break. Of course it is possible to create a LEGO RC car with suspension and even four wheel drive/steering, but then you end up with LEGO’s own RC Crawler. The goal was to keep it small, simple and robust. One of the problems I encountered when letting kids play with the RC cars all day is that the axles in the differential tend to slip and move out. I hence build a differential assembly in which the axles are completely locked in and cannot move. The worst thing that could still happen is that a wheel comes off which is easy to fix. The car uses only one L-Motor and is pretty fast for that. The turning radius is very tight and the car is just fun to drive. The differential makes it perfect to drive around tight corners. The heavy battery pack is right on top of the back axle, giving it the best friction. Well, it does not accelerate like an F1, but it might still make a small difference. Building instructions, LXF, and further information are available.
 -
Hi, I am working on a new project which is a tracked vehicle, I have started on it and remodeled it 3 times already. I am new to tracked suspension and wanted to incorporate hard shocks. The motor I will be using is the Lego XL motor.
-
Hi, I have recently started a tracked vehicle project. I have made a few other topics about it, building it etc. I was wondering if anyone has made a vehicle then turned around and made it articulated. (Especially tracked) I also need tips on how to do this. Thanks
-
 If you do, what will it have to look like? Should it be modular and per cylinder, or per engine type (inline, flat, V)? Should it come in at least three block sizes or three power levels? If you don't, why not? Will a need for a sophisticated transmission render it pretty useless, or will cost come into play? Is it gonna be impractical to even make one, even with the promise of SO MUCH POWAH? Keep it clean, guys, I'm just genuinely curious with what you think about such a part.
 -
Hi all, i got a Horizon Express-10233 as a present recently, and i would like to know more about the power functions as rather new to this. Is it necessary for me to get, 8878-1: Rechargeable Battery Box and 8887-1: Transformer 10V DC. Or is there a way that i can DIY my own rechargable battery box, as the one sold my Lego is expensive, and the transformer looks like any ordinary charger, i believe i can get one outside at a reasonable price as compared to the one sold by Lego. Would be glad if someone could help me with my queries. Many thanks!
-
Here is my most recent project I'm building. I've built the chassis of this Buggy from instructions made by Madoca 1977. The difference here is that I built this to use the AA battery box instead of the Lipo battery. In the future I plan to add one or two of my upgraded XL motor in here but right now the L motors are looking and handling great. More is to come feel free to comment...
-
8081 Extreme Cruiser & PF Modification PF Mod Ever wanted to see the Extreme Cruise be taken to the EXTREME. Then watch this Extreme Cruiser as it goes over the roughest terrain. Edit: Edited the video due to loud intro music
-
Here is my first Space MOC to be posted to EuroBricks. Introducing the Pest Annihilator a.k.a. The Cootie Crusher. This modular ship consits of three sections which can be separated into their individual components. The version in the photos represent version 2.5 of the creation as it has undergone some changes to make the vehicle more stable and kid friendly in the last 10 months. The drive section that contain all the Power Functions features is built on an odd Technic beam basis while the structure around the chassis is an even styled system build. The Pest Annihilator/Cootie Crusher