Search the Community
Showing results for tags '9v'.
-
-Mini.thumb.jpg.03594ed3626ab4a4b625a32af4d03d5f.jpg) (Click to skip to the post with the latest photos) The Backstory: For years I've wanted to be able to display my 12v collection at shows/exhibitions/libraries or wherever, but the wiring is a challenge - I reckon on my last full layout there was 250 to 300 feet (75-90 metres) of the stuff, which on a static layout is one thing, but one built in modules for transport is a challenge. Three or four months ago I came up with a solution (more on that below) and the dreaming started. After much playing in Bluebrick, and nostalgic posts appearing here about older era trains, I settled on a plan. I still had a bunch of my old blue track from the 4.5v era, but no motors. Off we go to Bricklink then! The Layout So, here's the plan. Ten years ago I had a small portable layout on 4 modules, each 3x5 baseplates, and over the years have simply added more of these. Following my Bricklink spree, I now have 2 working 4.5v motors, so rebuilt the loco from set 183 and I have the loco from 7720 in progress. These 2 will feature on the 4.5v loop below, which is 3 of those modules. Next to the 4.5v loop will be the showpiece, the main 12v loops. 12v Lower by andyglascott, on Flickr And on the right of the layout will be the 9v loops. Unlike the other 2 eras, I will have 9v track left over, so this is likely to be expanded in due course, particularly as @michaelgale releases motors, power supply etc. 9v Loops by andyglascott, on Flickr Lastly, there will be another 12v loop, elevated, which will run across the back of all three eras. 12v Upper by andyglascott, on Flickr Putting all of those together looks like this (the white baseplates are roughly where the mountains, tunnels etc will be for the elevated sections. The green and grey sections are simply so I could keep track of where the 3x5 modules were to try and avoid having curves/points on more than one module. When it all comes together, in most likely a couple of years, I'll be able to run 6 trains at a time. Whole Layout by andyglascott, on Flickr The Beginning After all the planning, and clearing away of my last (incomplete) layout, I've finally started building the first module, part of the 4.5v loop. I decided to start here as this will be the quickest era to build, and to a large extent, each era can also be displayed as a stand-alone smaller layout. These three modules will be countryside/farmland, and the trains will reflect the farming side of it when they get built. Module 01 Pic 02 by andyglascott, on Flickr The 12v Wiring The solution that I've come up with is fairly simple, but does involve taking a drill to some baseplates.... At each of the 12v points or signals I'll drill a small hole through the baseplate and the wood for each module, thread the wire through and attach either the original Lego plugs or a quick connect/release plug/connector so that when the layout is set up I'll use already measured lengths of wire to go from that point to the control panels, which will be on their own module. This is going to be a heck of a journey, and build, I'll post updates from time to time, particularly at landmark moments such as completing an "era". I always said, growing up, I was keeping my Lego for my kids. It was really only an excuse, and I'm really glad I didn't sell my old blue track even though I didn't, for years, think I'd use it. Sadly my original 4.5v motors, battery boxes, lights and even signals are long gone, but I was only 7 or 8 when I got 7720....
(Click to skip to the post with the latest photos) The Backstory: For years I've wanted to be able to display my 12v collection at shows/exhibitions/libraries or wherever, but the wiring is a challenge - I reckon on my last full layout there was 250 to 300 feet (75-90 metres) of the stuff, which on a static layout is one thing, but one built in modules for transport is a challenge. Three or four months ago I came up with a solution (more on that below) and the dreaming started. After much playing in Bluebrick, and nostalgic posts appearing here about older era trains, I settled on a plan. I still had a bunch of my old blue track from the 4.5v era, but no motors. Off we go to Bricklink then! The Layout So, here's the plan. Ten years ago I had a small portable layout on 4 modules, each 3x5 baseplates, and over the years have simply added more of these. Following my Bricklink spree, I now have 2 working 4.5v motors, so rebuilt the loco from set 183 and I have the loco from 7720 in progress. These 2 will feature on the 4.5v loop below, which is 3 of those modules. Next to the 4.5v loop will be the showpiece, the main 12v loops. 12v Lower by andyglascott, on Flickr And on the right of the layout will be the 9v loops. Unlike the other 2 eras, I will have 9v track left over, so this is likely to be expanded in due course, particularly as @michaelgale releases motors, power supply etc. 9v Loops by andyglascott, on Flickr Lastly, there will be another 12v loop, elevated, which will run across the back of all three eras. 12v Upper by andyglascott, on Flickr Putting all of those together looks like this (the white baseplates are roughly where the mountains, tunnels etc will be for the elevated sections. The green and grey sections are simply so I could keep track of where the 3x5 modules were to try and avoid having curves/points on more than one module. When it all comes together, in most likely a couple of years, I'll be able to run 6 trains at a time. Whole Layout by andyglascott, on Flickr The Beginning After all the planning, and clearing away of my last (incomplete) layout, I've finally started building the first module, part of the 4.5v loop. I decided to start here as this will be the quickest era to build, and to a large extent, each era can also be displayed as a stand-alone smaller layout. These three modules will be countryside/farmland, and the trains will reflect the farming side of it when they get built. Module 01 Pic 02 by andyglascott, on Flickr The 12v Wiring The solution that I've come up with is fairly simple, but does involve taking a drill to some baseplates.... At each of the 12v points or signals I'll drill a small hole through the baseplate and the wood for each module, thread the wire through and attach either the original Lego plugs or a quick connect/release plug/connector so that when the layout is set up I'll use already measured lengths of wire to go from that point to the control panels, which will be on their own module. This is going to be a heck of a journey, and build, I'll post updates from time to time, particularly at landmark moments such as completing an "era". I always said, growing up, I was keeping my Lego for my kids. It was really only an excuse, and I'm really glad I didn't sell my old blue track even though I didn't, for years, think I'd use it. Sadly my original 4.5v motors, battery boxes, lights and even signals are long gone, but I was only 7 or 8 when I got 7720.... -
It's finally finished! Luas full length Luas is the tram here in Dublin, and I've been wanting to build one for a long time. I started about a year ago, when I got the general concept for the cars figured out, but then abandoned it for a while. Sometimes the inspiration just isn't there... Anyway, over the past few weeks I figured out the cabin, the connections between the sections, improved the doors, which required a different way of doing the roof.... One thing I decided right at the start is that I wanted to do the micro-stripe yellow above the purple. The first idea was to use brackets (1x2/2x2 and 1x2/2x4) and you can still see those in the middle section. Luas middle section However for the outer sections I had to change the concept, as the plate part of the brackets got in the way of the sideways built doors. I ended up using flags, but getting enough of them in yellow and in the old mold (the clip is slightly different in the newer ones, and unfortunately Bricklink doesn't differentiate) was not easy. It's powered by a 9V train motor in the middle and it can manage the tight curves: Luas inside curve It does have a bit of an overhang, so don't park close to the tracks ;-) Figuring out the shape of the 'dressed up' bogies was not easy, despite the simplicity of the final design. Getting the bodie shape around them was even harder. The connectors between sections were another headache that's gone through umpteen different designs. In reality they're an accordion-type structure which is impossible in Lego. So I needed something that would keep the sections close on the straights, and would allow the tram to go around standard curves without showing a big ugly gap. For transport it also had to be easy to take the sections apart and for reliable running the connection has to have some flex when the track isn't perfectly level. I managed to do all of that:
-
Hello everyone. I´d like to present you my version of a DB Class 111. DB Baureihe 111 by Henrik S, auf Flickr A view of the front. I used bley frames for the windows, i think it fits well and looks very much like the prototype. I´m not quite sure if it would look better if the windows were rotated to their sides. It would certainly need a lot of tinkering and a bigger change to the front-section of the loco. DB Baureihe 111 by Henrik S, auf Flickr A closer look at the Pantograph. I´m quite satisfied with how they came out . DB Baureihe 111 - Pantograph by Henrik S, auf Flickr Please feel free to tell me your opinions and offer critique where you see fit. Best regards and thanks for stopping by! Reference picture
-
Hello, May i present my 9V bar layout, features some of my sets from the 90s, some lightly modded, and some bridges i made. Train delivers drinks to guests at parties.
-
On my new layout, I have now displayed four tracks that are operated individually with a 9V speed regulator each. All power connections to the rails have been checked w.r.t. polarization. Conceptually, the setup is equal to the Lego Train 9V Extreme display, including crossover swiches linking these tracks together. The basic idea is to run trains on these four tracks independent from each other in elective directions. The first tests showed no problems. However, these initial tests were performed with one train at a time. Recently I started to run several trains at the same time. Then I discovered that there seems to be some kind of interference between all four tracks. When running trains in opposite directions, the engines slow down or come to a stop. Notice that all crossover switches are in straight position. When operating the four speed regulators, they work only on the designed tracks, i.e. there is no visible interference at all in terms of other engines on other tracks would start running simultaneously. I just don't understand this problem, particularly considering the fact that I have never experienced similar problems on the Lego Train 9V Extreme track. Any advise to get this problem solved would be highly appreciated! Below a schedule over this layout with positions of the power connections to the track
-
Hello dear Lego fans, After having signed up here in the Eurobricks forums in 2011, I posted a new thread in the "Hello my name is..." section about my plans to create my own Lego City layout. Now almost 9 years later, I can finally show you some of the progress that has been made just at the beginning of the new decade :) Good things come to those who wait. Renovations on the attic are finally complete (apart from the lighting) and we now have around 110 m² to unleash our imagination. The current plans of the Lego city layout add up to around 60m² in size and they are, as you can see in the video, far from finished. However, I thought you might be interested in some of the things that my girlfriend and me were designing in the last couple of days. The name of the city is still unknown, but the overall design has started to take shape with a downtown area, which includes all the modulars, and shops, a residential area, an amusement park, a winter village, a train yard and a harbor/beach area. I would also like to add an airport to the city and some of the classic monorail tracks have been placed already. We are also getting into MOC a little bit and we will add our own creations to the layout as soon as they look nice! The commentary of the video is in German, but I am trying to add English subtitles into the system. Please let us know what you think here in the forums or in the comments section of YouTube. I will keep you posted on future updates if you like :) Note: All of the parts used in this layout are original Lego parts, except for some of the baseplates. I thought that lime green in the Hogwarts castle area might look cool, but I will probably exchange it for regular grass green baseplates in the near future. Thank you so much for taking a look! :) Christof
-
After last summer, I noticed deteriorations of current transfer from rails to 9V engines. This is due to coatings of rail plates, something that occurs over time. Normally, I clean rails/railplates manually. However, in the case of the 9V Extreme Track, this is hardly possible since many sections are difficult to access alt. out of reach. The only remaining expedient for cleaning is a highly efficient rail cleaning train! The latest version of my rail cleaning train consists of three different types of cleaning units: Cleaning unit type I: Total weight: 760 g Cleaning surface: wooden blocks covered with three layers of fabric Cleaning unit type II (4 units): Total weight: 250 g Cleaning surface: Masonite board Cleaning unit type III: Total weight: 380 g Cleaning surface: Cotton wool rolls (normally used by dentists ...) Because of the heavy weight in combination with considerable friction, I have to operate the rail cleaning train in two versions. (It feels like driving a car with applied handbrakes ...) Both versions include six locomotives 7939 with two 9V engines each: Rail Cleaning Train version Alfa: Rail Cleaning Train version Beta. Does it work? This is how the undersides look like after the first cleaning rounds: After several rounds through the entire layout, the current transfer between rail plates and 9V engines is back to normal again.
-
Hi all, wanted to share this MOC as I "teased" it many years ago but did not finish it until now. I started building the B1 in an effort to build the smallest possible 1:48 scale PF model, but ended up building the slightly smaller A6b, and then later on the even smaller EMD Model 40. Since then the B1 has been sitting in a folder on my computer gathering virtual dust. Last year someone inquired about the model and I decided to finish it once and for all, and this is the result: This is a pretty simple model just by virtue of the small size: the build is basically the same as that of the A6, just larger due to the larger scale size of the locomotive. It actually has a lot of volume compared to something like the Model 40, but the shape of LEGO motors and electronic components means that you can basically never fully utilize the 6-wide space in an 8-wide model. The part of the model that stumped me initially was connecting the massive side frames to the body. I had tried a couple times to find a solution over the years, but I finally cheated by cartooning the tanks on the sides of the locomotive with plates such that I could fit structural components behind them. The pantograph can also move up and down! Anyway, here is my video going into more detail about the model, as well as a Brickshelf gallery (when moderated). EDIT: Instructions for this model are now for sale on Rebrickable: https://rebrickable.com/mocs/MOC-48349/NonsenseWars/148-pennsylvania-railroad-b1-power-functions-9v
-
I'd like to present my latest locomotive, loosely based on various British 0-6-0 goods engines. This MOC is a first for me in several ways...it's the first locomotive for which I've attempted to print decals, and the first I've built using BBB wheels. I'd like to thank @ScotNick for graciously granting me permission to use his magnifying glass technique for the front cab windows. Lord Dudley is named after a 15th century politician and its number is an homage to the USS Voyager (NCC-74656). Lord-Dudley-1 by the chestertonian, on Flickr Lord-Dudley-2 by the chestertonian, on Flickr The 3-axle tender holds a 9V motor (the third axle swivels to go around curves) and features the classic BR "lion-on-a-unicycle." I don't have a proper label maker, so I printed out the decal on regular paper and covered it with a slightly larger piece of adhesive laminating sheet. This leaves enough overhang of the adhesive layer to stick to the sides of the tender. Note that only the logo and the red lining are printed; the white lining is brick-built. Lord-Dudley-3 by the chestertonian, on Flickr The tender holds a battery box to power the locomotive lights. The batteries are accessible by removing the coal. Lord-Dudley-4 by the chestertonian, on Flickr Lord-Dudley-5 by the chestertonian, on Flickr Finally, Lord Dudley's driver and fireman pose along the line by their engine: Lord-Dudley-6 by the chestertonian, on Flickr Lord-Dudley-7 by the chestertonian, on Flickr Thanks for looking! Soli Deo Gloria
-
I was discussing this afternoon with my fellow club members about the 10183 Hobby Train and the whole Save 9V campaign from 2006-2008. If I recall correctly, at one point in time, before ditching the 9V Line all together, there was an idea that Lego would continue the 9V line as the Hobby Train Line, with the RC line being the 'kids' line. There were rumours about other radii and all that kind of stuff. You know, like the good old 12V times. Or, at least... That's how I remember it. But my fellow club members say I'm making up stuff, and that I remembered this wrongly, it was just the Hobby Train 10183, and nothing more... And for some reason I can't find anything about the whole Hobby Train Line, because internet is being clogged with talk about 10183 (turns out 15 years later it DOES sell!) instead of the whole Line. So, my question is: Whatever happened to the Hobby Train Line?! /Edit: found this gem in my collection, seems my mind at least wasn't totally playing tricks on me!
-
Three years ago, I finished my Lego Train 9V Extreme Project. And now it's time to inaugurate My Own Lego World, a Project that - on and off - has been ongoing for approx. 30 months. This layout includes many vintage Lego sets from the time our daughters grew up. Most of these sets are from the 70s, 80s, 90s and 00s. Some originate from more recent years. My Own Lego World covers the following themes: City Paradisa & Beach Container Port & Shark Bay Outdoor activities World Cup Soccer (1998) Space & Space Center Airport, Aircrafts and Air Show Tivoli Train 9V In addition, it also includes several MOCs (e.g. signal box, track traverses, observation tower, stairways, open-air cinema, church, windmill and cableway base station with "elevator" tower) and a battery driven cableway (Rigi Lehmann). Addendum #1: Technical data & details Construction: Level 0: 74 cm above floor Level 1: 17 cm above level 0 Level 2: 36 cm above level 0 Top of Lego World: 214 cm above floor Layout dimensions: Level 0: 3.8 x 3.8 m (with two islands of 0.75 x 0.75 m) Level 1: 0.5 x 3.6 m plus 0.5 x 0.5 m Level 2: 0.5 x 2.1 m Total layout area (excl. Moon Base and Top of Lego World): approx. 17 sqm Train 9V: Total track length incl. sidings and dead-ends: approx. 51 m Total track length incl. Lego Train 9V Extreme layout: approx. 224 m with - all in all - 67 power connections to rails Including train shelves, 2 296 rails and switches are now deployed in this room with a total length of approx. 311 m: 1 871 straight (whereof 675 for train shelves), 330 curved, 51 modified straight (4, 8, 10, 12 and 14 studs), 19 standard-, 14 halfcurve and 11 crossover switches (eight switches are electrically operated). Movable train bridge between My Own Lego World and Lego Train 9V Extreme layout Gradients: approx. 6.5 and 8 percent Min. clearance: approx. 12 cm Track Design Program: Track Designer Application (R) version 2.0 by Matthew D. Bates (Matts LEGO (R) Train Depot) Electrics/Electronics: 1 power supply unit Voltcraft EP-925, 3-15V(DC), max 25A 2 modified train speed regulators (4548) with LM350T regulators, 3A diodes, outside heatsinks (with a thermal resistance of 1.9 K/W), mini fans and digital thermometers to measure temperatures inside the speed regulator boxes 3 standard train speed regulators (4548) 15 power connections to rails approx. 200 m RK cable 1.5 sqmm 1 LED strand (2 m) with dimmer Märklin pins and sleeves Cableway: Distance: aprox. 4.8 m Height difference: approx. 1.0 m Construction materials: 10 tables 0.75 x 1.5 m and 3 tables 0.75 x 0.75 m wood (45 x 45 mm) and wood strips (22 x 43 mm) MDF boards (6 and 10 mm) ground grass and ballast (Busch, Faller) fishline 0.47 mm cable conduits angle irons straps paint Addendum #1: Pictures Addendum #3: Videos Cableway:
-
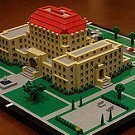
Hello! I would like to show you my rendition of the Chez Albert Parisian Restaurant :) There aren't many things in common with the beloved modular, I simply wanted to have my own idea about what a Parisian restaurant may look like. And the one from creator was simply too small.. So without further ado, here it is: It all began in January 2018 when we visited our family and they had this painting on the wall (reproduction of a fragment only): This served as inspiration to my build which of course was not an exact representation of that building, but it was a good start. It took me around 18 months to complete this party due to size, family obligations and some "great" ideas I had like including all interiors and a 9V lighting system for the ground floor and one of the rooms on the first floor. But I like the effect :) You turn the lights on and off by removing part of the awning which gives you access to old style 9V battery box: The building is modular: On the ground floor there is the restaurant together with toilet for the guests and restaurant kitchen. There is also a staircase leading to apartments upstairs: I also thought that including a part of build that no-one will ever see or notice is brillaint idea, here is the restaurant ceiling for you to enjoy ;) You can also see all the lights - 3 for restaurant, 1 for the entry and 1 for kitchen. Then there goes floor number one and first apartment with bathroom, corridor, bedroom and living room with kitchenette. First view from the top: and view of the kitchenette: Second floor has similar layout, just different finish: The attic is a typical place for singles ;) No dedicated bedroom... and a view of the kitchenette (a shot from a WIP): and last but not least - the roof! It was supposed to be flat, but since this is LEGO it bends up like a boat... I plan to complement this building with another one of similar size. Together they will form a small wall of buildings, a mini version of a street. This is already a work in progress that will likely not be finished this year. But who knows ;) I hope you enjoy this one for now :)
-
For the last 5+ years I have been running a train under my Christmas tree, powered by a LiIon PF battery box and double motors. I recently answered a question on Bricks.stackexchange.com where someone asked for advice on which power system to buy, and the answer I had to give surprised me so much, that I went ahead and changed my own strategy immediately as well. I am now the proud owner of an oval (16+ curves, 12 straights) with a L+R set of points of 9V track, including transformer, wall wart and power-to-rail connectors. Total cost were around $120, however, this is after deducting the going BL price for other train components that came with my purchase. If I didn't exclude those, my total would have been $190. (All US dollars). This prompted me to do a quick compare on the costs of a fully working train oval for under a Christmas tree. The Oval consists of 16 curves and at least 8 straights. The cost of whatever Christmas train you choose to run is not included: Powered UP: Battery Box: $50 at LEGO S@H, $35+shipping at BrickLink (only 1 US Seller) Motor: $14 at LEGO S@H Wheels & Axles: ~$3+shipping on BrickLink for 2 axles and 4 wheels Decorative sides: ~$2.50+shipping on BrickLink Tracks: 1 Track Pack (8 straights, 4 curves): $20 at LEGO S@H, $16 on sale occasionally at other stores; 12x Curved tracks: $6+shipping at BL or: Buy set 60197 ($160 at LEGO S@H, occasionally on sale for less at other stores (e.g. currently $128 at Target) plus 4x Straight track ($7+Shipping on BL) - used ones run about the same cost as the promo prices. Depending on how you count, this is $100-$160+tax for this setup, and you need to keep a mobile phone around (or pony up another $15 for the remote control), have to keep the connection alive, and will have to replace/recharge batteries every 2-3hrs. Power Functions: Battery Box: $13 on LEGO S@H ($15+shipping on BL), or the LiIon pack which has no US-based sellers currently neither on EBay nor BL, but should go for $100-$150 if available. IR Receiver: $10+shipping for a used one on BrickLink Decorative sides: ~$2.50+shipping on BrickLink Tracks: 1 Track Pack (8 straights, 4 curves): $20 at LEGO S@H, $16 on sale occasionally at other stores; 12x Curved tracks: $6+shipping at BL or: Buy a retired Power Function set (used) such as 60051, which with patience can be bought used, complete on EBay for $125-$150. You'd need extra straight track though (see Powered Up), which runs ~$7+Shipping. Again, depending on how you count, this is a $70-$150 purchase. Likely the cheapest option currently, until prices for Power Functions start skyrocketing once all components have officially retired. You get 2-3hrs run time, and unless you add $100 to your total for a LiIon battery box, you will need to buy rechargeable batteries and a charger (or cycle through alkaline AAA's like a madman). 9V: Get a used but working copy of 4561 ($100-$150 on EBay) Buy some extra straight track: 4*$5+shipping on BL (let's call it $25) Total: $125-$175 Suddenly the convenience of never having to change batteries or recharge with a $150 9V purchase sounds pretty attractive, doesn't it? Quite fascinating, for a product that has been discontinued for almost 15 years.
-
 For long, I've wanted a small strong mini Lego Technic motor, smaller than an M-motor. As I recently learnt how to draw Lego parts and had the opportunity to use 3D printed nylon (using laser sintering) , I decided to try a small motor as well. As the PU motor stuff is getting big and heavy, this is my response: a small easy-mountable motor with a case of only 5 by 2 by 2 studs. 70% of the motors in Lego Technic models don't have to be large. Only the mount of this tiny motor is 2x3 studs. The mount is tailor made for Technic applications: if you build often with M-motors you will know that an M-motor always must be connected to a 1L beam to ensure that the gears won't slip and to mount the M motor securely. The mount design of this new motor eliminates the need for the beam, so that's one stud saved already. Because the motor is only 2 studs wide, 3 mini motors can be in the space of 2 M-motors. Also, 3 mini motors take up the space of one XL motor.. The exterior design is derived from a PF M-motor, because I like the design and want to keep using the PF looks. This is still a work in progress as I need to mount a 9V connector and insert the inner electric motor(already in stock here). I also need to do some more painting and sanding. Nonetheless, the printed parts are quite accurate. I will give an update soon when the motor is working. The motor gets internal electrics that work up to 12V so also third party remote control bricks will be allowed to use their boost modes. My big hope is that TLG understands that we need small motors and remotes, not big ones. The length of 5 studs makes this motor very easy to put in all kinds of leftover spaces. Thanks for reading. I'm open to design improvements!
 -
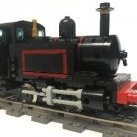
This little British-style tank engine is built around an old 9v train motor. I've had this model up on Flickr for some time, but just got around to posting it here. It's unfortunate that the 9v motor doesn't accommodate moving rods, but I can always pretend the engine has its brakes constantly applied to control those troublesome trucks! Thanks for looking! Soli Deo Gloria
-
This is the latest contribution to my Lego train collection: another Trans Europ Express (TEE) VT 11.5, this one 7-wide and 2.5 m long. (Still remember when I visited the railway stations in Basel as a young guy and admired these legendary trains with their monstrous locomotives). This train with four 9V engines is a (slightly modified) copy of @HoMas original that was launched last fall. The length of locomotives and coaches is 52 resp. 48 studs. (The significant overhang of the noses resulted in extensive modifications of the 9V Extreme track, particularly w.r.t. polycarbonate railings). Even this train is equipped with PF LED (powered by two 9V batteries) for the front and end lights. Button cell powered mini LED string lights are used for interior lighting in each coach with the benefit of no cables between the coaches. The TEE VT 11.5 project has been my most challenging, complex (and most expensive …) Lego train project so far. The result however is simply breathtaking and magnificent! What a magic experience to watch this train in action! Extreme coping with extreme …. And what an exciting and instructive journey it has been to build this iconic train – the crown jewel of my train collection! A big thanks to Selander and HoMa for all advice and help! And a big praise to HoMa for his incredible MOC, one of the most beautiful and most spectacular trains ever built in Lego. Big Brother and Little Brother ... (Copyright Ulrich Budde) And this is how the train looks like in reality. (The VT 11.5 was actually awarded a gold medal at the Expo 58 in Brussels “for outstanding technology”!)
-
Some time ago I posted this topic of a layout using only parts from the 9V era. That layout has since been torn apart to make way for an improved version. Since it's basically a complete new layout (the water tower is the only part that escaped unscathed), I thought a new topic would be justified. This time the layout has working (non-Lego) lights. Many thanks to @LEGO Train 12 Volts, whose engines with working lights inspired me to try it myself. The engine and tender are permanently coupled with a technic beam to protect the wiring. I just happened to find that a battery box for 4 AA cells fits nicely in a 4-stud space. The switch is visible in the coal. IMG_0850 by the chestertonian, on Flickr IMG_0852 by the chestertonian, on Flickr IMG_0851 by the chestertonian, on Flickr The passenger cars are now 30 studs long and have SNOT windows and removable roofs. IMG_0854 by the chestertonian, on Flickr The sleeping car interior: IMG_0855 by the chestertonian, on Flickr The dining car interior: IMG_0856 by the chestertonian, on Flickr An overview of the layout: IMG_0857 by the chestertonian, on Flickr The station includes two passenger platforms, a pedestrian bridge, and a maintenance shop with full interior. IMG_0844 by the chestertonian, on Flickr IMG_0845 by the chestertonian, on Flickr IMG_0846 by the chestertonian, on Flickr The signal tower: IMG_0843 by the chestertonian, on Flickr The freight platform: IMG_0836 by the chestertonian, on Flickr A small farmhouse with a horse-cart: IMG_0847 by the chestertonian, on Flickr Nearby, a shepherd and his faithful sheepdog watch over their flock. Thanks to @soccerkid6 and @LittleJohn for their versatile canine design! The sheep are based on a design I found here. IMG_0848 by the chestertonian, on Flickr A tribute to Ferdinand: IMG_0839 by the chestertonian, on Flickr The crane's hand crank can be locked in place. The piano was reverse-engineered from one I ran across online. IMG_0849 by the chestertonian, on Flickr Finally, I was inspired by the Switch Modification topic to connect a switch to a signal. Thanks for looking! Soli Deo Gloria
-
I have the pleasure to present a Rework of my first MOC After several years I had to redesign a locomotive with more bricks, more length and more realism and more functions Length: 58studs Wide: 7 studs Weight: 1050g Pieces: around 1200-1300 Motor: 9v motor + PF train motor linked with a PF extensión wire This Scheme is famous by the Big locomotive series and number painted on sides, I could put a vinyl sticker but I decided to go further and make all lettering with pieces with all limitations of this More details Grill effect using Dark gray and DBG This locomotive is not going to run in R40 as is ridiculous due the length, but is necessary to me to run trough Lego switches so, boguie has all front attached to pass without problems trough them. I used custom lightning using SMD leds and coil wire to include realist lights with no pieces modification. And also I included a LIPO battery with USB charging, all inside the locomotive MORE PICTURES IN FLICKR ALBUM
-
Some of you may recall a few months back that I posted an LDD MOC of a locomotive using only parts from the 9V-era (linked here). Since then I have built the locomotive in real bricks, along with a layout using the same premise: to examine what I could build using only bricks that I already have, all of which are from before around 2005. If you compare it with the render in the original post, you'll notice that the engine has been modified to look more American than European, and the coaches have been elongated. The base is a 4' x 4' piece of plywood; if anyone is interested, Krylon Gloss Emerald Green is a very close match to Lego green. IMG_0662 by the chestertonian, on Flickr IMG_0663 by the chestertonian, on Flickr IMG_0664 by the chestertonian, on Flickr IMG_0670 by the chestertonian, on Flickr The layout is set in the early 20th century as the west is beginning to settle down. The town of Brick Butte fell on hard times after the local Army post was disbanded in 1896. Fifteen years later, there is little left but a few buildings (some built from materials salvaged from the abandoned fort) and a few dozen residents. IMG_0665 by the chestertonian, on Flickr I'll introduce you to some of the prominent citizens: Count DuCoup moved to America after his nation's defeat in the Franco-Prussian War, and eventually settled in Brick Butte. IMG_0666 by the chestertonian, on Flickr Hank Solo, as usual, is engaging in some shady transactions... IMG_0667 by the chestertonian, on Flickr Sheriff Quentin G. Jensen and his deputy, Juan Quenobi, patrol the dusty streets. IMG_0668 by the chestertonian, on Flickr Retired Major General Ben Caine O'Bee trains his young neighbor in the use of the cavalry saber. IMG_0669 by the chestertonian, on Flickr Meanwhile, state senator Paul P. Dean visits the town in his newfangled motorcar... IMG_0672 by the chestertonian, on Flickr Finally, here's a video of the train running around the layout. Thanks for looking! Soli Deo Gloria
-
My ideas for fit powered up battery box to this set:
-
I just got finished replacing the tie bars for my P40 Switch Track from Fx Bricks. It gave me an opportunity of looking pretty closely at the switch itself and I started wondering how it turned off power on the inactive pathway. I just didn't see a way. At first I thought the Switch Rail's connection may somehow depend on if it's switched or not, but it was backwards from that. So, tonight I powered the track up and switched back and forth. And, at all times, both the diverging route and the straight route were powered. (Yes, if I pulled the jumper, there was no power on the diverging route at all times regardless of how the switch was positioned which is not a solution.) So, how would you have a siding for a train if it's always powered regardless of how the switch is positioned? The only possible way I can think of is this switch requires DCC so the train itself knows when it can go or not. I really hope I have something wrong because if I don't, then the P40 Switch Track is not compatible with 9v trains. Yes, it can deliver power, but it can't shut it off if the path is not active. Think of a yard ladder. Every lane would be powered at all times. There's no stopping trains then. All of the trains would be moving. Please let me know I'm missing something because if I'm not I spent a lot of money for nothing that I can use and I'm stuck with Lego's switches for a long time to come. (Yes, I'm stuck on 9v and happy with it, but trying to improve it.) ------ Later addition ----- Ok, I just reread the FAQ that's included in the product guide: >Does changing the switch route also switch the electrical power to the route? >No. The P40 switch does not switch the electrical power between the straight and diverging routes. Both routes are "live" and their corresponding rails are connected together. Then how would you have a siding to park a train? Or a yard ladder with multiple trains parked? All of the track would be powered at all times. Are they assuming DCC for everything? -Corey
-
Some years ago, I built a coal train with @HoMas Express Steam Locomotive BR10. Later I learned that this locomotive was primailiy used for long express trains like the Riviera Express. Recently, I decided to go for a Garratt Steam Locomotive which was mainly used for heavy freight trains in southern Africa and Australia. The choice fell on a Garratt designed by Tony Sava and built by @LeifSpangberg. This spectacular locomotive needed some modifications in order to cope with the challenges in my track, in particular humps. The train consists of ten fully loaded coal wagons, equipped with eight 9V engines. And this is what it looks like:
-
The Orient Express has always been one of my absolute favorite trains, with all its history and fame. Unfortunately, I have never had the opportunity to travel with this iconic and mythic luxury train that celebrated its 100th anniversary a couple of years ago. However, to create this spectacular MOC and watch it moving up and down my 9V extreme track is a decent compensation, to put it least ... My Orient Express consists of a steam locomotive with tender, a restaurant coach, two sleeping coaches and a baggage coach. The locomotive has some similarities with the legendary french Class 241-A express steam locomotive which appeared on France's rails in the early Thirties and pulled heavy express trains in the golden period of train travel before WWII. In those days, the Orient Express was operated by "Compagnie Internationale des Wagons-Lits et des Grands Express Européens", a company founded by Georges Nagelmackers from Belgium. Back to my MOC and some technical details: The locomotive and tender are built 8-wide, with a total length of approx. 60 studs. The electric headlights are connected to a 9V battery in the tender. Each coach is 7-wide and 48 studs long. The train has a total length of approx. 2.1 meters. This OE is equipped with six 9V engines: two on the tender and two on each sleeping coach. Like for many of my other wagons carrying "coal", I have used a piece of net stockings to prevent "coal" from dropping off. Quite amazing tu use and classify net stockings as Lego train accessories ... Last but not least, I would like to thank Selander for all his advice and support. Much appreciated! And this is what my Orient Express looks like: Bon Voyage! Addition: Shortly after finishing my own OE, I watched the movie "Murder on the Orient Express" with Kenneth Branagh acting as Hercules Poirot (2017). Nice pictures of and breathtaking scenes with the classic Orient Express! All of a sudden appeared a coach at the end of the train that I haven't seen before: a lounge coach with a porch! I decided right away to build this coach as well, and this is what it looks like - crowded, incl. piano player and waiter: My wife and myself. This is what the extended train looks like with five coaches, eight 9V engines - and my wife & myself on the porch, enjoying and toasting to the magnificent views over the Alps and over My Own Lego World! Finally, we got the opportunity to travel aboard this magic train! Cheers!
-
This topic was my second large topic about my Lego room after Lego Trains 9V Extreme - ready! which was published on June 6th 2017 A lot of things have happened since then. Attached are pictures and links about additions: New Lego Trains 9V since june 2017: Two Swedish Passenger Trains with Rc- and Da-locomotives (built by Selander) Additions to My Own Lego World since June 2020: Tivoli: Loop Coaster Space: NASA Apollo Saturn V International Space Station (ISS) (together with Space Shuttle Discovery) Famous Attractions: Colosseum Eiffel Tower Famous Historic Aircrafts: Orville and Wilbur Wrights Flyer (Kitty Hawk) WW1: Sopwith Camel and Red Barons Fokker Dr.1 147/11 Triplane Other Lego Sets: Motorized Lighthouse Piano Piano Typewriter Chess Brick Moulding Machine MOCs: Bistro chez Daniel (with mini loudspeaker) Waldenburg Castle
-
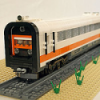
29.09.2023 - new locomotives Hello there and thank you for stopping by! Since posting last time i mocced up 3 more locomotives. They have been kept in the same "9V era plus style" i usually build in. The first new addition is a EMD GP "High Nose" Locomotive. It is based loosely on GP7 and GP9 Locomotives and is build in a CN Paint scheme to not look out of place when it runs together with the 10133 BNSF Loco. Speaking of 10133, the lower part and the longer hood-roof is heavily based on this set. EMD GP Highnose CN by Henrik S, auf Flickr EMD GP Highnose CN by Henrik S, auf Flickr EMD GP Highnose CN by Henrik S, auf Flickr EMD GP Highnose CN by Henrik S, auf Flickr Next we have a EMD Switcher Locomotive. Again, it resembles no particular prototype, it is basically an attempt to capture the general vibe of this type of locomotive in a 6 wide format. EMD SW Switcher Locomotive by Henrik S, auf Flickr EMD SW Switcher Locomotive by Henrik S, auf Flickr EMD SW Switcher Locomotive by Henrik S, auf Flickr EMD SW Switcher Locomotive by Henrik S, auf Flickr EMD SW Switcher Locomotive by Henrik S, auf Flickr The 3rd Locomotive is a european one, it is loosely based on the swiss Bernina Crocodile. Most of the parts used to build this locomotive come from set 10277 ( which was killed to create this 6 wide, 9V powered baby crocodile ). Bernina Krokodil (10277 Alternative) by Henrik S, auf Flickr Bernina Krokodil (10277 Alternative) by Henrik S, auf Flickr Bernina Krokodil (10277 Alternative) by Henrik S, auf Flickr Hope you enjoy, comments and constructive criticism are always welcome! _____________________________________________________________________________________________________________________________________________________________________________________________________________________________ It´s been a long time since i last posted in this thread . Some pictures on flickr were lost since then, some mocs got updated, some got dismembered to loot pieces for other projects. So i decided to revive this thread, and to show you some of my Mocs, mods and stuff i´ve been tinkering with since then. The Introduction of the 9V tracks from fxbricks in bigger radiuses triggered me to dust of my beloved 9v sets and to get into the rabbithole of lego trains again. I always had a soft spot for the 9V system, the sound of the metal rails.. It is a fondly remembered part of my childhood, many happy hours were spent playing with it . My models are obviously not exactly to scale. Some are not even prototypical. My goal has been to build something which resembles sets of the 9v era, including the wide range of new parts introduced since then. Another goal is playability. If possible I try to incorporate many play features (minifig seatings, working doors and mechanisms, cockpits and interiors, etc.). Locos: 4551 - crocodile I do not own this set, but i always liked the look of it. My adaptation of the crocodile has been color switched, from the ÖBB red to the german green color sheme. The „beaks“ of the original set were prone to derail. They have been changed to avoid this problem and have been shortened to look more prototypical. Other changes include the addition of 2 windows in the main section and a different roof. Lego 4551 Crocodile - modded by Henrik S, auf Flickr Lego 4551 Crocodile - modded by Henrik S, auf Flickr Lego 4551 Crocodile - modded by Henrik S, auf Flickr 4564 - 3 axle Shunting diesel Almost completly different from the original 4 axled locomotive found in Set 4564, i rebuild this loco to a 3 axle configuration. I always liked small shunting diesels like the german v60 or the vossloh G6, so the design of the superstructure resembles them. Lego 4564 - Modded by Henrik S, auf Flickr Lego 4564 - Modded by Henrik S, auf Flickr Lego 4564 - Modded by Henrik S, auf Flickr MOC – 4 axle modern diesel shunter A 4 axled diesel shunter with guardrails for operating safety. Loosely based on Vossloh and other very rectangular modern designs. Modern Diesel Shunter by Henrik S, auf Flickr Modern Diesel Shunter by Henrik S, auf Flickr Modern Diesel Shunter by Henrik S, auf Flickr Modern Diesel Shunter by Henrik S, auf Flickr DB BR 111 – electric locomotive An electric locomotive for passenger train services, heavily based on the german Baureihe 111. Build in the striking ocean blue – tan color sheme the DB used quite some time ago. BR 111 by Henrik S, auf Flickr BR 111 by Henrik S, auf Flickr BR 111 by Henrik S, auf Flickr Here it is with 4 passenger coaches. BR 111 with Passenger Train by Henrik S, auf Flickr The dining car, with pantograph to power the kitchen. Dining Car by Henrik S, auf Flickr Dining Car by Henrik S, auf Flickr 10183 - Modern electric locomotive This engine is loosely based on modern TRAXX locos. The base for this loco lies in a B Variant of set 10183 – Hobby train. After building the B model i kept tinkering with it, and over time it evolved into something resembling a modern TRAXX Locomotive. I actually have this loco 2-times: One in a red color sheme like DB uses, 10183 - Hobby Train Mod by Henrik S, auf Flickr and one in a black color sheme based on MRCE (leasing service for locomotives in Europe) Lego Hobby Train B Version (V2) by Henrik S, auf Flickr Lego Hobby Train B Version (V2) by Henrik S, auf Flickr Lego Hobby Train B Version (V2) by Henrik S, auf Flickr 7938 - Commuter train A lot has been changed. The middle waggon was removed and the remaining two parts are now connected with a jacobs boogie. The pantographs were removed, as the prototype for my version is powered by diesel. Another noteworthy change is the addition of implied doors. 7938 Mod by Henrik S, auf Flickr 7938 Mod by Henrik S, auf Flickr 7938 Mod - Cockpit by Henrik S, auf Flickr 7938 Mod - interior by Henrik S, auf Flickr Rolling stock: Container car; 2 and 4 axle versions It is build to carry the classic 4 wide containers common in the 9v era. The 4 wide containers look a bit small sizewise, but i like the versatility they offer. They can be transported by the classic 4 wide lego trucks, they can be grabbed by the Container Stacker. So in short, the playability outweighed the scale here. Container Cars by Henrik S, auf Flickr Container Car by Henrik S, auf Flickr Container Car by Henrik S, auf Flickr Container Car by Henrik S, auf Flickr Tank car A 4 axled tank car. The tank can be build in a variety of colors. The solution for the fairly round tank is not by me. I think i have seen the design somewhere here on eurobricks, but i don´t know by whom unfortunatly. So, if you read this and this is your design, please let me know and i will add your name for this technique! The original Design is by Phoxtane, check his tank car here: Tank Cars by Henrik S, auf Flickr Tank Car by Henrik S, auf Flickr 4537 – Twin Tank Car I fondly remember this waggon from my childhood. The original set rocked the classic white-green-red octan colors. On my quest to achieve a round and 6 wide design, this iconic color sheme unfortunatly had to go. Now it is dark bluish gray, which i think is a pretty common color for this type of freight car, so it is okay with me. Twin Tank Car by Henrik S, auf Flickr Twin Tank Car by Henrik S, auf Flickr EAOS - gondola car A car which can be seen countless times here in europe. There is not much to say about this car really, i tried to keep the weight down and the model features working doors. EAOS Gondola car by Henrik S, auf Flickr EAOS Gondola car by Henrik S, auf Flickr Small Box Car A classic of the 9V Waggons, in my oppinion it holds up nicely even today. The only change to it has been the addition of a curved roof, which in my oppinion looks pretty nice. Small Box Cars by Henrik S, auf Flickr Buildings and other stuff: 4554 – Trainstation Another classic 9V set (which i got for christmas in the 90s). I did not change much. Mainly the switch to a tan paint job and the interior of the station are different. The Rest is largely unchanged. 4554 Trainstation by Henrik S, auf Flickr 4554 Trainstation by Henrik S, auf Flickr 4554 Trainstation by Henrik S, auf Flickr 4554 Trainstation by Henrik S, auf Flickr 4554 Trainstation by Henrik S, auf Flickr 4554 Trainstation by Henrik S, auf Flickr 4555 – Cargo station Much like set 4554, not much was changed. I used the modern profile / masonry bricks to get a bit more detail into the building. The interior was tiled and the sparse furnishings were a bit extended. This set is part of the reason why i kept the 4 wide containers. I really like the old grippers in this set, which are also used on the container stacker set. 4555 Cargo Station by Henrik S, auf Flickr 4555 Cargo Station by Henrik S, auf Flickr 4555 Cargo Station by Henrik S, auf Flickr 4555 Cargo Station by Henrik S, auf Flickr Dockside crane Like the old harbour sets of the Lego town days, the base for my dockside is made of the elevated baseplates. The crane works and is able to unload the cargo from boat into freight cars (or into cargo trucks). Dockside Carne by Henrik S, auf Flickr Dockside Carne by Henrik S, auf Flickr So, thats all for now. I plan to update this thread kinda regularly, and to upload more content in the near future. Please let me know your opionions, critics and suggestions. I hope you have fun looking through these pictures!