Search the Community
Showing results for tags 'scale'.
-

[MOC] Full Lego Technic locomotive - in 1:22,5 scale
Paperinik77pk posted a topic in LEGO Train Tech
Hi all, these days I'm working a lot with Lego Technic, since I've bought some parts to experiment a bit this new world. I'm used to build old Lego Technic from the 80's and 90's...but these new sets are very very complex, and require a lot of time to figure out where and how to put a certain part. So , back to the Stud.io I started designing again...and came out with this thing: It's similar to old steam trams, to the GE 2/2 and HGE 2/2 locomotives, to some service railway cars...to the alternate 7720 model. Oh, well...it's a box and it's similar to all those boxy things! Dimensions are 13/14 stu...holes, units? for width and 25 for body lenght. Both buffers add an additional 6 studs to overall lenght. I'd say it is a small 1:22,5 locomotive, like my old yellow shunter with PuP. Since I'm still not so much able to recreate details such as doors and ladders...I simply avoided them. Pantograph is designed to use a rubber band for the moment - it could be nice to make it foldable with some gears! At least the body is self-consistent and can easily be removed. The battery is fixed on the central upper part of the body, right in the middle to increase weight on all 4 traction wheels. Rods are somewhat triangular and quite strange, but they're strong! Other kinds of rod arrangements can be done. Using a normal gear transmission could also avoid rods at all. The boxy body gives me the internal space to experiment for transmissions and motors. This chassis probably will change a zillion of times like the one of my XXL locomotives. In the picture above, you can see the possibility to have the double gauge solution (left axle is L-Gauge and right axle is configured for 45mm G-Gauge track). The gear you can see in the middle of left axle shows the possibility to implement a cog railway system using Lego flexible track. I sincerely do not know if the 45mm cog tracks could work with a Lego gear - so let's limit the cog solution to original Lego track It can become also a fancy Tram locomotive, like the "Gamba De Legn" ("Wooden Leg") used in Milan for many, many years. But for this one - I'm still struggling to create a proper, working engine. I've seen few full Technic locomotives, but it's really fun to build them! I hope you like it!!! Ciao, Davide -
"I should have bought more bread... and cheese!" This is an entry for Week III of the Style it Up Contest by InnovaLug. The proposition was to build something that could stand on up to 4 studs, unattached, as if floating. I'm enjoying to build non-castle themes lately, so here you go. I'm trying to expand my building horizons in different perspectives and scales. Also, make sure to check my other entries for this contest: Week I: Stag in the Shadows Week II: Self Portrait Week IV: Yet to come Hope you like it. Let me know what you think - I'd love to hear some critique. (and, if you'd like to build and display any of my MOCs, let me know and I can work on instructions too)
-
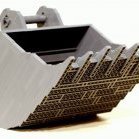 Hello Everybody Im happy to introduce you my Liebherr R 980 excavator scalemodel 1:25. The whole excavator is fully motorized with power functions. The goal was to combine the motorized technic world with the usual lego bricks. Was not that easy because of the weight. This beauty will be for ever with me, thats why i also builded up a box as you can see on the pictures. Let me know what you think. :-) Best Regards from Zürich Switzerland. Dani 0 by Dani Brickzone, auf Flickr 0 2 by Dani Brickzone, auf Flickr 0-1 by Dani Brickzone, auf Flickr 0-3 by Dani Brickzone, auf Flickr 0-2 by Dani Brickzone, auf Flickr 0-5 by Dani Brickzone, auf Flickr 0-6 by Dani Brickzone, auf Flickr 0-4 by Dani Brickzone, auf Flickr 0-12 by Dani Brickzone, auf Flickr 0-13 by Dani Brickzone, auf Flickr 0-14 by Dani Brickzone, auf Flickr 0-7 by Dani Brickzone, auf Flickr 0-8 by Dani Brickzone, auf Flickr 0-9 by Dani Brickzone, auf Flickr 0-10 by Dani Brickzone, auf Flickr 0-11 by Dani Brickzone, auf Flickr 0-15 by Dani Brickzone, auf Flickr 0-16 by Dani Brickzone, auf Flickr 0-17 by Dani Brickzone, auf Flickr 0-18 by Dani Brickzone, auf Flickr 0-19 by Dani Brickzone, auf Flickr
 -
 The Volvo FMX is an oddly styled truck, its bulldog nose like design stood out to me instantly. Having an inherent weakness for the odd I decided to build one all the way back in 2015. Four years later I proudly present my latest model :). Developing the Palfinger crane took the better half of the development time for this model. In order to house all the electronics necessary a flatbed truck design was chosen with 4 axles, 2 under the bed and 2 to support the crane and cabin. The crane is operated by 3 servo-controlled pneumatic switches, the newer style switch allowed me to build this more compact than we ever could! The Pneumatic cylinders for the extension sections have been modified to allow for a more realistic reach. Two original cylinders were cut and acetone welded together for each one of them. The compressor is powered by an L motor and assisted by a rubber band to reach the pressures necessary to operate the crane. The crane is able to reach the back of the bed, as was my goal, but isn't able to lift much anymore then, the limit of pneumatic control is really stretched when a single-cylinder needs to push an arm of 30+cm on a point 5 studs away from the pivot point. With all this functionality, details are fun but also frustrating to add. Two tiny tool compartments have been fitted on the rear of the truck stowing away lifting equipment. The engine is only built for the upper 2/3 to accommodate for the suspended axles and steering mechanisms. The model is also fitted with a full custom led kit. A custom electronics board with an Arduino pro mini takes the signals from the Sbricks and converts them into turn signals, driving lights, hazard lights and much much more. More can be seen on the Flickr album and in the Youtube video!
 -
Just browsed through the forum and could not find this anywhere. Think I just forgot to share it. Mentioned her some time ago in the General MOC-Discussion, WIP-Help, and Teaser Thread. If she is hiding somewhere in the forum, I do hope someone has the chops to remove this topic. Scale 1:40’ish L: 150 cm B: 26 cm H: 114 Bricks approx. 19300. Looking back at my earlier designs I found that my version of the HMS Surprise, just like the HMS Ontario, was somewhat wanting. This is a model of the HMS Surprise launched as the corvette Unité in 1794. In 1796, The Royal Navy conquered, refitted and renamed her. She later on chased pirates in the Caribbean for several years. The ship plays a central role in the Aubery-Maturin stories. This includes the movie from 2003 Master and Commander: The Far Side of the World. The HMS Rose, which was later, renamed HMS Surprise, plays the “role” as HMS Surprise. Neat, but somewhat confusing. Being notoriously bad at taking photos of my creations there is some Renders below, these are also in the General MOC-Discussion, WIP-Help, and Teaser Thread. …but you need to look at the LDD file to get a view of the details of the creation. Find it at MOCPAGES http://www.moc-pages.com/moc.php/452403 She has been on display at LW Copenhagen 2019. A Swedish AFOL has taken some fine Pictures from the event on this link. Hope it is ok that I link to this https://www.flickr.com/photos/86394332@N03/47062421172/in/album-72157705321073761/ There are also some more photos including WIP at my Flickr page. https://www.flickr.com/photos/131641614@N06/with/46031790204/
-
 Hello everyone! Before I start I want to wish all of you to stay healthy, survive and win the disease! Today at my birthday I decided to share with you my latest MOC. This is a brand new Liebherr LR 11000. From the previous model, it took only some boom sections and proportions. The chassis and superstructure built from nothing and were rebuild several times. Below please let me share with you some dry specifications of the model: - Crane is about 2 meter high - weights 5 kg - requires at least 5 big battery boxes for been fully operated - can be managed by 3 sBrick units. - has 10 PF motors (4 are in the chassis) - Has 9 pneumatic cylinders + a pump - Has a full-size V6 diesel fake engine like the real crane - Has 6 winches, 3 of them are installed to the boom like in the real crane, but none of the motors are on the booms. - Crane is able to assemble and disassemble back from horizontal to working condition without any human help. - Has 4 pneumatic features, three of them are operated from the cabin, two of them are operated from the operators work seat Now is hte time for it's features: - Driving and steering - one XL motor per each track. Torgue increased 1:25 - Slewing by 2 M motors - L Motor for SA Frame winch - L Motor for the Main boom winch - M motor for the luffing jib winch - M motor for the secondary hook winch - L motor for the main hook winches - Pneumatically adjustable operators cabin - Pneumatically adjustable derrick counterweight horizontally - Pneumatically adjustable derrick counterweight vertically - Pneumatically rising chassis for (dis)assemble. - L motor for the pump and V6 engine - Individual Sbrick custom profile - 3 Pair of lights: - Front LED - Cab LED - Main hook winches LED Here is the link to photos, I'll post some directly here: https://bricksafe.com/pages/Aleh/2020-lego-liebher-lr-11000 Bonus: Here is the performance of the superstructure stability without boom and without counterweight(!), only one battery box insalled for fotors activity. Boxes are full with batteries (24 pcs) Easy to fix the front suspension: https://bricksafe.com/files/Aleh/2020-lego-liebher-lr-11000/IMG_2983.jpeg/800x600.jpg 1,5 kg load. Please enjoy and feel free to ask any questions.
 -
My son saw a small "foil pack" X-wing somewhere online. We got the instructions from Bricklink and build one. When he got The Ghost in one of those small bags it was the same size as the X-Wing. That's not right. It motivated me to build The Ghost in the same scale. So 6 studs equals 15 meters. http:// http:// Here it is with a couple of the X-Wings. We made 12 red squadron and 12 blue squadron for a much bigger project the Ghost will be involved in. Also, the bag Slave One is the correct scale. No need to redo it! http:// I made a Razor Crest too. But it was the design by obijon. Sorry for the kitchen counter photos. Space is limited right now! http:// http://
-
 First of all a big thanks to @Stephan for all the assistance and @polymaker for Brick Studio software, I couldn't have made the following video tutorial with you. Few weeks ago as I noticed LDD was being updated by the community, I got a crazy idea... Is there a way to import an object into LDD so you can use it as a reference? Having this kind of an option would make designing scale models much easier and faster. I asked @Stephan for his input and he managed to provide the first ever working example of this idea. Since then I learned how to import any 3D model into LDD and have therefore created this tutorial. In the following video tutorial I go through the process of importing any 3D object to LDD. I think the implications of this possibility are simply HUGE across all Lego themes and it's my hope this tutorial will help and inspire you all.
 -
Hello guys, let me introduce my latest creation - this Rolls-Royce Phantom EWB VIII generation. I was always dreaming to build something like this, so it last I could implement it. Car is fully manual! It has complex suspension - Front with anti-roll bar, akkerman, pneumo disc brakes Rear - Multilink with pneumo disk brakes V12 fake engine, connected with Didumos 8th speed gearbox Openable doors, hood and bonnet. Rear doors are opening via big linear actuators. Interior has dark tan installations, imitating natural leather, each of 4 seats is adjustable in two dimensions + support for head Adjustable support for legs, two TVs, remivable tables, vine glasses. Front interior has crystal-installation above the glove box. Stereosystem with 8 dynamics Video of it's features is in the progress. All photos: https://bricksafe.com/pages/Aleh/wip-sedan/rolls-royce_phantom-ewb-2021
-
Once again I dug up something from the 80s... and once again it's something related to a movie police character called "Murphy" - Frank Murphy this time, to be precise. But although this Lego version of the Blue Thunder helicopter is in minifig scale unfortunately for Frank I wasn't able to incorporate functional cockpit doors... sorry Frank, you're stuck in there for all eternity! I hope you like my take on the iconic Blue Thunder from the 1983 movie. If you like it and you're up for a bit of a challenge you can find the free instructions here & some more pics here. Thanks & may the Gods have mercy upon poor old trapped Frank's soul...
-
Hello dear friends! Please let us (yes, today - we are both with ADCchannel are the authors) introduce the latest MOC - today this is Mercedes-Benz G-class 6X6 Trial edition. This truck (definitely it is!) is our common project. I was always dreaming of creating my own implementation of this greatest version of legendary Gelandewagen. I build the body with pleasure and know that ADCchannel riched senior skills in building chassis for truck trial, so I offered hiw some kind of collaboration. Luckily, he immediately agreed. The main difficulty was that we are living in different cities, but not far from. So, couple of month were spent truck is ready. To be honest body itself is absolutely new. From my previous G class Mansory edition I took only front view and side doors. Roof, interior, body frame is completely new. Mandatory point was to create easily removable body. So, you can split body from frame removing only six axles (easy to remove). Some description, though :) This monster is propelled by 3 XL motors - one per each axle. M motor for steering and we decide to power truck bu Buwizz. But it's ready to use regular Lego IR receivers. Suspension has 3 portal axles like original Mercedes. We use 7 Claas tires (actually 6 + 1 third party). Everything what can be opened - is openable - hood, doors, trunk. Unfortunately there were no room for any V8 engine due to front suspension construction. First purpose was to build truck suitable for trial. Here are the two different(!) videos. Feel free to watch and comment. Any critics would be highly appreciated. Dimensions: - Wide - 25 studs, - Lengh - 72 studs Here are some photos from bricksafe page: https://www.bricksafe.com/pages/Aleh/mercedes-benz-g-class-6x6 Pictures will be uploaded in a couple of hours. Some technical issues for now.
-
The shire of Zamorah spands true a wast valley with the Mitgardian mountains to the north, in the east and in the west there is offshoots of the mountain going south. This surrounds the shire like a horse shoe. To the south there is rolling green landscape with farmlands and forest along the river going south. At the mountain ridge on the west border of Zamorah shire stands the twin towers of Anc' Dam. Old watchtowers built in ancient times long before Zamorah was there. In the old library at The Royal Cartographer's Guild of Albion there is an ancient script roll that tells of long forgotten times when a race, not much different from the orchs roamed these lands. The script roll tells of two twin towers built by this orchlike race. The twin towers stands on either side of a ravine in the western mountain ridge. The ravine has always been a natural way to cross the mountain offshoot. When Zamorah was built and the shire expanded this was a good place to fortify. A bridge was built between the towers and a fortified gate was built at the bottom of the ravine making it much harder to enter the Zamorah valley. The ravine and the gate The bridge then made the western mountain ridge one of the most popular ways to get up into the Mitgardia mountains. The bridge is therefore a heavily guarded tollgate between Mitgardia and Avalonia. A good income for Zamorah and a great way of controlling the traffic between the guilds. The guarded tollgate on top of the mountain ridge View from the north of the twin towers of Anc' Dam Location The twin towers and the western gate is located in the west of Zamorah Location of the western gate in my micro scale MOC of Zamorah Shot of the western gate from my micro scale MOC of Zamorah
-
I built this for my "Midiopolis" topic over in the Town forum, but I decided to mention it here as well. The wheels are part number 38799 which at the moment is only made in white and is decorated for use as a tea cup saucer for a Harry Potter minifig. Midiscale BR Class 08 Shunter Midiscale BNSF 2099 Locomotive Midiscale Small Oil Tanker Midiscale Chicago Metra Cheers.
-
Good sol, everyone! I decided to build my own collection of rockets in one scale. As in real world, rockets could vary from 1 to 100 meters, the most optimal scale to choose was 1:220. Also, official ISS set is made in the same scale, so visiting vehicles would be able to dock to it the same as to their rocket carriers. And the first one, the very obvious too, Falcon 9 is here: Of course, the smaller the rocket, the harder it is to recreate all its features. Yet i managed to make as close to the real thing as possible. The rocket can be divided by stages. Merlin engine of the upper stage hides inside hollow half-cylinder parts of the first stage. Landing legs and grid fins can be deployed to replay the landing phase of the launch. The first stage is built in such a way, that it can be stacked as close together as possible to get the proper look of Falcon Heavy Which side boosters can "land" too In flight, they are securely attached via straight pneumatic connectors The standard Falcon 9 also comes with a Crew Dragon (or cargo, if you wish). Which can be configured in lauching, docking or landing version Finally, there are some easter eggs inside the fairings - a stack of Starlinks and something red... If you want to build it yourself - here are the instructions: https://rebrickable.com/mocs/MOC-199791/CogInTheMachine/1220-falcon-9-and-falcon-heavy/#details I will post next rockets soon. You may find them in my profile or by rocketgarden hashtag.
-
Hi, everyone! This is my take on the newest orbital-class rocket by Blue Origin - New Glenn. It is made, as all my rockets, in 1:220 scale, so its 7m diameter neatly translates into four studs. Seven engines on the first stage And two - on the second Deployable landing legs - black levers when not in use could be stored inside the fairing. Vulcan has the same engines And Falcon Heavy has the same payload to orbit. That's it for today. Instructions are here: https://reb.li/m/208157 Fly safe!
-
 hello hello guys im at the moment also working on a similare crane, a ltm 1050/1055/1060 a mixder of those three. it has one axle less, but im trying to implemte crape steering too the all wheel steering, also im building it as a all axis driven vihicle. problem now is not the switching between the two steering modes, but the axis that connect the transmission to the gear rack thats steering, because there is just to too much play at the end of the system. important to know is that im building this with flying axis and at the end of the transmission i have used a wormgear and a 20 tooth gear so the play build up between the 20 tooth gear and the gearrack at the end of the system. So my question is how to get rid of that play, and im pretty sure there has to be a sulotion because im very certain im not the first person who has build a model with flying axis that are steered
 -
Hello eurobrickers! Venatus - is a stunning tuning project of awesome MANSORY, based on Lamborghini Urus. This is one of my favourite SUVs ever, so I decided to build it out of Lego. This replica is my own vision and may have differences with the real model. This MOC has 4 x 4 wheel drive with complex suspension, inspirent by ancient @nicjasno works, V8 engine, a bit adapted 8 + N + R Gearbox by @Anto and a working gear shifter. To be honest I was thinking to build this car for more than a year, but the build itself took only half of the year. I hate modern white bars or stickers as a headlights, so I implemented them out of oldschool trans-clear parts, but the shapes are too far from the original headlights with Y-form inside. Maybe this is the only car here which uses 4 tyres and 8 wheel rims :) Please enjoy the video first - I did my best to film and edit it. And the original Mansory Venatus to compare (if I have something to compare with this divine project of course): And some photos of course: More photos: https://bricksafe.com/pages/Aleh/us_red_nose_truck/mammoet_sk6000/mansory-venatus-lamborghini-urus And instructions https://rebrickable.com/mocs/MOC-185897/OleJka/suv-inspired-by-lamborghini-urus-mansor-venatus-edition/#details
-
As my exploration of Prequel ships continues, I'm trying to shift my focus to Minifig-scale more, and decided to give a crack at Obi-Wan's sleek Delta-7 from Episode II: Attack of the Clones. At exactly 400 pieces, this compact and angular ship was full of technical challenges, especially with the constraint of making a proper interior that could accommodate a full Obi-Wan Minifigure without ending up with a bulky design. Following my "wings must be as thin as possible" philosophy (like the Eta-2), I used a combination of plates & tiles for the outline of the wings, and bricks on their sides for the rest: this resulted in 2-plate thick wings, which give the ship all its slenderness, especially seen from lower angles. At this scale, and given how compact the ship is in-universe, I wanted to respect the slim and sharp look of the original design. Making a functional cockpit with comfortable space was the most daunting task as I needed to securely attach the fin section and both angled fuselage parts that surround the cockpit without using any vertical space, where Obi-Wan sits. I also managed to incorporate a dashboard that doesn't obstruct the pilot's view and depicts the screen fairly well. The model features detachable landing gear to be displayed on the ground, as well as a canted stand for a more dynamic pose. The model is very stable overall and perfectly swooshable. ► Instructions for the Delta-7 are available on Rebrickable! More pictures on my Flickr page.
-
Hello Eurobricks community! Let me introduce my latest MOC - Hummer H1 out of Lego pieces. It has approx 3800 parts, incl 7 Motors. Functions are: - Independent suspension of all wheels - 3 RC differentials like in the real model - 8 Cylinder engine - module build - easy removable hood and body. - 4 L motors for drive- Servo for steering- M motor for the winch- L Motor for diffs lock VIDEO: All photos: https://bricksafe.com/pages/Aleh/mercedes_770/hummer_instructions To start this model I was inspired of two things: 1) This video 2) Humvee from CADA Most wanted render: Building instructions are available: https://rebrickable.com/mocs/MOC-174585/OleJka/hummer-h1/#details
-
See more:
-
I chose this set, cause it's one of my favourite official sets, I really like the styling, functionality and details @grohl managed to cram into it. Started working on this idea yesterday in LDD, currently some 50% done, please note that not all colors are defined yet. It will feature all of the functions from the original 42069, here you can see the fake engine: And of course, the intricate door opening mechanism which I still have to test IRL: Still have to finish the tent-lifting mechnism, rear slide-out drawer and the rear doors. The only issue was with that I had to replace the purple with another color, so I chose Dark Azure, but other than that so far so good.
-
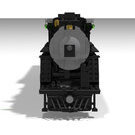
First, some context: Here's a shout-out to Daedalus304 and his ATSF #2926 4-8-4 locomotive, for this locomotive of my own shares quite a lot of cosmetics with 2926. Onto my project: Santa Fe 3463 was built on October 30th, 1937 for the Santa Fe Railway as a passenger locomotive and was assigned to crack passenger trains that ran from Chicago, IL to La Junta, Colorado along with its sister locomotives. 3463 was assigned to lightweight trains such as the Chief when they first rolled out, but given their power, they were assigned to heavier trains on the Chicago-La Junta Division in January of 1938. This locomotive pulled trains like the aforementioned Chief, the Scout, The Oil Flyer, and even the Fast Mail Express. In fact, one of these 3460 class Hudsons', No. 3461 set a record for the longest run without any maintenance stops, the only exceptions of course were fuel and water. No. 3460 was given a very special streamline shrouding which earned it the nickname "The Blue Goose" and was the ONLY streamlined locomotive to run on Santa Fe rails. 3463 would soldier on until 1953 when it pulled its last train The Antelope. In 1956, it was put on display outside what is called the Stormont Vail Event Center in Topeka, Kansas, and has remained since. There was an attempt to get this locomotive restored by the CSR in 2012, however, legal issues plagued this for 5 years and after that, the favor was to go to the CSR in 2018. But even then, there were more turn of events that still render the locomotive dormant. To me, the poor girl's restoration was doomed from the start and personally, I would like to see her back in operation someday. This model demonstrates the Hudson in 1/35th scale, it is roughly 11-12 studs wide, approximately 17 studs tall and 113 studs long. This thing is LOADED with details, even an (almost) perfect valve gear system. 6 L-motors are the current power source in place, 2 in the locomotive to keep the drive wheels in order and 4 in the tender, this may be upgraded later but I doubt it. This train HAS been assembled before, however, it was HEAVILY flawed. Faulty drive design with the side rods and gear ratio, too small drive wheels of the incorrect design (I ordered #13 boxpok drivers a while back) which as far as design goes to the wheels, drivetrain, and cosmetics has been resolved. You can check out my wheel by searching for Baldwin Disk Driver. That very same driver will also be going on this locomotive in the future. I even went ahead and designed some special parts that will be incorporated into the locomotive as well. This locomotive is a design that dates back to October of 2021 and by spring of 2023, I plan to have it completed by then unless something comes up. Who knows, I may enter it into the Brick Train Awards if the timing is right and I may have a consist running by the summer of 2023 as well, but I cannot say for certain because the locomotive and tender will come first. For the most part it is complete, but still could probably use a few tweaks before being finalized. With that out of the way, here is the photo gallery of my engine. Here is the valve gear on the LEFT side of the locomotive Here is the valve gear on the RIGHT side of the locomotive I did my best to capture the cab. Unfortunately, I could only find ONE picture and the picture in question is the one with the locomotive in its current condition, that being derelict. Here, we have a water glass on the left, In-Cab signals in the middle, Steam pressure gauge is located below the signals, Speedometer is to the right of the firebox followed immediately after the throttle. The brakes are located below followed by the power reverse on the cab floor. Oil "stoker" is located under the water glass along with gauges.
-
 Hi everyone Last weekend the Bricking Bavaria 2022 took place in Fürth, Germany. LEGO builders from around Europe travelled to Fürth to show their models. This year large cranes, lang heavy load transporters and even a technic locomotive in scale 1:17 were shown. It was really inspiring to meet other builders and learn about their building techniques, concepts and how their model work. For all people who had not the possibility to come to BB22 I cut a video with as many models in action as possible.
 -
Today will (possibly) be the day, when NASA will finally launch the first mission of it's new moon program - Artemis The mighty Space Launch System will start from pad 39b Taking it's payload - the Orion ship and ICPS stage to the moon This little copy of SLS is made using the same technology - from the leftover parts of the shuttle (from ideas set) The launch tower is no less interesting It has a black stick that holds the rocket upright And it also has a function - by turning the knobs on it's top you may swivel the umbilicals and service bridge I hope you like my model. Don't forget to watch the launch today at 18:17 utc Godspeed, Artemis! P.S. We'll hope that it won't be Scrub Launch System for the second time
-
"Wrecker, easy with my ship. "Your ship?" My Midi-Scale collection expands again with this nanofig-scaled Havoc Marauder from the Bad Batch series. Despite the small size, I once again went for a full SNOT look and paid close attention to proportions of the original shuttle. The build comes with a discrete, transparent stand to be displayed in flight mode. ► Instructions for the Havoc Marauder are available at Rebrickable or via email at flyinspace.mocs@gmail.com More pictures on my Flickr page.