Search the Community
Showing results for tags 'technic'.
-
Today I started a new model. I'll build it mainly using light bluish grey Technic parts. Here's a first sketch to plan Bricklink order:
-
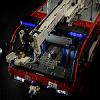
Hi Eurobrickers! I'm back with the new MOC - this time it's a new Mammoet SK 6000 crane! Current configutation is Mammoet SK6000 + Mammoet SK350 Fixed jib (which is compatible in real life) Original ring crane was just recently released by Mammoet in Netherlads! This is fan work. For built used only open source resources from WEB! Ok, also this MOC was built with unofficial consulting with Mammoet engineers, because it was a lack of the info in WEB, so I have to ask some thiings to match the real masterpiece crane. UPD: I was invited to the real crane's world presentation on last (or prevois) Friday to the Netherlads with my Crane MOC to show it at the mass media day near the real SK6000! Unfortunately I was on vacation that time and lost this once in a lifetime chance.. How it works: Centered counterweight is fixed and non movable, around it there are two train racks (imne are almost 180 degrees), so the crane is rotating arong the ballast. Real SK6000 does not have it, but from SK350 I took the jib which was surprisely fix and not luffing - it has no adjustments. Machine is able to lift 6000 tons and lift 2000 tons at the lenght of the footbal field from the basis !! The main feature of this crane is that it does not use winch to operate the boom - it uses special mechanism with chain, so I implemented this also :) Please enjoy the video first: Built with genuine Lego technic parts + 3rd party strings + 2 BuWizzBrick 's. I refused using trixbrix curved rails because found a solution with genuine lego parts. The model has 7500 parts which makes it the biggest MOC in my career! It has 8 L motors for smooth operating, powered by two buwizzes. Crane weights 8,3 Kg excluding power sources (battery boxes) and counterweights!! And the height is about 2.3-2.4 meters. More images are available: https://bricksafe.com/pages/Aleh/mammoetsk6000 Building instructions already available. Built took 1760 steps, which required a lot of effort to prepare it. https://rebrickable.com/mocs/MOC-195537/OleJka/mammoet-sk6000/#details
-
 Welcome to my garage LEGO!!! Hello! My name is Michael. I'm a Builder from Russia, I love muscle cars! URAL 4320 6x6 The legendary Soviet truck, which has been produced since 1977 to the present! I started collecting in parallel with Dodge at the beginning of the year. Initially, I put ordinary hubs on it and drove around the house very well, but before photographing the finished model, I decided to test it on the street, as a result, it was very hard for the engine, (the old version is on the video) after which, over the past week, I went through the chassis, put the portal hubs, abandoned the fake engine and moved the buggy motor under hood (to make a direct gimbal on the gearbox). As a result, it became slower, but more passable! Description: -Drive Buggy motor -Steering Geek Servo -Managing RCbrick -Permanent ALL-wheel drive 6x6 -Bridges with planetary gearboxes -2x high-speed transmission (the lever is duplicated in the cabin) -The steering wheel turns with wheels -Doors, hood and tank open -Detailed interior and under-hood space -Weight: 2.6 kg Length: 68 cm. Instagram: https://www.instagram.com/lego_muscle_garage/ Join my group in VK: https://vk.com/legomusclegarage All photos on the link: https://bricksafe.com/pages/Michael217/ural-4320-6x6 All photos on the link: https://bricksafe.com/pages/Michael217/ural-4320-6x6
 -
 Hello everyone! I am a recently new EB forums member (joined in 2020). I am a college student in the US pursuing Mechanical Engineering. I really enjoy building vehicles and mechanisms with Lego Technic to help visualize the ideas in my head and the designs I learn about from other people. I wanted to create this topic so I can record my older mocs and have a place to keep some current ones and W.I.P.'s as well. I will start adding more old pictures to this topic as I have time. I hope you enjoy all of these old (some finished, some not) M.O.C.'s of mine from my passionate hobby in Lego:) To get started, here is one of my oldest mocs to date, the R34 Wasp Jet (I made that name up btw): I have some other mocs from that era that I will share pictures of, but I have to transfer them from my camera SD card to my BrickSafe:) First I will share some other mocs that I have uploaded pictures of to my BrickSafe already. Here is an old Hummer W.I.P. I never finished... lol. I was waiting to buy some of these parts for the front axle wheel hubs. (sorry for weird camera angles) (note the use of a technic bushing as a differential lock selector ) Here is my one and only Battlebot. It is powered by two PF XL motors with a 24:1 gear ratio (worm gear to 24-tooth). I designed it as a big version of the 2x3 slope brick, but I have no idea if I actually created it at an accurate scale ratio, lol. I could have added a caster wheel towards the front, but I never got around to that. I used it against my brother's Mindstorms EV3 bot that he created which was 6x6 and my bot worked excellently. The Mindstorms just kept losing wheels and could not tip over my bot. The downside was that I did not create any attack mechanisms, so was really just playing defense the whole time:)
 -
 Model of a 2003 New Flyer D60HF articulated bus from Metro Transit in Minneapolis-Saint Paul, Minnesota. The model features motorized drive, steering with working steering wheel, a removable Cummins ISL engine model, and pneumatically operated passenger doors. Functions/features: Drive Steering Working steering wheel Removable Cummins ISL engine model with moving pistons Pneumatic passenger doors Instructions available on Rebrickable: https://rebrickable.com/mocs/MOC-245043/JLiu15/2003-new-flyer-d60hf-metro-transit-bus/#details In the 1990s and 2000s, Metro Transit in Minneapolis-Saint Paul, Minnesota ordered a large number of New Flyer D60 high floor articulated buses. Nicknamed the Galaxy, the D60HF entered production in the late 1980s and was produced until 2006 as a final option of a Metro Transit contract. The final units produced for Metro Transit in 2006 were the last high-floor articulated buses ever built in the United States and Canada. Over the years, Metro Transit's D60HF buses were gradually replaced with newer New Flyer D60LFR and XD60 articulated buses, and the final units in Metro Transit's fleet were retired in late 2021. My model depicts bus 3143, which is a 2003 model built in January 2004 and now privately owned by a friend of mine in Pennsylvania. Prior to its retirement, 3143 operated out of Metro Transit's South Garage, and later out of Heywood Garage in May 2020. A number of 2003 units were already retired by Metro Transit in 2016, but 3143 and several others were returned to service in May 2020 to provide space for social distancing amidst the COVID-19 pandemic. The remaining units were also retained for service during the 2021 Minnesota State Fair in August-September 2021, and were retired shortly after. 3143 operated in revenue service for the last time on September 5, 2021 and is among the final D60HF buses in Metro Transit's fleet to operate in revenue service. I had the opportunity to see 3143 in-person at the 2022 NJ Historic Bus Festival, which inspired me to eventually build a LEGO version of it. The building process began in summer 2024, starting with the rear section's chassis. Because the model was likely going to be heavy when finished, I used two Power Functions XL motors for propulsion. The two XL motors are placed transversely in the chassis, between the rear door and the rear axle, and are hard-coupled using knob wheels. Placing the motors longitudinally would have required more length, which was not ideal as the rear door and rear axle are relatively close to each other. This section is designed to be very compact, with the two XL motors taking up all available transverse space between the outer body panels and the rear door and rear axle placed as close as possible to the motors. This allowed me to still have space behind the rear axle to include a Cummins engine model, as the real-life version is powered by a Cummins ISL engine. Thanks to the high-floor design of the original bus, I was able to include a floor made using flat Technic panels, with gaps kept to a minimum. This had the benefit of keeping many mechanisms hidden as well, such as the steering mechanism, which is placed entirely under the floor except for a small portion of the PF servo motor that's exposed. The steering motor's output is also connected to the steering wheel. Unfortunately, some of the bevel gears connecting to the steering wheel are exposed as their diameter prevents covering them with Technic beams/panels. A challenge for this model is the articulated joint with seats in it - the real-life version has four passenger seats in the articulation joint's turntable which rotates halfway relative to the front and rear sections during a turn. Keeping the floor continuous here was particularly challenging as it is perfectly circular on the original bus, and perfectly round shapes in LEGO are rather difficult to create outside pre-made circular pieces. In the end I went with a design using panel fairings 2387/2389 around the perimeter of the floor section at the articulation joint, and the floor flows pretty seamlessly from the front to the rear section. The bellows use the same principle as in my New Flyer XD60 model, but thanks to the floor section at the articulation joint, I was able to keep all the rubber bands maintaining the shape of the bellows hidden beneath it. There are 68 passenger seats (34 in the front, 30 in the rear, and 4 in the articulation joint), consisting of a mix of high-back and regular ones. Another friend of mine owns bus 3200, a 2006 model, and I was able to design the seating layout exactly like in the original bus thanks to photos provided by him. AFAIK, the 2003 and 2006 models are largely similar to each other, and many of my model's details were done accurately thanks to his photos. Above the chassis and interior, there is a Technic roof frame in both the front and rear section housing two independent pneumatic circuits for the front and rear passenger door. Because the two passenger doors are independently controlled, I made each door use its own compressor and valve instead of e.g. having them share a compressor but using their own valves. A PF L motor is used for each of the pneumatic circuits, driving both the compressor (geared up 5:3) and the valve through a clutch gear and 3:1 reduction. The compressor/valve setup is built in a compact manner to ensure a mechanically efficient mechanism as the clutch gear slipping and the compressor add a significant amount of friction. They are placed below where the roof AC units are located in the finished model, as the valve's lever extends past the roof height slighly when passing through the middle position and the roof AC units can be designed hollow to allow the lever to pass through. Although I tried to ensure that the hose lengths for the front and rear sections are largely identical to each other, I still noticed the rear door to open and close slightly faster than the front door. Nevertheless, the pneumatic doors are one of my favorite features on this model, because its movement is much more realistic compared to if it was purely mechanical (e.g. a linear actuator or a worm gear). Designing the bodywork was relatively straightforward, and because Metro Transit uses a yellow and blue stripe for the livery, I was able to easily make it using LEGO pieces. This kept the need for custom stickers to a minimum. I had already designed much of the bodywork in Stud.io by January 2025, and the Metro Transit livery was recognizable even without stickers. I also like how the front destination sign turned out, as the protruding curved destination sign design is one of the iconic features of New Flyer high floor buses. This is further pronounced by the fact that Metro Transit has the area around the destination sign painted in yellow, and I feel my design captured the color break here pretty well. I also like how the rear turned out, especially for the rear grille and destination sign. However, there were still some shortcomings with the design, especially with the front and rear lights. The amber turn signal lights on the front and the two center brake lights on the rear of the real bus are much smaller, and it was difficult to go smaller than one-stud width for these lights. The side windows also had some inaccuracies which I feel could've been remedied by considering the body panels' design while designing the chassis and seating layout. Because of the position of the doors and seats, I had to make some windows smaller/larger than others by a stud (when they look to be all the same size on the real bus) to prevent the windows' positions from looking out of place relative to the doors and seats. The roof is largely made using 6x6 tiles, and because the PF rechargeable battery box is placed near the rear of the model facing upward, I added a switch on the rear that can be used to press the power button on the battery box, as well as remove a section of the roof to access the battery box for charging. The roof AC units on the real bus are sloped towards the top, and thanks to the 5540 piece becoming available in white, I was able to capture the slope shape of them while maintaining a seamless finish with the top surface primarily made using tiles. I'm overall satisfied with this model turned out. It is my fourth motorized bus model and my largest MOC to date (with over 6600 pieces). The model performed well mechanically, and the two XL motors do not struggle at all to move the heavy model. While I was initially concerned about the pneumatic door mechanisms having more possible points of failure than a purely mechanical design, the doors worked as expected every time I opened and closed them. Despite some shortcomings with the aesthetics, I had a great time designing and building this MOC, especially with this being my first time doing a model of a specific unit privately owned by a friend. It's also my first model of an older retired bus, as my previous bus models were all of newer buses in active service. Video: Photos:
 -
 Discussion thread for the upcoming LEGO Technic 42161 Lamborghini Huracán Tecnica. Nr. of pieces: 806 Release date: 01.08.2023 Price: 52.99€ Lime again, how boring.
 -
Welcome to my garage LEGO!!! Hello! My name is Michael. I'm a Builder from Russia, I love muscle cars! ZIL 130 Hello everyone! I've finished another USSR Legend, a true symbol of the era! For the first time, I was able to use a large windshield, and the entire model was built around it. Description: -Buggy motor drive -GeekServo steering -RCBrick control -Rear-wheel drive -2-speed gearbox (the lever is duplicated in the cabin) -The steering wheel rotates with the wheels -Working V8 -Doors, hood, sunroof, fuel tank, and glove compartment open. -Mechanical saddle lock -Detailed interior, rear axle, engine compartment, and more. -Weight: 2.2 kg. Length: 47 cm. Instagram: https://www.instagram.com/lego_muscle_garage/ Join my group in VK: https://vk.com/legomusclegarage All photos on the link:
-
 Hello everybody. I'd like to present you my MOC car for the contest. Corona helps me to remember old hobby))) Here you can see a model preview. The most important information about functions : 1) independent rear suspension 2) dependent front suspension with steering 3) oppening hood. 4) detailed interior

-
I'm designing an RC technic car (C8 Corvette) in Stud.io that I want to race against some other people. How many L-motors will I need to get the car up to a reasonable speed? (I'd like it to go around 5-10 mph, basically anything faster than a slow crawl). I have 2 L-motors built into the car right now, but I have a feeling they won't be powerful enough. I'm planning on using a BuWizz battery pack for power and bluetooth control. The car has around 1200 parts, so it probably weighs 3 pounds or so. I built a four speed sequential transmission into the car as well. For a car of this weight, should I use 4 L-motors?
-

[MOC] Full Lego Technic locomotive - in 1:22,5 scale
Paperinik77pk posted a topic in LEGO Train Tech
Hi all, these days I'm working a lot with Lego Technic, since I've bought some parts to experiment a bit this new world. I'm used to build old Lego Technic from the 80's and 90's...but these new sets are very very complex, and require a lot of time to figure out where and how to put a certain part. So , back to the Stud.io I started designing again...and came out with this thing: It's similar to old steam trams, to the GE 2/2 and HGE 2/2 locomotives, to some service railway cars...to the alternate 7720 model. Oh, well...it's a box and it's similar to all those boxy things! Dimensions are 13/14 stu...holes, units? for width and 25 for body lenght. Both buffers add an additional 6 studs to overall lenght. I'd say it is a small 1:22,5 locomotive, like my old yellow shunter with PuP. Since I'm still not so much able to recreate details such as doors and ladders...I simply avoided them. Pantograph is designed to use a rubber band for the moment - it could be nice to make it foldable with some gears! At least the body is self-consistent and can easily be removed. The battery is fixed on the central upper part of the body, right in the middle to increase weight on all 4 traction wheels. Rods are somewhat triangular and quite strange, but they're strong! Other kinds of rod arrangements can be done. Using a normal gear transmission could also avoid rods at all. The boxy body gives me the internal space to experiment for transmissions and motors. This chassis probably will change a zillion of times like the one of my XXL locomotives. In the picture above, you can see the possibility to have the double gauge solution (left axle is L-Gauge and right axle is configured for 45mm G-Gauge track). The gear you can see in the middle of left axle shows the possibility to implement a cog railway system using Lego flexible track. I sincerely do not know if the 45mm cog tracks could work with a Lego gear - so let's limit the cog solution to original Lego track It can become also a fancy Tram locomotive, like the "Gamba De Legn" ("Wooden Leg") used in Milan for many, many years. But for this one - I'm still struggling to create a proper, working engine. I've seen few full Technic locomotives, but it's really fun to build them! I hope you like it!!! Ciao, Davide -
 Hello, I'm here again presenting my 36th review in Eurobricks. Let's have a look at Dom's Dodge Charger! Before that, I want to thank LEGO for providing us with this set for review. Overview Name: 42111 Dom's Dodge Charger Theme: LEGO Technic Pieces: 1077 pieces Minifigures: 0 Price: £89.99 / $99.99 / 99.99€ Box Square boxes are quite uncommon in LEGO. However, this is actually my first technic set in my life so let's move into it and I'll let you know what's inside. Like usual, the back of the box shows us the play features in the set and we get to see the actual car picture at the top corner. At the side, we can see the actual size of the tyre. The Content We get four numbered bags with smaller same numbered bags so there are 8 bags in total. The instruction booklet is sealed in a plastic bag together with the sticker sheet. The frame and the tyres are not sealed inside the plastics. I've scanned the sticker sheet here in high resolution. The comparison photo of the actual car and a dog. This is found at the back of the instruction booklet and LEGO is trying to tell you they are rebuilding the world. Different version of Dom's Dodge Charger. The parts list. This is quite clear and you can zoom in to see the parts numbers by clicking at the picture and zoom in. This is an 11x15 frame in dark bluish grey with the part number of 6265646. I suppose it is new and currently exclusive to the set. It is still not catalogued in bricklink yet. Tire 56 x 28 ZR Street. 6035364 is a tyre produced in 2001 as seen in the left one. Technic, Shock Absorber 6.5L - Hard Spring. 6027566 is an old part but it is considered a new piece to me as this is my first technic set. It contributes to the suspension of the car making it bouncy. After finish bag one, you will get a set of bones like this. It feels fascinating building technic for the first time. I feel like building a car. (What am I talking about? IT IS A FREAKING CAR!) There is a sticker underneath the frame. I suppose the license is a serious issue here. Technic, Engine Cylinder without Side Slots, 4234251. Going towards bag 2, this appears as the engine part. It is released since 2009 and it is new to me here, haha. Technic, Engine Piston Round, 4112203. This is even older and it comes in blue too since 1990. Okay, 6276854. This one is new and currently exclusive to the set. Quite a nice and versatile piece for some Star Wars ships I think. As I said, this is new to me and I find these pistons build very interesting. After building the second bag, you'll notice the 'steering wheel' is at the back of the vehicle and the pistons of the engine at the front are controlling the rear wheels. Technic, Steering Wheel Large, 4125213. Since 1988. This wheel is useless in the vehicle and it controls nothing. Haha. Technic, Panel Fairing # 2 Small Smooth Short, Side B 4566249 and Technic, Panel Fairing # 1 Small Smooth Short, Side A 4566251. This is an interesting part to me as LEGO is very considerate in putting numbers at the parts so that we won't be confused of the right and left side of the piece. I love this kind of small details LEGO put in. Bag 3 is actually wrapping the front part of the skeleton. I really love the trans clear boat studs coupled with that sticker with the word Charger. The front of the car really looks gorgeous. Bag 4 completes the whole build and this is the rear view of the vehicle. The white California 2JRI424 License Plate is produced as seen on the 1970 Dodge Charger driven by Dominic Toretto. More info. Side view of the Car. I wonder why the technic pin is not 'finished' sticking out the rims. Hmm... It is quite hard to pull the lever inside the car after the hood is installed. It is too narrow inside. The grey technic part at the middle is the lever. Easier when it is still the skeleton phase. The front hood can be opened to reveal the engine inside. I love the look of the engine but imagine if we get chromed parts for this! Okay wake up. The bonnet is filled with 2 bottles of Nitrous Oxide can. I am Groot. *Groot is not included in the set.* Review summary Playability: 6/10 - Yes you can play with the car and as the steering wheel is at the bonnet of the car, it is quite convenient to control the front wheel. Design / Building Experience: 6/10 - The design is very nice at the front and back but please don't view from the top. You'll only see a black rectangle. Minifigures: -/10 - At least give us a minifigure without any hairpiece. Price / Value for money: 6/10 - It is a nice display set for a Fast and Furious fan. Don't display it inside a Koi fish pond (If you know what I mean). Haha Overall: 6/10 - I think this set is only targetted for Fast and Furious fans as normal LEGO fan would only see this as a black car. However building this makes me feels like I'm a real mechanic especially when you build the spring part. Thanks for reading! I hope you like this review. Do share your thoughts in the comments below! My reviews in Eurobricks. Review: 76060 Doctor Strange's Sanctum Sanctorum Review: 60134 Fun in the park - City People Pack Review: 70911 The Penguin™ Arctic Roller Review: 70818 Double-Decker Couch REVIEW: LEGO 76051 SUPER HERO AIRPORT BATTLE REVIEW: Short comparison of various sized Antman. Review: 9469 Gandalf Arrives Review: 31015 Emerald Express & 31054 Blue Express Review: 79018 The Lonely Mountain Review: 9474 The Battle of Helm's Deep Review: 21029 The Buckingham Palace [Review] 30611 R2-D2 Polybag Review: 9473 The Mines of Moria Review: 41103 Pop Star Recording Studio Review of City of Wonders Gift Sets in Malaysia. Review: 75030 Millennium Falcon Review of 76084 The Ultimate Battle for Asgard and 76088 Thor vs Hulk: Arena Clash Review of 76099 Rhino Face-Off by the Mine and 76100 Royal Talon Fighter Attack. Review of 76031 The Hulk Buster Smash and 76104 The Hulkbuster Smash Up Review: 75230 Porg [REVIEW] 5005254 - Harry Potter Minifigures (Bricktober 2018) [REVIEW] 5005255 - Jurassic World Minifigures (Bricktober 2018) [REVIEW] 5005257 - NINJAGO Minifigures (Bricktober 2018) [REVIEW] 5005256 - Marvel Infinity War Minifigures (Bricktober 2018) Review: 76105 The Hulkbuster: Ultron Edition Review: 70841 Benny's Space Squad Review of 76039 Ant-man Final Battle and 76109 Quantum Realm Explorers Review: 79003 An Unexpected Gathering The Fellowship of the Ring Collection. Review: 30452 Iron Man and Dum-E Polybag [REVIEW] 76048 Iron Skull Sub Attack [REVIEW] 40343 Spider-Man and the Museum Break-In [REVIEW] Four SDCC minifigures [REVIEW] 76144 Avengers Hulk Helicopter Rescue [REVIEW] 21313 Ship in a Bottle
-
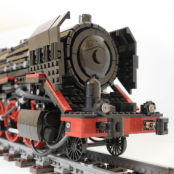 Hello everybody, I am glad to introduce you my last big project : a pneumatic steam locomotive ! I think it's one of the firsts pneumatic locomotives, using only Lego parts. First of all, the YouTube video and some photos: The idea with this model is to replace the steam of a real Locomotive by compressed air, and this for as much functions as possible. Here are the main functions : Movement of the train : Using 4 pistons, 2 on the sides, and 2 inside, the train can move forward. It works like a classic LPE, with 2 pistons shifted 90° from the others. 4 pistons consume a lot of air, but they guarantee enough power to move the whole train. To make the rotation smooth, a free wheel is hidden inside the boiler part of the locomotive. Its rotation is 25 times faster than the wheels of the train (40t/8t x2). The train isn't moving very fast because the pneumatic elements aren't modified. However, it's fast enough to make it interesting to look at the connecting rods and wheels moving. The breaks : On a real locomotive, compressed air is produced by a compressor (powered by steam) and is used to press some brake shoes against the wheels. Here, the same technique is used : a small piston is filled with compressed air, and thanks to some rods, brakes shoes are pressed against the wheels. It's cool but...it's not enough. Plastic against plastic isn't very efficient to stop the train's movement. Therefore, another rod is connected to the brake system and press another brake shoe against the free wheel. Because its rotation is faster (and therefore, with a low torque), it's is way easier to stop it. The Whistle : A system that I love in this locomotive is the whistle. Currently there isn't any whistle produced by Lego that could be used in the locomotive, so I had to think a little for finding something working. This whistle is activated by a switch in the cabin. The Cabin : Nothing much to say except that in contains 3 switches for the 3 main functions (whistle, wheel movement and brakes). There is also a pressure gauge showing the pressure coming from pumps. The train moves with a minimum of 1 bar. A 2-2.5 bars, the movement is faster. The air supply : There are several possibilities for the train : we can directly pump with Lego pumps, or store the air into 6 to 8 airtanks or produce the air with Lego motors and small pumps. For instance I use 4 pumps side by side, linked to some air tanks, but I don't what the final model should work. Maybe some motors and pumps could be cool ? The design : The hard part was to make the boiler of the locomotive. It's a little hard to make cylinders with Lego technic parts but, with flex axles passing through Technic beams, I managed to make something satisfying. Some details are visible on the locomotive, I tried to make it look a little crowded like a real locomotive with fake air/sand tanks, fake compressors and mechanical elements. It's probably possible to make it look better, but for instance I am happy with it. The rails are "homemade" with Lego bricks. The locomotive is too big of course to work on Lego railtracks. The wheels aren't perfectly flat so the train is "blocked" in position inside the rails. Therefore, the train can move foward cur cannot go out of the railtracks (which is great for a train). Finally, as a bonus functions, there are some bumpers at the front and back of the locomotive to imitate the real bumpers used to absorb small chocs on a Locomotive. That's it for now, I hope the model is interesting to you and if that's the case, don't hesitate to support it on Lego Ideas ! Click Here to support :) If you have any question or comment, please reply to the post, I'll be glad to discuss with you !
 -
once upon a time... Oh no, it was an orange 11x3 curved panel that was in my hands after dismantling the Porsche 42056. I had just read about the existence of the contest. What can I do with this panel? It suddenly found itself oriented in such a way that it reminded me of the door of an Izetta! I had found my model. Looking for photos, technical information, a little puzzled about the engine, the idea quickly drifted towards a sporty, crazy, unbridled version. As I have it at hand, the MOC will be equipped with the flat 6 of the Porsche! The only thing left to do was to find a name for it. The Izetta had a modern interpretation in the form of the Microlino imagined in Switzerland. I will therefore opt for a synthesis of the two. So here is "Ize'lino", the most dangerous micro car to drive ever designed! Suspension: Double wishbones at the front with torsion bars (7L axles) and single rear pendulum suspension. A view of the engine Steering: There is a HOG at the rear as on the technic sets of this scale, and the steering wheel is connected to the steering wheel through gears. It's a steering rack for a better précision. Tilting of the steering wheel: As I couldn't make it linked to the front door, I had the idea to ensure the movement by a mini LA controlled by a cascade of gears with the Z12 black gear on the left side behind the front left seat. here are the different gears and axles to drive the functions. Blue for steering, green for tilting the sterling wheel, and orange for transmission from engine to rear wheels. The door opens manually The rear trunk can also be opened: On the look side, there are front headlights attached to the mirrors and front turn signals integrated into the spoiler. At the rear, there are red lights, reversing lights and turn indicators. The front spoiler can be swivelled to allow mounting on the car carrier truck. Finally, the rear spoiler on top of the rear window allows the car to hit the ground at very high speed! The dimensions are L=33 x W=15 (side mirrors not included) x H=14
-
 My first video after a long time and my first ever review! Here are my thoughts on the 42111 Dom's Dodge Charger. Let me know if you have any comments or criticism for my review. This is my first time doing this, after all, and it probably isn't great, but it's the best I could do given my limited knowledge of good review-making. Thank you! As well, I plan on making a MODs and improvements video for this set. I plan to include: A working steering wheel Improved suspension Better interior Better access to the wheelie bar A floor for the trunk Some general cosmetic fixes Let me know if there's anything else you want to see! Thanks for reading/watching! BbBT
 -
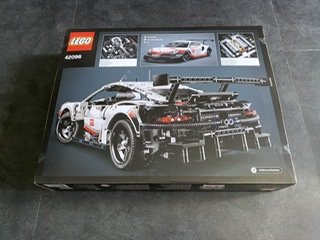
My first Technic
discoburg posted a topic in LEGO Technic, Mindstorms, Model Team and Scale Modeling
The 42096.
-
Hi! I built a telescopic tracked car, that can extend in two directions to overcome obstacles ? Have a look and subscribe to my channel, if you want more videos like that (building instructions available). Thanks!
-
Hello everyone! This is my first post, so comment on any questions and request for GBC modules. Just a few days ago, I was on Rebrickable for a little bit, and thought of finding GBC modules. Well, I wasn't very lucky, because the only one I could find was a back-forth style lift. It was made using the First Responder set. I did not even have that set, as my largest Technic set was Street Bike. I decided to get my Street Motorcycle set, and make this:

-
 I tried to build my own alternative model from set 42061 several times in past but all my attempts failed. When I was decided to sell this set I got idea to give it last try. My initial goal was to build some kind of buggy. After few hours I built working steering and in-line fake engine driven by rear wheels. Building car out of parts from set 42061 was painful (it has pretty bad assortment of parts) and I am not totally sutisfied with look of buggy so I call it "Ugly Buggy". By the way it fits to TC18 contest but I think it is too simple to submit it there. So I use it for TLCB Lock-Down Competition instead. When I finished building buggy I decided to build more - to build something easier. So helicopter was the best choice. I took little bit of inspiration from @BusterHaus - I like how he used gear rack for tail of his helicopter. My helicopter has both rotors connected by gears so you can spin them together by turning gear on bottom of helicopter. This is also my second entry to TLCB Lock-Down Competition. Building instructions for both alternative models are available at buildinst.cz Any comments are welcomed.
 -
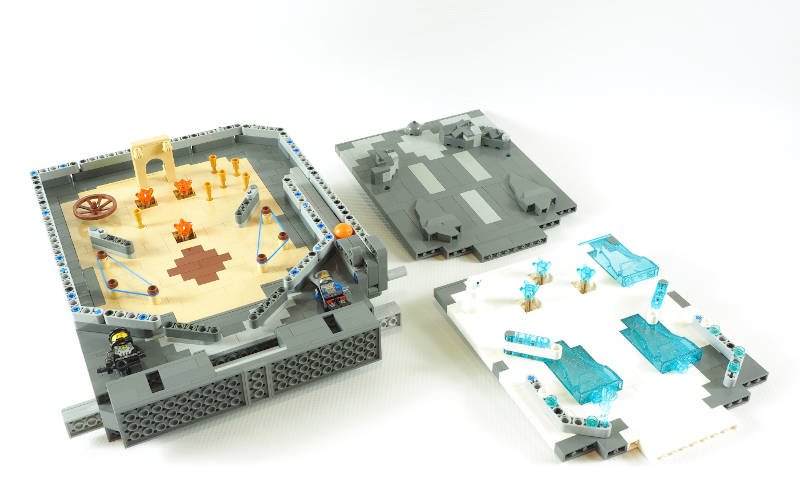
Two years ago I presented you my first pinball. Today I want to show the second version, with changeable boards and an interactive Mindstorms board. If you like it please add your support on LEGO Ideas page https://ideas.lego.com/projects/4025655b-7b86-4aeb-bc91-57aa33c862e7
-
 Hi to everybody, this is my new Moc, I started building this US Truck about 6 months ago and it was finished to be shown to the MEI 2020, unfortunately, for reasons of force majeure, the MEI is posponed so here we are. It's not based on a specific model, surely Mack from Cars inspired me a lot, and I took some inspirations by pics on the web. I chose to build less sophisticated suspensions, pendular on all axles, to allow a more robust frame (due to a very long wheelbase) and a more robust drivline, it doesn't have U-Joints (still some parts could be damnaged). As almost all my others Moc it's driven by 4 XL PF Motors and steered by a L PF Motors, more precise at low speed. It has 2 M PF Motors to operate the two speed gearbox and the fifth wheel. It has openable hood, behind which there is a detailed Inline-six engine with belt driven alternator and clima compressor. It has openable doors with detailed interiors such amortized seats, bed and various storage compartments. The truck is powered by 2 Buwizz but it's possible to use 2 Li-Po Battery and 2 SBrick. The trailer is designed to fit a Porsche 911RSR, original set N° 49096. It has working legs and rear access ramp powered by a Control+ Hub and 2 XL C+ Motors. I chose to use it because I have one on the shelf and because it's compatible with the BuWizz app, so I can control everything using only a smartphone. The trailer has detailed interiors, the car compartments and the meeting7telemetry room. Moreover I built a tool trolley. Now some numbers: Truck Length: 79,2 cm 99studs Width: 24,8cm 31studs Height: 35,2cm 44studs Weight: 6 kg M PF motor: 2 L PF Motor: 1 XL PF Motor: 4 BuWizz: 2 (or 2 LiPo Battery and 2 SBrick) Trailer Length: 127,2 cm 159studs Width: 24,8cm 31studs Height: 38,4cm 48studs Weight: 8.4 kg XL C+ Motor: Control+ Hub: 1 Truck and Trailer with load: Totalal lenght: 175,2cm 219studs Total weight: 15.9 Kg Here the flickr album: https://flic.kr/s/aHsmMGe99T I hope you enjoy!
 -
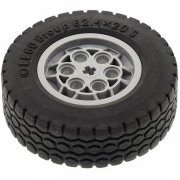
 Hi there, While building a small rc car using a RIM 55982 (18 x 14) I needed a way to lock the wheels to be able to drive it with a motor. Almost started drilling holes ..... and then, after removing the tire, it turned out there is a little notch inside the wheel. Looks like it is a space for a tiny piece of plastic to slide in, to lock the axle to the wheel. Exactly what I'm looking for! Have I missed something? Is there a LEGO part that fits this notch and locks the wheel? Or should I make it myself. https://drive.google.com/file/d/1UgLxSAbwba1zWIg1YRPNkqPdqAq3pMu7/view?usp=sharing
 -
I recently took apart a Technic RC tracked vehicle MOC and have ordered the add'l parts needed to build 8043. My question is, did that set originally come with V2 receivers? From the research I've done it appears it did but I can't imagine why. Thanks.
-
Hello everyone! First I have to say, that I'm new here and this is my first MOC ever, so it's not as good as I imagined it to be. It's a bit inspired by Crowkillers model 42083 B Model Bugatti Formula 1 Race Car, but most of it are my own ideas. Let's start with a photo! Functions: - Full independent double wishbone suspension - Steering - Fake V8 Engine & RWD - Openable engine hood All the parts are from Chiron 42083 set, as it is the only set I own. I am pretty proud of how it looks, apart from the front suspension. It doesn't look how I wanted it to be, but it's all because of lack of experience and time. There's no gearbox, because I have absolutely zero experience with that and I didn't want to waste a week on that. But maybe in next version... who knows :) I especially like the front wing, which in my opinion is an improvement over Crowkiller's version. Let me know guys what you think!
-
Hello does anyone have any advice for building custom pull-back or clockwork motors using technic pieces? I’m trying to build one for a custom armoured train since I don’t have the money for all the fancy motor pieces. Thank you
-
Hello I would like to share my first MOC Ferrari F1 SF90 in 1:8 scale. Making the MOC my main goal was display model so I decided to make it look as close as possible using all official Lego parts to real F1 car. But I wanted to have it all the basic features F1 car should have which are: - front and rear suspension - fake v6 engine (created by SuperKoala ) - removable front wing (I started all build from this element actually) - removable engine cover, - removable headrest system (this was added at the very end I didn't thought about this at all but it just came up naturally) - drs - steering The dimensions of the model : Dimensions 70 x 25 x 14 cm Weight 1,95 kg Pieces: 2186 My main donners at the very first stage were 42056 and 42000 which I already had and they had lots of elements I could use to try the concept. The first version was funny to watch as there were so many colors all over the place ;) I have used wheels and tires from 8674 as they are the best looking one and fit the best for design and don't have any labels on them (as unfortunately 8458 and 8461). The instruction has been done in Stud.io in PDF. Instruction build I also designed stickers sheet ready to print and I also will have printed version too. Hope you like it. Whole gallery Follow me: https://m.facebook.com/f1moc https://www.instagram.com/f1moc/