Search the Community
Showing results for tags 'trains'.
-
I had a whole stack of broken 12v light bricks where the bulb had gone. In particular they don't last that long when set in lamp posts. Sick of buying more so needed a way of replacing the bulb with a longer lasting LED. The first difficultly was finding the right LED with a built in resistor so they can run straight off the 12v power supply. I hadn't found 3mm white/clear LEDs before, just coloured ones, but found a supplier here for what I needed. These should also work fine for 9v. Then the other tricky bit was to open up the light brick without breaking it. This wasn't as difficult as I first thought, so here is the guide - no soldering and no glue! The tools used (almost common household items!) excluding the light brick and LED are : 1. A micro-screwdriver. 2. A bent curtain hook. 3. Some sharp nail scissors. https://savourous-eulah-autohypnotically.ngrok-free.dev/bulb/photo1.jpg Step 1. Using the screwdriver scrape off the plastic tab that helps hold into place the inner part of the light brick : https://savourous-eulah-autohypnotically.ngrok-free.dev/bulb/photo2.jpg Step 2. Using the holes for the plug as an anchor lever out the inner part of the light brick with the sharp end of the bent curtain hook until you can get under it : https://savourous-eulah-autohypnotically.ngrok-free.dev/bulb/photo3.jpg Step 3. If the inner part is still not loose rotate the other end of the curtain hook in the space made at the bottom : https://savourous-eulah-autohypnotically.ngrok-free.dev/bulb/photo4.jpg Step 4. Take out the inner part : https://savourous-eulah-autohypnotically.ngrok-free.dev/bulb/photo5.jpg Step 5. Use the micro srewdriver to remove the old bulb and contacts until the inner part is clear : https://savourous-eulah-autohypnotically.ngrok-free.dev/bulb/photo6.jpg Step 6. Throw away the old bulb and wiring and Insert the LED : https://savourous-eulah-autohypnotically.ngrok-free.dev/bulb/photo7.jpg Step 7. Bend the LED wires around the light brick making sure the LED is centred : https://savourous-eulah-autohypnotically.ngrok-free.dev/bulb/photo8.jpg Step 8. With the screwdriver continue to bend the LED wires into the plug contact holes : https://savourous-eulah-autohypnotically.ngrok-free.dev/bulb/photo9.jpg Step 9. Re-insert the metal contacts. This may take some force, but it will be this additional friction which means the removal of the plastic tab earlier doesn't matter : https://savourous-eulah-autohypnotically.ngrok-free.dev/bulb/photo10.jpg Step 10. Trim off the excess LED wires with the scissors : https://savourous-eulah-autohypnotically.ngrok-free.dev/bulb/photo11.jpg Step 11. Re-join the central part of the light brick with the cover (remember which way is up!) : https://savourous-eulah-autohypnotically.ngrok-free.dev/bulb/photo12.jpg Complete! Remember as it's an LED it won't work plugged in either way to the power supply, but that doesn't bother me in the slightest as you just turn the plug around / swap the pins if it doesn't work For train lights where the power will be reversed when you reverse the train I can recommend Janco's light bricks which are superb
-
With the possibility of at least three Trains-related sets through the BL Designer Program, I figured it deserved its own discussion thread! 2024 is shaping up to be a good year for ever-patient Trains fans. LEGO Bricklink Designer Program | Old Train Engine Shed Set number: NA Designation: Old Engine Train Shed Theme: Bricklink Designer Program - Series 1 Number of parts: 2,331 Minifigures: 6 Crowd Funding Start Date: February 7th, 2024 RRP: $229.99 US Fan-designer: Mind the Brick/Maria Kalaoglou 3,000 pre-orders required, 30,000 maximum produced. Limit of two per household. Update: FUNDED! Image: Official LEGO render Bricklink page: https://www.bricklink.com/v3/designer-program/series-1/224/Old-Train-Engine-Shed --- LEGO Bricklink Designer Program | Logging Railway Set number: NA Designation: Logging Railway Theme: Bricklink Designer Program - Series 2 Number of parts: 2,706 Minifigures: 3 Crowd Funding Start Date: June 2024 RRP: $209.99 Fan-designer: ties25 Note: Designed with motorization in mind 3,000 pre-orders required, 20,000 maximum produced. Limit of two per household. Image: Official LEGO Render Bricklink page: https://www.bricklink.com/v3/designer-program/series-2/642/Logging-Railway --- LEGO Bricklink Designer Program | Brick Cross Train Station Set number: NA Designation: Brick Cross Train Station Theme: Bricklink Designer Program - Series 2 Number of parts: 3,034 Minifigures: 8 Crowd Funding Start Date: June 2024 RRP: $279.99 Fan-designer: brickster 3,000 pre-orders required, 20,000 maximum produced. Limit of two per household. Image: Official LEGO Render Bricklink page: https://www.bricklink.com/v3/designer-program/series-2/728/Brick-Cross-Train-Station --- LEGO Bricklink Designer Program | Wild West Train Set number: 910044 Designation: Wild West Train Theme: Bricklink Designer Program - Series 4 Number of parts: 3,192 (was 2,760) Minifigures: 12 (was 6) Crowd Funding Start Date: February 4th 2025 RRP: $279.99 Fan-designer: llucky 3,000 pre-orders required, 30,000 maximum produced. Limit of two per household. Bricklink page: https://www.bricklink.com/v3/designer-program/series-4/1184/Wild-West-Train --- Series 5, Series 6 and Series 7 contain no accepted Trains-related sets. --- Series 8 will include "Brick Railroad Locomotive" an ATSF style locomotive. Bricklink page: https://www.bricklink.com/v3/designer-program/series-8/2739/Brick-Railroad-Locomotive Series 9 will include the "Woodbrick Freight Depot" a design from returning Trains designer Mind the Brick/Maria Kalaoglou. Bricklink page: https://www.bricklink.com/v3/designer-program/series-9/3131/WOODBRICK-FREIGHT-DEPOT Series 10 will include the "Wild West Train Station" from returning Trains designer llucky who brought us the Wild West Train. Bricklink page: https://www.bricklink.com/v3/designer-program/series-10/3681/Wild-West-Train-Station
-
Hi everyone, I present to you my second version of the Renfe S-130 like Ferro-Friki did some time ago. I wanted to remake this train that I made first in 2018 with not the best result so I now made this version in 7 studs. LEGO Renfe S-130 DEF [MOC] by Imanol, en Flickr The set is heavily detailed even in the rear of the power cars and end cars LEGO Renfe S-130 Testeros Interiores [MOC] by Imanol, en Flickr I have made a reduced train set of only 7 cars instead of the 11 that has in real life but it has one of each of the different cars that form the real train with detailed interiors. First the "Preferente" end and "Preferente" LEGO Renfe S-130 Lateral Extremo Preferente [MOC] by Imanol, en Flickr LEGO Renfe S-130 Lateral Preferente [MOC] by Imanol, en Flickr The interiors of "Preferente" cars LEGO Renfe S-130 Interior Preferente [MOC] by Imanol, en Flickr The "Preferente" adapted car and it´s interior LEGO Renfe S-130 Lateral Preferente PMR [MOC] by Imanol, en Flickr LEGO Renfe S-130 Interior Preferente PMR [MOC] by Imanol, en Flickr The cafe car and it´s interior LEGO Renfe S-130 Lateral Cafeteria [MOC] by Imanol, en Flickr LEGO Renfe S-130 Interior cafeteria [MOC] by Imanol, en Flickr And the Turista cars which are the same as preferente but with 2+2 seating arrangement LEGO Renfe S-130 Lateral Remolques Turista [MOC] by Imanol, en Flickr LEGO Renfe S-130 Lateral Remolques Turista [MOC] by Imanol, en Flickr And now that I presented it I want to ask for help to build it as it will be my first lego train in real life. The car coupling mechanism that I have installed is only for aesthetical purposes and will not work in real life. Another problem is that i have seen many models in which all of the rear of the locomotive or power car pivots and I don´t know if it could be necesary to do in this case. Lastly I want to know how to motorize it, being so long I would suppose I would need the two power cars to provide power but I don´t know. Anyway, I hope you enjoy this project as much as I enjoyed designing it
-
Last train show I came unprepared and didn't have AAA batteries, I used instead 8881 battery box (that use 6 AA batteries) The train managed to run on the same 6 normal Duracell batteries for 2 days (75% of the time each day) Has anyone used the big battery box 8881 with PF trains? if so what are your thoughts about it? I kinda liked how well the train lasted and I am considering keeping this setup.
-
Here is a WIP of my LGMS Module I been working on ...
-
This is my MOC of a Transperth B series Electrical Multiple Units using Bricklink Studio Lego designer. This train MOC is of the same name based of the real version that is currently in operation in Perth, Western Australia. I'm still creating it's instructions. I will eventually buy the bricks from online (Bricklink), Pfx bricks for realism and showcase it. I hope you will like it.
-
Unit Train Indexer use to position the cars in a Rotary Dump. Unit Train Indexer (Car Positioner) by Terry Akuna, on Flickr Indexer_Video by Terry Akuna, on Flickr
-
 What would you like to see me do to my Casey Jr. project to encourage more supporters? What can I change, and where can I do better? https://ideas.lego.com/projects/8b153541-1956-42b7-bfec-a8f31755bc7e
 -
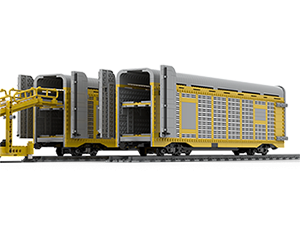
Functional Ramp and Autorack which can fit up to 6 Speed Champion cars. 65x10 Studs. Autorack_And_Ramp_06 by Terry Akuna, on FlickrAutorack_And_Ramp_01 by Terry Akuna, on Flickr
-
Video from the yearly model railroad exhibition in the danish city of Helsingør earlier this month. The LEGO contribution was done by our new (and smallish) train club, Togklodsen. Unfortunately I couldn’t participate but a lot of my trains did A rather spectacular crash occurs around the 12 minute mark
-
My first try at building a wooden gondola. I'll build a few more versions before I go into production for my layout.
-
Hello everybody, I'm starting this topic because I want to start automating my Lego Train layout. I am new to this so I have questions you might have the answer to and with that I hope this topic will help other newbies in the future. For starting off I'm thinking of buying: 1 arduino mega 2560. To control everything. 2 L298n modules to control 4 pf motors, for as many track switches. 6 (or more) lm393 lightsensetive optical sensors for train detection. 1 HC05 bluetooth module for communication with bluetooth devices. I think I am all set for hardware. Maybe a 12v powerline to power the L298n's. I have two powered up trains, which I hope to be able to control with the arduino too, didn't find anything about it yet (didn't look hard either though). Is this the right way to go Or do I miss something? Thank for you help.
-
Hi all, It’s been quite a while since I contributed to the forum, nice to see it’s still so active! Ambridge & Paxley (few more photos, a track plan, and a video of the layout on this page) was a new type of display for me - an 18ft long end-to-end railway, with a station at either end, and connected by a single line. We usually run looped track which requires less effort to run during shows. It is also only 48 studs deep - I wanted to see what I could achieve with a much narrow scenery depth than I’d usually start with. The layout is based on a fictional rural branch line, with Ambridge being the terminus station and Paxley a through station (in future - it was a terminus for the purpose of its first show earlier this year). All of my station/display names are taken from villages and towns in the BBC’s “The Archers”, a long-running radio serial here in the UK. Between the station sits a small valley, home to the River Am and Ambridge Cricket Club.

-
There were 738(I think) entries into the Brick Train Awards but we only saw about 50 of them. There have been questions on Facebook weather they were going to post all of the entries and the answer was sadly no. So here I would like to see the entries you the reader submitted into the brick train awards. So please post some of your entries here so we can see them in all of their glory. You can post as many entries of your you would like. 6 or less photos of the model and one video are allowed and one photo of the prototype if you want(this is what was done for the BTA's) and please if you decide to post don't go on rambling about why you didn't win and be a sore loser but don't brag if you won. Lastly please say kind thing about other entries if you want to. Here is my entity.
-
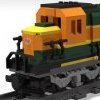
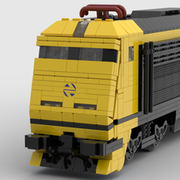
Two great trains are dueling on 12v gray track: the British Railways HST 125 vs the Deutsche Bahn BR403 "Donald Duck"! Two big countries with high expertise on trains,two different power sources (Diesel vs Electric), same speed (above 200km/h or 125mph). Who will win this Lego contest? None of them, since they both are built on the same Lego platform and shape - I created first the "Donald Duck" in Lufthansa colors and then I modified it a little to recall the HST125. So same power cars ,and same wagons, only with a different paint scheme . I've always focused on standard trains, and this is my first experiment with fast ones. After all , during "gray Era" we've seen a lot of steamers, diesels, electric trains...but only one example of fast train. So here's a shot of the DB403, with an applied sticker on front "window" to simulate double windscreens... ...and one of the "Screaming Valenta" - here the sticker is a bit different, but you can easily tell it is only a bigger one! Both are using parts available in the last years of "Gray Era" (so they could have been made starting from 1987). The HST could be a bit older than the 403 - since it's using the old style blue window in the cabin. I could also recreate a yellow sticker to cover the outer part of the trans-clear headlight, but I preferred to keep it as it is (just imagine the sticker detaching when the glue is old...I HATE that sensation ) Both could have working headlights, the DB403 can use a 12v light brick on top headlight. For the HST125 the problem is how to diffuse light from light brick to transparent slopes. But both trains could also leverage on 9V lights, which were already available at the time. The 9v Battery box fits easily in both bodies. Finally the 7745 has some internal competition!!! Hope you like these two! Ciao! Davide
-
Just out of curiosity... What do you think are the most iconic train sets? And, what are your favorite sets? I think we will see a lot of the same answers, hah. For me, I think the most iconic trains are: 1. 7740 2. Metroliner and my favorite is my far the 7740, I think the 12v system was the best system there is so far.
-
For a while now I've been working on creating replacement axel holders for lego train wheels. It all started when I got back into the hobby and ran out of train wheels. Looking around my local area (Australia, Queensland) the 1 or 2 clubs that used to be around disappeared so there wasn't anyone I could trade or buy them off. I then remembered brick link but I couldn't get the cost down to below $5-8 pre-unit shipped. When you want 100 or 50 or 24 of the $8-5 a peace starts getting really expensive. I then tried to order them from lego but they weren't shipping bricks and peace due to the outbreak. Shortly after trying to order directly from lego, they also discontinued the part I wanted. So a few months of design later, I now have a number of wheel axle configurations. I printed the last prototypes this week and I was a little surprised that they felt smoother than the official ones. Although having said that my existing lego wheels are all 9V or RC so they are really old. I have a version with no sides, a version that is designed to imitate the existing one from lego and one that has studs on the side that is primarily for snot builds (8/9/10 wide). I'm now moving into a phase where I'd be sending them out to an ABS plastic print farm because they take between an hour and 1hr+45min to print. Initially, I wasn't going to sell them but I was wondering if there might be a demand? If there was a demand what colours other than back people might be interested in? Other Questions Welcome.
-
Hello, I'm a huge train fan and have a section in my city where I have e a narrow gauge. Does anyone have a File or instruction file for a chassis? I really need one as I am very bad with the technic system. also, If you want, just send me a pic of the underside. I will figure it out from there.
-
Using part 87058 in black as a base, I built two sets of 2 articulated TTX well cars. Loaded them with a custom container design I published on Rebrickable last month, which uses the profile brick (1x2 and 1x4) as the base for the walls - seems to give the right corrugated steel look. Decals are from OKBrickWorks. Looking at the pictures I might need to raise the end trucks/bogies by a plate - did notice this all the time I ran them on my tracks, but on the pictures it seems the cars are not fully level. TTX Well Car with Containers by Phil B, on Flickr
-
 Hello, I bought some blue era remote points in rough shape, that need to be opened and repaired. Has anyone attempted this before? Is there any tips or tricks I should know about? Also, I do not own an original transformer, so I will be using a generic power supply for these. Will 12v DC work, or do I need higher voltage? Thanks, Unfinished_Projects
 -
I built this for my "Midiopolis" topic over in the Town forum, but I decided to mention it here as well. The wheels are part number 38799 which at the moment is only made in white and is decorated for use as a tea cup saucer for a Harry Potter minifig. Midiscale BR Class 08 Shunter Midiscale BNSF 2099 Locomotive Midiscale Small Oil Tanker Midiscale Chicago Metra Cheers.
-
Hello, I'm creating this write-up to share my experience buying and operating a set of old 12v track in the US. I had been wanting some 12v track and motors since I was in middle school (and I'm in college right now, so yes my tastes in Lego have always been old and expensive haha) but hadn't found the right lot until about a week ago. I managed to score the following lot on ebay for a good price: It is a decent amount of stuff, but some key things are missing: motor (the blue one in picture is 4.5v and doesn't work), transformer, and the piece for connecting to the track. My goal was to have an operating train for as cheaply as possible. Hopefully these ideas can help someone else out who wants to make use of older track without spending a fortune. FOR PURISTS: I handled all of these missing components in an unorthodox way that includes modification of vintage parts, so consider yourself warned Motor: Instead of buying original 12v motors, which are only available for crazy amounts of money on bricklink, I chose to use @bricks n bolts method of picking up track power and using it to drive PF motors (https://www.eurobricks.com/forum/index.php?/forums/topic/63535-mod-7745-to-use-the-pf-motor-still-on-12v-track/ I know it was a little while ago, but thank you @bricks n bolts for sharing! ) The process of cutting down the pins was pretty straightforward. I used a dremel with a cutoff wheel to make the initial cut and a sanding wheel to finish things up. If anyone attempts to do this, try to keep the pin cool, as I melted the plastic a bit on one of my pick-ups. I also ended up cutting off the curved section of one pick-up, to accommodate for the magnet assembly. Connecting to track: To connect to the track, I simply soldered some wire to the little tabs on the bottom of the rail. The correct part for connecting to these blue rails isn't that expensive on bricklink...if you don't factor in overseas shipping. Transformer: Since I live in the US, using an original transformer would require a converter (I had no luck finding the 110v version on bricklink or ebay). I originally thought of using a model train transformer of some kind, but wasn't sure so I asked here on the train tech. @dr_spock suggested a cheap DC motor controller and a generic 12v DC wall adapter (Thanks! ). This ended up working perfectly, and was quite cheap. Only downside is no reverse, but I'm ok with that for how much I spent. Final Result: With everything together I swapped out one of the motors on my Powered Boxcar (https://www.eurobricks.com/forum/index.php?/forums/topic/169681-moc-powered-boxcar-power-functions/) with the completed pick-up bogie and turned on the speed controller. It worked perfectly! I now have a functioning 12v loop that powers my newer trains! I do however have to watch out that I don't over-power the PF stuff. I suppose I could have used a 9v power adapter, but I'm leaving room for a 7740 that I hope will join my collection if I find a good deal ^These last 2 are videos, you just have to click on them There's a few more pictures of this project here if interested: https://flic.kr/s/aHskR5KZX3 Thanks for looking! Unfinished_Projects
-
Hello, I have 4.5v train motor (https://www.bricklink.com/v2/catalog/catalogitem.page?P=bb07pb01&name=Electric, Motor 4.5V Type A 12 x 4 x 4 with 4.5V stamped on front&category=[Electric, Motor]#T=C) that needs wheels. I have access to a 3D printer and 3D modeling software/knowledge. My question is, does anyone have dimensions for "wheel2a" ?(https://www.bricklink.com/v2/catalog/catalogitem.page?P=wheel2a&name=Train Wheel Spoked for Motor&category=[Wheel]#T=C) I would like to try to make something that goes into this motor and gives it a technic axle, or just recreate the wheel (either all plastic, or using purchased metal rod). Unfinished_Projects
-
My ideas for fit powered up battery box to this set:
-
Dear All, @mahjqa very recently opened a thread in the Technic forum showing his "Train-compatible Friends-style container crane". As he did not want to cross post, I am taking the freedom of posting the link to that beautiful and so functional crane here. @Zerobricks frontpaged it, but as there was no photo available - without photo. I am browsing the Technic forum frequently, as of course the TrainTech forum (but wait, there is more, of course there is ) Should you not browse the Technic forum frequently, here's the link - should you, please forgive me. All the best, Thorsten P.S.: @JopieK - please close this thread if inappropriate!


.thumb.jpeg.bf849dde081326724141a48f3f7b3ad2.jpeg)