Search the Community
Showing results for tags 'power'.
-
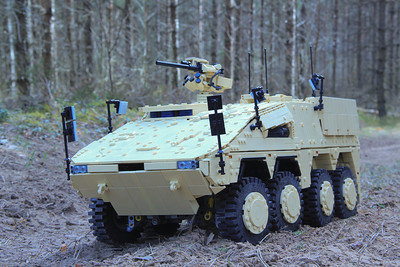
For the last couple of years I've been secretly working on something different than my previous cars and trucks. This here - I present to you Boxer - Infantry fighting vehicle. It's the same scale as my other car MOCs. But boy oh boy - it is a beast compared to those tiny cars. This one here is larger than the famous Abrams tank in real life. So imagine that this one here is like a heavy duty truck. Full with as many details as I could possibly find in the internet. It may sound silly that I mention it so, but... those military vehicle details, especially when it comes to the interior details and gadgets, those pictures are very hard to find. Probably for a good and secure reason, so - can't really blame anyone for that. Would love to see one of these up close in person. Some day, maybe. Till then - enjoy this one. Hope you like it, couse I sure do :) Oh, did I mention? It has all wheels double spring suspension, all wheels drive with PF (2 x XL) and 2 x front axle steering (1 x M). See full album on my flickr account
-
 Hi guys I work on the Nexo Knight Power shields for the Ldraw.org Parts Tracker Libary using spyrius.org libary for the codes. Now I found the first shield that was not listed. It is the shield #133 "Alpha Drill". Does anyone have the shield or a picture of the shield on which the code can be seen? Thanks in advance. Regards Johann
-
 Inspired by set 4885, (Spider-Man's Train Rescue) this four-car subway train features a removable roof on each car for access to the inside seating. The two black tiles on either end of the train are for the identification numbers / letters, such as the "A" train, or "01", for example. The studs just below the roof are for destination boards, on which you could put "LEGO", "CITY", or any other four (or less!) letter word as a destination for the train. The model is now motorized with power functions in the leads car, and each sections now has pantograph's on each unit which can be raised or lowered as desired. The front one also hides the RC receiver on the motorized unit, but this pantograph cannot be lowered, due to to being too close to the receiver to fully shut down. The four train car's roof sections are removable, and the train is supposed to be made up of two "set units" of four cars total, broken down into two groups of two. Each unit of two could operate individually of the other two if this were a real train, but they can not be broken down any further as they are supposed to be hard-coupled together. (As this is LEGO, however, you can do what you want!) The motor unit lacks seats, but features the battery box and receiver. The roof is removable for battery removal / replacement access. These three trailing cars have 18 seats total (six per car) facing in the relative direction of the "front" of the car. The roof sections are removable for easily placing mini-figures inside the cars. the LDD file is available at brick safe here. As usual, any and all comments, questions and complaints are welcome!
 -
(Can't find the forum relating to PF components. Since it is about the Carousel, I guess it could be placed in the Town forum) Anyway, for the 10257 Carousel, Lego recommends the M-Motor. My M-Motor from July 2017 has already become weaker and worn out! I guess it is not robust enough. Has anyone tried the L-Motor with the set? The video shows the trouble I have.
-
 I've searched for an answer to this for a long time, and I'm hoping I can get some help here. I'm working on a Technic car that uses PF motors to be a mobile vehicle. However, I've found time and time again that the model ends up being just too slow for my liking (if anyone has owned the 4x4 Crawler set, you know what I mean by slow). I own 2 L-Motors, 5 M-Motors, 1 XL-Motor. My question is: How do I make the model have faster speed without it looking like a skeleton car, and also, does adding additional motors increase power? For example, if I gear together 4 M-Motors so that they all end up on one drive axle, is their power combined?
 -
Hey! Check out my Lego Boeing 737-600! Working: aileron, rudder, elevator, control column RC: flaps, slats, spoilers, landing gear, thrust reverser Length: 110 cm Wingspan: 125 cm Height: 40 cm Weight: 2,8 kg Video here:
-
 For long, I've wanted a small strong mini Lego Technic motor, smaller than an M-motor. As I recently learnt how to draw Lego parts and had the opportunity to use 3D printed nylon (using laser sintering) , I decided to try a small motor as well. As the PU motor stuff is getting big and heavy, this is my response: a small easy-mountable motor with a case of only 5 by 2 by 2 studs. 70% of the motors in Lego Technic models don't have to be large. Only the mount of this tiny motor is 2x3 studs. The mount is tailor made for Technic applications: if you build often with M-motors you will know that an M-motor always must be connected to a 1L beam to ensure that the gears won't slip and to mount the M motor securely. The mount design of this new motor eliminates the need for the beam, so that's one stud saved already. Because the motor is only 2 studs wide, 3 mini motors can be in the space of 2 M-motors. Also, 3 mini motors take up the space of one XL motor.. The exterior design is derived from a PF M-motor, because I like the design and want to keep using the PF looks. This is still a work in progress as I need to mount a 9V connector and insert the inner electric motor(already in stock here). I also need to do some more painting and sanding. Nonetheless, the printed parts are quite accurate. I will give an update soon when the motor is working. The motor gets internal electrics that work up to 12V so also third party remote control bricks will be allowed to use their boost modes. My big hope is that TLG understands that we need small motors and remotes, not big ones. The length of 5 studs makes this motor very easy to put in all kinds of leftover spaces. Thanks for reading. I'm open to design improvements!
 -
Good evening together, Today i have a question to the community. For a new idea i have to collect some further information about the train remote-control 64227. I know there are around 14 steps to control the speed of a train. -7 => +7 (seven reverse and seven forward). But how many degrees will i turn the wheel from -7 to +7? I know it´s endless and in most cases it doesn´t matter, but in this special case i need to know as exact as possible. Does anybody know the degree per step too? With kind regards Martin
-
 Hi all, I have created a video of some generic torque and power insights in relation to trying to create a high performing 2 speed automatic gearbox for a vehicle. The most interesting insight for me was the realization of an optimal operating point for electric motors to achieve maximum output power from the motor. I also derive the power distribution of a split path torque transfer design, and demostrate some experimental results using it. Hope you find it interesting.
 -
 I have recently got my hands on Ni-Zn batteries, which can be considered a compromise between standard alkaline batteries and the Ni-Mh rechargeable batteries. Long story short, they can be recharged and still offer a LOT of power. I was able to get 10 KM/H out of my modded 42124 with Ni-Zn batteries compared to 7 KM/H with standard alkaline Duracell batteries. More details:
 -
Hello Speed Champions fans, my son asked me to build a white Audi R8. Both of us like the Speed Champions sets, therefore I choosen this scale. If you like it, you can support it on Lego Ideas: https://ideas.lego.com/projects/ead4242e-8bae-440d-930d-0c840d86ce5f It is a studless build from standard lego elements and modified City wheels are used instead of Speed Champions ones to keep the height to length ratio more realistic similarly to my earlier ideas. The front of this car is iconic and it was a real challenge to recreate it in this small size. I made lots of versions and I think the actual one with a tricky solution is the best. I tried more solutions to the black side blades too, the actual one was inspired by "LEGO Audi R8 instructions (MOC #96)" by "Jerry Builds Bricks" on Youtube, however I modifed it a bit as I wanted tilted blades similarly to the real ones. Only one sticker is used which is the Audi logo on the front as I'm generally not a fan of the parts with stickers, because of the lack of flexibility in using them with other builds. The set includes the minifigure shown on the main picture on the Lego Ideas. It comes form the set 75873 but with red helmet. I have added a rear wing to make the car more dynamic. It differs from the custom Audi wings, but I think it fits to the style of the car and to the side mirrors. Audi_R8-04 by László Torma, on Flickr Audi_R8-05 by László Torma, on Flickr Audi_R8-02 by László Torma, on Flickr Audi_R8-03 by László Torma, on Flickr
-
 I wanted to power static Mindstorm builds at shows/events through wall power instead of rechargable AA batteries. I was going to design my own AA battery adapters then I found these on Thingiverse. They came in STL files that can be 3D printed. You only need to print two per Mindstorm unit. They have a nice opening to feed the wires through. AA Battery Eliminator by movotrab: https://www.thingiverse.com/thing:3160060 I had to make a small notch on the battery cover for the wires to come out. From here you connect to a 9V DC wall adapter.
 -
Baby Porsche or VW Beetle tuning? This is a fictitious race car, I hope you like it :) You can support it on Lego Ideas: https://ideas.lego.com/projects/68cb5ef6-6e2c-40fc-9dca-0e4b7f3fe64a It is a studless build in Speed Champions scale, but with City wheels. I used only standard LEGO elements, the slopes with stickers are part of the set called 1968 Ford Mustang. Baby Porsche 01 by László Torma, on Flickr Baby Porsche 02 by László Torma, on Flickr Baby Porsche 03 by László Torma, on Flickr
-
Hello, let's start the race! It is my own hypercar concept with a minifigure. I reused some details of my earlier idea called "Hypercar concept 1", but I wanted to build this car even more dynamic. It is a studless model built from standard LEGO elements. The overall size is similar to the Speed Champions sets, but the wheels are from City sets as I wanted to keep the height to length ratio closer to the real sports cars. If you like this car, please share and support it on Lego Ideas: https://ideas.lego.com/projects/146d40fc-49de-4af5-8173-4c73892a003e Many thanks! Street racer 01 by László Torma, on Flickr Street racer 04 by László Torma, on Flickr
-
 I'm trying to build a waterproof LEGO (power-) boat using a 54779 Hull. Have already attached the hull to the deck using silicone but haven't found a way to build a hatch on top of the deck in order to: 1. Protect the electronics inside and 2. be able to easily remove the deck to switch the battery inside the boat on and off. Just covering the deck with base-plates is (unfortunately) not enough. Water is still finding a way inside. Putting plastic foil under the base-plates is a mess. The remaining option (so far) is to make a silicone mold which then works as a rubber strip between the deck and the baseplates to stop the water from going under the baseplates. Definitely not a method with guaranteed success. Anybody any tips? https://drive.google.com/file/d/168JsCBVT6ALASfuV-NYymiWoyGaMogaN/view?usp=sharing
 -
 Hi everyone BuWizz team has prepared another competition, more details below: PRIZES 1st PRIZE: Porsche 911 RSR + 1 BuWizz 2nd PRIZE: 2 BuWizz 3rd PRIZE: 1 BuWizz RULES -Show with your MOC the POWER of BuWizz Examples: lift a heavy object pull a car push a sofa fly a helicopter drive fast, etc... You must use BuWizz START & END Competition strats on Wednesday 20.02.2019. All entry videos will be excepeted until 23:59 h CET 20.03.2019. HOW TO APPLY Want to participate in our Competition? Apply now and we will enroll you as a contestant. After that, all you need to do is build your model and record a video of it do amazing stuff ? APPLY NOW CHOOSING A WINNER 5 independent and respected judges from AFOL community will choose the winner, and the 2nd and 3rd place runner ups. DECLARING A WINNER We will post the name of the Winner on 1st of April 2019. We will contact the winner by mail so please be careful when applying for the competition. More details on BuWizz website: https://buwizz.com/competition-the-power-of-buwizz/
 -
Hello, feel the speed! It is my own hypercar concept inspired by real hyper and supercars. It is a 6 studs wide, studless model built from standard LEGO elements. The overall size is similar to the Speed Champions sets, but the wheels are from City sets as I wanted to keep the height to length ratio closer to the real sports cars. It can be combined with my other MOC Hybrid Truck which will be available on LEGO IDEAS soon too. If you like this car, please share and support the it on LEGO IDEAS: https://ideas.lego.com/projects/44e6dbbf-734f-4b38-84c7-2075b09495bb Many thanks! LEGO Hypercar concept1-02 by László Torma, on Flickr LEGO Hypercar concept1-01 by László Torma, on Flickr LEGO Hypercar concept1-03 by László Torma, on Flickr
-
Location: D04, Terrial Minor Tags: Vehicle, Land Vehicle Job: Driver Start Log: Fairly standard assignment: patrol Terrial Minor and make sure Kawashita or Octan has not been completing any operations there. This new Titanium Thunder hover speeder made it fun though, man can that thing move! See more pictures here.
-
 Not really, but I found out that the motors in my GX EV3 peform better in IR Control mode than how they do in my program, and I believe that it is because the motor power is different. Each block in the EV3 programming software that moves the motors has a digit for how much power each motor should have. I'm wondering what this digit is in IR Control mode, because the motors act much better in this mode than how the do in the program. If anyone here knows the power of the motors when the EV3 brick is in this mode, please reply as soon as possible. It would be very appreciated.
 -
Hey guys, thought I'd try to flesh out my CCBS skills for once. I was really handy with the G1 constraction system, but with CCBS it just doesn't feel like things fit together right for me yet. And then I saw the Rebrick.lego.com contest. I absolutely love Bionicle, and I would kill to have a signed art book and a complete G2 collection. But murder is illegal, and wouldn't get me the signed art book, so I had to build. I think I have the legs and body down pretty solid, I might add wings to it, but I'm not feeling like it's done. Any criticisms or advice? This is the main body shot. I don't have the mask of ultimate power, since I can't find any of the new sets at my Target, ToysRUs, or Lego Store, but I made do with what I have. And this is a close up of one of the hands. I still haven't built any weapons for Makuta, Lord of Shadows, but it's possible to place them in his hand due to a technic hole from the technic beam w/ ball joint I'm using to support the thumbs. One thing I'm really worried about is filling out the stomach, below the chest. I built this off of a heavily modified and stripped General Grievous, which gives it sizable bulk, but it does lack attachment points for more shells. Photo for scale. He's more than twice as tall as Tahu, and probably uses 4 times a many pieces. I don't have a cape large enough in my collection for him, unless I decide to cut up a t-shirt, which I don't have any black ones to use. This MOC is in essence my farewell to Bionicle, in the wake of its cancellation. Any criticisms? I want to get this thing polished up before I enter it in the contest.
-
So anyone else here on Eurobricks watch tokusatsu? Well if there are what tokusatsu shows/movies have you seen?
-
I have long awaited the moment that two race buggy motors would be in my reach, as they are quite expensive now... and I also bought the Lego Technic lipo battery two years ago. The perfect recipe for a small lightweight racer! Read the rest of the story at: http://www.moc-pages.../moc.php/424516. For now, there's just these two pictures and two videos. To post the photos on Eurobricks, I had to serieusly resize them. If you want to see the better quality images, just click this link: http://www.brickshel...ry.cgi?f=561899. All photos can also be found on the MocPage link, and can also be hosted from MocPages. This is because brickshelf has sometimes a rather long posting time. Please do not use THESE EXACT photos on another website, they are really at 10% of their real quality because Eurobricks requests it. The brickshelf photos are really better!
-
Boxcab Shunter Hi guys, I've just finished a new Power Functions boxcab locomotive. I hope you guys like it. It was my first ever Power Functions MOC and I think it came out quite well. Here are the specs length: 16 bricks (with couplings) hight: 11 plates colour: yellow motor: PF train motor battery box: AAA weight: 314,1 gram But without further ado, Here are some pictures of it! Front view side view Motor How I hid the battery box And how I hid the reciever the only problem is that it doesn't have any wagons... And I have zero idea about what to build for it. I thought about some giant boat trailer or a flatbed but I scrapped those ideas. Bye
-
I'm not really a regular truck builder, but I like to think of new systems that do not exist in real life yet but that do improve the life of, for example, truck drivers. When something like a big tarmac machine has to drive onto a trailer to go to the next building site, the slope of the trailer should be very small. That small slope is nowadays achieved by making very large ramps that fold up vertically for transport, causing massive air resistance and therefore unnecessary fuel consumption. A way to make these ramps shorter is to decrease the bed height, because that asks for smaller vertical ramps. The second option is making the wheels below the bed smaller. But decreasing the wheel diameter increases the rolling resistance. Another way to solve the problem is placing the bed betweeen the wheels, so that it can be much lower, but that limits the cargo width: the tarmac machine can never be wider than the bed width, which is not handy if truckdriver x has to transport many different tarmac machines. Read the rest of the story and how I solved these problems with my my DAF CF with 3-axle trailer on http://mocpages.com/moc.php/421622 Or watch the video here: To give an idea of the model, I have posted one photo below, the others can be found on http://www.brickshel...ry.cgi?f=560197 in a better resolution.[/font][/size]
-
Four wheel drive on Lego Technic cars with small wheels is hard to realize, as they become relatively too wide (which is ugly) and the ground clearance is also compromised. The problem then is: how to get the same grip back with only rear wheel drive? Then you need to push something 'extra' in the back of your already crammed, small nice-looking vehicle... This concept is an approach to keep this 'something extra' as small as possible while giving awesome and unexpected grip to the car. (At least, I was astonished by what it achieved!) Instead of typing a lot, I've put it all into a video with the theory of how it all works at the back of the video to let the 7 billion minus 1000 viewers that are not interested into more advanced Technic stuff experience how it works in practice on a 2 cm (that is: inchy) thick ice floor. As for the car, it is built from Power Functions spares as all my L-motors (which have quickly become the main workhorse for every Technic builder) are ehm... in use. That is why you find me using a geared up XL motor, which gave me memories of the good old times when the poor knob wheel parts splattered around. Sharp images of the car and mechanism explanation can be found on: http://www.brickshel...ry.cgi?f=564319. On MocPages (beware, there is a piece of code there that simply destroys anything such as image resolution on .png files...) http://www.moc-pages.../moc.php/428881 Video: I finally have found PovRay so (with many thanks to all those who make that software) I can present a high-quality render:

(640x480).thumb.jpg.97b97cf52b621694f8ece5448230e728.jpg)