Search the Community
Showing results for tags 'custom'.
-
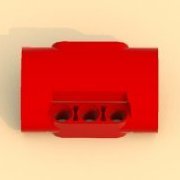 Please comment, request and discuss about LDD new parts here Now this topic is intended as a support area for the LDD New Parts thread Ok, let's do this. Inspired by @M2m thread I've started wrting a 3D Studio Max script that allows importing, editing and exporting LDD brick geometry and their XML data. They are rough, some geometry data is unknown (this doesn't have any visible or noticable impact so far) but it works and here's the result (click for bigger pictures): Fixed connectivity issue of 90 deg tube (pretty popular piece for 2018/2019 technic sets): Custom 3x5x2 panel that I saw in one of the Chinese custom (not copied from Lego) models: I was curious how my MOC would look like with more realistic, narrow tires so I shrinked Unimog tire to fit on 42029 rim. Dimensions: 81,6 x 30: For the tractor enthusiasts - how could a Class tire look like on an Arcos rim - also that Chinese model. Dimensions: 64,2 x 20 (I've made is slighty bigger than original tire): Moved some parts around and fixed default orientation of some of technic panels:
 -
Hi guys, For some time I've been working on these sticker sheets to use in various Lego Star Wars builds. It is primarily made for the Factions RPG here on Eurobricks, but I thought I'd share them with everyone. The sheets are in A4 format, and it is very important to print the PDF sheets at 100% size, since they are exact same size as official Lego stickers... Download Misc. Sticker Sheet 1 here Download Aurebesh Sticker Sheet 1 here Download Imperial Sticker Sheet here Preview below: Let me know what you think - comments, critique, and requests for future sheets... /DB
-
Nov. 2015 Initial Post: Hello Eurobrickers! I have a great announcement for you guys, especially those who are interested in Cavegod's UCS AT-AT. Over the past month or so, I have worked a countless number of hours in order to bring all of you guys something that this MOC deserved ever since its creation, a proper instruction manual. Yes, that's right, the famed issues of LDD will no longer be apart of this project thanks to this manual. Now I'm sure you're wondering, how big is a 6000+ piece manual? Well, to answer that question, the manual is a massive 1,089 pages. No that is not a typo, ONE THOUSAND AND EIGHTY NINE PAGES!!! A special thanks goes out to both Cavegod and drdavewatford. Cavegod designed a masterful MOC, one of the greatest ever, and drdavewatford was kind enough to allow me use of some of his photos throughout the manual. This could not be achieved without you guys! Enough of me talking, here are some images directly from the manual: (Initial images removed for clarity on update) Oct. 2020 Instructions Update: Almost five years after its initial release, I'm thrilled to announce that the remastered instructions for Cavegod's AT-AT are complete! The instructions feature updates that make this build SO much easier and affordable. The most important things that are included in the updated instructions are: Redesigned Legs. These new legs have a technic interior and erase any issues that occurred with the original leg stability Reinforced Body Frame. The handle is now incredibly sturdy and the technic structure that is housed within the body is significantly more sturdy Cheaper Pieces. After several years it was time to swap out the expensive parts. The parts and MOC are now much more affordable. Display Base. What MOC would be complete without a display base? I designed a large black display base that includes technic framing to snap in the feet, a much better alternative to the old method of tires within the feet. The base also features several snow-covered rocks to imitate a Hoth landscape The MOC now consists of 8,935 pieces and measures: 34" long 18" wide 30" tall The instructions are now reduced down to 550 pages. More information about getting the instructions and free access to the parts list can be found here Pete and I are super pumped to be sharing the update with you, and I cannot understate how much better they've made the build experience and final MOC. If you already own the instructions after getting them from me in the past, you should have received an email detailing how to obtain the updated instructions. If I missed you just shoot me a PM or contact me via email at alloutbrick@gmail.com and I'll get your upgrade over to you. Here's some photos of the update:
-
Been looking at capes that Lego should make: And for Bane: And kilts:
-
I wanted to show off all of my purist figs, because I have some that aren't TV show or movie characters, or Superhero figs, so here they are. I will be updating this constantly with new figs. I'm moving all my figs to this topic instead. NOTE: I do not take of minifig arms, as it breaks the torso, but will take off hands, and occasionally legs too. I will list the parts of each minifig (Hair / Helmet / Hat, Head, Neck, Torso, Hands, Legs, sometimes hips, etc.) Hope you enjoy the figs! [001] Shazam! [002] Bizarro V1 [003] Kid Flash [004] Yondu Udontu [005] Bizarro V2 Thanks for looking! MANY more purist figs coming your way soon!
-
 NEW: 2019 Silver Guards Elfendaemmerung: Wardancer’s Custom Wood Elf Army Current Status: Initial release 9. August 2016: 137 Elves, 69 pictures - 11 infantry regiments - 4 cavallery regiments - 3 war machines - 8 magical creatures - 9 individual characters This army has grown over the last 3 years. It includes many custom products and many customization techniques I invented myself. Here you can find detailled pictures of every unit. Elfendaemmerung - Wardancer's Custom Elf Army by MWardancer, auf Flickr Table of Contents Daylight Clans: Deepwood: A noble and sophisticated clan clad in dark green and silver. - Silver Lords - Archers - Swordmen - Iron Watch - Silver Guards - Sisters of Ex Orcis - DESTRO - Deadly Spear Thrower - ELVEREST - Elven Repeating Spear Thrower - MEADS - Modular Elven All-round Defense System - Prince Maerendil on Findelhuv - Prince Baerenn on Snaefellsness the Bear - Lord Maeven on Felsentritt, carrying the Goddess Banner - The Nameless Assassin - Nemesis the Archdruid - Tree Demon (summoned) - Dryad Fiérce and the Sylvaneth Sisters (summoned) Maidens of the Golden Glade: A proud and wild sisterhood wearing brown and gold. - Maidens of the Thorn - Riders of the Fast Bark - Golden Guards - Avengers of Oak - Veorra the Huntress Greenfield: An high-spirited kin in olive green. - Swordmasters of Gieven - Greenwood Rangers - Lords of the Harvest Twilight Clans: Elvnoi Dozor – Sinister folk also known as Gray Elves. - Princess Evadia on Swivt the Hippogriff - Protectors of the Inner Sanctum - Blades of Gray Everlight Clans: Arcane Royalty – Magical individuals in colorful robes. - The Everqueen - The Archmage Couple: Filin and Esan - The Uneven Brothers: Archmage Neapel and General Nepal ___________________________________________________________________________________________________________________________________ Daylight - Deepwood Clan - Deepwood by MWardancer, auf Flickr Silver Lords Riding Elven all-terrain steeds, these heavily armored noblemen break enemy lines when force is necessary. Silver Lords by MWardancer, auf Flickr Silver Lords (2) by MWardancer, auf Flickr Silver Lord by MWardancer, auf Flickr Archers These versatile archers are the backbone of the Elven army. If they cannot reach you, their arrows surely can. Archers by MWardancer, auf Flickr Archers (2) by MWardancer, auf Flickr Archer by MWardancer, auf Flickr Archer by MWardancer, auf Flickr Swordmen When the arrows cannot fly, swords will find their place. Swordmen by MWardancer, auf Flickr Iron Watch These heavy foot soldiers patrol the borders of the Elven kingdom, prepared to challenge man and beast with their versatile long spears. Iron Watch by MWardancer, auf Flickr Iron Watch by MWardancer, auf Flickr Iron Watch Commander by MWardancer, auf Flickr Silver Guard Trained for the defense of the realm, these elite guards carry long halberds to keep the enemy at bay. They protect valuable assets or points of strategic value. Silver Guards by MWardancer, auf Flickr Silver Guard by MWardancer, auf Flickr Silver Guard (2) by MWardancer, auf Flickr Sisters of Ex Orcis Even the hardest steel cannot harm intruders that partly exist in higher – or in most cases: lower – plains of reality. For this reason, the Sisters of Ex Orcis have specialized in making arrows from the famous Dragon Glass. Piercing through every thinkable and unthinkable form of ethereal or demonic protection, these elite archers banish supernatural creatures when conventional measures fail. Sisters of Ex Orcis by MWardancer, auf Flickr Sister of Ex Orcis by MWardancer, auf Flickr DESTRO – Deadly Spear Thrower “Griffin” Even though Elves have become one of the world’s leaders in exporting weapons, their own needs should not be forgotten. DESTRO is their tool of choice when normal bows reach their limits. Unlike the MEADS, which wreaks widespread havoc at a very long distance, DESTRO is deployed for medium-ranged precision shots. DESTRO "Griffin" - Deadly Spear Thrower by MWardancer, auf Flickr ELVEREST - Elven Repeating Spear Thrower When the firing rate is of the utmost importance, Elves use the ELVEREST system. Its primary functions include Crowd Control, Infantry Stop and Anti Siege. ELVEREST - Elven Repeating Spear Thrower by MWardancer, auf Flickr ELVEREST - Elven Repeating Spear Thrower (2) by MWardancer, auf Flickr ELVEREST - Elven Repeating Spear Thrower (3) by MWardancer, auf Flickr MEADS - Modular Elven All-round Defense System Initially designed as an answer to the proliferation of evil airborne creatures, the MEADS has quickly become a true all-round Elven weapon. It is known as a long-range cavalry killer and effective troll deterrent. The prospect of encountering a sudden rain of bolts reinforced with Elven steel is something even medium-sized dragons frown upon. Due to its modular nature, versions with up to 10 launchers can be built if mobility is not of primary importance. MEADS - Modular Elven Allround Defense System by MWardancer, auf Flickr MEADS - Modular Elven Allround Defense System (2) by MWardancer, auf Flickr MEADS - Modular Elven Allround Defense System (3) by MWardancer, auf Flickr MEADS - Modular Elven Allround Defense System (4) by MWardancer, auf Flickr Prince Maerendil on Findelhuv In a traditional Elven anthem it says: “These hooves are made for walking and that’s just what they’ll do, yes one day these hooves are gonna walk all over you.” It is horses like Findelhuv they sing about. Some say he crushed his first orcish skull when he was still a foal. Some say he bathed in the Everqueen’s blessed springs. The truth is only known to Prince Maerendil, who has guided his four-legged comrade into countless victorious battles. Prince Marendil on Findelhuv by MWardancer, auf Flickr Prince Maerendil on Findelhuv (2) by MWardancer, auf Flickr Prince Baerenn on Snaefellsness the Bear Only few have ever mounted a white bear and lived. Snaefellsness was the only exception known among Elves and Baerenn was the only rider he accepted. After the battle of the northern plains, he became the first bear ever to be honored with the protective rune of Griss-Ly. Prince Bearenn on Snaefellsness by MWardancer, auf Flickr Prince Baerenn on Snaefellsness (2) by MWardancer, auf Flickr General Maeven on Felsentritt, carrying the Goddess Banner Carrying the Goddess Banner is an honor only few can ever hope to achieve. When general Maeven, battle-tried since the ambush on Viéd Nahm, and his steed Felsentritt enter the battlefield, lesser beings tremble before the sacred aura the banner exudes. Fellow elves, on the other hand, are said to feel in increase in courage and morale whenever her symbol is present. aven on Felsentritt by MWardancer, auf Flickr Lord Maven on Felsentritt (2) by MWardancer, auf Flickr Lord Maeven on Felsentritt (3) by MWardancer, auf Flickr The nameless Assassin To many, the mere idea of an Elven assassin seems absurd, even obscene, in regard to the high standards of elven ethics. However, for some... delicate matters, nameless assassins are needed. This silent warrior answers directly to the Everqueen and to her only. The Nameless Assassin by MWardancer, auf Flickr Archdruid Nemesis Many conclude that Elves embody qualities of a forest on a friendly summer's day, such as hospitality, ageless wisdom, peacefulness and dignity. However, most who were unfortunate enough to travel a forest in a stormy night will agree that forests also have a threatening, archaic side. In times of war, Wood Elves tap the forests primal rage and direct them. The Archdruid is the key to the forest's dark powers. After opening the gates for earthly creatures, he restores the mobilized energy by sacrificing enemies in the swamp Nemesis the Archdruid by MWardancer, auf Flickr Dryad Fiérce and the Sylvaneth Sisters (summoned) With the orc problem becoming more and more pressing, the druids had to resort to calling the dryads. These vile creatures usually slumber in the harsh, barren parts of the forest. Once summoned, cold hatred makes them rise and move towards the enemy. A shell of wood hardened by the ages makes them virtually impenetrable to most of the weapons used by mortals. With claws as hard as steel they stab their enemies without mercy. Dryads move faster than their big brothers, the Tree Demons and they usually travel in groups. Fiérce was the first to be called, and she will be in a particularly bad mood until her younger sisters show up. So if something whispers and crackles in the woods tonight, better not suppose it is the forest fairy... Dryads - The Sylvaneth Sisters by MWardancer, auf Flickr Dryad Fiérce by MWardancer, auf Flickr Dryad Fiérce (2) by MWardancer, auf Flickr Sylvaneth Sisters by MWardancer, auf Flickr Sylvaneth Sister by MWardancer, auf Flickr Tree Demon (summoned) Please don't step on the trees, they might step on you. Often referred to as Forest Balrog, these Tree Demons are not to be messed with. Never ever approach them with an axe. If a tree has a circle of mushrooms around it, it is most likely a tree demon. They enjoy entangling their enemies in their branches and ripping them apart. Many tree demons befriend owls who serve as their air reconnaissance. Tree Demon by MWardancer, auf Flickr Tree Demon (2) by MWardancer, auf Flickr Tree Demon (2) by MWardancer, auf Flickr Daylight: Maidens of the Golden Glade Clan - Maidens of the Golden Glade by MWardancer, auf Flickr Sisters of the Thorn Riding into a thorny hedge is an endeavor most will never forget. Carrying the longest spears in the kingdom, Maidens of the Thorn block valuable passages for good. Even mounted enemies think twice before they risk running into the pointy end of this array. Sisters of Thorn by MWardancer, auf Flickr Sisters of Thorn (2) by MWardancer, auf Flickr Sister of Thorn by MWardancer, auf Flickr Sister of Thorn (2) by MWardancer, auf Flickr Riders of the Fast Bark In the vast lands of the Goddess’ kingdom, fast riders are essential. When trouble is brewing, the Riders of the Fast Bark are the first ones to arrive. Riders of the Fast Bark by MWardancer, auf Flickr Rider of the Fast Bark by MWardancer, auf Flickr Mothers of Pearl With sturdy horses armored in gold, these experienced warrior beauties break into enemy lines when defensive measures are no option. Mothers of Pearl by MWardancer, auf Flickr Mother of Pearl by MWardancer, auf Flickr Avengers of Oak After the cowardly attack on Oakenfold, an order of fighters was founded to keep nature’s righteous rage alive. These determined warriors are the backbone of the Golden Glade clan. Avengers of Oak by MWardancer, auf Flickr Avenger of Oak by MWardancer, auf Flickr Veorra the Huntress A sight as pleasant warm autumn forest, Veorra the Huntress leads the fierce Maidens into battle. But do not be misled, her arrows will sting you right into your heart. Veorra the Huntress by MWardancer, auf Flickr Veorra the Huntress by MWardancer, auf Flickr Daylight: Greenfield Clan - Greenfield by MWardancer, auf Flickr Swordmasters of Gieven These skilled swordsmen run into battle wielding their giant two-handed swords. Without shield or heavy armor they swiftly move across the battlefield when hitting things hard is essential. Swordmasters of Gieven by MWardancer, auf Flickr Swordmaster of Gieven by MWardancer, auf Flickr Greenwood Rangers The all-terrain, fast-moving Greenwood Rangers know their way through the fields like no one else. Greenwood Rangers by MWardancer, auf Flickr Greenwood Ranger by MWardancer, auf Flickr Lords of the Harvest These noblemen have sworn to protect the fields’ rich fruit. Protected by the Rune of Elvesgiving, these agile swordsmen are notoriously hard to hit. Lords of the Harvest by MWardancer, auf Flickr Lord of the Harvest by MWardancer, auf Flickr Twilight: Elvnoi Dozor Clan - Elvnoi Dozor by MWardancer, auf Flickr Princess Evadia on Swivt the Hippogriff No one understands how this partnership ever came to pass. Sublime, untamed, even tremendous – maybe it was these attributes that unified beast and mistress. Today, everyone who sets foot on Elven land should remember that it is not only a place for a princess to conquer the skies, but also a hippogriff’s territory. Princess Evadia on Swivt the Hippogriff by MWardancer, auf Flickr Princess Evadia on Swivt the Hippogriff (2) by MWardancer, auf Flickr Princess Evadia on Swivt the Hippogriff(3) by MWardancer, auf Flickr Princess Evadia on Swivt the Hippogriff (4) by MWardancer, auf Flickr Protectors of the Inner Sanctum Darker times, after all, called for darker elves. No, not for evil ones, but for the toughest of them all. Protectors who walk in the moonlight as swift as in the sunshine, who have sworn by the Golden Stag to protect the Everqueen’s inner sanctum. The recent encounter with the undead demands their presence at the border and so they march against an unknown enemy. Protectors of the Inner Sanctum regiment by MWardancer, auf Flickr Protector of the Inner Sanctum by MWardancer, auf Flickr Protector of the Inner Sanctum (2) by MWardancer, auf Flickr Iron Watch Commander by MWardancer, auf Flickr Blades of Gray In the gray hours between night and day, when perception fades to gray and senses tire, these riders do their work. Their blades strike while their targets still wonder if the masked horse is one of a thousand shadows in the sleepy forest. Blades of Gray by MWardancer, auf Flickr Blade of Gray by MWardancer, auf Flickr Everlight: Arcane Royalty The Everqueen Some say her wings are real. Some say they are of magical nature, like the flowers she allows to blossom wherever she is present. Some think the wings are simply part of her artful attire. Others claim they are merely an allegory on her majesty's arcane powers and timeless beauty. Be as it may, most who have the honor to come before her throne, the broken heart of the forest, do not question the Queen’s ability to banish demons with a gesture of her tender hands. The Everqueen by MWardancer, auf Flickr The Archmage Couple: Filin and Fenian As an expression of the self-complementing polarity of nature, the archmage couple’s power is only surpassed by the Everqueen herself. With direct access to the elements, these two give light whenever darkness tries to spread. The Archmage Couple: Filin and Fenian by MWardancer, auf Flickr The Uneven Twins: Archmage Neapel and General Nepal If their stories were unknown and their names not famous, no one would guess that Neapel and Nepal were born as twins. Whereas the former is said to have summoned his beloved spirit wolf at the age of four, the latter ins known to have wrestled forest lions as an infant. Be as it may, to most defeated enemies it seems irrelevant which part of the inseparable couple has dealt the fateful blow. The Uneven Twins: Archmage Neapel and General Nepal by MWardancer, auf Flickr
 -
Hi guys today I'm gonna show my custom LEGO SWAT TEAM. You can see ALL the details in this video where I'm reviewing them. Hope you will enjoy it , PLEASE LIKE ANS SUBSCRIBE TO MY CHANNEL, thanks for supporting.
-
This is a topic for purist custom minifigures from other themes, not a superheroes\villains, Star Wars and TV-shows characters. Rules and tips are here. Enjoy!
-
The gold pieces of my Bionicle sets from 2003-2005 in time "tarnish" and I don't know what to do to stop or revert the process. I tried bicarbonate, lemon juice, ammonia, peroxide, soap, salt, leaving a piece in the sun for a couple of hours, casting it in boiling water, putting it in a peroxide glass and leaving it in the sun. No results at all. I was considering painting my Avohkii, but I don't know how to achieve the perfect color. Do you know what paint/dye I might use? I want the piece to match the original 2003 gold from LEGO. Thank you :)
-
I built different hot rods and T-buckets in the past few months: a Green T-bucket, a Tow Rod, a classic black Roadster, Show Rods... ...but this time I built a unexpected machine... a '23 Ford T-bucket in pure Steampunk-ish style. This little machine features classic T-Bucket elements - an oversize small-block V-8, a short and reinforced chassis, drag slicks, "T" style radiator - mixed with Steampunk characteristics. Black, gold and brown colors are really a great combo and they seem looking tasteful on this little strange vehicle. Even if there are two pipes above the engine, necessary to exhaust the steam, this "T" can also use petrol, it's a sort of hibrid car...in fact on the back you can see the gas tank. Here the Steampunk "T" is photographed on my Garage. All the best and happy building! Andrea - Norton74
-
 Hello, I have been building with Lego technic and power functions for about 2 years now and like many others have discovered that the 7.2v of 6 rechargeable batteries is sometimes not enough for some creations. One day I found a old TYCO RC for free, looked at the battery and saw,"9.6v" I thought "SCORE!" and started making a adapter for it. I made this "Rat Rod" to test out how the extra 2.4v effected fast models. So enough talking here are the pics IMG_6020 by JJ2Sam, on Flickr IMG_6021 by JJ2Sam, on Flickr It uses: . Servo for steering. . 2 L-motors geared 3:1 for drive. . and obviously 1 custom battery "Box" The car was literately built around the Sbrick and has almost no open space in the chassis and it is very rigid for how small it is. The steering is regular rack and pinion and the L-motors were coupled together because there was sadly no room for a differential. I have not measured the top speed but I think it is around 6-10mph on a full charge. When I built the bodywork I tried to make it look tough and powerful almost like an armored bank vehicle. The battery almost took up all the space on the top so I had no room even to make a rough interior. I am not at all happy about the hood because of the steep angle and gaps but this was built just to test out the battery not to win a beauty award IMG_6024 by JJ2Sam, on Flickr Almost forgot the most important picture. Here's the video All pictures and more are on my Flickr account LINK Thank you for reading
 -
Warning: This thread might cause discomfort with your current dragon situation. Viewer discretion is advised. The Dragonification of Smaug the Wyvern Ever since the discussion whether Smaug was a wyvern or a dragon came up, I felt the need to give arms to the ultimate LEGO creature. According to some, dragons without arms are merely wyverns and therefore sad creatures. Would I dare to lay hands (pun intended) on such a marvellous creature? Would I dare drilling holes in it? Modified Smaug side by MWardancer, auf Flickr Modified Smaug total by MWardancer, auf Flickr Modified Smaug - The Last Thing You Ever Shall See by MWardancer, auf Flickr Modified Smaug showing his new claws by MWardancer, auf Flickr Modified Smaug from above by MWardancer, auf Flickr Customization notes: Buying two dark red arms is cheap and easy, so I decided to use techniques which would mess up the arms and not Smaug's body if things go wrong. When customizing a minifigure, you have to throw away parts sometimes because you destroyed them with paint, glue or drills. You cannot do that with an expensive dragon torso. Unlike the green fantasy dragon or similar molds, Smaug's front is much slimmer and curved. There is no flat straight surface where you could simply attach dragon arms. They would have big gaps and wrong angles. So I needed to carve and sand the arms to fit a threedimensional plain. This was easier than I thought. Also at this point there is no risk damaging the body yet. Then I drilled the holes to attach the arms. This fortunately worked well. Attaching the arms afterwards took over an hour because the pins I attached would not stick. The arms cannot move. It is impossible to achieve that because of the uneven shape of the torso.
-
Hi! Does anyone any on know where to find accurate decal templates for torso, legs and arms? I would be really cool if it is already scaled to minifigure size. That would save me alot of time. Thanks! Aaron
-
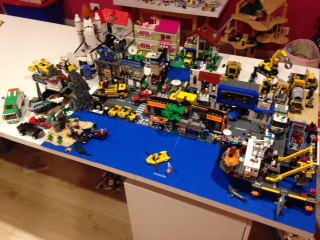
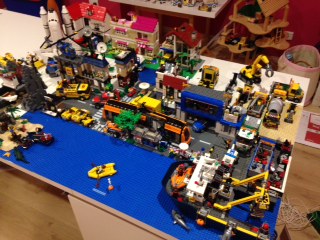
Long Story Short: I have long had hopes for how I wanted my town to turn out, and built a huge table that I dreamed of filling with custom creations and an elaborate layout… However, after many years of collecting lego, it seems as though not even the least of my plans will EVER be fulfilled. I have posted photos of how my layout looks currently: messy and full of holes that rely on the idea of custom buildings. What I need is some advice on how to best arrange my present collection, using only what I've got (some extra parts permitting) to make the most of it, but allow for effective additions down the track. I am also open to suggestions for custom builds that I can start and complete with what I've got. Short story long: All of the sets I own are pictured, all complete, but some with parts floating around elsewhere in the room. In addition to what is shown, I have the 7744 police station (demolished because I couldn't stand the blue windows and unfinished structure) the 4956 creator houses (sacrificed in an attempt to build the large red-roof house at the back) and the bridge from 7900 heavy loader set. To be honest, the town looks pretty lost without the police station and random emergency vehicles floating around. If anybody has ideas on how to repurpose the police station or photos of fitting, alternate designs would be great. In the past, I've gotten sick of seeing things the same all the time, and tried to make little modifications here and there which I could never finish properly with the parts I had. Most of those have been reverted, but I've started too many projects and finished none. The simplest plan I had for this corner of the town was to have a marina running along the water's edge, a port where the large boat is parked, and a railway line from the port wrapping around the outside edge of the table. The shopfronts you see, in a mad rush, were placed around a makeshift square, lane, and the idea was to have port vehicles drive up and around the back of the port, and exit along the water. All of which I can guess is very space ineficcient, and is holding up many other decisions for my layout. A proper automotive shop is currently in the workings to replace the car dealership, but that's it. I have no idea whether what I'm doing is right or wrong, but would greatly appreciate some advice to straighten my thinking, and give me a cleaner slate to work with.
-
Hello everyone 1- I hope this subject is in the right place. 2- Sorry for my bad english I think you all have at one time or another during a construction, wanted to have a room that does not exist to carry out your project. So, you've probably imagined several over the years. 1- I imagined myself to create several in recent days (others to come) You can find them on Flickr HERE you can react on what you see. 2- Would you like to propose some already, in 3D or other? I opened a group for: - the techniques, - tutorials - new coins 1 month ago on Flickr HERE 3- Do you have any ideas? => Could you describe by embellishing an image that you would like to have? I can try to create on request if my limitation 2D (photoshop) allows it. By the way for your information, I also realized baseplates that are on Flickr. I would like your opinions, your reactions, your proposals ... TYVM Some exemples:
-
So I've decided to start painting minifigures. I really need some help on figuring out how to remove printing and what paints to use. Help would be appreciated.
-
 Hey, guys. I’m trying to gather LEGO parts to be used for stop motion brickfilming, but I heard using blank LEGO minifigure heads is highly advised. I was intending to do a LEGO Scooby-Doo brickfilm, but I need to know someone who can add custom face decals to blank minifigure heads for Velma Dinkley. The custom face decals I need for Velma are dual sided. One with just glasses and freckles on the first side and the other with freckles only and without glasses. First, I need to know where I can find face decals from LEGO Scooby-Doo minifigures online. That way I can find a Velma face pattern so I can manipulate the image with Gimp. Then, I can show whoever can help me the patterns I want on both sides of my blank minifigure heads. Please let me know who can help me. Thanks!
 -
After couple of years working on a not-car projects I picked up BMW i8 as my next project. This time I plan to post a work-in-progress pics here as well. Just for fun I think 05-May-2018Started with side. It has interesting door shape - both - the front and the end are sloped. Let's see how this construction will flow together with 75 degree inverted slope 06-May-2018Yep - it flows very nicely with 75 degree inverted slope. But - wow.. the struggle with the door end and the section around it. It has three different angles there in a small area. So complicated. I bet I'll return to this section 06-May-2018Continued with front grill. Those small neck brackets are really nice. They give the narrow gray line just above the kidney-grill section. And at the bottom the bumper will cover half of the plate, so the lines both will be as narrow as it can get. Also - a small update at door window line. Implemented the half plate increase (do not mistake that with half-stud offset). This gives the window line much smoother increase from front to the rear 07-May-2018Continued with headlights. There isn't much space to work within but somehow I managed to "break" the headlight in two angles and cover the side of it. 08-May-2018Something unusual. Normally - when I redo a part of my MOC, it gets more accurate shape, but at the same time it gets more fragile. Not in this case. The headlight outter section and the outter-bottom part of the bumper got nice curvy shape and is even stronger than before. 16-May-2018Changed the bottom of the grill section. Instead of half-covering the lower plate, I changed the entire supporting construction and implemented there headlight brick technique. This gives the desired grill look and the bumper fits there perfectly too. Now I'm struggling with the air intake and the small loop below the grill. Have tried like three or four different techniques, but nothing fits there like I want it to... 18-May-2018 After countless iterations I think I finally got the front air intake right. Turns out - I had to use the smallLEGO Technic panels. The connection is strong and easy. To be continued...
-
 Hi, I would like to show you my new MOC. it is Leadsled, that I once promised to build. 1K - Cutaway Leadsled by Horcik Designs I wanted to build big red car, that would fit nicely on display next to my Tatra T2-603. (visit my Flickr or Scale modelling forum here to find photos of it) It features 4-forward gearbox, working steering wheel, no HOG (it is display model), huge but fake V8, openable doors with locks, openable trunk with gravitational lock (it is too heavy to stay opened) and detachable hood. And loads of minor details and holes. What?! 1K - Cutaway Leadsled by Horcik Designs, on Flickr 1K - Cutaway Leadsled by Horcik Designs, on Flickr This MOC was directly inspired by cutaway technical drawings of cars. In my opinion, all original Technic model were supposed to look like 3D-ized cutaway drawings. Leadsled showtime by Horcik Designs, on Flickr 1K - Cutaway Leadsled by Horcik Designs, on Flickr 1K - Cutaway Leadsled by Horcik Designs, on Flickr 1K Leadsled chassis by Horcik Designs, on Flickr 1K Leadsled Teaser by Horcik Designs, on Flickr Hope you like it. :) More photos on my Flickr Album.
 -
First off, I would like to say that, no, I am not terrible at maths! All shall be explained! (Sorry, this may be quite a lot of reading!) The Back Story: First aspect: Some weeks ago, I was having a general look for sets that might be of interest to me. I stumbled upon a very good deal on the Lego City Bus Station (Set no. 60154). I decided in a spur of the moment purchase to pick up 2 sets, with no real plan… That’s what sowed the seed! Second aspect: In the not so distant past, I had purchased a huge Lego haul from eBay containing many train set items and accessories. In amongst this, was an incomplete copy of the Lego Freight Rail Runner (Set no. 4564) – (maybe 80% complete) – at the time I didn’t really know what to do with it. Over time I harvested the 9V motor, wheels, couplings, bogie plates, wagon parts and straight track – basically all the good stuff! Now, I’m a big fan of seeing people doing set combining! I have never seen anyone attempt something like this! (Correct me if I’m wrong!) The Hypothesis: “Is it feasible to make a decent looking locomotive of any kind, combining Sets 60154 and 4564? – Using minimal significant other parts, but in cases where necessary only using parts I currently have, and not resorting to ordering things. The locomotive should ideally use Power Functions with 2 motors, lights are not necessary. Also, the finished model should be sturdy, strong, and able to be played with by children.” Answer, Was It Possible? Yes, and in my opinion, it turned out rather well. What I attempted to build was a massively simplified Class 37, with much artistic licence! Here is the finished product: Thus, the idea for “60154 + 4564 = 37?” was born! What do you think? Any questions, thoughts, or criticism will be much appreciated. Regards, James :)
-
Hello all you happy lego people! I know I've been away for ages and I do hope I am remembering all the proper rules here so let me know if I screw up and I'll fix it or get rid of it. Sorry to inconvenience anyone just throwing that out. Anyway I have been in the process of casting new custom pieces such as weapons, accessorys, Kits you get it and not gonna lie I do intend to bricklink I know advertisement is a absolute no no on this forum. I am not wanting to break that rule so while I indeed have plans nothing apart from certain projects will be mentioned here not even the name of what I speak of will be on this or any other thread I make. By the nature of this project being mentioned it tiptoes that fine line as is so please do not think I intend to advertise I will do that where it is appropriate I swear. Ok a couple of my projects for this is to have a fellow create some new parts to actually bring some my kits to life. I am makijg rough design sketches for him but I need to know a few parameters of blocks already out there. First up is Pins and their brick plugs. I know that to ensure the pins like on the Astromech body the holes have a slightly thinner inside that opens up to a little larger section to allow the pin to lock in place till you pull them out. My first question is a common one I'm sure but what is the diameter of the two sections of the socket the pin goes into. Next up deals again with the pegs and socket parts but this time in a lateral setup. How close together can a double pin tube like the one on the astromech for it's legs to peg in be with out interference on the pin next to it? Well that covers the most pressing things I need for a sketch. I'll likely have much more soon. Can anyone direct me to a handy place to find the dimensions of bricks, Pins and such? I have some calipers but I trust them mostly with finding diameter of objects I think can fit into a Lego claw. So that's about it for the moment. I do hope this isn't against the rules I mean I have seen custom brick and weapon threads before but I'm not 100% if this falls into that category as these are for 3D printed prototypes That I'll touch up and use resin for. Like I said if I made a mess let me know I'll clean it up ASAP. On the fact Everything is Awesome I do not post anything breaking the rules of the forum. It's against the instructions but we all slip once in a while. Thank you for the time and hope to hear some good feedback if this is indeed the right way to ask. All of you take care and build tomorrow's masterpieces, Plokman
-
Let’s see you guys’ go brick me custom Brickheadz. Here’s mine: (me and my monster) https://imgur.com/a/vnInf .
-
Hey guys, newbie heree. Im just starting to make decal customs and realized that the decals i made looks very paper-ish. Do you guys have a secret recipe for it to look more legit? likee it really looks like it has been printed?
-
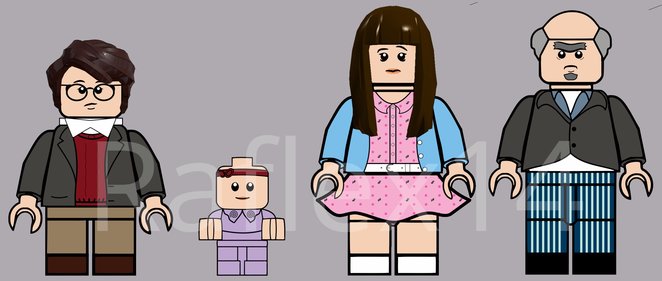
LEGO A Series Of Unfortunate Events Hi, am not sure if this is the correct forum, but i would like to share with you my custom minifigs designs of "A Series Of Unfortunate Events", These are my first Lego designs or decals, so feedback is accepted. I will release the decals in the future. I plan on creating more characters as well as a playset when i have more time. Let me know what do you think of them! :)
.png.12a2b2f48ce2edc64d1714b0b09e243c.png)
.png.10fc462b674f2a531f1fe1d59877f7eb.png)
.png.7f7b9d961fa82a5e995de0668f8d9084.png)
-
 Hello there! I already opened two threads in here about decals, but with the evergrowing amount of designs that I do for Star Wars and a few other franchises, I thought it would be wiser to make a thread where I can show all of my work in a single place. Maybe a few of you find some of my designs useful? I try to make mostly original design, but sometimes, I do imitate the officially released minifigs. Also, some decals are specific requests that I got, like adapting characters to different styles or make specific changes to certain designs. I hope you enjoy them! Lando Calrissian – Cloud City Lando Calrissian – The Force Awakens Era (based on a Lego Star Wars animated series) Captain Antilles – Tantive IV Galen Erso – Lah'mu Farmer Outfit Grand Admiral Thrawn – Fixed Rank Insignia Nien Nunb Ahsoka Tano – De-Cloneified Padawan Look You can also view my collection of selfmade decals on my decal site. As I mentioned, I also do requests as long as I like them and feel like accepting their challenge, so don't be shy to ask if you need anything Star Wars related! Since I do post my finished designs on my website, I may not update this opening post with new designs; however, I will post it in here when I finish a new decal, so make sure to check the end of the thread and/or my blog website if you wanna be up to date. Currently, I have four additional decals in the works: TCW Admiral Yularen, TFA Luke Skywalker, Cassian Andor und Poe Dameron With Jacket.

.thumb.JPG.3c74c0d405dc1afb04b2fa216ebc79e6.JPG)