Search the Community
Showing results for tags 'offroad'.
-
 GMC c4500 Ironhide He killed a total of about 20 evenings after working on the assembly. Spent about 2000 parts. The design of the entire filling is very complex, a gearbox with a double clutch and a double row of gears (so as not to disrupt under loads) and two gears (lower and higher), differential units (no one has yet seen that there are blocks of both bridges on similar lego cars ), the suspension so that when it works, it doesn’t hurt anything even when the wheels are turned up and the maximum squeeze, a connected winch, plus the location of all the motors in the mind (1 servo, 2 M-motors and 3 L-motor drive), battery pack and two receivers while the center of gravity was like mine it’s lower, plus the design and appearance itself all this made me explode my brain and spend a lot of time. 2017 year problem with photo, not loading https://www.youtube.com/watch?v=IxqSjZ2bfek&feature=youtu.be Thank you for watching
 -
 Good people of Eurobricks, let me give you my first take on the planetary hubs: Please excuse me for the lenght of the video, it's meant to show the developement stage by stage. I had big expectations towards the new hubs, since they've been announced. I realised, these hubs will solve the problem of the stress on drivetrains, yet will raise a new challenge. Due to the increased torque on the wheels, the frame (chassis) and the bracing of the suspension will be the new weak link. A wanted to have a finalized rig to the date of the release of the hubs. The backbone of the design came from a five years old chassis concept, it was a non motorized chassis: To mimic the geometry of the new hub, I've used the old ones with some extension, so it can be easily swapped, when time comes: The concept of the chassis came together quite well, thanks to using techniques well practiced in my early years. But there was still a long time till the release of the new hubs. Driven by curiosity, I've planted two PF XL motors in the middle of the chassis, making them drive two axles each. One for the front axles, one for the rear ones. No additional gearing has been added, the motors were connected straight to the differentials. Of course it had to be tested, hat's the part around one minute into the video: https://youtu.be/PGQpUrOS-NQ?t=59 Came with a surprisingly satisfying result, despite the usage of the old cv's and hubs, yet it was understandably far from being a "crawler" it meant to be. Also at this point I was short of claas tyres, so I've used some similar size rc tyres on the front 4. Got the tyres eventually, still a lot of time till the hubs coming though. As the final design was gonna use 4 buggy motors, time came to make the change: Same principals, like with the XL motors: No gearing added (slow output used), 2 motors drive the front, other 2 for the rear axles. Now feeding that much buggy motors would require 4 buwizzes. Or one well sized rc lipo that can comfortably supply 2 sbricks. 4 buwizzes cost about 400-450 pounds, while the lipo comes for 30 pounds. Any question? At this stage (still no new hubs) it was an obvious, yet pretty crazy idea to hit the tarmac. So I did. That's what you see at 2:16 in the video: https://youtu.be/PGQpUrOS-NQ?t=136 I had a lot of trouble that day with the bluetooth connection, brought a head on crash int o a container. It was heart-, but no plastic breaking. Finally the hubs came by the post and the picture got full. I've also planted another servo for steering (2 in total now) Indoor durability test at 3:27 https://youtu.be/PGQpUrOS-NQ?t=207 Climbing test (60 degrees) at 4:18 https://youtu.be/PGQpUrOS-NQ?t=257 Hereby I apologize for the dark enviroment at this recording Peek on the suspension at 3:12 https://youtu.be/PGQpUrOS-NQ?t=191 Lego should not be used outdoors... ahm, okay... Outdoor test from 4:55 in the video. https://youtu.be/PGQpUrOS-NQ?t=295 I came to the verdict, that the new hubs worth their money. In a usage that abusive, you see in the video the hub-cv connection definitelly require some lubrication. I've been using silicone oil and no downside appeared so far. Here is the difference it makes: That's it so far, a little spoiler at the end of the video. Hope it's gonna catch some expert eyes...
 -
After 42099 and the whole new PU system, I'm here with a MOC that uses something a bit older - RC system. After all these years it is still the most powerful 100% LEGO solution. Watch it in all its glory: Features: RC drive - 2x RC motor, geared 3:1 (slower output) RC steering Front suspension - double wishbone, soft, long travel, positive caster angle, 7 stud ground clearance Rear suspension - floating axle, soft, long travel, 5.5 stud ground clearance Please watch the video to see this machine in action and for more details. I hope you liked this model.
-
 - 4x4 - Spring shocks suspension at the front - Leaf springs at the rear - Opening doors with locks, bonnet, tailgate - Removable body - 2L, Servo, IR, LiPo ***
 -
 Hello my friend. This is my another asset to this forum in form of a off-roader/rock-crawler in this particular case its more like rock-bouncer, the reasons are follows. This MOC is powered by 3L Power function motors, which two of them are located in the rear axle, to help during uphill climb with more torque requested on the rear axle and overcome any obstacles Gear ratios are as followos, from motor to the axle its 3:1 to speed up the model, and afterwards it connected to new planetary hubs with theire respective ratios, steering is controlled by one servo and everything is controlled by one buwizz brick. Instructions are avaible at rebrickable: https://rebrickable.com/users/MK.Technic/mocs/ More photos on bricksafe page: https://bricksafe.com/pages/MK.Technic.Creations/rockcrawler-2l Video
 -
This is my own creation of a Mercedes-Benz G550 4x4² SUV. Check out my Rebrickable post for instructions which you can download for free: https://rebrickable.com/mocs/MOC-43865/BrickHugger171/mercedes-benz-g550-4x42/?inventory=1#comments
-
 Hi everyone, I have wanted to make an off-road truck for soo long and I just have enough time to build and design one. But I desperately need some expert opinions on how to design the front cabin for this vehicle. Does anyone have any ideas or designs you would like to share? ps I am looking for a design kinda like this:
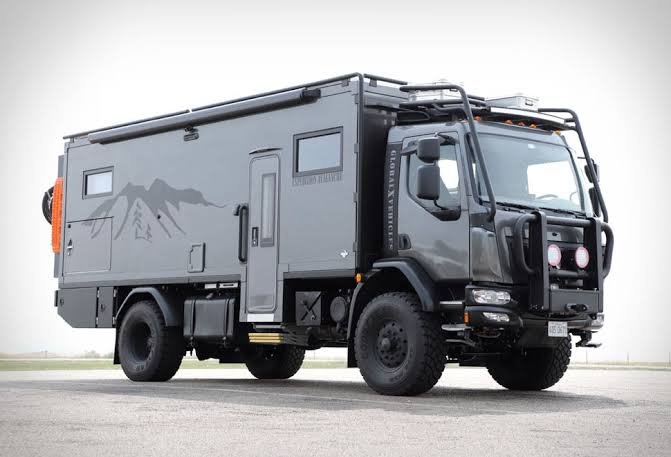
-
 Hello dear friends! Please let us (yes, today - we are both with ADCchannel are the authors) introduce the latest MOC - today this is Mercedes-Benz G-class 6X6 Trial edition. This truck (definitely it is!) is our common project. I was always dreaming of creating my own implementation of this greatest version of legendary Gelandewagen. I build the body with pleasure and know that ADCchannel riched senior skills in building chassis for truck trial, so I offered hiw some kind of collaboration. Luckily, he immediately agreed. The main difficulty was that we are living in different cities, but not far from. So, couple of month were spent truck is ready. To be honest body itself is absolutely new. From my previous G class Mansory edition I took only front view and side doors. Roof, interior, body frame is completely new. Mandatory point was to create easily removable body. So, you can split body from frame removing only six axles (easy to remove). Some description, though :) This monster is propelled by 3 XL motors - one per each axle. M motor for steering and we decide to power truck bu Buwizz. But it's ready to use regular Lego IR receivers. Suspension has 3 portal axles like original Mercedes. We use 7 Claas tires (actually 6 + 1 third party). Everything what can be opened - is openable - hood, doors, trunk. Unfortunately there were no room for any V8 engine due to front suspension construction. First purpose was to build truck suitable for trial. Here are the two different(!) videos. Feel free to watch and comment. Any critics would be highly appreciated. Dimensions: - Wide - 25 studs, - Lengh - 72 studs Here are some photos from bricksafe page: https://www.bricksafe.com/pages/Aleh/mercedes-benz-g-class-6x6 Pictures will be uploaded in a couple of hours. Some technical issues for now.
 -
 I started this project because I wanted to share my experiences building various offroad models over the last decade. This topic is meant to guide the builders with comparisments, suggestion and best building practices, It is however not a place to find already finished and perfected designs - that's up to you. Various aspects of the design of the vehicles will be split into several subgroups and explained in details. 1. Number of wheels First thing we need to know is how many wheels our design will have. Most common setups are as following: 4x4 Setup Advantages: 1. The simplest and most widely setup 2. Having only 4 wheels means lower weight and higher performance 3. Higher manoeuverability 4. Simple suspension and driveline design Disadvantages: 1. With only 4 wheels the suspension has to be designed to be as flexible as possible to get the most out of the wheels 2. In a case of a mechanical failure of a single wheel, the whole model's performance is greatly affected 6x6 Setup with double rear axles Advantages: 1. Two rear axle provide more traction area, especially when going uphill 2. Usually 6x6 vehicles are longer than 4x4 and therefore less likely to tip over 3. Since the front and second axle are usually closer than in 4x4 setup, there is less ground clearance needed between them 4. Greater redundancy in a case of a mechanical failure Disadvantages: 1. Lower manoeuverability due to a longer wheelbase even with rear wheel steering 2. More complex driveline and suspension design is required 8x8 or more wheels setup Advantages: 1. Having 8 or more allows for much greater traction area 2. Ability to drive over ditches 3. Because wheels are usually much closer there is much less chances of getting stuck on top of an obstacle 4. Excellent redundancy in a case of a mechanical failure 5. Better weight distribution 6. Less suspension travel required per each wheel as with 4x4 or 6x6 and hence better stability Disadvantages: 1. Lower manoeuverability even with rear wheel steering 2. Powering 8 or more requires a very complex driveline 3. Depending on a driveline, combined torque required for powering all 8 wheels can destroy gears if a single wheel gets stuck 2. Type of wheels and tyres Now that we decided on how many wheels we want for our offroad beast, we have to look into what type of tyres and wheels we want to use. I will hereby cover only the bigger types of tyres and wheels. 1. 94.8x44R Advantages: 1. Low weight 2. Good thread design 3. Low rolling resistance Disadvantages: 1. Low traction, these tyres are prone to slip on the rim at high loads 2. Due to its rounded shape the tyres tend to slide off obstacles when crawling over them 2. 94.3x38R Advantages: 1. Low weight 2. Medium traction 3. Low rolling resistance 4. Realistic design and proportions Disadvantages: 1. Shallow thread pattern 2. These tyres are very hard and don't adjust to the terrain 3. 107x44R Advantages: 1. Low weight 2. Medium traction 3. Very deep thread 4. Currently largest tyres by diameter Disadvantages: 1. High rolling restistance and vibrations due to the thread pattern 2. These tyres are a bit hard and don't adjust to the terrain 4. Power Puller tyres Advantages: 1. High traction 2. Good thread 3. Largest Lego tyres ever produced 4. Deep wheel offset Disadvantages: 1. High weight 2. Hard to use, they require complex hub assemblies 3. Very rare and expensive 5. Outdoor challenger wheels Advantages: 1. Very high traction 2. Very good thread pattern 3. Deep wheel offset 4. Over 7 studs of space inside the wheel Disadvantages: 1. High weight 2. Hard to attach to the standard axles 3. They require a lot of torque to use them at their full potential. 6. Tumbler wheels Advantages: 1. Low weight 2. High traction 3. Very flexible Disadvantages: 1. Low thread pattern 2. Small size 3. Expensive For the 94.8x44R. 94.3x38R and 107x44R tyres we have a choice of two wheels: 1. Racing wheel large Advantages: 1. Good mounting option with axlehole and pinhole 2. Available in multiple colours 3. Cheap Disadvantages: 1. No inside wheel offset means steering pivot point can't be placed inside the wheel. 1. Futuristic wheel Advantages: 1. Deep wheel offset allows us to place steering pivot point inside or closer to the wheel than racing wheel large 2. Slightly larger wheel size stops the 94.8x44R tyre from slipping on the rim Disadvantages: 1. Limited mounting options, with only one axlehole 2. Hard to find 3. Hubs Now that we have our wheels and tyres we need a way to mount and power them. Here are the most common currently available options: 1. New standard ungeared CV hubs These hubs are usually driven by the CV joint counterpart which pops inside Advantages: 1. Low steering pivot offset - usually at the edge of the tyre: 2. Firm wheel mounting 3. Readily available, easy to use and to build on. Disadvantages: 1. Low operating angle - the CV joint can operate to a maximum of about 30 degrees, which limits steering angle. 2. Very low torque transfer - the CV joints are prone to deforming and popping out even with low torque applies to them 3. Low ground clearance 2. Old ungeared CV hubs Advantages: 1. Low steering pivot offset - usually at the edge of the tyre 2. Firm wheel mounting 3. Better ground clearance than newer hubs Disadvantages: 1. Very low operating angle - the CV joint can operate to a maximum of about 25 degrees, which limits steering angle. 2. Very low torque transfer - the CV joints are prone to deforming and popping out even with low torque applies to them 3. Hard to find and expensive 4. No other mounting points than 4 ball joints 3. Built cardan ungeared hubs Example of a hub using a cardan joint to directly transfer the power to the wheel Advantages: 1. Low steering pivot offset - usually at the edge of the tyre 2. Easy to build 3. Can transfer higher torque than a CV joint 4. Higher steering angle Disadvantages: 1. Mounting relies only on the axle and is not as firm as standard hubs 2. Not capable of transferring high torque to the wheels 3. Low ground clearance 4. Standard portal hubs Advantages: 1. Easy to use and to build on. 2. Can transfer very high torque to the wheels when using 8z and 24Z gear combination 3. High steering angle 4. High ground clearance 5. Firm wheel mounting Disadvantages: 1. Very high steering pivot offset - requires stronger steering mechanisms and more fender space for wheel to swing 5. Built portal hubs Advantages: 1. Easy to build. 2. Can transfer very high torque to the wheels when using 8z and 24Z gear combination 3. High steering angle 4. Higher ground clearance than standard portal hubs 5. Low steering pivot offset when using futuristic wheels Disadvantages: 1. Wheels are mounted and held only by one axle, not as firm as standard hubs 2. Hub relies on friction of the components to keep it together, which can slide apart after prolonged use 6. Built planetary hub Advantages: 1. Highest gear ratio of all other hubs, 1:4 2. Firm wheel mounting when using futuristic of power puller wheels 3. High steering angle 4. Lower steering offset than standard portal hubs Disadvantages: 1. Requires old turntable, futuristic or power puller wheels for best results - all are hard to find 2. High number of moving gears 3. Least efficient due to the high friction caused by the large surface contact area and number of moving gears 4. Suspension Suspension is the mechanism that will keep our model's wheels in contact to the ground and will be supporting most of its weight. Most of the designs cover 4x4's Following factors determine the type of suspension system we will use: 1. Weight of the model - The heavier the model, the stronger the suspension components have to be 2. Speed - Faster models require more responsive suspension systems with low unsprung weight 3. Flexibility - The higher the obstacles you want to climb over the more flex and/or wheel travel suspension has to provide 1. No suspension I have yet to see and offroad vehicle without any type of suspension (except for maybe 42070, 42081 and 42082), but I will list my opinion regardless: Advantages: 1. Simple design - having no suspension simplifies our design...and that's about it Disadvantages: 1. No flex over terrain means, there are only 3 wheels at once touching the ground 2. Low stability 3. Poor weight distribution 4. No shock absorption at high speeds 2. Pendular suspension This is the simplest suspension you can put on your vehicle. It basically means one or more of your axles are free to swing about. When using this suspension I suggest using the small turntable where drive axle enters the axle. This will keep the drive axle from carrying the weight of the model, which causes unnecessary friction. 42030 is a typical example of this suspension system. Advantages: 1. Simple, robust design 2. Using this suspension on both axles can give the model very high flexibility 3. If there are no springs used, the model can have perfect weight distribution on left and right wheel Disadvantages: 1. Large unsprung weight, poor responsivness at high speeds 2. No shock absorption means this suspension is not suitable for high speeds 2. When using on one axle, the stability of the whole model relies on the unsuspended axle. 3. When using pendular suspension on both axles springs or a transfer mechanism are required to keep the model upright 3. Single torque tube suspension This suspension became available with the release of the 8110 Unimog. Best examples of this suspension are 8110, 9398 and 41999. It is the simplest suspension which also allows for vertical suspension movement. Advantages: 1. Simple, robust design 2. Universal joints can be placed inside the ball joint, allowing power to be transferred to the axle 3. Easy to implement Disadvantages: 1. Large unsprung weight, poor responsivness at high speeds 2. Axle requires a some kind of a linkage system to keep it cenetred (panhard or parallel links as seen above). 3. Using this suspension on the front axle usually results in negative caster angle which causes higher rolling resistance 4. When used on rear drive axle, the suspension has the tendency to cause oscillate, especially with soft suspension and high power 4. Hard to connect springs to the chassis 4. Double torque tube suspension This is an evolution of the single torque tube suspension, which uses two ball joints to drive each wheel side respectively. It is my own original idea. Advantages: 1. Simple, robust design 2. Universal joints can be placed inside the ball joint, allowing power to be transferred to the axle 3. Easy to implement 4. Self-cenetring, since axles are connected in the center there is no need for linkages to center it 5. Can carry power to each wheel side independently 6. Drive torque compensation Disadvantages: 1. Large unsprung weight, poor responsivness at high speeds 2. Using this suspension on the front axle usually results in negative caster angle which causes higher rolling resistance 3. When used on rear drive axle, the suspension has the tendency to cause oscillate, especially with soft suspension and high power 4. Hard to connect springs to the chassis 5. Parallel floating axle This suspension uses linkages which keep the axle parallel to the chassis of the model. For best functionality and reliability the lengths of all links and that of the double cardan joint should be equal. Also all the linkages and drive axles should be parallel. Advantages: 1. Keeping the axle parallel to the chassis reduces the oscillations effect 2. Better responsivness compared to the torque tubes 3. Neutral caster angle when used on front axles. 4. Self cenetring when using A arm as upper link or 4 link setup 5. Can be configured to carry power to each wheel side independently 6. If configured to carry power to each wheel side independently the drive torque can be compensated. 7. Easy to connect spring to the chassis Disadvantages: 1. High unsprung weight, less responsive at high speeds 2. Increased mechanical complexity, double cardan joints required to carry the power to the axle 6. Half axle independent suspension This is the simplest independent suspension you can build. Best example of such suspension are Tatra and Pinzgauer trucks. Advantages: 1. Independent suspension with low unspring weight, suitable for high speed 2. Robust design with low number of moving parts 3. Easy to connect spring to the chassis Disadvantages: 1. Changes of the caster angle as the wheels travel up and down 2. Hard to implement a drive system that does not carry the weight of the vehicle 3. Hard to implement steering system 4. Wheels tend to drag sideways on the ground when suspension travels up and down, reducing efficiency 7. Trailing arm parallel independent suspension Personally I have not used this suspension yet, but I did use a normal trailing arm suspension which does not keep the hubs parallel. Normal trailing arm suspension which does not keep the hubs parallel acts similarly to torque tube suspension. For the prallel version of the trailing suspension I imagine the following: Advantages: 1. Independent suspension with low unspring weight, suitable for high speed 2. Robust design with low number of moving parts 3. Long links allow for high suspension travel 4. Very easy to connect spring to the chassis 5. Can be configured to carry power to each wheel side independently Disadvantages: 1. Hard to keep the wheels from sagging under the weight of the model. 2. Difficult to transfer power to the wheels 8. Double wishbone suspension This suspension uses two A-shaped arms to keep the wheel hubs in place. As of late it's my favourite suspension system due to: Advantages: 1. Independent suspension with low unspring weight, suitable for high speed 2. Very customizable design with lots of adjustable characteristics (suspension arm lengths, caster angle, camber angle, steering geometries) 3. When build correctly it is far more robust than live axle suspension 4. Increased ground clearance compared to live axle suspension, especially when used with portal hubs 5. Can be configured to carry power to each wheel side independently 6. Extremely easy mounting of springs 7. Very stable compared to live axles 8. Frame holding the suspension can be part of the chassis, therebye lowering the center of gravity Disadvantages: 1. More moving parts as live axle suspension, increased mechanical complexity 2. Limited wheel travel - Lego wishbones allow a max. of around 25 degrees of suspension angle 9. Multi-link suspension To be updated when I build my first multi-link offroad suspension. I can assume the following characteristics: 1. Independent suspension with low unspuing weight, suitable for high speed 2. Extremely customizable design with lots of adjustable charactersitics (suspension arm lengths, caster angle, camber angle, steering geometries, virtual pivot point) 3. Large steering pivot point compensation 4. Increased ground clearance compared to live axle suspension, especially when used with portal hubs 5. Can be configured to carry power to each wheel side independently 6. Very stable compared to live axles 7. Frame holding the suspension can be part of the chassis, thereby lowering the center of gravity Disadvantages: 1. Very high amount of moving parts, increased mechanical complexity 2. Limited wheel travel - Lego wishbones allow a max. of around 25 degrees of suspension angle 3. Hard to connect springs to the chassis 10. Spring types Listed below are the most common types of springs available: 6.5L Soft shock absorber Advantages: 1. Small, easy to implement Disadvantages: 1. One stud of suspension travel 2. Low spring rate, can't support heavy models 6.5L Hard shock absorber 1. Small, easy to implement 2. High spring rate, can support heavy models Disadvantages: 1. One stud of suspension travel 9L soft shock absorber When using 9L shock absorbers I suggest you do not use the default offset upper attachment point, but use an in-line attachment point instead. This will reduce the friction and allow for better high speed performance Example: Advantages: 1. Two studs of suspension travel 2. More attachment possibilities than 6.5 L shock absorber Disadvantages: 1. Default attachment points create friction 2. Low spring rate, can't support heavy models 9L hard shock absorber Advantages: 1. Two studs of suspension travel 2. More attachment possibilities than 6.5 L shock absorber 3. High spring rate, can support heavy models Disadvantages: 1. Default attachment points create friction 2. Rare and expensive 11. Attaching springs to live axles If we start with basics, the first things we have to check is how position of springs affects suspension of live axles. The closer you place the springs together, the more flex the suspension will have, but it will also be less stable: I suggest you to keep springs at a distance of around 1/2 of the total model width. When placing springs you should keep them in-line with the wheel bearing in order to reduce friction. First example of bad spring placements: And example of good spring placement: When using multiple springs make sure to place them symmetrically centrred to the wheel hub: When attaching springs to torque tube suspension, you have to allow springs to tilt in two planes: You can also attach the springs to the suspension links to increase suspension travel. This technique is especially common on Trophy Trucks: 12. Attaching springs to independent suspension Independent suspension allows for much more flexible spring placement. Generally the closer you attach the spring to the main suspension arm pivot, the higher spring travel you get, but lower suspension force. Examples going from the hardest suspension with low travel to the softest with high travel: You can also attach springs inside the suspension arms: Or horizontally: As with the live axles make sure springs are in the center of the wishbones. Example of good placements: And an example of bad spring placement, which causes excessive friction and suspension binding: 5. Steering Steering is the system which allows our model to change direction. Generally there are two types of steering system used: 1. Skid steering Advantages: 1. Very simple to implement and control with two separate motors for left and right sided wheels. 2. Does not require a dedicated steering motor Disadvantages: 1. Not efficient, since wheels have to skid to steer 2. Power had to be reduced or even reversed in order to steer. 3. Not very accurate 4. Not very effective offroad 2. Classical steering with steerable wheels Advantages: 1. Efficient, with minimum loss of speed 2. Accurate 3. Does not reduce the power of the drive motors 4. Can be used in front, rear or all axles for tight steering radius or crab steering 5. Effective offroad Disadvantages: 1. Requires more complex hub assemblies 2. For best steering accuracy you need a dedicated servo motor. Examples of a simple classical steering system for live axles 1. Parallel steering system for live axles Here both hubs are always parallel. Position of the steering in the front or rear rack has no affect on the steering. Advantages: 1. Very simple and robust 2. Easy to build Disadvantages: 1. No Ackermann steering geometry 2. Steering rack moves inwards as it steers, requiring more space. 2. Ackermann steering system for live axles This system allows the hubs to steer at different rates. The steering arms are offset inside so they form a virtual steering point where at the point where lines meet. Advantages: 1. Better steering performance Disadvantages: 1. More complex assembly 2. Steering rack moves inwards as it steers, requiring more space. 3. Steering system with diagonal linkages This system acts similar as Ackermann steering system by using diagonal steering links. Advantages: 1. Better steering performance 2. Steering rack only has to move in one direction without sideways movements 3. Can be configured to be used in front or the rear of the axle. Disadvantages: 1. More complex assembly 4. Simple steering system for independent suspension 1. Very simple and robust 2. Easy to build 3. Can be even more robust when using double steering racks and links 4. Steering rack only has to move in one direction without sideways movements Disadvantages: 1. No Ackermann steering geometry 5. Ackermann steering system for independent suspension Advantages: 1. Better steering performance 2. Steering rack only has to move in one direction without sideways movements Disadvantages: 1. More complex assembly, less robust. 3. General steering tips 1. When using independent suspension always make sure your links are paralel to the suspension arms, otherwise you may end up with wheels which are not parallel and are causing excessive friction: 2. When using standard portal hubs make sure your steering system is robust enough to deal with the forces generated by wheel driving into obstacles. 3. If possible use servo motors which allow for high steering precision and return to center. They are especially useful at high speed models. 4. Most efficient way to steer the wheels is using the steering racks. 5. Build axles in such way they have positive caster angle, example for direction of travel from right to left. This will self-center your wheels and reduce rolling resistance. 6. Drivelines Drivelines are the responsible for transferring the power from the motors to the wheels. There are various drivelines you can build, here I listed few with their characteristics: Driveline types 1. Permanent 4x4 Advantages: 1. Simple, centralized, low mechanical complexity 2. Wheels are always powered, great offroad performance 3. Light weight Disadvantages: 1. Poor steering radius 2. Tyres have to skid when steering, lowering efficiency of the model 2. 4x4 with open differentials Typical example of this driveline is 42070 Advantages: 1. Differentials allow the wheels to so spin at different rates when steering 2. Very efficient since wheels don't have to skid when steering Disadvantages: 1. If one wheel loses traction, all the power is transfereed to it, poor offroad performance 3. 4x4 with lockable differentials Advantages: 1. Differentials allow the wheels to so spin at different rates when steering 2. Very efficient since wheels don't have to skid when steering 3. All differentials can be locked, so wheels are powered for great offroad performance Disadvantages: 1. Higher mechanical complexity 2. Dedicated motor is required to actuate differential locks, higher weight 4. Axle mounted motors Typical example of this driveline are 9398 and 41999. Advantages: 1. Differentials allow the wheels to so spin at different rates when steering 2. Very efficient since wheels don't have to skid when steering 3. If one wheel gets off the ground the second axle can still pull/push the model. Disadvantages: 1. Higher mechanical complexity 2. Usually the rear axle motor is more loaded than the front, especially when climbing uphill, the motors can't "help" each other. 3. Worse offroad performance than permanent 4x4 5. H drive: This is my favourite driveline due to the following reasons: Advantages: 1. Motors allow the wheels to so spin at different rates when steering 2. Model can skid steer 3. Very efficient since wheels don't have to skid when steering normally 4. Having 2 drivelines allows you to carry more torque to the wheels 5. Redundancy, even if one drive fails the model can still move 6. Wheels are always powered, great offroad performance Disadvantages: 1. Higher mechanical complexity 2. Slightly higher weight 6. Wheel motor drive Each motor powers a wheel independently. Advantages: 1. Motors allow the wheels to so spin at different rates when steering 2. Model can skid steer 3. Very efficient since wheels don't have to skid when steering normally 4. Redundancy, even if one or more motors fails the model can still move 6. Lower mechanical complexity Disadvantages: 1. Motors can't "help" each other 2. Higher weight due to a higher motor count Transferring power axially When transferring power via axles, you can reduce the flex by using connectors instead of simple "bare" axle: Use axles with stops to prevent them from sliding out of gears: Where possible always brace tooth gears from both sides: Transferring power at an angle Where pairs of U joints are used, make sure to align them to eliminate vibrations: Brick built CV joint which can transfer high torque at over 30 degrees angle Brick built cardan joint which can transfer extremely high torque up to 15 degrees angle Brick built flexible drive which can transfer medium high torque, extract and retract, suitable for low angles Transferring power perpendicularly The following perpendicular gearboxes are the best suitable for transferring high torque Avoid knob and worm gears, because they waste energy Gearboxes In my models I generally use the following gearboxes: 1:3 differential gearbox Advantages: 1. Very high gear ratio between low and high gear, 1:3 2. Capable of transferring high torque 3. Very efficient since only 2 gears are used at any time Disadvantages: 1. Takes a lot of space 2. This gearbox requires a good housing to brace the gears properly Compact two speed gearbox Advantages: 1. High gear ratio between low and high gear, 1:2,77 2. Capable of transferring high torque 3. Very efficient since only 2 gears are used at any time 4. Very compact design Disadvantages: 1. Requires two of the rare 20 tooth clutch gears 2. More complex shifter assembly. Diagonal gearbox Advantages: 1. High number of gears 2. High gear ratio possible, over 4:1 2. Capable of transferring high torque 3. Very efficient since only 2 gears are used at any time Disadvantages: 1. Takes a lot of space 2. Input and output axles are not parallel. 3. A complex shifting assembly is required for sequential operation. Driveline effect on suspension Transferring torque on the wheels can affect the suspension, especially when live axles are used. The following photo shows how the torque causes one side of the axle to push down and the other to lift up: In order to minimize this effect I suggest the following: 1. Make sure to have most if not all the downgearing inside the axles, so you do not need high torque going to the axles. 2. Make sure your models have a low center of gravity 3. You can eliminate this effect by using two counte rotating axles which cancel each other's torque, example below: 7. Motors and control Following are the most common types of motors used for Lego models. You can find more info here: http://www.philohome.com/motors/motorcomp.htm My personal favourites are L and RC motors due to the balanced output speed to torque ration and great mounting options. 1. PF-M Advantages: 1. High speed output 2. Smallest available motor 3. Cheap and available Disadvantages: 1. Low torque 2. Poor mounting options 2. PF-L Advantages: 1. High speed output 2. High torque 3. Cheap and available 4. Great mounting options Disadvantages: 1. Odd shape 3. PF-XL Advantages: 1. Very high torque 3. Cheap and available 4. Good mounting options Disadvantages: 1. Slow speed output 2. Large form factor 4. PF-Servo Advantages: 1. Very high torque 2. Very precise output with 15 positions 3. Good mounting options Disadvantages: 1. Slow speed output 2. Output axle can move a max of 180 degrees 3. Large form factor 4. Hard to find 5. 9V-RC motor Advantages: 1. Most oowerful Lego motor 2. Very high speed output 3. Good mounting options 4. Two output axles with different gearing ratios 5. Drive axles can pass through the motor Disadvantages: 1. Low output torque 2. Low efficiency 3. Power hungry 4. Odd form factor 5. Hard to find and expensive Power options 1. PF - AA battery box Advantages: 1. High capacity 2. Good mounting options 3. Works with rechargeable batteries, but with lower performance 4. Cheap and easy to find Disadvantages: 1. 750mA current limit - not enough to fully power RC motor 2. Heavy 3. Has to be removed and opened to replace batteries 4. Wasteful 5. Odd form factor 2. PF - LiPo battery box Advantages: 1. Small form factor 2. Light weight 3. Easy to recharge Disadvantages: 1. 750mA current limit - not enough to fully power RC motor 2. Low capacity 3. Studded design 4. Expensive and hard to find 3. RC control unit Advantages: 1. No current limit - can power 2RC motors at once 2. 3 Power levels 3. Has integrated steering output with 7 positions 4. Good mounting options 5. Easy battery replacement 6. Radio based control Disadvantages: 1. Poor quality, prone to breaking 2. Limited angle (45 degrees) and torque from the steering output 3. Has to be removed and opened to replace batteries 4. Very large form factor 5. Expensive and hard to find 6. Heavy 7. Required dedicated antennas and remote Control options 1. PF receiver and controller Advantages: 1. Receiver is easy to integrate into the model 2. Controllers have physical feedback 3. Cheap and easy to find Disadvantages: 1. IR based, low range, useless outside 2. Lack of PWM motor control, unless using train controller which is awkward to use 3. Odd form factor for use with steering 2. RC control unit See above 3. Third party options such as BuWizz and Sbrick Advantages: 1. Smaller form factors, easy to integrate into model 2. More outputs than PF system 3. Smooth control of motors 4. High range thanks to Bluetooth control 5. Higher power available with BuWizz 6. Customizable profiles Disadvantages: 1. Smart device is required 2. No physical feedback 3. Sbrick is limited by PF battery box 4. Price 8. Chassis Chasis is the backbone of your model which olds everything together. For chassis I suggest you to use the following components in order to make it strong and robust enough to deal with the stresses involved when crawling or driving at high speed: Some flex in the chassis might be a good thing to improve offroad capability, but only if id does not affect the driveline and cause friction on the drive axles. Remeember to use diagonal support, since triangles are the strongest shapes. You can also use panels and motors as structural support. Interlocking your chassis will keep it from slipping apart. For good examples of chassis designs I suggest you check the instructions for 9398 and 42083.
 -
Ninjago - Cole´s "sandsquatch" ATV Whenever there are vehicles involved,the black Ninja who is also the Master of the element Earth, always seems to get vehicles for rough terrain. So what´s better for rough terrain than a menacing, fourwheeled ATV? Pretty much nothing, that´s the reason i build one using parts from the bin and from one of his newest sets (yes, that awkwardly oversized bike) IMG_20190610_164125 IMG_20190610_164100 IMG_20190610_164041 IMG_20190610_164016 IMG_20190610_163944 IMG_20190610_163909 I tried to incorporate a few design features and the color palette so it will fit his character. Hope you guys like it as much as Cole does.....
-
 Hey Eurobricks, PunktacoNYC back again with another rock crawler! This time it's called the Rocket Crawler and it is my largest, fastest crawler yet. Youtube video: Features: - 4 L-Motors for drive (one per wheel) - Ackerman steering with custom virtual pivot system to maximize steering angle - Rigid, triangulated 4-link suspension with 100% Lego-legal original, extra large links - Very minimal, light bodywork, and a cute rocket atop the cab - BuWizz for extra power and SBrick for a great custom control scheme - RC4WD 2.2” Bully Competition Tires The initial inspiration for this crawler was twofold; I wanted to build a RC competition super-class-like crawler, what with giant relative wheel size, slim body, and high articulation. I also really wanted to make use of RC4WD's quite large Bully competition tires. This project has been in development for over a year thanks primarily to issues with the front axle. The problem with the front axle was that Lego universal joints simply could not handle the high torque required to spin such large tires. I tried using custom Lego universal joints custom dremeled brass remote-controlled boat u-joints, and even knob gears at the pivot point - nothing worked. So, I mounted the motors directly to the wheels, all within a virtual system to move the steering pivot closer to the center of the wheel for a better turning radius. There is approximately 90° of articulation between the front and rear axles: Easily adjustable suspension height: (high) (medium) (low) The chassis: Wheel comparison: Concept 1: Concept 2 (later): This has been my favorite project. Let me know what you think. P.s. I got a snupps page (nice idea, Sariel): https://www.snupps.com/punktaconyc
 -
 It's not a scale model of a real life model, though @nico71 mentioned it looked like a Kraz in the comments of Mahjqa's video and I do see the resemblance. It features the following functions: Drive with a L-motor to the rear axles (no AWD). Steered front axle with a L-motor. M-motor for dumping the load with a LA. All axles have pendular suspension with the front axles using actual springs and and at the rear the 2L rubber liftarms to "dampen" the pendular axles a little bit (idea stolen from this MOC/WIP from Jundis). Movement of these rubbers is limited to prevent tyres rubbing the chassis when an axle is tilted. Working headlights Self locking tailgate from @ludov (I don't know if he came up with it, but I did steal it from him ) (center axle also has a thin white liftarm under the tyre at the rear) The self locking mechanism from Ludov works like this: LBG is the bed, yellow is the chassis and white is the lock. The bed is connected to the chassis at the end of the yellow connector and the lock can tilt 1 stud ahead of that which means that it drops further down than the bed would. Thanks for watching and reading. Hope you like it
 -
Hey everyone, I just wanted to share my upgraded MOC from TC27 (yes, it's been a while) and show a recent photo day that I felt like taking. I decided to remove the canopy for this shoot and showcase the semi-upgraded version from the base that I had designed. This model utilises a flatbed and a trundle drawer in the back. It is straightforward, and I guess it could fit into traffic if it were big enough for Aussie roads. Let me know if there's room for an Aussie ute in your hearts. I do understand that this is a very international LEGO space, but I love seeing everyone's reactions to how we like our vehicles down under!
-
This is a model I've been working on for a few months for the BuWizz gathering and now it's finally time to showcase it. The rules required a 1:10 scale model built after a real vehicle with a working gearbox, steering wheel and fake engine powered by a maximum of 2 BuWizz motors. I also managed to squeeze additional functions and features as following: 2x BuWizz drive motors 1x BuWizz 3.0 for control Working steering wheel actuated by a PU L motor 2 Speed motorized gearbox controlled by a PU m motor All Wheel Drive using planetary hubs Independent double wishbone suspension on all wheels with around 2 cm travel Working fake V12 coupled directly to the drive motors Detailed interiror with tilting rear seats to access the BuWizz Detailed exterior with opning doors, bonnet and tailgate Built out of around 2850 pieces 47 x 21 x 18 cm Weighs around 3 kg As usual with my representations of the real vehicles, I first started with sourcing, editing and importing a 3D reference into LDD. Here's how the digital model looks compared to the LEGO version: And here's the LEGO version without the reference: I hid the doors, bonnet and the tailgate in order to show the detailed interior: The driveline is very compact and efficient. Two BuWizz drive motors are placed right behind the rear seats and power the 2 speed gearbox and an (oversized) V12 engine directly. As with the real vehcile, suspension system is independent at all 4 corners. Steering system is actuated by the steering rack directly and geared up. Gearbox is activated by a PU M motor via a linear clutch and a wave selector: So that was the theory... After a few small fixes and corrections, this is how the finished model looks like in real life (oops, I lost my license plate): Rear view showing the spare tyre, detailed lights, guardrails and exhausts: Doors, bonnet and the tailgate can open up to reveal the massive V12 engine and front shock absorbers: Interior features an adjustable and working steering wheel, 4 fully detailed seats, console and a transmission tunnel. Rear seats can be tilted individually to access the BuWizz 3.0 for charging; Here's a view of the back with the opened tailgate. Thanks to the central motor placement, there's a lot of free space: One of the design goals was to protect all the gears and drive axles from dirt and to keep the bottom as flat as possible. I think I did very well, it's smooter than the real vehicle in that regard: And finally here's a video where among other details you can see how well it performed at the competiton: If you want to have an even more detailed look, you can download the LDD file here: https://bricksafe.com/files/Zblj/lamborgini-lm002/Lamborghini LM002.lxf To summarize I'm really proud of this model. It looks, performs and just feels good and hits all the right spots. One thing's for sure, I'm keeping this one assembled, as I trully believe it's one of the best models I ever designed.
-
 Hello again, Back in March 2023 I started my YouTube channel with my Raid Buggy. Granted, it look somewhat crude and it was quite slow, but it was my first model with BuWizz motors and bricks so it has a special place my heart. Recently it was the 1 year anniversary of it, and I decided to make a remake of it to prove some how much my LEGO building skills have changed and to honor the original model and channel. So enough with the backstory, let's get to the details: Features 4 Wheel drive with a 2-speed gearbox steering with double steering racks Soft double-wishbone suspension Working gear stick Bodywork built to resemble the original model One of the things that I wanted to show with this model was that you don't necessarily need 4+ BuWizz motors in order to make a good fast off-roader. For this, I decided to make use of a 2-speed gearbox, which has a low gear with the same gearing as the Raid Buggy V1 and the high gear which is some 67% faster (6.2 km/h). The gearbox design was heavily based off @Zerobricks's excellent Simple Off Roader but modified to fit my needs. Another benefit of this is that it has a neutral gear, which is very useful for downhills. From then, I finished it off with the axles of my Monstermog and the chassis was done! from there, I had to build the bodywork, the part that I had been dreading the most For me the body was a very important part, as I wanted to make it reminiscent of the original yet it would have a more sporty look and a stronger construction. Just like the first model, it uses many connectors in @Attika's characteristic style. In the end, the bodywork suffered many changes but I consider them for the better, as it now has a more imposing look and a much more sturdy connection so it can be rolled over without having to fear of breaking it. And now a few more images: The model ended-up being a very good off-roader, with a somewhat high speed (6.2 km/h) yet with some torque left for harder off-road. I pretty much had no issues with it, except the front open differential which sometimes got in the way when off-roading in the low gear. It's otherwise a model more focused on high-speed on uneven terrain so I'm happy with it If you would like to build this model, you can download the .io file at rebrickable here. And as always, here's a YouTube video containing some off-road footage, functions showcase, and some nice Punk Rock music Feel free to post a comment about what are your thoughts about it, and see you in the next one!
 -
Hey everyone, I stripped down my Dodge Demon MOC to the chassis and I want to modify it in a way that will make it look more rugged and potentially even have some RC components added! Do you all have any suggestions that you could please give to support the build?????? Here is a before and after of the chassis as of today: The Changes I have made are the following: - Improved central ground clearance - Components of the chassis have been removed to allow the fitment of bigger tyres - Larger Tires - Some reinforcement of the suspension struts and how they connect to the chassis I have a workbench post on rebrickable with a video! https://rebrickable.com/users/CrazyKreations/workbench/6109/ What should I add or change next?????
-
 Good day/night/whatever everyone! I want to share with you a little experiment of mine that got a bit out of control. I hope, you remember set 8284 and its really unique looking b-model. At least I do. Furthermore, it is one of my favourite b-models and I really wanted to pay tribute to it. Obviuos thought was, of course, to make it RC with the new Control+ elements. After half an hour I got something that could drive and steer. I even tested it in the local park, but... something was off. It just wasn't enough. However good looking this buggy is, its transmission wasn't created with electromotors and speedy driving in mind. Wheels tended to fall off. Gears in diff broke at least once. And offroading capabilities were...em... on the small side of expectations. And I got an idea! I decided not just to motorize this buggy, but completely redesign, reimagine it from technical point of view, keeping exterior close enough to what it was before. You know, like these like-oldtimer-outside-but-modern-inside tribute cars which car companies sometimes make. Also I wanted to make transformation function more interesting and useful. So, I started on the blueprints... And here it is! All modern all new Dune Buggy! With familiar face which got a facelift. Literally. New version of transformation not just shortens the car, but lifts all front section up While cockpit raises up, special levers make sure that headlights between wheels always stay horizontal. And not only that. Another special lever in the rear section locks the differential using new orange shifter. This way buggy becomes most offroad. And now - to the video! (With the new intro btw)
 -
 Among those 3 buggy`s/ truggy`s that I have to test-build them I just managed to add a 4th one. This one is the first 4x4 with 2 motors. As usual, it packs some buggy motors (2 of them, as I said), a servo, removable body (at least semi-detachable), positive caster-angle and full independent suspension. The weight is just under 900g; pretty decent, considering it is 4x4 and that has a pretty big body and some useless pieces to imitate the electric motor of the real RC buggy. Unfortunately, I think that this will only be available with normal RC batteries, because almost no existing hub for Lego is not fitting.
 -
Hey everyone, for a couple of months I've been working on a lego technic camper module that fits on Lego 42129 easily! After a lot of designing, I have come up with a design. I've made a video for all to see and please let me know what you think of this model. This model doesn't affect the Zetros's ability to move in any way (however just to be safe please consider reinforcing the rear axle). It has the following features: Awning Interior with dedicated seating area, bedding and kitchen (kitchen has to be built with bricks haha) rear compartment storage along with a lock Openable windows for ventilation Flexible but sturdy structure for offroading openable door Additional step ladder that can be used to enter the unit Additional storage on the door side of the unit that has a separate compartment to the rear storage space for jerry cans Space for extra wheel
-
After my rusty train, I was wondering if I can give the same treatment to a car. I wanted to build a beetle for so long, but I don't wanna copy other's work, and also wanted to make some weird stuff, it's a kinda trademark that I have :P After Several hours of designing, I came out with this Baja Rat Rod based on a Beetle The suspension and steering are fully articulated and posable, but they won't work as real suspension/steering, considered this more like an action figure that you can do some dynamic poses to take some cool photos. Even though most of the car is gone, I tried to keep the recognizable beetle profile.
-
Here's my next MOC: I-Beam Suspension Trophy Truck Size: 36L, 16W, 16H, cm Weight: 702g Parts: 843 Features: - Independent front I-Beam suspension - Live axle rear suspension - Opening doors with locks - Opening bonnet with holder - HOG-steering - Fake engine - Modular construction Video: More pictures: Instruction available on Rebrickable: https://rebrickable.com/mocs/MOC-102687/paave/i-beam-suspension-trophy-truck/
-
 Some might still remember this offroader I started sometime ago in 2019 and showed earlier versions in the 8081 mods thread a while ago. Well, I finally "finished" it now and created digital models for it. I call it the COMMANDO and it is "sold" by MM (Mars Motors). People that follow my Turbo Racers series and my series of 42093 scale cars with swappable engines should already know MM. To show its capabilities I made a trip to a special location and examined what it can do there. Have a look into the video to see what it possible: The configuration in this video has all axles locked and uses the drivetrain variation #2 (see below). The COMMANDO started as the glorious 8081 A model and went through lots of modifications - especially to the front and rear axles and also to the outer hull - on the way to the final result. I created three versions so far: with 1 x PF AA battery box with 2 x PF AAA battery boxes with BuWizz 2.0 ...from which the BuWizz one was used during the video and also most of the time I drove it so far. Here are a few more detailed pictures showing it in that terrain: Here are two pictures showing the chassis construction (click to magnify): ...and here are the three drivetrain variations that can be used (click to magnify) More variations are possible and the gearing can be changed with relative ease, as the motors are not an integral part of the construction: #1 is used for the PF versions and #2 is used for the BuWizz version. #3 can be used to examine the effects of open differentials in offroad situations. The COMMANDO can use various tyres and clearance should be good enough for all of them: 45982 81.6 x 38 R Balloon tyres 18450 81.6 x 44 R (Tumbler) tyres 69912 81 x 35 Tractor (Zetros) tyres I have also already designed a few addons that will be released at a later time - need to create the digital models first - and I have even more ideas for it. So far I have available: front winch rear PTO exploration gear tracks So stay tuned for additions. I hope you like the COMMANDO and I hope it is a worthy successor to the 8081 A model. If you're interested, the - free of charge - digital models (Studio files with detailed steps and submodels) and more pictures are available on Rebrickable: https://rebrickable.com/mocs/MOC-111591/johnnym/mm-commando/
 -
 Hi all! My new model - is realisation in Lego - off-road custom based on the legendary american SUV - Jeep Cherokee (XJ). Everything according to the canons - axles, a rear differential lock, winch, snorkel, fenders, footrests, thick-walled pipe bumpers, an expeditionary trunk, chandelier and big wheels.
 -
My next alternate model of the 42125 set - Dune Buggy It's a replication of the well-known Meyers Manx dune buggy. Also the BF Injection in the GTA games. Size: L35, W19, H13, cm Parts: 665 Weight: 610g. Features: - Opening bonnet and trunk - Full independent suspension - H4-engine - Working steering wheel. A width is 2 studs shorter, than it's in the original set, so I used the floating differential suspension system. Working well. See the video: Instruction is available on Rebrickable: https://rebrickable.com/mocs/MOC-76011/paave/dune-buggy/
-

[MOC] 6x6 Ural 375D
Sariel posted a topic in LEGO Technic, Mindstorms, Model Team and Scale Modeling
I present a little off-road experiment of mine. It's a large-scale model of the Soviet Ural 375D heavy-duty military truck, a truck I've had the pleasure of driving last year. The model's look is somewhat compromised but it achieved the primary goals, which included stress-testing the planetary wheel hubs, the new differential and my 4-speed remotely-controlled sequential transmission. I'm happy to report that none of these components failed and the truck, which weighs 3.94 kg, is able to drive over a 6 cm tall book or climb inclines slightly above 15°. It's not a perfect model, and it's truly sluggish, but oh well. Functions: remotely controlled drive and steering remotely controlled 4-speed transmission (with the lowest speed disabled so I could use a PF Servo as shifter) remotely controlled pneumatical locking of differentials in all three axles 6x6 drive suspension: live axles #1 and #3, pendular axle #2 (for improved chassis rigidity and to maintain ground clearance) switch-operated rear winch opening hood with a V8 piston engine running at constant speed and opening doors and a tiny detail that I really wanted to get done: a see-through grille