Search the Community
Showing results for tags 'model'.
-
 After becoming obsessed with unique vintage Seiko desk clocks from the 1980s or so, I decided to make a Lego after one of them! This is sort of an "art deco" vibe, mixed in with modern. This particular one uses a rolling low-friction pivot point, which creates a very unique movement when touched, and can move on it's own for at least a minute. The clock side of the balance acts as a sort of "gimbal" as well. Both sides have to be exactly balanced in order to work, and I mean EXACTLY. A single stud will completely throw the balance off. The clock is simply a quartz "insert" that I found, which perfectly fits into the round black piece with friction just like a Lego (the only one I found which would fit that exact piece). Otherwise, the sculpture would have to be significantly bigger to accommodate a fully made Lego clock and ruin the intended desk proportions (which, may be a good idea for another creation). In the future, I would like to swap out the clock face for one that matches the art deco vibe of the whole thing better. Some of the unique Seiko clock sculptures had hidden magnets powered by battery, which would make the clock move in different ways, but this one simply moves when touched with no hidden magnets. More images, a video, and instructions can be found on its Rebrickable listing: https://rebrickable.com/mocs/MOC-253210/FabulousFox/balance-and-fulcrum-table-clock/#details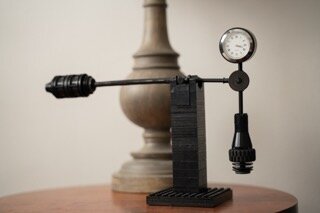
-
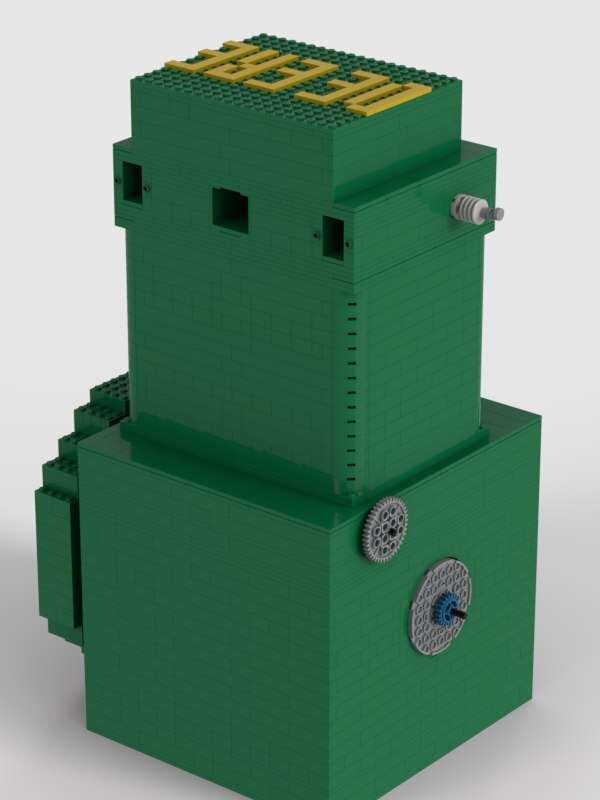
 Here is a scale model engine I made, inspired by Digitaldan's 1:1 scale engine. Before I get into the LEGO version I made, let me tell a few things about the original: The John Deere Model A was a row crop tractor built from 1934 to 1952 in three generations: Unstyled, Styled, and Late Styled. It was a direct competitor to the Farmall F-20 and later the Farmall H. The engine was a transverse mounted inline 2 with a 5.5" bore x 6.5" stroke, for a total displacement of 309 ci (5.1 Liters!). Governed speed was 975 RPM. These engines were notorious for being extremely loud, and vibrated a lot with terrible power delivery. In my opinion, the only reason John Deere stayed in business was because their tractors were cheap to run. In 1934 a model A on steel wheels sold for $1,025. The comparable Farmall F-20 on steel sold for $900-$1,000 in 1934. The difference was that because of the high compression ratio, the Deere could run on may different fuels. The F-20 started on gas and switched to kerosene when warm. My model has 8x8 square pistons and a 10 stud stroke for a total displacement of 655 cc. The crankshaft is built out of 6x6 round bricks and incorporates engine1ear's caged bearing system. I built the model in Studio 2.0, and it consists of 12 separate modules: The block, crankshaft, cylinder casting, camshaft, head assembly (including valves), flywheel, 2 pistons, and 4 pushrods. All these modules add up to a grand total of: 2366 parts! https://www.tractordata.com/farm-tractors/000/0/2/25-john-deere-a.html Why only two cylinders?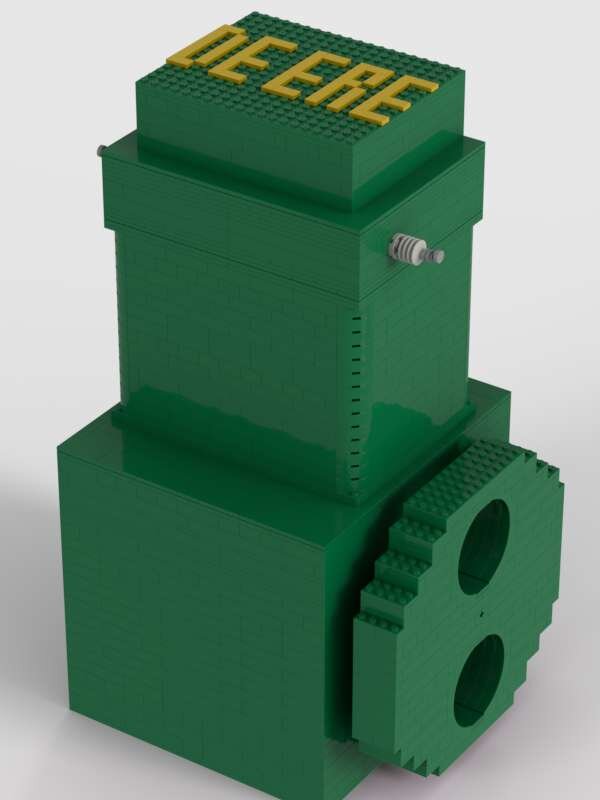
-
 It has been a while since I've introduced you to my early history of Model Team scale and type MOCs I have built years ago. I have to appoligise to the ones who have been looking for more, because there is a lot more to show. Let me correct this mistake and present to you the next page in my LEGO car building history booklet.It's Jeep Wrangler Rubicon - three door version. This was the first MOC I've built using exatly zero white bricks. Maybe it is a bit hard to tell from the sunny background, but the color is dark red. Back in those days we didn't have the new tires in this diameter, therefore I didn't have any other choice than to use those bubble tires. Hard to tell now, which ones would look better for this offroader. Anyways. To tell the story further - it is a three door version. Everything opens. Doors, trunk, hood - all were functional. And of course, as for these cars - the black roof can be detached. It actually consisted of three parts, which you could detach independent. There was one bit on top of the driver, similar one on top of the front passenger. And then the biggest part at the rear. Oh yea.. now, when I see the pics, it was quite a challenge to build the nose, the part which gets narrower. Aaand... the front grille. But all legit. Nothing glued or stressed.Yep... that's it for now. Hope you like it. Feel free to leave some comments or ask any questions about it if you have any. I hope I still would remember the details about it.See ya soon. Hopefully sooner that in two years from now :)Rolic
 -
 My fastest vehicle yet, this model is designed to take trails at speed, just like the real trucks to on the deserts of the world. I was quite happy with this, it's fast, but still capable of moderate terrain. it is, just like the real trucks, very easy to flip at speed. Rebrickable LXF file Instructions
 -
Hey all, hopefully you've stopped by the frontpage recently, because a new LDD update file has been released!! I just downloaded it myself, and I must say that the most important elements added (imho) were the Servo Motor and the L Motor!! Please read this thread for more details!! Thanks, ~M_Slug357~
-
My new Lego Gundam MOC, base on a Gundam in season 2 of the series "Mobile suit Gundam 00", piloted by main character. This mobile suit later will attach with the mobile armor 0-Raiser to become 00 Raiser which is very powerful. Name: 00 Gundam Code: GN-0000 Upgrade form: 00 Raiser Pilot: Setsuna F Seiei Power source: 2 GN-Drive (Twin-drive). Series: Mobile suit Gundam 00 Weapon: 2 GN-sword, 2 beam saber. Compare to my previous MOC from "Gundam Iron Blooded Orphans" which i wanted to simple and easy to build the inner frame. This time, i purposely want the frame have more articulation and the out side armor become more accurate to the real design. ***For all articulation and detail, please check the video : No weapon view: LEGO 00 Gundam GN-0000 by demon demon demon, trên Flickr LEGO 00 Gundam GN-0000 by demon demon demon, trên Flickr LEGO 00 Gundam GN-0000 by demon demon demon, trên Flickr LEGO 00 Gundam GN-0000 by demon demon demon, trên Flickr LEGO 00 Gundam GN-0000 by demon demon demon, trên Flickr The twin-drive can be rotated to the front: LEGO 00 Gundam GN-0000 by demon demon demon, trên Flickr LEGO 00 Gundam GN-0000 by demon demon demon, trên Flickr Two GN-sword can be attach on both sides: LEGO 00 Gundam GN-0000 by demon demon demon, trên Flickr LEGO 00 Gundam GN-0000 by demon demon demon, trên Flickr LEGO 00 Gundam GN-0000 by demon demon demon, trên Flickr LEGO 00 Gundam GN-0000 by demon demon demon, trên Flickr LEGO 00 Gundam GN-0000 by demon demon demon, trên Flickr Holding GN-sword: LEGO 00 Gundam GN-0000 by demon demon demon, trên Flickr LEGO 00 Gundam GN-0000 by demon demon demon, trên Flickr LEGO 00 Gundam GN-0000 by demon demon demon, trên Flickr LEGO 00 Gundam GN-0000 by demon demon demon, trên Flickr LEGO 00 Gundam GN-0000 by demon demon demon, trên Flickr LEGO 00 Gundam GN-0000 by demon demon demon, trên Flickr LEGO 00 Gundam GN-0000 by demon demon demon, trên Flickr LEGO 00 Gundam GN-0000 by demon demon demon, trên Flickr LEGO 00 Gundam GN-0000 by demon demon demon, trên Flickr LEGO 00 Gundam GN-0000 by demon demon demon, trên Flickr LEGO 00 Gundam GN-0000 by demon demon demon, trên Flickr LEGO 00 Gundam GN-0000 by demon demon demon, trên Flickr Two GN-sword can transform to gun mode. LEGO 00 Gundam GN-0000 by demon demon demon, trên Flickr LEGO 00 Gundam GN-0000 by demon demon demon, trên Flickr LEGO 00 Gundam GN-0000 by demon demon demon, trên Flickr LEGO 00 Gundam GN-0000 by demon demon demon, trên Flickr LEGO 00 Gundam GN-0000 by demon demon demon, trên Flickr Thanks for visiting !
-
Hello everyone, this is my new LEGO Gundam MOC. This time i want to try to build a Mobile Suit from Universal Century timeline which has similar design with RX78-2 Gundam in the Scale 1/60. This Gundam is from the movie "Mobile suit Gundam F91", piloted by Arno Seabook ( appear again in Cross Bone Gundam ). The "F" in the name stand for "Formula". This is light class Gundam, and of course shorter than other normal Mobile Suit. But this Suit equipped with the very powerful weapon: Variable Speed Beam Rifles (VSBR) on the back. This is my Youtube channel (demon1408): https://www.youtube.com/channel/UC9ZlMk-PW3hKg4ZOzzGd2pg?view_as=subscriber And if you like this, please support me in LEGO Idea : https://ideas.lego.com/projects/8dc1c051-9ba0-4d11-80bd-0ad14a5319a2 Weapon: _Mega Machine Cannon _Beam Sabers _Beam Shield _Variable Speed Beam Rifles (VSBR) References: _Master Grade 2.0 (MG) _Movie art Albums: Flickr: https://www.flickr.com/photos/134378223@N05/albums/72157700972342935 Devian Art: https://www.deviantart.com/demon14082000/gallery/67512324/LEGO-Gundam-F91 ***You can check the Youtube video for full gimmick and articulation : Over view: LEGO Gundam F91 by demon1408, trên Flickr LEGO Gundam F91 by demon1408, trên Flickr LEGO Gundam F91 by demon1408, trên Flickr LEGO Gundam F91 by demon1408, trên Flickr LEGO Gundam F91 by demon1408, trên Flickr LEGO Gundam F91 by demon1408, trên Flickr With Beam Rifle: LEGO Gundam F91 by demon1408, trên Flickr LEGO Gundam F91 by demon1408, trên Flickr With Mega Machine Cannon: LEGO Gundam F91 by demon1408, trên Flickr LEGO Gundam F91 by demon1408, trên Flickr LEGO Gundam F91 by demon1408, trên Flickr The Cannon can be attach on the back: LEGO Gundam F91 by demon1408, trên Flickr LEGO Gundam F91 by demon1408, trên Flickr LEGO Gundam F91 by demon1408, trên Flickr Using the VSBR: After switch the VSBR to the front, you can extend the length and armor of the weapon. At first i just make it extend the length just like the MG version. But then i think its possible to implement the extended armor just like Metal Build version, and this is the result. Maybe you will see it clearer in the Youtube video. LEGO Gundam F91 by demon1408, trên Flickr LEGO Gundam F91 by demon1408, trên Flickr LEGO Gundam F91 by demon1408, trên Flickr Use all weapon at once: LEGO Gundam F91 by demon1408, trên Flickr Or using 2 VSBR: I also implemented the Full Operating mode. You can pull out the Heat Radiations Fins from both shoulder armors and Retractable Thrusters from behind of legs unit. You can only push the back of the leg and all 3 thruster will be bursted out. The beam shield can also be pulled out. LEGO Gundam F91 by demon1408, trên Flickr LEGO Gundam F91 by demon1408, trên Flickr LEGO Gundam F91 by demon1408, trên Flickr .....All weapon again: This is my most favorite pose...because it look so cool and powerful. LEGO Gundam F91 by demon1408, trên Flickr LEGO Gundam F91 by demon1408, trên Flickr LEGO Gundam F91 by demon1408, trên Flickr Thanks for visiting !
-
DOWNLOAD: Runnable version /Windows platform/ GitHub repository HOW THIS WORK: This extracts brick usage informations form a LEGO Digital Designer model file. This program tells you, which parts where used, and how many of them, thus creating a Bill Of Material. DESCRIPTION: This is remastered version from https://sourceforge.net/projects/lddpartslist/ . I repair some bugs, add preview and update XML documents. So: partnames.xml knows 8700+ official LEGO elements. There are still mysterious parts that are waiting to be discovered. xml2html.xsl and xml2txt.xsl they are responsible for the content and appearance. If you familiar with XML style sheet transformation. You are welcome to modify them to you wish.
-
After couple of years working on a not-car projects I picked up BMW i8 as my next project. This time I plan to post a work-in-progress pics here as well. Just for fun I think 05-May-2018Started with side. It has interesting door shape - both - the front and the end are sloped. Let's see how this construction will flow together with 75 degree inverted slope 06-May-2018Yep - it flows very nicely with 75 degree inverted slope. But - wow.. the struggle with the door end and the section around it. It has three different angles there in a small area. So complicated. I bet I'll return to this section 06-May-2018Continued with front grill. Those small neck brackets are really nice. They give the narrow gray line just above the kidney-grill section. And at the bottom the bumper will cover half of the plate, so the lines both will be as narrow as it can get. Also - a small update at door window line. Implemented the half plate increase (do not mistake that with half-stud offset). This gives the window line much smoother increase from front to the rear 07-May-2018Continued with headlights. There isn't much space to work within but somehow I managed to "break" the headlight in two angles and cover the side of it. 08-May-2018Something unusual. Normally - when I redo a part of my MOC, it gets more accurate shape, but at the same time it gets more fragile. Not in this case. The headlight outter section and the outter-bottom part of the bumper got nice curvy shape and is even stronger than before. 16-May-2018Changed the bottom of the grill section. Instead of half-covering the lower plate, I changed the entire supporting construction and implemented there headlight brick technique. This gives the desired grill look and the bumper fits there perfectly too. Now I'm struggling with the air intake and the small loop below the grill. Have tried like three or four different techniques, but nothing fits there like I want it to... 18-May-2018 After countless iterations I think I finally got the front air intake right. Turns out - I had to use the smallLEGO Technic panels. The connection is strong and easy. To be continued...
-
My entry for the Fictional Architecture category of Marchitecture. I chose to recreate Lichtenstein Castle, which is a real building, but is also used as the castle in Dornröschen – a 2009 German film adaptation of Sleeping Beauty. The model certainly had its challenges, but I’m very pleased with the end result. Credit for the bridge design goes to John, who helped me out with that portion. Plenty more pictures are available on Brickbuilt. Feedback always appreciated
-
 This weekend i found many copy's on my door mat from a interview last month i heaved with the international tug magazine LEKKO. Because this was not my first interview for a magazine, news site ore TV and heaved learned a lot from earlier experience that it's write more in my way, but the outcome is not writing exactly what i have told the interviewer. Still this is free promotion and i am proud that they ask me to stand with a 3 paged article. For enlarge the article you can better see my Flickr link: https://www.flickr.com/photos/vfracingteam/albums/72157680847111183
 -
 September 2013 the first WIP picture of my crane was uploaded, now 3,5 years later I dare to say the model is finished. In all these years I have faced a lot of technical challenges with this model, thought most of them are solved a few remain annoying (steering and drive). In the end I consider the model done and decided to learn from the not fully working features to improve on in later builds. Other tough challenges that were beaten in this model are: Fully capable outriggers that lift the complete model of its axles, Lift of the boom using a brick build linear actuator, fitting tens of meters of wire in the model to power all the led's. A full list of the features can be found at the end of the post. Even though I consider myself quite a purist a few elements of this model are not from TLC. For control the model uses 5 sbrick's together with a custom profile, enabling all the rc features I needed with a good signal . Since the PF led's are way to expensive and dull I decided to solder my own led's with the right color and a good brightness. The stickers are supplied by JaapTechnic. More pictures can be found on my flickr Full road configuration with 14.4 tons of ballast weight. The spreader plates are stored on the back. All the light are controlled by the Sbricks, this includes the indicators, beacons and reversing lights. Yes this actually lifts. With the jib mounted the piston is able to erect the then 1.7 meter boom to full height. Fully erected the model stands 2.6 meters tall. Even though the model faces a lot of technical challenges all of the details are added including full interior in both cabins. Full feature list. Motorized functions: Drive, Steering, Outriggers front and back, Compressor for the outriggers, Slewing, Boom lift, Boom extension, Winch, Cabin lift. Light functions: Normal driving lights, indicators, hazard lights, beacons, reversing lights, working lights on the superstructure. Other functions: All cabin doors open, Openable storage doors on the back, Full suspension, Folding jib with multiple angles, Folding safety railing.
 -
 Well, it is great to see a forum dedicated to scale modeling, so its not more then fitting to put my latest work here: A Peterbilt 379 with Polar tanktrailer. A large (1:13) scale Lego tanker combo had been on my list for a long time. I made a small 1:22 Kenworth cabover with milktrailer in the past, and had plans for a 1:16, but in the end started work on a full 1:13 scaled combo. My 2012 dumper combo was getting old, and I wanted something new to bring to shows as well. Now I wouldn’t be myself not to take a new build a bit further again, and this one should be extremely detailed, coloful, and fitted with lights. Once more I hooked up with my good friend Rob from Brickstuff.com, and this time we didn’t make compromises. We even added a custom controller/effect board, powered by a USB Varta 10400 mAh powerpack that is located in the sleeper! There are lights everywhere including over 60 driving / contour lights, but as a special feature the underside of the chassis of both tractor and trailer are equiped with over 180 RGB LEDs to simulate the glow effect seen on showtrucks. This really gives amazing effects. A custom remote control is split into two channels that control the contour lights and the underside seperatly. Effects include color changing and strobes. It took me 5 months to build this truck and some 9000 bricks went into this, including electro-plated chromed bricks by Bricks4all.nl. My buddy Jaap Kroon (Jaap Technic) printed the stickers for me, a job well done! And a shot in the dark: A video is on my flickr stream: https://www.flickr.com/photos/bricksonwheels/
 -
This is my entry into the Architecture category of Marchitecture. It was a very fun challenge to work in the Architecture scale, and see how much of the real building’s detail I could capture. Due to the small scale, it was easy to make revisions, a good thing as it took quite a few experiments to get each area of the Chateau to look how I wanted. More pics on my website. Thanks for looking
-
Hello everyone, bare with me as this is my first post and my make some newb no-no's I've been looking to order a set online with future hopes to install a Sbrick and have some fun with the kids. Now, i can't decide what to order...if i order anything at all. Was looking at Aliexpress and can't decide what to get. i want a good decent set that offers most of what i'm looking for in a bundle. Keeping in mind, most of the outdoor area here is either bumpy, grassy or parking lot. - maybe looking for racer, possibly F1. but i see that getting stuck a lot around here except the parking lot. - WHEELS and SUSPENSION ;) family are mechanics, this is the only way i get to keep my hands clean ;) - parts gearbox, 4wd... - was planning to get SBRICK, motor advice? With that being said, i'm thinking of a crawler/buggy type..... long suspension, big wheels, room for motors..... able to "take a beaiting" Any suggestions, I thinking along the lines of the 3335 or 3360?
-
For a new commission, i heaved to worked complete out of my comfort zone. Later on you get the full picture what my dedication was.
-
Years ago I had a wish to build a truck. And.. I had plenty of white bricks. So I googled some white trucks and it just happened that I found a Scania T-cab wrecker truck from Slades Garage. Somehow I even got in contact with Matt, the driver (and owner?) of the truck. I contacted him for more pics and features of the truck. But.. he didn't replay in time. The first version of my model had pneumatic features on it. Many of functions where wrong. Then.. months later fellow Mocker - Dennis from Netherlands - discovered my moc and offered me few more pics of the truck from one of the truck-shows. That gave me opportunity to observe the details more closely and build a better version, a second version. And this time I went for remote control features. But - as the electric motors were stronger than previous pneumatics (and they also took more space) the result was more fragile. So there was a second rebuild, a third version with entirely new chassis, built out of lego technick. So.. after something like three years and countless iterations, I consider the moc finished. It has eight functions - all four by two channels are used: - Driving (XL motor - channel 1) - Steering (M motor - channel 1) - Left outtrigger (M motor - channel 2) - Right outtrigger (M motor - channel 2) - Raise / lower main boom (L motor - channel 3) - Underlift (M motor - channel 3) - Extract / detract main boom (L motor - channel 4) - Spool (M motor - channel 4)
-
Hi, This is my newest 1/42 scale model of a Ferrari Testarossa (ish^^). Without the grilles its hardly a rossa, but if one would add custom stickers on a real one, it could turn into one ;) The whole build is 5 wide in front and ends in 6 wide at the rear end and taillights. I also rendered my first 360° view and arranged a small video clip for it. Enjoy! Ferrari on model stand by Ron Dayes, auf Flickr PLEASE CLICK ON THE PICTURE BELOW FOR THE VIDEO Ferrari Testarossa remastered by Ron Dayes, auf Flickr
-
 By reading the title you may thought - Yeah i know this model, you designed it 4 years ago... Yes... but nope. This is an entire new version relying on the same real truck but this time in 2 different colours. The previous version designed in December 2012 used Technic beams and liftarms. Since brick build models can be way more detailled - I chose that technique to build the new model with. Also i discovered the truck could use some more power so there are now 2 PF XL motors in it. There are a lot of improvements on this new 2016 version. All features, included by the fact its SBrick controlled, are listed below: Powerful 8x4 drive train by 2 Power Functions XL motors 2 axle steering by Power Functions servo motor 2 Power Functions front LED lights Sbrick Controlled Openable cabin doors with realistic hinge design Openable storage doors with realistic placed lever behind the seats Tilt able cabin with easy acces to the V8 fake engine Fully adjustable seats and steering column Fifth wheel suited for automatic steered trailers Front and rear tow bars Easy accessible Rechargeable battery box on top of the cooler behind the cabin Improved playability with sturdy overall build quality Off course there is a building instruction available for these new models. Compared to all my other instruction this one goes again one step further in quality. With all stickers implemented in the instruction you can't make a mistake anymore regarding their position. Check out my website for more information about the building instructions: JaapTechnic Website Check out the entire photoshoot on Flickr LEGO - Mercedes-Benz Actros 4165 by Jaap Kroon, on Flickr LEGO - Mercedes-Benz Actros 4160 & 4165 by Jaap Kroon, on Flickr LEGO - Mercedes-Benz Actros 4160 & 4165 by Jaap Kroon, on Flickr LEGO - Mercedes-Benz Actros 4165 by Jaap Kroon, on Flickr
 -
 Hello people, as i have seen some topics made by some members were they share their creations, modifications and ideas, i thought it was a good idea to start my own topic about that, this way i can avoid filling other topics with too many information by saving all that information here and just posting small texts in those other topics. To start, i would like to share some creations which i worked on: Model Team Nissan Frontier. This is one of my oldest models, i made it even before i knew about Eurobricks, and i would like to share it with you because you might like it or modified it: This model features front independent suspension, rear leaf spring suspension using 5.5 axles, HOG steering, working doors, bonnet and tailgate, 5 seats and a towing hitch; its very possible that some parts are with wrong colors or there could be outdated building techniques, but i think that is not too bad for one of my first LDD models (i am no sure, but if i have enough time and inspiration i could make it in real Technic parts), The LXF: http://bricksafe.com/files/imanol/nissan-frontier/Nissan Frontier.lxf. Model Team Paramount Group Marauder MRAP. Again, one of my oldest models, it is made at a pretty small scale but it could still be considered as "model team" (i think), it has pendular suspension in both axles which are damped by cross-axles which act as leaf springs, it has HOG steering, working winch and doors, a spare tire and 2 turrets that can be mounted on the roof: The LXF: http://bricksafe.com/files/imanol/paramount-marauder/Paramount Group Marauder.lxf Technic Unimog U500 Long Chassis (I have called it UNI-MOC) You might have seen it in the latest posts at 8110´s Mods topic ( http://www.eurobricks.com/forum/index.php?/topic/57543-8110-unimog-mods-and-improvements/&page=78 ), it is a 64 studs long and 24 studs wide model which i started to make because the modifications in the 8110 got to a too high level and i wasn´t satisfied with the whole model, i created this new model to hold all of my wanted functions and details, this model has some designs from other builders: Madoca´s Tatra 2-speeds gearbox (slightly modified to fit in this new chassis), Efferman´s planetary rims, a modified version of Didumos knob gear driven axle and a 3-side dumping system and dropping sides inspired by Kumbbl´s modifications, it was also made by some help and inspiration by Pat-Ard: This Unimog has 4 M-Motors, 2 L-Motors, 2 XL-Motors, 3 IR RC Receivers, 2 AAA Battery Boxes and 3 PF Switches (brick-built with ugly colors), why so many motors? well, as you might know, the 8110 had only one M-Motor inside it, which was meant to drive the 3 main functions of the set (front PTO, rear PTO and the pneumatic pump) the problem was that the functions couldn't be used simultaneously, you couldn't power front and rear PTO´s at the same time or with the pneumatic pump and because this system uses a gearbox and axles to engage and transmit the power to the different parts, this results in a lot of friction and power losing (other of the reasons of why i started this MOC), other thing that bother me about the 8110 was the proportions of it, it was very tall with lifted wide axles, but very thin cab and bed which made it look silly, the chassis had no space for all the functions that i wanted, i couldn't place enough motors or functions on it, and the axles were another problem, the steering pivot and angle was a disappointing, the tires couldn't steer too much with the half pins, and if you removed them, the mudguards and the surrounding elements needed to be placed far away from the tires to avoid them from colliding, these are few of the reasons of why i started to make my own version of this UGN class of Unimog (which are U300, U400 and U500). Some of the good features of this model are: Improved steering pivot (2 studs closer to the wheels compared to standard portal hubs) Wheels and portal hubs can handle more torque without jamming parts The axles are more compact (less tall), so the chassis can move even lower for a more realistic performance Front steering by L-Motor Rear steering (By M-Motor) with the same axle design as the front one Anti-roll bars in both axles, which help a lot to handle with weight and give a lot of stability, and they can be easily removed for serious offroading Remotely shifted 2-speeds gearbox by M-Motor Directly driven pneumatic pump (L-Motor) and PTO´s (M-Motors) for less power losing 3-side tipping 37 studs long 23 studs wide dump bed with dropping sides using a V2 large pneumatic cylinder Drive by 2 XL-Motors So, these are some of my models, i hope you like them, and i hope to upload more of them, i will try to do my best with all them, let me know what you think about this topic and the models, and any suggestion is well received Thanks.
 -

How Stud.io import LDD models
Jarema posted a topic in Digital LEGO: Tools, Techniques, and Projects
I use Stud.io Open Beta v1.0 (21) with LEGO Digital Designer 4.3.10. This digital model is under Creative Commons license. Did Stuid.io use out-of-date ldraw.xml or I should wait to next release ?!! FIRST IMAGE Import into Stud.io as LDD model. SECOND IMAGE Import into Stud.io model after export from LDD using updated ldraw.xml as LDraw model. -
Hello and thanks a lot for checking out our latest collaboration! This project features a highly detailed replica of the iconic 1968 Fiat 500 F! Produced from 1957 to 1975 the Cinquecento is considered one of the first real city cars. Read more here. Consisting of 1157 pieces (all add-ons included) this model would be the ultimate for any fan of the Italian legend and definitely a great addition to any Lego collection. The major features are: -detailed exterior with custom prints such as the fiat logo and several prints on the back end -openable hood, trunk and doors -sun-roof (closed and opened) -removable luggage-rack on the back end -suitcase with a bottle and a glass inside -detailed trunk with spare wheel, fuel tank, car jack and a toolbox -engine compartment with a detailed 500cc straight twin engine -detailed interior with movable seats, pedals, handbrake as well as custom prints for the dashboard and the speedometer As mentioned above the proposal for the set includes two sun-roofs which can be interchanged to have the roof either opened or closed. Furthermore, it also includes a removable luggage rack with a suitcase. Now enjoy this beautiful video and make sure to share it! So what are you waiting for? Head over to Lego Ideas and hit the support button to make this become a Lego set! This model was built in Mecabricks and rendered using Blender. Special thanks to zanna for making the awesome pictures and the video! It doesn't only need a good model to make a great project but also a cool way of presenting it. Make sure to check out his Flickr account for more amazing images! Thanks for checking out our post. Make sure to support, comment and share!
-
This model is a modified CREATOR set called Lighthouse Point. (set number 31051) I removed the light-up brick and as such changed the top of the tower, along with tweaking the inside details and adding a custom Lighthouse keeper out of 1990's mini-figure parts. The model has modular parts out the wazoo, with a whopping 10 building sections. (their was one one more module from the set, but I removed it before taking pictures.) The set also comes with a killer whale / orca. You may have also noticed I had a bunch of trans - yellow bricks from a Classic Space build left over. They made a good replacement for the light brick. The inside features a table, lamp, and mounted instrument from the early days of sailing.... though this device measures where you are via the sun, so what is it doing on a stationary lighthouse? (The yellow chairs I added myself, along with the red soda can.) The set contains 10 modules as follows, (in no particular order): Tower top with light, building roof, building proper, small dock, exposed small rock, exposed large rock, tower foundation, two red tower modules, and a white tower module. This cute critter comes with the main model of set 31051. His flippers move, his tail flops around, and his jaw opens to swallow fish.... or unwitting swimming mini-figures! Thier is no LDD file for this build, but it shouldn't be too hard to recreate what I did, right? Comments, Questions, and Complaints welcome!
-
 Hi Everyone, Just want to share a video and some photos of a MOC I recently finished. The aim was to make a compact studless chassis with a studded body over it. The result is that the bodywork can be easily taken off and the chassis can be reused for other models. More photos and instructions can be seen on Rebrickable: http://rebrickable.c...s/night-phoenix Thanks!
 -
Alternate MOC model from official LEGO City sets. Let's start with a few LEGO City 60182 set alternate remake models. 60182 Truck and trailer 60182 Hot Rod Duel 60182 Minivan and pickup 60182 Dragrace cars Thanks for watching!