Search the Community
Showing results for tags 'STEAM'.
Found 189 results
-
Hello everyone, Years ago, I saw a 3D rendered image of a streamlined locomotive online. I built a model of it then, but I didn't do a very good job of modeling it. Complicating the matter is the fact that the locomotive seems to be fictional, so I only had one render of it to go on. After coming back from college I decided to see if I could do a better job of it. Here is the result: and here's the image I based it off of: Some details wound up being cartooned away. The fictional locomotive appears to be based in part on H45 024, a high-pressure variant of the DRG Class 45. Since there was only this one rendered image for reference, I had to extract out the proportions of the model by "reversing" the perspective of the image to figure out what the locomotive looks like from the side. The side view suggested an oddly short condensing tender; I may change that on a later revision. There are two things I enjoy a lot about this model. The first is the three linked flanged drivers, which prompts a lot of head-scratching when I point it out. The model does in fact drive through all switches and curves -- I'm using a variant of Ben's sprung wheel trick shown here. Essentially, the middle drivers are on sprung half-axles and retract inwards a little on curves. The second feature is the use of technic piston heads for buffers -- they're just the right size! It turns out that if you jam them over a 1x1 plate with horizontal clip they stick. Full gallery here. Thanks for looking -- let me know what you think.
-
Hi! This is my new Cuusoo project, a river paddle steamer! It has an interior and several play functions, like an automated paddle wheel without any motor ("push driven"). Please check it out at the link, and perhaps vote for it, or leave a comment! Thank you!
-
[full gallery] I have modified the locomotive from the Lone Ranger, Constitution Train Chase (Lego set 79111) to add working driver rods. I had to completely rework the pilot to make everything work, but I think the final design is pretty good. The new model is the same width as the original, one stud longer, and it has working rods. The mechanicals are packed in very efficiently. The front wheel just barely clears the cow catcher, the side rods just barely clear the crossheads, I came up with a clever bearing to fit over the moving pilot axle, etc.. With the moving rods I think this engine is shaping up to be pretty sharp. A larger tender would be nice, and one of these days I'll take a stab at that. The one tradeoff (and I'm not sure it is much of a tradeoff) is the fact that I had to convert it from a Ten Wheeler to a Mogul. Here's a shot of the modified engine on a curve I've prepared instructions for the modification and have already uploaded jpegs to brickshelf (I'm working on finding a good home for the .pdf version). There are two versions of the instructions: V1 is for building the modified model from scratch, V2 is for retrofitting the completed model after it has been built. To build this modified model you will need the parts that come with Lego set 79111 and the additional parts listed on the last two pages of the instructions. Note that this build requires 4 non-Lego pieces for the driver rods, available here. [full gallery]
-
SKYHOLM 1858. The United States achieved world supremacy and respect of all countries. At the first International Technical Exhibition in 1858 the flying city of Skyholm designed by the US chief engineer was presented. The city was sent to travel from continent to continent and show the rest of the world the success of the American experiment. The flying city became a great symbol of the American ideals. However the city suddenly disappeared for the unknown reason. The greatest achievement of America disappeared completely … No one knows how to get to Skyholm. __________________________ This is my entry for the russian contest STEAMPUNK MACHINE which won first place. Blogged by The Brothers Brick Deeplinks : Main-First level-Second level-Steam reactor-Roof Main Picture | More Pictures Inspired by BioShock Infinite by Irrational Games SKYHOLM- the flying city by Fianat, on Flickr SKYHOLM- the flying city by Fianat, on Flickr SKYHOLM- the flying city by Fianat, on Flickr SKYHOLM- the flying city by Fianat, on Flickr SKYHOLM- the flying city by Fianat, on Flickr SKYHOLM- the flying city by Fianat, on Flickr SKYHOLM- the flying city by Fianat, on Flickr SKYHOLM- the flying city by Fianat, on Flickr SKYHOLM- the flying city by Fianat, on Flickr Thanks for viewing!
-
Hi, I am currently working on a 4-4-2 steam engine and need some help. The base looks like this: I know that I can fit a 88002 PF Motor here, but the engine would run muuch too fast and wouldn't have much hauling power, so I wondered what I would have to do to get it to the same speed as the other PF trains, if possible. Is there a possibility, and how would I have to do that???
-
Hello again peoples :) I present here another Tank Engine MOC, this one based off a train that once ran through my back garden from 1830's to the 1950's! :O Sadly, it was retired and scrapped and retired after the roads became more popular, but it was one of the oldest railways in the world. Out of all my Engine MOCs, i'd say this is my most 'advanced', and by far my favourite! I'm very pleased with the result. Here's a picture of the real thing ( A painting, I know, but it's the best one I could find :P ) Let's see how my one looks in comparison! Please forgive the camera quality, I have to use my phone sadly. :/ Here's the 3/4 front view! The coupling system will work different to the Lego magnetic one, due to my own scarcity of those parts. I'll use two of those pieces that are 2x3 with the holes in the front. I like the look of the buffers, and i cheated a bit with the engine "face", because I don't have that part in black :( I used black insulation tape to colour it black, without permanently affecting the part. I also left two dark grey lines for those things Steam engines have, I think it's a hinge for the door or something?? :S Here's the illustriative back view: If I had two dark grey 2x1x2 window pieces, they'd be there, instead of the angry eyed look it currently has :( A side view, showing the studless nature of the engine: I had to leave the front wheel a stud up from the tracks to allow it to turn on curves, because the back two wheels are a motor. I've made it so the rear buffers come off easily, in case I want to motorize it some day. Here's the inside of the cab: It's a 4x4 space, with a firebox underneath the controls. Here's the final view of it, on my work in progress town layout! I made a makeshift carriage for it too, but it's not worth seeing, I might post pictures later on when I make some proper carriages for it. Please let me know what you think of the engine! Leave me some constructive criticism too please. :) Axle
-
Lego 79111 Constitution Train Chase The largest of the new Lone Ranger licensed series, this train comes complete with track and a bunch of figures. You'll have to wait till the end to see the figs though. I haven't seen the movie (it's not out yet!) and honestly am not that familiar with the Lone Ranger, so I'm reviewing this primarily as a train set that happens to be tied to a movie, not as a licensed set that happens to be a train. Name: Constitution Train Chase Set Number: 79111 Pieces: 699 Price: $99 Minifigs: 7 Theme: Lone Ranger Year of Release: 2013 Links: Bricklink Peeron Brickset The Box The Box front shows what I assume to be the Lone Ranger theme, with a bright yellow band across the top for high visibility on the store shelves. The train is shown on track with the usual liberties in how things are happening - for example, the horse cannot stand in that pose without falling over. They had to stick the water tower in the back so it didn't obscure the train, which is a bummer since it's a cooler accessory than the exploding rocks. The Figs At the bottom of the front there's a lineup of the figures included, with their names so you know who's who. Lego was really trying to save space to give the train as much room as possible on the front though, so they cut the legs off all the figs! The 1:1 On top of the box, they used the same figure lineup (but with legs this time!) as the 1:1 size indicator. That's sorta surprising to me, since most buyers would know what size a minifig is, but it's hard to judge the size of the train from the photo. Something like the wheels from the locomotive would be a better scale I'd think. The Back On the back of the box we have the usual second photo of the whole set, plus insets of all the play features. You can see that the water tower falls over, the gun spins, the tender has a hiding place, etc. The Contents Inside the box you get: bundles of track, 6 numbered bags, one un-numbered bag, a tiny sticker sheet, and two manuals. Sorry, no cardboard for the manuals so things are a bit curled. The Stickers The small sticker sheet isn't too bad, considering the size of the set. There's a couple stickers for the locomotive and one "scratched panel" that'll go on the jail car. The Manuals Two books - the first builds the locomotive and tender, the second builds the other two cars and the accessories. All the instructions are clear and simple to follow, as long as you actually pay attention to the part box to make sure you do everything you're supposed to on each step. The Wheels The locomotive gets 6 large wheels. They're the same as the Emerald Night (and the Toy Story train). They're packed as two bags, each with two flanged drivers and one blind. Good to see these available again! (well, I guess they are in the Monster Fighter Ghost Train, but who bought that?) The Special Parts There's some nice pieces here. I'm not 100% sure on the colors, but I think the silver bars and rocks are "metallic silver" in Bricklink naming. That's definitely a new color on the ingots, and the silver rocks haven't been seen in years (assuming they are metallic silver). The printed tiles (you get an extra of the stopwatch) are nice and useful, though a real slingshot would be cooler! And the guns... this is a new mold from the old revolver. It's nicer, more detailed, and you get it in both light and dark pearl grey in this set! 3 light and 2 dark, to be precise. The crate is not a new mold, but it is a new color. I think it's medium dark flesh, but I could be wrong. Building the Locomotive, 1 The locomotive starts with a nice sturdy frame. That's good to see, since the Toy Story train was so wobbly. Building the Locomotive, 2 Pretty obvious where this is going... but also obvious that there's not going to be an easy way to motorize it. Building the Locomotive, 3 Details are starting to appear. It also surprises me every time how many colors Lego sneaks into things where they won't be seen. This set included a number of the dark orange 2x2 round plates, and none are visible in the end. Did they have extra dark orange ABS left over or something? Building the Locomotive, 4 More stacking. And some SNOT starting to show... Building the Locomotive, 5 The first stickers go on 2x4 tiles to indicate the RR. I like the detailing in the rods on the sides too - a black wand, a black lightsaber handle, a cone, and another wand. Simple but nice detailing. Building the Locomotive, 6 Finally, the wheels. Sadly, there's no driving rods in the set to make it look more realistic, but it'd be easy enough to add. And I'm not OCD, so my wheels aren't all lined up like in Lego's photos :) Building the Locomotive, 7 The front bogey is nicely designed. And you can't have a western train without a cowcatcher! Building the Locomotive, 8 The base of the locomotive is done. Since the center driving wheels are flangeless and there's nice articulation between the front and main parts, it'll work just fine on Lego track. Building the Locomotive, 9 Now the cab is taking shape and we're finally getting some color! Sorry, no glass in those windows. Have to add that yourself if you want it. Building the Locomotive, 10 The green slopes here are the same as used in the Emerald Night, but without the gold stripes. There's a bunch of snot brackets used to give the boiler its shape. Building the Locomotive, 11 Here's how the front of the loco comes together. There's an extension with snot brackets that lengthens the boiler, and a tile on the top of the bogey so it can slide. Once the rest of the green slopes are added it'll be plenty strong. Building the Locomotive, 12 Nearly finished. The dark green looks great and I like the black stripes in it. Building the Locomotive, 13 The bell and light are both nicely built. The pearl gold clip and fez make for a great small bell to fit the scale of the train. Building the Locomotive, 14 Complete. The hat on the front gives some nice details there, and the overall train is just nicely made. I'm not 100% in love with the smokestack design, but it's ok. The Tender, 1 The tender is pretty simple, but it looks good. The trapdoor is a quick way to get some basic play features for the kids, and some round black plates on top help the appearance. The Tender, 2 And it's done. (actually, it's not. there's a shovel that goes on the front and some wands that go in the back clips that I forgot to put on before the photo - but basically, it's done) The Gun Car, 1 Here's the base - a nice way to get snot right away. And the second car will use the same base, so pay attention :) The Gun Car, 2 I really like the touch of red here. Otherwise, it'd be pretty dull. The Gun Car, 3 Some storage bins are added, as well as the base of the gun. The Gun Car, 4 There is a pretty simple mechanism coming to make the gun spin. First, a crank is built (that tan crankshaft part is pretty rare in this color) with a gear and a towball as a handle. The Gun Car, 5 The gun car is done. You can see the gear mechanism here. The binoculars and barrel make a pretty decent-looking gatling gun. The black pins mean it has enough friction to stay at whatever angle you put it. Likewise, the click turntable underneath means you can position the gun and have it stay. The Jail Car, 1 The base is the same, but the top changes from the gun car. Bunches of 2- and 4-long log bricks combine with some 1x1 cylinders to make most of the walls. The Jail Car, 2 The sides are now done and sliding doors are added on both sides. There's also a nice jail door dividing the car in half. The Jail Car, 3 Nearly done. The Technic beam in the rear pivots to knock out the end wall (not in place yet). I love the simple little lamps at each end of the car though. A great little detail touch. The Jail Car, 4 The end wall. The sticker side goes inwards to form the jail cell in the car. The outside has some dynamite attached - combined with the lever sticking out of the roof at you have the nearly-mandatory-for-Lego-sets knock-out wall. The Train Is Done The full train. It's a nice length for pushing around by hand, although it definitely helps to have it on the track since the front bogey on the logo flops around if you don't. It's sorta goofy - I mean, how many trains have massive gun cars like this? - but it's a great toy. And if you mod the cars into something nicer, it makes a great old steam train. I just think it's fantastic! The jail car would be simple - take out the lever and bar windows, fill in those gaps, and it's a great little boxcar. Take the gun off, and you have a nice little flatbed car. The Water Tower, 1 Time to finish the scene. First comes a water tower. The base has a lever and some of the new 1x2 plate with pinholes, and they're all nicely reinforced with the tan curved bricks. The Water Tower, 2 Almost done. There are a few trans-blue parts inside the tank to be the water, and the whole thing is ready to topple. The Water Tower, 3 And it's done. The dynamite (with a little help from the red lever on the other leg) is ready to crash the water tower across the train tracks! I found in my play that usually the whole tank pops off, but it doesn't come open and spill the 4 trans-blue parts out. That's fine as far as I'm concerned - they'd be a pain to pick up if they flew out. But really Lego, just 4 little 1x1 round bricks to fill the tank with? And I assume that this water tower is for the townsfolk, not for filling the train as it comes through, since the spout is away from the tracks if you have it ready to fall and block them. Makes you wonder though why they'd build a tower so close to the rails... The Exploding Rock, 1 No build photos needed here. It's simple but blows up pretty good. The Exploding Rock, 2 It's a nice play feature except for one thing. You have to hold the front of the rock down when you press the lever or the whole thing flips up. The tan base needs to extend out a little on the lever side for stability! On the other hand, the pair of grey slopes sticking out on the front make great spots to hold it down with a finger or two. The Figs Finally, what you've all been waiting for. Here's the 7 figures. The Lone Ranger gets a pair of guns, but Butch only gets one. And poor Latham - he can hardly stand up with that rifle in hand! Seriously though, these figs are just fantastic. I'm not familiar with who they all are, but who cares? They're just great old-time characters! Four very different hats, wide variety of torso prints, great faces. The Backs All the figs have back printing as well. The Alternate Faces With the hair off, you can see the alternate faces that some have. FYI, Tonto's hair is rubbery, but the rest are hard plastic. Tonto's hair also has a small hole on top for the bird to attach to. The Horse Even I know you can't have the Lone Ranger without Silver. This horse is like the new ones in LotR with moveable rear legs, but it's the first time for that version in white. And yes, the standard brick and plate are included if you want to remove the saddle. The Comparison, 1 Here's the Constitution next to the Emerald Night. You wouldn't expect them to be on the same scale since EN was the same price but without track, such awesome figures (though it does have 3 basic figs), or a Disney license. I have to say, I'm impressed with how well the Con stands up to the bigger brother. I wouldn't think twice about running them on the same layout, especially if you added some driving rods to the wheels. The Comparison, 2 From the front you can see how much larger the EN is in pretty much every way. The boiler is MUCH bigger, but again, I'm impressed that the Constitution doesn't look bad in comparison! The Comparison, 3 For a perhaps more fair comparison, here's the locomotive from the Toy Story train (7957). Granted, the TS train is supposed to look like a toy, but I just was never really impressed by it. It always seemed flimsy to me, and it was annoying to push around by hand since both sets of wheels are articulated on that locomotive. The set didn't include track, so most had to play on the floor with it. The Con is much more sturdy and looks FAR better. The extra $20 in retail price is well worth it, especially since you get more figs AND a loop of track. The Conclusion Wow. I LOVE this set. I'm not really a western guy and don't know the Lone Ranger, but I think Lego hit a solid home run on this set. I think it's a far cooler train than any of the recent sets. Obviously apples to oranges since there hasn't been a steam train since the EN, but still... the one drawback as a train is that there's no simple motorization option. You could put a train motor under the tender, but it'd take modification of the floor to work, and there's not room for a battery box in the tender. A better option might be to make a larger boxcar and use that for power, since you could put the motor underneath and the battery and IR receiver inside. For the kids, it's a great train with lots of play possibility, sturdy enough to play with, and it comes with track to play on. The Ratings Value: 10/10 - Considering the EN was $100 when it was out, and other train sets are more (but also include power functions), this is a solid value. You get 7 great figs, a horse, some scenery, and a great train with track. Design: 10/10 - It still looks good even standing next to the Emerald Night. Enough said. Minifigs: 10/10 - These 7 figs (and the horse if you want to count him) are all great. Not a dud in the group, and a wide variety too. Playability: 9.5/10 - I only took off anything because if I was a kid I'd want it motorized and have a remote. That would have kicked the price way up though, so I totally understand Lego doing it this way. Parts: 9/10 - Train parts, nice dark green curves, a simple but sweet water tower. My only complaint would be a lack of much color, but it's not supposed to be a brightly colored Toy Story train. Overall: 10/10 - A Great Set.
-
full gallery I am pleased to present my rendition of the preserved GN S2 class 4-8-4 northern, #2584. This locomotive has been on my to do list for quite some time. I was waiting for the cheese slopes to come out in sand green and then it was only a matter of time. I first saw this engine many years ago while taking Amtrak through Havre, Montana where she is on static display. How bold to paint a steam engine such a bright green. Sure, she was an oil burner, but still, imagine the work to keep that boiler looking clean. The US railroads loved to do this sort of thing and fought to keep their equipment clean (remember, these trains were the equivalent of today's business class on transcontinental flights, heck, the NYC's 20th Century limited is where the phrase "roll out the red carpet" originated, but I digress). Delivered in 1930, the engine arrived in the Glacier Park paint scheme and the fleet of S1 and S2's were used to pull the finest passenger trains on the Great Northern. By early 1950's they were reassigned to freight and repainted black. The 2584 was retired Dec 1957 and stored. GN decided to preserve this locomotive and after restoring it, put it on display in 1964 (more details can be found here). When I saw it, it still had "no trepassing, BN Ry" signs on the fence. So presumably it has been under railroad ownership throughout. When I started building the custom valve gear parts, I knew it was time to build this engine. It took a few months, but here's my model. I must say, building in rare color like sand green is extra fun. Let's take a tour from the front to the back. On the nose I had to have the air compressors, and here was the first collision with the limited parts availability in sand green. I almost gave an arm and a leg to solve it but in the end I managed to keep the arm. Getting all of the snot for the smoke box working was an exercise in multi-dimensional optimization. On the side the stairs up to the running boards turned out well (I'm not sure if I came up with that solution on my own or if I first saw it on another model). Also note the hand rails, a refined design from my earlier northern's. Within the boiler, the framework is largely unchanged from my J, and later used on two other northern's. The design is solid for operating at shows with uneven tracks- the drivers are pulled from the pilot truck and the boiler itself rides on just two trucks. This has the added feature of keeping the swing within reason on curves. Allowing me to put the tender foot plate at the cab foot plate (with the aid of a few wedge plates). I must say, when building a locomotive for tight curves, you come to understand why the rear corners of the cab roofs and top corners of the tenders were cut off. The frame is also strong enough that you can put two or three of the northerns on the point of a heavy train and pull through the front couplers. While viewing the second image above, note the sloped front to the cab borrowed from my NP northern, the mud ring on the bottom of the firebox borrowed from my Milw northern, the cab roof details borrowed from my SP pacific. I think the vent hatches look particularly good in dark red. You will also see one of the design elements that I'm quite pleased with, the sand green ladder above the running board. I'm getting ahead of myself on this tour. Jumping back to the drivers for a moment, I used my custom rods and valve gear bars for the drivers, including modeling the Walschaerts valve gear. Meanwhile, up top, I managed to sneak in a 1/2 plate offset for the green boiler jacket (visible in the very first photo in this post, where the gray smokebox transitions to the green boiler). Now moving to the rear, this oil burner had a Vanderbilt tender. I knew that wouldn't be much of a problem since I had already built one packed with PF equipment for my SP pacific. I had to build the complete engine first, so that I could figure out the clearance for the tender. This time it wound up being almost entirely snotted. Since I did not have to worry about putting anything in the tender, I could get the proportions better than the SP tender. I even included a rounded bottom (though no good photos yet exist). I've got to say that Vanderbilt tenders are hard to photograph and I'm not completely satisfied with the quality of the photos of the tender, but this one should give you an idea, If you look closely, you will also see my Indiana Jones moment. I was faced with figuring out how to get the ladder on the front of the tender. On curves, the couplers swing out to 6 wide. So there wasn't enough room to get any design I liked in there. Seeing the man waving a pair of machetes at me, I dropped my whip and picked up my six shooter. Voila, as I slip another rung down the lego purity slope, the custom ladder was born. They looked so good, I decided to hang another pair off the back of the tender (I'll post more about the ladders soon). Now returning to the prototype for a moment. The Havre locomotive looks striking in its green paint, but while I was digging up reference material for this model, I quickly learned that it was the wrong color. From everything I've read, the Glacier Park paint scheme was commonly used on passenger locomotives, but it was never an official scheme. For the curious, click the small image below for the best color example of the scheme that I'm aware of. Also note the herald on the engineer's side, the goat is facing to the right. The closest lego color to the original green would probably be dark green. Still, I like sand green as the prototype is currently and I didn't want this to look like a Emerald Night MOD. Still, it has gotten me wondering why the prototype is the wrong color. GN preserved this engine and then BN, so it is not like some misguided town repainted it in the faded color after years of neglect. full gallery
-
Work got fifth place (of the thirty seven) in a contest "Steampunk Machine", at Bricker.Ru site (in 2013 year). You can look for other works by this link. Text is taken from the contest: Ladies and Gentlemen! Mesdames et Messieurs! Herr und Frau! Tovarischi! Come closer!!! Only today you can see by your own eyes New, Fantastic, Practical & Efficient self-moving vehicle Excalibur!!! Let me introduce the Inventor: Mister Fines Moriarty... What can you tell us about your creation? - First of all it is: - Three-axle vehicle of cross-country ability. - Aggressive appearance helps to scare away the bad ghosts & silly pedestrians. - Excellent colors! Noble bronze & yew. - Equipped with the newest steam boiler. - Two exhaust pipes helps to control temperature in boiler! - On both sides of cabin there are wide convenient doors. And good rear-view mirrors. -Capacious cargo bay. - I will not show you what is inside ;) - Two headlights. - System of steam-cylinders are FIRST TIME-made in one case! - Windscreen wiper. On the upper side you can see inlet of the: - Air Injection System. Also we can see fire-box-door. It can be feed by wood or coal of other fuel. - Steering-wheel provides precious steering control. Or you can buy it, or it will follow you in your nightmares… You to choose... ;) I hope you liked it. Thanks for watching! Yours, Pikachu... P.S. If you find mistakes - please write to me & i'll correct them.
-
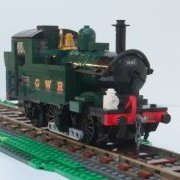
This MOC is a blast from the past:http://www.flickr.com/photos/brian_williams/sets/72157633093116564/ . The year was 1999 when I joined GMLTC to exhibit at the NMRA National Train Show in Minneapolis, Minnesota. To my knowledge this was the first time a Lego layout exhibited with the NMRA National Train Show - and it was a HUGE hit. My contribution to honor the occasion was to build the William Crooks: the first locomotive to operate in Minnesota and two prototypical cars of the Saint Paul and Pacific Railroad. Now remember this model is a tad old... and it hasn't been upgraded through the years. It retains a basic slope boiler and studs on the roofs. However, the custom stickers still hold-up with the best today as they were made on an Alps. The technique to allow the cylinders to clear the pony truck is still quite unusual. And of course there is the pure nostalgia factor ! - Brian Williams
-
One of the most enduring stories of the Civil War is the 1862 Andrews Raid... or better known as the Great Locomotive Chase. The namesake at the center of this drama is the locomotive "The General": http://flic.kr/s/aHsjEtRoBg . The paint scheme shown here is not how she appeared in 1862... however it is the one popularized in the mid-20th century and what most people remember. This static display model was a commission. It leverages many techniques from my Wild Wild West locomotive "Inyo" but with a more traditional brick frame. It also sports a set of Zephyr1934's (Ben C's) custom drive rods ( http://www.bricklink...re.asp?p=zephyr ). My only regret is that I ran short of large BBB drivers so had to include standard Lego drivers :-( - Brian Williams
-
This little engine was inspired by the little shunting engine from LEGO's own City set, 4204 'The Mine' which it is pictured with below. This little engine is just 5 studs wide, and can run on rails at just 4-studs wide. The LEGO historians amongst you may recognise the character on which it's name is based. The engine is based on the iconic miniature engine 'Talyllyn', from the Talyllyn Railway, the worlds first preserved railway in Wales, United Kingdom. The aim was to not to create an exact replica of the engine, but rather it was a self discipline exercise to produce a set that would fit in nicely along side the rest of the LEGO City range. As well as to represent a steam engine at this small scale. Heres an image of it next the magnificent Emerald Night to appreciate the scale of the model. The entire 3-piece train is a tad longer than just the Emerald Night's Engine section! Had all the pieces been available in their respective colours I would have made a physical version of the model, but alas they don't, so instead this model was created using Bricksmith and rendered in POV-Ray (Thanks to C3POwen's awesome tutorial). I've decided to upload it to LEGO Cuusoo, so if you like please SUPPORT it there. It would be great to have an actual LEGO Train set that was more affordable to those with a smaller pocket, as the smaller sets in the Trains range always seem to be random rolling stock, railway furniture (lights, station accessories, etc) or track packs, not much with the 'swoosh/chuff' factor. There are more pictures as well as a second engine and some other rolling stock in the works which I'll post up here, and in its Flickr Album when they arrive..
-
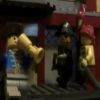
There doesn't seem to be a dedicated thread on here about this year's STEAM, so I created this one to show a couple of videos. This one's mine: This one was made by Infinite 8, who were also there on the Saturday with some expensive-looking equipment, and is slightly higher quality: Enjoy.
-

LDD MOC: Brick Railway Systems #1227, 2-8-4 Steam Locomtive
Murdoch17 posted a topic in LEGO Train Tech
I bought some instructions from Anthony Sava's BrickLlink store the other day, and finally finished MODing the model in LDD. The instructions I bought were very easy to understand, and If your thinking of buying them, do it. You won't regret it! ...Anyway, I haven't come up with my usual backstory yet, so here are my pics. The locomtive is number 1227, and was built in 1933 by Lima Locomotive Works for Brick Railway. The white tiles on the tender / cab are supposed to be printed, and in real life will say: Sides of cab: 1227 Sides of tender: BRICK RAILWAY SYSTEMS Rear of tender: BRS (or maybe 1227, I haven't decided on this yet) Inside of the cab. The slopes will be replaced with two printed pieces, and the firebox door is also a placeholder. I really enjoyed redoing this model, and making into my style. Once again I wish to thank you, Mr. Sava, as you design really thought out, good looking engines' & rolling stock. I give you :thumbup: for excellence and ingenuity. (NOTICE: NO instructions will given here or anywhere else by me, so don't even ask, as I don't want to take away Anthony's hard work and give it away for free. If you really want it, buy the instructions & modify it.)