Search the Community
Showing results for tags 'mindstorms'.
-
 Dear All, LEGO lasts forever – assuming “forever” is exceeding 6 decades – which surely will happen (or has happened already?). I still have bricks from 1965 (my first LEGO set was #323 – a push along steam train running on rubber tires …) – that still have very good clutch, colors only very little faded – and seamlessly fit into 2017 sets. Almost as long as I live, LEGO has been part of my life. True, there were dark ages from the late 1970’s to 1996 – but then it instantly came back – everything: The excitement about a new model, just another LEGO box, new bricks, colors … and it never disappeared since then, in contrast. 1998 was the ultimate rush back into the LEGO world: The Mindstorms RIS system – the RCX (at that time without the “1.0” extension) – it blew my mind. And since then a somewhat larger collection of all themes has assembled over the past 20 years. Building over multiple themes is my brick-philosophy. During my dark ages computer technology became my favorite hobby. The “IBM PC” was lightyears out of reach but other miracle machines came up: The C64, the Sinclair ZX81 – and that one was within reach of my limited budget! 1 kByte of memory and a 16 kByte dynamic RAM extension I built myself. “Tri state TTL bidirectional bus drivers”, the 74LS243 – and no internet, that remained to be invented. And it went on – the ZX Spectrum with 16 kByte of on-board memory got a 64 kByte memory “upgrade” – switchable in two banks. It was fun. Today, TTL chips are fading out and 64 kByte would result in the worst digital “photo” ever … I am not whining – so many wonderful new things have emerged! What really shocked me though was when TLG did not even think about making a 64 bit driver for the “perfect” Mindstorms USB IR/VLL tower. That beautiful communication hub for all RCX1.0, 1.5, 2.0, Scout, Spybotics, MicroScout, CodePilot bricks one is truly dead since 64 bit operating systems have taken over. At least this is what I have learned from the internet after years of searching. The next shock came around 2002, when .NET came up and Microsoft said “no more VB6 development at all”. VB.NET was so different from what I knew. In the following years I stuck to VB6 … my fault, sure. But I am moving slowly as time for LEGO is rather limited. XP vanished, 32 bit OS came out of fashion – and all that cool stuff – the Mindstorms software, the NXT software, NQC for RCX, RobotC for RCX … and all my VB6 programs – almost “gone”. Well, I kept of course my Dell Latitude E6500 laptop running WinXP SP3 with all that stuff installed and I still have it! Carefully backed-up everything and there it is, slowly aging. I hardly like to play with that thing – I don’t want that it gives up, which will eventually happen of course. Yes I know: “Install XP within a virtual machine” – but that did not work to the extent I would like to use a “LEGO programming and playing workspace”. The one thing that changed everything were internet rumors about the old Mindstorms RS232 tower working well with NQC/BricxCC on a 64 bit Win7 machine. So for the past couple of days between Christmas and New Year’s I was browsing the net, installing this and that, copying stuff from my old XP machine … and: BINGO. It all works! Everything works on my rather new DELL Precision 7510 with Win10 Professional as OS. All the old-back-from-the-late-1990’s stuff! OK, I know, not everybody will be as excited as I am. But I believe LEGO lasts forever – and now all the software I love so much, as well as all my old-fashioned programmable bricks (there are currently 9 RCX1.0, 6 Scouts, 10 MicroScouts, and 1 NXT PBricks doing work on my train layout) are directly accessible from this laptop, and they are programmed/operated using NQC/BricxCC, NXC, NXT-G, RobotC, the Mindstorms SDK 2.5, and most importantly VB6 SP6 programs – all natively running on a Win10 64 bit platform. A dream came true. And for all old or old-fashioned Mindstorms PBrick heads, for all who never managed to get their head around .NET stuff, for all who still believe that RCX’ and Scouts are miracle thing: Here is how I got it to work: Assemble some software from the internet: BricxCC (free, latest version from 2011) The Mindstorms Software Developers Kit (SDK) 2.5 (free on Philo’s homepage) RobotC for RCX 2.03 (which is free as well). Don’t download the 32 bit tower driver. It won’t work. The NXT 64 bit driver from TLG VB6 SP6 from Microsoft VB6 cumulative update for SP6 from Microsoft Get out the original CDs for: VB6 (SP5 or higher) The NXT-G 2.0 software suite – if that is not at hand, TLG’s Mindstorms website has it Assemble some required hardware The Mindstorms RS232 tower. They came in 1998 with the original RIS system – and they are widely available at BrickLink for about $5. Don’t forget to put a fresh 9V battery into the battery compartment on the back. Slide the range knob on the front to the left (short range). An USB2RS232 converter – I tried a (randomly picked) LogiLink converter, which works just fine. A PBrick of type RCX, RCX1.5, RCX2.0, Scout, or Spybotics. The next steps are for proper tower access: Plugin the USB2RS232 converter into the computer and let it find and install the driver (either shipped with the converter or on the internet). Open device manager (Windows key + X, select “Device Manager”), expand the “Ports (COM and LPT)” section, find the “USB Serial Port (COM X)” entry, double click it, choose “Port settings” then “Advanced” and make sure the COM port for this device is in the range between 1 and 8. Otherwise BricxCC and other old programs will not find the USB/RS232 converter = IR tower! It cost me some time to figure that out. When all COM ports in this range are taken by other devices, move one of them to the next free COM port far up and then manually (modern hard/software has no issue using COM ports in the range exceeding COM 8!) assign the converter to the now free COM port in the 1 – 8 range. Plugin the IR tower cable into the USB2RS232 converter. Next is getting access to RCX, RCX2, Scout, and Spybotics PBricks via BricxCC – this will also let you download the latest RCX firmware is case it is “gone”: Install BricxCC (full install) – this comes with NQC and many more things, e.g., the RCX firmware downloader. Put a PBrick from the list above into the IR tower range, a couple of inches away. Start-up BricxCC – it will try to connect to an RCX PBrick and most probably fail (“Cannot find brick. Switch it on or move it closer and press OK”). Press “Cancel”. Select “Tools” in the menu, go to “Find brick” and in the window that opens, select the correct COM port manually. Also select the correct PBrick. An RCX, RCX1.5, or RCX2 without firmware will correctly reply to the “RCX-type” in this window. The LED in the tower should come on and the program should connect to the PBrick, which is shown by many of the menu icons now being enabled. Download firmware to the PBrick (RCX, RCX1.5, RCX2) and that is done. Next is RobotC – this very straight forward: Install the software and run it. Select menu entry “Robot” and then “Platform type”. This should be “LEGO Mindstorms RCX”. Select menu entry “View”, then “Preferences”, then “RCX communications port” and select the COM port you have the USB to serial converter on. Download the required RobotC RCX firmware – and done. Next ist NXT-G – again very straight forward: Install the NXT-G software. Install the 64 bit NXT driver – done. Finally VB 6 – this is a little more elaborate: Install the Mindstorms SDK 2.5 – this will register one essential DLL correctly (vpbcom.dll). I don’t know how many times I tried that manually – I am too old I guess. Don’t install any USB tower software – it won’t work. You can test a PBrick connection using the “ScriptEd” program – upon starting it, the IR Tower LED should come on. This program also lets you download firmware or monitor the IR tower. Very handy for checking things. Install VB 6 from the CD. Now the trick here is that a full default install won’t work. Follow the instructions of this youtube video. There are many others, but this worked for me. I did the install directly from the “VB6 Professional CD” I still had (the video assumes you have an enterprise version but that makes no difference). The single most important point is to uncheck either the entire “Data Access” check box during the preparation steps for the installation or select “Data Access”, click “Change Options” and uncheck the “ADO, RDS, OLE DB Data providers” entry. The let the install program do what it has to do and be patient at the end, when it attempts to register all sorts of things. That may take several minutes, at least on my machine. I had a cup of coffee, did some other things and when I came back, it successfully finished the install. Install VB6 SP6 in case it is not already on the CD. Install the cumulative patch for VB6 SP6 in case it is not already on the CD. Right click on the new VB6 icon in the start menu, go to “Properties” and select “Run in XP SP3 compatibility mode”. Run VB6. Open or start a new project, then select “Project”, “References” and then tick the “LEGO VPBrick 2.1 Type Library” – and access to the above PBricks is established! The Mindstorms SDK has a PDF explaining the calls to the routines you need for that (e.g. ”FindPort” or “OpenPort”. This is it. At least on my computer. There may some other things to do on other machines, but it really appears to be doable. Just in case you want to program with VB6 “forever” or more importantly run all of TLG’s miracle PBricks from the latest Microsoft OS … as I do. And Yes I know, neither Microsoft nor any decent programmer will endorse this, in contrast. But then: It wasn’t my fault that TLG never published a 64bit driver for the Mindstorms USB tower. Nor did Microsoft ask me whether or not it would be OK to abandon VB6. All the best Thorsten
 -
 Two years ago I presented you my first pinball. Today I want to show the second version, with changeable boards and an interactive Mindstorms board. If you like it please add your support on LEGO Ideas page https://ideas.lego.com/projects/4025655b-7b86-4aeb-bc91-57aa33c862e7
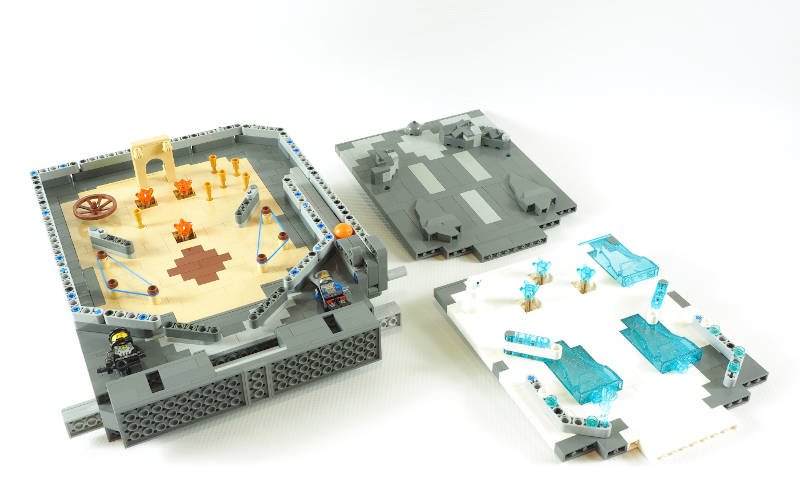
-
 Did you know that any standard EV3 brick is capable of controlling the LEDS separately? And that the display is capable of displaying 4 shades of gray? No, this extra functionality is not available via the standard programming environment that Lego provides. But if you use low level programming (I used EV3DEV in combination with C++), you have. See the example below. You can read my article at our blog here: https://siouxnetontrack.wordpress.com/2020/04/25/lego-mindstorms-ev3-with-an-image-with-4-different-shades-of-gray/ Or have a look at the Youtube videos. Enjoy. Hans
 -
 Thought I'd create a thread to just post WIPs of my MOCs, or neat mechanisms. Finished: Generic Muscle Car
 -
I have a small IT class project for school where I have to program an EV3 robot through the small basic extension. I want the robot to play a sound file (a short rsf file) but I don't have access to all of the folders nor do I have access to the EV3 software... The sound file I want to play was made at home using the EV3 software but I can't use the exported rsf in my code for some reason. I have tried several things but without access to all the folders (I can reach several folders but not through the root so I can't reach the sounds folder) and the EV3 software I'm stuck... Can anyone help me with the rsf without saving it in the sounds folder?
-
I'm trying to use EV3 with Scratch. I've posted few videos. Maybe someone will be useful.
-
 Hi. I was working on my car MOC (with a four-speed gearbox designed by Sariel) and had some unfortunate events happen. As stated in the title, the differential is somehow making the gear ratio higher than I need it. The gear moving the diff is moving at the same speed as the power input, but the wheel hub moves one rotation for every 3/4 rotation that I move the input shaft. Is this differential piece supposed to do this? I want the wheels to move at the same speed as the motor at 4th gear, which brings me to my next problem. I hear rapid-fire clicking noises every time my car is in 3rd and 4th gear. This happened to my other MOCs too, but I was able to solve it. Since the car is to be powered by two EV3 large motors, I actually believe there might be a clutch mechanism in the motors such as in the Technic linear actuators that also make a terrible clicking sound when they move all the way up or down. Whatever it is, I'm open to responses and hope the Eurobricks community could provide an explanation and solution about both of these issues. Here's some pictures, the orange and red pieces in the first pic were for testing the rotations. ' Thank you for your time.
 -
A new video has been uploaded to our Youtube channel. In 2019, lots of new elements have been added to our layout. To name a few: the warehouse, able to store 60 containers with candies, with two independent stacker cranes, the four candy circles, and an updated delivery station. Also brand new is the PC software that connects everything. We have worked hard to get the software working stable and with success. You can see the result in the video. Enjoy the video! -- Hans
-
Hi. I'm new here but I've been lurking a bit and now I've decided to make a post. I've built a large biped, through multiple iterations in the last 7-8 years. It's a decent build but I've decided I'd like to rebuild it with linear actuators as opposed to all of the current gearing used. Just like I read another poster say in some other thread here, moving the black part of the turn table while keeping the grey part stationary will add a ton of friction. This unit works pretty good, I had it posted on the lego mindstorms site before it shutdown. I also posted it to bricklink as well. I still think it would benefit from LA's, I think there would be less friction and better overall efficiency as opposed to the current 6 turntables driven by one motor. Bricklink Destructor Page I'd like to post pictures and such here but apparently I'm limited to 102.4kb of upload on this post. Please take a look at my post at bricklink and give me some input. There is a .io to take a look at the model. I've also changed the zamor launcher I'm using since I built the digital model. I'm using a standard hailstorm configuration with standard magazines, I've found them to be much more reliable than the design I was using when I build the .io. I've considered building an "agitator" into the zamor mag to prevent ball jams, but the rebuild of the Destructor is priority. Current biped info: Walking: This is achieved by one motor mounted on the bottom center of the biped. It has an 8 tooth gear driving the turntable, which in turn drives another turn table above it and attached to it. The top turntable pulls the legs forward by about 4 studs. The turntable attached to it is responsible for driving the gear inside each leg, which changes the angle of the foot to take the weight while stepping forward. Obviously the legs are synchronized by the motor, as synchronization is very important for this model. Turning: This is achieved by driving a turn table with a worm gear attached to a NXT motor. The is a touch sensor located by a tab in the leg attached to a gear. This is synchronized with when the foot has the weight on it, allowing the sensor to indicate when the foot will be active. At the same time we also know the other foot can rotate back to its original state if it is still in a turned state. Weight: Probably around 1-1.5 kilo Speed: About 40 cm /minute Zamor launchers: Typical hailstorm style launchers. May come back to them once I can work out a way to use linear actuators for the walking portion of the biped. What I was thinking for this build: (Starting from feet up in terms of mechanical workings) First a rough motor idea, I'm using an EV3 to control the machine. Motor 1: Walking/Turning Motor 2: Gear switcher for walking/turning Motor 3: Zamor launchers Motor 4: Maybe instead of switching I could use this motor for turning?? Not sure yet.... Feet: This is where my current turning mechanism is. For a LA driven biped, I was thinking a possible gear switch mechanism to change from walking mode to turn feet mode for turning. Still deciding whether a LA or gear is the better for this. I'm kind of leaning towards gears due to the rotation forces needed for turning the foot. And the difficulty of getting rotational force through the leg down to the foot, while maintaining minimum torque/slop. Walking: I still think one motor driving both legs is best due to the absolute synchronization required. One thing I am considering Is sending two rotational forces through the leg, (if feasible) one to control walking and a gearbox to switch to feet rotation. The second rotation force will operate the gearbox for walking or turning the feet. Possibly I could use the second rotation to send through the leg, knee and down to the foot. Now that I think of it maybe CV joint could do this. Zamor launchers: Maybe they would even benefit from the LA treatment? To be looked into at a later date.... Appreciate any input anyone has. If the link doesn't work the biped is named Destructor. It's on the Bricklink Studio page. Thanks. Edit: For whatever reason the studio page takes forever to load. It eventually does though.
-
This is a 1:8.3 scale Technic MOC car I am making powered by EV3. Things have been going well until I ran into some space issues with some Large Motors. I wanted them to be vertical, but they were too big, so I'm trying ways to get more space so the motors won't be very visible when I build the exterior. In the right picture, I positioned the motors at an angle to save space, however it may make the rear too long. The maximum room I have (according to blueprints) for the motors is 2.5 inches away from the rear wheels, so I need to save a lot of space or I have to expand the rear. All in all, I have to position the motors where they are not too high or not too far from the rear wheels. I'd thought I post this issue I have because I wonder if there is any other better way to do this. Thanks in advance for any thoughts or advice.
-
I am planning to create new GBC modules in the coming years. It will be a combination of Lego Mindstorms and Lego Technic. So not mindblowing mechanical constructions like Akiyuki, but constructions that can only work because they are controlled by the intelligent Mindstorms brick. My first module that I am trying to build (still unsure if I can make it work), is based on the Planar Parallel Mechanism that I saw on Youtube: I find it really cool how it moves. And I thought: let's build this, and use the grabber (visible from time frame 1:23) to pick up balls at the left side of the GBC module and bring them to the right side. Here is an LDD sketch from the first prototype: And a small movie of the first test. The green markers are there, to put the prototype in the start position. That's my major issue right now: how do I now where the four legs of the mechanism are? Working on that now, will keep you posted. Suggestions and compliments are welcome ;-). Regards, Hans aka Mindstorms GBC
-
 Here's my little dumper truck. Functions: - drive & steering (obviously) with PF - adjustable suspension angle (left/right) controlled by a Mindstorms EV3 unit that reads sideways tilt from an accelerometer to keep the truck upright; basically a self-leveling suspension - dumping with EV3 reading PF remote using an IR sensor - Baja Claw TTC tires by RC4WD on Lego 56mm rims. I've tried to fit more, but the problem with these trucks is that the chassis has actually little room, it needs to be pretty flat to fit under the cargo hold, and the area with the most room (front of the front axle) is taken up by the Mindstorms EV3 unit. There was a 4-speed transmission initially, but I've taken it out as it kept disengaging under stress (the truck weighs 4.156 kg). Photos: https://www.flickr.com/photos/44849526@N06/albums/72157710566416217
 -
 Allow me to finally introduce a project that has been a source of many sleepless nights, frighteningly advanced hair loss, and multiple failures since 2016: Moving Minifig Machine Like GBC, "MMM" consists of modules. The module in this thread is a Mindstorms-powered fun fair ride where the minifigs move in, jump, and then leave. See the short introduction here: The idea was born at a LEGO event. The audience always loves GBC, but most builders prefer to build city layouts. MMM is an attempt at combining the movement from GBC with minifig-scaled buildings. Modules are based on raised base plates. This allows for the conveyors and mechanical components (such as a Mindstorms NXT as seen in this module). The front wall allows the builder to showcase the name of the module. It can also be left blank as seen in the adjacent modules, or you can tape printouts onto them with some interesting information of the modules. See building instructions for standard modules here: https://brickhub.org/i/themes.php?theme=MMM The design of this module is based on the classic game Theme Park by Bullfrog which was released in 1994. The "graphics" of the modules I have built are form the 1995 port to the Playstation. This screenshot is from the DOS version: You can see a very fancy version of the in-game model in the cut scene at 8:17 of this video: The module uses a single L-motor for the two tracks. It uses a mechanical "diode" to make the outer track go in a single direction, while the other can change direction. I show it in detail in this update: An NXT motor is used to raise and lower the jumping pillow, while the walls move in and out. Finally, an M-motor is hidden in the "pillow" to move the tracks on it that connect with the outer track at an angle which allows for entry and exit that works fairly reliably. You can see me testing it in this video: I have tried a variety of designs for the pillow which would allow it to be built in red. Designs include rolling cylinders and free-spinning wheels. All of these attempts failed horribly, and I decided on compromising with a gray pillow. I know it is not much, but I hope that you can see the idea behind this. The project might fail - it has done so many times - but I also think it has potential. I have more modules planned and hope that you will enjoy the presentation of them. And if you think that I'm exaggerating when I say 2016, I must begrudgingly say that it is true. Here is an unlisted video of the layout as it were in 2016. The modules have since then been redesigned:
 -
For delivering the candies to the visitors, we use four lockers. The ticket you have received at the beginning, is used to open the locker containing your own candy. The current version uses an iris-like mechanism, you can see it in the picture (click on it to see it on Youtube in action): I am planning to upgrade the lockers to a new door mechanism, the so called torggler doors. It is named after its inventor Klemens Torggler. Below you find a Youtube video containing the first proof of concept. The mechanism will be improved in the coming weeks. Stay tuned! Enjoy, Hans
-
 Summarizing: - WeDo 2.0 - Spike Prime - Mindstorms Ev3 I believe that, since their introduction, automation and then coding were supposed to represent the natural evolution of Technic,however they ended to be confined in the educational niche. Moreover, wouldn't have been better, on a marketing level, to avoid the fragmentation in three themes? I understand that there are different ages and costs but I think that Lego could have stuck with only one sub-brand, whatever it was, then proceeding to diversify. A single sub-brand would have increased the exposure, hence the sales. Confusing marketing, wasted opportunities.
 -
 Motorized model of a crawler crane with Mindstorms EV3. Features driven tracks, and superstructure functions controlled by an automated distribution gearbox. Functions/features: Driven tracks Boom elevation Boom extension Winch Superstructure rotation Ever since TLG released the rotary catch pieces from the Bugatti set I sought to incorporate it in a distribution gearbox so that I could control 4 functions with 2 motors. However, I did not want the play experience to be constantly interrupted by shifting the gearbox. For instance, if I used PF and installed a stepper mechanism to control the gearbox, I'd constantly have to count how many "shifts" I've done to ensure the right function is engaged. With that in mind, I realized Mindstorms EV3 is the perfect solution to this - by simply utilizing a touch sensor, the mechanism can detect how far the shifting motor has rotated thus automatically selecting the right function. The gearbox, which sits at the heart of the superstructure, features a cam attached to the shifting motor to hit a touch sensor. When a command is received from the remote, the shifting motor rotates until the touch sensor is pressed, then the EV3 tells the shifting motor to rotate a certain number of degrees to select the corresponding function. This utilizes a switch/case for the remote, and because it features up to 11 button combinations all superstructure functions are controlled from the same channel (channel 2 on the remote). This gives controlling the model a very natural feel, and sometimes I even forgot that I was controlling a distribution gearbox because the EV3 shifts it so seamlessly. As for driving, it too uses a switch/case for the remote. Because it's just a simple tank drive, the commands for this are much more straightforward compared to the gearbox functions. Driving is controlled from channel 1 on the remote. Additionally, there are sound effects that play while operating the crane. Pressing the left two buttons together in the 1st channel starts the engine (thus starting the program), and pressing the right two together stops it (thus ending the program). Because the PF IR remote uses levers instead of buttons, this effectively makes the model inoperable with only a PF remote. The EV3 remote feels more natural for controlling this model too, as some superstructure functions (boom elevation and superstructure rotation) involves pressing two buttons simultaneously. In the end, I'm pretty satisfied with how this model turned out. I was initially worried that this gearbox I had in mind won't work as smoothly as I imagined, but it turned out to work flawlessly. It often made me forget that I was even controlling a gearbox as the EV3 does the shifting for me. Of course, there's still areas that could be improved - for instance, the boom extension and winch operate pretty slowly. Not using a worm gear in those mechanisms probably would've helped, but that would mean the mechanism becomes "unlocked" as soon as the gearbox disengages it. Occasionally the gearbox would jam, making me restart the program, but overall the finished model met my expectations. Video: Photos:
 -
 Hello, First topic post here. =) So I've built a 6DoF robot arm with a motorized end effector and have so far only done the basic programming of the joint movements using python (ev3dev). I have looked at implementations of reverse kinematics and RRT path planning on other robot platforms and would like to implement it for my arm. Anyone on here has done it before and would like to share how they've done it? Looking for collaborators on the programming side if there is any interest. Here's the link to my very basic code so far: https://github.com/ninoguba/ev3-robotic-arm Thanks, Nino
 -
 I did program something with two "own Blocks" wich work together, but for that I need to check if the text entered in the text parameter of the first block matches the one of the second block. Basically I need to know how to check if "Text variable one" matches "Text variable two". Please comment if you know how to do that, or if you have any good alternatives, currently I use numbers, but that's hard to keep track off. Edit: I program in Mindstorms Ev3 with the Ev3 brick
 -
 This lego GBC module uses the lego Mindstorms EV3 to power the module. It uses a robot arm style mechanism to lift the balls from the previous GBC module to the next one. It is quite reliable and has had almost no issues while I have been testing it. It is quite simple and small for a mindstorms GBC module but it is the first thing that I have ever made and programmed with it. (Do you recommend using the EV3 programming app or Python? I know Python quite well but have not tried using it for mindstorms before) I think it turned out ok for my first MOC using mindstorms, hope to make the next one much more interesting :) Instructions. Photos on Flicker.
 -
Hi, After lurking for several years and after arising of this new Mindstorms forum it's time to start sharing some of my own MOC's. I present the Boogie Burnout: This bot is based on the Rocker-Bogie suspension mechanism, which is also used for the Curiosity and Opportunity Mars rovers. The Bogie-Burnout is my own interpretation of the system and not a copy of existing robots. My main goal was to experiment a little and see if the Rocker-Bogie system would work in the scale of my other MOC's All 6 wheels are able to pivot up and down and turn in every direction. The main problem I faced building a rover this scale was the flexibility of the Rocker arms in conjunction with the middle base part of the robot. Adding flexible links between the left and right wheels solved most of the flex, but turning the wheels 90 degrees still caused the robot to look like a drunken sailor. Adding removable stabilizers solved most of the wonky movements. When not driven 90 degrees side wards these links can be released on one side to give back all flexibility to the rocker system when driving over obstacles. As it turned out, a Lego Technic structure this big has enough flexibility to drive over obstacles without having to unlink the stabilizer bars. The wheels are driven by 4 medium Power Functions , which are geared down in a ratio of 11.7 in two steps. To prevent the current regulator kick in, each medium motor has his own IR receiver, which makes 24 receivers in total. The Power Functions remote is driven by two Mindstorms motors, one for speed control and one pressing the stop button. Controlling two channels simultaneously and thus reducing the amount of IR receivers resulted in lag and speed difference between motors. For each two motors and receivers there is one battery box, this again to prevent the current limiter kicking in. The outside plating of the rover can be removed easily within seconds. Bonus: The Bogie Burnout is high enough to drive on top of one of my older MOC's, which opens some possibility's on events :) Video: Note for the purists: This is not a 100% pure MOC. Some 0.5mm Teflon rings are used to prevent slack in the mechanism and the Mindstorms cables are custom made to length. Some tape is added to the wheels to prevent them from scratching.
-
Hi all, I have a LEGO office building with an elevator. I've automated the elevator with a mindstorms touch sensor. The program starts by descending down the elevator shaft until it sits on top of the touch sensor at the bottom of the elevator shaft. Ideally, the touch sensor is supposed to trigger the mindstorms motor to turn in the opposite direction and pull the elevator back up for fifteen seconds. The mindstorms motor turns again in the opposite direction, so the elevator descends down again to hit the touch sensor. (The process repeats indefinitely) In a vacuum, this program works fine. However, I've had numerous issues with the sensor not triggering, and the elevator eventually winds in the wrong direction and binds with the roof, breaking. I've tried making the elevator heavier, but it still has issues. I want to program a fail safe so that it will bypass the first wait block or cut off the program if the touch sensor doesn't trigger within a certain timeframe. I've included a picture of my current program. Within the infinite loop, I want the loop to start by waiting for the touch sensor to be pressed, then executing the two other motor commands I have following it. While the program is waiting for the touch sensor to be pressed, I want another thread to wait for twenty seconds. If the touch sensor is not pressed within that timeframe, I want the program to bypass the first touch sensor wait block and continue with the last two motor rotations (then repeat). I've been able to branch off into two different coding threads within one program, but I can't recombine the two inputs into the beginning of one block. How do I do this or accomplish my goal in another way? I'm at a convention right now and I really just want this to work. Some more information, the mindstorms motor is connected to a control switch, which tells my power functions motor which way to turn. That's why the mindstorms motor rotations are so short. Thank you everyone for your help.
-
This article about the new Candy Circles, is related to two other threads of mine: 1) The Lego Candy Sorter 2) The Lego Candy Warehouse The new developed Lego Mindstorms EV3 Candy Circles are replacing the Candy Sorter. The color detection of the Candy Sorter was simply not reliable enough. Once calibrated, it worked fine but it was too sensitive for a change in light. Therefore, it was not good enough to perform for a longer time, e.g. at Lego World or during another demo. We decided to go back to manually sorting the candies. But then we still needed some dispense mechanism to release a candy, that would be stored in the Candy Warehouse. I came up with the following solution: Four large circles, containing the candy. A circle would be able to release one candy at a time. The released candy would then be transported to the Trebuchet (where the candy would be put in a container, and then the container with candy is stored in the Candy Warehouse). This was the first prototype: As you can see, there is a touch sensor and one marker added onto the ring. The marker was used to sync a full rotation. After the sync, I would just rotate the ring 360/16 degrees to release the next candy. Because there is always a bit of drift, the sync (per full rotation) was planned to make sure that the drift could not increase infinitely. But, of course it would be better to stop exactly at each bucket. So I made a second proto. As you can see, each bucket has its own marker to stop exactly at the right position. This proto was good enough to start building four circles. And a matching conveyor belt. This is the result: And of course a video: Next step to make: how to determine that a candy circle is empty? I don't have free ports to add an additional sensor. And of course it needs to be reliable! Will keep you posted. -- Hans
-
I get that this isn't the topic forum to ask this under but, I need help with this idea. so I did research and look for how to use a webcam with ev3 and ev3dev_Python, but couldn't seem to find the camera model I'm using. My camera is literally called usb2.0 pc camera if that helps and have no clue about anything else. it works just fine to the only issue is how do I use any kind of USB camera with EV#Dev_Python?
-
 Hi everyone, I'm Shah, and I like making models using just one Mindstorms kit. As I create new builds I'll add them to this post. Would like to share my latest MOC, a steamboat loosely based on Steamboat Willie. STEAMBOAT WILLI3 by Ahmad Sahar, on Flickr STEAMBOAT WILLI3 by Ahmad Sahar, on Flickr STEAMBOAT WILLI3 by Ahmad Sahar, on Flickr Short video clip and building instructions here. Hope you like it.
 -
You might know our group from making the largest automated train layout using twenty Mindstorms EV3 bricks and a PC application (see https://siouxnetontrack.wordpress.com/). Since the beginning of this year we changed our theme from trains to games. We are now making board games like Four-in--a-Row, Jenga, chess, etc. From LEGO, of course. But also where you can play the game against the computer, so robotics and programming is all included. The first game we are building is Four-in-a-Row. The making of can be read in posts at our new blog: https://bricksbuildsbytes.wordpress.com/. In the picture below you can already see the board game, adding the robotics is the next step. Please let us know what you think.