Search the Community
Showing results for tags 'layout'.
-
-Mini.thumb.jpg.03594ed3626ab4a4b625a32af4d03d5f.jpg) (Click to skip to the post with the latest photos) The Backstory: For years I've wanted to be able to display my 12v collection at shows/exhibitions/libraries or wherever, but the wiring is a challenge - I reckon on my last full layout there was 250 to 300 feet (75-90 metres) of the stuff, which on a static layout is one thing, but one built in modules for transport is a challenge. Three or four months ago I came up with a solution (more on that below) and the dreaming started. After much playing in Bluebrick, and nostalgic posts appearing here about older era trains, I settled on a plan. I still had a bunch of my old blue track from the 4.5v era, but no motors. Off we go to Bricklink then! The Layout So, here's the plan. Ten years ago I had a small portable layout on 4 modules, each 3x5 baseplates, and over the years have simply added more of these. Following my Bricklink spree, I now have 2 working 4.5v motors, so rebuilt the loco from set 183 and I have the loco from 7720 in progress. These 2 will feature on the 4.5v loop below, which is 3 of those modules. Next to the 4.5v loop will be the showpiece, the main 12v loops. 12v Lower by andyglascott, on Flickr And on the right of the layout will be the 9v loops. Unlike the other 2 eras, I will have 9v track left over, so this is likely to be expanded in due course, particularly as @michaelgale releases motors, power supply etc. 9v Loops by andyglascott, on Flickr Lastly, there will be another 12v loop, elevated, which will run across the back of all three eras. 12v Upper by andyglascott, on Flickr Putting all of those together looks like this (the white baseplates are roughly where the mountains, tunnels etc will be for the elevated sections. The green and grey sections are simply so I could keep track of where the 3x5 modules were to try and avoid having curves/points on more than one module. When it all comes together, in most likely a couple of years, I'll be able to run 6 trains at a time. Whole Layout by andyglascott, on Flickr The Beginning After all the planning, and clearing away of my last (incomplete) layout, I've finally started building the first module, part of the 4.5v loop. I decided to start here as this will be the quickest era to build, and to a large extent, each era can also be displayed as a stand-alone smaller layout. These three modules will be countryside/farmland, and the trains will reflect the farming side of it when they get built. Module 01 Pic 02 by andyglascott, on Flickr The 12v Wiring The solution that I've come up with is fairly simple, but does involve taking a drill to some baseplates.... At each of the 12v points or signals I'll drill a small hole through the baseplate and the wood for each module, thread the wire through and attach either the original Lego plugs or a quick connect/release plug/connector so that when the layout is set up I'll use already measured lengths of wire to go from that point to the control panels, which will be on their own module. This is going to be a heck of a journey, and build, I'll post updates from time to time, particularly at landmark moments such as completing an "era". I always said, growing up, I was keeping my Lego for my kids. It was really only an excuse, and I'm really glad I didn't sell my old blue track even though I didn't, for years, think I'd use it. Sadly my original 4.5v motors, battery boxes, lights and even signals are long gone, but I was only 7 or 8 when I got 7720....
(Click to skip to the post with the latest photos) The Backstory: For years I've wanted to be able to display my 12v collection at shows/exhibitions/libraries or wherever, but the wiring is a challenge - I reckon on my last full layout there was 250 to 300 feet (75-90 metres) of the stuff, which on a static layout is one thing, but one built in modules for transport is a challenge. Three or four months ago I came up with a solution (more on that below) and the dreaming started. After much playing in Bluebrick, and nostalgic posts appearing here about older era trains, I settled on a plan. I still had a bunch of my old blue track from the 4.5v era, but no motors. Off we go to Bricklink then! The Layout So, here's the plan. Ten years ago I had a small portable layout on 4 modules, each 3x5 baseplates, and over the years have simply added more of these. Following my Bricklink spree, I now have 2 working 4.5v motors, so rebuilt the loco from set 183 and I have the loco from 7720 in progress. These 2 will feature on the 4.5v loop below, which is 3 of those modules. Next to the 4.5v loop will be the showpiece, the main 12v loops. 12v Lower by andyglascott, on Flickr And on the right of the layout will be the 9v loops. Unlike the other 2 eras, I will have 9v track left over, so this is likely to be expanded in due course, particularly as @michaelgale releases motors, power supply etc. 9v Loops by andyglascott, on Flickr Lastly, there will be another 12v loop, elevated, which will run across the back of all three eras. 12v Upper by andyglascott, on Flickr Putting all of those together looks like this (the white baseplates are roughly where the mountains, tunnels etc will be for the elevated sections. The green and grey sections are simply so I could keep track of where the 3x5 modules were to try and avoid having curves/points on more than one module. When it all comes together, in most likely a couple of years, I'll be able to run 6 trains at a time. Whole Layout by andyglascott, on Flickr The Beginning After all the planning, and clearing away of my last (incomplete) layout, I've finally started building the first module, part of the 4.5v loop. I decided to start here as this will be the quickest era to build, and to a large extent, each era can also be displayed as a stand-alone smaller layout. These three modules will be countryside/farmland, and the trains will reflect the farming side of it when they get built. Module 01 Pic 02 by andyglascott, on Flickr The 12v Wiring The solution that I've come up with is fairly simple, but does involve taking a drill to some baseplates.... At each of the 12v points or signals I'll drill a small hole through the baseplate and the wood for each module, thread the wire through and attach either the original Lego plugs or a quick connect/release plug/connector so that when the layout is set up I'll use already measured lengths of wire to go from that point to the control panels, which will be on their own module. This is going to be a heck of a journey, and build, I'll post updates from time to time, particularly at landmark moments such as completing an "era". I always said, growing up, I was keeping my Lego for my kids. It was really only an excuse, and I'm really glad I didn't sell my old blue track even though I didn't, for years, think I'd use it. Sadly my original 4.5v motors, battery boxes, lights and even signals are long gone, but I was only 7 or 8 when I got 7720.... -
 Hello everyone, for those who do not know me, I'm a big fan of trains and especially Lego Train. I finally have a space to create a Layout finally worthy of the name. My approach comes a little more of the model in the sense that I like to see a train pass over another, to automate the network, make realistic through light signals, station stops, etc. ... I started this project in February 2016 in my basement where I made by myself, furniture and shelf for storing SET Lego but also to design the layout. I was already well advanced when an incident occurred: the flooding of the basement end in May 2016 .... Then in August, the discovery of a leak in the water supply of the house forced me to completely dismantle this first try of a Layout to access the water inlet pipe ..... I come back now in force therefore with a first experience, many tests on the possibility for our pretty trains to climb slopes (straight or curved) to optimize the best of my available space and create a nice layout ! ;-) Due to financial limits, this layout will be not made with 100% of Lego, I will use wood and homemade stickers, custom electronic to make it. Here are the first shots (or I should say the nth plan because with Bluebrick, we never stop to change those plans) to my future Layout (so different from the first that I had designed and unfinished) WMLTL - v5 - Level 0 by LegoLow, sur Flickr Corresponds to trainyard + walkway + a brief passage of the 12V track WMLTL - v5 - Level 1 by LegoLow, sur Flickr Ground level with his future main station WMLTL - v5 - Level 2 by LegoLow, sur Flickr First level of the "mountain" : secondary station and then, possibility to climb in the mountain or to go back to the main level WMLTL - v5 - Level 3 by LegoLow, sur Flickr WMLTL - v5 - Level 4 by LegoLow, sur Flickr WMLTL - v5 - Level 5 by LegoLow, sur Flickr Top of the mountain.... Finally a view (done quickly, I will improving later), global superimposed, giving the idea of what will be hidden, visible .... WMLTL Project - v5 by LegoLow, sur Flickr Following probably next week with the start of the implementation of Level 0. It's a big challenge for me because this project is made of mixing differents things : LEGO, electronics, electricity problematics, Priority management on a network, etc.... Hope you will find that interesting to !
 -
Hi guys, I currently have a small city/train layout. It is currently getting to small for my trains and modulars. (if you are interested you can find it here: http://www.brickshel...ry.cgi?f=554588). This made me think over a redesign of the layout where I have more space for the trains and the modulars, and where I have more "track-space" to move the trains on the layout (with the current design I can move 4 trains independently on the layout). I have now to describe what you can see in the image above: First you see the whole visible track of the layout. You can also see that it consist of three levels: gray baseplates = level 0 green baseplates = level 1 (20cm above level 0) tan baseplates = level 2 (only streets and houses, 20cm above level 1) All blue baseplates are placeholders for modular houses. You can also see, that this layout only works with modified points. The tracks on the red baseplates are the ramp where the train can go from level 0 to level 1. In the picture above you can also find the dimensions of the layout. In the pictures below, you can find the track layout of each single level (for reference the track ramp is shown in all thee pictures): Level 0: Level 1: Level 2: Now my Questions are: What do you think in general of my layout? What would you change/ what didn't you like? Do you think the given ramp is doable with PF-Trains (height difference = 20cm) BR, Guenther
-
Hi everyone, Not that long ago I posted my ship on Eurobricks. Now my layout is finished and just in time for Bricks am Meer this weekend. For more pictures visit my Flickr album. Feedback and questions are appreciated. Sander
-
The Castle of Captain Sabertooth is our contribution to a larger Captain Sabertooth (Kaptein Sabeltann) layout built by Scandinavian AFOLs. The whole layout will be on display at LEGO World Copenhagen, Denmark next year. Illuminated using the Brickstuff lighting system, which can be seen in the YouTube video below.
-
Hi, so my LUG is considering building a new train layout for a train museum that hosts us. The Layout we have their now uses 9v Tracks, because we have set it up so that the tracks are powered for X amount of time by a button press. However, the 9v Tracks are ancient, and the trains we have on them struggle to pull even two cars. I don't know if it's because of the layout's size, as it is quite large. (20'x8' or so) So, I suggested we switch to RC track, and use some sort of power functions trains. My LUG though, isn't convinced about this, as they're worried about the batteries wearing out, and having it so that a button can be pressed to start the trains. So my questions are the following: Say we use Power functions trains. How long do the batteries last, if the train is running for a while? We come to the museum every weekend, but the museum is open all week. With power functions, is there a way to set it up so a button can be pressed to run the trains for X amount of time? I'm thinking Mindstorms, or something, but I don't know. We're also not purists, if that helps. Does anyone have examples of such a layout? If anyone has any questions, feel free to ask below. Thanks!
-
 Dear Community, as I am rebuilding my city, and really like the Ninjago city & docks sets, I would like to integrate them.. Do you have any examples to share on how you combined these two universes? Here is my current work in progress layout with three distinguished areas: City, Amusement Park, Suburb. I will then add a sea side probably to include the Old Fishing Store, but for the moment my issue is how to best integrate the Ninjago sets.. Here is where I thought Ninjago sets could fit.. Actually, I have a couple of ideas.. One could be to have a river going into the city (insert a 16 wide river "lane" going through) and then add bridges (almost every city is built around water in real life), or having a lake in the middle.. but in any case for the moment they are in 2 different areas in my mind.. I would really appreciate to see how YOU integrated these elements with other modular buildings.. Or if you haven't, do you have any ideas? Merci in advance for your tips and advice!
 -
I have a standard 36 inch by 80 inch hollow core interior door on folding legs that serves many purposes in my hobby room. It constantly gets repurposed for any number of different hobbies I enjoy. Currently I have it set up for my trains and I've tried to cram as much track and functionality into it as possible. Right now my layout has: two complete loops, a crossover between the two loops, a reversing leg, five sidings, nine switches, a passenger platform with crossing, a cargo or maintenance terminal and room to park all my trains. My blue cargo train (60052) and white passenger train (60051) can run at the same time despite the zero clearance between the loops. The BNSF loco can navigate the entire layout but cannot pass another train on the curves because of it overhang. I know it might look a little jam packed to some but it provides me with endless switching and running possibilities. Hope you like! Newest update- Here's a video of my layout today with only my custom trains running.
-
Hey! So it was time for the yearly Lego train layout in the living room. This time with around 80m of tracks and the Terminator enjoying himself on the roller coaster. Have fun! :D
-
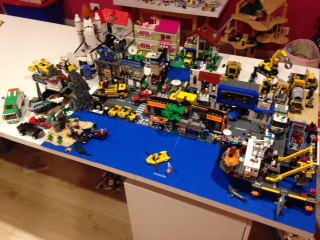
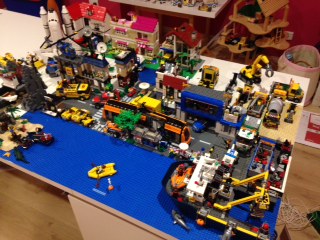
Long Story Short: I have long had hopes for how I wanted my town to turn out, and built a huge table that I dreamed of filling with custom creations and an elaborate layout… However, after many years of collecting lego, it seems as though not even the least of my plans will EVER be fulfilled. I have posted photos of how my layout looks currently: messy and full of holes that rely on the idea of custom buildings. What I need is some advice on how to best arrange my present collection, using only what I've got (some extra parts permitting) to make the most of it, but allow for effective additions down the track. I am also open to suggestions for custom builds that I can start and complete with what I've got. Short story long: All of the sets I own are pictured, all complete, but some with parts floating around elsewhere in the room. In addition to what is shown, I have the 7744 police station (demolished because I couldn't stand the blue windows and unfinished structure) the 4956 creator houses (sacrificed in an attempt to build the large red-roof house at the back) and the bridge from 7900 heavy loader set. To be honest, the town looks pretty lost without the police station and random emergency vehicles floating around. If anybody has ideas on how to repurpose the police station or photos of fitting, alternate designs would be great. In the past, I've gotten sick of seeing things the same all the time, and tried to make little modifications here and there which I could never finish properly with the parts I had. Most of those have been reverted, but I've started too many projects and finished none. The simplest plan I had for this corner of the town was to have a marina running along the water's edge, a port where the large boat is parked, and a railway line from the port wrapping around the outside edge of the table. The shopfronts you see, in a mad rush, were placed around a makeshift square, lane, and the idea was to have port vehicles drive up and around the back of the port, and exit along the water. All of which I can guess is very space ineficcient, and is holding up many other decisions for my layout. A proper automotive shop is currently in the workings to replace the car dealership, but that's it. I have no idea whether what I'm doing is right or wrong, but would greatly appreciate some advice to straighten my thinking, and give me a cleaner slate to work with.
-
During the 19th century, steam was the primal and most important source for machinery and vehicles. Besides steam-powered vehicles, mechanics developed clockwork machinery. Interesting and very usefull machinery were the result of the developing. The miners are mining in the Endarmire Iron Mine. They’re searching for iron. The mechanics use the iron to build (mining) machinery. The Endarmire Iron Mine is a large mine, which contains lots of iron and other ores. In the workshop, three mechanics are assembling clockwork drones. The drones going mining for iron. A large mineshaft brings the miners and drones into the mine. The conveyor belt brings the crates, filled with iron, outside the mine. The conveyor belt and mine shaft are motorized. In the center of the layout is a ore-cruncher. There are two docks for flying transport vehicles. Pictures: 01_Endarmire_Iron_Mine by Mathijs Bongers, on Flickr 02_Endarmire_Iron_Mine by Mathijs Bongers, on Flickr 03_Endarmire_Iron_Mine by Mathijs Bongers, on Flickr 06_Endarmire_Iron_Mine by Mathijs Bongers, on Flickr 19_Endarmire_Iron_Mine by Mathijs Bongers, on Flickr 31_Endarmire_Iron_Mine by Mathijs Bongers, on Flickr 18_Endarmire_Iron_Mine by Mathijs Bongers, on Flickr I've took pictures of the individual Steampunk machines, I'll post them soon If you want to see more (detailed) pictures of the layout, see my Flickr album: https://www.flickr.com/photos/mathijslegofan/albums/72157664907370627 I hope you like it
-
When my wife and I built our new home I decided that I needed my own room for my Lego collection and to build a Lego layout with a complete Lego town. So here are some pictures so far, I hope everyone enjoys what I have done. I used the 9V system exclusively and don't have any plans to change that. It took me forever to ballast the track using the L-Gauge system and a ton of Lego pieces so I really don't plan to change the track layout anytime soon either. The switches are the worst! I am happy with how everything turned out for the most part with the exception ot the yard, I wish it were larger for train staging but such is life. I also wanted a double main but without a 9V crossover solution that isn't possible yet, hopefully sometime soon. Feedback is always appreciated! Lego Layout WIP by freezingvettes99, on Flickr Lego Layout WIP by freezingvettes99, on Flickr Lego Layout WIP by freezingvettes99, on Flickr Lego Layout WIP by freezingvettes99, on Flickr Lego Layout WIP by freezingvettes99, on Flickr Lego Layout WIP by freezingvettes99, on Flickr Lego Layout WIP by freezingvettes99, on Flickr
-
Hey Guys, I have been working on a very small set-up that would both allow a number of modulars and some city prices as well as my TRAINS! While I have all the trains powered at this point many will not see any action but I am very happy with how it has turned out and already planning my next modular buy! Lego Train/Town Set Up by Ernie Darby, on Flickr Lego Train/Town Set Up (Left) by Ernie Darby, on Flickr Lego Train/Town Set Up (Right) by Ernie Darby, on Flickr
-
What do you think.. are the Speed Champions just a tiny bit too big for a Modular Building Layout, or do they fit in?
-
One of the first buildings (from our part of the layout) complete for a Medieval layout to be displayed at a LEGO event in Denmark in May (Klodsfest 2017 Aarhus) More buildings can be seen in the video below
-
After many years of dreams, reflections, planning (starting Winter 2011/12), testing (starting fall 2013) and finally building (starting spring 2014), this project has finally crossed the finish line - probably one of the world's most extreme and most challenging layouts for Lego Train 9V! An indescribable feeling, great satisfaction and relief - and what a fantastic experience! First some introductory remarks: This is not a "usual" but rather a conceptual layout with analogue power supply and -management, without landscapes and buildings (except one train station). A particularly sophisticated construction with four themes: a one-track vertical climb, two double-track climbing spirales, a double-track high-level track 2.16 m above floor level and a rail yard. The layout is intended for Lego trains equipped with standard Lego 9V train engines. It is built with standard Lego 9V rails and points, some of which are modified. So are all four 9V Train Speed Regulators. With the help of points, the layout can be segmented into four sections (Loop A - D) which make it possible to run four trains simultaneously, independent of each other, with up to ten engines each. However, this requires more hands... To avoid/prevent spontaneous decoupling, all my trains are equipped with super magnets. I also would like to take this opportunity and thank all of you who have contributed with support, valuable advice, and encouragement during all these years. Without all this help, this project would have remained just a dream. And this is how it looks like: More pictures, facts and videos will be added to the first entry of this thread Addendum # 1: Technical Data and Details: Track lengths: Total track length (incl.sidings and dead-ends): approx. 173 m Total "Tour" length (from start to start): approx. 105 m Loop A (High-level track 1/High-speed track): approx. 32 m Loop B (High-level track 2): approx. 29 m Loop C (Climbing-wall from level 85 to traverse on level 175): approx. 46 m Loop D (Level 50 and level 85): approx. 21 m Rails: 949 straight, 263 curved and 37 modified (4, 8, 10 and 12 straight) Points: 13 standard points (whereof 3 are operated electrically) 6 crossover points (4) 11 half-curve points (1) Track Design Program: Track Designer Application (R) version 2.0 by Matthew D. Bates (Matt's LEGO (R) Train Depot) Electrics/Electronics: 1 Power Supply Unit VOLTCRAFT EP-925, 3-15 V(DC), max. 25A 4 modified Train Speed Regulators (4548) with LM350T regulators, 3A diodes, outside heatsinks (with a thermal resistance of 1.9 K/W), mini-fans and digital thermometers to measure temperatures inside the boxes 4 Control-boxes to operate 12 points electrically. The boxes are equipped with "memory-sticks" to memorize the position of each point since these are out of reach and sight. 12 PF Medium engines mounted on the electrically operated points 52 Power connections to rails 1 Control-box to selectively turn on/turn off 11 power connections Approximately 1000 m cable whereof approx. 850 m RK cable 1.5 square mm Märklin pins and sleeves 1 LED strand (4 m) with dimmer 1 IR-thermometer to measure heatsink temperatures Construction: 7 levels: Rail yard level (50 cm above floor level) Train station level (85) U-curve level 1 (115) U-curve level 2 (145) U-curve level 3 (175) Eaves level (195) Top-level (216) Max. gradient: 83 per thousand (The gradients are built in such a way that all trains can manage to get uphill and downhill with adhesion, i.e. without cogwheels). Min. clearance: approx. 12 cm Train shelves: Shelf system: Algot (IKEA) 15 train shelves type A (102x11x1.6 cm), 8 straight/shelf 27 train shelves type B (166x11x2 cm), 13 straight/shelf 12 train shelves type C (217x11x2 cm), 17 straight/shelf all train shelves are strengthened with 22x45 mm wood strips All in all 54 train shelves with a total length of 86 m (678 straight) and 108 railway buffers 2 "Trains-in-Transit" (TIT) Trolleys (Algot) Room dimensions: 5.5 x 7.3 m Occupied floor space (incl. train shelves): approx. 9 square m Construction materials: Wood (45x45 mm) and wood strips (22x42 mm) MDF boards (6 and 10 mm) Glass shelves (6 mm) Polycarbonate strips (3 mm) and rivets Cable conduits Steel cords (3 mm) with wire locks Perforated plates and angle irons Cable ditches and cabling towards cable terminal Cable terminal Power supply unit and cable terminal box Control center Addendum # 2: More pictures with some of my MOCs Glacier Express with Matterhorn in the background Trans Europ Express (TEE) "Rheingold" and TEE-VT 11.5 in alpine environment Swiss "Crocodile" (10183) with heavy RhB cargo transport in the steepest part of the entire track - a gradient of 83 permille! "Uppsalapendeln" in the midst of the Swiss Alps - imagine if this were for real .... Emerald Night on its way up to the mountains Track Cleaning Train at Knivsta Station - ready for new missions Track Maintenance Train on its way for a new mission Addendum #2A: Train shelves "Trains-in-Transit" (TIT) Trolleys with two Maersk and one TTX Train section(s) ready for transit Addendum #3: Videos https://www.youtube.com/watch?v=47CqLOQKGLM&t=10s
-
 In a previous thread, I proposed a collaborative Nostalgia Train Layout for this Summer's Brickworld Chicago: http://www.eurobricks.com/forum/index.php?/forums/topic/146028-brickworld-2017-train-collaborative/ This is a new thread is to determine participation so this is your chance to sign up :-) We hope that this collaboration will attract many participants by recreating the nostalgic look and feel of the older train layouts featured in Lego catalogs and the train idea book. Unfortunately Brickworld won't permit us enough floorspace to do the large "L E G O" layout I first proposed. Therefor we are moving forward with the alternative shown here: a moderately sized "50" nostalgia layout to celebrate 50 Years of Lego Trains! Here is a description: - The overall size is 16'x13' - Only official Lego sets will be featured: track, trains, stations and other sets. We have limited space so priority will be given to train specific sets first, then to general town sets as needed. Upgrades and part substitutions are fine as long as the trains still look original (for example replacing 12v traction tires, re-gearing an Emerald Night, etc). - This is a floor layout. The green and tan areas are created with colored roll paper taped to the floor. Tracks will be laid down over the colored paper. - Scenery will consist of loose trees, vehicles and figures placed on the paper between the sets (just like in the catalog pictures :-) Open areas will remain so people can step around for access. - Security will be addressed by having special stanchions up all show days (not just the weekend public days). These stanchions will feature a additional lower horizontal pipe to prevent young ones from entering the layout area. There should be about 30" between the stanchions and the outermost tracks. - Once we know what everyone is bringing, we will develop an operating schedule with hours when who's trains will run. The signup sheet is here: https://docs.google.com/spreadsheets/d/1TWLe2n5GGTr_nSR4KT4gXIht13L1dktrYV25H3z30pU/edit?usp=sharing Please list what you can bring and then Please signup by May 15.
 -
 Hello peeps, I started to move my office/lego room around in the last few days and wanted to display my ninjago sets more proudly as I have come to love the theme a lot. Specifically the city of Stiix and the airjitzu temple as they both have water. Here are some pictures of my current layout. (note: i am new to Moc creations). Ninjago layout 2 by Vincent ST, auf Flickr[/img] https://farm2.staticflickr.com/1571/24326270739_287632d894_k.jpg' alt='24326270739_287632d894_k.jpg'>Ninjago layout 3 by Vincent ST, auf Flickr[/img] I am open to suggestions and would love feedback. I am able to buy bricks but I wish to not to as I am trying to reduce spending money on lego for a bit. Thank you guys and I am looking forward to your comments :)
 -
Dear all Train Tech guys, Thanks to the kindness of SBrick team I got two SBrick units for some testing - one of them was built into my LEGO MÁV Stadler FLIRT electric motor unit, another one into my LEGO MÁV Siemens Taurus electric locomotive. We tried as well to install SBrick between 9V Train Speed regulator and a loop of 9V track, where usual 9V-based trams were running. Fig.1. TFOL driving SBrick-controlled Stadler FLIRT on our layout. 1. SBrick installation For first, a quick overview for those, who don’t know, how SBrick works. If you are familiar with the smart brick, you surely can skip this chapter. To imagine SBrick it is the easiest to think about a normal LEGO Power Functions IR Receiver with four outputs, more channels and without the restriction of the infrared technology - with other words your smartphone or device doesn’t need “visual” contact to the receiver unit, thanks to the bluetooth connection. Also it works surely fine within the range of 50 metres, but by good circumstances it works from 100 metres as well. Other great advantage, that SBrick’s current limitation is 3 Ampers per output, while PF IR receiver has 800 mA - better choice if you want to run something heavier then avarage 6W trains. Fig.2. The SmartBrick unit. (Photo taken from sbrick.com.) SBrick could be powered with normal LEGO battery boxes or LiPo rechargeable battery with a Power Function extension cable. It is also possible to power SBrick from old 9V battery boxes or even a 9V Train Speed Regulator, using the 9V/PF end of the extension cable. In this case you should check, if the little green light on SBrick is on - depending on polarity the SBrick is enpowered, or nothing happens. You can plug on your train motors, lights, other PF motors on the SBrick’s four outputs. Next step is to design your remote control interface for your device. To do this, you need to be registered on social.sbrick.com, then go to designer.sbrick.com to create your profiles. The profile designer works in most of the web browsers properly, you can add sliders, joysticks and buttons to it. It is really advised to fill the “name” field in setting - later you need to know, which slider do what when configuring SBrick. Sliders work like old RC Train Remote control, joystick is an advanced slider, buttons works like turn on and off. For all controllers you can configure maximum output - if you want to limit your train’s maximum speed, quite easy to do, setting a value lower then 1 to maximum output. Also you can set up, if the controller will reset to zero or not, when you stop touching the screen of your device. You can set background for your controller, you can change the design of the sliders, joysticks and buttons - we have dozen of previously created ones, but you can use also own-designed images as well. Fig.3. My profiles designed for event TEMOFESZT 2015. Upper one manages three SBricks at the same time, a tram line with a slider, the ferris-wheel with a button (0.3 maximum output) and two other sliders my FLIRT train. Theoretically, if your screen is big enough, you can manage 16 SBricks and 64 funtions at the same time from the same device - perfect tool to operate a whole layout. After the profile is done, you should connect your MOC to your device. To do this, you need the SBrick application (or for quick play SBrick Tester application). Create a new Creation in SBrick application, turn on SBrick in your MOC, add SBrick to your creation and download your profile to your device. Then click connected SBrick (or SBricks) in your Creations menu, and pair sliders and buttons (if you named them before, it is easier :) ) to the outputs (A,B,C,D) of the SBrick in your MOC. After doing this, click the profile in the app you made for your MOC, and start playing :) 2. SBrick & Stadler FLIRT Surely most of you know this creation. It is my 8 stud wide electric motor unit, the original train manufactured by the swiss Stadler company. The LEGO train’s weight is around 3,5 kg-s, previously it was driven by two 9V train motors and two PF train motors, connected to 9V ones. The train also has front-tail lights (using modded PF leds, described in RailBricks #9) and interior lights - three functions to operate. Fig.4. Cables and cables - all of my train’s funtions connected to the SBrick unit. The bigger battery box (which never turns off) grants continiouos availability until the batteries die. As before, I sacrificed the toilette part of the interior to install electric parts - the big AA battery box powers the SBrick unit, and functions are mounted on the outputs. I had a small issue here with the design of the SBrick - if you plug more than one PF cables on the lower (C,D) outputs, it will be inpossible to plug any to A and B. So if you have to plug more than one on some output, you should put them on A and B, or if three output needs more than one plugs, you should insert an additional extension cable first to lower one C and D, and then plug your needed cable ends to the extension cable. In the train now boogie 2 and 4 are driven - 9V train motors are removed, and normal train wheels replaced them at boogie 1 and 5. The third (middle) boogie is unpowered as well. Operating the train is quite easy, if you learn, how to use your touchscreen properly. Since I have direction dependent front-tail lights, I named on my profile (refer to Fig.3) the two ends of my train “A” and “B”, just like the real thing. When starting, I always turn on lights for first, and later if I press the same direction of driving slider, the train will start into the direction of three white lights on it’s front. This could be especially important, when you have a layout where trains are running not only around on one loop, but they direction can be changed at wye-s, and you can’t exactly remember, which end is which on your fully symmetric train or loco. Fig.5. Wye-s designed by Bill Ward. Perfect way to get lost, where your train will depart when you touch the screen, or even turn the PF remote control around. Operation time was fine - the SBrick unit doesn’t take more power than the PF receiver unit, with the pack of AA rechargeable batteries I operated my train for a full day (exhibiton was opened between 10 am and 6 pm), the train was running for 2,5-3 hours before powered down, and it wasn’t turned off for all the day. Also I tested the train at home for continouos running - after 15-20 mins the PF-train motors got too hot and and train stopped, while SBricks temperature raised from 36-38 °C to 44-46 °C. (You can get voltage and temperature data using the SBrick tester application.) The SBrick unit works fine - I doubted it will manage my quite heavy train (compared to avarage trains built by AFOLs), but it served really good - the more problems I had with the software part. The SBrick application written for Android have several problems - not serious ones, but quite annoying. Connection problems Sometimes the application can’t reconnect to the SBrick. It happens when you exit from the driving screen from your smartphone or tablet (in this case the connection will be dropped automatically), and then you turn on again your controller - it starts to reconnect, then askes if SBrick is powered. This connection issue may happen if you connect your MOC from an another device while the first device is disconnected - until you are connected to the MOC with the second device, you can’t reconnect with the first one. The reconnection problem happened when the second device got disconnected as well. Also using the SBrick and SBrick tester applications from the same device can lead to this reconnection problem. Fortunately, all outputs of the SBrick are resetted to zero when you device loses connection with your train, so no accidents may happen. Fixing connection problems As I experienced, restarting SBrick application helps in most of the cases. If this doesn’t help, in your creation’s menu you should remove the SBrick, then add it again, reconfigure it, and it will work. Application crashes Smartbirck application crashed for dozen times during the three days - mostly when attempting to reconnect. Slider problem Basically I used “slider”-s to drive my trains. I don’t exactly know, how the software part of the sliders are written, but the first 80% of the length of the slider from zero (middle) point is quite useless in train operations. After reaching 80%, the train starts slowly moving, but it is really hard to set up the train speed properly on the remaining 20% length of the slider bar. As far as I know a totally new application for SBrick is under contruction, so the output function for the sliders and joysticks will be redesigned in the near future to avoid this problem, and hopefully previously mentioned connection problems and crashes will disappear as well. 3. SBrick & Siemens Taurus locomotive During the summer event of Kockajáték Club I installed one the SBricks to my Siemens Taurus locomotive. The loco works with two Power Function train motors, connected to the old RC train base - SBrick was placed on the output of the train base, so to turn it on for first I needed to give maximum power from the train base. Check this video of the locomotive pulling cars, and controlled from a distance. With this locomotive we made also some fun tests with the train guys hanging around - we put ten of our 8W, 58-64 stud long coaches on the locomotive to pull them. When the magnet coupling didn’t fail (with careful driving) the SBrick unit (and the two PF train motors) could pull all the cars, but the SmartBrick got really hot in less than 5 minutes - we reached the 90 °C temperature easily, and the SBrick got shut down by temperature protection. After couple of seconds it cooled down, and the smartphone reconnected to it. The whole weight of the pulled train was around 11 kilograms. 4. Controlling traditional 9V lines with SmartBrick Using an SBrick doesn’t mean you have to give up your 9V trains, tracks and motors. Get a 9V speed regulator, put SBrick on its output with a PF extension cable, and use the same cable to enpower the 9V loop, putting the dark bluish gray end on the Smartbrick and the light bluish gray end to the part you connect to the 9V tracks. Turn on speed regulator to maximum, put a 9V train on the loop - and now your 9V creation could be controlled from everywhere in a 50 metres radius circle, not just from the speed regulator. Putting more sliders connected to more loops will give you the oppourtunity to controll all your layout from the same place, while you don’t need tons of 9V extension cables to put every speed regulator at the same place. SBrick is even a powerful tool when you don’t have loops, just sections isolated from each other, like analogous model railway - every section could be controlled as described by loops. If you motorise switches with PF motors and connect them to SBrick, you can manage almost everything only using your touchscreen. 5. Conclusions SBrick is a powerful device to make your LEGO trains work with minor issues. The greatest advantage of SBrick that you need no vision to the receiver unit and you can controll your trains from a great distance - no more runaway trains thanks to the limitations of PF IR receiver. SBricks is also compatible with older 9V-based stuff - those who doesn’t want to switch to the newest LEGO train system can use it as well. The current limitation allows you to make really big and heavy trains to run - which is almost impossible when using original PF IR receiver. On the other hand - one SBrick unit is quite expensive, one brick costs £40 and taxes. However this price is not that high if you compare the possibilities to the possibilities what three PF IR receivers can give you for the same amount of money. Current SBrick application has minor issues as well, crashes and disconnects are quite annoying, and the application won’t work propely on all Android-based smart devices. For final words, I really advise to everyone who is into trains, especially at big shows to make a try with SmartBrick. Running only one train with your phone or controlling a whole layout with one screen - the decision is up to you. Video of the functions described above:
-
Simple video update with my current city layout. http://www.youtube.com/watch?v=www.youtube.com/watch?v=h8VlEbaw5ow And here are some pictures and the overall display is easy to take be taken apart and transported to public displays THANKS FOR WATCHING !
-
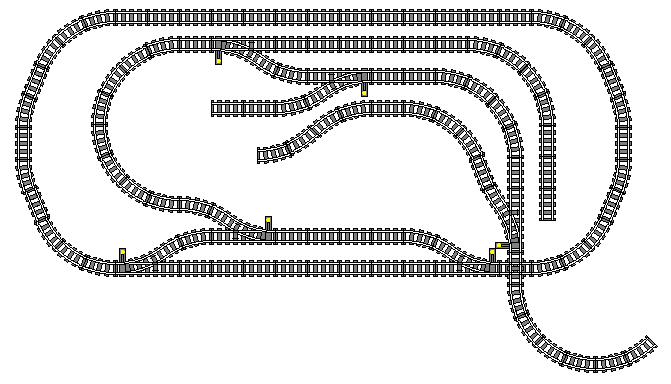
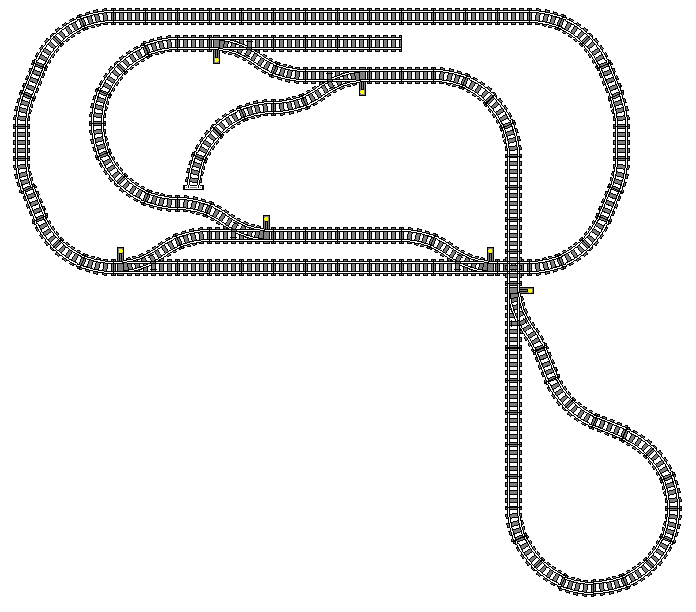
Hey guys, I've recently been trying hard to come up with a useful layout to use both my old 9V trains and my PF trains on the same layout. I just can't come up with anything that works and is interesting. Most of the time I end up with one loop and a dozen sidings and that would only allow me to run one train at once which is a bit boring. I have a decent amount of track (150+ pieces), both 9V and PF, but I just can't figure out something that I like. Here are a couple examples of some layouts I came up with: I don't really like either of them too much but I can't come up with anything better than these two. I'd like to know how you designed your layouts and how you go about designing new ones. I'd like to utilize as much of the track I have as possible. I've already looked at dozens of pictures online but most layouts are either too big or not interesting enough. Looking forward to seeing yours :)
-
Recently i made some expansions on my Modular Square. Within a few months, i have to fit in the Lego 10255 Assembly Square as well, but i'll find a way! I used 20 modular sets to create this square. For the square itself, i used over 16.000 parts for tiling, trees and benches! Enjoy my HD YouTube video, that i made last week and get inspired!:
-
Hello fellow fans :) A while ago I posted a topic where I showed my Lego layout I had planned for Ninjago. It sucked but now I have decided to use all of the table for the layout so here is an image of what it looks like right now. Ninjago Layout 1 by Vincent ST, auf Flickr[/img] Thank you for checking this out. I can post more in the future. Thank you for reading :)
-
The first pictures of BoBS promoted on Lego Fan Events start hitting BOBS, time to co-ordinate our efforts and make a list so you can enjoy past expositions! Events in gold are events with a lot of BoBs participants, some of them even coming from abroad! Do you want to put an event on the list? Comment in this topic and I'll put the event and the participants on the list. Interested in participating in an event? Comment here and I'll put you on the list. Upcomming Events Brickmania Limburg 2016 (Belgium) Also called: BML When: 27 & 28 august 2016 Where: Houthalen-Helchteren, Belgium (not far from Maastricht and the German Border) Organiser BoBs lay-out: Maxim I Participants: Maxim I, Belgium (Esl) Sebeus I, Belgium (Ole) Kabel, Germany (Esl) TitusV, Belgium (ESL) Captain Greenhair (ESL) [*]Status: registration closed [*]Website: www.belug.be Skaerbaek Fan Weekend 2016 (Denmark) Also called: LFW, Skaerbaek When: 24 & 25 september 2016 Where: Skaerbaek, Denmark Organiser BoBs lay-out: Maxim I Participants: Maxim I, Belgium (Esl) ??? Come on people! [*]Status: open, registration will start 1st of April Brickmania Antwerpen 2016 (Belgium) Also called: BMA When: 12 & 13 november 2016 Where: Antwerp, Belgium (2h drive from Amsterdam, 2h30 drive from Cologne, 3h drive from Paris ) Organiser BoBs lay-out: Maxim I Goal: A 84 square meter Pirate lay-out Participants: Captain Braunsfeld, Germany (Esl) Captain Green Hair, Netherlands (Esl) Imperial Shipyards, Germany Kabel, Germany (Esl) Legostone, Germany (Esl) Maxim I, Belgium (Esl) Pimbo, Netherlands (Cor) Sebeus I., Belgium (Ole) Tomsche, Belgium (Cor) TitusV, Belgium (Esl) Bonaparte, Belgium => ? Ecclesiastes, Netherlands => ? Lord Vladivus, England (Cor) => ? Faladrin, France => ? And a few Belug-members adding to the lay-out [*]Status: open, registration started [*]Website: www.belug.be more events to be announced! Past Events (the deeplink takes you to the topic of the event that has been posted in EB or outside EB, full with pictures) Brick Tricks 2016 (6 & 7 february, Tielt, Belgium) with Maxim I & Captain Greenhair [*]Rails in the Rockies 2016 (around 15 february, Estes Park, Colorado, USA) with Vedauwoo [*]Oakwood Retirement Home Lego Family event (9 april, Madison, Wisconsin, USA) with Phred & Andrew [*]Brickmania Wetteren 2016 (9 & 10 april, Wetteren, Belgium) with Maxim I, TitusV, Tomsche, Sebeus, Peter G. & LJ Hornblower
-
Here is my 2016 layout, with most of the items already built, but some still remain to be purchased. Here is a complete list of what's on my tables, not including trains or automobiles because they can be rotated on or off the layout very easily. All of this sits on three very carefully arranged 30 inch by 72 inch tables. Now for the reality check: This is the current state of my trains and town layout. I don't have any other space for things on the table, as below the tables and in the closet is full of Lego bins, either color sorted in slide-out drawers, former model chunks in bins, or put together in customized paper boxes. Here we see the entire layout and compared to the nice chart I posted earlier, it's bit of a mess. The water models area has a police station and Cloud Cuckoo Land in it, and the left hand town area next to the station has my clock radio and assorted stuff for models not yet built. The rail yard is mostly put together, with my streamlined 4-8-2 steamer and diesel PA / PB units getting ready for their day of work. The steam loco is arriving at the coaling / water towers to refuel while the ALCO units are going to be switched onto the mainline to pull it's assigned express train. (The train is not on the table to save space and keep it from getting too dusty.) The town is mostly there, with the streetcars rounding the curves onto and off the main street. The sections only needs two 90 degree (X) crossings to be finished. Now you may be thinking it's really bad, but it is a lot better than it was, and still has a ways to go. It's all about baby steps toward the larger goal of having my dream layout, something I have always wanted since seeing my Dad's layout when I was 5 or 6. For those wondering, here's my ideal layout's items.... most of them I have already, but a half-dozen or so I don't own yet. This layout contains the following track sections: 3 - Right switches 3 - Left switches 62 - Straight segments 46 - Curved segments 2 - 90 degree rail crossing (still needed) 1 - Double rail crossover This layout contains the following train facilities: - Truss bridge - Ironwood Train station -Trolley Stop (still needed) - Water and coal refueling stations - Double stall train shed This layout contains the town buildings: - Sinister Victorian Mansion - Stone Bank - Western Saloon - Thunder's office - Town Hall (still needed) - Military Surplus store - Tudor style House - Model Rocket store - Tavern - Train club meeting house - Railway Headquarters (still needed) This layout contains the following miscellaneous other items: - Tramp steam ship - Lighthouse - Car ferry - Leisure vessel (still needed) - Rural Cabin Comments and feedback would be really appreciated!