Search the Community
Showing results for tags '12v'.
-
I had a whole stack of broken 12v light bricks where the bulb had gone. In particular they don't last that long when set in lamp posts. Sick of buying more so needed a way of replacing the bulb with a longer lasting LED. The first difficultly was finding the right LED with a built in resistor so they can run straight off the 12v power supply. I hadn't found 3mm white/clear LEDs before, just coloured ones, but found a supplier here for what I needed. These should also work fine for 9v. Then the other tricky bit was to open up the light brick without breaking it. This wasn't as difficult as I first thought, so here is the guide - no soldering and no glue! The tools used (almost common household items!) excluding the light brick and LED are : 1. A micro-screwdriver. 2. A bent curtain hook. 3. Some sharp nail scissors. https://savourous-eulah-autohypnotically.ngrok-free.dev/bulb/photo1.jpg Step 1. Using the screwdriver scrape off the plastic tab that helps hold into place the inner part of the light brick : https://savourous-eulah-autohypnotically.ngrok-free.dev/bulb/photo2.jpg Step 2. Using the holes for the plug as an anchor lever out the inner part of the light brick with the sharp end of the bent curtain hook until you can get under it : https://savourous-eulah-autohypnotically.ngrok-free.dev/bulb/photo3.jpg Step 3. If the inner part is still not loose rotate the other end of the curtain hook in the space made at the bottom : https://savourous-eulah-autohypnotically.ngrok-free.dev/bulb/photo4.jpg Step 4. Take out the inner part : https://savourous-eulah-autohypnotically.ngrok-free.dev/bulb/photo5.jpg Step 5. Use the micro srewdriver to remove the old bulb and contacts until the inner part is clear : https://savourous-eulah-autohypnotically.ngrok-free.dev/bulb/photo6.jpg Step 6. Throw away the old bulb and wiring and Insert the LED : https://savourous-eulah-autohypnotically.ngrok-free.dev/bulb/photo7.jpg Step 7. Bend the LED wires around the light brick making sure the LED is centred : https://savourous-eulah-autohypnotically.ngrok-free.dev/bulb/photo8.jpg Step 8. With the screwdriver continue to bend the LED wires into the plug contact holes : https://savourous-eulah-autohypnotically.ngrok-free.dev/bulb/photo9.jpg Step 9. Re-insert the metal contacts. This may take some force, but it will be this additional friction which means the removal of the plastic tab earlier doesn't matter : https://savourous-eulah-autohypnotically.ngrok-free.dev/bulb/photo10.jpg Step 10. Trim off the excess LED wires with the scissors : https://savourous-eulah-autohypnotically.ngrok-free.dev/bulb/photo11.jpg Step 11. Re-join the central part of the light brick with the cover (remember which way is up!) : https://savourous-eulah-autohypnotically.ngrok-free.dev/bulb/photo12.jpg Complete! Remember as it's an LED it won't work plugged in either way to the power supply, but that doesn't bother me in the slightest as you just turn the plug around / swap the pins if it doesn't work For train lights where the power will be reversed when you reverse the train I can recommend Janco's light bricks which are superb
-
-Mini.thumb.jpg.03594ed3626ab4a4b625a32af4d03d5f.jpg) (Click to skip to the post with the latest photos) The Backstory: For years I've wanted to be able to display my 12v collection at shows/exhibitions/libraries or wherever, but the wiring is a challenge - I reckon on my last full layout there was 250 to 300 feet (75-90 metres) of the stuff, which on a static layout is one thing, but one built in modules for transport is a challenge. Three or four months ago I came up with a solution (more on that below) and the dreaming started. After much playing in Bluebrick, and nostalgic posts appearing here about older era trains, I settled on a plan. I still had a bunch of my old blue track from the 4.5v era, but no motors. Off we go to Bricklink then! The Layout So, here's the plan. Ten years ago I had a small portable layout on 4 modules, each 3x5 baseplates, and over the years have simply added more of these. Following my Bricklink spree, I now have 2 working 4.5v motors, so rebuilt the loco from set 183 and I have the loco from 7720 in progress. These 2 will feature on the 4.5v loop below, which is 3 of those modules. Next to the 4.5v loop will be the showpiece, the main 12v loops. 12v Lower by andyglascott, on Flickr And on the right of the layout will be the 9v loops. Unlike the other 2 eras, I will have 9v track left over, so this is likely to be expanded in due course, particularly as @michaelgale releases motors, power supply etc. 9v Loops by andyglascott, on Flickr Lastly, there will be another 12v loop, elevated, which will run across the back of all three eras. 12v Upper by andyglascott, on Flickr Putting all of those together looks like this (the white baseplates are roughly where the mountains, tunnels etc will be for the elevated sections. The green and grey sections are simply so I could keep track of where the 3x5 modules were to try and avoid having curves/points on more than one module. When it all comes together, in most likely a couple of years, I'll be able to run 6 trains at a time. Whole Layout by andyglascott, on Flickr The Beginning After all the planning, and clearing away of my last (incomplete) layout, I've finally started building the first module, part of the 4.5v loop. I decided to start here as this will be the quickest era to build, and to a large extent, each era can also be displayed as a stand-alone smaller layout. These three modules will be countryside/farmland, and the trains will reflect the farming side of it when they get built. Module 01 Pic 02 by andyglascott, on Flickr The 12v Wiring The solution that I've come up with is fairly simple, but does involve taking a drill to some baseplates.... At each of the 12v points or signals I'll drill a small hole through the baseplate and the wood for each module, thread the wire through and attach either the original Lego plugs or a quick connect/release plug/connector so that when the layout is set up I'll use already measured lengths of wire to go from that point to the control panels, which will be on their own module. This is going to be a heck of a journey, and build, I'll post updates from time to time, particularly at landmark moments such as completing an "era". I always said, growing up, I was keeping my Lego for my kids. It was really only an excuse, and I'm really glad I didn't sell my old blue track even though I didn't, for years, think I'd use it. Sadly my original 4.5v motors, battery boxes, lights and even signals are long gone, but I was only 7 or 8 when I got 7720....
(Click to skip to the post with the latest photos) The Backstory: For years I've wanted to be able to display my 12v collection at shows/exhibitions/libraries or wherever, but the wiring is a challenge - I reckon on my last full layout there was 250 to 300 feet (75-90 metres) of the stuff, which on a static layout is one thing, but one built in modules for transport is a challenge. Three or four months ago I came up with a solution (more on that below) and the dreaming started. After much playing in Bluebrick, and nostalgic posts appearing here about older era trains, I settled on a plan. I still had a bunch of my old blue track from the 4.5v era, but no motors. Off we go to Bricklink then! The Layout So, here's the plan. Ten years ago I had a small portable layout on 4 modules, each 3x5 baseplates, and over the years have simply added more of these. Following my Bricklink spree, I now have 2 working 4.5v motors, so rebuilt the loco from set 183 and I have the loco from 7720 in progress. These 2 will feature on the 4.5v loop below, which is 3 of those modules. Next to the 4.5v loop will be the showpiece, the main 12v loops. 12v Lower by andyglascott, on Flickr And on the right of the layout will be the 9v loops. Unlike the other 2 eras, I will have 9v track left over, so this is likely to be expanded in due course, particularly as @michaelgale releases motors, power supply etc. 9v Loops by andyglascott, on Flickr Lastly, there will be another 12v loop, elevated, which will run across the back of all three eras. 12v Upper by andyglascott, on Flickr Putting all of those together looks like this (the white baseplates are roughly where the mountains, tunnels etc will be for the elevated sections. The green and grey sections are simply so I could keep track of where the 3x5 modules were to try and avoid having curves/points on more than one module. When it all comes together, in most likely a couple of years, I'll be able to run 6 trains at a time. Whole Layout by andyglascott, on Flickr The Beginning After all the planning, and clearing away of my last (incomplete) layout, I've finally started building the first module, part of the 4.5v loop. I decided to start here as this will be the quickest era to build, and to a large extent, each era can also be displayed as a stand-alone smaller layout. These three modules will be countryside/farmland, and the trains will reflect the farming side of it when they get built. Module 01 Pic 02 by andyglascott, on Flickr The 12v Wiring The solution that I've come up with is fairly simple, but does involve taking a drill to some baseplates.... At each of the 12v points or signals I'll drill a small hole through the baseplate and the wood for each module, thread the wire through and attach either the original Lego plugs or a quick connect/release plug/connector so that when the layout is set up I'll use already measured lengths of wire to go from that point to the control panels, which will be on their own module. This is going to be a heck of a journey, and build, I'll post updates from time to time, particularly at landmark moments such as completing an "era". I always said, growing up, I was keeping my Lego for my kids. It was really only an excuse, and I'm really glad I didn't sell my old blue track even though I didn't, for years, think I'd use it. Sadly my original 4.5v motors, battery boxes, lights and even signals are long gone, but I was only 7 or 8 when I got 7720.... -
 Hello everyone, for those who do not know me, I'm a big fan of trains and especially Lego Train. I finally have a space to create a Layout finally worthy of the name. My approach comes a little more of the model in the sense that I like to see a train pass over another, to automate the network, make realistic through light signals, station stops, etc. ... I started this project in February 2016 in my basement where I made by myself, furniture and shelf for storing SET Lego but also to design the layout. I was already well advanced when an incident occurred: the flooding of the basement end in May 2016 .... Then in August, the discovery of a leak in the water supply of the house forced me to completely dismantle this first try of a Layout to access the water inlet pipe ..... I come back now in force therefore with a first experience, many tests on the possibility for our pretty trains to climb slopes (straight or curved) to optimize the best of my available space and create a nice layout ! ;-) Due to financial limits, this layout will be not made with 100% of Lego, I will use wood and homemade stickers, custom electronic to make it. Here are the first shots (or I should say the nth plan because with Bluebrick, we never stop to change those plans) to my future Layout (so different from the first that I had designed and unfinished) WMLTL - v5 - Level 0 by LegoLow, sur Flickr Corresponds to trainyard + walkway + a brief passage of the 12V track WMLTL - v5 - Level 1 by LegoLow, sur Flickr Ground level with his future main station WMLTL - v5 - Level 2 by LegoLow, sur Flickr First level of the "mountain" : secondary station and then, possibility to climb in the mountain or to go back to the main level WMLTL - v5 - Level 3 by LegoLow, sur Flickr WMLTL - v5 - Level 4 by LegoLow, sur Flickr WMLTL - v5 - Level 5 by LegoLow, sur Flickr Top of the mountain.... Finally a view (done quickly, I will improving later), global superimposed, giving the idea of what will be hidden, visible .... WMLTL Project - v5 by LegoLow, sur Flickr Following probably next week with the start of the implementation of Level 0. It's a big challenge for me because this project is made of mixing differents things : LEGO, electronics, electricity problematics, Priority management on a network, etc.... Hope you will find that interesting to !
 -
 Having spent the last few days restoring some of my childhood Lego trains, I've run into a couple of problems which I hope the experts on here may be able to help me with! 1. 4.5V battery box (BL Item No: x488c02) This particular box comes from 7722 and was originally used to power a 4.5V train motor. The motor still works (I have tested it by connecting it to the 12V transformer with the control knob inverted) but it fails to run when connected to the battery box (filled with three brand-new rechargeable C batteries). Does anyone have any troubleshooting advice for these battery boxes? Can you suggest what steps I could take to try and get it working again? Any thoughts on the best substance to use to clean the contacts? 2. 12V conducting rail (looks like BL Item No: 2731b) This rail should transfer power to the track when connected to the 12V transformer, but fails to do so. I've tried unscrewing the plug and replacing it with another, but that doesn't help. Rather strangely, it also cuts the circuit when added to a loop! My suspicion is that there's an internal fault, possibly caused by corrosion (it looks nice and clean, but I spent some time rubbing it with a model railway cleaner before testing it!) Has anyone come across a problem like this before? Many thanks in advance for any help you are able to provide!
 -
Book Review (Review by Thorsten Benter) Almost a year has passed since initial publication of this book. There are a number of on-line reviews available – this one on EB seems to come in a bit late. Well, I don’t think so, in contrast. This book is a comprehensive how-to-build-a-train resource rather than a compilation of what is out there. And this sets the book aside from so many others. It will be up-to-date as long as The LEGO Company produces bricks and sets. Plus, with the arrival of the Powered Up system, more space becomes available inside the train body as compared to comparable PF functionality: The dedicated receiver becomes obsolete and no line of sight is required for communication creating some additional space – space for sophisticated building techniques! This books tells you everything you need to know about the historical LEGO train theme development at TLG, about scales and widths, about pivot points, microstriping, SNOTing and offsetting, and so much more with relevance to train building! (Note: A PDF copy of this review with higher resolution pictures will be shortly available at Holger’s website) Summary: A must-have for every LEGO train fan, for people entertaining the idea of getting into LEGO trains, and for people who still don’t know that they will become train fans after reading the book Superb photography of LEGO models, outstanding renders of CAD models In-depth analysis and assessment of the different LEGO train eras Demonstration and teaching of advanced building and design skills My personal LEGO book score: 10/10 About the book: Author: Holger Matthes Published: Oct. 2017 by No Starch Press Inc., San Francisco, CA, USA. Hardcover, 135 pages + 90(+) pages reserved for 4 full building instructions (ICE train, gondola car, Swiss Crocodile, and a vintage passenger coach), 150+ most relevant and educational figures (excluding the beautiful chapter openers or page breakers as well as the set building instructions), 20+ tables including bulleted lists. ISBN: 1-59327-819-5 Price: € 14 (Kindle edition, Amazon); € 23 (Print edition, Amazon) both as of 9-2018. $ 19 (ebook only), $ 25 (ebook and print edition, nostarch.com) both as of 9-2018. The present English edition published by No Starch Press is based on the initial German edition “LEGO Eisenbahn – Konzepte und Techniken für realistische Modelle”, which was originally published by dpunkt Verlag Heidelberg, ISBN: 978-3-86490-355-7. The initial German edition of the book based on Holger’s manuscript composed in 2015/16 caught the attention of foreign publishers: It began with the present English edition in 2017. It then took a bit longer until the Chinese publisher “Posts & Telecom Press” (who has already published a bunch of LEGO books written by fans) very recently released the Chinese version: http://www.ptpress.com.cn/shopping/buy?bookId=0ed0cd68-ca59-41fc-9bf9-193b06089996 (ISBN: 978-7-115-48419-2): After publication in 2017, No Starch Press’ English version became the reference for further translations. In summer 2018, the Spanish (“LEGO TRENES”; LEGO TRENES https://www.amazon.es/TRENES-Libros-Singulares-Holger-Matthes/dp/8441540179) and the Italian (“TRENI LEGO”; https://www.amazon.it/Treni-Lego-colori-Holger-Matthes/dp/8868956411) editions became available. And the Russian version is on its way (sorry, Holger couldn’t tell me any further information about its availability): (Note that the Russian cover on the right is purely made up by me – Google translator says the Cyrillic headline reads “in preparation” – but who knows …) About the author Holger Matthes is a hobbyist who has been building with LEGO since 2000. He was involved in the creation of various official LEGO projects such as the Hobby Train set #10183 and frequently presents his models and gives workshops at LEGO exhibitions worldwide [copied from Amazon website]. Table of content of the book (short version) Part 1: Overview and history Introduction A history of LEGO trains Part 2: Building your own train models (My own creations – MOCs) Basic principles Designing your own models Case studies in design Part 3: Building instructions A note on the included building instructions Appended to the body of the book, you’ll find four high quality and carefully composed instructions in addition to two free online instructions: Inter-City Express (ICE; driving and trailer cars, PF motorization, windshield designs) Gondola car Swiss electric Be 6/6 “Crocodile” Vintage passenger car Steam Engine BR 10 (as bonus online available at http://holgermatthes.de/bricks/en/br10.php) Steam Engine BR 80 (as bonus online available at http://holgermatthes.de/bricks/en/br80.php) There is further information available online. Holger directs you to https://www.nostarch.com/legotrains; but most of the very valuable stuff is actually hosted on his website. I highly recommend to visit his site: http://www.holgermatthes.de/bricks/en/index.php. You will find a wealth of background information, tips&tricks, how-to, and much more. The Book Let’s face it: Almost one year after initial publication, Holger still sets the stage with this book for LEGO train fans. It will be tough to get it much further; not on 135 pages (not counting the instructions pages), not with regard to the topics covered, not with regard to the width of the audience addressed. This book provides diverse perspectives on the art of building LEGO trains, coaches, and rolling stock – and is at the same time always determined, focused, and addresses most relevant “issues”. Train builders repeatedly face tough challenges: A train is not a building, which simply resides in all its beauty; rather trains are work horses – either hauling heavy cargo loads or endless passenger coaches, or switching rolling stock for hours and hours in a train show – or on your personal layout. At the same time, a LEGO train is “beautiful” and “esthetic” in the recognition of a train fan - as a building is for City fans. However, to be able to render real trains into LEGO models, regardless on the scale used, requires some serious knowledge about the myriads of LEGO bricks available, about advanced building techniques, and even electrical wiring skills. There simply isn’t much space in a LEGO train. Space as in “Space … is big. Really big. You just won't believe how vastly, hugely, mind-bogglingly big it is. I mean, you may think it's a long way down the road to the chemist's, but that's just peanuts to space.” [Douglas Adams, The Hitchhikers Guide to the Galaxy, 1979]. It is usually >extremely< packed inside a LEGO train model, particularly when electrifying it. Shaping the outer appearance with advanced building methods such as SNOT or angled and carefully secured pieces usually eats up all the space inside the hull. And lastly: Trains need to be sturdy. They not only haul heavy loads – they also have to run endless distances on track – in the best case on long stretches of straight track and smooth curves, here and there a bit bumpy – in the worst case negotiating endless and sharply bent curves and switch points in complex rail yards. This is exactly what Holger addresses in his book: How to achieve a sturdy, reliable, and at the same time esthetic and beautiful train. And we should just get it straight from the very beginning: Stickers are frequently recognized as the “icing on the cake”. And this is certainly true. BUT: Believe it or not, you can also legally “build” tiny lines, sloped coloring, narrowly split windows and much more when using advanced building techniques! And that sets aside this book from so many postings, building instructions, and other resources: Holger shows us how to accomplish “brick-built stickering” by using the endless variety of bricks and plates to build streamlined and nicely accentuated and smooth surfaces – rather than using the bulky, essentially non-LEGO-philosophy-but-by-TLG-released ICE #55768 nose with stickers attached all over it … There is so much more in the book. This is what I am trying to highlight in the following. Holger’s book is a must for us all: Beginners, advanced builders, as well as Train Tech gurus! And those who believe that they already are. One more thing to add: Photography and CAD image rendering. Or: A picture is worth a thousand words. Holger says: “The biggest thank you goes out to my old friend and master photographer Andy Bahler, without whose pictures this book would have been useless. His commitment, night after night, was above and beyond expectation …” The pictures are spectacular – you will notice right away. Organization of the book There are three parts in this book, although there is no such explicit assignment in the table of contents. Holger tells us on page 2 though: “The first part of the book gives an overview of LEGO trains over the different eras, covers some history, and answers questions about how to combine old LEGO trains from the attic with today’s kits. The second part of the book is about building your own LEGO train models, also known as My Own Creations (MOCs). Using my many years of experience building LEGO models, I’ll show you how to create proper train models, covering both the possibilities and the limitations. Finally, the book ends with step-by-step building instructions for several models.” Usually, the table of content is a good starting point for the organization analysis. However, this book is extremely focused and self-contained in each of the chapters of the three parts. This is very helpful (and also very different from other books), as the LEGO universe, including train worlds, is as diverse as it possibly gets. The number of pieces alone currently available through TLC’s official channels such as LEGO sets, PaB, and LEGO stores – or even more so – through the uncountable BrickLink stores around the globe is truly mind-boggling. Well, it is not only the sheer number, but more so the endless combinations possible – and what you achieve with such. Chances are: One gets rapidly lost and a little frustrated. Exactly this is NOT happening when “reading” this book. OK. We do it differently – as it seems appropriate for a “different” book: We walk through, as the very nice and focused organization of the book simply allows that. Part 1 “INTRODUCTION Decades ago, the toy designers at LEGO likely never imagined how durable their work would be. Today, parents can dust off their childhood LEGO trains and play together with their children who have just received their first brand-new LEGO train set. And fans of all ages can revive older sets and parts to create entirely new models.” In order to prevent such an almost natural “disorientation” or lost in parts and ways to connect them, in part one the book begins with a review of on-line resources. Information-, instruction-, and brick-availability-wise. Holger lists only the most relevant internet locations. Start here and progress further on your own. It makes your building life so much easier. As with every printed book, online references may become outdated at some point in time. Holger names thus only most reliable web portals, which will most probably exist for a long time. “A HISTORY OF LEGO TRAINS Let’s explore the evolution of the LEGO train systems from the earliest set to the present.” Next, there is a historical review of which type of train system was available at what time defining an era. This is rather significant. First of all, this approach results in a theme classification rather than a temporal evolution of sets: The blue, grey, 9V, RC, and PF era. As the pieces from different areas are naturally largely interchangeable (otherwise it would not be LEGO!), you may mix them as you see fit. Nevertheless, each era has a certain typical appearance – if you want to capture that, you need to know what was going on during that particular era. As an example, people in love with the grey (12 V) era often capture the look and feel of that time – for example studs everywhere, not many curved bricks/diverse slopes (as they were not available at that time) – rather limited colors schemes, black, red, and yellow ... The reader learns what has been produced when and in what color scheme. There is also ample of information on the technical features of each era – it appears as if the author is deeply involved and well connected in the LEGO train community – all the way up to participate in the design of selected sets. Holger shares his knowledge with the reader – always in a concise and focused way. It is pointed out that Holger is not even attempting to compile a complete list of sets available within the different eras – in contrast, he is summarizing the unique era characteristics and features. He focuses on power sources, tracks (including switches and crossings), and other elements (wheels, baseplates, in addition to unique features, such as trucks, couplings and buffers). The grey (12 V) era sections stands out of course, as this was the most diverse and most creative train theme ever (IMHO, of course!). Here you will find an – again unique – compilation of “remote-controlled accessories”, “windows and doors”, “light bricks”, “weighted bricks” … What I personally find extremely useful – and it must have been a considerable effort – is i) a summary table, listing the most important features of each era, and ii) Holger’s evaluation of these features he headlines as “Seen from today’s perspective”. Even long-time and experienced train enthusiasts will surely find valuable information in this chapter! Part 2 “BASIC PRINCIPLES Let’s dive into the world of LEGO elements and explore the endless ways to connect them.” Now that one knows the individual features of the different eras, Holger opens part two of the book with a compilation of relevant LEGO pieces for train building. It is really surprising how many there are! I have built trains myself – seeing all the various elements nicely grouped and organized makes it so much easier to get an overview of individual pieces, select the ones you may want to try out – and compare them to other options. This section is extremely helpful when you start off with a new model – or when you want to overhaul an already existing train. In the following section, Holger introduces typical train specific building techniques (although you can use many of them throughout the entire LEGO universe!). And is not surprising that there are eleven dedicated pages on SNOTing and fractional-plate offsetting in all three dimensions. These are the most crucial techniques when shaping the look of a train. SNOT (studs not on top) is a powerful technique and has become very popular among train fans. Originally rather restricted to a few elements, which allowed to “reverse” the building order, the LEGO Company has released a broad variety of SNOT elements over time. These are of course also shown in the preceding chapter on relevant LEGO train pieces. I’d say that this chapter is extremely important for beginners and of great interest to experts as there are various approaches shown side-by-side. At least for me this chapter is highly inspiring. The same is true for plate offsetting, i.e., building with only one half stud or even less displacement off the stud grid. First, the look of a train becomes much smoother even when not using curved bricks; secondly, this technique allows you to literally “build” colored surfaces with fine structures and even thin stripes (called microstriping). Without using stickers that is … Ever used minifig guns to create pantographs? Or ice skates as door handles? No? Well – Holger shows you! “DESIGNING YOUR OWN MODELS You might be wondering if you’re ready to begin making your own models. Which train should you build? Maybe you should start with the commuter train that takes you to work every day, or a freight train? And who hasn’t dreamed of a beautiful steam engine in LEGO?” Now we are getting down to business. The following two chapters of part 2 are not about “building a train” – they are about “how to do it right”. We are talking about scaling and modeling rather than “pushing along”. Before Holger goes into details though, he points out the importance of thoroughly choosing a scale. This is an extremely important decision to be made when attempting to model a real-world train. How much detailing is required? How much abstraction is allowed? Citing Holger again (page 73): “Building a recognizable model isn’t about scaling every part exactly, although proportion matters. Intentionally omitting some details or exaggerating others is usually necessary. Scale modeling with LEGO is a bit like drawing a caricature: the end result may not be an exact likeness, but it is recognizable and undeniable.” We learn about model scales (1, L, O, HO …), alternative approaches (scaling by wheel size) as well as choosing a model width (6-, 7-, 8-stud-wide). Don’t mix these up – almost any scale may be used for any track width! There are so many diverse examples here on EB. Holger narrows the scope of widths covered in his book to 6 - 8 stud wide (see cover page of the book), as these are the widths most builders choose – in addition to the official 6-wide LEGO models. He discusses the advantages and downsides of each of these widths in detail. A very important aspect when designing and building a LEGO train – regardless of the model scale – is the official LEGO track geometry. Maximum distances of fixed axles, alleviation of this rather restricted distance using articulated single trucks (a theme repeatedly discussed here on EB), sliding middle axles in three axle trucks – you will find all the answers in this book. When it comes to attaching cars to each other – even more design aspects have to be considered, which are all discussed: Pivot points vs car distance, additional pivot points to reduce car distance, the effect of pivot points on design issues, to name a few. And then: Steam engine design: 7 full pages! As far as I am concerned, steam engines are the most challenging models to render in LEGO. To say it with Anthony Sava’s words: “I'd buy a set with a steam engine in it, but I have little interest in buying a box on wheels.” (EB Forum, April 2nd 2018). Holger shows us all the challenges and caveats. The remaining sections in this chapter are: Power and Control, discussing mostly the implementation of PF elements, Modeling Details, and Track Design and Layout. Again, extremely valuable information and guides are given. One comment on third party suppliers: At the time of writing this book, both SBrick controllers (as a replacement for PF receivers, featuring wireless Bluetooth connectivity) as well as ME Models (as a supplier of wider radii curves) were actively present on the market. As of now (i.e., August 2018) though, the new LEGO Powered Up system introduced lately makes SBricks for trains almost obsolete – and Me Models have gone out of business some time ago. There are a good number of very good 3rd party alternatives for additional track pieces – large curve radii, complex switch point geometries to name only a few. They come as superb injection molded pieces which are almost indistinguishable from original LEGO track, as well as 3D printed varieties. I believe that a book of the format Holger has chosen simply does have to deal in-depth with such developments as they are much more volatile than almost any LEGO product. Taking aside the LEGO RC interim solution of course. But again, Holger gives a full account of why RC happened at all and why its lifetime was even shorter than that of many 3rd party small businesses. I really enjoyed this section very much. Regarding very recent developments by TLG naturally not covered in the book (the original German manuscript was written in 2015/16): The introduction of the Powered Up system leaves much more space within a train engine so that all the building tips and tricks provided in Holger’s book become even more intriguing! It appears as we can even more freely combine advanced power/remote control options with the present advanced building instructions. Which makes this book even more valuable! “CASE STUDIES IN DESIGN Armed with the tools and knowledge about LEGO modeling covered in the previous chapters, we’ll now take a closer look at the actual design process using some of my own builds as a guide.” This chapter needs to be explored – interpreted – by yourself. This is – as far as I am concerned – the heart of the book. Here you will learn how to begin designing a model. I find this part the most difficult: How to begin – looking at the all the bricks, plates, slopes, clips, there are so many of them … so we should take this to our heart: “Designing a model is a creative and personal process: there’s no right or wrong way to build a successful model. The guidelines in this section are meant to get you started. You’ll certainly develop your own strategies along the way.” Along with: Decide on a scale and choose the width: 6-, 7-, or 8-wide? Decide how the train will be powered and what type of track it’ll run on. Choose a target audience: should it be a realistic, recognizable model, or are play functions more important? You will notice: This is about >you<! Nevertheless, you will also learn a lot in this chapter. Holger has chosen a regional express train (Bombardier double deck train), a powerful electric locomotive (Siemens Vectron engine), and a (well, Holger is German after all …) steam engine (BR 10) as case studies. This is a very clever selection – as the techniques he shows apply to almost every engine I am aware of – including American diesels as well as American steamers … or all the various European trains, Emanuele (EB member LT12V) is currently presenting here on EB … And finally … Part 3 “BUILDING INSTRUCTIONS! Get inspired with these step-by-step instructions for building an Inter-City Express, a simple gondola, a Swiss Electric Locomotive Be 6/8 “Crocodile,” a vintage passenger car, and a steam engine.” From page 136 to 227 you will find first class, high(est)-quality building instructions for the above referenced models. There is nothing more to add. As said: This book is a must … Play Well! @Jim Thank you very much Jim for giving me the opportunity of writing this review for EB - it was a great pleasure. And for sending me this wonderful book! @HoMa Thank you Holger for writing this book. And for all the additional information you gave me when writing this review and for your comments! Thanks for reading, Thorsten
-
So far, only ONE AFOL has given me the right answer :-) Hi everybody, This one is a real challenge! After the quiz N2 that we had as warm-up, here we are with a harder quiz. I am really curious to know if anybody knows or can find the answer of this one. I would consider a prize for the winner(s). If you are sure you know the answer, please "DO NOT SPOIL", but only pm me. But if you have any guess together with some reasons for your guess, you are very welcome to comment under this post so that we can discuss about it and who knows, maybe we get multiple responses. Here is the question: WHICH INSTRUCTIONS have MORE THAN ONE VERSION? The sets in question are 7710, 7715, 7720, 7722, 7725, 7727, 7730, 7735, 7740, 7745, 7750, 7755, 7760. I believe you cannot find the answer by googling (I couldn't). Good luck :-)
-
I have seen two variations of instructions 7860: 1) For the second release 1982-87, the code of instruction is 113483 ©1981. In the instructions, we can see this variation of "Straight Conducting Rail with Rail Interruption" 3242apb01: https://www.bricklink.com/v2/catalog/catalogitem.page?P=3242apb01&idColor=9#T=S&C=9&O={"color":9,"iconly":0} 2) For the third release 1988-94, it is 120622 ©1981 in which we can see this variation of "Straight Conducting Rail with Rail Interruption" 3242bpb01: https://www.bricklink.com/v2/catalog/catalogitem.page?P=3242bpb01#T=S&C=9&O={"color":9,"iconly":0} 3) What about the first release 1980-81? Is there any instructions for it (do you have it?) in which we can see "Straight Conducting Rail with Rail Interruption" 3242a: https://www.bricklink.com/v2/catalog/catalogitem.page?P=3242a&idColor=9
-
 Hi all, this evening I prepared a wagon which was in my mind for some time, but I've never built. @jtlan mentioned it in the "castering effect" thread, showing us his two very nice Umbauwagen 3YG, which are built with new parts. Since these wagons are the perfect partners for DB BR78 locomotives, I tried to replicate it in gray era style. It is very simple and straight: the narrow part where the doors should be was not replicated interiors are similar to the 7725 undercarriage is quite simple - since it must leave space to the passive steering system I added a toilet, since it was a nice challenge. It does not have a door in the photos, so the toilet is visible. After some passengers complained, I closed the door. Steering system is very basic, and it leaves space for interiors (I just noted that the two red parts have "Pat Pend" markings - my 60s collection will be happy) . The only part not used in the gray era is the 6x24 train base. It can be made of plates, but I have a lot of them - and this is a good use. I cannot use the green color, but I saw the Umbauwagen was also made in blue as a wagon-lit. Here it is with my 12v BR78 and 7820 . Hope you like it! Ciao! Davide
 -
Hello All, I am looking for 12v trains that are 100% complete along with track and transformers to start my 12v collection. I am in the U.S. so I have had a hard time finding any 12v trains for a decent price. Please comment here or PM me with information if you are willing to sell any Thanks, -Cameron Muir
-
Hello, I am reaching out to all 12v train users. I recently purchased and received a 12v train (the 7725). Unfortunately the motor is dead, I put it on the track after building the whole model and setting all the track up to find it not moving. At first I thought maybe if it hadn't run in awhile it would need a little help. That didn't work so I tried it by just connecting a wire to the motor itself and gently moved the wheels. The motor started to produce a light smoke so I immediately shut the power off and haven't tried anything since. I did see some life though at one point, it did move about 1/16 of a turn at best and I could hear it trying to move. If the seller is cooperative hopefully I can work something out with him. If not I was hoping many people on this forum could lead me in the right direction. Here is what I know about the motor: It looks to have been opened before. It is the version with the separate bogie pin. From what I can see there is some hair spun around the axles. I am wondering if I need to completely give up on the motor or if there is a way to fix or replace just the motor inside. I am really lost and would love any help that someone could give me. I looked for awhile but I haven't found a post about someone having the same problem as me. Even if someone has a broken lego casing for the motor but there electrics still work I could be interested in that as well. Thanks, -RailCo
-
Hello Guys! I am trying to find grease in America that would be safe to use on Lego 12v motors (from the 80s) without paying horrendous prices. I am wondering if anyone has found suitable grease in the U.S. I have had a few people tell e about ROCO 10905 but that would be $20 to have it shipped over here from Europe. Thanks -RailCo
-
Hello! Going through my parent's attic over xmas I rediscovered my old 12v train set, which I'm now trying to restore and get working again. After cleaning up a bunch of contacts with WD40 the actual train and power brick work, which is nice. However the remote control for the signals seems to be completely jammed and neither button will actually move. Has anyone successfully repaired one of these? I can't even see how to take it apart without breaking it. Thanks
-
I've recently picked up the 12v controller and a signal set, and intend to pick up some lamps too. I really like both the look and the way they are controlled. I also love the way it's all controlled from one central control unit. So here's my question: Has anybody either modified the innards of the 12v controller to drive 9v or modified 12v motors and controller to rail wires to run without the central rails? I'm keeping my mind pretty open at the moment, just looking for ideas that (with the minimum of modifying aging mechanisms) that would allow me to use any part of the 12v system on a more modernly powered layout. Worst case scenario, I'll just use the controller as a signalbox and nothing more, it's still pretty cool. :)
-
 Government Warning: Lego Bricks were harmed in the making of this tutorial. Good evening! I recently converted my 7725 to Power Functions because I don't have a 7740 to convert to power functions. It just didn't look right on four wheels and I could not fit a technic mechanism and M motor in there... So I present the cutters guide to 6 wheel bogies. (If someone has already done this please let me know so that I can give them credit, I didn't turn up any results like this when doing a Google) 6 wheel Lego power functions motor on 7725 by Canvas Rails, on Flickr 6 wheel Lego power functions motor on 7725 by Canvas Rails, on Flickr 6 wheel Lego power functions motor on 7725 by Canvas Rails, on Flickr 6 wheel Lego power functions motor on 7725 by Canvas Rails, on Flickr 6 wheel Lego power functions motor on 7725 by Canvas Rails, on Flickr 6 wheel Lego power functions motor on 7725 by Canvas Rails, on Flickr 6 wheel Lego power functions motor on 7725 by Canvas Rails, on Flickr 6 wheel Lego power functions motor on 7725 by Canvas Rails, on Flickr Power functions 7725. by Canvas Rails, on Flickr Purists, please note, the lance was already broken by a careless child so I am recycling, not abusing a perfectly good piece (The 1.5 pin was just an innocent bystander. Sorry). The trick is to get the cut as close to the short end of the 1.5 pin as you can without compromising the structural integrity of the short end. You will know what I mean if you get it in the wrong spot. The effect is similar to the burning tyre rolling past Indiana Jones. Does anyone have a solution that does not involve a knife?
 -
Hi! This is my latest MOC. It's a pf 7760 that runs on pp3 (9v) battery with a custom adapter. Since i don't have the 7760 i built it with all kinds of colors (it is a prototype after all). Here is the pp3 battery. I wanted this loco to have the iconic 12v clicking , so i put a little metal tab between the motor and some bricks. Here it is in action with the custom clicking sound. The rear with the ir receiver. And here it is .
-
Hi All , just signed in to this forum cause I was wondering about something .... I'm into the 12 volt train system again and was wondering about modified 12 volt track . Hs anyone done some modifiyng on tracks , switches ,etc. ? Here's some pics of my own creations untill now... A half straight track with original contacts a point prototype with same angle as 2 curved rails Let's see what you guys have !
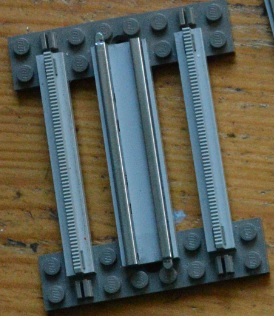
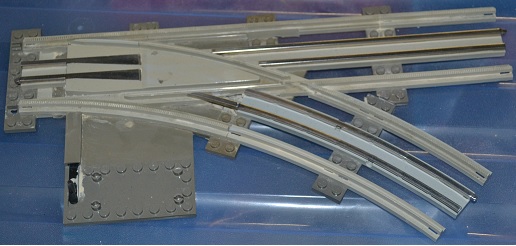
-
As there is a thread on repairing 12v motors and one on couplers, I thought the old timers here might be interested in my technique for repairing 12v couplers. I'm sure this must have been tried before but I couldn't find any previous threads. I turned the drill bits with my fingers but a quality drill should do even better. I worked my way up to the correct diameter through three different bits to avoid stressing the plastic, then shaved off the resulting lip with a sharp knife. (Mandated Government Warning: Lego was harmed in the making of this post (but it was only technic) Repair of Lego 12v and 4.5v train couplers by Canvas Rails, on Flickr Repair of Lego 12v and 4.5v train couplers by Canvas Rails, on Flickr Repair of Lego 12v and 4.5v train couplers by Canvas Rails, on Flickr Repair of Lego 12v and 4.5v train couplers by Canvas Rails, on Flickr Repair of Lego 12v and 4.5v train couplers by Canvas Rails, on Flickr Repair of Lego 12v and 4.5v train couplers by Canvas Rails, on Flickr Repair of Lego 12v and 4.5v train couplers by Canvas Rails, on Flickr Repair of Lego 12v and 4.5v train couplers by Canvas Rails, on Flickr
-
Hi All, It's been awhile since my last post, so I thought it was time I made another. I have been in receipt of a BB12VB-RED recently! Ahem, probably more like a year or so ago. As you can see from the photos, one of the pickups is very damaged… Another Eurobrick member, Alainneke, had already kindly made some replacements out of brass… I had sent him the diagrams of the pickups in AutoCAD, and extremely excellent reproductions were sent as a test in return. At the time I’d only opened my 'teenaged' black motor, as seen in photos, and the new brass pickup studs were supposed to be destined for it… The RED 12V motor is very, very rare, I have held back on using the replacement pickups until now… I am glad I have waited though, my apologies Alainneke! After reading VGO’s suggestion in post http://www.eurobrick...pic=50345&st=25, post #28, I tried the idea out on a black motor and it moved during the operation and I snapped a tab off the end, see pic. So I decided to build a jig out of Lego to hold the motor. The top part of my jig is real Lego, while the bottom is entirely made of Fako(Fake Lego) due to my needing to augment some of the pieces to fit the underside of the motor and wheels. I used MEK(Methyl-Ethyl-Ketone) to ‘weld’ the pieces together, along with some small strips of a smooth(no embossed numbers) credit type card, see pics. Okay, My advice is that you try and run a razor blade around the circumference of the bottom of the motor, hopefully using a ‘jig’ like shown. I do mean “Razor blade” as a “Stanley” knife blade will do the damage that I have shown in my earlier openings, try a ‘BIC single blade’… Making and using a ‘BIC’ single razor blade… I used the razor whilst the motor was in the top part of the jig. Once in the jig, use a 2.5mm rod/nail and hammer in both power plug holes, to gently persuade the bottom to come loose on either side. Seat partially opened motor on the ‘bottom’ part of the jig, and use the remainder of the credit/shopping card to gently hammer down on the wheel axle to pry the last of the plastic welds apart. The motor is now broken open… Here are some pics of the open casing with the old and new pickups, I will update the post after I have cleaned up the motor parts. If for whatever reason you need to take a wheel off, I.e. for cleaning excessive hair/crud in sleeve bearing, then you start by removing the cir-clip next to the sleeve bearing. Move bearing nearer to gear cog, then gently pries the cylindrical spring clip out of the wheel in the same area as the hole in the wheel. When you're cleaning the parts inside, be careful with the metal part 'A'. There are two small hardened steel discs that sit either end of the spindle, only the dirty grease is holding them in.... Now it's time for reassembly and re-greasing...
-
Hi all, I'd like to present you my first 12V MOC. It is a Deutsche Bahn BR78 - inspired locomotive, built using extra pieces from a 7730 and 7750. This is the third big steamer I use, along with the original 7750 and the 7777 steam locomotives. I built this one following using special pieces (e.g. lights lenses are yellow/clear like in 7750 - rubber pipes on the sides) and following the style of the early 80's Lego trains. It was simplified in many details, like the cabin (using standard doors and windows) and sides (which are missing a lot of leverages, handrails and so on). Here it is on my test station - front and rear lights are on when moving forward, small white light on the back is on when moving backwards. Hope you like it!
-
 Hi everybody, I have been carefully watching all trains 7730 on sale in different countries since summer 2017. At the beginning, I realized that the 3 * yellow cones listed in the inventory in bricklink had axle hole: https://www.bricklink.com/catalogItemInv.asp?S=7730-1 The yellow cones 3943a: https://www.bricklink.com/v2/catalog/catalogitem.page?P=3943a&idColor=3#T=C&C=3 This yellow cone 3943a appears in two sets. 3 used for the train 7730 and 2 used in 599-1. But many trains had the other version 3943b with axle hole: https://www.bricklink.com/catalogItemIn.asp?P=3943b&in=S This version is used in two sets. One used in 4982-1 and 2 used in 6954-1. Lego produced both versions since 1979. But there are some doubts on this. Sets in which 3943a appear are produced in 1979, 1980 and 1981 (msotly). This suggests that sometime about 1981-82, Lego replaces 3943a with 3943b. The train 7730 was produced from 1979-82. Then probably, some sets made in 1982 came with 3943b. About one third of the trains i have seen have the version 3943b. As the two versions are as rare as the other, I simply conclude that Lego released some of them with 3943b. It is not likely that so many private sellers lost all the three yellow cones 3943a and then bought or found the other version 3943b and replaced with them. Thus, if you bought this train in your childhood and still have it, could you please comment which version are your yellow cones? If you still have the box, could you check if it is D/F/NL or UK/F/I version? It its also helpful if you tell from what country the train was bought. For learning about different versions of box, see: If you could attach a photo of your train, box(the language part on the right side of the front box) and cone, it would be great and helpful. Also, a photo of the bottom of the motor, if you are sure that the red motor is not switched with another one. Reading the number on the bottom of the motor, we can see in what year it is produced. Here is mine where you can read 38 0 which means week 38 year 1980: This will help me to come up with more evidence to submit a change of inventory request. Regards Here I put some the trains on sale, now or before coming with cones 3943b: https://www.ebay.co.uk/itm/202086086008?clk_rvr_id=1385696026058&rmvSB=true http://www.ebay.ca/itm/Rare-boite-Lego-TRAIN-7730-briques-neuves-jamais-jou%C3%A9/172901510590?ssPageName=STRK%3AMEBIDX%3AIT&_trksid=p2055119.m1438.l2649 https://www.ebay.it/itm/152813017599?ul_noapp=true http://www.ebay.ca/itm/Lego-Eisenbahn-12V-12-Volt-Dampflok-G%C3%BCterzug-7730-mit-BA-OVP-komplett/263014487777?ssPageName=STRK%3AMEBIDX%3AIT&_trksid=p2055119.m1438.l2649

-
 I am so excited with Lego's news about their reselling the Taj Mahal, because there's always the possibility that this is just the start of something big, and we could be getting an affordable chance to buy classic sets that we missed out on, or don't want to pay the current online prices. I remember with the arrival of the internet how cool it was to go to places like Lugnet, and then to Ebay, and being shocked at how much trains had gone up in price, even just from 1980 to 2000. Then after everyone complained online about how they missed out on the Metroliner, it suddenly reappeared like a legendary phoenix. With the Club Car in tow! At the time, it made perfect sense bringing back the first 9v train while 9v was still going strong. 10 years seems to be the magic number for rereleases with Lego, as seen with the Legends line, and now Taj Mahal. So I was wondering, what if any trains do you think Lego could/should rerelease? Could they take old 12v and 9v sets and swap in Power Functions? What about the Train Shed, or Santa Fe Super Chief? Emerald Night? Are there any regular retail trains sold after 9v that people are clamoring for a return of, as we saw with the Metroliner almost 20 years ago? Is a train related rerelease even feasible with Lego today? I would love to hear what others think is possible / desired. Personally I wish I could buy more Santa Fe cars for regular retail price!
 -
Hello, when I started collecting the sets from the grey 12v era 1980-1990, I bought many used sets and incomplete lots. Bricklink was (and is) a great help to check them for completeness, and to complete the missing parts. But later on, I faced some problems, e.g.: 1. I found part variants, that Bricklink doesn't know . 2. Some invetories are obviously wrong. For example, it is hard to believe that the power rail 2731a shall be contained in set 7725, but not in 7727. In reality, it looks as if this part wasn't used at all before 1986. 3. Alternative parts are not consistent among various sets. For example, the second version of the black steam cylinder x461 is listed as alternate part for 7730 and 7750, but not for 7865. I got into conctact with other collectors (e.g. Reza) and we exchanged lots of pictures and information. The result is a huge table that can be downloaded here: Table It is a write-proteced Excel file. To use the file, you need a monitor with huge resolution (at least Full-HD) and not too big scaled font size (for Windows, 100% is fine). The table shall be a basis for discussion, not a final document. In many cases, there are only hints and conclusions, but no hard evidence. Any feedback is appreciated. A short guide to the table columns: A "Part" Basic part description B "Variant Type" The different known variants of the part. C "Number" Bricklink part numer. Parts that Bricklink doesn't know, use a "+" at the end of the name, or ar marked "?". D-N "Years" Assignment of the part variants to the years of production / selling. O-P etc. "Sets" Each set consists of two columns. The first one indicates, if the set does containt the part at all. The second columnt indicates, how many parts are contained, and if it is a "regular" or "alternate" part. P.S. I already had contact to the Bricklink inventory admins. They are interested in improving and consolidating the set inventories. But for me, the process is extremely complicated and time-consuming. Every single change for every single set should be handled as separate "inventory change request", and every request takes weeks/months until a decision is made. Imho, this is very ineffective, so I decided to write this text and to provide the table for download.
-
 Hello all, I'd like to introduce my latest MOC, the Siemens Vectron locomotive of GySEV/ROeEE railway company. These locomotive appeared only months ago on Hungarian rails, the Austrian-Hungarian railway company, GySEV/ROeEE bought 9 of these with different equipment. Some of them are dual-voltage and run under 25kV, 50Hz (Hungary) and 15kV, 16.7Hz (Austria), some of them are capable to work with DC supply as well, and 2 of them with the two different AC-supply will get diesel units inside to ensure the locos can move on industrial tracks not electrified at all. When these locomotives started to appear I designed it in LDD, there was a little competition between Hungarian LEGO train fans with the design. I was the first who finished the virtual build and I loved it, so I decided to build it as soon as possible. This was the first versions, but only AC-DC locomotives have 4 pantographs, the AC-only types have only two of them. I'm quite proud of the angular green tile in the side pattern and also the angled front needed a little thinking around. I started to love the old hing plates with two and three teeth - these teeth do NOT brake the line of the hinge plate and the whole LEGO part fit into less space and easier to build other things on the top of these bricks. The slots for lights are also capable of to be lit by LEGO LED lights - another good invention introduced first in my Stadler FLIRTs to use the flexible exoforce tubes which are capable of bringing the light of PF LEDs where I need that light. You may ask why is that M-motor hanging around - it has a great importance in this model! As the real thing with two different AC-supply, my Vectron works under two different LEGO-voltages - it is compatible with 9V track and 12V track as well! The M-motor switches a polarity switch brick, which cuts off 12V pickups from 9V train motor's contacts - when the locomotive runs in 9V mode, the pickups for 12V track could touch the same rail when going through 9V points, and the loco could short circuit herself! When the loco runs in 12V mode, the polarity switch is ON, and the 9V train motors are supplied from 12V track. At the other end of the locomotive there is an another M-motor - it cuts off the 9V train motor from the output of the controlling SBrick - it won't be a wise idea to power that SBrick both from battery box and both from the 9V track, through its output... Look at the next image, how it works: So if the locomotive reaches the end of electrified track (12V or 9V), it still can carry her train forward - it can run on internal battery box as well. And finally, yes, these stuff did fit into the model: (Since the lower light on each side serves as red and white light on the real thing and upper slot serves for long distance lights at night I put white lights on the upper, red lights on the lower slots.) Also some other images and further details can be found in Hispabrick Magazine #29: http://www.hispabrickmagazine.com/sites/default/files/Descargas/HBM029_ENG.pdf Comments and critics welcome! Some other photos:
 -
Hi all, since 7777 book came out, I've always wanted to integrate Trains and Technic worlds. Back in the 80's the problem was the complete lack of train wheels with a Technic axle hole. It was solved with RC trains a lot of years later. Therefore, I can convert a 9v train to PF without too many problems (aesthetically speaking). But for 12V trains it is different. Wheels are made in a specific way, they have the hole for connecting rods, they're more "fat" than RC/PF wheels. Frankly, I do not like 12V trains converted to 9V/PF standard bogies. But I like the PF motor, its speed, the possibility to increase speed gradually...and the fact it keeps the central hole for third wheel. So, in these years I repaired a lot of 12V motors...and some were really in bad shape. Look at the right wheel, it is completely destroyed inside. So I decided to try to implement my solution to connect standard, intact 12V wheels to technic axleholes (which I do not list here, since it was not satisfying). First, I got a standard Technic bush, and cut it a bit. Then I put it inside the damaged wheel hole. It fits fine, but needs to be glued. Once glued, it is time for some testing. The 6-long axle goes right in - but the red ring coming out from the wheel is too thick. So I prepared another wheel (gray bush). This time I cut the bush a bit shorter and fits right. The 5.5 axle is perfect , so I'll need to cut two 6-long axles to the right lenght. And this is the result - this is my 7740 no°3, totally converted to PF. It works fine, but as you all can imagine, it is all made by hand and bushes are not machinery-centered. Therefore the locomotive is not stable as I would like. For the moment, better than nothing!
-
Hello everybody, On Page 5 of this brochure from 1991, it is mentioned: http://worldbricks.com/en/catalog-year/1990/catalogs-1991/1991-lego-catalog-2-en-fr-nl.html For owners of 12V Lego trains, a special 12V train brochure is available. Please contact Lego Spares service. Aux utilisateurs de trains Lego 12V: Réclamez la brochure special "trains 12V" a Lego S. A. ... Please let me know if I can find in internet and download the special 12v train brochures from 1991, 1992, 1993 (or even from 1990, 1989, 1988). Otherwise, iIf you have them, I really appreciate if you can scan them or just let me know, so that I can find a way to borrow them from me, or even buy them. This is for a longterm project for improving the current inventory of 12v and 4.5V trains on bricklink. One concern is the service bag 5086, which is declared on bricklink from 1993, but I am not sure. I cannot find it in any brochure available online! Cheers