Search the Community
Showing results for tags 'sbrick'.
-
 BrickController2 is an Android and iOS application that allows you to control your Lego models using a compatible gamepad. It supports the following devices: - SBrick - BuWizz 1-2 - BuWizz 3 (basic support) - Lego Powered-Up devices: Boost, PUP HUB and Technic HUB (or Control+) - PF infrared (on Android devices having infrared emitter). Features: - Multiple profiles for a single creation - Multiple motor (or output) assignment to a single controller event - Different types of devices can be used at the same time - The same motor (or output) can be assigned to multiple controller events - Different joystick characteristic settings - Different button modes: normal button, simple toggle, ping-pong toggle, carousel toggle, ... - Train mode on joysticks - Normal and servo mode for the new Control+ motors - Sequences (like for flashing light) BrickController 2 on the Google Play Store: BrickController2 android BrickController 2 is also available on the Apple App Store. BrickController2 iOS Video tutorial created by @kbalage (many thanks for this): And another great video by @kbalage: Older versions: BrickController Android application. It lets you to control Lego creations via Lego infra-red, SBrick and BuWizz V1 and V2 using any Android compatible game controller: Current version: BrickController 0.6 User guide: BrickController User Guide Minimum system requirement: Android 4.4 and bluetooth low energy support on the phone (or tablet) Video on the older SBrickController application:
 -
 Hello! We are ethusiastic adult LEGO fans and we have developed this new remote technology (kck.st/1sf6zOU). We know that lego is not just a toy, but an expression of the passion of creation. We are very interested in your opinion! Once upon a time there was a group of LEGO fans that had a dream, namely the dream of not simply taking readily existing building blocks to create a new model, but rather to create something that would take the LEGO experience to an entirely new level. They started their journey half a year ago but in order to fully realize their dream they now need your support. Take a look at what they’ve achieved so far and play your part to help turn what was simply a dream six months ago into a reality today . What they have produced is the SBrick, a universal remote control unit that slots simply into your existing LEGO models and allows you to control up to 64 Power Functions® units using your smartphone or tablet. This is just one of the very many things it does (there is a full list of the features listed below). If you browse any of the LEGO forums worldwide, it soon becomes clear that this is something that this is something fans have wanted for a very long time and the good news is that this very product is here now.
 -
RC Car Toy Story
Leviathan posted a topic in LEGO Technic, Mindstorms, Model Team and Scale Modeling
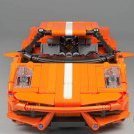
Hi everyone, Here is my last original creation : The RC Car from Toy story movie ! I would like to make a RC car controlled by smartphone and easily recognizable by young people (and older one too...) Features : RWD by 2 L motors Steering by 1 Servo motor Controlled by 1 Sbrick (or 1 Buwizz without bbox) Independent suspensions External switch for power supply Some nice colors I used 2 pythagoriciens triplets to improve chasis stiffness. The car is divided in 3 modules : front, motors and rear In the picture below you can see red bush on 4l axle with stop. It's the switch to power up or down the battery box. I used Anto's buggy motorisation : http:// http://www.techlug.fr/Forum/viewtopic.php?f=5&t=11544 but il replaced 8t by 24t. HD photos gallery : https://www.flickr.com/photos/147164115@N07/albums/72157713497548457 Building instructions are available : https://rebrickable.com/mocs/MOC-39835 I added 3x3 lime dish for the eyes on 3D model : I hope you'll like it, See you soon ! -
 You’re stuck inside, we’re stuck inside Build us a B-Model to win an AWESOME prize! Whilst we’re all stuck inside we want to see what you can build with your LEGO pieces locked-down, whilst in lock-down! That means creating a new vehicle from only the pieces found within an existing official LEGO set. There are some incredible prizes on offer from the awesome guys at SBrick, the leading remote control solution in the building toy market, allowing you to control your models remotely using a smart device like a phone, tablet, gamepad, or even Chromebook, MAC or PC! The Rules Build us a B-Model from only the pieces found within a single official LEGO set. The set can be from any era or theme, including Technic, Creator, Town, Space, Pirates… everything except Galidor. You may also choose to use the pieces from two official LEGO sets if the RRP of each set was below $25. Photograph and upload your B-Model to Flickr, MOCpages, Brickshelf, or Eurobricks between May 1st and June 30th 2020. You must include the words ‘TLCB Lock-Down Competition’ or a link to this page somewhere in the creation’s title or description, so that we know you’re entering it. You don’t actually have to be in Lock-Down to enter, although do please abide by whatever the COVID-19 advice is in your country of residence. How to Enter If you upload your B-Model to one of the free-to-use creation-sharing sites above with ‘TLCB Lock-Down Competition’ in the title or description our Elves will find it. You can also contact us in the usual ways or post a message on our Facebook page with a link to your creation if you want to make sure we’ve seen it! You may enter as many creations as you like and the winners will be chosen based upon the designs that best meet our usual Submission Guidelines and our completely subjective opinions on what we think is cool. Prizes! Winner: SBrick Pro Pack; Includes SBrick Plus, Wire, 2x Lights, Servo, L-motor, Battery Pack, & colourful cases Runner-up: SBrick Starter Pack; Includes SBrick Plus, Wire, & colourful cases Legal Stuff TLCB Lock-Down B-Model Competition runs from May 1st to June 30th 2020 GMT, and no late entries will be considered. All entries must be your own work and be built and photographed during the eight-week competition. If you’re under the age of 18 you must get parental permission before entering the competition, as winners will need to provide TLCB and SBrick with their contact details. TLCB and SBrick are not responsible for any additional tariffs, taxes, customs, bus tokens, or traffic tickets your country may impose on you when claiming your prizes. Good luck to all our readers, and don’t forget you can join the discussion, ask questions, submit complaints etc. via the comments here at TLCB or via our Facebook page. You can find TLCB’s Facebook page here, SBrick’s Facebook page here, and you can read our 5-star review of the awesome SBrick bluetooth brick by clicking here. Stay Safe, and Happy B-Model Building!
 -
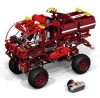
 Hello everyone. As a monster truck MOC was one of my earliest creations, the time has come to remake it! Weight: 2030g - Powered by 2 SBricks - 4 XL motors for propulsion - 2 Servo motor for steering - M motor for switching steering mode (normal/crab) - M motor for raising front hood and rear bed - LED lights for headlights - Openable doors and tailgate Those old-school power functions components still work sufficiently in this MOC. The body was inspired by 80's monster trucks made from lifted and modified Ford pickup trucks. The under structure was designed for robustness. Eventually it looks more like modern tubular chassis. There could be multiple options for the sets of dual shocks. (Hard/Soft, Hard only, H/H, S/S) Vertically placed M motor moves Polarity Switch connected to rear Servo motor. Horizontally placed M motor is for two functions. Front hood opens via worm and 24T gear. On the other hand rear bed is raised via small actuator. That requires two driven axles of different torque and rotational speed for each side. Center differential enables single motor to transmit the power to both sides. One of the benefits of portal hub is easy to change gear ratio. Body parts could be replaced with different color scheme, though they are not fully modular. On November 2nd and 3rd, Monster Jam live was held in Japan for the second time. I did go to the event and took photos of amazing real monster trucks and drivers. Thank you, Bari Musawwir and Neil Elliott! Building instructions available at Rebrickable.
 -
 The Volvo FMX is an oddly styled truck, its bulldog nose like design stood out to me instantly. Having an inherent weakness for the odd I decided to build one all the way back in 2015. Four years later I proudly present my latest model :). Developing the Palfinger crane took the better half of the development time for this model. In order to house all the electronics necessary a flatbed truck design was chosen with 4 axles, 2 under the bed and 2 to support the crane and cabin. The crane is operated by 3 servo-controlled pneumatic switches, the newer style switch allowed me to build this more compact than we ever could! The Pneumatic cylinders for the extension sections have been modified to allow for a more realistic reach. Two original cylinders were cut and acetone welded together for each one of them. The compressor is powered by an L motor and assisted by a rubber band to reach the pressures necessary to operate the crane. The crane is able to reach the back of the bed, as was my goal, but isn't able to lift much anymore then, the limit of pneumatic control is really stretched when a single-cylinder needs to push an arm of 30+cm on a point 5 studs away from the pivot point. With all this functionality, details are fun but also frustrating to add. Two tiny tool compartments have been fitted on the rear of the truck stowing away lifting equipment. The engine is only built for the upper 2/3 to accommodate for the suspended axles and steering mechanisms. The model is also fitted with a full custom led kit. A custom electronics board with an Arduino pro mini takes the signals from the Sbricks and converts them into turn signals, driving lights, hazard lights and much much more. More can be seen on the Flickr album and in the Youtube video!
 -
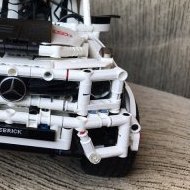
 Hello! This is my new Moc: a Scania S730 tractor unit, in 1:17 scale. It was built during free time between march and october. It is full RC with an XL motor for driving, and Servo for steering, and a Sbrick to remote control. It has opening doors and detailed interior. On the rear axle there are pneumatic suspensions, controlled with a manual pump at the back of the cab. The model has a "showtruck" look when suspensions are raised: Stickers are self made, printed with different shades of white ink on black vynil. Tyre badges are directly printed. The most challenging part of the model was to create the steps to access the cabin... and the cabin itself! It is 18 studs wide (cab and front bumper), but the roof, on the front, is 17 studs. The wheelarches and sideskirts are 19 studs wide. The cab can be romoved, to access to the battery box. I'm considering put this model on Lego Ideas. I'm not able to make instructions so if somebody would like to build it, they must vote for it! (just joking ) A trailer is also under costruction!
 -
We’ve been working on redesigning and improving our web interface to control multiple trains using one tablet / phone. Besides the trains, you can of course also control all the other devices in your layout: switches, lights, boom barriers, etc. We added the following features: Support for SBrick We have added support for SBrick controllers, so now you can control LEGO PU hubs, SBrick and our 4DBrix WiFi controllers with our system. Just like for PU hubs, controller SBrick requires a BLE112 dongle and an software license. Touch Controls You can now control the speed of the train by sweeping the power control, see video below. It’s a very intuitive and effective way to control the trains, especially to position them. Skins We have redesigned the multi-train interface. It now uses skins so you can customize the look of the app in function of the train you’re controlling. We’ve tried to give it a LEGO feel. At the moment you can use a number of pre-defined skins. The goal is to support custom skins in the future. Emergency button We also added an emergency button so you can immediately stop all trains in case that’s needed. You can see it at the bottom of the screen capture of the control app. Let us know what you think and don’t hesitate to get in touch with us if you’re interested in controlling your LEGO train layout this way. ---- P.S. the initial post had an incorrect link to the YouTube video, this has been fixed now.
-
 Hello everyone! Before I start I want to wish all of you to stay healthy, survive and win the disease! Today at my birthday I decided to share with you my latest MOC. This is a brand new Liebherr LR 11000. From the previous model, it took only some boom sections and proportions. The chassis and superstructure built from nothing and were rebuild several times. Below please let me share with you some dry specifications of the model: - Crane is about 2 meter high - weights 5 kg - requires at least 5 big battery boxes for been fully operated - can be managed by 3 sBrick units. - has 10 PF motors (4 are in the chassis) - Has 9 pneumatic cylinders + a pump - Has a full-size V6 diesel fake engine like the real crane - Has 6 winches, 3 of them are installed to the boom like in the real crane, but none of the motors are on the booms. - Crane is able to assemble and disassemble back from horizontal to working condition without any human help. - Has 4 pneumatic features, three of them are operated from the cabin, two of them are operated from the operators work seat Now is hte time for it's features: - Driving and steering - one XL motor per each track. Torgue increased 1:25 - Slewing by 2 M motors - L Motor for SA Frame winch - L Motor for the Main boom winch - M motor for the luffing jib winch - M motor for the secondary hook winch - L motor for the main hook winches - Pneumatically adjustable operators cabin - Pneumatically adjustable derrick counterweight horizontally - Pneumatically adjustable derrick counterweight vertically - Pneumatically rising chassis for (dis)assemble. - L motor for the pump and V6 engine - Individual Sbrick custom profile - 3 Pair of lights: - Front LED - Cab LED - Main hook winches LED Here is the link to photos, I'll post some directly here: https://bricksafe.com/pages/Aleh/2020-lego-liebher-lr-11000 Bonus: Here is the performance of the superstructure stability without boom and without counterweight(!), only one battery box insalled for fotors activity. Boxes are full with batteries (24 pcs) Easy to fix the front suspension: https://bricksafe.com/files/Aleh/2020-lego-liebher-lr-11000/IMG_2983.jpeg/800x600.jpg 1,5 kg load. Please enjoy and feel free to ask any questions.
 -
 Hi there, I've developed a very annoying habit in the last few years. I randomly build pickups and other 4x4's. Even bought a real one. Anyway, the latest one is quite a biggy (sizewise) thanks to the planetary hubs. I've found a trick build them into solid axles with a practical ground clearance. This trick is going to be conroversial here. But start up with the video instead: All pics to be found here: https://bricksafe.com/pages/Attika77/ultimate-pickup In the comments under the video, noble members of our community noted, that there are parts which could solve the 1/4 stud misery. (if you don't know what is that, off you go, and whatch the video to the end! ) One of these is the 14t gear from the old diffs: I've made the attempt, but due to that collar on the bottom (top on the pic) it is too wide and puts srain on the drivline, making it hard to turn it by hand, so it is off the table unfortunatelly. So I speak for myself when I say, cuting those axles worth it. Not a rare piece, and costs 1 cent on bricklink, but only because there is no smaller value in the currency itself. In return the design prooved itself very reliable. Another "weakness" of the axle is the inperfect geometry. The wheelhubs aren't completelly vertical. There is about 1 degree tilting inside on the top. /---\ Before overdramatising this atribute, think, if you've noticed it in the video? Apart from the axles, the rest of the truck is the product of those years I've mentioned above. The essence of it is a simplest possible drivetrain: And a steering solution refined for non-rack steering: (The render is made of an older version, hence the different connector) If you don't belive your eyes, yes I choose to use 4x2 beams to form steering arms. It looks savage, but it is doing the job very well, brings ackerman geometry in the game. It does not hold the wheels rock solid of course, but in practicality it isn't noticable on the field. I've got a rack steering solution as well, but that brings the servo down A, onto the front axle (I don't do that. Ever ) B, into the mid chassis, where I don't have room for that. So we keep that for another build. Also has a working steering wheel using the rear output from the servo. ame old bevel system I've been using in most of my builds. Check the 1st episode of the pickup saga for more on that. Suspension Solid axles on a 3 link setup. It is kinda made up design, slightly inspired by the rear suspension of my Isuzu Trooper. Changing the shocks, or their hinge point on the top, gives 3 different ride height and suspension stiffness. The black, soft springs give a softer, relaxed, lower stance to it, while the dark grey shocks (known from the set 8880) are lifting the truck to a practical maximum, but still can reach full articulation. Not in all situations good to have your truck up in the sky. Like the climbing in the video. With low shock setting it made 52 degrees, but 47 "only" on big wheels and lifted shocks. The center of gravity moves with your ground clearance. That's about it, the rest is smoke-screen, like the body, and fancy doors. Oh, here is a fun fact: When it came to the seats, I realised I have 2 adjustable seats salvaged from a lorry build from about 5 years ago. Luckily they fit perfect so just made a rear bench in the same style. A non adjustable lazy style. Please feel free to ask about it, or just say something about cutting axles. I hope you find something useful here to take home with you.
 -
How to create your own controller for SBrick (Profile Designer) First Run of your new SBrick
-
Hello everyone. This is my second Tatra model.Comparing to previous Tatra 813 Trial Truck built in 2014, it is bigger, heavier and a little bit faster. Weight: 3810g Length: 62.4cm Width: 24cm Height: 25cm -Powered by 2 SBricks -6 L motors for propulsion -2 M motors for steering -M motor for 2 speed gearbox -Working steering wheel and V12 engine -Openable doors, front grill and roof hatch The model was specifically inspired by a unique truck of Jansa Team participating at real truck trial events. I tried to replicate overall look as possible without using any stickers. The cabin became one stud longer than it should be. Also using many system parts was somewhat compromising as a Technic builder. This time I omitted offset axles because symmetrical structure was more robust and efficient. Each side of half axles are independently driven via two parallel drive shafts. That enables slightly smoother turning than previous one adopted single drive shaft. Body parts are removable by pulling out both seats and two 5.5L axles behind the rear bed. When I completed the chassis early in 2018, it never came to my mind that LEGO would officially release "game changing" planetary wheel hub. Admittedly those bulky half axles using portal hub look outdated in 2019. The core of chassis contains bunch of L motors which I called 'Six Pack Abs'. The gearbox is simple yet packed 16 gears into tiny space between L motors. Although suspension mechanism is not like real Tatra, pairs of swing half axles move like real one. That realizes good off-road capability. The steering angle of 1st axle is twice as 2nd axle. Two hard-coupled M motors move 13L gear rack via dual pinion gears. For more powerful steering, I did not use white clutch gears. Consequently geared down motors keep rotating and make clicking noise when gear rack reaches end position. After all, this MOC ended up to be just a big truck driven by old technology. (Strangely it sounds like aged Tatra 813 in modern truck trial events...) Still I am happy with the result and sharing another massive 8x8 model. If you like it, feel free to put colorful stickers on it, make alternate cabin design or build more accurate chassis with new hub parts. Building instructions available on Rebrickable.
-
 Hi, Do u like Sbrick or Buwizz?
 -
 Hey guys, so I made a custom SBrick profile for an upcoming MOC and I need to log into the SBrick app to use it. I haven't really used the app for about a year now, and since then I had switched to a new device (iPhone X from iPhone 7). Today I tried logging into the app, but when I put in my email and password a popup says "login failed". I then changed my password and was able to log in with it in the browser, but in the app it still says "login failed". When I hit "connect with Facebook" a popup tries to come up but disappears almost immediately. I also tried creating a new account with a different email, but even that says "registration failed". At this point I feel like it may be a problem with the app rather than my account, as I figure it would at least let me register. I emailed SBrick at info@sbrick.com about the issue but not sure if I'll get a response from them. I wasn't able to find much help online regarding this either. Any help is appreciated
 -
What is Sbrick Pro Software?
-
What is Sbrick Light?
-
Hi everybody, I always wanted to make Madoca1977’s Baja Trophy Truck or something similar…. Well here’s my result. Now here you can see it in action…. I wanted to use buggy motors to drive the Baja buggy. (Unfortunately I only have 1 Lego Buggy motor, but for this model I bought 2 buggy motors from CADA). The front of the Baja Trophy Truck's chassis is the same as Madoca. The rear wheel drive is my own design. This also applies to the seats and cabin. The cabin is not as strong as Madoca's and also lacks the roll cage. I wanted to see if this model has a bit of speed and agility. As it turns out, I can barely drive the model because it is so fast. It drives on all kinds of terrain. The buggy drives fine with the normal 1.2 volt rechargeable batteries. But driving through the grass is a bit difficult. I once read a topic on this forum about lifepo4 batteries and thought let's give it a try. And to my surprise, it really drives everywhere like crazy. Topic "do-you-use-12v-or-15v-batteries" The buggy has : 1 Servo motor for steering 2 Buggy motors for driving (1 on each rear wheel) SBrick for control Battery box with 3x LiFePo4 and 3x dummy batteries (Work also fine with normal (reachable) batteries but has not much speed when driving through grass or very rough terrain) Building Instructions Nowadays I want to be able to rebuild my own models when I break them down, so I make a digital copy of the model. I always did this in LDD but since it is no longer updated I switched to Stud.io. It took some searching but now I am able to build the models and making the instructions is also easy. Here are some examples Since Madoca has provided his Baja Trophy Truck with free instructions, I want to share my Baja Buggy's instructions with everyone for free. Here you can find the Building Instructions and Studio file I'm not good at designing beautiful bodywork, but building this Baja Buggy has given me hours of building fun. Making the instruction toke me a lot of evening hours, but I like the result. Sorry for the experienced builders, the instructions are step by step as Lego does nowadays, this means that there are a total of 663 steps (about 500 pages). It is certainly not a professional design, there are some steps in the Studio file that do not fit completely, but it fits perfectly when building. Some work in progress Compare Here are some pictures showing the model compared to the famous 8466 4x4 Off-Roader and the 42110: Land Rover Defender. And a few renders of the Baja Buggy More pictures can be found here.
-
.thumb.jpg.c73e512ce1ed75fb1580e192a3e8b48a.jpg) Robust working 1:12 RC model of the 6x6 rocker-bogie mobility system used in Mars rovers Perseverance and Curiosity... Tons of play value. Works well over most neighborhood surfaces and terrains, but sometimes gets stuck in loose sand. What you put on top is up to you. NB: The NASA rovers are 6x6x4 platforms, with 6 wheels, all 6 driven, and the 4 corner wheels steered. At 1:12 scale, steering individual wheels with LEGO motors is out of the question. So this model is necessarily a 6x6x0 platform — but one with reasonably effective skid steering. Several years ago, made a pretty faithful working 1:12 model of Curiosity with more emphasis on visual realism than on mobility system performance. The current model vastly outperforms the old one... Purist alert: SBrick RC receiver, non-LEGO elastics used to suppress wheel spread.
Robust working 1:12 RC model of the 6x6 rocker-bogie mobility system used in Mars rovers Perseverance and Curiosity... Tons of play value. Works well over most neighborhood surfaces and terrains, but sometimes gets stuck in loose sand. What you put on top is up to you. NB: The NASA rovers are 6x6x4 platforms, with 6 wheels, all 6 driven, and the 4 corner wheels steered. At 1:12 scale, steering individual wheels with LEGO motors is out of the question. So this model is necessarily a 6x6x0 platform — but one with reasonably effective skid steering. Several years ago, made a pretty faithful working 1:12 model of Curiosity with more emphasis on visual realism than on mobility system performance. The current model vastly outperforms the old one... Purist alert: SBrick RC receiver, non-LEGO elastics used to suppress wheel spread. -

Sandvik Toro 60
Superkoala posted a topic in LEGO Technic, Mindstorms, Model Team and Scale Modeling
Hello Eurobrick, It’s been a long time I haven’t posted here, for many reason. Now I’m back to Lego, let me present you my latest MOC, a Sandvik underground mining truck. (Please note this review is also posted on my own website Superk-technic.com) The Toro 60 is a 60t truck buit by Toro/Sandvik. It is a new approach of the underground mining application, by using a rigid frame truck instead of an articulated one. This allows to have a larger payload for a similar size truck. The Toro 60 is 6×4 truck, with a steering rear axle allowing to take sharp turn in gallery. Here is a presentation video of the truck. The MOC: This MOC is a simple reproduction of the main function of the real truck, as well as a cosmetic challenge to reproduce its unsual aspect. It is not mounted on suspension because I’m lazy because the rear steering-driven axle was a huge mess to create. And also because I’m lazy. It is powered by a Lego rechargeable battery and a SBrick bluetooth controller. All images are available on FLickR Propulsion. Axle 2 and 3 are powered through a PF-L motor. It was the best compromize between compacity and power. It fits well in the chassis between the two axle, but unfortunately there is a little lack of power for the outside run. A PF-XL motor would have been a better choice, but harder to integrate int he structure. Steering. The front axle is a classic Ackerman steering, and the rear axle is rigid and mounted on a turntable, like the real truck. Both axle are powered by a single PF-Servomotor. If you already played with a large turntable you should have noticed that if you gear directly a PF-SM on it your turntable isn’t straight, it has a slight angle. To compensate that, I geared the control axle with a 16t/16t: there is no onger an angle but it reates some slack in the direction. Tipper operation. On the real truck the tipper is actuated by to large and very (very)(very) long hydraulic jack on the forward part of the tipper. This kind of part doesn’t exist in Lego so I used classical large Linear Actuator. It works well when the tipper is empty; It’s a lot more difficult to raise it when fully loaded. Some Details. The front part of the MOC has been worked (more than usual) to represent as accurately as possible the original Toro 60. There is some asccess point and handrail on both side of the face. The massive front radiator shows the big fan, and the cabin is simple but includes a seat and a (on-functionnal) steering wheel. Footnote: The “official” color of Sanvik truck is red, but some parts are not available in red, in particular the panels. This is what the truck could have look like (visual made with Bricklink Stud.io): Thank you for reading ! -
Hello everyone! Thanks to the purple Titanian, it took 18 months for coming back from yet another dark age in my life. Now I am here with yet another pickup truck. Design was inspired by Ford Raptor, Dodge Ram and GMC Sierra. Dacoma 4x4 Redux Weight: 1360g -Powered by Sbrick -2 L motors for propulsion -Servo motor for steering -M motor for two speed gearbox, (sort of) limited-slip center differential and lockable rear differential -LED for headlights -Openable hood,doors and tailgate Video: https://www.youtube.com/watch?v=qMUH1YmF1F4&t=1s This is an improved version of my Dacoma pickup truck and TLC 80. I could not finish building instructions for them because they had fatal drawbacks on their drivetrain. In low gear, bevel gears in center differential often skip and pop out by the torque of propulsion motors. To make it reliable, it was necessary to reduce the stress on center diff while handling higher torque in low gear. The gearbox works sequentially. (1 - 2 - 3 - 2 - 1) 1: High - 2: Low - 3: Low with rear diff lock In low gear, center diff works like limited-slip diff. In high gear, two L motors are coupled and rotate center differential together. Front and rear axles are driven via open center diff. In low gear, only one L motor rotates center diff. Another motor is connected only to rear axle. (In other words, it just supports rear half of drivetrain.) Which means rear half of axle in center diff is (nearly) locked. That means front half of axle in center diff is locked as well. Maximum suspension travel is not as long as older Dacoma truck. But new one articulates better thanks to softer front suspension. Years ago I happened to get some rare blue parts from old sets. So I could build it in blue. With a few tweaks, it can be built in white, orange or black. Building instructions: https://rebrickable.com/mocs/MOC-25520/Madoca1977/dacoma-4x4-redux/#comments I hope you will like it. And I will work hard not to take a long time for sharing next model.
-
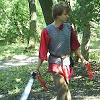
 Hi everyone, This is a new project I am/was working on. I build an trailer capable to load high objects. For now it’s finished but I am not that pleased with the looks. In Dutch it’s called a “Binnenlader” as far as I know in English it “Innerloader”. It’s used to transport high objects like prefabbed walls. Some transporters use this kind of trailer to have 2 loading floors (Double Deck Trailers). The bottom of the trailer is very low to the ground. The trailer can be loaded by crane but it is also possible to load a carrier that can be load- and unloaded by the trailer. The carrier can be separated from the trailer. This is done by lowering the trailer, open the tailgate, and drive forward leaving the carrier standing. by My model automatically opens and closes the back door when the trailer is moving down or upwards. Don’t think is done with a real trailer but I wanted to make it remote controlled with as less motors possible. I was able to only use 1 motor. Have a look at the video and photo's:. http://youtu.be/D-oJ6EqskxQ
 -
 Hey Eurobricks, PunktacoNYC back again with another rock crawler! This time it's called the Rocket Crawler and it is my largest, fastest crawler yet. Youtube video: Features: - 4 L-Motors for drive (one per wheel) - Ackerman steering with custom virtual pivot system to maximize steering angle - Rigid, triangulated 4-link suspension with 100% Lego-legal original, extra large links - Very minimal, light bodywork, and a cute rocket atop the cab - BuWizz for extra power and SBrick for a great custom control scheme - RC4WD 2.2” Bully Competition Tires The initial inspiration for this crawler was twofold; I wanted to build a RC competition super-class-like crawler, what with giant relative wheel size, slim body, and high articulation. I also really wanted to make use of RC4WD's quite large Bully competition tires. This project has been in development for over a year thanks primarily to issues with the front axle. The problem with the front axle was that Lego universal joints simply could not handle the high torque required to spin such large tires. I tried using custom Lego universal joints custom dremeled brass remote-controlled boat u-joints, and even knob gears at the pivot point - nothing worked. So, I mounted the motors directly to the wheels, all within a virtual system to move the steering pivot closer to the center of the wheel for a better turning radius. There is approximately 90° of articulation between the front and rear axles: Easily adjustable suspension height: (high) (medium) (low) The chassis: Wheel comparison: Concept 1: Concept 2 (later): This has been my favorite project. Let me know what you think. P.s. I got a snupps page (nice idea, Sariel): https://www.snupps.com/punktaconyc
 -
hello hello guys im at the moment also working on a similare crane, a ltm 1050/1055/1060 a mixder of those three. it has one axle less, but im trying to implemte crape steering too the all wheel steering, also im building it as a all axis driven vihicle. problem now is not the switching between the two steering modes, but the axis that connect the transmission to the gear rack thats steering, because there is just to too much play at the end of the system. important to know is that im building this with flying axis and at the end of the transmission i have used a wormgear and a 20 tooth gear so the play build up between the 20 tooth gear and the gearrack at the end of the system. So my question is how to get rid of that play, and im pretty sure there has to be a sulotion because im very certain im not the first person who has build a model with flying axis that are steered
-
 Hello all, I'm glad to introduce my project I spent approx one year to work on. Those who follow my railway MOC model topic here, on Eurobricks, should be familiar with my work, and could know I do own a big station with additional storage yard (fig.1.) to store all my long, 1:45 scaled railway models. Fig.1.: My train station in BlueBrick layout software 1. Why and what? My station displays a renovated mainline station - not a dedicated one, just a station, which looks quite average on refurbished Hungarian double-track lines. A modern station comes with working light signals - and this need started my project. I owned two completed mainline signals back in 2013 (fig.2.), using polarity reversal bricks to switch four pairs of modified PF ledlights (modification allowed that only one of the ledlights turned on, depending on the applied voltage's polarity, this modification was nicely described be Viktor Péter Kovács in RailBricks #9). These signals were operated by hand, both turning them free and red after trains, which could cause a lot of error, leaving them accidentally free after a train passed. Also my station needed 5 entry signals, 11 exit signals and one shunting signal for my storage yard. It is easy to see, that without some automatisation these can't be handled light by light. It is important, that my project is about making a system which handles my station, giving play experience by setting routes and managing train traffic, but it is not about automatisation of the trains. Train drivers should drive their own trains (9V, PF, PU, custom) according to the appearing signal aspects set by the "station driver". Fig.2.: My old signals - both of them powered with two pairs of PF ledlights. 2. The real life prototypes Before continuing, I need to explain the Hungarian signalling system in short - and also the logic behind it, and the difficulties it causes. Excluding any branchline special signals, focusing on mainline block signalling, there are two types of signals - main signals (red-white-red pole, they give a speed order to pass and forecast for next main signal) and repeat signals (yellow-white-yellow pole, forecasting only if the corresponding main signal is free or not, these are used where the tracks' curvature doesn't give enough distance to note the signal aspect of main signals). Three colours are used - green, yellow and red. Red always means to stop, giving no forecast of the next main signal. Yellow allows to pass at the maximum speed permitted for the train by other conditions (track, vehicle), forecasting next main signal will be red. Blinking yellow allows to pass at the maximum speed permitted for the train, forecasting next main signal will be allowing passing by 40 km/h (speed for normal switches in turning direction). Green indicated to pass at the maximum speed permitted for the train, the next main signal will be also allowing passing by maximum speed permitted for the train (so it forecasts next main signal being yellow, blinking yellow or green) Yellow-yellow (two lights) allows to pass with the maximum speed of 40 km/h (implying some switches in turning direction will be ahead), next main signal is expected to be stop. Yellow-blinking yellow allows to pass with the maximum speed of 40 km/h, next main signal will allow also passing by 40 km/h. Yellow-green allows to pass with the maximum speed of 40 km/h, next signal will allow maximum speed to pass by. As you look at my track configuration, you may see, that all these variations mentioned above should be considered when putting ledlights to my signals. Fig.3. shows my station with installed signals and the secured neighbouring blocks. This signalling logic also means, that I should know if zero, one or two sections are free after a main signal, including the route (turning on points, or not). Fig.3.: Shematic track layout of my station including the neighbouring signalling blocks, too. 3. System components Why are the neighbouring openline tracks considered? When I allow a train to leave my station (setting a free exit signal for it) it should mean that at least the first section is free and no other train is there. So I should have control over that section - detecting trains entering and leaving them from both direction. Train detection was also needed to turn the signals automatically back to red when a train passed, reducing the chance of accidentally leaving them free by manual operation. I chose the products of SBrick mixed with LEGO-elements. SBrick offer very nice, Bluetooth-controlled light hubs (SBrick Light), which can control 24 independent channels or 8 RGB channels, changing light colours. Since I didn't need the RGB-option (different colours are at different points in the real signals), I could use all the 24 channels of each hub (and since my signals needed 3 or 4 lights each and I have 24 of them, it was quite useful). The other SBrick product, the "+" smart brick can handle inputs and outputs - only for the Power Functions era. But besides train motors, technic motors, ledlights the PF-era had two types of sensors and I used the distance/moiton sensors to detect trains. These were never really put into commercial, the WeDo 1.0 elements were available for schools for education purposes. Fortunately Bricklink and eBay had them... And all these inputs (distance sensors) and outputs (SBrick light ledlights, PF M-motors to set points) are connected through the surface called SBrick Pro. I connect to the SBrick hubs with my PC, running the code simply from browser. You can write all your code on this surface, using some Scratch-based language (before this project I never did any programming). You can add scripts to different events (like if the distance sensors' values change, on stratup, pressing virtual buttons you added to your "remote control"), writing texts, and of course, managing the outputs. Each physical ledlight, motor or sensor is paired in the code with different variables (like strings describing the signal aspect, number values for distance sensor measurement, logical variables to store occupation of segments, etc). And yes, it took one year to write the code from zero (as I said, I never wrote any code before I started this project), collect the physical elements and building them into my layout. It was tested at five events this year, these events brought a lot of problems (and I had no option to test it before events since my layout is 11+ meters), but for the last event, our lugs annual exhibition at Martonvásár city (Hungary) finally it worked 2×10 hours at opening days without any major issue, so now I can finally proudly present it (fig.4.). Fig.4.: The remote control created in SBrick Pro for my station. I used the following components: 4 SBrick+ hubs + 2 WeDo 1.0 sensor on each 2 SBrick hubs + 5 PF M-motors on them 6 SBrick Light hubs + 88 SBrick leglights on them for different signals some PF extension wires 3 9V speed regulator to power SBrick+ and SBrick hubs from 230V AC. 4. How does it work? a) Setting a route Routes can be set selecting the big metallic buttons on the remote control surface (one button for each neighbouring openline section and one for each station track), while direction is selected with the top corner buttons (from left to right, or from right to left). If the route can be set (no occupied segment is involved and it is not conflicting any other existing route), the program: set the points via SBrick and PF M-motor, it virtually locks the points (no other routes can be set including the locked points), and after this sets the corresponding signals free. The buttons of sections involved in the locked route stay red. Removing a route (if you don't want it or the train already passed it) can be done with the bright blue buttons next to each route displayed the bottom left corner. Removing a route can't be accidental, for safety it requires "two-hand operation", keeping spacebar pressed while saying okay to the warning message. After this is done, a counter start giving safety time before the route and the switch locks get cleared. b) Motion sensors Sensors of WeDo 1.0 can detect objects in front of them from approx. 15-20 cm. For the largest distance they have a value of 10, while if you put something very close (<1,5 cm) it gives the value of 0. Since they are mostly placed 2 cm from the tracks (to make sure wide steams can also pass), a value of 3 is set at treshold value, if the value given by the sensor goes below this value it is counted as detection. For first, the code checks if a train is expected to be there. All sensors check one position, but trains could arrive from both direction, the sensors can't decide, which direction the train came from. The program evaluates the logic variables - direction set for the section, is any route set for the involved sensor and the neighbouring signal aspects - if it finds out that the train shouldn't be passing the sensor, gives a high pitch warning on the PC, and also resets any free signals back to red which would possibly let a train to the section where an another train violated the red signal. If the train is expected to be in front of the sensor, the signal belonging to the route and direction will fall back to red. After the train passes the sensor, there is a safety checking - seven detection cycles ran with timing, all should find the sensor value above treshold before saying the train really passed. If the automated looping mode is turned on (letting trains go through the station), after the train passed the sensor and clearence timer is also out, the cleared section's signal will automatically set free. All routes can be resetted in once with the bottom right bright blue button. This is necessary if some errors pop up, or someone passes a red signal - in this case to clear the error message reset must be performed. A reset has also a clearence time, and all sections' must be checked if they are occupied or not and this information is asked by the software. Setting a section clear is also a "two-hand operation" to avoid making a section accidentally free while there is a train on it. 5. Experiences a) Problems I used this setup on five different events from this year's April. At the first three events there were too much false error detections - these were related to bugs in the code. Sometimes the routine for checking a train started twice or more times thus leading to "redrunning" errors. To find out, where my code runs into a bug, I started to write some values on the remote and also making error codes and messages for different events to spot out my errors. Later I left this parts in, since now these error messages clearly can point out, where and what happened in a case of redpass. The varying width of different trains and setting sensor cycle time was also hard to do - I must deal with 12 wide steams (with rods) and sometimes 6 wide short sets. The steam engines always crashed into my sensors, so I put them more far away from the tracks, resulting in non-detection of 6 wide trains. And if the sensor doesn't catch a train at all, it will go on error at the next sensors, since it won't expect the train to be there, if the previous one haven't counted it before. The code issues have been solved, but I don't now what to do with different widths - at least at our own events we have train varyings between 8 and 10 studs of width, there are no oversized models and no original LEGO set trains. Also setting too frequent sensor value writing to variables lead to out of memory error, while setting it less frequent brought the possibility of missing short and fast trains. b) Play experience It is really nice to manage the traffic! When it finally started to work properly (at the fifth event), it was really cool to leave it in automated mode (it lets trains going through the station, and if a section get's free, it lets the next train) or set an ending or starting route for arriving and departing trains. The best part was BSBT 2022 in Schkeuditz, most of the participants really liked, that they need to drive their own trains according to the appearing signal aspects and not only following an another train as close as possible. :P I also created a loop-operation mode for myself if I'm not collaborating with someone else to create a layout. In this case the two group of block signals are logically connected, forming a third section between themselves (fig.5.), creating a double track loop, with four sections of each (three openline, one station section). Fig.5.: My Stadler KISS EMU on the outer loop, between two block signals. The inner loop's block signal gives one green, indicating that the following two sections are clear. You can note the SBrick Light hub and SBrick+ blocks in the middle, the WeDo 1.0 sensors on the sides of track, between the signals of the group. c) System components Bluetooth has is limitations, and pushing 12 different hubs to this project was quite overkill and unexpected even from the SBrick-team - but it works. For first I had many connection issues, it was really lucky moment when all the 12 hubs went online and connected to my PC, but later I found a "wizard" option, which seemed to be doing nothing, but after quitting from it all connections got resetted and all hubs went online instantly. So no more angry waiting, pairing and swearing at it. SBrick lights are really nice, they can be powered both from internal batteries or 230V AC with power supply cable, for a use like mine the plug-in power supply is preferred. The option of programmed handling of 24 different channels is superb. SBrick hubs are now well-known over the world, they do well, the SBrick+ hubs can handle the input, unfortunately the newer sensors have no more PF-connectors, so these SBrick+ hubs work only with the rare WeDo 1.0 units, it is quite a hard limitation. You can see my system in action in the following video: ...and I felt really honored to have a mention from @michaelgale and Enrico Lussi at their articles from BSBT 2022: Michael Gale's article at BrickNerd Enrico's article at BMR 6. Future plans The system will be fully done, when the P40 switches of FXTracks will come out and I can replace all my old R40 9V points to fancy new R104 ones (fig.6.). I am too lazy to motorize all my 9V points currently, and when I competely rebuild my layout to incorporate the new points I'll do the missing motorisation progress, too. Fig.6.: Comparison of my current layout using R40 switces (bottom) and the future layout with FX Tracks R104 switches (upwards). Your comments and critics - as always - welcome. Feel free to share your impressions! :)
 -
hi all. i recently decided on buying an SBrick to compliment my 12 existing lego PF motors. but.... i was exploring their website to find out more about the SBrick, and went to the (support hub) section, clicked on the SBrick and scrolled down to (technical info) and it gave me this information Casing material: ABS (acrylonitrile butadiene styrene) Operating temperature range: -20°C – 60°C Operating voltage range: 3V – 5.5V Maximum continuous current total: 500mA Maximum continuous current per channel: 500mA Range: up to 50 meters. It depends on the controlling device, the SBrick’s distance from, and the electrical properties of the ground, and the orientation of the unit. Deep “null” areas might exist closer to the SBrick than the maximum range. what i dont understand is how can the operating voltage range be 3-5.5 volts if you're supposed to power the SBrick with a PF battery box (they suggest this), that contains 9 volts? so im worried that if i buy an SBrick that its not going to have enough output power, compared to the IR receiver i use. so my questions are 1: can someone who has bought an SBrick in the last 1-2 years, please tell me what the output voltage is when powered by a PF battery box containing 9 volts? 2: would u still recommend buying an SBrick? 3: and is this information above, correct?
