

Fabulous Fox
-
Posts
22 -
Joined
-
Last visited
About Fabulous Fox

-
 Yes, I’ve even built some of his mods back in the day. I was referring to real life cars.
 -
Yea, it’s systems problem. What I was really trying to say beneath all this is that I wish the entire drivetrain was super realistic and had all the exact geometries of real life. At that point though, it’s no longer Lego It’s finding the right balance and I think they did here…besides Ackermann and maybe the steering pivot point not being centered exactly. Do all cars even have Ackermann?
-
Thanks for the explanation! My first thought would be to say the designer could have designed the whole area to accommodate an equal pivot point for the Z-linkage without it interrupting any other parts. My second thought would be that they could have also designed another specialized part/parts for the Z linkage system, just like they did with the springs, specifically made to actually function with the rest of the suspension in a way that’s realistic but scaled down. Again it seems like the practicality of this would be very minuscule in what it actually does functionality-wise. I guess my next question is what could be done to measure exactly how effective a theoretical proper Z-linkage would be in Lego?
-
I haven’t gotten around to watching the video yet, but I checked out your timestamp. The Z-linkage is what actually got me really excited for this set lol! It baffles me how they would include the whole thing but not make it functional. But like you said it’s an easy fix to make it functional. Though I wonder what good that would actually do.
-
Indeed Interesting, what makes the Z linkage just for show?
-
Anyone have any insight on what I asked about suspension and steering designs actually being practical in a Lego model and at that scale?
-
Well it seems after all these years we finally got a Technic Supercar that's pushed the needle a bit more. Not perfect, but this one packs more new features than many of its predecessors. We have yet to see how the functions perform, though. We got: - More advanced suspension (triplex, plus the Z linkage) with new suspension parts. - Most advanced transmission with new gears and parts. - Complex door linkage system. I absolutely hate that they still use the ugly paddle shifters, though and the interior seems unfinished. I unironically liked the ones used in the Porsche, despite them not always working. What I'm really curious about is: 1. How advanced is this suspension and steering setup, really? What more could they have added that they did not? (Ackerman, caster, and camber angles, etc.) It's definitely more than we got before, but does the triplex setup and Z linkage actually affect things or is it just for show? Do the new "A-frame" suspension parts even do anything at this scale? I do not know enough about these cars to know if they even have these things or how big a difference it would make at this scale. What's always annoyed me was the lack of attention to complexity in previous suspensions, so this car seems like a step up, finally. I also hope the steering is more practical to use. 2. How will the drivetrain perform friction-wise? Also, how are the shifters? In the Sian for example, I encountered a lot of friction in certain gears, in certain directions, which sometimes ground things to a halt. I came to the conclusion that the drivetrain was designed/braced poorly and the slight difference in part tolerances all bound up throughout the system, making some people's models perform well and others, not. I hope this one is designed more for reducing friction. This will probably be a day one purchase either way, I love to test out new functions.
-
At long last...here is a proper video for this clock...and a make over! This clock has been more than six months in the making. All the details are in the video! https://youtu.be/_qaTfnDf9tE?si=DJuZshMsHK1cAtvv
-
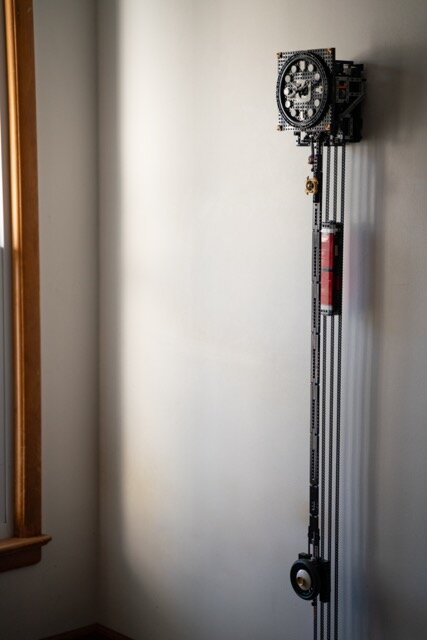
History For years now I have been following all content related to Lego clocks online. My love for real life clocks, with all their mechanical complexity and beauty, pairs perfectly with the art of Lego. I have even built a few Lego clocks by others over the years, (notably, some from @nico71, @KEvron , and Dillon Sharlet's recent wall clock on YouTube) but most of them did not end up working very reliably aside from KEvron's. It's insane the amount of hours I spent tinkering with their clocks years ago, for good reasons, though. These clocks were great and were a great accomplishment in of themselves, but they were not the most practical. Some you had to balance on the edge of a table and some you had to design your own wooden bracing so they could be held to the wall. Then came along Darrel Aldrich on YouTube with his wall clock designs. His clocks are designed to simply hand on one screw on the wall (using the Lego Art mosaic set hanger piece) and are designed around a few main "frame" pieces which allow you to place various axles to your heart's content. Not only do these frame pieces make it easy to design a relatively strong structure (still not as strong as Lego Technic bricks I don't think, as KEvron commonly used, but enough nonetheless), but they make it easy to place the axles and gears all on one plate, similar to a real clock. It uses a grasshopper escapement, which does not (theoretically) have friction when the pallets work with the escapement, which is good for Lego parts and just a great/interesting mechanism all around. After a few more years of not making any Lego clocks, this spring I finally built Aldrich's most recent automatic wall clock. Now, once again I spent a long time tinkering with the grasshopper escapement he used and ultimately, it was too finicky for me. Plus, at that point I also wanted the clock to be fully manual so that I could sleep knowing there was no electricity in it whatsoever. So two months or so after the first version, I re-designed the clock to his manual version of the wall clock and put in a grasshopper escapement from @Davidz90. David is the ultimate Lego clock wizard. He's made countless clocks and knows every bit about the physics involved in them. In fact, he even wrote a book, "Guide to Lego clocks: Science of measuring time with bricks," which can be found on Amazon. I read his book and asked him (way too many) questions about his various grasshoppers and clock physics. It even got me to start reading more articles and papers on clock physics/history, which I love. Again, a couple months later and (many) more versions tested and re-tested later, I arrived at the current version the clock is in. Intro The clock is meant to be fairly accurate, easy to mount, easy to adjust, and decently-good-looking. It can be within a minute accurate per week (definitely more if you really fine-tune the pendulum length) and runs for around 48 hours on a weight and chain system designed by Aldrich. I eventually want to design a proper box/face for it in the future and add more complications, but for now this is sufficient. Below is the video I recently made of the clock. It is not meant to be an elaborate video, just more of a quick review of Aldrich's and Ziemkiewicz's combined into my own clock. In the video description is a list of great Lego clock topics and YouTube channels worth looking into. I only posted one image to here because it won't let me upload more file sizes Specifications: 100% manual (no electronics), 100% Lego, 100% non-modified parts, only hung by one screw. Pendulum is two seconds and has been a few seconds accurate a day in my week of testing this version (under a minute each week). It runs for around 48 hours on an H-loop chain system (by Aldrich), where the chain is simply pulled up by a chain when needed. Escapement is a grasshopper from Ziemkiewicz. Pendulum is around 240 grams. Weight is around 860 grams. Gear ratio from 24 tooth chain gear to the 40 tooth escapement is 1:75. Honorable Mentions The following people have either helped me build Lego clocks or greatly inspired me to get into the craft (YouTube handles): @darrellaldrich8334 @davidziemkiewicz1350 @KEvronista @DillonSharlet Videos Mainly Used to Make this Clock
-
At 1:04 he switches it into a higher gear ratio and it cracks/slips until he reinforces it with his hands, which the structure should be doing anyway. This is what happens when I attach a motor or push it along a surface long enough (like 3 feet) to cause the cracking. Most people just stop at moving it a foot or so and don’t realize all the friction that builds up if you push it further, which is why I theorize there isn’t a lot of talk about this.
-
I want to bring something to attention, even though many will not care or notice, this set came out some time ago. The drive train in this set is NOT braced properly, it is not structurally secure enough for all the axles and gears. In the high gear, when I push the vehicle forward more than a foot or so or attach a motor to the engine - basically anything that moves the drivetrain more than just a few seconds - the gears slip and crack massively. This is quite unfortunate considering the gearbox was already dumbed down in this one. I always make sure to check spacing on axles and gears when building and my build certainly is fine in that regard. Everything is built correctly. I’ve encountered this problem on many sets and MOCs over the years, particularly the previous Land Rover and Lamborghini in their higher gears. Most people do not push the sets further than a foot, where the friction builds up enough to cause slipping. The variances in Lego parts (gears and axles) will cause friction build up throughout the system. Some people get lucky with their parts, some don’t. This is why this is happening. The designer unfortunately did not design the build in such a way that axles and gears are very securely braced - that way any part variances will not stop the gears from working. @Didumos69 is someone whose MOCs are excellent in this regard - the axles are always properly braced. The new engine parts in this build have WAY more friction than the previous, regular piston blocks and crankshaft. This may be a big reason for the friction as well. I don’t like this one's looks either. Lego needs to start designing their sets better for their big part variances. The video in this review has this problem. It was the only thing I could find on the internet of someone having friction problems with this drivetrain. https://youtu.be/g5gDEUiiv-0?feature=shared
-
I never thought of refining a sketch-like model over and over again and not worrying about being 20 steps ahead all the time, I think this may help. I remember Markus showing all the prototypes in the bulldozer video but for some reason I never thought of doing that for MOCs. Funny you mention the 8043, it was my first flagship and one of my favorite Technic sets to this day. Best Christmas Present ever
-
I guess I should have clarified my question a little bit. I don’t think I have a problem with coming up with the initial idea for a model, functions, and general steps to take to design it nor not having enough knowledge of parts. I know most Technic parts off the top of my head (how they can connect to other parts too) and have all my Technic parts sorted pretty well. I’ve been building official sets and MOCs for years now. Mostly from 2005 to present. I should say that I try making alternate models from the bigger sets way more than I ever have tried freestyle ones, I don’t really know why (maybe this is my problem). What my problem is, is in ACTUALITY designing it, part-by-part. The part where you’re using your brain to figure out which parts to attach. You know, the part where you sit down with a part and think, “What do I need to connect to this? What should connect to this so that it makes sense to connect to this I need 10 steps down the line and also be braced properly?” I can TELL you how to brace parts and how to make certain mechanisms. But when I have to really sit down and connect the parts, it just doesn’t click. For some reference, when I’m sitting down and I’m figuring out which part to connect next, I tend to think to myself all the parts that would remotely make sense to connect to it, and mentally go over each one in my head until I find one that makes sense and ALSO gives me most potential connections for future parts. But the problem is, I don’t know which parts I will need to connect 10 steps down the line yet. Am I supposed to just guess and keep changing things as I see fit? That sounds like I would need to change parts 50 times each before finding the right combination. An example of this is, say I want to insert an axle. If I don’t know exactly how the build will go 20 steps down the line, how am I supposed to know which length or type to use? If I decide to just use any length for a placeholder, I’d imagine I would have to change it at least five times or so before finding the right one. Maybe this is a mindset shift I need? Maybe it just takes longer than I think? If you guys had unlimited time to build, say a 2,000 piece Technic alternate build, how many hours do you think it would take you? (Just the model not the instructions or anything else).
-
I appreciate the detailed response! I actually already do a lot of these things, especially looking at older instructions and thinking about their decisions , except I didn’t think of having different iterations of the same thing. I used to watch that video a lot when I was younger, it’s a lot of what inspired me to get into Technic.
-
So I have a question that’s always bothered me and I’m hoping some of you on here can give your thoughts since many of you are pretty experienced MOC builders. I’m horrible at designing Technic MOCs. I’m totally fine with designing system MOCs. I’ve been building Lego and Lego Technic sets and others’ MOCs for years and years, from the simplest to the most complex. I’ve watched countless videos and read countless topics on Technic. I have and have read Sariel’s book. I understand all the basic mechanical principles and part types. I understand how to brace gears and build strong. But for some reason, when I sit down to start a MOC, my brain just doesn’t seem to work. I can’t really think more than two steps ahead, which I know you need to with Technic. It’s not like this with system. Now, I can design super small MOCs, like micro scale, and even small mechanisms (I made a custom differential once), but as soon as I need to design a full vehicle it’s over. Recently, I built 42131 and some alternate builds, and I was motivated to make a wheel loader out of its parts (adding tires and one more differential ofc). I sat down to start and my brain just couldn’t, beyond putting the differentials in and connecting them by a few beams and a turntable in the middle. It’s been like this every time I’ve tried to design a vehicle in Technic. When you guys are designing Technic MOCs, what’s your process like? Does it really just take tons of thinking, brain power, and time, trial and error, more than I think? Or is it relatively straight forward for you guys? I think I could if I REALLY had to, it would just take months probably. At the end of the day it’s not a big deal, because I love building from instructions so much.