Search the Community
Showing results for tags 'alternate model'.
Found 10 results
-

[MOC] 42154 Dodge Viper GTS (1996) - alternate build
Timorzelorzworz posted a topic in LEGO Technic, Mindstorms, Model Team and Scale Modeling
Hello Eurobrickers, let me allow to share a new creation with some insights made from LEGO Technic set 42154 Ford GT as an alternate build. The idea behind When the 42154 Ford GT came out with its inventory in March 2023, I was impressed by the earth blue colour and had immediately a Lamborghini Lanzador in mind to build with this pieces. I was sure that this model is doable with the given parts, but unfortunately this vehicle is an upcoming electronic car with no engine. Skip the engine and functionality only for design? Nope, not this time so I decided not to make this model and was working on some sketches for a Koenigsegg Gemera instead but that car did not convinced me at all so I decided to finally skip (pause) 42154. To be honest, I found the inventory of the set very special with many odd part numbers, but was impressed by the large amount of connectors used and blue axle pins and also red 2L axles. In February 2024, I stumbled over pictures of the Dodge Viper GTS in second generation, manufactured since 1996 and directly felt in love with this car. To reuse the headlight parts and white parts for stripes seems to be a good option and I finally got keen with the inventory of the 42154 set to make first sketches. In the beginning of March 2024, the project for the Dodge Viper was official born and the finished model ends up with impressive 1430 parts used only from the set 42154 Ford GT. Model features 1:11 scale HoG linkage-steering suspension in front and back engine with moving pistons openable doors on both sides realistic openable hood with lock detailed interior measures 41cm x 18cm x 11.5cm Model impressions Model details Both doors of the model can be opened to see the interior. Pedals are made for the driver with existing parts. The car is controlled from the back with a knob that is responsible for steering the front wheels with a linkage system. The hood opens up to 60 degrees and can be locked to safely stay in position while playing and displaying the model... ...and easily unlocked to close. Opening the hood reveals the engine that is driven directly by the rear wheels through differential. As common for B-model compromises and limited parts, this Dodge Viper uses (only) a V6-engine under the hood instead a V10 - sorry folks. It was very hard to fit all the functionality (engine + steering + suspension) under the hood in tiny space, but everything works well as suspected. Made with DieCast For the first time I used a Diecast-model and also many pictures from it. Here are some pictures for comparison: If you like what you see, feel free to support my work and to build your own Dodge Viper from your 42154 donor set. Instructions and more info can be found here Happy building! -
42146 Dragline Liebherr HS 8300 - B-model alternate build
Timorzelorzworz posted a topic in LEGO Technic, Mindstorms, Model Team and Scale Modeling
Hello everyone, I want to share a new creation. This time it is an alternate build (B-model) for the Liebherr LR 13000 Crawler Crane set #42146. You can find instructions here to build the model by yourself. 100% made out from parts of donor set 42146 with no additional parts needed. 100% controllable with official Control+ Application. In order to all functions of that Liebherr HS 8300 Dragline Excavator, you get a complete overview in the following article on how to build, control and calibrate this alternate model. Summary of Functions & Features remote controlled tracks and 360° superstructure rotation remote controlled boom remote controlled independently hoist-rope and drag-rope controllable with official Control+ App for Smart Device using 6 motors and 2 hubs spinning radiator fans detailed cabin playful details like fire extinguisher, ladder, railings and exhaust pipes brick-built bucket 133 cm / 52 inch long 100 cm / 39 inch high high-quality premium PDF instructions includes guide how to calibrate the model Impressions Main control The Liebherr HS 8300 Dragline Excavator is designed to work 100% with official Control+ Application using the already known interface from its main set. Driving tracks and rotating the superstructure works exactly like the LR 13000 does with the original designed buttons on the app interface. Boom control The giant boom of this alternate model is controlled with the right app lever. It drives the longest rope (shown in blue) through pulley mechanism to raise and lower the boom. The highest and lowest position of the boom depends on the limitations of the app after proper calibration of the model. The boom stops automatically in the lowest position to always ensure a 360° rotation of the superstructure without colliding with the tracks. A linkage mechanism slightly moves the nose who is helding the drag-rope and ensures that the app can detect the highest boom position during calibration. As a nice addition, a spinning radiator fan is connected to the same motor that drives the rope for boom. The second fan spins freely. Hoist-Rope & Drag-Rope Controlling the bucket works like the real machine with an independently hoist-rope (shown in green) and drag-rope (shown in red). The hoist-rope is controlled either up or down with the left joysticks vertical movement. By horizontal movement with the same stick, the drag-rope goes in and out. Since this two ropes are controlled by just one joystick, combinations with both ropes are possible and also needed for proper playing. This requires a bit practice though, but makes it possible to control the bucket and two ropes together with just one (steady) finger. The length of the hoist-rope depends on the app limitations for that joystick movement, meaning that the hoist-rope can't go too long before the app stops the motor. On the highest position of the boom, the bucket can reach the ground with fully extended hoist-rope where boom and hoist-rope are in limited positions controlled by the app. During calibration the app also detects the most inner position of the drag-rope. Working under ground With lowered boom and extended hoist-rope, it is actually possible to dig something below the model. This makes fun by placing the model on a table for example. Calibration For a correct calibration by the Control+ app, it is required to separate the hoist-rope from the drag-rope. In the instructions there is a full guide included how to calibrate the model during building. Additionally there is an extra PDF guide included that explains how to calibrate the model at any time. Please make sure you have completed the calibration to ensure the best playing experience with this model. How to build Building the Dragline Excavator starts with the base from the LR 13000 main set. Make sure you build the undercarriage with book 1 until step 343 is completed. Before you continue building, check the tracks und turntable function. After the correct calibration with Control+ app, the instructions for the HS 8300 takes over to complete the alternate model. The premium instructions for this model comes with 338 pages of high-quality images and building steps to ensure a satisfying and slightly challenging building experience for a 18+ set. Make sure to test all functions and alignments of ropes through the building process. Happy people with sealed parts can open bags 3 to 5 to complete the build. Connecting ropes with spools and making nodes can be an annoying thing even for the main model. If you already have built the LR 13000 main set, you can let the spools with ropes connected. The alternate model starts with wound up spools during the building process. Controlling quick guide To become a real Dragline expert under the sun, here are some quick tips for controlling the model: 1) Place the model from the left to the right At the beginning, place your model driving from the left to the right to match the joystick interface for the Control+ app. 2) Sliding bucket over ground This is some basic control for Dragline Excavators. Slide the bucket over smooth surface by controlling the drag-rope winding inside simultanously with the hoist-rope slightly going down. 3) Moving bucket along the boom As advanced controlling, this requires a bit practice but also avoids loosing cargo when the bucket moves along the boom. The drag-rope should go out simultanously with the hoist-rope going up with a bit tension on both ropes. 4) Unload the bucket On a loose drag-rope, the bucket always hangs in the air on the hoist-rope. Simply give some length on the drag-rope to tilt and unload the bucket. 5) Keep watching the drag-rope The app itself cannot detect outer limitation for the drag-rope. In case the drag-rope goes out too far, it is possible that the rope slips over the spool. Treat the drag-rope always with a bit tension. 6) Avoid tension on same direction This case is also not detectable by the app. When the drag-rope goes in simultanously with the hoist-rope going up, there is too much tension at any point. As a result, the parts holding the bucket are going apart at the weakest pin connection. Giving some length on both ropes and connecting them together solves this. Final note Goal with this alternate model was to create something else from the hard discussed Liebherr LR 13000 Crawler Crane. Rebuild, re-calibrate and having fun is exactly the way how this model works. The app goes hand in hand with the design with a large learning curve on controlling the model. Let's find it out by yourself. Think out of the 42146 box and have fun with this replica of Liebherr HS 8300 Dragline Excavator. If you like the design and you even own the 42146 LR 13000, go for it on rebrickable and build your own. -
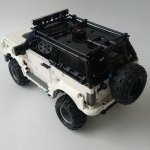
42156 Volvo: The Iron Knight - alternate build
Timorzelorzworz posted a topic in LEGO Technic, Mindstorms, Model Team and Scale Modeling
Hi Folks, let me allow to share a new creation. This replica of famous Volvo Iron Knight Race-Truck is completely built with parts only from set 42156 Peugeot 9x8 Hypercar as an alternate model (B-model). Only a copy of donor set 42156 is needed to build this iconic truck. You can buy the instructions for this model here if you're interested in building. Features & Functions openable doors on both sides HoG-steering with removable knob independent push rod suspension in front and back V6-engine with moving pistons connected to rear differential openable lid in back to see suspension working Volvo brand with no sticker detailed design and interior lights that are glowing in the dark modular building with splitted premium PDF-instructions measures 44cm x 20cm x 18cm Impressions Headlights Lights in front are made with fluorescent bars from donor set to represent instantly recognizable headlights. A Lego addicted heart beats higher for the first time when the iconic V-shaped lights are glowing in the dark. No custom sticker Thanks to the inventory I'm happy to share my first model with a completely brick built front to recognize Volvo's brand only with pieces from 42156 and without any need for custom sticker. Suspension The model uses a soft push rod suspension in front and back. Due the fact that this truck is two studs shorter in wide than its base model, the suspension design is not only a simple copy, but an own approach with a way different building instead. Through an openable lid in the back, the suspension can be watched working. Steering Driving and steering the truck works directly with a steering knob on top of the cabin. This steering knob is removable and can be easily pulled out for better displaying the model. Engine The real Iron Knight uses a straight 6 piston engine instead of V6. Due limited inventory and missing crankshaft parts, it was not possible to form a straight working engine out of V6. Some compromises are made here and as a result, this alternate model uses a working V6-engine with moving pistons. Instructions & building process Premium instructions for this model comes in two separate PDF-files with high quality images and building steps very close to the original Lego Technic ones to ensure a satisfying building experience. Building this Iron Knight alternate model starts with the 249 pages long main PDF to finish the rear end first with differential and suspension included. The second instruction file takes over to assemble the entire front section together with a suspension and steering system you never built before. After 132 pages the front section becomes married with the rear end. Frames and structural elements are added to make the model solid. The working V6-engine becomes attached and connected to the rear differential through drivetrain. More parts are added to form characteristic lines and shapes, getting closer to a real looking Volvo Iron Knight. Some parts of the cabin are attached and the drivers seat and doors take place at their final spot of the model. After 381 pages of joyful building in total, this Volvo Iron Knight alternate model is finished in all glory and ready to drive on your shelf or desk. Grab instructions here Crafted in Sweden. Rebricked with passion in germany. Have fun with this 42156 Volvo Iron Knight alternate build. Follow me on Instagram -
42143 Ferrari F40 - 1:8 - alternate build
Timorzelorzworz posted a topic in LEGO Technic, Mindstorms, Model Team and Scale Modeling
Hi folks, I'm happy to share my latest creation to complete my 2022-lineup. With this model, the craziest journey is now over that I've ever had for an alternate build. This replica of a Ferrari F40 is purely built from Lego set 42143 Ferrari Daytona SP3 as an alternate model (B-model). Having the set 42143, all required parts will be donated and no additional parts are needed to build this F40. The model uses 23 spare parts from Daytona's large spares inventory, resulting in 3603 total parts for this MoC with 95% Daytona parts used. More info and instructions can be found here Functions & Features independent suspension in front and back manual steering with working steering wheel openable doors with locking system openable hood openable rear section working popup-headlights with linkage system 5+R speed transmission gearbox F40-V8-engine with moving pistons open window in bottom to view gearbox detailed interior and engine-bay modular building with separate premium PDF-files detailed design with printed parts fits all Supercars in 1:8 scale measures (all parts closed) 57cm x 26cm x 14cm Impressions Engine The V8-engine with moving pistons is directly connected through the gearbox to the rear differential. By opening and stabilizing the rear section, the engine and engine-bay can be revealed to watch inside this F40. The engine-bay is one of the most detailed part for an alternate model, with exhaust pipes completely made from the engine to the rear end. Even the crossbar from the back to the roof, that gives the real F40 more structure, has found a way into this model. The stabilizer-bar that keeps the rear section open can be stored safely under the rear without loosing them. Gearbox Welcome to my most realistic gearbox so far - the 5+R speed transmission gearbox inside the middle console of the car with a shifter layout very next to the original. For a full wheel spin, the engine fires 1.841 times in the first gear and only 0.663 times in the fifth gear. A higher selected gear results in less friction on the drivetrain and in lower moving pistons of the engine. Following is a summary of all gear ratios, measured from wheel (input) to engine shaft (output): Reverse - 1:1.767R 1. Gear - 1:1.841 2. Gear - 1:1.479 3. Gear - 1:1.104 4. Gear - 1:0.884 5. Gear - 1:0.663 Popup-headlights The model features iconic popup-headlights like the real F40 does, triggered by hand. Once the hood is open, the mechanism can be triggered to open and close the lights. This linkage mechanism is secured with a rubber band, holding the lights strong and in place. The following animation shows exactly how the popup-headlights works. Details The model uses most of the printed parts from its 42143 donor set, giving it the final touch and the instantly recognizable Ferrari brand. Doors of this F40 are implemented with a locking-mechanism. The doors snaps in automatically and stays in closed position. More features to mention are the iconic black stripes around the car, the air-intakes, the slightly angled shapes, the detailed interior with printed dashboard and the front lights, that are very detailed under the trans-clear parts. Instructions & building process The premium instructions for this model comes in 5 separate PDF-files with high quality images and building steps that are very close to the original Technic-instructions. The build can be quite challenging for inexperienced builders, but is for a 18+ set of course a satisfying experience for more practiced adults. Building this F40 starts on the 368 pages long main PDF with the ingenious 5+R speed transmission gearbox and the front axle to complete the front section of the chassis. The build continues with the second PDF and 136 pages later, the rear section is added to the front. After the marriage process with rear and front section, more parts are added to the chassis to make a solid structure, where every function works perfect at this point of the build. Iconic lines are more and more represented to give this model a real F40 experience. The third PDF takes over to complete the openable rear on 170 pages and added to the build. Some more details are added and the roof and windshield will be finished, getting closer to a real looking F40. On the fourth PDF, both doors are built and attached to the car 78 pages later. The F40 continues with the fifth and last PDF to build the hood on 185 pages with the triggering mechanism for the popup-headlights and then attached to the model. After 937 pages in total, the F40 alternate build is finished in all its glory. Comparison Final note With 95% Daytona parts used, this model pushes the limit of what is possible with a given inventory, offering builders a relative easy way to create this F40, where only the 42143 donor set is needed providing all the parts. I'm happy that I've finally managed the biggest brainfuck that I've ever had in my head with this model, resulting in the biggest model I've ever made and in one of the biggest alternate builds in history. Thanks to Uwe Wabra, my favourite designer, who makes this possible just with the Daytona. With several functions and authentic design-features very close to the original one, this model is not only a piece to display. More info and instructions can be found here Have fun with this Ferrari F40 alternate build. -
 This model based on one of the famous Volvo truck - Iron Knight. The main idea was to replicate this truck in small scale and use for this just parts from Lego set 42123 McLaren Senna. Definitely not all shapes and parts of the original truck I was able to build properly, but I think it is compromise in scope of limited range of parts. Instructions: link to intruction Dimensions: 15x37x15.3 studWeight: 516 gFunctions:1. HoG2. Working V8 engine driven by rear axle3. Openable doors4. Detailed exterior
 -

Difference between C & D models?
teos posted a topic in LEGO Technic, Mindstorms, Model Team and Scale Modeling
What is the difference between what is referred to as a C-Model and a D-Model? Technic sets often have an A & B model and I thought a C-model was a fan created alternate option, which leaves me wondering what D-model is. For instance, I'm pretty sure the Duck model I found online that is built using only parts from 42040 is considered a C-model. (Fun model to build, though one of the 12 tooth gears doesn't like to stay put for long) -
Here's my entry to the Alternate Model category of CCCXI, using 10223: Kingdoms Joust. Defiant to the last, the queen takes up her husband's sword to protect his corpse:
-
Eurobricks and Rebrickable were challenged by LEGO® to make alternate models for current year city sets. The builds had to only use the pieces in available in the official LEGO model, be made in LDD, digitized, tested in real brick and be a model a 7-10 year old could build. I received set 60061 "Airport Fire Truck". I found this set to be quite difficult to work with, especially because of the lack of normal 1xN bricks in red, but it was a fun challenge Here are my alternate models: Food truck The truck is equipped with an oven that might be turned up a bit too much Rendered image of digital model: American style truck Rendered image of digital model:
-
Eurobricks and Rebrickable were challenged by LEGO to make alternate models for current year city sets. The builds had to only use the pieces in available in the official LEGO model, be made in LDD, digitized, tested in real brick and be a model a 7-10 year old could build!! I received set 60004 "Fire Station" This is a big set with more than 700 pieces. With it's great quantity of red parts I decided to build some alternate "fire stuff". Here is what I have executed the last two weeks: Alternate Fire Truck Alternate Fire Station Alternate Ensemble Rendering of the Ensemble Thx for watching & so long, Jens
-
[TC5] 9394 C-Model Helicopter
jono rocky posted a topic in LEGO Technic, Mindstorms, Model Team and Scale Modeling
G'day. This is my entry to the Technic C-model contest. I borrowed my sons lego set and created this helicopter loosely based on the Apache helicopter. I used the technic set 9394 Jet Plane 499 pcs, http://brickset.com/...394-1/Jet-Plane. The biggest challenge was to make it different to other helicopters and with limited pieces, so I came up with the idea of a handle and trigger that the faster you pulled the trigger (lever) the faster the rotor would spin but still be able to be free spun. Then have removable weapons and be sturdy enough for kids. 4 days of play from 3 boys it still works. Free Rotating rotor blades. Removable swivel undercarriage gun. Removable rocket/missile wing store pylons. Retractable front main wheels. Retractable handle for one handed use to lever to spin main rotor blades. Geared and sprung lever to spin main rotor blades. Movable pilotage system. 9394 C Model Helicopter by jono.rocky, on Flickr 9394 C Model Helicopter by jono.rocky, on Flickr 9394 C Model Helicopter by jono.rocky, on Flickr 9394 C Model Helicopter by jono.rocky, on Flickr 9394 Left over pieces by jono.rocky, on Flickr