Search the Community
Showing results for tags 'free instructions'.
Found 8 results
-
Fine dine and get some pictures taken at the Florentine Palazzo! How am I so bad at keeping myself promises. Last time out, with the release of Octan Avenue, I thought that a full year between modulars was long enough. Well... this one took two years . Anyway, I think it was worth the wait. The Florentine Palazzo is my twelfth modular building and my fourth corner modular. Free Instructions for this model available at Rebrickable! This model went through a gigantic number of changes. It started as two separate projects that I joined into one. On one side, I had project code name "Worcester" (yes, I give my projects code names ), a new modular building on two 16x32 baseplates (à la Pet Shop or Bookshop) with a distinctly English architecture. Base inspiration was this pair of building in the town of (you guessed it) Worcester. I still might pick up this idea sometime, but it wasn't quite working out then. The other project was a redesign of my second modular, the Italian Villa (my first EB topic I believe) to make instructions. My techniques then were not the most elaborate and the builds weren't exactly designed for stability. Upgrading the Italian Villa would have meant a whole lot of changes probably, so I scrapped that too. But then I thought about doing a brand new modular in a similar vein, which is the Florentine Palazzo! Since it was going to get instructions, I thought about what I really would like to have in modular town. A companion to the Parisian Restaurant came to mind immediately. None of the subsequent buildings match its elegance in shapes and overall refined look. In terms of overall size and details, I tried to get close to the restaurant's greatness. As of late, I prefer looking at drawings rather than real buildings for inspiration. They leave more to the imagination and make me feel less like a plageriser. Anyway, the main inspiration for the palazzo was a building in the Alsatian town of Colmar (drawing · real building). It is not really a building that through one of my usual Google Maps trips I would pick out as inspiration, but the drawing made the creative juices start flowing. Initially, I tried to recreate the building faithfully, but I soon found that joining the upper "towers" closer together made for a more cohesive and interesting façade, so I went down that route. These days I rarely do a full 32x32 baseplate as a single building and the space next to the staircase led perfectly to a completely different kind of architecture next door. One of the styles of architecture that I had been wanting to put in modular form for a while is the architecture of Malta. To me it just feels like the architecture one would find in Sicily but with delightfully colourful timber balconies dotted about to give it interest. As some of you may know, restrain in colour choices really isn't my thing ( *cough *cough Baseplate Alley anyone? ) so this was an interesting exercise in exactly that. Anyway, I had so much fun "carving" details in the plain tan façade to the point that I might prefer this bit over the entire model. I particularly like how the façade keeps sloping back as it goes up. The buuilding was inspired by the Palazzo Ferreria in Valetta. ================== Interiors: Interiors have never been my biggest strength and probably will never be at this rate. Still, I've tried my best to make them quite interesting. Have I succeeded? Hopefully 1. Ground floor: Initially, I wanted to build a post office, but before doing any of the interiors, I showed the building to a friend of mine and he told me something along the lines of "Are you crazy? You should definitely be building a restaurant there!". To be fair, it does look like a prime spot for a restaurant, plus it matches the Parisian Restaurant, so restaurant it was. On top of that, the alleyway I had built under the Maltese house could theoretically be used for bringing stock to the restaurant, so that too makes sense. I think it turned out rather nice honestly. 2. Middle floor: Part of the problem of doing the exterior before the interior is that sometimes one has to mould the interior concept to what is already there. Ideally, the restaurant would have taken up two floors, but the exterior stairs with the fountain underneath was way too cute to remove. And having waiters go up and down exterior stairs didn't quite feel right. That's when the idea of a photography studio came, mostly because there was a dark room on the attic which would be pretty much be perfect for a developing room. The middle floor includes the cameras on sale plus a studio for studio portraiture. 3. Attic: The developing room was fun to build. An enlarger, three trays for developer, stop and fixer mixtures, a cupboard full of chemicals and a sink. I also had a photo drying string, but, honestly, Studio (where I make the instructions) is so crap at dealing with flexible parts that I deleted it after much frustration ================== To see everything that I haven’t been able to explain in words, feel free to take a look at the model yourselves, many of the “how was this/that made” are visible! 3D MODEL And, of course, the free instructions that you can use to build this model for yourselves! FREE INSTRUCTIONS =================== Thanks for reading through and hope you like the model!
-

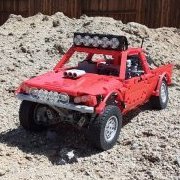
[MOC] Trial Truck 6x6 [free building instructions]
keymaker posted a topic in LEGO Technic, Mindstorms, Model Team and Scale Modeling
Hi, I hesitated if I even should post this MOC here since it is so simple but at the end here I am. I created this truck mostly to have some fun outdoors. It has minimal amount of features and its main goal is to drive over not so pleasant terrain, like sand, mud, snow and even quite deep water. And I can do that without fears, that drivetrain will jamm, gears will skip, motors will get wet and at the end I won't have desire to clean all this mess up. I also very like the closing mechanism of "differentials" covers. It is simple, effective, works like a charm and has satisfying click when closing. This Truck is also testing ground for a couple of solutions I wanted to try out, like drive shafts connected to the axles at the angle, steering controlled by rod or way of suspension for both front and rear axles. Nevertheless please enjoy the video, use the instruction and check some details below if you want to know more. Instructions: https://rebrickable.com/mocs/MOC-136120/keymaker/trial-truck-6x6-rc/#details Some details and main functions: dimensions LxWxH: 37,5x13x15cm weight: 1132g 6x6 drive (3xPF L motors) steering (PF servo) suspension on all axles completely secure bottom of the truck with panels easy access to all "differentials" via openable covers Couple of highlights why this truck can be fun to build and to play with: Drivetrain - it is very solid, so you won't hear skipping gears, if wheels aren't spinning, then you either broke some part or stalled motors. It is also super easy to use different gear ratio or different number (1/2/3), type (M/L/XL) or even technology of motors (PF/C+). What is more, removing all electronics takes only couple of minutes and truck is ready to taking the shower to clean all evidence of you off-road madness Construction - it is very rigid and solid, you can lift it up by almost any part of the frame and body Off-Road Design - all gears are protected so you don't have to be afraid that they will jamm due to sand, mud, snow, stones etc. And even if something get inside "differentials", it is super easy to open covers and clean this up. Last but definitely not the least - ability to drive through deep water - UP TO 8CM! It over half of the height of the truck. 8cm of water and your electronics is still safe. Internals of the truck: P.S. I know it is rather ugly, but it brings fun! :) -

42111 Alt Model: V8 3 Wheeler (Instructions)
EvilEnderman posted a topic in LEGO Technic, Mindstorms, Model Team and Scale Modeling
For no better reason other than to have a bit of a laugh, I have built a 3 wheeled truck, powered by a (fake) V8 engine Alternate build of Dom's Charger Featuring: Opening front bonnet Detailed V8 engine with nitrous, turbo Opening engine cover to show engine mechanism Live axle rear suspension Front torsion bar suspension Detailed interior Steering via the wheel in the cab Free, high quality instructions available on Rebrickable Sample Page: -
The Bat Free Building Instructions: https://rebrickable.com/mocs/MOC-99935/makushima/the-bat Lego Technic MOC - The Bat (Free Building Instructions) by makushima
-

[MOC] Remote controlled 4-speed AWD gearbox
harriedegroot posted a topic in LEGO Technic, Mindstorms, Model Team and Scale Modeling
A compact sequential heavy-duty 4 speed remote controlled AWD gearbox Each gear of this remote controlled gearbox approximately doubles the speed of the previous. The output shaft contains an integrated lockable differential for AWD. See the video for a WORKING DEMO | FREE INSTRUCTIONS below. GEAR RATIOS 1st 6:1 2nd 3.3:1 3rd 1.8:1 4th 1:1 FEATURES compact remote controllable sequential gearbox 4 transmission speeds evenly distributed gear ratios differential output (AWD) differential lock single rotary catch many mounting points no half studs INSTRUCTIONS [PDF] https://bricksafe.com/files/hdegroot/remote-controlled-4-speed-awd-gearbox---with-perfect-gear-ratios/remote-controlled-4speed-awd-gearbox-with-differential-lock.pdf [3D MODEL] https://bricksafe.com/files/hdegroot/remote-controlled-4-speed-awd-gearbox---with-perfect-gear-ratios/remote-controlled-4speed-awd-gearbox-with-differential-lock.io REBRICKABLE: https://rebrickable.com/mocs/MOC-83457/hdegroot/remote-controlled-4-speed-awd-gearbox-with-perfect-gear-ratios BRICKLINK: https://www.bricklink.com/v3/studio/design.page?idModel=244834 -
Not all ideas are good ideas and even the powerful and experimented Kuat Drive Yards (KDY) engineers can fail utterly. The AT-AC or All Terrain Armored Crawler is a perfect example of one of these false good ideas. While the supremacy of the AT-AT on the field was not to be demonstrated anymore, particularly after the crushing imperial victory on Hoth, the Imperial Army still complained about the AT-AT expensive cost per unit and its highly demanding maintenance. KDY engineered went back to their plans and after a few months, they proposed the AT-AC. The concept was quite simple, starting from the successful AT-AT, they replaced the costly maintenance-intensive articulated legs by continuous track systems. AT-AC by Veynom, on Flickr When presenting the AT-AC to the Imperial Army, KDY was proud to claim that it was significantly less expensive than the original AT-AT, that it required only one third of the AT-AT maintenance time, while still retaining the same firepower and robust protection. Unfortunately, the first field deployments quickly demonstrated all weaknesses of the AT-AC. Because of its great armor and protection, it was heavy and because it was heavy, it was really slow when crawling, its speed approaching ridiculous levels when the landscape was not ideal. The second issue comes from the change of height. While crawling on the ground, the AT-AC was no more inspiring fear but also found itself very limited in its fire coverage ability. AT-AC by Veynom, on Flickr As consequence, the limited number of assembled prototypes have been assigned to 3rd class garrisons on planets with limited local technological civilizations. Surprisingly, the troopers reported only positive feedback about their AT-AC. These were offering comfortable, reliable and well protected transportation and the lack of agility was not a real issue when battling primitive tribes and species. It is even rumored that some COMPNOR officers would have confessed that with AT-AC on Endor instead of AT-ST, the rebellion (not to mention the despised Ewoks) would never had won. AT-AC by Veynom, on Flickr One last remark about the AT-AC. According to several concurring sources, it would have been nicknamed Crawling Armored Transport (C.A.T.) among the troops. COMPNOR supposes that it may related to some kind of resemblance to an animal on one of the remote planets where the AT-AC operates. AT-AC by Veynom, on Flickr Disclaimer: the above is 100% fiction. This MOD is based on set 75288 (the 2020 AT-AT) with the track system design from the Sandcrawler 75220 (from 2018), some detailing here and there, and a bit of color swap. Free instructions are available on Rebrickable. Just click here.
-

[MOC] Microscale Navy Aircraft Carrier FREE Instructions
MovieMocs posted a topic in Special LEGO Themes
Hey guys, I just finished putting together this cool little aircraft carrier and I wanted to share the instructions with you so here you go :) Link to instructions: https://drive.google.com/file/d/0BwunF-qOHu-ANDRJMG1MUHJRSFE/view?usp=sharing -
[MOC] Completed "The Sinner" Supercar
offroadcreations posted a topic in LEGO Technic, Mindstorms, Model Team and Scale Modeling
Ok, so I don't do this often, but I am creating a new topic for a recently finished MOC: THE SINNER supercar. Small demo video: This picture describes all the features: This picture is to show that I took it apart to make a partslist: If you want to build it, I made free photo instructions. And Rebrickable, so you can see if you have the parts to build it: http://rebrickable.com/mocs/MOC-8330/offroadcreations/the-sinner-supercar/ Overall, this MOC was a long journey from a small idea, to a bad chassis, to a good chassis, and to a finished MOC. A HUGE thanks to everyone who forced convinced me to make this better. This would've been a failure without you! Tell me what you think of the final product.