Search the Community
Showing results for tags 'motor'.
-

GBC General Discussion
Jim posted a topic in LEGO Technic, Mindstorms, Model Team and Scale Modeling
Great Ball Contraption (GBC) - General Discussion and Index This is a topic used for GBC general conversation, questions, hints, tips, etc. This first post will be used to maintain an Index of GBCs here on Eurobricks or other websites. Eurobricks topics LEGO GBC 8 + Building Instructions (5 modules - 2 motors) New Akiyuki GBC Instruction Index Other sources Greatballcontraption.com -
Hi All, It's been awhile since my last post, so I thought it was time I made another. I have been in receipt of a BB12VB-RED recently! Ahem, probably more like a year or so ago. As you can see from the photos, one of the pickups is very damaged… Another Eurobrick member, Alainneke, had already kindly made some replacements out of brass… I had sent him the diagrams of the pickups in AutoCAD, and extremely excellent reproductions were sent as a test in return. At the time I’d only opened my 'teenaged' black motor, as seen in photos, and the new brass pickup studs were supposed to be destined for it… The RED 12V motor is very, very rare, I have held back on using the replacement pickups until now… I am glad I have waited though, my apologies Alainneke! After reading VGO’s suggestion in post http://www.eurobrick...pic=50345&st=25, post #28, I tried the idea out on a black motor and it moved during the operation and I snapped a tab off the end, see pic. So I decided to build a jig out of Lego to hold the motor. The top part of my jig is real Lego, while the bottom is entirely made of Fako(Fake Lego) due to my needing to augment some of the pieces to fit the underside of the motor and wheels. I used MEK(Methyl-Ethyl-Ketone) to ‘weld’ the pieces together, along with some small strips of a smooth(no embossed numbers) credit type card, see pics. Okay, My advice is that you try and run a razor blade around the circumference of the bottom of the motor, hopefully using a ‘jig’ like shown. I do mean “Razor blade” as a “Stanley” knife blade will do the damage that I have shown in my earlier openings, try a ‘BIC single blade’… Making and using a ‘BIC’ single razor blade… I used the razor whilst the motor was in the top part of the jig. Once in the jig, use a 2.5mm rod/nail and hammer in both power plug holes, to gently persuade the bottom to come loose on either side. Seat partially opened motor on the ‘bottom’ part of the jig, and use the remainder of the credit/shopping card to gently hammer down on the wheel axle to pry the last of the plastic welds apart. The motor is now broken open… Here are some pics of the open casing with the old and new pickups, I will update the post after I have cleaned up the motor parts. If for whatever reason you need to take a wheel off, I.e. for cleaning excessive hair/crud in sleeve bearing, then you start by removing the cir-clip next to the sleeve bearing. Move bearing nearer to gear cog, then gently pries the cylindrical spring clip out of the wheel in the same area as the hole in the wheel. When you're cleaning the parts inside, be careful with the metal part 'A'. There are two small hardened steel discs that sit either end of the spindle, only the dirty grease is holding them in.... Now it's time for reassembly and re-greasing...
-
 We have been working on a software to design and automate LEGO train and monorail layouts. The first BETA version of nControl is out and can be downloaded for free from the 4DBrix site. It has a track planner for train and monorail layouts and has the first elements of the automation simulation: track switches, traffic lights and sound effects. We also have 2 YouTube videos to get you started. Download link: https://www.4dbrix.com/downloads Getting started videos: https://youtu.be/wddnCAJZTlQ https://youtu.be/w2RDMXt1sgQ Let us know what you think; any feedback, suggestions or ideas for additional features are welcome! Lowa
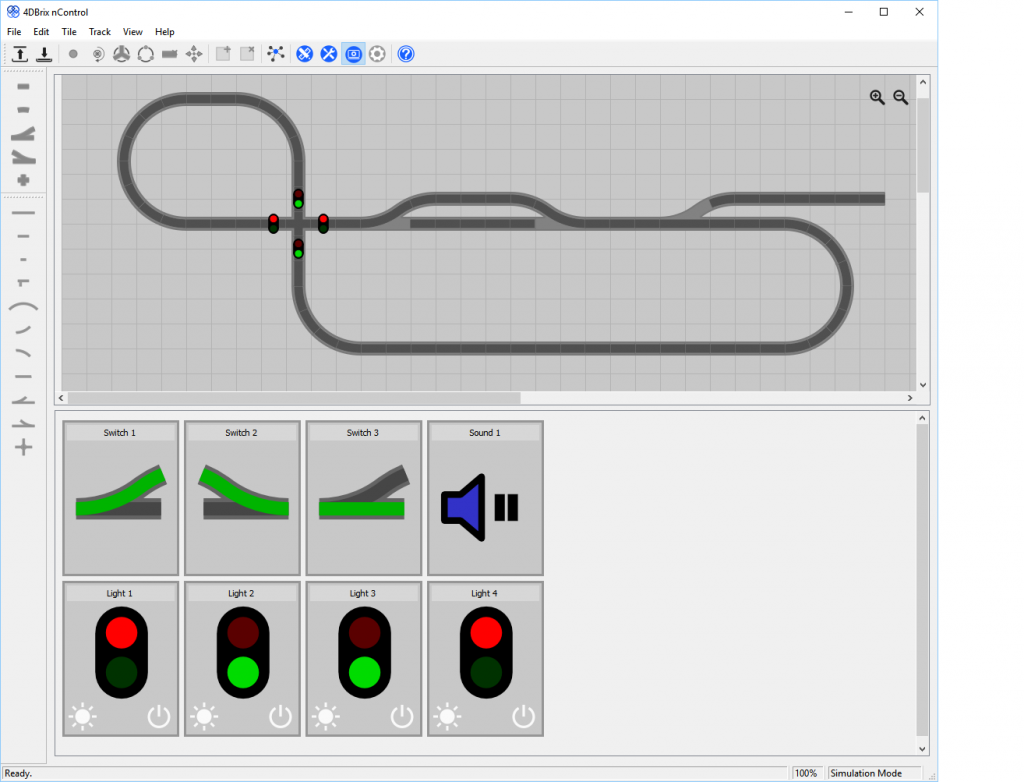
-
First off, I just want to say this set is apparently VERY popular, (and for very good reason!) as I tried in May to get one and the LEGO store was out for a long while. I finally got the second-to-last one on double points VIP points day on the 7th of this month. The following post is not a perfect analysis, but I thought I'd show off what I did to the contents of this set as no reviews are out yet.... though this is NOT a review! This vessel is a slightly modified set 30152,( Weekend Getaways). I removed the tall poles serving as radio transmitters / receivers plus I added a surplus reverse tile to the bridge's computer to keep it stable. The inside is the same as the stock set, with cup rack, stove, sink, tables and chairs. The rear porch and front bedroom are also the same as designed. The ship is incredibly light - more than my similar sized Adventurers tugboat and I would highly recommend it for it's play-ability and cool looks. The rear awning just oozes coolness, and is the one spot where I screwed up. (The fabric holes are just big enough to go onto the pins, not between them and the frame as I originally thought. I nearly tore it taking it apart again, but luckily I did not!) This model was made from leftover parts of set the C model of 30152 (Weekend Getaways) and several pieces from my own LEGO collection. I modified the original design to have four lights for navigation and a gray engine instead of a white one as used in the set. The model seats one figure and has barely enough room for a single standing passenger. ....that's about all I have in regards to this set comments-wise. As always, Thoughts, Comments, Questions and or Complaints are welcome, but please try to be kind! Thanks again for reading, Murdoch17
-
Does anyone know where to find broken 9V train motors? I searched bricklink and ebay but i didn't find anything. I want to make it in to a custom PF power pickup.
-
 Hi guys, I admitted defeat on TC10 since my chassis won't allow me to connect any real bodywork to it (I know I give up too easy), so instead I decided that I wanted to try and reverse engineer gsia16's citroen saxo rally car! However, with the regular 9v non rechargeable battery pack, the motor will go for a short amount of time and then just slow down or stop completely, inching forward a millimeter at a time and straining the battery. I wanted to ask if this is the fault of the battery box not giving enough power, or the motor just being "old" (it's part of the 8287 set) I've searched around but can't find an answer (perhaps im not using the right search terms or something) anyways, if it is the battery, could I use a 7.2v NiMH from a RC car? (for example one of these) if so, that could provide a lot more power to it (more than the 9v lego pack could) and make for an interesting ride, provided it won't fry the receiver (that's my other worry about it) What do you guys think? would the buggy motor get a new lease of life, and would it still be able to power an M motor for steering? Thanks, -ender
 -
“Everything that happens once can never happen twice. But everything that happens twice will surely happen a third time.” If there is one thing at BMR that this could apply for, definitely now that September is coming to a close, it would be the month of OcTRAINber. And yes, just like last year, we would like to announce that this year there will indeed be another OcTRAINber building challenge! Just like last year and the year before, OcTRAINber isn’t just a regular challenge, it’s a themed challenge. Two years ago it was all about ridiculous long trains, last year it was all about foreign trains, and this year the challenge is… The Technic Challenge! As you know, OcTRAINber is all about building outside of your comfort zone. Ofcourse, all of us motorize our trains, be it with PUP, PF, IR, 9V, 12V or anything in between. But in real life, not only the wheels move. There is so much more going on in trains and trackside structures that moves around, or wiggles, or turns, or whatever it does, as long as it makes a movement. So, for this year, we thought it would be fun to challenge our Lego Train community to come up with as much train-related stuff that makes movement, other than just the regular motorization of a locomotive. And, different than the last two years, this time it doesn’t have to be a train, it can also be a trackside structure! As long as it has a form of movement not necessary to let it run on the tracks, you are good to go! Rules As per tradition, we won’t tell you as of yet any of the specifics we will use to score builds until October 1st, but, as per tradition, we will give the general rules that are necessary to enter your builds and start planning! “Moving” is defined as: A movement of any locomotive, rolling stock, structure, or other railroad-related item that is NOT indented to propel the item forwards or backwards on track. Of course, the item can have these movements (we even recommend doing this, because static trains are soooo boring), but you will only be scored on extra movements, like doors opening, or running vents, or a moving telehandler on a goods dock… So, you can enter your newly build Acela Express, and it can be 9V powered, but it needs to have some extra modes of movement included as well, otherwise we will disqualify your entry. I’m sure you get the point. Entries must be original models. No stealing. This also means no MODs, only MOCs. We are making no rules for the scale you choose to model in. We are welcoming models of 6, 7, and 8 studs, and anything in between or beyond! However, we appreciate detail and accuracy. Reasonably sized models are usually better for that, but we don’t knock anything or anyone with serious skill. NEW BUILDS ONLY. We are willing to accept anything unpublished or anything that was not published before September 1st 2019 as new. We want to inspire and promote a challenging build, entering an old model doesn’t quite work in that regard. Entries MUST be made on our Flickr group in the appropriate thread. This is the ONLY place we will be looking for entries, nowhere else. Sending photos to us on social media or showing us in person do not count as entries! We will be accepting entries from Midnight on October 1st to Midnight on November 1st (meaning October 31st, at 23:59 PDT). There is possibility of a grace period to ensure those that need that one final Bricklink order have a fair chance. Entries and Prizes Keep in mind that OcTRAINber is a ‘quality over quantity’-building event. This means that we rather encourage you to build one amazing build than several sub-par ones. That’s why, just like last year, we will restrict the number of entries to only one per person. We are not accepting digital entries this year to emphasize the spirit of the challenge. We haven’t finalized on prizes yet, but since this is a building challenge, we will for sure have some, just like in previous years. Just like last year, we want to encourage you to show off your WIPs this year as well, to make OcTRAINber really a month that is all about trains within the Lego community. Therefore, extra credit will be given to the best WIP stories and/or pictures during the event. Specific information about WIP points will be mentioned in the kick-off article, but the rules will be pretty much in line with last year’s event. We will pick the winners after we have announced the official close of the competition and have stopped accepting new entries, which will be some time after November 1. Once the judges (who, just like last year, will be announced in an upcoming article) have come to a sound conclusion regarding the winners, we will post one final article announcing them, and then we will be in contact with those winners regarding their prizes. So, that’s it for now. We are very excited about this years’ installment, hopefully the same goes for all you train-heads out there! Stay tuned for updates on the start of the challenge, the judges and the scoring when OcTRAINber starts on October 1st. So pack your gear and all aboard OcTRAINber! BTW: For more information and extras it's always wise to check out both Brickmodelrailroader.com, our Flickr and our Facebook, but we will ofcourse try our best to also answer your questions here on the famous Train Tech forums! ---------------------------------------------------------------------------------------------------------------------------------------- As we announced a bit over a week ago, this year BMR will again run the OcTRAINber contest. OcTRAINber is a contest meant to get outside of your comfort zone and build something you haven’t thought of before. You know, that one truly special build that will spice up your layout like no other has before. All within the realm of Lego Trains, but with a twist. So, let us officially introduce you to the contest and let’s get rolling! OcTRAINber First of all, the name. It’s called OcTRAINber, if somebody had not noticed after two years. Why OcTRAINber? Well, because it’s a great intermediate month between SHIPtember and November. Also, TRAINS. Mostly TRAINS. TRAINS. “The Technic Challenge” Second of all, the subject of this years OcTRAINber. Why the Technic Challenge? Two years ago we had a ‘build your longest’ theme, and last year we were all about ‘building that foreign dream of yours’. Both of them produced some really nice models, but, in essence, they were all static. Yes, some of them were motorized, and yes, some of them even had very fancy motorization that not even us had thought of before. However, in the end motorization was just a nice have-to, not a requirement, which is strange when you think about it. Therefore, we have decided that this year everything is forced to move. The more movement, the better! The Rules The Rules have already been announced in the previous OcTRAINber post, but for completeness’ sake we have pasted them here again: “Moving” is defined as: A movement of any locomotive, rolling stock, structure, or other railroad-related item that is NOT indented to propel the item forwards or backwards on track.Ofcourse, the item can have these movements (we even recommend doing this, because static trains are soooo boring), but you will only be scored on extra movements, like doors opening, or running vents, or a moving telehandler on a goods dock. So, you can enter your newly build Acela Express, and it can be 9V powered, but it needs to have some extra modes of movement included as well, otherwise we will disqualify your entry. I’m sure you get the point. Entries must be original models. No stealing. This also means no MODs, only MOCs. We are making no rules for the scale you choose to model in. We are welcoming models of 6, 7, and 8 studs, and anything in between or beyond! However, we appreciate detail and accuracy. Reasonably sized models are usually better for that, but we don’t knock anything or anyone with serious skill. Also, the building of Train-related builds which aren’t trains themselves (trackside structures etc.) is stimulated, so no need to even join the 6 vs 7 vs 8 wide wars this year! NEW BUILDS ONLY. We are willing to accept anything unpublished or anything that was not published before September 1st 2019 as new. We want to inspire and promote a challenging build, entering an old model doesn’t quite work in that regard. Type of Entries Unlike the previous two years, we will only accept real-life builds this year. This has everything to do with the subject of this year’s challenge. It’s just virtually impossible to show movement in digital builds, and to prove that it actually works. To level the playing field we have thus decided not to allow digital builds. However, we will have to separate categories of Entries: Direct Drive and Indirect Drive. To explain this a bit further: Direct Drive entries are entries that are/could be driven by a separate motor that is specifically meant for that moment. So think moving crossing poles, a truck that runs around, waggling ducks, a moving carousel… You name it. The Indirect Drive category in the other hand is meant for entries that move around because of a movement that is already happening. So think a train that is already running around due to it’s train motor, but that has some movement that is kinetically powered and only moves when the train moves. Does your Entry have both? Well, then you are in luck and you can enter it in both categories! That’s just a gesture from us here at BMR to stimulate some extra movement :) Third party parts BMR has always been positive towards third-party parts, as long as they have any way of added value to the hobby. So the rule of thumb is simple: Lego: Yes Third Party Parts meant specifically for use with Lego: Yes* Clones: No *Other than the previous years we have made some extra specification to the Third Party Parts. All Third Party Parts this year have to be meant for use with Lego. So BuWizz, PFx Brick, sBrick etc. are allowed, but Arduino and Raspberry Pi are not. Rule of thumb: If it has studs and/or connectors to one of the Lego electric systems, it’s OK. If not, it isn’t. Points Points will be awarded in three categories: Credibility, WIP Story and Movement Factor. First of all, credibility of the prototype. This means we will be looking at how much the build represents the real life prototype. This means the quality of the build, but potential scale etc. If you are sending in a fantasy model, we will look at how credible the build is; would it fit in, does the backstory make sense? (Please note that this means an entry does need to be based in the real-life in some way, so no fantasy universes like Star Wars, etc.) Second of all, the WIP story. This refers to both showing off your building process, but also to how and why you decided to model a certain prototype. The better the story and the more updates you give and the more elaborate your building story is, the better. (Also, feel free to cross-post these pictures in our WIP-thread while you are still building!) Third and last, the Movement Factor. This is all about the how of the movement of your build. So, is it powered in a special way, or does it have some crazy movement, or does it have some special functionality, etc. The more the merrier, but as always with OcTRAINber, it’s about quality first, and quality second. So it’s great if you have some wobbling pigeons, but if one of them also flies up and down… that could definitely add some points. The Judges This contest will have four judges. Why four? Well, because last year we also had four. Just like last year we will have a guest judge related to the building contest. This year our guest judge will be none other than Peer Kreuger, better known as Mahjqa, one of the most well-known technic gearheads out there. Almost (if not all) of Peer’s builds have some funky motorization in them, which time after time surprises and makes his builds even more fun. We are delighted to have him and we hope it will give you guys an extra incentive to build! Glenn Holland Cale Leiphart Gerbrand van den Eeckhout Peer Kreuger (This year’s guest judge!) Timeline We will be accepting entries from Midnight on October 1st (being right now!) to midnight on November 1st (meaning October 31st, at 23:59 PDT). There is possibility of a grace period to ensure those that need that one final Bricklink order have a fair chance Entries Entries are to be sent in ONLY via our own BMR Flickr! There are two discussions; one for the Direct Drive Entries and one for the Indirect Drive Entries. This is the ONLY place we will be looking for entries, nowhere else. Sending photos to us on social media or showing us in person do not count as entries. Next to that, please also add your pictures in the pool! Also, we have a special thread for WIP pictures, just to keep OcTRAINber going. However, do keep in mind that pictures in this thread don’t count as entries! The Prizes No contest without prizes! Just as last year we have some really nice prizes from several outlets. Which prizes specifically will be made public as soon as possible, so to keep the hype train running for a little bit longer! Spare Parts We here over at BMR are very, very excited about OcTRAINber 2019: The Technic Challenge and we are looking forward to all those entries. We are really looking forward to see what the community has to offer in terms of creativity and we hope that all of you will be stimulated by this contest to finally build that one amazing moving MOC that you always wanted to build, but never managed. Also, if there are any things that aren’t fully clear, you can always reach out to us by posting your message below. So pack your gear and get aboard OcTRAINber!
-
Hi, I don't own any of the fairground sets, but I'll be adding a couple to my collection pretty soon and want to motorize them. I own the power functions battery boxes that are better suited for Technic sets. Is there a difference between this battery box and the system one that shows up in the new Rollercoaster video? I don't know if the speed of the motors will be different depending on what battery box is used.
-
This hover bike was built by Squidman in 2009 as part of payment for a debt to the Skull Twins, and was one of two nearly identical space hogs. The second bike had an inverted color scheme with mostly white instead of black and was called Ivory. The bike seen in this post is called Ebony, and is the last of it's kind, as the other skull twin and his bikes were swallowed by a black hole while trying to outrun the Space Police III forces around seven years ago. The bikes features two laser weapons around the skull ornament on the nose. This three-engine hover cycle is one of the fastest bikes in the Milky Way, seconded only to legendary "Rewind 3", which went so fast it broke the time barrier. So far, it hasn't showed up again, but that hasn't stopped bookies from taking bets stretching back past the last 100 years to next millennium (or two). One of the mysterious Skull Twins... no-one knows what's under the mask, with some saying that he has no face, just soul-piercing, glowing red eyes. The Ebony bike and it's Skull helmeted driver left our galaxy for the Andromeda galaxy due to law enforcement pressure in 2011, and upon his return in 2018 found the galaxy a much darker, more sinister place with the Space police IV dictatorship in place. Due to his disappearance in 2011, this skull twin was declared dead a long time ago and is using this legal void to commit a great many crimes. (The bike was remade into it's current form using only parts from the set, with the addition of the skull twin helmet, head, dark gray pants, a 2 x 2 DBG tile, and a 1 x 2 black plate. This list obviously does not include the white mini-figure stand! ) As usual, comments, questions and complaints are always welcome!
-
 Here's my entry model for the TC13 competition: It was inspired by the real life Tesla roadster 2 both aesthetically and mechanically. The model uses 3 pullback motors in the following configuration: As you can see the rear two pullback motors power the wheel directly for best possible acceleration. BUT the front pullback motor is geared up. This additonal gearing gives the model a higher top speed and a greater range, which is a technique I have yet to see on any other pullback cars. Around 30 panels were used to give the car it's very smooth, organic shape. Notice the small yellow rubber band used to keep the front part tightly together: There is enough room in the back of the cabin to fit two or three small human beings: The rear boasts a difusor and a small spoiler in the back, just like the real thing: While this is one of my smalles models to date, I am very pleased with how it turned out. The shapes are very smooth and organic and the fact the car drives mere milimeters above ground, give it a very sporty feeling. Video coming as soon as I find enough space to run it
 -
 Strandbeest is designed by Theodorus Gerardus Jozef who is a great Dutch artist. Today I make my droid with Strandbeest's legs. Each leg in this contraption has 11 movable rods and 2 fixed rods which form 8 joints. Camellia Servo Strandbeest droid model is controlled by CAPPUCCINO controller with ARM technology. Each body part of this droid has an individual LEGO motor to drive its moving speed, distance, time and direction. As 8 LEGO motors are used, droid's head, body, left leg, right leg, left arm, right arm, left hand and right hand are able to be controlled cooperatively! Left and right by two motors, each has 2 front and 2 rear legs. Upper body Left arm Right arm Left hand Right hand Head and eyes, One eye is a camera to record its view. Waist Back 40th LEGO Technic nameplate 1977-2007 Just make you own droid at home. Welcome to Camellia Café
 -
 Hi there, I've noticed whilst testing 'Electric Technic Motor 9V Geared 480rpm' (47154) http://peeron.com/inv/parts/47154, it was making a strange buzzing noise whilst going both clockwise and anti-clockwise. Could this mean one or more of the internal gears are failing? Thankfully, there are four thin screws on the bottom which allow the motor to be taken apart. Are replacement gears obtainable? If not, then I have to have them either 3D Printed or cast in a silicone mold. Thanks.
 -
Camellia Café presents a special designed SERVO JEEP model being controlled by Camellia Café Servo motor controller with ARM technology. ' This JEEP is a Full time or Part time four wheel drive car with shrink function and Servo running model. Front wheels and rear wheels are driven by two individual LEGO motors. When both motors are active, it is a full time four wheel drive car. When either is active, it is a part time four wheel drive car. The speed can be adjusted in a large range and with good accuracy via our motor controller. With an addition motor, the car body is able to shrink for easy parking, and extend to get spacious inner space. When using a mobile phone and Camellia JEEP APP, your children could control SERVO JEEP remotely. No matter turning, running back or running uphill, SERVO JEEP is mobile and powerful. In the SERVO mode, SERVO JEEP can run in a precise distance at a preset value. This plays a key role in autopilot and auto parking. The steering motor can be controlled with 5 degrees at minimum. Front differential and rear differential are used. Front wheels driven motor and rear wheels driven motor. Front wheels use double wishbone suspension. Steering system With an addition motor, the car body is able to shrink for easy parking, and extend to get spacious inner space. 40th LEGO Technic nameplate. Without car cover cloth. The car body cover. Open the front cover to see the front engine. Front engine - 6 cylinders V type. Rear engine - 2 cylinders V type. Rear of JEEP. Car lights: Daytime running light, Foglight, High beam and Red lights for break. Please enjoy Camellia Café servo motor controller and drive SERVO JEEP model. And make you own car at home. http://www.camellia.xin/models/servojeep.html
-
(Can't find the forum relating to PF components. Since it is about the Carousel, I guess it could be placed in the Town forum) Anyway, for the 10257 Carousel, Lego recommends the M-Motor. My M-Motor from July 2017 has already become weaker and worn out! I guess it is not robust enough. Has anyone tried the L-Motor with the set? The video shows the trouble I have.
-
Hello everybody, On Page 5 of this brochure from 1991, it is mentioned: http://worldbricks.com/en/catalog-year/1990/catalogs-1991/1991-lego-catalog-2-en-fr-nl.html For owners of 12V Lego trains, a special 12V train brochure is available. Please contact Lego Spares service. Aux utilisateurs de trains Lego 12V: Réclamez la brochure special "trains 12V" a Lego S. A. ... Please let me know if I can find in internet and download the special 12v train brochures from 1991, 1992, 1993 (or even from 1990, 1989, 1988). Otherwise, iIf you have them, I really appreciate if you can scan them or just let me know, so that I can find a way to borrow them from me, or even buy them. This is for a longterm project for improving the current inventory of 12v and 4.5V trains on bricklink. One concern is the service bag 5086, which is declared on bricklink from 1993, but I am not sure. I cannot find it in any brochure available online! Cheers
-
faulty XL motor?
9v system posted a topic in LEGO Technic, Mindstorms, Model Team and Scale Modeling
hi all i have a XL motor from the volvo loader set which i used in the invisible lift gbc but after using it, the motor only runs in one direction now and needs a push to get it going? is there anything i can do? -
 I've searched for an answer to this for a long time, and I'm hoping I can get some help here. I'm working on a Technic car that uses PF motors to be a mobile vehicle. However, I've found time and time again that the model ends up being just too slow for my liking (if anyone has owned the 4x4 Crawler set, you know what I mean by slow). I own 2 L-Motors, 5 M-Motors, 1 XL-Motor. My question is: How do I make the model have faster speed without it looking like a skeleton car, and also, does adding additional motors increase power? For example, if I gear together 4 M-Motors so that they all end up on one drive axle, is their power combined?
 -
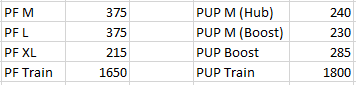
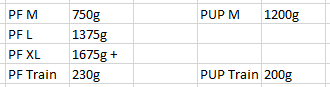
 Lego 88006, 88007, 88008, 88009, 88010, 88011 Powered Up! components Thanks to Lego and EuroBricks for making this review possible! Since Lego is switching to a new system instead of Power Functions, they wanted people to check out the new parts. Name: Powered Up Set Number: 88006, 88007, 88008, 88009, 88010, 88011 Pieces: n/a Price: varies, see below Minifigs: 0 Theme: Technic, Train, Boost, and Creator Year of Release: 2019 These sets are technically new, but the parts aren't. They've been available in the Boost and Train sets for a while now, so lots of people have already looked at them. Sariel did x-rays of all the PF and PUP devices (and older too!) JopieK did a teardown of the PUP parts and posted it here on EB. treczoks is putting together documentation on the protocols and others are doing similar. This review will be different than my normal ones, since it's not a standard set. It's not really a "set" at all. I want to compare the new parts to the old PF system, both in function and design. So first, here's all the PF and PUP sets: A couple of them don't have any prices that I've seen online yet. The highlighted prices are ones that I saw listed on the Lego US site, but they're not online now (12/20/2018). Obviously, all the Lego electronics are pricey. But for comparison, to get a full train setup (speed remote, battery box, motor, IR receiver) you'd be at $55. The equivalent PUP setup (motor, remote, hub) would be around $90 (guessing at the train motor price). The bluetooth electronics are much more complicated and expensive than infrared is. A simple motorized set (something like the new Vestas windmill, or the Roller Coaster, or similar) would be very expensive in the PUP ecosystem, since there is no "dumb" battery box. It's possible that Lego will add one at some point for those set types, or they'd need to keep PF alive. There's also a few gaps in the lineup. The WeDo motor, which is PUP compatible since it's in the Batmobile set, is not available standalone. I'm actually really curious why they used that motor in that set instead of the "PUP Medium" motor. Also, there's only the one motor so far. There's no XL or other "big" motor, so we'll have to see if the PUP Medium motor is powerful enough to handle the XL's loads. The switch is not really needed anymore, since the hub has controls built in. I can see extension wires coming - I'm sure builders will want them, and it'd be simple enough. As for the much-desired adapter wires, that's a bit tougher. It'd be great to control PF motors from a PUP hub. However, the PUP system identifies the motors, so the adapter cable would have to identify to the hub that it's a PF motor. The hub would not know which motor it was. Enough of the talk, let's look at the parts. The Box Bags IMG_4289 by mostlytechnic, on Flickr These parts come in individual bags. Anyone who's ordered PF components individually will be familiar with them. These aren't sets that you'll find on a store shelf (except maybe a Lego store), so the outward appearance and extra space taken up isn't worth the cost to box them. The Contents IMG_4291 by mostlytechnic, on Flickr Here are the parts themselves. The Interesting Parts IMG_4291 by mostlytechnic, on Flickr I always have an "interesting part" section in my reviews to highlight new molds, colors, rare parts, etc. But here, they're all interesting so I just repeated the photo. If that annoys you, just keep scrolling and see new images below. The Manual IMG_4290 by mostlytechnic, on Flickr For a company that normally has zero text in their manuals, wow. Here's some of the paperwork that comes with these, because they have electronic parts. Each document is in THIRTY FIVE different languages, so each paper is only a couple sentences. Each of the battery-powered parts has a "how to put the batteries in" flyer. Every item had a paper saying "Protect the environment by not disposing of this product with your household waste. Check with your local authority for recycling advice and facilities." Yes, every single item had that included. Battery Boxes IMG_4307 by mostlytechnic, on Flickr Here are the current Lego battery boxes. From left to right is the 6 AA box, mostly used in Technic, then the Boost Hub, currently only used in the Boost robotic set which holds 6 AAA batteries, then the PUP Hub, also holding 6 AAA batteries, and finally the PF 6 AAA battery box, commonly used in trains. The new hub is the exact same size as the 6 AAA box, and it has the green power button in the same location. However, the new one has the connections on the end instead of on top. The Hub IMG_4302 by mostlytechnic, on Flickr First, we have the basic Powered Up hub. This is the 6 AAA box, which is 3 parts. The batteries go into a "cartridge" which snaps into the base. It might be possible for a rechargeable module to become available at some point, but there's no external charging port like the PF rechargeable box, so it'd require taking the box apart still. The Boost Hub IMG_4293 by mostlytechnic, on Flickr Likewise, the Boost Hub uses a battery "cartridge." However, it's part of the base so it would be possible to have a rechargeable battery module with a port in the bottom. The Motor Lineup IMG_4295 by mostlytechnic, on Flickr The new PUP motor (sometimes called the Boost motor since that's where it's currently available) is almost as large as the PF XL motor, but it's studded. The only pin connections are on the face of it. The PUP motors do have a big feature that the PF ones don't. They have built in rotary encoders, like the Mindstorm motors do, so programmable systems can see how much they've turned. The motor can actually be used as an input sensor too - put a tire on it and have a dial control! This only works with the Boost hub though since you need the programming capability to do anything with the information. The Train Motors IMG_4308 by mostlytechnic, on Flickr The new train motor is identical in shape and size to the PF one. The only outward difference is the cable- it's shorter and wider. The Plug IMG_4298 by mostlytechnic, on Flickr As you can see, the new plug is smaller, but the cable is wider. Overall it takes up less space, since once it's plugged in, the hard plastic sticks out one stud. The old connector was fully exposed all the time. It'll take a little different building design though, since the new plug sticks out from the battery box. The Sensor IMG_4300 by mostlytechnic, on Flickr This, to me, is the oddest part of the inclusion in this shipment. This sensor comes with the Boost robotics set. In that setting, it makes sense, and I understand why people would want to buy it alone (to add more sensors to their design). However, without the Boost set, it's usefulness is limited. It does nothing useful when connected to the regular Hub. When it's connected to the Boost Hub, it's a great color and distance sensor with lots of usage. I'm actually now trying to piece together a Boost set out of my parts collection to try all the Boost designs, since I have the Hub, Sensor, and Motor here. But to the majority of people using the new PUP system, they won't see any use for the sensor. Yet. What if, down the road, Lego sells a train set that includes the sensor and some software updates to the basic Hub? It'd be trivial then to have some colored tiles on the train tracks so that the train could be programmed. Make noises at certain locations, stop, etc. The current Duplo trains do that! So why not bring that functionality to the older kids and AFOLs? This DOES need a software update from Lego though, since like I said, the smaller Hub does not allow any programming or recognize the sensor, as far as I can tell. And the Boost Hub is too big for a standard 6 wide Lego train. The Remote IMG_4304 by mostlytechnic, on Flickr Speaking of trains and controlling them, here's the new remote. It is TINY! Granted, I'm a big guy (6 foot 3) with big hands, but this is small. It's certainly smaller than the PF speed remote. And personally, I'm torn on the functionality. If you're not aware, the Hub can detect what motor is connected and act differently based on that. If you connect the Medium motor, this remote acts like the old small PF remote - the buttons give you 100% power for as long as you hold them. Release the button, and the motor stops. If you connect the train motor, this remote acts like the PF speed remote. The + and - buttons step through speeds and it keeps running. The red button stops it. This makes sense for kids and keeps the line of parts simpler, but it removes advanced functionality. What if I want to run the medium motor at lower speed? I can't. The top center of the remote is an RGB LED. It lights up the same color as the hub to show what units are paired together. The PF system allowed 4 "frequencies" with 2 channels each. The PUP system has 5 "frequencies" with 2 channels each. This remote also removes the need for the PF switch. You can turn the button sections of this remote. So if you want one motor running reversed, just turn that set of buttons upside down. If you want to steer left and right, you can turn the buttons sideways. One thing you cannot do is modify the remote, the way the PF remotes would be modified, with addon parts. Lego themselves has done this - like the 9398 Crawler set: The new remote has some pin holes on the sides, but no way to attach to the buttons. The App IMG_4311 by mostlytechnic, on Flickr The big new function with the new system is the app. There's the Boost app, which allows programming the Boost Hub, and the PUP app, which controls the basic Hub. This app is very limited. You pick which set (currently the Batmobile, Freight Train, and Passenger Train), and then appropriate controls appear. It's all preconfigured and not modifiable. It doesn't allow you to design your own controls the way SBrick and others do, so if you want to make a new vehicle, you have to control it like it's a train or Batmobile (using those particular motors, since the hub knows what is connected!) I strongly suspect Lego will come out with another app (or a major update to this one) to control custom builds, and frankly, I don't know why they haven't yet. The Performance, Speed IMG_4573 by mostlytechnic, on Flickr I mounted a tire on each motor (both PUP and PF) and checked the RPM at full speed. Here's the results: As you can see, the PUP M motor is closer in speed to the XL than the other PF motors. The PUP train goes slightly faster at full speed than the PF train motor. I checked all the speeds, and it ranges from about 500 to 1800. The Performance, Power IMG_4574 by mostlytechnic, on Flickr I also checked the force each motor can generate. As I don't have a proper torque meter, I made my own rig. In the photo, it was trying to lift a heatsink from a computer. That was too easy, so I moved on to a heavier weight. The XL motor was still able to lift that, but none of the other motors could. The measurements on the train motors were at full speed. One thing I noticed - the PUP train motor would cut out after a few seconds at a stall. When I hit stop, it would be immediately ready to run again, so I don't think this was the internal thermistor cutting it out. I think the hub is monitoring the speed and shutting it off when it wasn't rotating. I should try having an actual train drag a load and see what happens... The Conclusion So, what's my conclusion? Overall, I see what Lego wanted to do with the new PUP system. It eliminates the IR weakness, removes the need for a separate receiver, and updates the system to be "app-enabled" like all the cool toys are now. I think that also brought some new limitations that Lego CAN remove, but hasn't yet. I'm looking forward to seeing the PUP system appear in Technic sets to see how Lego handles that. That will be a while though, since the only motorized Technic set in the first half of 2019 is the Stunt Racer, and it still uses the PF system. That COULD have been a great set to use PUP in, similar to the Batmobile, but for some reason they chose not to. I'm guessing the M motor doesn't have the speed for the stunt racer and they didn't want to put the WeDo motors in? That doesn't seem like great logic to me, and I really hope there's more motor options to come. The PUP M motor is too big and too slow for a lot of Technic applications. Right now we're in the transition phase and I hope Lego is listening to the various categories of users. AFOL train users want to connect multiple motors on the same channel to run big trains. Technic users need smaller motors. Creator needs a simpler, cheaper system. And almost everyone needs customizable app interfaces
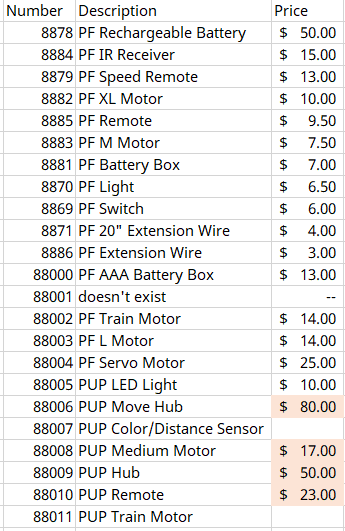
-
To show off engine I've built for TC18 entry constructed this mini-MOC - an engine trolley. Moves like a real one where paired wheels have 360 degree rotation, so it is easy to steer and place an assembly.
-
Last night I completed a refurbishment of a rather poorly 12v train motor. The contacts had worn giving intermittent working and the bushes were squealing like a pig so it was time to open up the case... First off made a jig to hold everything secure... I used my scalpel to cut into the case as shown on the red lines here... Then flipped the jig over and pushed down on the axles which released the two halves of the case leaving this in the jig... And the motor part in all its grotty glory.... Took the metal blocks out and started stripping down the axles and motor - +30 years of grime.... Also noticed that a wiring disc had become unsoldered - another cause of the rough running... The contacts were removed - you can see how uneven the wear has been... Got two bb53's from Bricklink specifically for their pickups... And split them open... The bb53 contacts have "nipples" on them which the motor contacts do not so these were filed flat... After that everything was cleaned with methylated spirits , the wiring plate resoldered, greased and reassembled.... Then glued and clamped.. And then after an hour taken for a test run.... https://i.imgur.com/CCPQZyD.mp4 I think the patient will live !!! Joff
-
I started this project because I wanted to share my experiences building various offroad models over the last decade. This topic is meant to guide the builders with comparisments, suggestion and best building practices, It is however not a place to find already finished and perfected designs - that's up to you. Various aspects of the design of the vehicles will be split into several subgroups and explained in details. 1. Number of wheels First thing we need to know is how many wheels our design will have. Most common setups are as following: 4x4 Setup Advantages: 1. The simplest and most widely setup 2. Having only 4 wheels means lower weight and higher performance 3. Higher manoeuverability 4. Simple suspension and driveline design Disadvantages: 1. With only 4 wheels the suspension has to be designed to be as flexible as possible to get the most out of the wheels 2. In a case of a mechanical failure of a single wheel, the whole model's performance is greatly affected 6x6 Setup with double rear axles Advantages: 1. Two rear axle provide more traction area, especially when going uphill 2. Usually 6x6 vehicles are longer than 4x4 and therefore less likely to tip over 3. Since the front and second axle are usually closer than in 4x4 setup, there is less ground clearance needed between them 4. Greater redundancy in a case of a mechanical failure Disadvantages: 1. Lower manoeuverability due to a longer wheelbase even with rear wheel steering 2. More complex driveline and suspension design is required 8x8 or more wheels setup Advantages: 1. Having 8 or more allows for much greater traction area 2. Ability to drive over ditches 3. Because wheels are usually much closer there is much less chances of getting stuck on top of an obstacle 4. Excellent redundancy in a case of a mechanical failure 5. Better weight distribution 6. Less suspension travel required per each wheel as with 4x4 or 6x6 and hence better stability Disadvantages: 1. Lower manoeuverability even with rear wheel steering 2. Powering 8 or more requires a very complex driveline 3. Depending on a driveline, combined torque required for powering all 8 wheels can destroy gears if a single wheel gets stuck 2. Type of wheels and tyres Now that we decided on how many wheels we want for our offroad beast, we have to look into what type of tyres and wheels we want to use. I will hereby cover only the bigger types of tyres and wheels. 1. 94.8x44R Advantages: 1. Low weight 2. Good thread design 3. Low rolling resistance Disadvantages: 1. Low traction, these tyres are prone to slip on the rim at high loads 2. Due to its rounded shape the tyres tend to slide off obstacles when crawling over them 2. 94.3x38R Advantages: 1. Low weight 2. Medium traction 3. Low rolling resistance 4. Realistic design and proportions Disadvantages: 1. Shallow thread pattern 2. These tyres are very hard and don't adjust to the terrain 3. 107x44R Advantages: 1. Low weight 2. Medium traction 3. Very deep thread 4. Currently largest tyres by diameter Disadvantages: 1. High rolling restistance and vibrations due to the thread pattern 2. These tyres are a bit hard and don't adjust to the terrain 4. Power Puller tyres Advantages: 1. High traction 2. Good thread 3. Largest Lego tyres ever produced 4. Deep wheel offset Disadvantages: 1. High weight 2. Hard to use, they require complex hub assemblies 3. Very rare and expensive 5. Outdoor challenger wheels Advantages: 1. Very high traction 2. Very good thread pattern 3. Deep wheel offset 4. Over 7 studs of space inside the wheel Disadvantages: 1. High weight 2. Hard to attach to the standard axles 3. They require a lot of torque to use them at their full potential. 6. Tumbler wheels Advantages: 1. Low weight 2. High traction 3. Very flexible Disadvantages: 1. Low thread pattern 2. Small size 3. Expensive For the 94.8x44R. 94.3x38R and 107x44R tyres we have a choice of two wheels: 1. Racing wheel large Advantages: 1. Good mounting option with axlehole and pinhole 2. Available in multiple colours 3. Cheap Disadvantages: 1. No inside wheel offset means steering pivot point can't be placed inside the wheel. 1. Futuristic wheel Advantages: 1. Deep wheel offset allows us to place steering pivot point inside or closer to the wheel than racing wheel large 2. Slightly larger wheel size stops the 94.8x44R tyre from slipping on the rim Disadvantages: 1. Limited mounting options, with only one axlehole 2. Hard to find 3. Hubs Now that we have our wheels and tyres we need a way to mount and power them. Here are the most common currently available options: 1. New standard ungeared CV hubs These hubs are usually driven by the CV joint counterpart which pops inside Advantages: 1. Low steering pivot offset - usually at the edge of the tyre: 2. Firm wheel mounting 3. Readily available, easy to use and to build on. Disadvantages: 1. Low operating angle - the CV joint can operate to a maximum of about 30 degrees, which limits steering angle. 2. Very low torque transfer - the CV joints are prone to deforming and popping out even with low torque applies to them 3. Low ground clearance 2. Old ungeared CV hubs Advantages: 1. Low steering pivot offset - usually at the edge of the tyre 2. Firm wheel mounting 3. Better ground clearance than newer hubs Disadvantages: 1. Very low operating angle - the CV joint can operate to a maximum of about 25 degrees, which limits steering angle. 2. Very low torque transfer - the CV joints are prone to deforming and popping out even with low torque applies to them 3. Hard to find and expensive 4. No other mounting points than 4 ball joints 3. Built cardan ungeared hubs Example of a hub using a cardan joint to directly transfer the power to the wheel Advantages: 1. Low steering pivot offset - usually at the edge of the tyre 2. Easy to build 3. Can transfer higher torque than a CV joint 4. Higher steering angle Disadvantages: 1. Mounting relies only on the axle and is not as firm as standard hubs 2. Not capable of transferring high torque to the wheels 3. Low ground clearance 4. Standard portal hubs Advantages: 1. Easy to use and to build on. 2. Can transfer very high torque to the wheels when using 8z and 24Z gear combination 3. High steering angle 4. High ground clearance 5. Firm wheel mounting Disadvantages: 1. Very high steering pivot offset - requires stronger steering mechanisms and more fender space for wheel to swing 5. Built portal hubs Advantages: 1. Easy to build. 2. Can transfer very high torque to the wheels when using 8z and 24Z gear combination 3. High steering angle 4. Higher ground clearance than standard portal hubs 5. Low steering pivot offset when using futuristic wheels Disadvantages: 1. Wheels are mounted and held only by one axle, not as firm as standard hubs 2. Hub relies on friction of the components to keep it together, which can slide apart after prolonged use 6. Built planetary hub Advantages: 1. Highest gear ratio of all other hubs, 1:4 2. Firm wheel mounting when using futuristic of power puller wheels 3. High steering angle 4. Lower steering offset than standard portal hubs Disadvantages: 1. Requires old turntable, futuristic or power puller wheels for best results - all are hard to find 2. High number of moving gears 3. Least efficient due to the high friction caused by the large surface contact area and number of moving gears 4. Suspension Suspension is the mechanism that will keep our model's wheels in contact to the ground and will be supporting most of its weight. Most of the designs cover 4x4's Following factors determine the type of suspension system we will use: 1. Weight of the model - The heavier the model, the stronger the suspension components have to be 2. Speed - Faster models require more responsive suspension systems with low unsprung weight 3. Flexibility - The higher the obstacles you want to climb over the more flex and/or wheel travel suspension has to provide 1. No suspension I have yet to see and offroad vehicle without any type of suspension (except for maybe 42070, 42081 and 42082), but I will list my opinion regardless: Advantages: 1. Simple design - having no suspension simplifies our design...and that's about it Disadvantages: 1. No flex over terrain means, there are only 3 wheels at once touching the ground 2. Low stability 3. Poor weight distribution 4. No shock absorption at high speeds 2. Pendular suspension This is the simplest suspension you can put on your vehicle. It basically means one or more of your axles are free to swing about. When using this suspension I suggest using the small turntable where drive axle enters the axle. This will keep the drive axle from carrying the weight of the model, which causes unnecessary friction. 42030 is a typical example of this suspension system. Advantages: 1. Simple, robust design 2. Using this suspension on both axles can give the model very high flexibility 3. If there are no springs used, the model can have perfect weight distribution on left and right wheel Disadvantages: 1. Large unsprung weight, poor responsivness at high speeds 2. No shock absorption means this suspension is not suitable for high speeds 2. When using on one axle, the stability of the whole model relies on the unsuspended axle. 3. When using pendular suspension on both axles springs or a transfer mechanism are required to keep the model upright 3. Single torque tube suspension This suspension became available with the release of the 8110 Unimog. Best examples of this suspension are 8110, 9398 and 41999. It is the simplest suspension which also allows for vertical suspension movement. Advantages: 1. Simple, robust design 2. Universal joints can be placed inside the ball joint, allowing power to be transferred to the axle 3. Easy to implement Disadvantages: 1. Large unsprung weight, poor responsivness at high speeds 2. Axle requires a some kind of a linkage system to keep it cenetred (panhard or parallel links as seen above). 3. Using this suspension on the front axle usually results in negative caster angle which causes higher rolling resistance 4. When used on rear drive axle, the suspension has the tendency to cause oscillate, especially with soft suspension and high power 4. Hard to connect springs to the chassis 4. Double torque tube suspension This is an evolution of the single torque tube suspension, which uses two ball joints to drive each wheel side respectively. It is my own original idea. Advantages: 1. Simple, robust design 2. Universal joints can be placed inside the ball joint, allowing power to be transferred to the axle 3. Easy to implement 4. Self-cenetring, since axles are connected in the center there is no need for linkages to center it 5. Can carry power to each wheel side independently 6. Drive torque compensation Disadvantages: 1. Large unsprung weight, poor responsivness at high speeds 2. Using this suspension on the front axle usually results in negative caster angle which causes higher rolling resistance 3. When used on rear drive axle, the suspension has the tendency to cause oscillate, especially with soft suspension and high power 4. Hard to connect springs to the chassis 5. Parallel floating axle This suspension uses linkages which keep the axle parallel to the chassis of the model. For best functionality and reliability the lengths of all links and that of the double cardan joint should be equal. Also all the linkages and drive axles should be parallel. Advantages: 1. Keeping the axle parallel to the chassis reduces the oscillations effect 2. Better responsivness compared to the torque tubes 3. Neutral caster angle when used on front axles. 4. Self cenetring when using A arm as upper link or 4 link setup 5. Can be configured to carry power to each wheel side independently 6. If configured to carry power to each wheel side independently the drive torque can be compensated. 7. Easy to connect spring to the chassis Disadvantages: 1. High unsprung weight, less responsive at high speeds 2. Increased mechanical complexity, double cardan joints required to carry the power to the axle 6. Half axle independent suspension This is the simplest independent suspension you can build. Best example of such suspension are Tatra and Pinzgauer trucks. Advantages: 1. Independent suspension with low unspring weight, suitable for high speed 2. Robust design with low number of moving parts 3. Easy to connect spring to the chassis Disadvantages: 1. Changes of the caster angle as the wheels travel up and down 2. Hard to implement a drive system that does not carry the weight of the vehicle 3. Hard to implement steering system 4. Wheels tend to drag sideways on the ground when suspension travels up and down, reducing efficiency 7. Trailing arm parallel independent suspension Personally I have not used this suspension yet, but I did use a normal trailing arm suspension which does not keep the hubs parallel. Normal trailing arm suspension which does not keep the hubs parallel acts similarly to torque tube suspension. For the prallel version of the trailing suspension I imagine the following: Advantages: 1. Independent suspension with low unspring weight, suitable for high speed 2. Robust design with low number of moving parts 3. Long links allow for high suspension travel 4. Very easy to connect spring to the chassis 5. Can be configured to carry power to each wheel side independently Disadvantages: 1. Hard to keep the wheels from sagging under the weight of the model. 2. Difficult to transfer power to the wheels 8. Double wishbone suspension This suspension uses two A-shaped arms to keep the wheel hubs in place. As of late it's my favourite suspension system due to: Advantages: 1. Independent suspension with low unspring weight, suitable for high speed 2. Very customizable design with lots of adjustable characteristics (suspension arm lengths, caster angle, camber angle, steering geometries) 3. When build correctly it is far more robust than live axle suspension 4. Increased ground clearance compared to live axle suspension, especially when used with portal hubs 5. Can be configured to carry power to each wheel side independently 6. Extremely easy mounting of springs 7. Very stable compared to live axles 8. Frame holding the suspension can be part of the chassis, therebye lowering the center of gravity Disadvantages: 1. More moving parts as live axle suspension, increased mechanical complexity 2. Limited wheel travel - Lego wishbones allow a max. of around 25 degrees of suspension angle 9. Multi-link suspension To be updated when I build my first multi-link offroad suspension. I can assume the following characteristics: 1. Independent suspension with low unspuing weight, suitable for high speed 2. Extremely customizable design with lots of adjustable charactersitics (suspension arm lengths, caster angle, camber angle, steering geometries, virtual pivot point) 3. Large steering pivot point compensation 4. Increased ground clearance compared to live axle suspension, especially when used with portal hubs 5. Can be configured to carry power to each wheel side independently 6. Very stable compared to live axles 7. Frame holding the suspension can be part of the chassis, thereby lowering the center of gravity Disadvantages: 1. Very high amount of moving parts, increased mechanical complexity 2. Limited wheel travel - Lego wishbones allow a max. of around 25 degrees of suspension angle 3. Hard to connect springs to the chassis 10. Spring types Listed below are the most common types of springs available: 6.5L Soft shock absorber Advantages: 1. Small, easy to implement Disadvantages: 1. One stud of suspension travel 2. Low spring rate, can't support heavy models 6.5L Hard shock absorber 1. Small, easy to implement 2. High spring rate, can support heavy models Disadvantages: 1. One stud of suspension travel 9L soft shock absorber When using 9L shock absorbers I suggest you do not use the default offset upper attachment point, but use an in-line attachment point instead. This will reduce the friction and allow for better high speed performance Example: Advantages: 1. Two studs of suspension travel 2. More attachment possibilities than 6.5 L shock absorber Disadvantages: 1. Default attachment points create friction 2. Low spring rate, can't support heavy models 9L hard shock absorber Advantages: 1. Two studs of suspension travel 2. More attachment possibilities than 6.5 L shock absorber 3. High spring rate, can support heavy models Disadvantages: 1. Default attachment points create friction 2. Rare and expensive 11. Attaching springs to live axles If we start with basics, the first things we have to check is how position of springs affects suspension of live axles. The closer you place the springs together, the more flex the suspension will have, but it will also be less stable: I suggest you to keep springs at a distance of around 1/2 of the total model width. When placing springs you should keep them in-line with the wheel bearing in order to reduce friction. First example of bad spring placements: And example of good spring placement: When using multiple springs make sure to place them symmetrically centrred to the wheel hub: When attaching springs to torque tube suspension, you have to allow springs to tilt in two planes: You can also attach the springs to the suspension links to increase suspension travel. This technique is especially common on Trophy Trucks: 12. Attaching springs to independent suspension Independent suspension allows for much more flexible spring placement. Generally the closer you attach the spring to the main suspension arm pivot, the higher spring travel you get, but lower suspension force. Examples going from the hardest suspension with low travel to the softest with high travel: You can also attach springs inside the suspension arms: Or horizontally: As with the live axles make sure springs are in the center of the wishbones. Example of good placements: And an example of bad spring placement, which causes excessive friction and suspension binding: 5. Steering Steering is the system which allows our model to change direction. Generally there are two types of steering system used: 1. Skid steering Advantages: 1. Very simple to implement and control with two separate motors for left and right sided wheels. 2. Does not require a dedicated steering motor Disadvantages: 1. Not efficient, since wheels have to skid to steer 2. Power had to be reduced or even reversed in order to steer. 3. Not very accurate 4. Not very effective offroad 2. Classical steering with steerable wheels Advantages: 1. Efficient, with minimum loss of speed 2. Accurate 3. Does not reduce the power of the drive motors 4. Can be used in front, rear or all axles for tight steering radius or crab steering 5. Effective offroad Disadvantages: 1. Requires more complex hub assemblies 2. For best steering accuracy you need a dedicated servo motor. Examples of a simple classical steering system for live axles 1. Parallel steering system for live axles Here both hubs are always parallel. Position of the steering in the front or rear rack has no affect on the steering. Advantages: 1. Very simple and robust 2. Easy to build Disadvantages: 1. No Ackermann steering geometry 2. Steering rack moves inwards as it steers, requiring more space. 2. Ackermann steering system for live axles This system allows the hubs to steer at different rates. The steering arms are offset inside so they form a virtual steering point where at the point where lines meet. Advantages: 1. Better steering performance Disadvantages: 1. More complex assembly 2. Steering rack moves inwards as it steers, requiring more space. 3. Steering system with diagonal linkages This system acts similar as Ackermann steering system by using diagonal steering links. Advantages: 1. Better steering performance 2. Steering rack only has to move in one direction without sideways movements 3. Can be configured to be used in front or the rear of the axle. Disadvantages: 1. More complex assembly 4. Simple steering system for independent suspension 1. Very simple and robust 2. Easy to build 3. Can be even more robust when using double steering racks and links 4. Steering rack only has to move in one direction without sideways movements Disadvantages: 1. No Ackermann steering geometry 5. Ackermann steering system for independent suspension Advantages: 1. Better steering performance 2. Steering rack only has to move in one direction without sideways movements Disadvantages: 1. More complex assembly, less robust. 3. General steering tips 1. When using independent suspension always make sure your links are paralel to the suspension arms, otherwise you may end up with wheels which are not parallel and are causing excessive friction: 2. When using standard portal hubs make sure your steering system is robust enough to deal with the forces generated by wheel driving into obstacles. 3. If possible use servo motors which allow for high steering precision and return to center. They are especially useful at high speed models. 4. Most efficient way to steer the wheels is using the steering racks. 5. Build axles in such way they have positive caster angle, example for direction of travel from right to left. This will self-center your wheels and reduce rolling resistance. 6. Drivelines Drivelines are the responsible for transferring the power from the motors to the wheels. There are various drivelines you can build, here I listed few with their characteristics: Driveline types 1. Permanent 4x4 Advantages: 1. Simple, centralized, low mechanical complexity 2. Wheels are always powered, great offroad performance 3. Light weight Disadvantages: 1. Poor steering radius 2. Tyres have to skid when steering, lowering efficiency of the model 2. 4x4 with open differentials Typical example of this driveline is 42070 Advantages: 1. Differentials allow the wheels to so spin at different rates when steering 2. Very efficient since wheels don't have to skid when steering Disadvantages: 1. If one wheel loses traction, all the power is transfereed to it, poor offroad performance 3. 4x4 with lockable differentials Advantages: 1. Differentials allow the wheels to so spin at different rates when steering 2. Very efficient since wheels don't have to skid when steering 3. All differentials can be locked, so wheels are powered for great offroad performance Disadvantages: 1. Higher mechanical complexity 2. Dedicated motor is required to actuate differential locks, higher weight 4. Axle mounted motors Typical example of this driveline are 9398 and 41999. Advantages: 1. Differentials allow the wheels to so spin at different rates when steering 2. Very efficient since wheels don't have to skid when steering 3. If one wheel gets off the ground the second axle can still pull/push the model. Disadvantages: 1. Higher mechanical complexity 2. Usually the rear axle motor is more loaded than the front, especially when climbing uphill, the motors can't "help" each other. 3. Worse offroad performance than permanent 4x4 5. H drive: This is my favourite driveline due to the following reasons: Advantages: 1. Motors allow the wheels to so spin at different rates when steering 2. Model can skid steer 3. Very efficient since wheels don't have to skid when steering normally 4. Having 2 drivelines allows you to carry more torque to the wheels 5. Redundancy, even if one drive fails the model can still move 6. Wheels are always powered, great offroad performance Disadvantages: 1. Higher mechanical complexity 2. Slightly higher weight 6. Wheel motor drive Each motor powers a wheel independently. Advantages: 1. Motors allow the wheels to so spin at different rates when steering 2. Model can skid steer 3. Very efficient since wheels don't have to skid when steering normally 4. Redundancy, even if one or more motors fails the model can still move 6. Lower mechanical complexity Disadvantages: 1. Motors can't "help" each other 2. Higher weight due to a higher motor count Transferring power axially When transferring power via axles, you can reduce the flex by using connectors instead of simple "bare" axle: Use axles with stops to prevent them from sliding out of gears: Where possible always brace tooth gears from both sides: Transferring power at an angle Where pairs of U joints are used, make sure to align them to eliminate vibrations: Brick built CV joint which can transfer high torque at over 30 degrees angle Brick built cardan joint which can transfer extremely high torque up to 15 degrees angle Brick built flexible drive which can transfer medium high torque, extract and retract, suitable for low angles Transferring power perpendicularly The following perpendicular gearboxes are the best suitable for transferring high torque Avoid knob and worm gears, because they waste energy Gearboxes In my models I generally use the following gearboxes: 1:3 differential gearbox Advantages: 1. Very high gear ratio between low and high gear, 1:3 2. Capable of transferring high torque 3. Very efficient since only 2 gears are used at any time Disadvantages: 1. Takes a lot of space 2. This gearbox requires a good housing to brace the gears properly Compact two speed gearbox Advantages: 1. High gear ratio between low and high gear, 1:2,77 2. Capable of transferring high torque 3. Very efficient since only 2 gears are used at any time 4. Very compact design Disadvantages: 1. Requires two of the rare 20 tooth clutch gears 2. More complex shifter assembly. Diagonal gearbox Advantages: 1. High number of gears 2. High gear ratio possible, over 4:1 2. Capable of transferring high torque 3. Very efficient since only 2 gears are used at any time Disadvantages: 1. Takes a lot of space 2. Input and output axles are not parallel. 3. A complex shifting assembly is required for sequential operation. Driveline effect on suspension Transferring torque on the wheels can affect the suspension, especially when live axles are used. The following photo shows how the torque causes one side of the axle to push down and the other to lift up: In order to minimize this effect I suggest the following: 1. Make sure to have most if not all the downgearing inside the axles, so you do not need high torque going to the axles. 2. Make sure your models have a low center of gravity 3. You can eliminate this effect by using two counte rotating axles which cancel each other's torque, example below: 7. Motors and control Following are the most common types of motors used for Lego models. You can find more info here: http://www.philohome.com/motors/motorcomp.htm My personal favourites are L and RC motors due to the balanced output speed to torque ration and great mounting options. 1. PF-M Advantages: 1. High speed output 2. Smallest available motor 3. Cheap and available Disadvantages: 1. Low torque 2. Poor mounting options 2. PF-L Advantages: 1. High speed output 2. High torque 3. Cheap and available 4. Great mounting options Disadvantages: 1. Odd shape 3. PF-XL Advantages: 1. Very high torque 3. Cheap and available 4. Good mounting options Disadvantages: 1. Slow speed output 2. Large form factor 4. PF-Servo Advantages: 1. Very high torque 2. Very precise output with 15 positions 3. Good mounting options Disadvantages: 1. Slow speed output 2. Output axle can move a max of 180 degrees 3. Large form factor 4. Hard to find 5. 9V-RC motor Advantages: 1. Most oowerful Lego motor 2. Very high speed output 3. Good mounting options 4. Two output axles with different gearing ratios 5. Drive axles can pass through the motor Disadvantages: 1. Low output torque 2. Low efficiency 3. Power hungry 4. Odd form factor 5. Hard to find and expensive Power options 1. PF - AA battery box Advantages: 1. High capacity 2. Good mounting options 3. Works with rechargeable batteries, but with lower performance 4. Cheap and easy to find Disadvantages: 1. 750mA current limit - not enough to fully power RC motor 2. Heavy 3. Has to be removed and opened to replace batteries 4. Wasteful 5. Odd form factor 2. PF - LiPo battery box Advantages: 1. Small form factor 2. Light weight 3. Easy to recharge Disadvantages: 1. 750mA current limit - not enough to fully power RC motor 2. Low capacity 3. Studded design 4. Expensive and hard to find 3. RC control unit Advantages: 1. No current limit - can power 2RC motors at once 2. 3 Power levels 3. Has integrated steering output with 7 positions 4. Good mounting options 5. Easy battery replacement 6. Radio based control Disadvantages: 1. Poor quality, prone to breaking 2. Limited angle (45 degrees) and torque from the steering output 3. Has to be removed and opened to replace batteries 4. Very large form factor 5. Expensive and hard to find 6. Heavy 7. Required dedicated antennas and remote Control options 1. PF receiver and controller Advantages: 1. Receiver is easy to integrate into the model 2. Controllers have physical feedback 3. Cheap and easy to find Disadvantages: 1. IR based, low range, useless outside 2. Lack of PWM motor control, unless using train controller which is awkward to use 3. Odd form factor for use with steering 2. RC control unit See above 3. Third party options such as BuWizz and Sbrick Advantages: 1. Smaller form factors, easy to integrate into model 2. More outputs than PF system 3. Smooth control of motors 4. High range thanks to Bluetooth control 5. Higher power available with BuWizz 6. Customizable profiles Disadvantages: 1. Smart device is required 2. No physical feedback 3. Sbrick is limited by PF battery box 4. Price 8. Chassis Chasis is the backbone of your model which olds everything together. For chassis I suggest you to use the following components in order to make it strong and robust enough to deal with the stresses involved when crawling or driving at high speed: Some flex in the chassis might be a good thing to improve offroad capability, but only if id does not affect the driveline and cause friction on the drive axles. Remeember to use diagonal support, since triangles are the strongest shapes. You can also use panels and motors as structural support. Interlocking your chassis will keep it from slipping apart. For good examples of chassis designs I suggest you check the instructions for 9398 and 42083.
-
 Hi again, Especially the Technic Fans part of this community, hosts people from almost all ages, say 9+ So, I think, this is a tough question: What do you think: Should the newer sets have more models which are: * More complex but without motor(s) and/or RC, * More complex and with motor(s) and RC, * Less complex but without motor(s) and/or RC, * Less complex and with motor(s) and RC, * Stay in the same "choice/production system by LEGO" or, * Leave the moddings/mods to the MOC creators? You may say that "it depends", you may say that "the topic is stupidly created because some are more into classic models with lots of mechanical but not motorized/RC parts, some do, so there is no definitive answer to this", BUT, I would kindly like to have your OWN thoughts. For example; I would like to see a Bugatti Chiron Set which has the same complex system, but also being able to be remote controlled and capable of reaching at least 25 km/h. Take this topic like a poll with detailed answers with intra-members-communication, as well. I hope I made myself clear. Many thanks in advance and, Best Regards, Idris
 -
 Almost all my MOCs are motorized but I always have felt admiration for the manual ones and in the end play with them is almost the same. Of course that some of them have to be motorized like trial trucks but I think that the machinery for example would be funny to play motorized or not, what do you think?, what are they advantages and disadvantages in your opinion?. I start first, manual ones would be cheaper and easier to scale well so you have a lot of them to choose in the other hand motorized ones are expensive and you have to find machines where you can put all the components respecting its scale which is always a big problem but in the end you are doing something that moves by itself... it is difficult to choose... I would like to start manual MOCs just to not to see more wires anymore...
 -
in this topic i wanns hear about the shortage of Lego motor and your ideas the subject discussion will be based on the Powerfunctions series motor & Powered Up Series motor and the contents are here 1. Size Compared to Old Motor, Powerfunctions & Powered Motors are bigger with planetary gear(to get more torqe However, instead of getting enough torque, sometimes the size of motor is too big and need your idea or opinion about it(like problem with big size or nice experience) 2. Shape(or design) there was an idea(M motor was oval type, and L&XL Motor were difficult to hold conrrecly because of the round shape) the Old lego, on the other hand, close to rectangle write any idea on it please :) 3. Building system(Coupling method) its really nice for me but sometimes the rc car's wheel was disassembled while running because of coherence weakness and hope the coherence of Pin & hole was more stronger. write any idea or your experience on it too please :) 4. specifications Imao the most frustrating part is specification especially torque i saw that many ppl use motor in parallel to get enough torque or just satisfied with just moving even slowly I'd like to hear your opinions. Thank you.
-
Hi I'm L, still mainly play with PF1 motor even PF2 has been released for now With the PF2(new electrical system that broke the old lego paradigm) PF1 motor are no longer likely to come out anymore Imao So I'd like to make compatible motor for the PF1 electric building system myself consider the proper shapes, specifications, and placement of the wires and while im making it, i wanna make it really good and nice to use, over lego motor to acieve it, I want to hear the user's reaction or wish. I look forward to hearing from your idea Question here 1. Which is more important (1) Torque(strength) (2) Speed 2. Size(Size and torques are in semi-parallel relationship) (1) 2x2(Micro motor size) (2) 2x4(S size) (3) PF Series's was fine, just need more torque 3. Shape (1) Round (Like XL Motor) (2) Square(Like Old Lego Motor) (3) Oval(Like M Motor, Flat Bottom Type) 4. Building type (1) Pin & Hole (2) Stud & Tube (3) Axle & Axle Hole 5. the unit of length (1) odd number(etc. 3x5x5) (2) even number(etc. 2x4x4) 6. Power Supply Method (1)PF1 (2)PF2 and last, I'm going to post it on the crowdfunding site if it's a good response after I've made the motor brick prototype. So what if there was a third-party motor with better performance? 1) If the performance is good, it can be purchased. 2) Because it is not Lego, it is not purchased. thanks for your asnwer and have a nice day~ and any critical, basic ideas are always welcome from L


(640x480).thumb.jpg.97b97cf52b621694f8ece5448230e728.jpg)
