Search the Community
Showing results for tags 'hill'.
Found 9 results
-
Hi. Here's a funicular I built for an exhibition hosted by our LUG Kockice. It is based on a real life model called "uspinjaca" from my hometown Zagreb, Croatia (south-eastern Europe). It's apparently one of the shortest and steepest lines in the world (although the Los Angeles funicular sometimes takes that title). It doesn't really matter. It is still in operation today, mostly used by tourists to get a good view of downtown Zagreb. (more on Wikipedia) The incline angle had to match any one of the existing LEGO slope pieces so I could adapt the cars and surroundings more easily, this makes the whole build hard to match real proportions, but that is always the case with LEGO. The cars are counter-weighed by boat weights and pulled by LEGO Technic spools. Only one M motor runs them through a worm gear. The switch is hidden beneath the track in the top station so the car that reaches the top can change the direction of the spools. The switch knobs can also be easily removed if you want to manually control the cars using a train speed regulator. Uspinjaca Funicular by Sven Franic, on Flickr Uspinjaca Funicular by Sven Franic, on Flickr If you are wondering why that guy is trying to burn the street lamp, we still have people who go around the old part of town every night with a special stick, manually lighting all the gas lamps. (nazigac on google). Uspinjaca Funicular by Sven Franic, on Flickr There is also a low quality video of it running on my flickr page.
-
 Already two years ago, I got inspired at defeating steep hills with the LiteJeep. That could already beat 50 degrees, but because of its high riding height (good for offroading) and relatively heavy PF L motors, I reckoned there would be more irons to put into the hill-climbing fire. Very important things for hillclimbing are sufficient grip, huge power and a low weight. Weight ultimately gives more grip, but it also causes the vehicle to flip earlier when it is located above the center of gravity. With these factors into the equation, I decided to create a vehicle with loads of grip, so with 4 rubber tracks, and with articulated steering to make a sturdy connection between right and left possible, which is essential for climbing: when any vehicle is climbing, the suspension does unexpected things, so a stiff frame and suspension setup are required. Lightweight design requires a low complexity too, so that is why articulated steering is chosen. Having a front and rear part to let the vehicle adjust its shape to the terrain is an option I used several times in my rubber-tracked vehicles. This is the first vehicle in which I used the maximum footprint instead of the triangular form, again for maximum grip. Please note that, when you choose for the sturdyness and simplicity of articulated steering ánd want to let it adjust to the terrain, the middle joint becomes very complex as it contains joints in two axes! There is always a place where pain comes back. The Law of Conservation of Pain holds here.. In this case, all the trouble was in the difficult joint, which took about 5 hours alone. Then for the power: initially an XL motor was used in the front, but having a driveshaft through the already complex dual joint proved to be impossible. And then the idea came. Why not generate the power at the place where it is needed? Why not, if there are two separate parts, have some powerplant in both front and rear? But then there was a problem: I have a very large project in which all my three L motors are used. This pushed me in the direction of using M-motors, which proved out to be a very good forced choice. Combined with the lightness of the overall model, they proved to have ample torque left with a 3:1 gear ratio, having enough torque to keep the four tracks spinning all time when grip was lost. This is amazing, and you can see why Lego has put two M motors in their latest Tracked Racer. But the limits of that thing are way lower than the Quattrack's limit. Using two PF medium motors for drive and one for steering, this one of my very few (and maybe the last) Lego Technic MOC with only 2006 components. The Sbrick will throw all range headaches away and have much less delay than the stone-age PF IR remote it is replacing. Why did I use such standard power functions components? The new PF servo is slow and quirky, a medium motor allows for much more smoothness in steering. Moreover, if you are driving at steep slopes like this, it asks all your concentration to keep it on the move. If you cannot feel where the remote control knobs are (The intrinsic problem of the Sbrick) the vehicle will fall of before you've compensated. So the old system proved to be the best system in this situation. The articulated joint actually contains 3 joints, to have a suspension force on it in both directions: up and down. That is why there are rubber bands and one shock absorber. By the way, also the steering joint is included. Now, because the front and rear part of the Quattrack are relatively conventional (no steering nor differentials), all the pain of good and accurate steering is shifted to the design of this central joint. I dare to state that the success of this vehicle relies for a big part on this 2D joint. In the video, the operation is explained. On this photo, it looks as if the ground clearance is half a stud. This is not the case; in fact, it is over 1 stud. The underside is very smooth, which helps the low superstructure to glide over obstacles. Because of the weight saving, I designed it to have very clean looks. Styling means more weight. However, I managed to squeeze in some little details like fake cabin flashing lights, front lights, rear lights, cabin seats and a steering wheel. The reason why I did this, is that I wanted it to be a possible real-life vehicle as well, not just a scientific experiment. Adding weight is bad for climbing ability, so I tested the Quattrack also with the cabin removed and say what !!? The climbing angle was the same. This front look shows all that. The Quattrack contains everything, but nothing more. You do not need a zillion pieces of Lego to break records. Only 556 grams of it is sufficient in some cases. The video is the proof of all my theories... [media] I have not put all text and photo's on Eurobricks. More is to be found on Brickshelf and MocPages. If you like my video's, you might want to take a look on my YouTube channel.
 -
A time when villages weren't burnt or plundered, and peasants murdered or taken as slaves. A time when you didn't walk in fear and look over your shoulder at every turn. A time when you could rest under a tree, and know no drow would slaughter you in your sleep. First build of the year (at last) :P and its pretty simple. Just a small scene to start with larger ones on the way. The Hill was a nice challenge to try and create, and I needed another tree design so this was the perfect time to try it out. I'm pretty happy overall. I will probably post one or two builds today or tomorrow. Hope you enjoy :) P.s. I did mean it to seem a little blocky :P
-
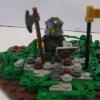
The brotherhood of the forest bulls roam through the countryside and forests of the cool South. Here on this hills, a throw wide to the nine realms, the elder brother Edmat decided to pose and if them the environment is inclined to build a place to live. A lot of time before the onrushing winter does not remain .... Anyway, the guys around certainly going to enjoy the forest bulls. Whether they dereint also belong to the Brotherhood? -------------------------------------- I built this MOC some time ago and presented it first at imperiumdersteine.de and now here for all non german speking FOL!
-
[MOC] Lego Technic outdoor 4x4 Jeep hill climber
896gerard posted a topic in LEGO Technic, Mindstorms, Model Team and Scale Modeling
I have built a lightweight 4x4 car that also performs quite well on hills. 50 degree hills, actually. It has been optimized for weight. It is driven by 2L motors, steered by one M-motor and powered by the 8878 battery. I have added an extensive review on http://www.mocpages.com/moc.php/400971, so if you have a question maybe the answer is there. -
[AoM] Tower Phase 1: Using the creations of mother nature
Dutchy posted a topic in Guilds of Historica
This is my first entry for the Age of Mitgardia freebuild challenge After William, Maxime and Alexander walked trough the woods of Mitgardia for a few days, they decided that it was time to search for a place where they could rest. They were exhausted and needed sleep and food. They found a river full of fish and now they just had to find a safe place to rest. There was a big rock a few meters from the river and after finding out that there was a hollow space underneath it, they decided that this would be their home for the next couple of days. William climbed on top of the rock and had an amazing view. He could see that they were not far away from a little village, because he saw smoke coming up above the hills, but for now, they're too tired to travel further. William stayed on top of the naturally shaped tower to watch out for any hunters or dangerous animals. William Bright on top of the rock The hollow space underneath the rock, covered with leaves to protect them from unwanted visitors. Without the minifig. I'm a newbie to building MOC's and the small amount of bricks I have doesn't really compensate that but I hope that, with your C&C and these phase builds, I keep getting better at it. So, I would really appreciate any C&C from you guys Thanks for viewing. -
Hello, I'm working on the Bag End of the Hobbit. It's a hugh building with all rooms and lots of details the only thing what is missing is the hill underneath and on top of the hobbit hole. Could some one give me some tips for techniques how to build a smooth hill? After I finished with my building I'll share my building on Flickr and ,of cause, here ;) Hope you can give me a hand! Best regards Lego-Freak
-
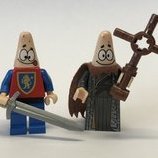
King of the Hill Knights, Barbarians, Peasants and Wizards clash to become King of the Hill This is an entry into the Flickr group Lego War’s The Castle Battle Contest, Category 3: Single Stud Battle! Category 3: “Single Stud Battle” How many minifigs can you have battling (and balancing) over one stud of space? Based on a similar contest from times past, this category will test your creative balancing skills to the limit! Hahaha! This is definitely the most enjoyable build I’ve had in a while! Although, I must say—I did expect it to be far more challenging then it turned out to be! I utilized shields as a way to balance more and more figures, as well as having various figures just hanging on for dear life! I also greatly focused on the first figure since he would be holding up everything, and I gave him a shield and a flag pole on his back to attach more peoples. The horse was something I thought to put in about halfway through the build, and I was surprised to see I was able to balance him—in fact, the horse is actually the only part of the build not attached stud wise to any other part—so he’s basically a free floating structure. So, in the end, I’m very happy with my entry, and my new found balancing skills! Enjoy ~Nemo
-
A creation based off of the episode “The Clock King” from Batman the Animated Series. I rather like the Clock King, and while his appearance in JLU Animated is cooler, he nonetheless is great in B:TAS too. I went for the gear look on this build like in the episode, and added in more clocks for looks. Unfortunately I had to change the “death torture” of Mayor Hill so I could include all three characters in the same scene. Anyways I’m glad with how it turned out. Enjoy ~Nemo