Search the Community
Showing results for tags 'technic'.
-
 Hello everyone! I am a recently new EB forums member (joined in 2020). I am a college student in the US pursuing Mechanical Engineering. I really enjoy building vehicles and mechanisms with Lego Technic to help visualize the ideas in my head and the designs I learn about from other people. I wanted to create this topic so I can record my older mocs and have a place to keep some current ones and W.I.P.'s as well. I will start adding more old pictures to this topic as I have time. I hope you enjoy all of these old (some finished, some not) M.O.C.'s of mine from my passionate hobby in Lego:) To get started, here is one of my oldest mocs to date, the R34 Wasp Jet (I made that name up btw): I have some other mocs from that era that I will share pictures of, but I have to transfer them from my camera SD card to my BrickSafe:) First I will share some other mocs that I have uploaded pictures of to my BrickSafe already. Here is an old Hummer W.I.P. I never finished... lol. I was waiting to buy some of these parts for the front axle wheel hubs. (sorry for weird camera angles) (note the use of a technic bushing as a differential lock selector ) Here is my one and only Battlebot. It is powered by two PF XL motors with a 24:1 gear ratio (worm gear to 24-tooth). I designed it as a big version of the 2x3 slope brick, but I have no idea if I actually created it at an accurate scale ratio, lol. I could have added a caster wheel towards the front, but I never got around to that. I used it against my brother's Mindstorms EV3 bot that he created which was 6x6 and my bot worked excellently. The Mindstorms just kept losing wheels and could not tip over my bot. The downside was that I did not create any attack mechanisms, so was really just playing defense the whole time:)
 -
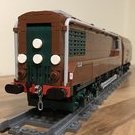
 Model of a 2003 New Flyer D60HF articulated bus from Metro Transit in Minneapolis-Saint Paul, Minnesota. The model features motorized drive, steering with working steering wheel, a removable Cummins ISL engine model, and pneumatically operated passenger doors. Functions/features: Drive Steering Working steering wheel Removable Cummins ISL engine model with moving pistons Pneumatic passenger doors Instructions available on Rebrickable: https://rebrickable.com/mocs/MOC-245043/JLiu15/2003-new-flyer-d60hf-metro-transit-bus/#details In the 1990s and 2000s, Metro Transit in Minneapolis-Saint Paul, Minnesota ordered a large number of New Flyer D60 high floor articulated buses. Nicknamed the Galaxy, the D60HF entered production in the late 1980s and was produced until 2006 as a final option of a Metro Transit contract. The final units produced for Metro Transit in 2006 were the last high-floor articulated buses ever built in the United States and Canada. Over the years, Metro Transit's D60HF buses were gradually replaced with newer New Flyer D60LFR and XD60 articulated buses, and the final units in Metro Transit's fleet were retired in late 2021. My model depicts bus 3143, which is a 2003 model built in January 2004 and now privately owned by a friend of mine in Pennsylvania. Prior to its retirement, 3143 operated out of Metro Transit's South Garage, and later out of Heywood Garage in May 2020. A number of 2003 units were already retired by Metro Transit in 2016, but 3143 and several others were returned to service in May 2020 to provide space for social distancing amidst the COVID-19 pandemic. The remaining units were also retained for service during the 2021 Minnesota State Fair in August-September 2021, and were retired shortly after. 3143 operated in revenue service for the last time on September 5, 2021 and is among the final D60HF buses in Metro Transit's fleet to operate in revenue service. I had the opportunity to see 3143 in-person at the 2022 NJ Historic Bus Festival, which inspired me to eventually build a LEGO version of it. The building process began in summer 2024, starting with the rear section's chassis. Because the model was likely going to be heavy when finished, I used two Power Functions XL motors for propulsion. The two XL motors are placed transversely in the chassis, between the rear door and the rear axle, and are hard-coupled using knob wheels. Placing the motors longitudinally would have required more length, which was not ideal as the rear door and rear axle are relatively close to each other. This section is designed to be very compact, with the two XL motors taking up all available transverse space between the outer body panels and the rear door and rear axle placed as close as possible to the motors. This allowed me to still have space behind the rear axle to include a Cummins engine model, as the real-life version is powered by a Cummins ISL engine. Thanks to the high-floor design of the original bus, I was able to include a floor made using flat Technic panels, with gaps kept to a minimum. This had the benefit of keeping many mechanisms hidden as well, such as the steering mechanism, which is placed entirely under the floor except for a small portion of the PF servo motor that's exposed. The steering motor's output is also connected to the steering wheel. Unfortunately, some of the bevel gears connecting to the steering wheel are exposed as their diameter prevents covering them with Technic beams/panels. A challenge for this model is the articulated joint with seats in it - the real-life version has four passenger seats in the articulation joint's turntable which rotates halfway relative to the front and rear sections during a turn. Keeping the floor continuous here was particularly challenging as it is perfectly circular on the original bus, and perfectly round shapes in LEGO are rather difficult to create outside pre-made circular pieces. In the end I went with a design using panel fairings 2387/2389 around the perimeter of the floor section at the articulation joint, and the floor flows pretty seamlessly from the front to the rear section. The bellows use the same principle as in my New Flyer XD60 model, but thanks to the floor section at the articulation joint, I was able to keep all the rubber bands maintaining the shape of the bellows hidden beneath it. There are 68 passenger seats (34 in the front, 30 in the rear, and 4 in the articulation joint), consisting of a mix of high-back and regular ones. Another friend of mine owns bus 3200, a 2006 model, and I was able to design the seating layout exactly like in the original bus thanks to photos provided by him. AFAIK, the 2003 and 2006 models are largely similar to each other, and many of my model's details were done accurately thanks to his photos. Above the chassis and interior, there is a Technic roof frame in both the front and rear section housing two independent pneumatic circuits for the front and rear passenger door. Because the two passenger doors are independently controlled, I made each door use its own compressor and valve instead of e.g. having them share a compressor but using their own valves. A PF L motor is used for each of the pneumatic circuits, driving both the compressor (geared up 5:3) and the valve through a clutch gear and 3:1 reduction. The compressor/valve setup is built in a compact manner to ensure a mechanically efficient mechanism as the clutch gear slipping and the compressor add a significant amount of friction. They are placed below where the roof AC units are located in the finished model, as the valve's lever extends past the roof height slighly when passing through the middle position and the roof AC units can be designed hollow to allow the lever to pass through. Although I tried to ensure that the hose lengths for the front and rear sections are largely identical to each other, I still noticed the rear door to open and close slightly faster than the front door. Nevertheless, the pneumatic doors are one of my favorite features on this model, because its movement is much more realistic compared to if it was purely mechanical (e.g. a linear actuator or a worm gear). Designing the bodywork was relatively straightforward, and because Metro Transit uses a yellow and blue stripe for the livery, I was able to easily make it using LEGO pieces. This kept the need for custom stickers to a minimum. I had already designed much of the bodywork in Stud.io by January 2025, and the Metro Transit livery was recognizable even without stickers. I also like how the front destination sign turned out, as the protruding curved destination sign design is one of the iconic features of New Flyer high floor buses. This is further pronounced by the fact that Metro Transit has the area around the destination sign painted in yellow, and I feel my design captured the color break here pretty well. I also like how the rear turned out, especially for the rear grille and destination sign. However, there were still some shortcomings with the design, especially with the front and rear lights. The amber turn signal lights on the front and the two center brake lights on the rear of the real bus are much smaller, and it was difficult to go smaller than one-stud width for these lights. The side windows also had some inaccuracies which I feel could've been remedied by considering the body panels' design while designing the chassis and seating layout. Because of the position of the doors and seats, I had to make some windows smaller/larger than others by a stud (when they look to be all the same size on the real bus) to prevent the windows' positions from looking out of place relative to the doors and seats. The roof is largely made using 6x6 tiles, and because the PF rechargeable battery box is placed near the rear of the model facing upward, I added a switch on the rear that can be used to press the power button on the battery box, as well as remove a section of the roof to access the battery box for charging. The roof AC units on the real bus are sloped towards the top, and thanks to the 5540 piece becoming available in white, I was able to capture the slope shape of them while maintaining a seamless finish with the top surface primarily made using tiles. I'm overall satisfied with this model turned out. It is my fourth motorized bus model and my largest MOC to date (with over 6600 pieces). The model performed well mechanically, and the two XL motors do not struggle at all to move the heavy model. While I was initially concerned about the pneumatic door mechanisms having more possible points of failure than a purely mechanical design, the doors worked as expected every time I opened and closed them. Despite some shortcomings with the aesthetics, I had a great time designing and building this MOC, especially with this being my first time doing a model of a specific unit privately owned by a friend. It's also my first model of an older retired bus, as my previous bus models were all of newer buses in active service. Video: Photos:
 -
 Discussion thread for the upcoming LEGO Technic 42161 Lamborghini Huracán Tecnica. Nr. of pieces: 806 Release date: 01.08.2023 Price: 52.99€ Lime again, how boring.
 -
 Welcome to my garage LEGO!!! Hello! My name is Michael. I'm a Builder from Russia, I love muscle cars! ZIL 130 Hello everyone! I've finished another USSR Legend, a true symbol of the era! For the first time, I was able to use a large windshield, and the entire model was built around it. Description: -Buggy motor drive -GeekServo steering -RCBrick control -Rear-wheel drive -2-speed gearbox (the lever is duplicated in the cabin) -The steering wheel rotates with the wheels -Working V8 -Doors, hood, sunroof, fuel tank, and glove compartment open. -Mechanical saddle lock -Detailed interior, rear axle, engine compartment, and more. -Weight: 2.2 kg. Length: 47 cm. Instagram: https://www.instagram.com/lego_muscle_garage/ Join my group in VK: https://vk.com/legomusclegarage All photos on the link:
 -
 Hi! It's time to upgrade one more shelf model (the previous one was the Batmobile https://www.eurobricks.com/forum/index.php?/forums/topic/180543-mod-motorized-batmobile-76139/&tab=comments#comment-3302360). Ferrari 42125 has a lot of free space, so I've inserted four buggy-motors and a few BuWizz receivers. The chassis is very simple, I've removed suspension, V8, driver seat and steering wheel :) And the bodywork is the same as in the original LEGO set. Here is the result: Thanks for watching :)
 -
Stampunk goggles. A small accessoiry of my Steampunk layout, which I've built last year. Pictures also at Flickr: https://flickr.com/photos/mathijslegofan/albums/72177720328932848
-
 A long time has passed since I made a new proper Technic alternate build. Stumbled upon the 42181 VTOL set on clearance sale for 60 Euros and thought that it was too good of a deal to pass on so I bought it. At first I didn't have an Idea what alternate should I make but reading comments about the original set a lot of people talked that this as close as we will get to an actual Osprey set. Probably a lot of You remember the cancelled 42113, so I took an inspiration from it and started on making the best possible Ospray version that I could manage. In the end alternate turned out much better then anticiapted. Looks were important, but so was the functionality. The alternate retains the core features of the cancelled 42113, without any motorization of course. Functions: Flying and landing mode - rotate engines using Blue bevel gear on the top. Moving rotors using the second Blue bevel gear on top (Rotors work all the time, in all the engine positions.) Retractable landing gear - by pushing or pulling the central lever all 3 landing gears work at the same time. Manually opening rear ramp - ramp is there, although the space is limited due to the internal mechanisms. Instructions are available for sale on my Rebrickable page. Cheers!
 -
All my bus models up to this point have been of buses currently in active service. However, my next bus model will be of an older, retired bus: Metro Transit's 2003 New Flyer D60HF. Metro Transit, the transit operator in the Minneapolis-St. Paul metropolitan area, ordered a large number of New Flyer D60HF articulated buses in the 1990s and 2000s, with the final buses in 2006 being the last high-floor articulated buses ever built in the US and Canada. Over the years, they have been gradually replaced by newer New Flyer D60LFR and XD60 articulated buses, and the final D60HF buses were retired by 2021. A number of units were bought by private owners after retirement, such as #3143 (a 2003 model), which was exhibited at the 2022 NJ Historic Bus Festival. My plan is to make my model be of bus #3143; the simple yellow/blue livery should be easy to build in LEGO so the amount of custom stickers for this model should be minimal (only the fleet numbers, Metro Transit logos, and destination signs come to mind). Thanks to the high-floor design and the boxy build of the original bus, it should be easier to incorporate mechanisms into this model as opposed to my New Flyer XD60 model as New Flyer Xcelsiors are low-floor buses. The chassis can be reinforced much better (I could probably make it 5 studs high throughout the bus, same as the rear section of my XD60 model), and I may even be able to place all electronic components and mechanisms in the chassis without placing any (e.g. the doors mechanism) in the roof. The model will use Power Functions motors and will be controlled by SBrick. The tentative list of functions/features for this model is: Drive (with two XL motors; my XD60 model with one XL motor felt a little underpowered) Steering (with working steering wheel) Pneumatically opened doors (one of these per door) Cummins engine model (with new engine elements from 42170 Kawasaki set) Bike rack (removable) The design process starts out by using my New Flyer XD60 model as a base to determine the locations of various features (axles, bellows, etc). I plan to use 49.5x14mm tires for this model, as they offer better proportions than 49.5x20mm tires. The middle and rear axles with double wheels can also be spaced further apart, allowing me to use a 5.5L axle with stop and thus prevent the half shafts from pulling out from the differential under load, an issue experienced with my XD60 model. I still need to determine the seating layout of the original bus, which will make it much easier to design the chassis without needing to make adjustments later on for the passenger seats. I also plan to use the new engine elements from the 42170 Kawasaki set in the Cummins engine model, as the axles-and-bushes design is a bit noisy and I've found it to jam a few times too when using it in my previous bus models. Side note: I have found the new Kawasaki engine pistons to not "click" properly in place to a liftarm, stud or the crank disks in Stud.io - maybe this is just due to these parts being new and not having been really refined yet in Stud.io? Would love to hear any other experiences with this. There's still much to be done, but I'm looking forward to this MOC. I've already built an articulated bus model, and this one should be more straightforward with the high-floor and boxy design. I strive to add something new in every one of my bus models, and I'm curious to see how the pneumatic doors turn out (all my previous bus models used mini linear actuators or a worm gear for the door). If you guys have any suggestions for me, please let me know.
-
Today I started a new model. I'll build it mainly using light bluish grey Technic parts. Here's a first sketch to plan Bricklink order:
-
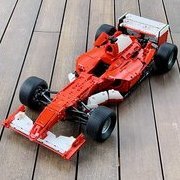 Hello everyone. I would like to share a MOC I have just completed: Ferrari F2004 F1 car It’s in 1:8 scale with 1700+ parts. Some features: working V10, pushrod suspensions, steering wheel, removable front wing, rear wing, headrest, and engine cover I have uploaded some pictures to bricksafe: F2004 Bricksafe Instruction is also available here: F2004 Instruction
 -
 Hello again! I’m happy to share my latest Icons-style classic F1 car, the Tyrrell P34! This is the only six-wheeler to ever win an F1 race, achieving 1st and 2nd at the 1976 Swedish Grand Prix. This time, I was able to incorporate a few extra Technic functions into the model while still maintaining the look and feel of an Icons-themed scale model built primarily with system bricks. It features working 4-wheel steering linked to the steering wheel, a rear differential, and even a working fake engine. Here’s an animation showing off some of these features, courtesy of Car MOCs Channel: Design Highlights: Steering I started with the 4-wheel steering, the most prominent feature of the P34, and one that I wanted to be functional and look accurate. It was also one of the more challenging aspects given the scale I wanted to build at. I went through about a dozen designs before settling on a sliding gear rack as the most low profile solution. The ideal part, the 1x10 Technic gear rack (6592) is quite rare, so I adapted by combining a 1x4 gear rack plate (3743) with the relatively new 1x1 plate with vertical bar (3661) and a 1x2 technic liftarm (60483) to maintain the 10-stud track width. The actual car used a single-rack system, but this double rack design was the best compromise I could make to keep the whole steering system under 3 studs of height. Livery Brick-built livery is always a priority for me, and on this car the main design feature to capture was the yellow stripe running down the sides of the cockpit and body. The slight angle of the stripe on the side of the cockpit is achieved by attaching a 1x3 tile to a stud between two wedge plates. It’s a slightly tighter fit than typical connections, but not illegal enough to bother me. The stripes on the sides of the bodywork are also interesting exercises in stud reversal and clip connections, tapering slightly wider and taller towards the rear, just like the real thing. Front Wing Aligning the top edge of the front wing with the car’s nose was tricky, especially while maintaining a smooth slope with brick-built NACA duct cutouts. I couldn’t fit the five metal support rods on the front splitter at this scale, but you can imagine the gaps between the tiles used to build the splitter as standing in for them. I also managed to recreate the small metal plates just in front of the wheels using trapezoid flag pieces. Engine At first, I planned to create a static brick-built you would find in most of the Icons vehicles today. But the lack of an engine cover allowed me to fit a working V8 with a rear differential. Vertical space was still the biggest constraint, as I had to make sure the cams had enough clearance with the ground while making sure the pistons didn’t collide with the velocity stack trumpets at the top. The result is a compact yet functional engine that captures many of the key features of the Cosworth DFV and surrounding engine bay, including support rods and even some suspension elements. A few real life photos: Building instructions and more photos are on Rebrickable. Looking forward to hearing your thoughts!
 -
 Hi everybody If been playing around with constructing at 45 degrees in technic and found the following techniques: The first one is using an axle through some connectors thus giving you 45 degrees and of course you can now start mounting or building of the axle: I also played around with the Pythagoras theorem and found the two practical values to use: 5 ( 6L in LEGO the first L is the 0 position ) and 7.071 { 5.sqrt(2) } rounded to 7 ( 8L in LEGO the first L is the 0 position ) 7 ( 8L in LEGO the first L is the 0 position ) and 9.899 { 7.sqrt(2) } rounded to 10 ( 11L in LEGO the first L is the 0 position ) The first Pythagoras pair used is the top left with the 6L black axle and the two no. 4 connectors. Not a fan of this method as it is a bit over sized and if you build the parts rigid into you construction with support from the top and the back of the no. 4 connector it might ever so slightly bend the axle or damage your parts. The second pair method one is the 11L beam again not a fan of this method as it will pull ever so slightly as it is actually a bit under sized. The second pair method two and most favoured by me personal is the one I like most yes there will be a small 0.1mm gap in the gray axle but it is really small. I like this method better because I can brace the no 4 connectors from the back and from the tops. I wanted to share this but also I would like to know if you guys have any other techniques you would like sharing? I would like to keep it stud less if possible. Of course using the new A plate with some technic bricks would also be a possibility: http://alpha.brickli...lor=11#T=C&C=11 Anton Edit 1:Used flickr deaplinks instead of attachments
 -
 A creative video of RC modification from @Kenneth Klapper, using high-performance RC components from ZENE Bricks。 Two 3S batteries, Two ZENE motors with 1:4 planetary reducers, Two ZENE metal differentials, and other accessories. Based on the modification of Lego's 42177 Mercedes G500 6x6, it has perfect power and off-road capabilities, can be driven in various terrains, and has extremely high playability. You can see that it is easy to drive on the grass without using high-power. Designer @K4enneth7 video: Lego MOC Brabus G900
 -
8 Billboards so far... by Humble Bricksmith, on Flickr Over the past year, I've been working on making city billboards, depicting classic LEGO themes. Billboards are a great way to add unique flair and character to any LEGO city or diorama. Without using any printed bricks, it becomes very difficult to create small details without scaling up your creation. I figured that billboards are a good compromise between detail and scale. For anyone interested, check out my Flickr, or support me on LEGO Ideas! Also, you're welcome to download LDD or Studio files of these projects Here.
-
 Review: 42058 Stunt Bike Name: Stunt Bike Number: 42058 Theme: Technic Year: 2017 Pieces: 140 Price: USD $19.99, Euro 19.99€, AUD $32.99 Brickset: Extra Info Technic Early 2017 Review Series Welcome to the third in my batch of 2017 Technic reviews! I was offered all the small sets early 2017 for review late last year... but I ended up getting them all! Thus I have a lot to review. I've been doing them in parallel and changing my process as I go so hopefully the latter ones will end up being the best. On that angle I'll probably retcon some of the earlier reviews if I improve my process. Due to this remember that I'm happy to take extra photos or provide extra info on request, and anything especially good will be added to the main body of the review. Do note though that sometimes the model may no longer exist if I have have made an alternate. On the subject of alternates, I will be making the alt model, if I have the instructions, think the model is worth making, and I have the time. Also I'll show mid stage construction only if I think it's relevant. Thus don't ask for construction photos or alt models if they aren't part of the review.... I am prepared to extract parts for detail photos though. Photos will all be hosted on Flickr so larger versions are available, and relevant videos will be on YouTube and linked to from here. I don't edit photos much; very rarely I'll crop one and almost never will "correct" them so the photos should be as natural as possible. I will try to not be repetitive; thus it's worth reading my other reviews. For example I'm not going to complain too much about the digital instructions; I'll try to complain about new things, or maybe not complain at all! Here's all the other reviews of H1 2017 Technic... 42057 Ultralight Helicopter 42058 Stunt Bike 42059 Stunt Truck (and 45058/42059 Combiner) 42060 Roadwork Crew 42061 Telehandler 42062 Container Yard 42063 BMW R 1200 GS Adventure 42064 Ocean Explorer 42065 Tracked Racer Mucho multi thanks to the EB LUG Ambassador CopMike and the LEGO CEE Team and Designers for allowing me to review these sets for Eurobricks. So onto the review! Packaging Front.... ...back.... ...top. Unboxing Standard punch box. Only one instruction book and it's staple bound without a substantial cover. Secondary model has instructions online only; I'll be making this soon. The build is not sectioned. The yellow bionicle tooth and pullback motor are slightly special, with the ramp and the... ...the anniversary part being slightly more special than those. Parts list. Random instruction page. Build It's done! Spare parts. For better or worse (spoiler: probably worse) the pull back motor has a geared drive train. Since this offers no mechanical advantage it really just adds style... and friction. The ramp is a custom colour and has rubber feet to help it grip rather than slip. You can see the anniversary part here on the bottom. Action video! Bonus action video! Adding stickers doesn't really change the look that much IMHO but I will say there seems to be a common theme with the "companies" this year. I wonder what "CHEQ-URED" sell? Ratings Function: Well really this is a Racer with a pointless gear link. But it gets an extra mark for the gear link. 3/10 Parts: Not much special so if you're short on small wheels, small gears, paper ramps or pullback motors it's a good set. 4/10 Price: The Australian price of this set seems rather high IMHO. 5/10 Accuracy: Well.... Clearly it looks like no bike. (Yeah, that's a challenge.) It also would be horrid for stunts. (Better for drag racing.) But as square bikes go it's pretty cool. 4/10 Fudge: Pullback cars aren't really my thing. If they are your thing then you'd probably see the worth in this 6/10 Overall: Meh. Loads better Technic for less money 4/10
 -
 Hi! I am trying to create a Trophy Truck, but the steering system is giving me trouble. Whenever I turn, the wheels get stuck and the whole car slows down. I am using the pre-2011 style hubs and suspension. Anyone have any tips? -TechnicRCRacer image removed due to limitations
 -
Hi! I'm TechnicRCRacer and I love Technic! I have all the big sets and am creating MOCs as fast as I can to manage time. I also like the Creator Expert series because of the nicely built cars. If you want to know, my favorite set is the Porsche GT3 RS because of the cool orange panels and the very cool gearshift system. I attached a picture of my favorite MOC I built. -TechnicRCRacer

-
 I got the Bucket Wheel Excavator in September last year, and after building it and modifying it (with Mindstorms), I dismantled it to use the pieces in my other Mindstorms creations. I'm particularly interested in the large yellow planetary gears/rings that come with the set, I hope to use them to create some sort of tank with a rotating turret. However, I'm not too sure about the geometry of the pin-holes in the rings, I don't really know where it is safe to attach a pin in a certain hole. If anyone knows of the correct geometry of the rings, it would be very helpful!
 -
 Hi, I was bored so i decided to try reverse engineer the upcoming 2017 telehandler (42061). I filled dark areas with parts according to my sense of logic. https://drive.google.com/open?id=0ByDobrCn2djYTWo5U2xEUWZyZTg
 -
 hello, im selling all my legos, need some money so i will keep my mocs, so i builded a huge one, to use all parts that could be nice to put in use into a future moc its a pre ww2 based plane, i already put the wip step into another topic, here i will put the final version, if you guys have ideas to improve, you all are welcome! Video: Pics: PB214220 by Omar Dib, no Flickr PB224235 by Omar Dib, no Flickr PB224237 by Omar Dib, no Flickr PB224226 by Omar Dib, no Flickr PB224227 by Omar Dib, no Flickr PB224228 by Omar Dib, no Flickr PB224229 by Omar Dib, no Flickr PB224230 by Omar Dib, no Flickr PB224231 by Omar Dib, no Flickr PB224232 by Omar Dib, no Flickr PB224233 by Omar Dib, no Flickr
 -
hello!!! my new moc, still wip, 3 days of work, im a lil bit tired, the plane already take form, need to fit flaps, interior and some other stufs, heres the video!! my submarine getting small hahaha working radial engine into plane Thanks!!!
-
I'm unsure whether or not I should be posting this in this list or on the Technic list, but I guess that it's more topic-specific here. There are a lot of vehicles over on the Technic list, and that's fine. Technic LEGO probably best lends itself to constructing vehicles of various types and there are many fine and talented exponents of that art over there. But I did start wondering what else might be made from LEGO Technic; something without wheels, motors, PF or remote control. After a bit of a brainstorm my mind settled on the good old-fashioned mechanical signalbox lever frame. There have been very few previous attempts at such a build (at least as far as I can tell from my research), so I thought it would be interesting to see if I could make some headway. I'm not terribly technically minded, but this was something that I do have a reasonable understanding of, and it's complicated enough to be challenging to design and build. The starting point was to make the model fully functional and as realistic as possible, which means that any notions of scaling correctly would go out of the window (luckily that's an approach I'm very comfortable with). Therefore I wanted not just to have the lever frame but the interlocking frame too. Sadly Technic does not lend itself well to the conventional tappet method of interlocking, so I would have to devise my own system that did suit the medium better using sliding bars with pegs engaging with holes. I also wanted to include the catch plate mechanism on each lever. Fortunately for my sanity I haven't kept a tally of the number of hours I spent brainstorming and then trying things out in LDD. As I said I'm not the most adept at technical matters, so this really has been a labour of love. However, I got there in the end and came up with a mechanism that looked good in digital form. Having done so I cast around for a prototype that I could recreate and settled upon Downham (the station is now called Downham Market, correctly reflecting the name of the town) between Ely and Kings Lynn in Norfolk as it was around 1974. It's a modest frame with 22 operational levers at this stage operating both points and signals. Downham at this time still had both an Up and Down yard as well as privately operated sidings, so it's an interesting location with lots of operational potential. This is the LDD render of the lever and interlocking frames without the locking bars. My poor little netbook couldn't cope with the whole thing in one file so each had to be designed separately. And this is the completed frame. It took a day and a half to assemble and, while 22 levers sounds quite modest (and is when compared to other locations on the network), the actual result is a bit of a monster. It looks more like a Wurlitzer organ than anything else. A close-up view of the interlocking system. You can see how it should work with the pegs engaging with holes to either lock or release levers in the frame. The idea behind interlocking is to prevent collisions and other mishaps on the railways by physically stopping the signalman from operating certain points or signals. This is the catch system on one of the levers. As is the case in a real signalbox, the lever must be released from the catch plate by operating the handle at the top of the lever before it can be pulled. A signalman would be familiar with the position and function of all the levers in his signalbox, but just in case each one is colour coded (as per British practice) and identified by a plate. There's more on my Flickr page. So, does it work? Well, yes and no. But mostly no. The catch plate system works brilliantly. Admittedly because it uses a rubber band it can be forced, but it's not easy to do so. But it's in the interlocking frame where things aren't so great. Part of this is because I designed the frame to be modular so that it can be expanded as required. A small prototype frame lead me to believe that the level of flex would be acceptable, but it turns out that at full size the flex is a significant problem. Luckily I designed the frame so that it could sit on baseplates which will almost completely eliminate flex altogether, and so I have some on order. But the biggest problem is that the various parts of the interlocking system need to stay perfectly aligned in order for it to work properly, but they simply refuse to do so. Levers that are meant to be locked can still be operated while others that are meant to be released remain steadfastly jammed because the locking bars do not move as they are designed to do. Part of this is because the friction in the system needs tuning (for which I have replacement parts on order) but mostly because I underestimated what would be needed to keep all the parts in correct alignment. Therefore I've had to design structures to add to the frame that I hope will keep the various parts in line. The locking bars themselves still require a redesign in order to work with these modifications, but that is next on my list. Hopefully these remedies will be enough to have the frame working smoothly. If these fail to address the problems the next area of attention will be the sliding bars that drive the interlocking frame. After that I'll be out of ideas. I hope you like it. I'm having a lot of fun with it and am proud of what is my largest MOC to date. There are more updates planned which I hope to reveal as time goes on.
-
 Lego Technic – Liebherr LR624 Litronic Crawler Loader Features A medium-class Crawler Loader work machine produced by Liebherr. İf 2008 Product design award. Generation 4 Liebherr crawler loaders provide exceptional han dling performance even in diffi cult terrain. Fast work cycles, an optimum bucket capacity and outstanding machine handling under load give them optimum operating properties. - Full Function Remote Controlled. Activate the double remote-controlled Power Functions motors for powerful, simultaneous driving and digging action – just like the real machine! -Includes the following Lego® Power Functions components: 2 large motor, 2 medium motor, a battery box, 2 remote controls and 2 infrared receivers -High Detail Kokpit. Operator Seat, Control Joysticks, Control Panel, Hand Brake, Fire extinguisher and Hot Coffee. -High Detail Exterior, Doors that can be opened and closed. To remove the battery box, the back hood can be easily opened. Illuminations, Grids,Stickers. -Total 1434 Parts -All Original Lego® Technic style design.
 -
Name : Justice Gundam. Pilot : Athrun Zala. Series : Mobile Suit Gundam Seed. Material : LEGO. Code name : ZGMF-X09A. Height : 21 inch. References : _Justice gundam : Real Grade _Freedom gundam : Master Grade 2.0. Full Video - see how all the gimmick and articulation work in real life , check this video : or see more in my album :Flickr : https://www.flickr.com/photos/134378223@N05/albums/72157674353592682MocPages : www.moc-pages.com/moc.php/435132 This mobile suit is build to fight support side by side with ZGMF-X10A Freedom Gundam : How the main unit of this set (Justice gundam) look like without action base : Beam saber from side skirt : Beam boomerang from shoulder armor : Fatum-00 : _The backpack unit, also is a mobile armor which can fight along with Justice automatically . I purposely build this unit to be a lego Technic set with 4 functions _2 "Beam cannons" can be turn up down : _Switch forward the level and rotate the upper gear to control the 2 "Turret machine guns" on both side of the Fatum. The machine gun has 2 part, 1 main gun on top and 2 support guns which is my addition and can move independently. _Switch back the level and rotate the upper gear to control 2 wings. I did this because i think it'd be more interesting to control both wings at once. _Rotate the other gear to extend the Fatum so there will be more space for the mobile suit can stand on it which you can see below. This is how the Fatum be attached on Justice's back : How it stands on the Fatum : This is the other way to attach the Fatum-00 : My other addiction is the mode which i call "Full thrust mode" . Using more 16 thruster to speed up : _4 on each legs. _1 on each side skirts. _2 on back skirt. _2 on each shoulder. *GUESS WHICH MOBILE SUIT'S ICONIC POSE STYLE ! *Bonus scene : *Remember to check the video above to see all the gimmic and articulation work ! or check my previous MOC : http://www.eurobricks.com/forum/index.php?/forums/topic/139168-moc-freedom-gundam-zgmf-x10a/
-
 Lego Technic takes to the sky! This is a model of a drone which I created. It features spinning propellers and a moving camera. Watch the video for more details: More soon! Enjoy! BrickbyBrick