Search the Community
Showing results for tags 'star wars'.
-
Today I started a new model. I'll build it mainly using light bluish grey Technic parts. Here's a first sketch to plan Bricklink order:
-
Update: Version 4.5 of the one that started in this thread http://www.eurobrick...pic=112171&st=0
-
 UCS Kintan Strider Speeder Bike As featured in the Book of Boba Fett • by Corey Schaaf | BrickWars.net It's been fun putting this build together. I've worked with so many different people on executing this project. From working with a manufacturer for a custom case, to my signature Printed UCS Plaques, the unique serialized tiles that's different for every build, to the UCS Stickers from a company in the UK - to the final print production of my Limited Edition UCS Instruction manual — I can just about call this one complete. Pieces: 2,285 + 2 Minifigs Weight: 71.5 oz | 4.7lbs Width: 57.6 cm | 22.7 in Length: 25.6 cm | 10.1 in Height: 24.8 cm | 9.7 in Estimated Part Costs: $375-$450 My manual is built in the same way my original UCS instruction manual for the Resistance Troop Transport ship was designed but in a much smaller print run. Only 150 copies of my manual will be available. Email subscribers will be notified when the pre-sale starts, so if you're interested, I would encourage you to visit https://BrickWars.net/moc-bw3001 and signup via the email link at the bottom of the page. You can find all the details and specifications on my website for this build at https://brickwars.net/moc-bw3001. If you have any questions, feel free to ask! You can also give me a follow me on https://www.instagram.com/brickwarsnet/ as well. New Video of MOC Just added
 -
Hello everyone! I would like to apologize if it is not allowed to show our lego’s collection… it is considered as spam may be? Sorry in this case. It includes MOCs (LDD0xx), MODs (xxxx+LDD0xx), Lepin figures ("-F" from "false")... from all the episode films (I-IX), with referenced names from Wookieepedia (https://starwars.fandom.com/wiki/Main_Page). This videos had already existed, but today they have been updated because of the Chistmas adquisitions. The LDD files are available if someone wants any of them, feel free to improve them. I hope you like it!
-
Hello again everyone Following on from my Snowspeeder post a few weeks back I realised I had neglected to build the Rebel Transport from Empire Strikes Back. So I decided to rectify that. There are no really tricky elements to this build. It does switch from 2 to 3 studs at the bottom using the new 2x3 jumper plates. This then allows the 5-stud wide main body to get the shape at the front. It is not as round at the front as it should be but you can’t always do everything in this scale and you have to approximate. It also uses the old finger hinge plates to attach the side “panels”. It would have needed a 1 plate high gap between the clip/hinge and the main body to use clips or the clicky hinges so sometimes old is better! Hope you like it Jon
-
Hi, i'm in the process of making a new MOC. It will be a mini assault on Hoth MOC, BUT with a kinetic walking AT-AT as centre-piece. I have parts to somewhat test the walking mechanism, but I don't have enough parts to build the whole MOC, so I can't acquire good footage and test it properly. I'm asking for someone with quite an impressive lego parts collection to build my moc, test it and take some photos and most importantly a video of it. Together we can improve it and eventually put it up on Rebrickable. Any other suggestions and/or improvements are ofcourse welcome as well. I will add a render of the current state of the MOC, just so you have an idea of the finished MOC. Thanks.
-
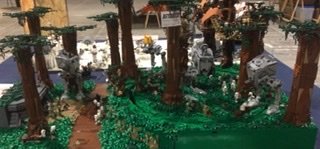
Nal Hutta was a hot, swampy planet located in the galaxy's Outer Rim Territories that was the homeworld of the Hutt species. The planet was a haven for the criminal elements of the galaxy. We can find here also Bounty Hunter Enclaves, such as this one here. My build to celebrate May 4th. This is my first Star Wars MOC, wanted to build something with my new Mandos. C&C welcome! Sorry for the background, I took them in my store.
-
And here lands my latest MOC ship: the Porax-42 Gunship. On-screen version: Porax-42c Gunship by Veynom, on Flickr Concept art version: Porax-42 Gunship by Veynom, on Flickr This gunship is based on The Mandalorian serie, and particularly episode 6 where it can been seen in a hangar at the end of the episode. It also appears among the concept arts. Note that the on-screen version is a bit different from the concept art, specifically the reactor pods front. Porax-42 Gunship by Veynom, on Flickr I decided to change the color code because I had a bit enough of the usual 50 shades of grey. I would have like trying a black and (dark) red color scheme but I lack the necessary curved slopes. Porax-42 Gunship by Veynom, on Flickr Porax-42 Gunship by Veynom, on Flickr The resulting ship is quite compact and relies on extensive use of SNOT. Porax-42 Gunship by Veynom, on Flickr Porax-42 Gunship by Veynom, on Flickr Hope you like it. Comments welcome.
-
When it was revealed that the third of the three new Star Wars helmets would be the TIE Fighter Pilot, I was puzzled. Against Boba Fett and the Stormtrooper, a TIE Fighter Pilot is hardly that iconic. Pictures looked pretty good, though, so I was left curious about this one. 75274 TIE Fighter Pilot Helmet | 2020 | 724 Pieces USD $60 | GBP 55 | EUR 60 (variable) | CAD 80 | AUS$ 90 ___________________________ This is one of four review topics for the Helmets Collection: an individual detailed build and review for Boba Fett, Stormtrooper, and TIE Fighter Pilot, and an overview review looking at the whole line including the packaging, all three together, value and the concept in general. These sets were kindly provided by LEGO but all opinions are my own. Now, let's dive into the TIE Fighter Pilot! __________________________ Bag 1 Bag 1 has quite a colourful assortment for an all-black helmet, some of the biggest individual pieces to be found in the set, and plenty of foundations for SNOT. The only semi-rare part is the blue 1 by 1 and 2/3 brick with two studs on the side in blue, and you get 14 in this set. The core of the helmet, like the Stormtrooper, is comprised of two semi-hollow levels. That keeps the beginning build moving quickly, and doesn't feel like it's cutting any corners since there's really no need for a fully solid interior. At the end of bag 1 we're left with lots and lots of studs ready for SNOTing, and a teensy bit of the top of the helmet. With Captain Rex for size comparison, you can see the model isn't going to be very big. Rex will continue with us for reference throughout as it takes shape. Bag 2 Somehow I missed taking a picture of the contents of bag 2, but it would've been a bunch of black. The build starts with the stand, which is slightly different from the Boba and Stormie stands because it has attachment points for the gas transfer tubes. It's reinforced through the centre with technic beams. The rest of bag 2 has you attach the core to the base and build the back of the helmet, which is mainly just a lot of plate stacking and not particularly interesting. The height of the model has now nearly doubled. Bag 3 Here we've got a lot of black and a few bright flashes. Some newish parts like triangular tiles, but nothing rare. The eye portion has clever direction changes using the new-ish bracket with four anti-studs on the side, and clips for angling. It turns out well. By the end of bag 3, those eyes are attached as are the tops of each side. Bag 4 Here we've got - surprise! - a lot more black, for the mouth-piece and one side. The mouth includes two of the four prints in the set: two 2x2 tiles with black lines. Almost all the different sorts of small wedge plates also make an appearance. The mouth build uses more interesting colours for no particular reason, and is attached using a dark red riot shield, which has turned into quite a versatile piece - I wonder if the part designer could've anticipated that when it was first created. The side of the helmet entails a lot more stacking with just a few direction changes. Bag 5 Bag 5 simply builds the mirrored other side of the helmet. Here's where it ends up: Bag 6 Bag 6 contains the parts to finish off the tubes, the top of the head, the plaque, and the insignia. The chin section is a fiddly little build with a bunch of small slopes and SNOT, but it comes together nicely. But there's nothing as tedious as threading 18 little train wheels onto a flex tube - twice! And with the Imperial emblems attached and a bit on top, we're done! Here are the leftovers, not much to speak of: Completed Model - Without Stickers This set only includes two stickers, to extend either side of the mouth. I wondered what it might look like without those stickers, since they're quite small and not necessarily easy to apply in an ideal position. Given that the model is so black, to me it looks completely fine without those stickers applied. It doesn't look like something is obviously missing. Completed Model - As Intended Now here it is "all stickered up". The helmet looks quite menacing, like it should, and since it's all black any blockiness or awkward stepping of the parts kind of blends together in your mind when you look at it. Here's the back, in case you're interested. While it's complete from all angles, there's nothing to see back here. The side profile is quite good, though, and shows the interesting interplay between studded and smooth surfaces. In my mind the contrast between the textures makes the studded areas read as fabric, which of course they aren't meant to be, but overall the balance is fine and doesn't look messy, which perhaps is a risk. The stepped bows leading to the tubes are a bit abrupt, and don't look great close up, but from a distance they look ok. Final Thoughts and Rating I opened by saying that on face value, a TIE Fighter Pilot helmet seems like an odd choice for an inaugural line of three Star Wars helmets. As far as subject matter goes, it feels like something that would turn up in a second or third lineup, not the first one. However, having now built it and looked at it for a while on my table from a distance, like one would with these display pieces, I have to say it's a really good choice for the medium and well done. The TIE helmet in universe has a great deal of different angles, all very smooth and rounded, which is obviously going to be hard to pull off in blocky, angular LEGO with lots of little pieces working together. But like I said, since it's all black and there's nowhere for light to go, all of those little bits meld together and look pretty seamless. The proportions aren't perfect, of course, but unless you hold up a picture of a movie still or real-life prop next to it, it looks right. And, above all, it looks cool. Parts: This rating is too subjective to give. If you like slopes, black, and/or SNOT parts, there's plenty here for you, but otherwise it doesn't feel like what I'd call a "good parts pack". Build: 8.5/10 - The majority of it is stacking stuff, and there are (necessarily) tedious sections. Also, while all new pieces each step are outlined in yellow, I found it somewhat hard to keep track of what was being added at times (though I do have a hard-wired tendency to ignore the piece callouts, but I'm not holding that against the set). Design: 9/10 - Besides the areas with the bows leading to the tubes, for which there must be a somewhat more elegant solution even at this scale, the overall design looks great. Overall: 8.75/10 - This model is good. The build isn't the most fun or instructive, but it does the job, and the completed model looks excellent. Plus, it has the most parts of the three, so value-wise it's up there. In my review of the complete series, I'll talk more about value, as well as if I think people want a TIE Fighter Pilot helmet model anyway. Looking at it on its own, I would certainly recommend it for anybody who likes the source material, or wants a cool and mean-looking all-black thing to display. Up next: the Stormtrooper helmet.
-
About 3 years ago, I made a Nebulon-b out of parts I had at my house, and really liked it. People were asking me for instructions to buy it, and I didnt have any. Now, three years later, I have finally gotten around to upgrading it and making instructions. With that being said, here is my new and improved Nebulon-b Escort Frigate:I built this with the main goal of making it movie accurate, sturdy, good for display, but most of all, CHEAP! All of the 1895 pieces will cost you about $190 to order through bricklink, which is less than many other mocs Ive seen that can be very expensive. This was very fun to build, and way better than my old model. Disclaimer: I have not built this version out of physical bricks, and am planning to buy it for myself once I gain enough money to buy the parts myself. The point is, the inside structure is almost identical to my old one, and it is sturdy. The stand will be enough to hold it up.I did not include an interior, but there is enough space in the main part under the antennas for two minifigs sitting down. It can easily be decorated if you are into interiors in your models.The ship looks good from all angels and has a little unfilled space which you can barely see. Here are the rest of the images: The moc is now For Sale at: https://rebrickable.com/mocs/MOC-41937/AWproductions/nebulon-b-escort-frigate/?inventory=1#info Here is the link to my old model that I built if anybody is interested: https://www.eurobricks.com/forum/index.php?/forums/topic/150019-moc-nebulon-b-escort-frigate/
-
This is my ATST MOC. It has 597 pieces, is in mini-figure scale, and has every detail I could Pack in at this scale. While designing this I aimed for two things: show as little studs as possible, and full movie accuracy. I haven't seen any other mocs that meet both my goals as well as this one and I am very happy with how it turned out. The build is sturdy and well built for playability. It also has movable joints that can be adjusted for different poses. The head can rotate AND turn, something that I haven't seen in any other mocs. The hatch opens, and it comes with a full interior as well:The part where the head connects to the legs is one of my favorite parts because it was a challenge to design:The legs were also interesting to build because having them skinny and still movie accurate was hard.And the neck joint was probably the hardest to figure out because i had to make it rotate and turn, like shown :Here is an image of the bottom and right side:It also comes with a stand to help support it. The stand can rotate and turn to adjust to any angle you might pose it in: Here is a picture of the prototype i built. I dont have all the pieces needed at home, so it looks a little rough. But, some people requested to see it so here it is! This MOC is for sale. You can buy the instructions on: https://rebrickable.com/mocs/MOC-41267/AWproductions/at-st-movie-accurate/?inventory=1#comments
-
Here we go, almost exactly 3 years after publishing about my Star Wars Medical Corps, I finally completed the capital ship that I envisioned to build. Better late than ever... Please discover below my DP20M Medical Frigate. For additional background and history, I invite you to read my original Star Wars Medical Corps topic. DP20M Medical Frigate by Veynom, on Flickr About the DP20M: The DP20M is an unarmed modified version of the famous DP20 Corellian Gunship. As often with vehicles and spacecrafts assigned to the medical units at the end of the Republic Galactic era and during the Empire, these were either 2nd-grade ships, either refurbished ships. The DP20M is no exception to the rule. The structure of the ship being sturdy and robust, it was common to find DP20 that could still travel around the galaxy but whose weaponry was damaged during combats. Some of these DP20 were then recycled into medical frigate by completely removing the weapon and extra shielding systems. The spared volume allowed for the installation of additional health support and medical equipment. DP20M Medical Frigate by Veynom, on Flickr DP20M Medical Frigate by Veynom, on Flickr DP20M Medical Frigate by Veynom, on Flickr The DP20M was designed to provide a small surgery room along with a bacta tank, a reanimation room, and a small hangar hosting a tiny speeder as well as a first-aid container. Here are the various modules: DP20M Medical Frigate by Veynom, on Flickr Playability: The cockpit can be opened and a pilot minifig easily fits inside, even with a large helmets DP20M Medical Frigate by Veynom, on Flickr DP20M Medical Frigate by Veynom, on Flickr The central section can host 2 medical beds with extra medical equipment around. DP20M Medical Frigate by Veynom, on Flickr DP20M Medical Frigate by Veynom, on Flickr DP20M Medical Frigate by Veynom, on Flickr The rear section contains 2 different modules: - the surgery room with a bacta tank DP20M Medical Frigate by Veynom, on Flickr DP20M Medical Frigate by Veynom, on Flickr DP20M Medical Frigate by Veynom, on Flickr Apparent studs allows for minifigs to be placed in several places inside the room. The bact tank can be opened to welcome a minifig. Several accessories are available to play around. - The small hangar can host a speeder and a first-aid medical container. DP20M Medical Frigate by Veynom, on Flickr DP20M Medical Frigate by Veynom, on Flickr There is also an extra stud to clip the speeder and a join ball to clip the container. Accessories can also be stored on the wall. The lateral panels open vertically and rotating bars are available to block them in open position. The manipulation is very easy and can be done blindly. The build is sturdy, easy to carry and fully swooshable. The Medical Corp is now complete: Star Wars Medical Corp by Veynom, on Flickr Star Wars Medical Corp - Play features by Veynom, on Flickr Technical details: 70 studs in length Initial idea inspired by the half cone panel from the Tantive IV set from 2009 3 years of time between the first idea and cockpit prototype and the completion of the ship. Once the technic backbone frame was drafted, the build went fast, starting from the rear until the cockpit. Lot of SNOT in many locations. The "good old piece of junk" aspect is emphasized through the extensive use of old "not so white anymore" bricks from the 70s and 80s. DP20 construction process by Veynom, on Flickr I hope you enjoyed it, comments are welcome
-
May the 4th be with you! The galaxy is a big place. Beings and cultures of every shape, size, and flavor exist everywhere you go! And while we've seen either too much of the politics of Star Wars (Ep. 2) or too little (Ep. 7), we've barely scratched the surface of seeing the ways various cultures manage to survive from day-to-day. We've seen moisture farmers, Cantina bar-tenders, blue krill farmers, Klatooinian grog makers, Kessel miners, coaxium refiners and many others. But there are so many other ways an economy thrives in the Star Wars universe! Show something we've already seen or come up with something new that fits within the Star Wars universe. There is only 1 category this year. But there will be 1st, 2nd, and 3rd place winners. We had some challenges getting Lego to sponsor prizes this year so they are a little smaller. There is a chance that the prize pool could increase so check back for updates! To enter you must build a MOC that shows economy happening within the Star Wars universe. Your build should showcase something that helps a group of people survive from day-to-day. This needs to involve more than just an average citizen at his 9-5 office job. Beyond that it's up to you! As always, if you have questions feel free to ask. Rules Only one entry is allowed per person. There is no maximum or minimum size limit. The contest will run from 4th May to 15th June, 2020. As long as it's still June 15th somewhere in the world, you can still enter. Entries posted after the deadline will be disqualified. This contest is open to all EB members, even if they joined EB after the contest has begun, with the exception of the Star Wars staff, who are not eligible to win prizes. All entries must be new creations, not posted anywhere else prior to being entered in the contest. You may be asked by a staff member to change your entry if it is too similar to an earlier creation. All entries must be built from real LEGO. No clone brands, no third-party custom parts. Digital entries will be allowed. All digital entries must use only existing pieces in existing colors. All entries must be posted as a new topic in the Watto’s Junkyard forum, the title prefixed by, "[Economy] - entry name". (For example, "[Economy] – Blue Milk Processing Plant".) Please place a link in this thread to your entry. That will ensure your entry is counted. You may do a 'full-blown photo edit' with all the text, effects, background compositing, support erasing, and other effects on one picture. All your other pictures may have no editing other than color adjustment or background removal for a solid-color background. For obvious reasons, any photo editing that changes the shape, functionality, or color (not tint or adjustment, but actual color) of a LEGO piece is prohibited. It is also prohibited to use the Lego logo in any picture. All entries are considered WIPs (Works In Progress) until the deadline passes. Until the deadline has passed, you are allowed to change and improve your MOC. The winners will be decided by EB members voting. Only EB members who were members before May 4th, 2020 will be allowed to vote. Prizes First place will win their pick of 75272 Sith TIE Fighter 75278 D-0 75269 Duel on Mustafar 2nd place picks from one of the remaining sets. And then 3rd place. The remaining set will be saved for a future contest. There will also be a raffle for 75267 Mandalorian Battle Pack. Anyone who doesn't win one of the top 3 places will be entered into the raffle:
-
I had actually built these over a year ago, but it just hit me today that I never posted them online. I was aiming to find a balance between something that's close to minifig scale, albeit without sacrificing detail and functionality. It was the advent of part 26047 Plate, Modified 1 x 1 Rounded with Handle that enabled me to build these so that the front legs can rotate inward when switching to the rolling mode. I have six completed droidekas that I decided to pose at different angles alongside a B1 and B2 battle droid for reference. I will provide a parts list and breakdown if requested.
-
Hello erveryone, After 13 Months of building I finally finished my A New Hope in Lego Series. I recreated more than 50 Scenes of our so beloved Star Wars movie from 1977. I hope you all enjoy my little photo series and I am happy to receive some feedback from you guys Next Project: "The Empire Strikes Back" in Lego. Follow me on Instagram to always see the latest parts of my upcoming series: https://www.instagram.com/codyaner_bricks/?hl=de A New Hope (1/6) by Codyaner_bricks, on Flickr A New Hope (2/6) by Codyaner_bricks, on Flickr A New Hope (3/6) by Codyaner_bricks, on Flickr A New Hope (4/6) by Codyaner_bricks, on Flickr A New Hope (5/6) by Codyaner_bricks, on Flickr A New Hope (6/6) by Codyaner_bricks, on Flickr Kind regards Codyaner
-
This is my MOC of the Separatist AAT from Star Wars: The Clone Wars. It features a moveable turret and seating for one battle droid.
-
A long, long time ago I started working on a micro scale Millennium Falcon. To begin with all I wanted to do was add detail to the Microfighter but I kept tinkering and before I knew it I had a growing collection of micro Star Wars freighters and fighters, and here they are! Instructions for all these little builds are on my Rebrickable page. Since this all started with that Falcon Microfighter the cockpit piece (a light blueish-grey 2x2 truncated cone) became my yardstick for scale. Luckily trans-black 1x1 slope pieces work as fighter cockpits at the same scale so all the ships are, and will continue to be, as close to scale with each other as I can manage, at least based on these pieces and whatever reference images I can gather from Google. My Blockade Runner (April 2021) is the last ship on my micro Star Wars to-do list, although it’s hardly micro! The size and weight were a new challenge for me, I’ve never had to worry about a moc falling apart under its own weight before, but I enjoyed the challenge and managed to make it pretty easy to pick strong. I’ve put together instructions for the Tantive IV as well as the Liberator from Star Wars Rebels, which I couldn’t resist building for myself. Rather than doing new posts for each new ship I’ll edit the very long post below. All the instructions are on my Rebrickable page and there are photos and Studio renders some photos of the ships in this post, plus a few more on Flickr and Instagram. Thanks for looking!
-
This is a very early TIE Fighter model, the TIE DReI. Seen here in the colours used by the infamous sith lord Bha-Ron the Red. (this is what happens when someone asks me what mix between a TIE Fighter and the Red Baron's Fokker Dr.I would look like)
-
Hello all - I'm new to this forum and this is my first post but thought I'd come here for some ideas. I recently finished my first 2 Star Wars mosaics and am absolutely in love with how they turned out: Boba Fett (see pic attached) Stormtrooper (pic too big to attach - link below) https://www.bricklink.com/v3/studio/design.page?idModel=15425 I was wondering if anybody had some other Star Wars Mosaic designs that I could build to pass the time during all this craziness. It would be very helpful if there were Studio/LDD files and/or part lists to make ordering parts and building easier . . . I'm not very creative but am GREAT at following instructions =) I found a great Darth Vader mosaic on BrickLink Studio but it's waaaaaaaaaaaaay too big (160 x 160): https://www.bricklink.com/v3/studio/public_gallery.page?idUser=370022 The Stormtrooper mosaic that I built was 96 x 96 and that's about as big as I'd want to go. My Boba Fett Mosaic is 48 x 48. Any ideas and designs would be greatly appreciated. Thanks so much in advance! Steve
.jpg.08ae923e4b3fc91d3d7a3cc7531002a3.jpg)
-
Hi! One year ago create this MOC. You can see working in https://www.flickr.com/photos/blackfalcon81/ Thanks!?
-
Here is a small reversible vignette made for a contest on BrickPirate. The concept is simple: DO a vignette and make its mirrored counterpart (a bit like Stranger Things). I have selected Anakin Skywalker becoming Darth Vader in a very classical way. Light side, dark side by Veynom, on Flickr Dark side, light side by Veynom, on Flickr A few highlights: Anakin becomes Darth Vader, that's the obvious central point; Clones become Stormtroopers, still a natural evolution. Trade Federation droids become rebels ... this is a daring evolution. Blue lasers become red, and vice-versa The light side is chasing droids in an evil environment but the dark side is hunting down rebels in a bright and white environment. In the end, which side will you go for ?
-
[MOC] [INSTRUCTIONS] – LAATi Republic Gunship – The Clone Wars
Chef posted a topic in LEGO Star Wars
********************************************************************** INSTRUCTIONS NOW AVAILABLE Given the number of techniques used from JBB_777’s design I have obtained his consent prior to making my instructions available (for a modest USD 10) 486 pages of detailed PDF instructions on Rebrickable ********************************************************************** It took the better part of the year but I present my rendition of a minfig scale LAATi Republic Gunship. It is based on the version from the The Clone Wars television series, which made a stronger impression on me than the one that appeared in Episode II AOTC. The TV show told the full story of the Clone Wars and the considerable extent of the gunship's deployment and impact in battle. I used both the studio model from AOTC and images from the show as reference materials to design this MOC. The MOC uses many of the building techniques seen in JBB_777’s 2017 gunship, which I liked very much, such as the Technic frame and the method to attach the wings to the body. The engine took inspiration from Caleb Ricks’ gunship from 2018. I designed this ship to be as accurate as I could to the source material. One main attribute of the ship I included but that is usually left out in other MOCs is the angled fuselage that widens from front to back. The stepped surface is a compromise to achieve this result given the choice of the internal supporting structure. Other MOCs based purely on the version from AOTC did not have to face this issue due to the omission of doors in the movie model, which left empty spaces on the ship’s lower body. My builds tend to be sturdy and this MOC is no different. However I made a little gaffe – the ship is slightly off balance. The engine and wings of the ship went through several redesigns and by the time I was satisfied with the look I did not realize how much additional parts and weight I had added. However the ships still sits fine on its own as long as no extra pressure is applied to the rear. Additional Facts: The MOC consists of 1917 parts and took 7 months to complete Measures 33cm long (excluding turret barrels) with 38cm wingspan Shares 50% of the parts with JBB_777's gunship The AT-RT from the final image is a moded version of one of JoeChu1980's AT-RTs Chef_LAATi_View1 by Chef Aslopert, on Flickr Chef_LAATi_View2 by Chef Aslopert, on Flickr Chef_LAATi_View3 by Chef Aslopert, on Flickr Chef_LAATi_View4 by Chef Aslopert, on Flickr Chef_LAATi_View5 by Chef Aslopert, on Flickr Chef_LAATi_View6 by Chef Aslopert, on Flickr Chef_LAATi_View7 by Chef Aslopert, on Flickr Chef_LAATi_View8 by Chef Aslopert, on Flickr Chef_LAATi_View9 by Chef Aslopert, on Flickr Chef_LAATi_Geonosis by Chef Aslopert, on Flickr Thanks for reading! -
In a decade of reviewing Star Wars sets this is first time I've reviewed one before the film was released. Still, it's a familiar ship! It remains to be seen whether the A-wing will play an important role in Episode IX: one assumes it will, for it to have been made into a set, but if the V-Wing is anything to go by, a blink-and-you-miss-it cameo is equally possible. The named pilot is a good sign. Note that this Sequel Trilogy A-Wing is a slightly different variety to the Original Trilogy version; we saw it briefly in action alongside the bombers in the opening battle of The Last Jedi. Set Information Set Number: 75248 Name: Resistance A-Wing Starfighter Parts: 269 Figures: 2 Release: 2019 Price: GB £24.99 | EUR 29.99 | US $29.99 | DKK 250 | AU $44.99 The Box I love the box artwork in this wave. Behind everything is a pattern of greebling in black, all made apparently from LEGO parts. It's really smart, and combines nicely with the yellow lines and minimalist STAR WARS logo. By the looks of the top-right overlooking figure, Kylo Ren gets his helmet back on for this film. The set fils the space nicely; in the background is a planet ... ... SPOILER ALERT! It's a foresty planet, if the box back is anything to go by. If you're a Star Wars fan reading this, it's likely you'll already have heard enough about the coming film to have learned - or to be able guess - the name of the planet, but I'll try not to spoil it for those who haven't. I look forward to finding out if the A-Wing actually goes there, and with both of these characters. In a one-person ship. Like its recent predecessors, this incarnation of the A-wing comes with spring-shooters, as the inset shows. It's a thumb-tab box, I'm afraid to say. Instructions The single booklet is clear and nicely-paced, with call-outs and sub-builds picked out against a plain light grey background. I didn't encounter any colour issues; I made a mistake at one point but that was likely due to not paying enough attention. The usual set inventory is to be found at the rear, as are advertisements for the other sets of the range and a plug for the Tt games Skywalker Saga game due to be released next year, which I'm looking forward to (and not just because it'll keep the kids occupied ). Sticker Sheet There are several decals, as expected, though I think fewer than on the last 'red' A-Wing, which as I recall had stickers on all the fins. Curiously, the stickers are applied asymmetrically, with two fewer decals on the port side of the ship. As is usual for A-Wings, you are required to mount two stickers over the curved surface of the cockpit canopy, which can be a pain to get straight. It is interesting that the Republic's Open Circle logo appears here. Parts The three modules contain a fairly typical array of parts: The only unique part I have found is the 4x4 tile with 4 studs appearing for the first time in Dark Green. I always seem to be short of white 2x4 wedge plates (particularly right-handed ones, for some reason) and 2x3 white tiles, but I can't see myself parting this set out anytime soon. Figures I think this is the first A-Wing to feature a named pilot. This fella has the delightfully American name Snap WexleyTM (I'm sure there'll be a Chip Jetson along sooner or later). You may or may not know the name, but it's likely you'll remember him from The Force Awakens - most likely in the context of 'Hey, it's that guy!' (that guy being Matt Parkman from Heroes). I'm delighted to see Lt. Connix appearing as a figure - appearing as she did prominently in The Last Jedi as the bridge officer who aided Poe Dameron's misguided mutiny - and being played of course by Carrie Fisher's daughter. Snap is identical to his earlier incarnation in the 75125 X-Wing Microfighter except for a different head which now has lines under the eyes. His jumpsuit was also sported by Poe Dameron in the 2015 orange and black 75102 X-Wing set. Lt. Connix's torso is unique. Her hair is - fittingly - Leia's, from 2009's superb 8038 Battle of Endor, but appearing for the first time in medium dark flesh; it has a hole for attaching a headpiece: Her head featured previously in Harry Potter and - I was surprised to find - in Sally Ride in the Women of NASA set. It is double-sided, shown here with the highly underrated Resistance Bomber set's crew. Build I have chosen not to document the entire build process, though you can some in-build pictures on my flickr album if it takes your fancy. Instead I've shown the part-disassembled set alongside its immediate predecessor, 75175, showing that the underlying construction is very similar. Essentially the ship is built around this cockpit piece with the wings attached to the sides, a blocked pinned onto the rear, and the engines stuck at and able to the block - though the attachment is a pin in the new set compared to clips in the earlier red version. As you can see, the spring-shooter mechanism is identical. Looking at the inverted slopes behind the shooter mechanisms you should also be able to see that the ship is a stud longer than its ancestor. Overall, the build is fun without being challenging. There's a little unavoidable repetition in the wings and engines, but each section is short enough for this not to be too tedious. The Complete Set Owners of earlier A-Wings will likely notice that this latest iteration has a sleeker outline than many of her ancestors, reflecting the change in design of the Sequel Trilogy A-Wings. In part this is achieved by the colour scheme and decals: the coloured section is six studs wide where it has previously always been four; also, I've already mentioned that the ship is a stud longer than the earlier version whilst being the same width. The wing shape is also a factor: the use of 2x4 wedges instead of 3x6 marks a sharper outline. I love the dark green. It is not new to the A-Wing fleet, having appeared in LEGO back in 2009's 7754 Home One, and I believe the original A-Wing concept art featured green ships which were changed to red due the problems with greenscreen filming techniques. It looks great here, especially with the smart black detailing. The black looks great on the wedge pulleys of the engines too. I've never been mad-keen on the 2x2 trans-yellow round bricks here, but at least there is internal consistency. I would be tempted to swap out the grey 9L axles for 8L black ones. Excepting 7754's green A-Wing with its marvellous removable engine, and the first-generation blocky one which I never owned, I think this is the first version not to use a triple-curved slope behind the cockpit. Instead there's a short device of curves and a slope. I don't know why this was chosen, but it does make the canopy slightly easier to open as you can get a fingernail under the rim: Notice how the decals on the green 1x4 tiles beside the cockpit perfectly continue the line of the 2x4 wedges in front . At the rear, the usual double-curved arrangement persists, though in this case centred with a round tile with one stud rather than the usual four round tiles . In this case, it is mounted via a 2x2 plate onto opposing 1x2-2x2 SNOT brackets, in what I think is a needlessly overcomplicated technique. There is room in the bricks underneath this to place a SNOT bracket lower down, and therefore mount the rear contraption flush to the body rather than proud as it does here. The 75175 version demonstrates this perfectly. You can also see here how the engines are mounted via Technic pins rather than the clips on 75175. This version is sturdier if a little fiddly to put together. The underside is quite smart. The landing gear folds away nicely. You can see again the rear curved thing and its slightly awkward attachment, a side effect of which is the inverted SNOT bracket sitting proud. The instructions indicate mounting the little crank pins onto the landing gear with the 'toes' facing towards the centre of the ship, somewhat counter-intuitively. The nose gear is also mounted higher, giving the ship a nose-down attitude when landed, at least with the gear fully extended, as instructed. I prefer to extend the legs to a slant, as in the lower picture, which goes to alleviate the nose-down slant a little: Note also the absence of stickers on the port side, except on the tails. Maybe the designer only had access to one view of the ship and didn't want to get it wrong? You can see the effect the lander position has on the sitting position in this comparison: One thing I'm not so sure about is the effect of the two 1x2 dark green curve slopes in front of the cockpit; they stick up a little too far, which is very apparent in this view. In case you were wondering, the black 2x4 wedge plates on the sides are intended to represent openings, I think for proton torpedoes or suchlike. The gold bullion apparently stashed behind the protruding green curved slopes is part of the design, as we shall see shortly. As we look inside the cockpit, admire again the continuation of the line of the 2x4 wedges onto the decal behind. In the inset you can see how it doesn't quite match up to the canopy, which has a 1 in 3 slope rather than 1 in 4, but it leaves only a tiny gap. Meanwhile, of course, poor old Snap has to pilot his ship with ... NOTHING! Not even a lever?? Look carefully behind the cockpit at the green and white rear panel: you can see how it sits on two white 2x2 cutaway corner plates, which marry up with the same parts on the body behind. It looks like this should be removable for a play feature, or storage, but alone of all the A-wings this set does NOT have a feature behind the cockpit. There is plenty of room however to store the blasters in the cockpit itself, safe in the knowledge that they can rattle around without interfering with the flight controls. Below is the only reference image I could find (a metal model from here): Assuming this representation is movie-accurate, I think the LEGO version has done a pretty good job. The set has captured the narrower outline of the sequel-trilogy RZ-2 variant, and the outward flare of the wings from the sleeker nose to the outboard weapons. Speaking of these, having seen this I do wonder whether the 2016 Rebels version's chunkier blasters are a better match than the slender offerings in the new set. No official LEGO A-Wing has attempted to make the nose a flat slope, rather than curved; simplicity of build quite reasonably wins over accuracy here. It is interesting that in this model the engine fins slant outwards rather than inwards at the top. The blue RZ-2 A-wing from TLJ had fins slanting inwards. They are supposed to be adjustable, I guess. The shape of the LEGO fins is not correct, being double-stepped as they are. This part has been in seven sets, four of which are A-wings, and it is likely the part was designed for the A-wing: strange therefore that the shape is awry. Comparison Here is the new set compared without stickers to 2017's OT version, 75175: The new set's narrower nose is obvious, and works better as the gradient of the double-curved wedge slopes matches the wedge plates underneath. I've already pointed out that 75248 is a stud longer than her elder sister; note also here that the cockpit canopy is also mounted a stud further to the rear. I think I prefer the trans-clear canopy, too. See here for a side-on comparison, or here from the rear. Here's all the greenies together: 2016's 75150, 75248, and 2009's 7754. It may look otherwise from the picture, but bar the outboard weapons all three of these sets are the same width: 14 studs across the beam. And finally, here's all my A-wings together. Of all of them, 2013's 75003 (top right) is the only one to attempt the notch at the front of the ship in bricks (it's too wide); and it's the only one to get the shape of the fins right. The stickers help, but even so I think the new set looks great and fares well to the comparison. Conclusion I'd delighted with this latest A-Wing. It's a lovely-looking ship, and the first brick representation of the newer RZ-2 variant from the Sequel movies. It feels like part of the family alongside the two most recent 'slanty fin' sets, and I think the three together would make a nice shelf display (If I can find the stickers sheets for the other two). Appearance 9 Sleek and attractive, and a good likeness of the model (as far as we know!). Like all LEGO A-Wings, it suffers for the curved nose; the wing shape isn't quite right, thought perhaps better than most of the earlier sets. Playability 7 Swooshable, and with retractable landing gear and an opening cockpit (and obligatory spring shooters), but there aren't the ancillary vehicles which come with some other A-Wings, and no behind-cockpit storage here. Figures 9 The inclusion of two named characters for a low-priced set is welcome; though they may not be front-line characters, this will most likely make them rarer and all the more cherished. I'm delighted that Lt. Connix has a minifigure at last. Parts 7 Not a particularly remarkable collection of parts, though dark green is always welcome. Build 7 Very much average difficulty, and without any particularly new or interesting techniques, but the process is enjoyable. It's a very similar build to 75175. Value 10 At £25 it seems very good value for money (I got on sale for £20). For a little over half the RRP of 75175, you get a similar-sized ship, losing out only on a service vehicle and a generic figure. My verdict 9/10 Excellent value and a good looking set: a must-buy. Let's hope the ship features prominently in the film! Hope you enjoyed the review. Rufus
-
Hey everybody, I'm new to the community but I've been MOC designing for sometime now and I have finished my massive project. I've been working on it for just under two years, The ISD II The Eviscerator. It sits on a single removable stand measuring at 148 studs long with 19,225 pieces. I really wanted to capture that "It doesn't look like Lego" feel and try to give it a studio model vibe. One of my goals for this build was to have only one stand that the model sits on securely. This was an incredible challenge due to the size and weight of the model. In fact, it's what took the most time to develop through out the build. Overall, I'm satisfied with how the model turned out. This is more accurately representing an ISD II Destroyer. I tried to pay attention to every detail I could, based on a couple of star destroyer sources. It's a very modular build making it easier to assemble and disassemble. There is no interior in this model. Just pure structural integrity throughout the entire inside. Just the frame and stand are 6,000+ pieces, but this was my goal. Create as accurate of model as I could, displayed on one removable stand, and not having to limit detail because of weight and size. Anyways, enough rambling: You can view the rest of the photos here: Flickr Album Now here is some great news. If you want to build one yourself, you can! I have made instructions for this build that are available at https://www.brickvault.toys/products/imperial-star-destroyer
-
Hello everyone! This is my first submission to showcase one of my first MOCs I ever worked on a few years ago of the HWK-290, The Moldy Crow, from the video game series Dark Forces / Jedi Knight. I noticed that another user has recently posted their own MOC, @millenniumf and has done a fantastic job with theirs. Some aspects of their creation have me itching to revisit this design and make some modifications. You can find their MOC of the Moldy Crow here. My model is pulled straight from the design of someone named Suboken, that can be seen here on previous 2015 EuroBricks post. More images of his Moldy Crow MOC can be found here on Flickr. My version was a little modified on the outside appearance. I chose to go with a dark tan instead of dark orange as the pieces were much more accessible in that color. I modified the exterior with small panels to make it look quite a bit more rough instead of the smooth exterior of the original design. I also made the model a bit more functional by adding a few features. I hollowed out the tops for some small storage room. Then I installed a slide-out panel from the side that holds several tools / accessories for our heroes. And on the opposite side I installed a launcher that pops out. None of these things are from the actual ship... I just wanted something a bit more unique and detailed and fun. I hope you all enjoy my MOC! Would love some constructive criticism and suggestions. Sorry the images aren't exactly the best - just taken with a mobile phone camera. But hopefully this gives you an idea of what I've created. I am considering fixing the angled windows on the sides. I first was thinking to use stickers but had NO IDEA how to do that. One of the worst features of my version is the windows are boxy haha. ENJOY! My custom Kyle Katarn minifig I purchased from here at Firestar Toys. My custom MOC Weegee droid from the video game, Dark Forces II: Jedi Knight. Belonged to Kyle's father, Morgan Katarn.


.thumb.JPG.a6e449e5685f8b389fadcf907e1be99b.JPG)


.thumb.jpg.bd14ef2f37e611c480e62af863c5c389.jpg)