Search the Community
Showing results for tags 'ww2'.
-
 Finally finished my latest project, a Sdkfz 251/1 ausf.D in scale 1/10. History of the Sdkfz. 251 After the MK V tank, I wanted to do something different and the 'Hanomag' is just this. The suspension is made with torsion bars and works as it should. The MOC is powered by 2 x XL motors & steering is done with 1 x M motor with a clutch & an Sbrick module. I wanted to integrate the lock-steering system but I simply didn't have the room to get all things integrated, maybe this is something for the future. stickers are being made & maybe there will be a PAK-40 soon behind this, still thinking about it. Dimensions:51cm x 18cm x 20.5cm Weight: 2.5kg Total brick count: about 2.000. Leave a comment if you want. my Flickr page for more pictures on my projects & completed MOC's
 -
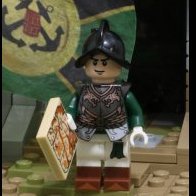
A Band of Brothers by Nicholas Goodman, on Flickr A super simple build but with the new military section I thought I would post it
-
Here is a WW2 1942 build inspired by Call of Duty 2's Stalingrad Missions Repairing the Wire by Nicholas Goodman, on Flickr Repairing the Wire by Nicholas Goodman, on Flickr
-
Features: 2 x 8mm MG 4 x 20mm Cannon Canopy slides back to open Throttle lever Cockpit accepts a minifig pilot Naviagation lamps (red, green, white) Retractable landing gear National insignia built in bricks; no stickers used Camouflage painting applied on all sides using bricks Engine can be separated for inspection
-
Hi all, The model is Messerschmitt Bf109, the most numerous German fighter in WW2, if not the most famous. I designed it from scratch and did not take features from other creators' work. I spent about 7 years designing and financing this project, and I finally finished it last year. Thanks to the work-from-home policy I don't have to drive as much, and I have more free time to share my creations with the world. You will see that some parts are in the new bluish grey while some parts are in the old grey. There are different patterns of 1x2 jumpers. A few parts even show cracks. This is the testament to the time spent to build this up, so I decided not to replace them with new parts in perfect condition. The 1x2x3 train door pieces and the 1x1 round plate with tow ball don't come in the new light bluish gray anyway. The building technique I used to make the aerodynamic fuselage is similar to the 3D wooden puzzle made out of interlocking thin boards. You can see the vertical and horizontal layers coming together to form a pixelated curvature. The width of the fuselage starts in 4 studs and reduces to 3 studs, then 2 studs, squeezing all the way to 1 stud. The internal connection is achieved with technic pieces, locking hinges and clips. I use it a LOT in my models because it allows you to add complicated painting schemes to the surface while maintaining the correct form and structural integrity. Notice that I still try to use as much slope/wedge/curved pieces as possible. Features: - 2 x 20mm cannons mounted on wings - 2 x 8mm MG on top of the engine (represented by a pair of black 1x4 hinge pieces) - 20mm cannon mounted coaxial with the propeller axle - Ammunition stowage (accepts any 1x2 tile as ammo belt) - Skeleton canopy opens/closes like the real thing - Cockpit has enough space to accept a pilot wearing an aviator helmet and a life jacket (new small type) - Throttle lever tilts back and forth - Instrument panel represented by 2 hollow studs in black - Service doors on wings - Landing gear retracts completely into the wings (VERY sturdy as well!) - Tail gear may be steered - Navigation lamps. (red, green, white) It's an homage to the tradition of Lego's airport sets that always had navigation lamps on the commercial airliners. - Engine cowl opens for inspection; exhaust pipes and ignition system visible - Behind the engine you can see the turbocharger intake and a hole for the hand crank - Fuel tank cap can be opened - Both wings may be detached for towing on road - Fuselage separates into 4 major components (to swap/combine painting schemes easily) - National insignia is made out of bricks; no stickers used. Designed to be visible from all sides. - A jettisonable fuel tank may be attached to the bottom I have posted a video on YouTube so that you can see the moving parts: Pictures: (The wings may look very fragile because they are hanging on the 1x2 locking hinge pieces, but there's another pair of clips inside the fuselage that connect to the top side of the wings. The wings are actually so strong that you can lift the whole thing by the tip of a wing. Details explained in the video.)
-
Hi all, This is a German jet fighter in WW2. Features: - 4 x 30mm cannon barrels visible on the nose - National insignia made in bricks; no stickers used - Canopy opens backwards - Accepts a minifig pilot - Retractable landing gear - Navigation lamps (red, green, white) - Fuselage can be broken into 2 parts - A transparent support is required when the gears are extended because the tail is heavier than the nose. In the real fighter the nose would be way heavier because of the cannons and the engines, but my model is all ABS plastic so the weight difference cannot be put into practice.
-
Hi all, It's a Soviet light bomber used in WW2. You will see the building technique similar to that applied in my last model, Bf109E. Enjoy! Features: - 2 x 23mm cannons on wings - 2 x 7.62mm MG on wings - 1 x 12.7mm Berezin defensive MG (can be aimed freely) - 6 x 100kg bombs (4 carried inside the wings, 2 mounted below) - 8 x 82mm anti-tank rockets (laser shooter bricks) - Cockpit accepts 2 minifigs - Throttle lever tilts back and forth - Landing gear retracts completely into the wings (VERY sturdy as well!) - Navigation lamps. (red, green, white) It's an homage to the tradition of Lego's airport sets that always had navigation lamps on the commercial airliners. - Engine may be separated for repair - Intake and exhaust slits for the radiator and oil cooler - National insignia is made out of bricks; no stickers used. Designed to be visible from all sides. - All white winter camouflage - Retractable skis for landing/takeoff on deep snow (optional) I have posted a video on YouTube so that you can see the moving parts:
-
Breakdown in North Afrika 1942 Breakdown in North Afrika 1942 by Nicholas Goodman, on Flickr Breakdown in North Afrika 1942 by Nicholas Goodman, on Flickr Breakdown in North Afrika 1942 by Nicholas Goodman, on Flickr
-
A Marine squad cautiously moves through the jungles of Guadalcanal, towards the newly captured Henderson Field 1942. March to the Airfield, Guadalcanal 1942 by Nicholas Goodman, on Flickr March to the Airfield, Guadalcanal 1942 by Nicholas Goodman, on Flickr
-
Here is a Messerschmitt bf109 directly inspired from a real model from WW2. All bricks are genuine Lego. Messerschmitt Bf109 G-6 by Veynom, on Flickr Messerschmitt Bf109 G-6 by Veynom, on Flickr This is a G-6 sub-version as piloted by Gruppenkommandeur Friedrich-Karl "Nasen" Müller". Nasen was a nightfighter pilot who survived the war with over 30 confirmed victories. My model depicts his G-6 from Summer 1944. Here is below a comparison between a real drawing from his fighter and my creation. Btw, the G version was nicknamed Gustav. You may detect 2 differences between the above pictures and the below ones ... answer at the end. Messerschmitt Bf109 G-6 by Veynom, on Flickr I had to make hard choices for the color section but ultimately, I decided to use LBG, DBG, dark green (I would have preferred a dark dark green) and black for the underside. Messerschmitt Bf 109G-6/As by Veynom, on Flickr Decals are custom and come from AIMS for 1/32 scale models, except for the propeller nose where I cut some Lego sticker sheet. Messerschmitt Bf 109G-6/As by Veynom, on Flickr Here are a few shots from the field: Messerschmitt Bf 109G-6 by Veynom, on Flickr Messerschmitt Bf 109G-6 by Veynom, on Flickr Messerschmitt Bf 109G-6 by Veynom, on Flickr Messerschmitt Bf 109G-6 by Veynom, on Flickr Messerschmitt Bf 109G-6 by Veynom, on Flickr I had started with the idea of an all black bf109 but as I could not get the corresponding decals for the exact marking, I progressively moved to this camo version. Doing nice camo with bricks remains a challenge, particularly dependant on available colors and shape. But I've hope for the future as TLC just released a part matching perfectly the bf109 nose ... About the 2 differences: The G version has no support for the rear wings ... I had incorrectly mounted 2 antennas like in the E version (Emil). In my final version, I made the canopy longer by 1 stud. The top bars are therefore 5-stud long (from cut hoses), instead of 4. It better match the pictures. The comparative picture still have the 4-stud long canopy. Hope you like it ...
-
Behind the barbarian name of Sd.Kfz. 250 mit 5cm PAK 38 hides a very rare variant of a WW2 German half-track. Sd.Kfz. 250 mit 5cm PAK38 by Veynom, on Flickr While the standard version was designed for troop transport, there were many variants fulfilling many purposes, just like its longer cousin the Sd.Kfz. 251. Sd.Kfz. 250 mit 5cm PAK38 by Veynom, on Flickr This model represents a 5-cm anti-tank gun (PAK) mounted on a modified Sd.Kfz. 250. It includes the side storage boxes and has a longer frame on the rear to provide more space to the gun servants. Sd.Kfz. 250 mit 5cm PAK38 by Veynom, on Flickr This variant was seen in Yugoslavia in at least 2 different models. One of them is exhibited at the war museum of Belgrade. It is unfortunately not in good condition with many missing components. Sd.Kfz. 250 mit 5cm PAK38 by Veynom, on Flickr I've decided to apply a winter color scheme, which was done by hastily splash covering the vehicle with some white color easy to remove. This explain why the grey is still visible at the bottom of the vehicle. This type of color scheme is likely to match a German unit fighting in Yugoslavia during the first months of 1945. Sd.Kfz. 250 mit 5cm PAK38 by Veynom, on Flickr My model is loosely based on the old 2014 BrickMania version. It is however recolored, rebuilt, detailed, and globally improved as the kit was rather old and no more matching today's standards. I think my version is a bit better. Decals come from my stash of old 1/35 scale models: license plates, black cross, red numbers. The front engine service door sticker is an official lego sticker, or rather, this is the cut-around of an official sticker. It had the right shape and color (LBG). This is a first try for me but I like the results. I will reuse this trick when I need to add more panel hatches or so. Minifigs are mixing multiple sources, from custom to official. Say "Hi!" to Dengar when you recognize his head. Sd.Kfz. 250 mit 5cm PAK38 by Veynom, on Flickr For fans that read until the end: Sd. Kfz. = Sonderkraftfahrzeug (special purpose véhiclel)This page gives many details about this specific Sd.Kfz. 250 variant.
-
A project that was sitting since too long on my bench: a German "Natter" on its launch ramp. The Bachem Ba 349 Natter (Viper) is a rocket-powered interceptor developed by Germany from late 1944. It is a rather small aircraft measuring 6m by 4m, built mostly from wood except for the armored cockpit. It was launched vertically from a ramp designed to be basic. Armement of 24 rockets was installed in the nose and designed to target allied bombers. The Natter never entered into operational services. Its first piloted flight ended tragically with the dead of the test pilot and crash of the prototype aircraft. No allied airplane was ever shot down by a Natter. However, at the end of WW2, allies showed a lot of interested into German late-war technologies and attempts to grab and study everything they could. Ultimately, the Natter generated more"what-if" stories during the post-war years than any result in the airs. Because the Natter was never deployed on large scale, I only put simple markings on it: 2 Balkenkreutz (black cross) and simple technical writings next to the cockpit hood; but no swastika on the tail. View from the sky, with the rockets in the nose. Quite a nice and unusual view for airplanes. I also quickly assembled a small trailer to transport equipment. Based on official models, of course. When taking black and white photos, it almost look like photos form back-then. I really enjoy them. As an amusing coincidence, only a couple of days before finalising the layout, I stumbled across the picture below depicting a very similar scenery: the Natter on the light launching ramp made of wood. But this photo shows american soldiers analysing the place before taking a Natter away. Small game: Can you identify the non-LEGO element of this MOC ? There are some but in very limited quantity. (click below to reveal the hidden content and discover the details) If you like this MOC, I would appreciate you to also like this Instagram post. By doing so, you would boost my participation to an online contest https://www.instagram.com/p/DMsQpPxowGA/?utm_source=ig_web_copy_link Thank you! As a conclusion: I truly enjoyed building this MOC. While the aircraft itself sat on my bench for 6 months before I finally completed the layout, I quite like the end result. The trees are nice as well. And the layout is not too fragile. No glue was used. :)
-
Gentlemen i designed an accurate french adrian helmet modèle 1935 modified for armor crew (my eyes were bleeding seeing the traditional plane pilote genuine lego helmet with glasses on all the amazing WW2 tanks pictures). I needed a french tank to fit my crew inside. I confess, i was on ALI EXPRESS and find a nice R35. it looks good, but it was a huge mistake, so painfull to build( but minifigs stickers was good). But i am a little proud of what it renders with my accurate equipped crew. TADAH..... Equipage r35 by LA BRIQUE DE CAMBRONNE, sur Flickr the adrian helmet mle 1935 modified Equipage r35 by LA BRIQUE DE CAMBRONNE, sur Flickr have a nice day.
-
Minifig scale replica of one of the first flying wing aircraft powered by jet engines constructed in 1945. It is modeled after the V3 of the aircraft, the only version of the aircraft that still exists today (on display at the Smithsonian). The MOC features fully retractable landing gear and a dual colour scheme. The biggest challenge was trying to get all the angles and shapes as true to the original as possible because there isn't that much source material out there on the web. The original pilot would have worn a pressure suit but sadly Lego hasn't released one of that kind yet so I used the next best thing I could find. If you're interested in getting the instructions for this moc feel free to contact me at brickster.creations@gmail.com Lego Horten HO 229 by legomanijak, on Flickr Lego Horten HO 229 by legomanijak, on Flickr Lego Horten HO 229 by legomanijak, on Flickr Lego Horten HO 229 by legomanijak, on Flickr Lego Horten HO 229 by legomanijak, on Flickr Lego Horten HO 229 by legomanijak, on Flickr
-
Here's my first tank build, the classic American M4 Sherman, I built it a while back but never posted it here so here it is... Yeah, I know I got bad lighting in the photos... Just Lego pieces, no customs The back looks okay, I never decided on a variant, in retrospect, I probably should have. The other side, the whole build is built with 1 stud = 1 foot, so there is no interior but thanks for taking a look :)
-
Moving Through Halfaya Pass, April 1941 Moving through Halfaya Pass, April 1941 by Nicholas Goodman, on Flickr Moving through Halfaya Pass, April 1941 by Nicholas Goodman, on Flickr Moving through Halfaya Pass, April 1941 by Nicholas Goodman, on Flickr
-
The Sienar Technologies board of directors did not really appreciate that Rothana Heavy Engineering - one of their direct competitors - started selling the Katyoucha variant of their TX-225 tank to the Empire. (see the full article from 3 years ago here). Clearly, by proposing a relatively cheap rocket-launcher, Rothana would start grinding some of Sienar's market shares. But Sienar did not waste time before reacting and quickly started their own project of a rocket-launcher for the Imperial Army. In order to remain competitive from the pricing side, Sienar took two important decision. First, the new design should reuse as many existing components as possible. This first decision quickly make Sienar look toward their TIE families and existing designs. The second decision was to use the same model of rockets as Rothana. This would allow the Empire not to change their ammunition supply chain and permit in theory to quickly swap the Rothana TX-225 Katyoucha by the future design from Sienar. The project resulted in a fast prototype delivery and the TIE-Calliope was released. It was based on the existing TIE-Crawler which was already in use inside the Imperial Army but on tope of the existing Crawler a rocket launcher was mounted. But Sienar did not mount any small rocket launcher. They designed a rocket launcher that could carry no less than 50 rockets! And the TIE-Calliope could fire these one by one, in salvo, or even all of them within a handful of seconds. Useless to that the the impact of such firepower on any target was devastating. On top of that, the noise produced by the rockets during their flight generated a frightening feeling on the receiver's end. Thanks to this impressive solution, Sienar could even develop a great commercial argument: the ratio between the firepower and the deployed man on the field is way above whatever any competitor can offer (and almost 10x higher than the Katyoucha ratio). Indeed, the TIE-Calliope is equipped with 50 rockets, 2 blaster canons, and one turbolaser canon while only requiring a single pilot. On the other side, the TX-225 Katyoucha is only equipped with 16 rockets and 4 medium blaster canons and requires 3 crewmen to operate. Definitively, Sienar knows how to market their products. TIE-Calliope by Veynom, on Flickr But enough of the historical speech and let's discover the beast: TIE-Calliope by Veynom, on Flickr TIE-Calliope by Veynom, on Flickr TIE-Calliope by Veynom, on Flickr TIE-Calliope by Veynom, on Flickr Both of them together: TIE-Calliope & TX-225 Katyoucha by Veynom, on Flickr Naturally, before creating the Calliope variant, I had first to build a TIE-Crawler. Here it is, without its launcher. TIE-Crawler by Veynom, on Flickr You can see the 2x3 plates inside the track module panels. They were intended to receive the rocket launcher. In the final version, these plates were moved backwards. After all, when moc-ing, it is all about doing and undoing, isn't it? TIE-Crawler by Veynom, on Flickr TIE-Crawler by Veynom, on Flickr For those of you following our Desert Wars project, the TIE-Calliope will replace the Katyoucha as of June 24. Have a thought for the poor Katyoucha. Katyusha! by Veynom, on Flickr Please note that neither the TIE-Calliope, neither the TX-225 Katyoucha appear in any Star Wars material. They are both designs I created, aiming to propose ideas that could exist in the Star Wars universe. And while the old TX-225 Katyoucha was based on a soviet rocket launcher truck from WW2, the TIE-Calliope is based on a M4 Sherman tank variant. In the end, it is quite common to derive Star Wars designs from WW2 materials. Comments welcome, hope you liked it. PS: in the end, the Imperial Army selected the AT-AT from Kuat to mass equip their forces. Sienar and Rothana only received minor orders.
-
 Supporting the Resistance, Western France 1944 Supporting the Resistance, Western France 1944 by Nicholas Goodman, on Flickr Supporting the Resistance, Western France 1944 by Nicholas Goodman, on Flickr Supporting the Resistance, Western France 1944 by Nicholas Goodman, on Flickr Supporting the Resistance, Western France 1944 by Nicholas Goodman, on Flickr Supporting the Resistance, Western France 1944 by Nicholas Goodman, on Flickr Supporting the Resistance, Western France 1944 by Nicholas Goodman, on Flickr
 -
 Hi there everybody! It's been a while since I posted anything here, but allow me to present my latest Project: A small scale Tiger II tank! Years ago when I got first into World of Tanks Blitz, the Tiger II was my favorite tank. I still play it sometimes, so I decided to build it. My goal for this Tank was simple: To get all the functions big RC tanks have in a small scale tank model, and still make it look good. - RC driving (powering the front drive sprocket) - RC turret rotation - RC gun elevation/depression - Suspension system to replicate the torsion bar suspension From the beginning it was clear that this would not be possible using LEGO electronics due to the size constraints. I used a CADA Battery box, 2x M motor (drive) and 2x Micro motor (Turret+Gun) to power the tank. The rest of the Tank can be built with 100% LEGO with some minor color changes, especially on the insides to save money. Building istructions are on Rebrickable I hope you like my little gray cat and am looking forward to your comments Gray Gear
 -
Down the Net, Saipan June 1944 Down the Net, Saipan June 1944 by Nicholas Goodman, on Flickr Down the Net, Saipan June 1944 by Nicholas Goodman, on Flickr Down the Net, Saipan June 1944 by Nicholas Goodman, on Flickr Down the Net, Saipan June 1944 by Nicholas Goodman, on Flickr Down the Net, Saipan June 1944 by Nicholas Goodman, on Flickr Down the Net, Saipan June 1944 by Nicholas Goodman, on Flickr Down the Net, Saipan June 1944 by Nicholas Goodman, on Flickr
-
Sturmgeschütz III Ausf. G by Veynom, on Flickr Behind the strange name of Sturmgeschütz III Ausf. G (also shortened into "StuG III"), we can find one of the most successful German armored vehicle of WW2. Initially designed as mobile and armored artillery support for infantry, the StuG III quickly revealed itself as a very effective tank destroyer. In fact, it was so successful that it became the most produced German fully-tracked vehicle of WW2, and the 2nd most produced armored vehicle (just behind the Sdkfz 251 half track). Sturmgeschütz III Ausf. G by Veynom, on Flickr So, why manufacturing a tank destroyer when you already have the best tanks around (Panzer IV, Panther, Tiger)? The answer is quite simple: cost. The StuG III was cheaper and easier to produce than all other more modern German tanks. Still, it could carry the devastating 7.5cm anti-tank gun. Moreover, it offered easy maintenance when on the field. Thanks to that, more than 11,300 units were built (all versions included). This number is to be compared with the number of built Panthers (6,000), Tiger I (1,500), or even with the total number of armored vehicles built on the Panzer IV chassis (8,500). Sturmgeschütz III Ausf. G by Veynom, on Flickr The Stug III's low profile made it hard to spot and target, as the above picture can illustrate. Sturmgeschütz III Ausf. G by Veynom, on Flickr The side armored plates are named "Schürzen" and offer additional protection. The Ausf. G version is characterized by the wider superstructure, and the rotating cupola with periscopes. My model depicts an early-to-mid production model. late-production models have a sloped and rounded gun mantlet and a machine gun on top of the structure. Sturmgeschütz III Ausf. G by Veynom, on Flickr Another characteristic of the StuG III is its capacity to store and carry a lot of equipment behind the superstructure. This was often used to carry spare parts (tracks & wheels), food, water, gas, and ammunition (ok not when in the front line). Sturmgeschütz III Ausf. G by Veynom, on Flickr For the build, my model is freely inspired by those from Brickmania (BKM), Custom-Bricks (CB), and other MOCs from the Internet. The minifig and crate stickers are from BKM. The tracks and tanks stickers are from CB. All of my olive green tiles were used for the camo. That was a challenge: it had to look realistic and yet, the model had to hold together. Enjoy!
-
Another go with a WW2 action scene. Here is a small vignette showcasing a German Nebelwerfer in action, probably on the East front. Nebelwerfer 41 in action by Veynom, on Flickr Nebelwerfer 41 in action by Veynom, on Flickr The model is mostly based on the BrickMania design, except for the wheels and ammunitions. The Nebelwerfer - literally "smoke launcher" - was originally designed as a rocket launcher with a name purposely chosen to deceive its true nature. Rocket researches in Germany started during the 1920s and were fruitful in the late 30s. The "Nebelwerfer" name was used to go around the restrictions from the Versailles treaty preventing Germany to develop and produce weapons. In reality, the Nebelwerfer could launch smoke, of course, but also combat gas and highly explosive rockets. It was used during the entire WW2 conflict on all fronts. As I do not like to simply "copy" an existing model, I also built a light blueish grey version which has a different undercarriage and mounting system. The undercarriage is based on a modified plate 2x2 with pins while the mounting system relies on a technic connector. It allows for larger and more realistic wheels and a lighter mounting system. Nebelwerfer 41 by Veynom, on Flickr Here, the rear view of both Nebelwerfers shows you the loaded one firing its first rocket (left) and one without any ammunition in it (right). Nebelwerfer 41 by Veynom, on Flickr Hope you like these. I have been contemplating to build a white-ish version representing the winter paint job used on the East front as well but I lack the necessary bricks. And I have no winter soldier as well. ;)
-
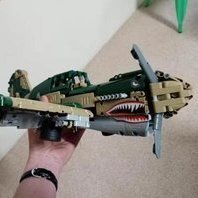 Dear all, I'd like to show a MOC I finished last month: the Curtiss P-40E Tomahawk in the colours of the Flying Tigers in China. Tiger_11_wheelup by Roel Cruijff, on Flickr As you can see it's in dark green and khaki; colours which aren't readily available in LEGO sets. I had to order these bricks from CADA and wherever I could find them, so I hope I am not violating any rules there since these bricks are not from LEGO. Still, I don't regret it as my 'original' colour-vomit set made from mostly 42039 pieces just didn't have the right look to it: spareparts by Roel Cruijff, on Flickr It started innocent enough, with me making the front cowl and canopy... but you know the feeling, once you are that far it becomes a life mission and needs to be finished. halfway by Roel Cruijff, on Flickr At first the canopy could open, but I had to let that idea go when the controls were added. canopy by Roel Cruijff, on Flickr Really happy with the dihedral there. I used some black 15-length liftarms, which I have not been able to take out and switch to light grey. dihedral1 by Roel Cruijff, on Flickr Once the model was fairly complete, I ordered the various green and khaki parts, and came up with this: Blank_08_topview by Roel Cruijff, on Flickr Blank_03_sideview by Roel Cruijff, on Flickr Blank_05_bottomview by Roel Cruijff, on Flickr The flaps fell off right after I took this photo, so I fortified them since. They are controlled with a level in the cockpit, but I like the way they slope in down position: Blank_07_frontview by Roel Cruijff, on Flickr The flight surfaces are controllable by a small joystick behind the cockpit. It was very hard fitting the mechanisms in there, and I am afraid to take it apart for a picture as it'll be a challenge to put it back again. Tiger_12_controls by Roel Cruijff, on Flickr I am most proud of the landing gear retraction system. As you may know, the gears of a P-40 retract one after the other, so I always wanted to make it fully manual operation. Here below you can see how it works. You turn the small black cog to drive the linear actuator. this will push the gear axle back and forwards. A fixed cog at the base drives the wheel axle, and the 90 degree turn becomes a 90 degree twist, making the wheels fold neatly under the wings: Blank_13_wheelhalf by Roel Cruijff, on Flickr Blank_12_wheelturn by Roel Cruijff, on Flickr Here is the mechanism in case you'd like to try it: https://www.mediafire.com/file/fqgxwfmazzuclv0/Gear_retracting_mech.io/file The decals are simply laminated colour prints stuck with double sided tape. Works like a charm. Hope you like it and that it may inspire more WW2 aviation models!
 -
The images for my model are too large to put here, so here's a link to them on Bricksafe This model is a 1:25 scale replica of a ship that served in Czechoslovakia and Germany in WWII. While in Czeckoslovakian service it was named Presedent Masarysk, named after their first presedent. It was a river monitor that was the leader of their brown water flotilla. It was launched in 1932 and in 1936 when Czechoslovakia was annexed by Germany was transferred over to their navy and renamed Bechelaren. It mostly did escorting on the Danube river, however it partook in the German counter-offensive on Budapest in 1944. In 1945 the ship was turned over to the allies, whom disarmed it then gave it back to the newly reformed Czechoslovakia in 1947. It was used as a working platform until it was scrapped in 1978. The model, if built out of actual lego would be exactly 2 METERS long. Despite minifigure scale normally being either 1:32 or 1:45 I've personally found that I prefer 1:25 scale for minifigs. Also it was originally a typo that I didn't catch until I had already finished the model. I made it so that you can remove everything on the deck and take the hull apart by bulkhead. I had to get creative with the interior since I couldn't find anything about it other than how many bulkheads it had. I also kept finding conflicting numbers as to how many crew it had, so I put in as many beds as the largest of the numbers I came across. (43) If you'd like to build the model you can buy the instructions here: https://rebrickable.com/mocs/MOC-81516/Legodudelol9a/bechelaren-presedent-masarysk-river-monitor/#details
-
Operation Stalemate II, September 1944 Marines of the 1st Division attempt to reach the sea wall under heavy enemy fire following an amphibious landing on the Island of Peleliu. Operation Stalemate II, September 1944 by Nicholas Goodman, on Flickr Operation Stalemate II, September 1944 by Nicholas Goodman, on Flickr Operation Stalemate II, September 1944 by Nicholas Goodman, on Flickr Operation Stalemate II, September 1944 by Nicholas Goodman, on Flickr Operation Stalemate II, September 1944 by Nicholas Goodman, on Flickr Operation Stalemate II, September 1944 by Nicholas Goodman, on Flickr