Search the Community
Showing results for tags 'pirate'.
-
INTRODUCTION There's always room for you If you wanna be my friend We are, we are on the cruise! We are! It's been around since 1997 but this year is the first time Lego has delved into the world of One Piece. Beginning as a serialized manga before production began on the anime, Netflix picked up the long-running show in 2023 to produce a live action version. Season 2 of the live action adaptation airs next year in 2026. That made 2025 the perfect time for Lego to team up and create the first wave of One Piece sets. This is my 5th and final review of this theme. You can read my review of the Going Merry, the Windmill Village Hut, Buggy's Circus Tent and Battle at Arlong Park respectively. Chronologically, this set covers the 5th an 6th episodes of the 8 episode season 1. But what would One Piece be without a crazy amount of back-story episodes! So let's go back in time before the battle at Arlong Park and see what makes the Baratie so special. SET INFORMATION Number: 75640 Title: The Baratie Floating Restaurant Theme: One Piece Released: 2025 Part Count: 3402 Box Dimensions: 52 x 47.5 x 12 cm Weight: 4680g Set Price (RRP): £269.99/$329.99/€299.99 Price per Part: 7.9p/9.7c/8.8c Links: Brickset, Bricklink THE BOX AND WHAT'S INSIDE The box is massive as benefits a set of this size. Meant to be more of an Icons style display piece, the box forgoes the colorful background and opts for a classy black instead. Inside the box no space there is no empty space. It is jam packed with bricks. We get 2 packages for the instruction books and stickers. And we get 2 sticker sheets. The stickers are used sparingly, but for a set this size I wish we had gotten prints instead. THE BUILD Unfortunately, first impressions on this build are not the best. The build starts with the fish's mouth at the front of the ship. And just a couple bags in the unsightly injection points are plentiful. But perhaps even more jarring is the color variance of the 1x4 modified plates. Most have the standard hue, but a few are more peachy. Can you spot the 3 off-colored pieces here? The unsightly injection mold points continue all through the set. It's barely noticeable on some pieces, but on colors like reddish brown it's an awful eyesore. Those flaws aside, the build was fantastic from start to finish. The front of the mouth is built up with a wide variety of pieces to give it both a rounded shape and secure connection points. Shaping for the fish head is achieved by using newer curved pieces. Other curves are made using a new, shorter version of a classic curved brick. The tan is what's in the set, the grey is what existed before. The end result is a very close replica of the front of the Baratie. Moving on to the rest of the floating restaurant we build the grand staircase allowing guests to descend to the dinning area. This is done by stacking 1x5 technic plates, 1x4 rounded plates, and tiles and wedge plates. The result looks excellent. Put together, the sections start to take on the shape of the Baratie. To get the shape of the ship, large panels are built for the right and left sides and then attached using clips. This is a common technique in sets these days, but the way the Baratie uses the curved bricks to get a perfectly flush connection is impressive. The left panel is connected using this unique method. And the right panel is connected using clips. Only half-way through the bags but already the set is too big for my light-box! Next I have to show an oddity I've never noticed in Lego pieces before. As I was finishing the right panel I noticed an odd gap between these brown L-tiles. So I did some testing. The top row are the tiles included in the Baratie set. The bottom four rows are pieces from my collection. You can see that the black and gray have no noticeable gap. However, even my older browns have a little more of a gap. Rotate the pieces and the gap disappears from the newer brown L-tiles. So I put the tiles back, rotated this time and you can see that a new gap is there. And here's back at the original state. These are very odd variances in piece sizes. Has anyone else had this problem? Rounding off my list of complaints, here are some more injection mold marks extra noticeable on the pearl gold pieces. And here are 2 of the stickers used to make a lantern. My fingerprints mar the overall affect and I question if it was really necessary to use stickers at all for this part. The lanterns hang belong the railing and above the main door. The back of the model is doll-house style with lots of space to place figures. The curved seats allow 3 minifigures to be seated comfortably. The orange seats are built on turn tables and can therefore move though they aren't intended to. The kitchen is well furnished with food and equipment, though it's very tight and hard to place minifigures. Getting Luffy into his Chore-Boy position at the sink took many tries! Leading out of the kitchen is a back door. If you're a starving pirate this is where you enter so that Sanji can feed you. Zeff's office has a transponder snail and some other pirate paraphernalia. Inside the cabinet is a pearly pink jar. If this is a reference to something I don't know what! The upper levels house treasure. This has nothing to do with the show, live action or anime. But it's a nice way to fill the space. The top part can come off to allow access underneath, but it's not really needed. In front of the main door is a weathered platform to recreate Mihawk and Zoro's fight. I like the weathered look, but having those gaps filled with plates would have been better. It's hard to pose more than a couple figures on the platform since the gaps in the tiles don't allow the figures to pivot at all. The splat gear turns to two round jumper plates allowing to figures to sword fight each other. This is a brilliant idea. However, with the sword in Zoro's mouth and the size of Mihawk's blade, Yoru, it means if you fight with them their blades are always knocking against the mermaid statues. The platform should have been at least 1 stud longer. Speaking of swords. Mihawk's blade is an amazing new element. It has a stud on one side of the handle to allow it to stick to the neck bracket on Mihawk for easy carrying. And Zoro's third blade, which he holds with his moth is also a new element. It can be held by a hand, but the plastic is soft and mine got damaged by putting in a hand. I really wish they would have made a neck-bracket with a clip to hold any sword. But I guess the sword wouldn't have been as close to Zoro's mouth then. Much like the Going Merry, the Baratie tries to use forced perspective to get both a display model and a playset in one. However, where the Going Merry does it well, the Baratie fails in many aspects. The front of the Going Merry is mostly minifigure scale and moving back it becomes more and more micro. The Baratie jumps between two scales more sporadically. The micro door between the fish's mouth and the main door is micro scale, but it's a jarring contrast between the two minifigure scale parts. The outside balcony in front of the ship's sign are minifigure scale, but the sign itself is micro scale. It's tricky to balance the scales like that and the Baratie doesn't quite make it. Put the Going Merry up next to the Baratie and the scale doesn't work either. The Baratie should be much bigger in size comparison. The sections that are minifigure scale are great, it's the micro scale that doesn't seem to fit. THE MINIFIGURES There are a total of 10 charaters included in this set. First off we have the main crew of the Straw-Hat Pirates. Zoro, Nami, Luffy, Usopp and Sanji. They all have alternate faces and pieces created specifically for One Piece. They other five are Zeff, the owner of the Baratie; Garp, a navy Vice Admiral and Luff's grandpa; Helmeppo and Kody, Navy cadets; and Mihawk, one of the 7 warlords. All fit the context of the Baratie episodes well. I'm glad we got some Navy members. Though I wish they would have left off the Cadet badge from the two cadets. We can't re-create some of Luffy's battles against the navy yet! Missing from the line up is Patisserie Patty. His inclusion would have made the line-up perfect. Zeff uses a new beard piece and in a new color. It's called Ochre on Bricklink. Here you can see how it compares to some other Lego yellow hair colors. Some have been unhappy with the choice of a cowboy hat for Mihawk. So I tried switch it out for the musketeer one. The feather looks really good, but the hat isn't quite right. It also doesn't allow for his sword to attach behind as the brim rests too low. What Mihawk needs is a cowboy hat with a feather hole, but that would have been a new mold. Of the two, I think the cowboy hat is a good choice. I also changed Garp's hair as the spiked hair didn't seem to represent him well. If Lego made the piece I used in light gray it would have been perfect. Here's the modified Mihawk in his coffin shaped boat. Holding his sword he looks impressive, but a little too much like Barabossa for my taste. OVERALL As far as being the largest set in this wave I think the Baratie could have done a little better with the Straw Hat crew. Across all 5 sets we get 5 different versions of Luffy. The Baratie version is on the right. He's only technically exclusive due to the specific match up of hat and face print. But if you've bought the other sets you already have this Luffy. I like that they gave him his classic red vest, but an option would have been to have a different outfit for the Baratie or at least a unique face print. Zoro gets a total of 3 versions. The Baratie version on the right again is exactly the same as the Buggy set. Another missed opportunity to include something special. Nami gets 4 versions. The only unique version is from the Arlong Park set. Again, I love that they focused on her classic outfit. But the Baratie was a chance to include something new. Usopp gets 3 versions with the Baratie version the same as the Going Merry, just without the slingshot. Sanji gets the short end of the stick with only 2 versions. And here, the Baratie gives us a unique outfit that's totally in character and a great addition. I would have loved a face print with hearts for eyes though. The chase gimmick for the One Piece sets are the Wanted Posters. The Baratie comes with 5 random 2x3 tiles. I got 2 Gold Rogers, 2 Kuros, and 1 Don Krieg. Across all 5 sets I got 2 Kuros, 4 Buggys, 2 Don Kriegs, 2 Alvidas, 2 Arlongs, and 2 Gold Rogers. That means I'm still missing Luffy and Mihawk. Almost 600 euros worth of sets and I still don't have a full set. I appreciate the idea of chasing after the posters. But I think Lego needs to do a better job. Either ensure each set has 0 duplicates giving someone better odds at getting a full set or they need to include all 8 in the Baratie. SCORE How do I rate this set? DESIGN 8 This is a decent display piece and playset. Though it succeeds better as a playset. It tries to balance scales and doesn't quite reach the mark. BUILDING EXPERIENCE 10 This was thoroughly fun to build. There are many great techniques and it never felt repetitive. FEATURES 9 There are so many places to put figures, there are a great number of treasures scattered around the ship, and a huge selection of food and food prep pieces. That gives you a lot of ways to display the set. There is also the great fighting feature though the platform needs to be just a little bigger. If there was better space to place minifgures and a larger platform this would be a 10. PLAYABILITY 10 The Baratie really shines when it comes to play. Storytelling is easy. And sword fights are fun if you use shorter swords. PARTS 9 There is a great variety of pieces in this set. The color choice is okay, but the constant switching from red to brown doesn't quite do it for me. I don't know what they could have changed, but I feel like some of the colors should have been different. VALUE FOR MONEY 9 You get a great number of parts for the price. However, I feel like we needed at least one member of the Baratie's staff to help Sanji and Zeff. Even if you had to trade out Helmeppo to get him. Also, the distribution of the Wanted Posters needed to be better. FINAL SCORE: 9 As the flagship set of the first One Piece wave the Baratie had a lot to live up to. And it gets close. It's a great model with fantastic techniques. The figure selection, while not unique enough for this set, is decent. If you're a fan of One Piece I would say this set is worth getting. It's already been on sale on Amazon so you might get lucky and find a good deal for Christmas. However, if you're looking for the best bang-for-your-buck the Going Merry is a far better choice. Both sets have the full Straw Hat crew. And the extra figures in the Baratie are nice, but little things like the wrong hair for Garp and the "Cadet" printed on Helmeppo and Koby's uniforms lower the overall appeal. And now, to wrap up our story. Luffy and his crew discovered an island and now face it's lone inhabitant... Hey, you're interrupting our meal! I am the spirit of Gol D. Roger! Who disturbs my rest? You're not Roger, just who are you? Alright, you got me. I just like my privacy and that usually scares people off. Geez, don't scare us like that! Yeah, it's not very nice of you. Trust me, you don't want to mess with our captain. And why's that? I'm going to become King of the Pirates! Har har har! I wish you luck boy. May you have better luck finding Gol D. Roger's treasure than I have of looking like him! And so Luffy and his crew sailed off to find the One Piece!
-
This is a collaboration between me and @Legostone . We present: The Inferno! Soon after 71391 Bowser Airship was released, I collected enough medium nougat coloured hull pieces to build a ship. Initially my intention was to build a replica of the famous Inferno, as seen in the move The Goonies. However, upon closer inspection of the reference material, we eventually decided to deviate and add some more interesting features. David came over to my place for a Ship Building Weekend, we had done one of those before, resulting in the creation of the Revenant. This is what we started from, on a Friday evening: (I typically collect potential useful parts in the hull of a WIP ship, that's just my process ) And this is what we had at the end of the weekend. Needless to say, we had been quite productive. One might even call this speed-building. From there on I continued on my own to finish this beauty. Though we continued to discuss solutions via whatsapp. I had never built a ship with a sprit topmast before, for a more classic galleon rig. It's more tricky than a modern bowsprit, meant for jibs, but I think it works. Some things we didn't like about the Goonies' Inferno are: the not so glorious stern (we wanted galleries!), the odd position of the main mast and the lack of fire power (Our ship now runs a compliment of 18 12-pounder guns on a dedicated gun deck and we left some room on the upper deck for additional 3 pounder guns, though I've only placed two near the capstan. The colour scheme is one I am very happy with, On top of the medium nougat hull sit the walls, which are made out of (old) dark grey. It more brownish tone, compared to the newer Bluish Grey, works great on a "wooden" ship. David and I had collected just enough rust-coloured gunport flaps, before Bricklink decided that Rust is not an official colour . To be fair it's not that different from regular red but still, regular red might have been too bright to play nice with the rest of this particular colour palette. Above the main gun deck, we have a splendid marriage of dark orange and dark red, continuing all the way up to the beakhead. On top of the stern medium nougat makes a return. I find that the reuse of the hull colour elsewhere on the ship often works well to bring some balance in the colour scheme. Pearl gold serves as decorations, ornamenting the prow and stern. I've taken some pictures before I added the sails, as it is often easier to see more of the ship itself that way. The deck is made entirely of dark tan. I personally find that reddish brown is easily overused so I've tried to limit it for little details on deck only. I had these printed tiles from the Snow White set, which goes well on the binnacle. Concerning the helm, a ship like this really isn't supposed to have a steering wheel. A whipstaff would have been more appropriate There is no interior, on a fully rigged ship it doesn't make much sense investing time in details into an interior that can never be accessed anyway. I'm very happy with these grates, I had these built already for another ship but it just felt right to use them on this one. (It's going to hurt collecting more reddish brown fences, they're quite expensive ) I think medium nougat would work well for the masts, instead of the current tan. Unfortunately I only considered that when the standing rigging had already been applied. Captain William B. Pordobel, can't forget about him. And that concludes our business, let me know if you like it. David and I are already discussing a new ship to build on another ship-building weekend .
-
Fortuna is back! - Completely rebuilt for Series 6 of the Bricklink Designer Program! Better, stronger, more detailed, more sophisticated, more polished! Fortuna is a fast sailing frigate designed as a Privateer. As a true frigate, Fortuna is equipped with 20 cannons and 2 swivel guns. With your help, Fortuna can become a limited release set! Please vote for her on BrickLink once voting opens: https://www.bricklink.com/v3/designer-program/series-6/2056/Privateer-Frigate-Fortuna Please have a look at the video to see the working capstan in action: I am honored to present this lovely frigate on the Eurobricks Pirate MOC Forum first. After all, my journey into Lego sailing ships started on this very forum back in 2009! Please do take a moment to vote for Fortuna on Bricklink once voting opens: https://www.bricklink.com/v3/designer-program/series-6/2056/Privateer-Frigate-Fortuna
-
This model was originally inspired by three sets: 3817 (Flying Dutchman) from the Spongebob Squarepants theme, set 4184 (The Black Pearl) from Pirates of the Caribbean, and 21322 (Pirates of Barracuda Bay), from Ideas. It features three and a 1/2 masts with what are going to be fabric sails of Black Pearl size but of 2010 Imperial Flagship markings. The 2016 Ninjago "Skybound" flag (see below) will fly from the middle mast as Captain Henry Walker's pirate flag. The ship also has a crows nest and two removable sections: a rear upper deck for access to the captain's cabin and a forward deck panel for getting at the front four cannons. (there are eight cannons total on the ship) Here is the rear of the ship featuring the captain's cabin windows and a trio of lanterns. The ship's name, the Inferno, goes in printed 1 x 1 tiles on the exposed gray studs on the rear of the ship. The rowboat sits on a section of deck that easily comes off for access to the cannons. The roof of the captain's cabin is removable, with a table and chair for Captain Walker to sit at and read maps. Captain Henry Walker (in green) and his crew. The pirate flag of the Captain Walker. (This picture was taken from Bricklink's catalog and is NOT mine. It's from the 2016 Ninjago Skybound wave.) NOTES: I'm working on getting this built in real life, since my last ship is so unreasonably expensive to build in real life it's ridiculous. (Thus this one is better, as it less expensive / parts intensive) I'm gonna need help on the sails, so I'm asking @Alazon, would you mind helping me with these please? They would be in Black Pearl sizes, but in 2010 imperial flagship style colors? Comments, questions, and complaints are always welcome!
-
This strange, pixelated-looking ship has sailed the digital seas and plundered many a helpless Minecraft village. Life was good for it's three man crew, but a chance encounter with a User Exit Portal (think like TRON) sent the pirate ship Inferno into the real world, albeit still in it's 8-bit form. Now, stuck in an unfamiliar world with strange logic, (Round surfaces? What is this deviltry!?!) the crew of the Inferno with it's Captain will have to navigate a way back to their computer paradise from the modern Pacific Ocean using 18th-century techniques. You may have noticed that some parts are missing decorations, including the cubed skeleton heads at the rear of the ship and the black pirate emblems on the sails. Also missing is the four dark bluish gray connectors between the masts and ship base. (two pieces per mast) I have removed the flick-fire missile / cannons as designed in set 21152, as I detest those parts. Let's just say the cannon's are just too small to see at this scale. The ship breaks into three parts for storage, and comes with a plank for walking people into a watery grave that slides left and right. (It is located in the middle section.) The ship also breaks up for use on the skull island part I did not use from the original set, as the ship can look like it's wrecked there. Does this sound familiar? It should, as the Pirates of Barracuda Bay (set 21332) uses the same principle about one year later! If you don't believe me, check out this Brickset link to the set, under more images. It will show you the alternate way to display the set. This is the Captain of the ship, One-Eyed Willy. He also does doctoring and is good at it. (most of the time) This is the first mate / cook, a mister Barbarossa. (this is from before the Black Pearl caught his eye and he deserts Willy to join a certain Captain Sparrows' crew.) ...and then we have the gunner / navigator, Long John Silver. (His navigating is what get's Willy trapped in a cave where the some children find the Inferno 200 years later. As for Mr. Silver, he slips away before the battle starts in a rowboat to the shore.) NOTE: the last three pictures (the figure ones) are taken from Bricklink! Any questions or comments? I plan on building this very soon, as I can't afford the big pirate set coming out April 1st, so this will have to do...
-
Hello to community, below a small digital MOD / MOC, a redesign of the classic pirates set 6267 Lagoon Lock-Up from 1991. I'm also a bit in the barracuda bay hype, while waiting for the set I played a bit around with the pirates theme and also photoshop. ;-) Maybe you like the redesign. 6267 Lagoon Lock-Up Revisited by legolux1973, on Flickr Edit: I also created building instructions for the MOC, you can download them (PDF File, for free, no registration) at the Webpage of my local RLUG under the below URL: http://afol.lu/afol52/filebase/index.php?file/51-6267-lagoon-lock-up-revisited/ If you like the MOC and/or the Instructions I would be really happy if you would vote for my LEGO Ideas Project Queen Elizabeth II at the LEGO Ideas Website: https://bit.ly/legoqueenelizabeth I would really appreciate. :-) Happy Building. :-) Stay safe and healthy, legolux1973
-
 After 113 years of development (that's right, before the release of lego), I present to you a MOC which could possibly revolutionize the lego industry as we know it. Prepare to be blinded by my all-powerful, Barracuda of the BLACK SEAS! 2050315ebbb0fc5011dce3acad2ab0db by The Neighborhood Merchant, on Flickr As you can see, this is truly a breath-taking MOC. Now don't faint just yet, because I have to run you through the one of the kind play-features I included in this ingenious build. 8806820d6bb259bcf7f982af89de36f8 by The Neighborhood Merchant, on Flickr Let's start with the rowboat. "Simplicity" must be the first word that strikes your mind when seeing, but alas, if you look closely you will notice a string. That's correct, but that isn't any string, it's A CORD and I used a truly spectacular method of creating a knot only the greatest minds of this generation would begin to comprehend. ee554e016dd55577db957e4f44cd6230 by The Neighborhood Merchant, on Flickr Enough blabbering. Here's our next piece. Yes, it's a rudder, but perhaps the first-ever moving rudder presented to us by an intellectual (me of course). To create this ingenious design, I used a clip and attached it to some handles. It may seem simple to the weak-minded, but this practice took around 1,500 minutes to master. 2583388e83eb4c6ef2b71d9b6a80c82d by The Neighborhood Merchant, on Flickr Next, we have a fully functioning Captain's room. After 1.3 years of thought, (after achieving transcendence) I was able to imagine the perfect layout for this room, a treasure chest, a goblet, and a map. These are all necessities that we all have in our rooms so I figured a pirate captain would have them. Quite a long shot, but we all have to take a chance once in a while. 9ab5e0a6e5c4c38c78c25f4952f923cb by The Neighborhood Merchant, on Flickr Yes, the windows open as well. Take another second to bask in the glory of this MOC, take your time please as many before you have fallen trying to take this all in. Also, sorry, I've had a copyright on these play features for around 20 minutes now so if you use these play features ever, your MOC will be considered mine for all of eternity. c4bcefd74242df9d26c70c1da9223b9f by The Neighborhood Merchant, on Flickr Next, we have a custom flag I've created. Yes, I know, it's not official Lego, but I've spent around 15,000 hours and had to create an app called photoshop to make this intricate of a design. 13cb150028cfae413370599dccff8180 by The Neighborhood Merchant, on Flickr Back to play-features. I've also included a board that can be used to recreate the Gollum scene from LotR. Quite ingenious to include it on a pirate moc if you ask me. 358c2a9e43df0ba6667d8a75c71e91ee by The Neighborhood Merchant, on Flickr Second to last, I have to introduce these sails I also custom designed. Took around 1.3 Trillion seconds, but that was the easy part. The difficulty was in getting lego to custom make a new rigging piece for me, because I couldn't keep tying those "truly spectacular method of creating a knot only the greatest minds of this generation would begin to comprehend" knots all day. 2a1b43b71130ee6545b384dbf1bfae2a by The Neighborhood Merchant, on Flickr And lastly, the greatest piece: the figurehead. This may look like a normal minifigure to you, but I assure you it was created using the most prestigious tactics. I traveled in space to NASA's Jupiter Juno Probe to infiltrate and "borrow" it's minifigures (I suggest you look it up if you haven't already), then proceeded to melt them down to craft this figurehead mold. Shhhh don't tell NASA! So what'd you think? I hope it wasn't too much for you to enter another dark age, but please, contact me anytime if you'd like to become an apprentice. Stay tuned for the following other MOCs I have planned within the next few millennia: -Red Beard's Rummer -Skull Eye's Stalker -Caribbean Clifford -King Anne's Avenge -The Plastic Pearl -Armada Ship of Flags -Loud Mary and most importantly -The Imperial Bankbreaker Happy Aprils Fools Day everyone! Honestly, I had a blast making this, and I think I went just a little bit overboard. Hope you enjoyed and stay safe, my friends! Take care and here's to another year of goofy times!
 -
I originally made this ship on stud.io over a year ago and recently finished building her. She has 16 guns in total and has taken inspiration from both imperial flag ships and La Grenouille from moc your bricks on youtube (who I defiantly recommend you check out) HMS Citadel by Harry Berning, on Flickr HMS Citadel with imperial flag ship by Harry Berning, on Flickr HMS Citadel by Harry Berning, on Flickr HMS Citadel by Harry Berning, on Flickr HMS Citadel by Harry Berning, on Flickr HMS Citadel by Harry Berning, on Flickr HMS Citadel by Harry Berning, on Flickr Stud.io render HMS Citadel render by Harry Berning, on Flickr Sorry for the poor background I hope it wasn't to distracting I will be displaying her along side other ships at the reading brick show If you have any questions feel free to ask below
-
Pirate Lord Dreadwind by Mohamed Marei, on Flickr "Prepare for the plundering of yer lifetime, ye wee scallywags!" <Additional Photo> This is sort of a wrap up of a WIP that I had started 4 years prior, when I set out to build a crazy pirate skeleton dude incorporating this head design3. However, I never managed to finish that design and had to put this on the backburner indefinitely. And here we are, a whole four years (and an entire LEGO collection rebuilt from scratch) later. Hope you guys enjoy it and I look forward to showcasing some more MOCs on here! It's been years since I posted something here XD
-
The USS Florida Gator is a ship inspired by my Alma Mater. I have been hanging out here for a little while, but this is my first post and I would love some feedback. It was challenging trying to fit everything that I wanted with the narrow hull design, but I got creative. The captain's quarters is based on the BSB. 3 guns under the deck, as well as an armory/treasury, and a galley. Captain's quarters lifts out to reveal the brig. Several prisoners have been taken along their journey: Chief Osceola (FSU mascot), Davy (Tennessee mascot), UGA (Georgia mascot), and Mike the Tiger (LSU mascot). I'm also not sure how to include multiple pictures, so I'll have to fill subsequent posts. 20190917_144720 by Sean Williams, on Flickr 20190917_144730.5 by Sean Williams, on Flickr 20190913_113208.5 by Sean Williams, on Flickr Tennessee Volunteer walking the plank prior to ship extensions being outiftted 20190913_113159.5 by Sean Williams, on Flickr Bowsprit 20190913_113257.5 by Sean Williams, on Flickr Poop Deck 20190913_121717.5 by Sean Williams, on Flickr Small window at the bottom allows a little light into the brig 20190913_121615.5 by Sean Williams, on Flickr Captain Spurrier in his quarters 20190913_121631.5 by Sean Williams, on Flickr 20190913_121138.5 by Sean Williams, on Flickr Brig beneath the captain's quarters 20190913_121151.5 by Sean Williams, on Flickr 20190917_144050.5 by Sean Williams, on Flickr Below decks 20190917_144011.5 by Sean Williams, on Flickr In the galley cooking up LSU Tiger stew
-
A merchant ship is smashed against a rock. The survivors (two soldiers and a sailor) find themselves hanging onto a part of the deck. They manage to find some empty barrels and spars and a small sail, and use them to create a raft. Afterwards they spend a long time drifting, and trying to sail in the direction of civilization.
-
Boreas's Haul Hi everyone! Long time viewer, but I just joined recently. Thought I'd share one of my first ships I've made with you guys and get some input from the masters ! I've always felt bad to know that poor little merchant guy (he deserves a name) was on his same tiny little merchant ship for a whole 27 years, so I decided to build him his own regal trading fleet. Even though his little plastic face still shows the same expression, I know deep down his smile is a little wider now. Anyhow, here are some some pictures of the ship: IMG_2779 by Neighborhood Merchant, on Flickr IMG_2799 by Neighborhood Merchant, on Flickr IMG_2805 by Neighborhood Merchant, on Flickr IMG_2807 by Neighborhood Merchant, on Flickr IMG_2787 by Neighborhood Merchant, on Flickr IMG_2813 by Neighborhood Merchant, on Flickr IMG_2816 by Neighborhood Merchant, on Flickr He probably should think of investing in to cannons, but lets just say he was too greedy to get any (truth is that I forgot to build them). Also, I've always been a huge fan of modular sets so I also included a full interior: IMG_2817 by Neighborhood Merchant, on Flickr IMG_2820 by Neighborhood Merchant, on Flickr For the hammocks, I used the ones used in set 60153-1, and I highly recommend them for pirate builds. When at the proper width, they fit minifigures in so well that you can move the entire ship several times and they wont fall off. COMBINED by Neighborhood Merchant, on Flickr I have an obsession with the old 2 x 3 printed books and old castle shields (anyone else?) so I tried to incorporate them in to my Captain's Quarters. Do you guys think they fit or should I remove them? IMG_2829 by Neighborhood Merchant, on Flickr The line for the top of the ship is connected to the bow and stern and held up on the top with two clips, so even though it looks like a pain to get inside it only takes a few seconds by just lifting the line off the two clips. Here's the crew and the rest of the "fleet": IMG_2832 by Neighborhood Merchant, on Flickr IMG_2836 by Neighborhood Merchant, on Flickr If anyone wants to know, I designed the sails using photoshop and I made the sails using printable A4 pre-treated canvas paper, and then just doubled them. Anyhow, thank you so much for stopping by, and have a wonderful day! Also, to all of you are wondering, don't worry about the old merchant ship! I put Fraunces in charge of it and it seems that he is enjoying his time on it . IMG_2837 by Neighborhood Merchant, on Flickr
-
With recent events transpiring on the brick seas, paranoia and hostile thoughts continue to plague many minds. One under the influence of this paranoia, an unnamed governor (NPC) under the command of Corrington, has ordered a personal heavy frigate to be built to patrol surrounding waters of any and all possible "hostilities". After the ship's completion, it set course for the governor, but oddly on its arrival, the governor has disappeared. The island was charted and the governor was heavily sought after, but with no luck. Perhaps his paranoia got the better of him? Or was it those pesky tribals? The facts of his disappearance may never be unraveled but one fact does remain: the Legion remains docked, waiting... (Apologies for the ship exceeding the background, I was not prepared for the sheer size of this behemoth. ) C7 by The Neighborhood Merchant, on Flickr IMG_6873 by The Neighborhood Merchant, on Flickr IMG_6871 by The Neighborhood Merchant, on Flickr Oddly, the ship was never officially certified to the fleet of Corrington. In fact, the ship's manufacturer has remained anonymous. With these peculiar facts, the crew to the Legion find themselves wondering just who their allegiance is pledged to now? IMG_6867 by The Neighborhood Merchant, on Flickr Now with the governor's disappearance, the unnamed island is bursting with new life. Pirates, scoundrels, Oleanders, Corries, Eslandolians, and merchants alike all want one thing, to take on the seas with the Legion. Captain William Marcus of the Legion and his crew have now turned to the pleasure of coin. What is to become of the crew of the Legion? Will their colors remain true and their loyalty to Corrington come back, or will they burn their colors and turn to the rebellious side of the Sea Rats? Perhaps even an Eslandolian or Oleander will purchase and reconfigure the ship to serve their empire. IMG_6796 by The Neighborhood Merchant, on Flickr Thanks for reading my story! I built this ship a while back before I got fully into Eslandola. Since I'm part of Eslandola, I have no use for this Corrington heavy frigate so I'm not licensing it as my own. If you're interested in licensing the ship to your fleet, feel free to DM me! Here are some more pictures of the ship and its fun features: IMG_6863 by The Neighborhood Merchant, on Flickr IMG_6865 by The Neighborhood Merchant, on Flickr IMG_6810 by The Neighborhood Merchant, on Flickr The flooring to the upper and lower deck can easily be removed to get access to all sections of the ship! IMG_6815 by The Neighborhood Merchant, on Flickr IMG_6784 by The Neighborhood Merchant, on Flickr IMG_6828 by The Neighborhood Merchant, on Flickr IMG_6835 by The Neighborhood Merchant, on Flickr IMG_6830 by The Neighborhood Merchant, on Flickr night by The Neighborhood Merchant, on Flickr IMG_6878 by The Neighborhood Merchant, on Flickr The base for the ship has multiple features and enjoyable displays, here's a small underwater view from the swivel corner. Play Feature by The Neighborhood Merchant, on Flickr One of the swivel corners had a turnable gear that opens up a minifigure display underneath the "HMS Legion" pattern. IMG_6860 by The Neighborhood Merchant, on Flickr Full crew for the Legion. IMG_6879 by The Neighborhood Merchant, on Flickr The front can easily be opened for a quick display of a hat/hair rack to quickly exchange the headgear for the minifigures! Goodbye! by The Neighborhood Merchant, on Flickr Another small ship I made alongside it, Rose Mary. The base is all on hinges so it can be folded and stored inside the stand for the legion. Thanks for viewing! I hope you enjoyed. As always, may your journeys on the brick seas be filled with wealth! Cheers. bam 2 by The Neighborhood Merchant, on Flickr More play-features/misc. pictures:
-
This topic has a lot of photos inside, to make it easier for everyone to see the latest version of my MOD, I have editted this first post to show version 5, 14th Nov 2020. Your feedback is welcome or share your MOD ideas Please! Port View by R Y, on Flickr Bow by R Y, on Flickr Stern Starboard by R Y, on Flickr My Lego collection consisted mainly of SW sets and its MOCs, I was tempted to get the 21322 Barracuda Bay when it came out in April but decided to save up for the UCS A-Wing, which I still haven’t got around to build yet, I have been modify the 75175 A-wing. A-Wing Mod by R Y, on Flickr I wasn’t too keen on the 31109 Creator Pirate Ship when I first saw its photos, especially the brick-built sails. During the Queen’s Birthday long weekend, I was reading posts on OZLUG of buying multiple sets to make it a bigger ship; that grabbed my attention as I mod all Lego sets where possible after I figured out Bricklink. However, at RRP of $160 AUD each, I might as well just buy the 21322 for $300 AUD; then again thanks to OZLUG, I realised that they are $119 at Kmart, meaning $238 worth of investment, no brainer! I quickly read up on reviews from Brickset and Brother’s Brick, how the completely brick-built design is its selling point, instead of using specialized boat hull pieces. My local Kmart had no stock, so I went to the next nearest one, nothing on the shelves again and a store girl told me all they have is already on the shelfs even though the online stock check shows limited availability. Disappointed, I was about the leave the store empty handed before I talked past the customer service counter, there was only one person in line so I decided to wait and check. The service girl was very helpful and checked the stock room for me, it turned out they do have three at the back, which I gladly picked up two; she told me apparently people try to steal Lego all the time, so they keep the good stuff at the back. I had to wait for my baby to settle and sleep before started building that night. As the original model is built in 3 sections: bow with forecastle, waist, stern with captain’s cabin; I decided to build 2 x waists sections and have 3 masts. I always build repetition sections step by step simultaneously instead of finishing one section and start another, personally I find this method quicker. My aim is to stick to the original Lego design and finish the hull asap, redesign the masts into foremast, mainmast and mizzen mast, and use the remaining pieces to touch up and make the 2 waists transition smoothly. 31109 Long Side View by R Y, on Flickr I wanted to rig the ship from the bowsprit to the stern flagpole, I had to move the “Plate Round 2 x 2 with Pin Hole and 4 Arms Up” to the mainmast beneath the lookout so the arms are equal distance to the diagonal spars from the foremast and mizzen mast. I spent more time on the foremast and rigging than any other sections. I tried a few different arrangements before settled down on the current layout, where the rigging goes down to the bowsprit from the upside-down diagonal spar. I used light bluish grey Technic Bush instead of the yellow ones provided. The hose piece is still slightly short and the bowsprit is pulled upwards, but the jib sail hides most of it. Overall, I was happy that I achieved my goal. Masts and Rigging by R Y, on Flickr I added a 1 x 2 red brown plate to each of the gun port openings so they are not too close to the waterline, I initially wanted to add 2 pieces per opening, but they were too high and affected the guns inside. You can tell where each of the section ends with the breaks from the 3027 6 x 16 plate in dark tan secured with 2 x 2 blue round tiles. I made sure the 1 x 4 special plates overlap the gap to secure the sections. The alternating red and light orange strip along the deck worked out perfectly, I was initially worried that I may get a double up of same coloured plates with my MOD. Joins of the Sections by R Y, on Flickr As Lego only gives half the number of guns compare to the gun ports, having 2 sets gives me 4 guns to fill up the front gun deck, squeezed 2 minifigs inside with torches. Gun Deck with Baboon by R Y, on Flickr I plated over the opening next to the gangways on the 2nd waist, to make it look like a quarterdeck, but not really raised due to the limitation of my skills in the mod. I really like the brick-built rowing boat from the alternative Skull Island bult, I made it longer using 2 x 2 slopes at the stern and made other changes as certain parts were already used in the main ship built. I also built a boat rack with 4 cheese slopes and some plates. The rowing boat fills up on the empty quarterdeck perfectly, I really like how it turned out. Rowing Boat by R Y, on Flickr With the 2 sets of 3 human minifigs, I swapped around their outfits, brought in a pair of black legs to swap out the peg leg. Now I have 6 different minifigs, I left out the epaulette for the officer to differentiate him from the captain. a9 by R Y, on Flickr a8 by R Y, on Flickr I built the red/green parrot and blue seagull according to the instructions, again had to use some different pieces due to availability. Lastly, I added the pet baboon hanging off the shroud, it’s a really fun build where its arms and waist are twistable to get a good pose. Baboon by R Y, on Flickr I really liked how this MOD turned out, this is probably the cheapest and easiest way to get a Lego 8-gun full-rigged-ship (three or more masts), even the 21322 only has only two masts. It’s around 58cm long from the tip of the bowsprit to the edge of stern flag, around 36cm tall from the tip of mainmast to the bottom of the hull, 19cm wide at the horizontal spars. With the elongated waist, it makes the forecastle and poop deck seem small in comparison, a bit out of proportion to be honest; but at this stage, I don’t have the skills to design and make them bigger. Side Front View by R Y, on Flickr Top Front View by R Y, on Flickr Back View by R Y, on Flickr
-
Captained by a Scottish fellow named Albert McCartney, this ship, the "Kintyre", originally operated out of what became one of the Southern-most English Colonies. There mission was as a privateer to harass any Spanish ships coming from the Caribbean to the old world with gold and silver, (plus harass and steal from the French), for around five years, starting in 1705. But eventually, McCartney grew tired of paying his due of treasure to the English crown, and set off to make his own way in the world "free" of any government. He moved his base of operations to a small island in the Caribbean with his crew, where there resided a abandoned French attempt at a fort from years prior. He got his crew to complete the fort, and used it as his base of operations. He plundered many a French, Spanish, and other nations' ships, along with his former comrades in the English navy. In early summer 1717 the Kintyre was last seen by some trappers on land (near what later became the port of Savannah, Georgia) sailing low in the water, going north, unknowingly into the path of a massive hurricane. The resulting wreck has never been found, and it was rumored to have been loaded to the gun-ports with gold and silver taken from a Spanish treasure ship by Florida's southern coast. (which had been found empty of most of it's treasure in the 1960's.) This could explain the heavily laden shape of the Kintyre that day in June 1717. As to what happened to the ship after it left the later-day Savannah area is anyone's guess, as it seems to have vanished without a trace off the face of the Earth. This ship is named the Kintyre, and is a recolor and MOD of set 31109 (3-in-1 Pirate Ship) in the Creator theme. She is captained by a Scottish fellow named Albert McCartney (nicknamed McCartney the Green for the color of his ship and clothes), a former (fictional!) privateer turned pirate. Some parts are missing, as the plastic pirate flag from Ninjago, 12 lattice window pieces, etc. And yes, the name of the ship and it's Captain are both Paul McCartney references. (The Mull of Kintyre and Uncle Albert / Admiral Halsey songs along with their creator's last name inspired the names of the ship and it's captain.) This MOD was also inspired by this very similar model by Eurobricks user @Wurger49. The name of the ship is supposed to go on the back of the captain's cabin spelled out in 1 x 1 printed tiles, located just below the flag pole. The Captain's cabin has a desk and chair. Eight cannons are ready for firing on the Kintyre. It was said by the trappers that last saw the Kintyre afloat that one or two cannons were pushed overboard to make the ship more buoyant. (Most likely against the weight of the treasure they had just stolen from the Spanish ship in Florida.) Excavations for enlarging the port of Savannah in the 1970's found two such cannons buried under two hundred year of ocean silt. These were confirmed by the proper authorities to be of the same age and type used by the English Navy around the time of Kintyre's construction in 1699. The only question remains is this: where is the rest of the ship and it's treasure? Questions comments, and complaints are always welcome!
-
Me again, this time with a take on a small pirate ship. I like how it turned out really classic-looking due to the colour scheme, it wasn't my intention going in but I'm actually really happy with it. The idea for it came from trying to use the bow pieces as a hull. If I add rigging it will probably look more ship-like and less 'toy'-like but for now I think it works well. Maybe the masts could be redesigned too I reckon. Let me know what you think! The stern could use some redecorating at some point maybe. No interior details just yet but it is ready for it. Here's a rough photo of the first version of it before I remade it. And finally next to the massive Unicorn, barely fitting in the frame together!
-
Hello, I built a flintlock pistol with shooting funktion. The design resembles the pistols which were used about 1800. Because they were often carried during travels, which were very dangerous, they are called travel pistols. Please watch the video, here.
-
Hello friends! After so many years of reading and fawning over everyone else's ships, I finally got up the courage to post one of my own. I wanted to make a pirate ship that was playable while still being sort of accurate. So while you won't see any hand-strung shrouds and ratlines, I can assure you that it's a hit with the kids. I call it the Medusa, mostly because of the green color scheme I adopted for this project. Pirate ships look so good in red and black, sometimes I forget that any vessel could have been a pirate ship. I opted to portray this pirate captain before his debilitating injuries. His name is Horatio North, in case you're wondering. Okay, so I'm aware that rudder is garbage. I actually forgot to build a rudder at all until I went to take pictures. It will get revised out when I go to clean up that quarter; it looks o.k. in real life, but the picture definitely doesn't catch its good side. Fun fact: half the cannon doors on this ship are fake! Even though I'm too young to have played with classic pirate sets, I respect the nostalgia with this fancy chap. Besides, he matches the ship! The more attractive, rugged version of that last bloke I think that thing is called a 'cathead.' The figurehead was a pain in the butt, but the end result is worth it IMHO Most of the sails are easy to take down and replace after a fierce battle The very meh stern Yup. This is the innovative, super-useful thing I put in the cabin. Kinda looks like the chair from Blue's Clues. A bookcase, since I failed at making a brick-built map of the world on that wall. I did, however, find room for my favorite detail from The Brick Bounty Okay, so I basically make storage space when I can't think of anything cool to go there. u_u Under the bell and the [fake] scuttle, I included some bunks. Can someone help me out? I know I took this cannon design from somebody on this forum, but I can't remember who it was. Let me know if these look familiar so I can properly thank them. Finally, a shot of the jolly bunch all together. This was my fourth focused attempt to make a brig that was both fun to play with and more accurate than not. Not sure if I succeeded, but I had a blast doing it. I have another ship I built for the Bluecoats that I haven't photographed yet. With your comments and constructive criticisms, perhaps I can coax up the courage to post that piece as well. MAC
-
The Reaper emerges from the depths to haunt the seven seas! Lego Ghost Ship, auf flickr Lego Ghost Ship, auf flickr Lego Ghost Ship, auf flickr Lego Ghost Ship, auf flickr I designed this scary vessel in Stud.io as a Halloween project. It is supposed to stretch the proportions of high build sixteenth century ships to the extreme. The castle-like structures are letting it look like some relic of a distant past compared to the typical Lego pirate ships, so even pirates would fear it as something, that has haunted the seas for centuries. I would welcome suggestions for the upper most deck, as it looks rather plain right now. Happy Halloween!
-
Here is my take on the LEGO Classic Pirate set 6257 Castaways Raft 6257 Castaways Raft Reimagined by Nicholas Goodman, on Flickr Castaways Raft by Nicholas Goodman, on Flickr Castaways Raft by Nicholas Goodman, on Flickr Castaways Raft by Nicholas Goodman, on Flickr
-
My first post! My rendition of the Unicorn from Tintin (mainly based on the film). Just edited with better photos. Would love to hear your thoughts! And here's Tintin and Haddock with the Unicorn model - please forgive me using a cat for Snowy!!
-
Hello fellow builders!! I just wanted to share with you my MOC of HMS Surprise (a frigate that was commissioned in 1794), and to ask you for your help and support for my project. For more (and better) pics with a description of my MOC you can go to https://ideas.lego.com/projects/9f73a563-081e-4726-9437-dff9a5293641 if you really like it, and think it'll make a cool new Lego set, I would also love to have your support for HMS Surprise so we can turn a design into a real Lego Set. Thanks!!!
.png.51b5b5114a1e25fdd7be68c04a92848d.png)
.png.f8e7d537a3193ffc6958d58ef36cac52.png)
-
 So, I'm back again with another MOC, this time I thought I'd tackle the WLO-5 Speeder Tank (aka. the Pirate Tank) seen throughout the Clone Wars by Hondo and his gang. WLO-5 Speeder Tank When I first started the design for this, it was heavily based off of screenshots since I couldn't find anything else. When I was almost finished, I realized that I had scale drawings of this thing the entire time that were included on the Blu-ray (Which I have included on my flickr). I realized almost immediately that my proportions were WAY off. So, I started from scratch. And this was the result. From the start, I wanted to try and incorporate an interior into the build, there wasn't a huge amount of space after the rebuild, but I was able to fit one in. It's not super detailed, but I was able to get the basic shapes, the driver, and most importantly fit the couch at the back, including a bottle of pirate rum. The rear hatches can open and the turret can rotate. You have to remove the turret gunner’s legs for him to fit, but given that the actual pirates legs would extend into the interior it works visually. A couple comparison photos with my Delta-7B and AAT for size. Starhawk Speeder Bike While I was at it, I thought I'd design some Pirate speeders to go with the tank. I didn't realize just how small they would be at minifig scale, so I had to simplify them quite a bit. Overall though I'm happy with the design, and by removing a few plates you can accommodate 2 riders. And a comparison to my Delta-7B. Hope you enjoy.
 -
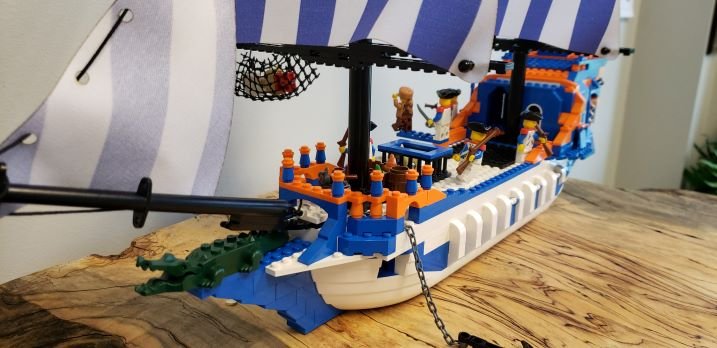
Hello, I am normally not a big fan of the official LEGO ships and I tend to rip them away for pieces for my own ships designs. But the 6243 Brickbeard's Bounty my sister gave me was quite nice but, like other official ships, too bulky. I Moded it in order to add the vessel more lenghth and to add a second deck to make it more threatening with 2 batteries of guns ! After all, a great pirate ship deserves more guns ! Now this ship is closer to a brig and has a better overall look IMO. The purpose was not to alter it too much, to make it instantly recognizable despite of the modifications. Let me know what do you think of it !
-
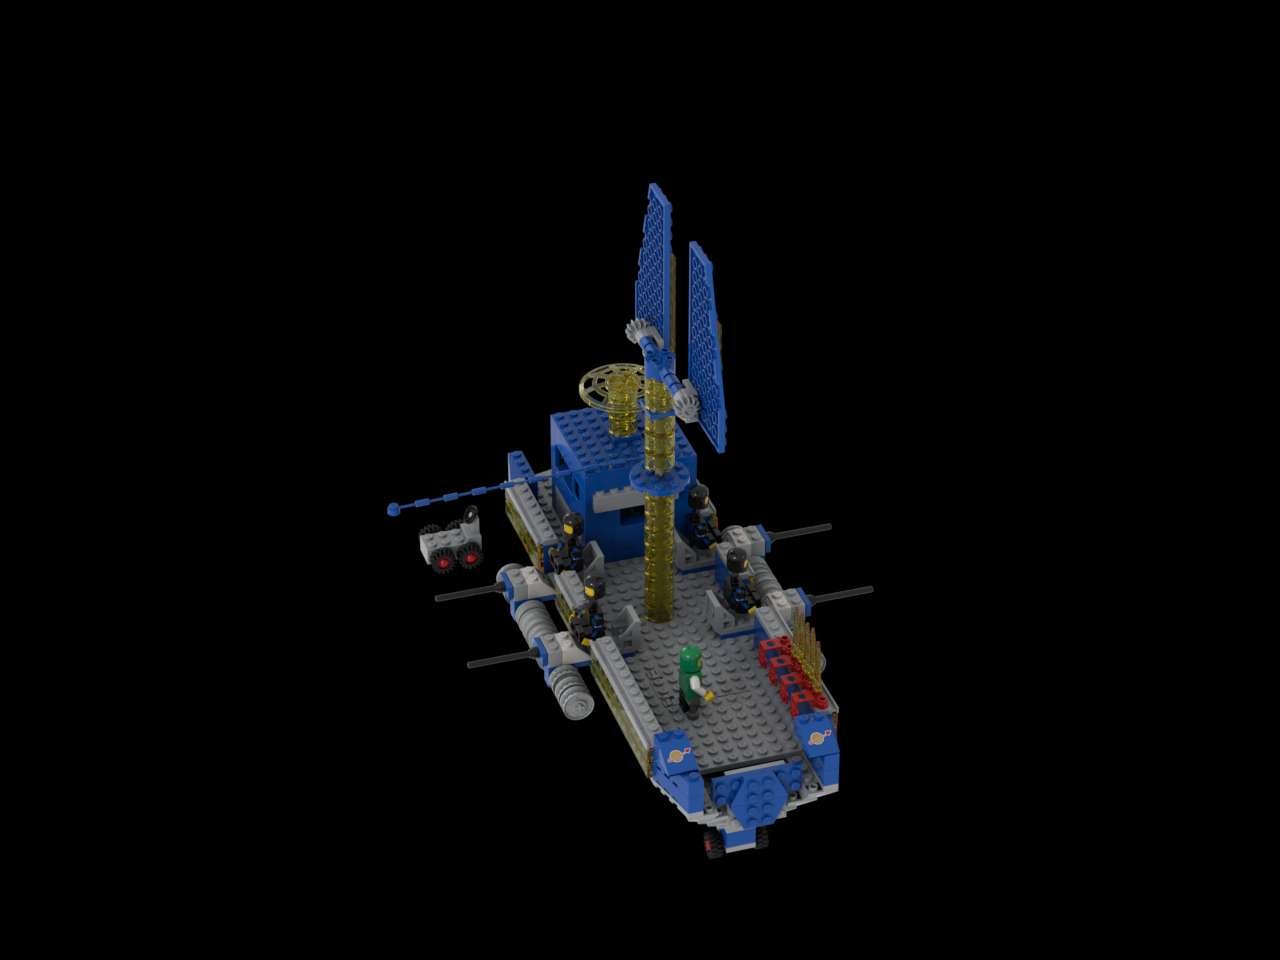
Get ready to sail the 7 star systems with this fearsome vessel! Solar powered light speed engines, a fearsome crew of 4, plus their one legged captain, this ship is ready to tangle with anyone who comes across it! https://ideas.lego.com/projects/f8b37d14-140b-4d3c-a43c-04b246421ffc/comments_tab?comment_uuid=548d54cb-e7c5-498b-a41f-77cbcc5359df#comment-548d54cb-e7c5-498b-a41f-77cbcc5359df&gid=1&pid=1


.thumb.png.efc8b90108a64cf072881a8a09216202.png)