Search the Community
Showing results for tags 'gearbox'.
-
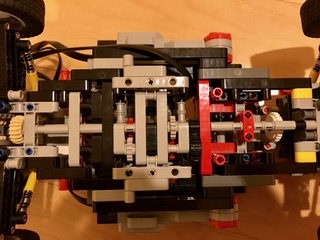
 I've been thinking of a simple yet effective sequential gearbox for a long time, and since LEGO had released a 18T clutch + 14T gears, I've come that now it's possible to partially reveal it It's a kind of successor of the Anto's 6NR gearbox The main difference is that there are no multiplier gears. There are straight up-down transitions connected left-right with equal gear ratio. With the current 6 clutch gears existing, it's possible to make 6 speeds, but to fit the 15x11 frame, only 5 speeds for now. There are still no studio files for new gears, so I used 16 gear recolored. The orange is 18T clutch, and the white is 14T. The upper 16T gear - axle - is connected to engine, the yellow connector - to wheels, the red connector - to turn drums on 45° It will be possible to create 8 speed gearbox (or 9 with specific drums?), when LEGO releases 14T clutch + 18T, 10T clutch + 22T, and 22T clutch + 10T gears. If someone can design these parts for 3D print ready, that would be nice All the possible gear ratios: 1. 8/24 = 0.33 2. 10/22 = 0.45 3. 12/20 = 0.6 4. 14/18 = 0.77 5. 16/16 = 1 6. 18/14 = 1.28 7. 20/12 = 1.66 8. 22/10 = 2.2 9. 24/8 = 3 I don't have all the gears needed now, but with what I have, it works well You can use this gearbox wherever you want and I wouldn't mind to see it in the future ultimate set with probably different drums
 -
 Hi everyone! Happy New Year 2026 to all of you! It’s been a while, hasn’t it? To kick off this new year, I’d like to present my latest creation, inspired by a slightly crazy project started by a guy in his garage. A project from someone who first built a GT40 replica from scratch, then took on the wild challenge of designing and building his own hypercar. I’m of course talking about the Hyperpilote by Benjamin Workshop a very famous home made French builder. I’ll let you check out his YouTube channel—he’s quite active and regularly shares updates on the progress of his project: https://youtube.com/@benjaminworkshop?si=HpPa3anAV1SEwS1X On my side, I started designing the LEGO model toward the end of his Kickstarter campaign in 2022 and completed it at the end of 2025. Initially, the real car was meant to be fully electric, before switching to an internal combustion version in 2024. This major change ultimately didn’t have a significant impact on my development, which I was carrying out in parallel, as I had quickly decided to focus my efforts early on the exterior design, using the body panels from the Lamborghini Sián 42115. Here we go—time for the photos! I. General Specifications 6-speed gearbox + Neutral + Reverse by @Anto (https://rebrickable.com/mocs/MOC-171508 ... s/#details) Gear indicator Steering-wheel-mounted paddle shifters Independent suspension Elytre doors opening mechanism Integrated lifting rams (“Air Jacks”) Front and rear anti-roll bars Self-locking differential mechanism when steering Functional front radiator Opening features: doors, hood, and trunk II. Design The design of the real car is heavily inspired by the McLaren P1. This influence is evident, on the one hand, in the unique three-seat cockpit layout, and on the other hand, in the teardrop-shaped canopy, which gives the rear wheelbase a much more pronounced and muscular stance.I reused the P1 body panels in light bluish orange to achieve this overall look. The front end is a blend of panel placements inspired by @Charbel Charbel’s McLaren 720S (https://www.eurobricks.com/forum/index.php?/forums/topic/172734-moc-18-mclaren-720s-w-instructions/&tab=comments#comment-3134415), used to shape and frame the headlight line. The headlights themselves are made from DBG barrel elements, similar to those used on the LaFerrari MOC by @T Lego: https://www.eurobricks.com/forum/index.php?/forums/topic/193303-moc-ferrari-laferrari-18/ As a small nod, I tucked a nitrous bottle behind the driver’s seat, in the spirit of Need for Speed II—for those who remember… The rising beltline between the front and rear wheel arches was quite challenging to resolve. The slope is very subtle and integrates into an opening body panel. I wanted the door opening mechanism, inspired by the Ferrari Daytona SP3 42143, to be completely hidden within the overall design. Each door opens independently via a push-button that actuates a linkage system with friction and an over-center mechanism, allowing the door to remain open. The door is then closed by pushing it back and breaking the over-center point. The door can also be opened without using the push-button; however, the lever must then be engaged to lock the door in the raised position. For added realism, I wanted to incorporate a realistic version of Nissan’s famous twin-turbo V6, the VR38DETT, complete with the full exhaust plumbing as well as its two side-mounted turbochargers. Its red engine cover contrasts nicely with the car’s orange bodywork, in my opinion. The chassis is extremely rigid despite the absence of a central spine, thanks to the 3×19 frames on each side: https://www.bricklink.com/v2/catalog/catalogitem.page?P=67491#T=C The gearbox located behind the cockpit also plays a structural role. For reference, the car weighs over 2.5 kg. And the French touch ! You want the same in Green ? Wait... III. Features To explain all the features of the model, let’s start with the schematic below: Blue: Main transmission, RWD, and radiator rotation Light Green: Gear-shifting mechanism and indicator Yellow: Anti-roll bars Red: Steering via HOG or wheel and coupling to the differential lock mechanism Green: Elytre door lifting mechanism Blue: The gearbox is based on Anto’s version: https://rebrickable.com/mocs/MOC-171508/Anto/ultimate-6nr-gearbox-with-forks/#details Go check it out—his system is brilliant! It’s a 6-speed + Neutral + Reverse gearbox. The gear indicator is visible through the rear hood (I simply forgot to add the sticker for the photos ^^). I also extended a driveshaft to operate the radiator fans at the front of the car. Light Green: The paddle-shifting mechanism is angled and uses the rotation of Wheel 2474: https://www.bricklink.com/v2/catalog/catalogitem.page?P=2474&idColor=3#T=C&C=3 A rotation stop is also included to prevent infinite spinning. Yellow: The car features anti-roll bars on both axles. Red: I designed a differential lock system that engages when the wheels are straight. During steering, whether left or right, the system automatically releases the differential. This solution combines efficiency with simplicity of use. Green: Each elytre door opens independently via a lever that actuates a linkage system with friction and an over-center mechanism, keeping the door open. Finally, not shown on the schematic, this model version features a pneumatic circuit that powers four actuators—one at each axle—allowing the car to be lifted a few centimeters off the ground. The effect is impressive when the car rises! The system is powered from the rear via a manual pump, and the selection lever is cleverly hidden beneath the horizontal suspension elements. IV. Specifications Scale: 1:8 Dimensions (L × W × H): approximately 54 × 24.5 × 12 cm Weight: 2.6 kg Number of pieces: 4,260 Development time: 3 years V. Inspirations McLaren 720S @Charbel: https://www.eurobricks.com/forum/index.php?/forums/topic/172734-moc-18-mclaren-720s-w-instructions/&tab=comments#comment-3134415 LaFerrari 1:8 @T Lego: https://www.eurobricks.com/forum/index.php?/forums/topic/193303-moc-ferrari-laferrari-18/ McLaren Senna @langko: https://www.eurobricks.com/forum/index.php?/forums/topic/181511-moc-mclaren-senna-18-2nd-version-finished/&page=4 1:8 Ford GT LM GTE 2016 @Jerry LEGO Creations: https://www.eurobricks.com/forum/forums/topic/208996-moc-18-ford-gt-lm-gte-2016-68/ VI. Useful Links HD Photos – Orange version: https://www.flickr.com/photos/147164115@N07/albums/72177720331075173/ HD Photos – Green version: https://www.flickr.com/photos/147164115@N07/albums/72177720329313566/ Building Instructions – Only Green version: https://rebrickable.com/mocs/MOC-245958/Levihathan/hyperpilote-18/#details Disclaimer : For those who are observant, you’ll notice that in the orange version, some pieces are not officially available from LEGO in Light Bluish Orange. Most of these are simple connectors, and it’s unfortunate that LEGO doesn’t offer a wider range of parts when releasing a flagship set. I do not encourage the use of third-party shops, but if you plan to rebuild this car, be aware that you may need to source parts from suppliers like Webricks or Godbricks to complete the inventory. Unfortunately, Rebrickable does not allow the publication of instructions containing non-LEGO parts, but the instructions do exist—so if you prefer the orange version, please contact me privately or via Rebrickable/Instagram. The car also features 3D-printed wheels and custom stickers. I personally designed these pieces, matching the wheel diameters of the Sian 42115 but with the design of the P1 42172. These files are included with the instructions, as are the stickers. Here’s a preview of the instruction manual’s table of contents. The design is fully modular to make assembling the car as easy as possible: 360° video : Thank you for your attention and see you !
 -
 Hi, I modded the mercadees benz arocs so that it has steering and suspention and drive on the two front axles as well as acenter diff between the two, RC steering, and a drive motor for the wheels. The flat 6 is in the same place roughly and the gearbox motor is roughly in the sam place too. Now I'm trying to add the same sort of outriggers that the 42009 has, but to the mercadees benz arocs, I ALSO am trying to have the steering axle going through this assembly to the rear wheels as well as a centre differential underneath. the outriggers. This sounds like a lot yes but the pnumatic pump can be moved to the back and there is new connectors now to make more compact assemblies. The gearbox would still have two clutches, the only difference, is the pnumatic pump is connected to the same output as the turntable, which frees up one output for the small linear actuators of the outriggers. Does anybody have any ideas on building this? I have been trying but I cannot seem to put my ideas into actual assemblies. I think it is a good idea to use the black 12tooth 13L gear strips like in the 42009 because the arocs outriggers are much too cumbersome. I did manage to fit a centre differential under the original arocs outriggers which is good. The purple axle is for the tipper, the green axle is for the turntable , the orange and brown axle are for the outrigers.
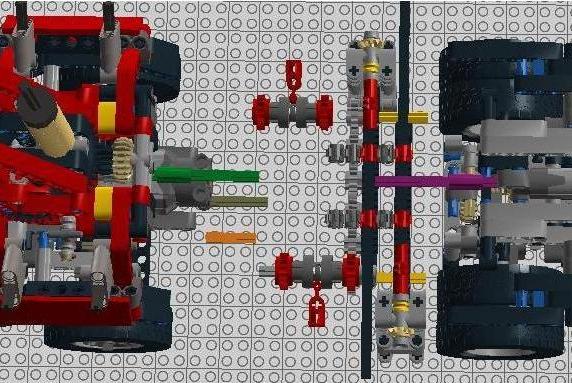
-
 I'm building a 6-speed sequential gearbox for use in a future MOC and I've come across an issue. Basically, I need to control three driving rings with a single input, but I can't figure out how to do it. I'm familiar with the standard method of controlling two rings by using eccentric mechanisms 90 degrees out of phase, but this doesn't work with 3. I need six positions that can be selected with a single axle. I don't need a paddle-shifter - I can do that bit myself. The positions must be in order like this: [The three changeover catches are in a line, F means flipped forwards, R means flipped backwards, O means in the middle/neutral] FOO ROO OFO ORO OOF OOR This is all to do with the way the gears are arranged (I needed the ratios to be close; difference between each gear is around 1.3x). I can't change this. The crucial thing is that the mechanism must be compact. I can't give exact dimensions, but I'm quite pushed for space in this MOC. Thanks in advance for any help!
 -
 I just found a way to do a shifting system witch doesn't use any rubber band. Basically , it's the same system as my Porsche 919 but I replace the bands by these connectors. Some people don't like having bands inside a car (including me ), so this allow even more possibilities. The system is really reliable and works really smoothly. Instructions : https://goo.gl/photos/HjHqpVXdE951Qm1o8
 -
Hey there guys! I finally got myself an S-brick, i wanted to test it out so i built this go-kart. Functions: - 2 gears gearbox - auto clutch - braking system - differential The vehicle turned out to be pretty fast and with a great handling, unfortunately i need to wait some better weather to shoot a video of it and a bigger place as well. Like in a real kart there's no reverse gear so i'll probably need something like a parking lot to test it out. The gearbox is working great with the buttons of the S-brick operating the M motor I hope you'll like it!
-
.thumb.png.116032e930e483fb4ebbfdc62183bd34.png) Hi, In a push-along car that I'm building, I'm using Boratko's 5+R AWD gearbox and I'm running into problems when putting the gearbox into reverse. I have an AWD setup with three differentials, the center differential is part of the AWD gearbox. The front and rear differentials each drive a 20 tooth double bevel gear which in turns drives a 12 tooth double bevel gear attached to the gearbox output axle. So the overall output-wheel ratio is 28:12. I can push the car without problems in all forward gears, but when I put the gearbox into reverse, the 20 tooth double bevel gears and differentials start slipping. When I separate the gearbox from the rest of the car and drive it by hand, I can also feal much more resistance in reverse. In gears 1 to 5 everything feels very smooth. As far as I understand, the different resistance between forward gears and reverse is mainly because of the fact that in reverse 5 of the 6 gears with clutch turn against their axles and in gears 1-5 only one gear with clutch turns against its axle. Now my question is: Is this normal behaviour or am I doing something wrong? And what can I do to make the gears with clutch turn against their axles with less resistance? And a separate question: Appearantly the transfer between the differential and the 20 tooth double bevel gear is the weakest point in my drive train. They are placed in a static transfer box and in a normal arrangement with the double bevel gear placed orthogonal to the differential. Still the differential can move quite a lot. So my question is: Is there a better way to transfer drive to the differential? Hope someone can give me some directions. Thanks! Diederik
Hi, In a push-along car that I'm building, I'm using Boratko's 5+R AWD gearbox and I'm running into problems when putting the gearbox into reverse. I have an AWD setup with three differentials, the center differential is part of the AWD gearbox. The front and rear differentials each drive a 20 tooth double bevel gear which in turns drives a 12 tooth double bevel gear attached to the gearbox output axle. So the overall output-wheel ratio is 28:12. I can push the car without problems in all forward gears, but when I put the gearbox into reverse, the 20 tooth double bevel gears and differentials start slipping. When I separate the gearbox from the rest of the car and drive it by hand, I can also feal much more resistance in reverse. In gears 1 to 5 everything feels very smooth. As far as I understand, the different resistance between forward gears and reverse is mainly because of the fact that in reverse 5 of the 6 gears with clutch turn against their axles and in gears 1-5 only one gear with clutch turns against its axle. Now my question is: Is this normal behaviour or am I doing something wrong? And what can I do to make the gears with clutch turn against their axles with less resistance? And a separate question: Appearantly the transfer between the differential and the 20 tooth double bevel gear is the weakest point in my drive train. They are placed in a static transfer box and in a normal arrangement with the double bevel gear placed orthogonal to the differential. Still the differential can move quite a lot. So my question is: Is there a better way to transfer drive to the differential? Hope someone can give me some directions. Thanks! Diederik -
 Video Found Here: Specifications: Number of Gears: 4 Gear Ratio Spread: 5:1 - 1:1 Shift Reliability: 99% Friction Level: Low Transmission Type: Dual-Sequential Synchronized? Yes Auto-stop? No Optimal Transmission Motor RPM: 15 - 40 Length: 10 studs Width: 11 studs Height: 5 studs (6 with optional support) Note on dimensions: dimensions are measure to the furthest protruding point of the transmission; that is to say, the transmission does not actually occupy all of the space designated above. Also, I know that the measurement for width is greater than that of length, (which is against their very definitions) but length was measured as being parallel to the drive axles. This is the transmission I used in my RHM Wutzwerg (http://www.eurobrick...opic=125571&hl=) supercar. It is a dual-sequential transmission, meaning that it is actually a pair of 2-speed transmissions (one with ratios of 3:1 and 1:1, the other with ratios of 1.67:1 and 1:1) which are shifted in sequence to produce 4 distinct, sequential speeds. It is very smooth and very reliable, the only potential concern being that it can slip under <b>extreme</b> stress situations; this can be remedied by added a gear reduction later in the drivetrain. It does also lack an auto-stop function, however I will be posting an appropriate stepper-motor shortly. Instructions are here: https://drive.google...XVFRGc. Before building, please read the following important notes: -Instructions are in *.lxf (LDD - Lego Digital Designer) format. Sorry, I am horrible with other Lego CAD programs. -Green marks the drive input, red marks the drive output, and purple/pink marks the transmission shifting input. -I do ask that if you use this in a model, you give me credit as the designer of the transmission. -Elastics have to be fastened like this: http://www.moc-pages.com/image_zoom.php?mocid=426942&id=/user_images/116595/1459193308m …so that the yellow part (orange in the instructions) is pulled on axis towards the shifting axle. -The yellow ribbed axle connectors in the instructions need to be replaced with the part below: http://www.moc-pages...595/1459193300m -Any questions, comments, or otherwise can be addressed to me in the comments and I will make an attempt to respond as quickly as possible. This thing won't accept pictures at the moment, so here's a full catalog of them: http://www.moc-pages.../moc.php/426942
 -
Hi everyone ! Fasten your seat belts, because today I’m reaching the top speed of 420 km/h with this replica of the Bugatti Chiron 1:8 scale ! Around 4,000 parts, a weight of 3,7 Kg it takes me 2 years of study and design to achieved it. First of all, the pictures renders are slightly different than the video content. I made some modifications (for the roof...) The french manufacturer mixed-up performances and sophisticated design for an unique masterpiece with only few units sold for. The real challenge grabbed my attention so I decided to design it. For more informations about the car, please visit : The road map includes parameters following : 1:8 scale (using of 42056 tires) PFS features (powered by one Buwizz ®) 7 speeds Dual-Clutch Gearbox (DSG) Full 4WD transmission A good approximation of the bodywork Active spoiler feature A high rigid chassis Modular assembly This MOC includes a lot of characteristics as well basics manual ones that more complex ones. But first, here are some pictures below : Main features : Dimensions : 56 x 24 x 16 cm Weight : 3,7 Kg Power supply : 1 Buwizz with easy access Motorisation : 5 mottons Independent suspensions Manual ones : Openable doors with locking system, and openable hood by friction Steering HOG Unplugable motorisation (RC motors and steering ) for playability because the car is very heavy ! Openable trunk providing self-invented W16 engine details and Buwizz access Openable gloves box… …hidding a secret key witch unlock nice PFS features ! (insipired by the real top speed key) After a long build process, I’m very proud of the result. During development, I decided to put an additional feature to improve playability : a small lever to unplug motorisation. Indeed, the car is very heavy so you can’t move it easily. From wheels to the drive train and the 2 RC motors, the high gear reduction lock any movement. The secret key system create some kind of manual interaction allowing selection between 2 motorised features powered by one M motor : Spoiler extension (3 handling modes reachable) Adjustable suspension in height I’ve made a small video to illustrate spoiler mechanism : I found inspiration on Pipasseyoyo Bugatti Veyron system for height setting https://www.youtube.com/watch?v=eaX5JLdBcyg. Irreversibility is performed by 4 worms screw, one for each axle. http://www.techlug.fr/Forum/topic10504.html I assume all similarity with @Didumos69 anti-roll bar and torsion bars system on the front axle. His advanced setup is very strong and reliable. https://www.eurobricks.com/forum/index.php?/forums/topic/143038-moc-rugged-supercar-hammerhead-19-scale/ Remote ones : 5 motors : 2x RC motors / 2x M motors / 1x XL motor 7 speeds Dual-Clutch Gearbox (DSG) driven by XL motor Spoiler animate by 1 M motor and its own gearbox Suspension height controlled by the same M motor Steering by 1 motor or the HOG Full 4WD transmission driven by 2 RC motors Gearbox ratios : 1st : 1:9 2nd : 1:6 3rd : 1:5,4 4th : 1:4,5 5th : 1:3 6th : 1:2 7th : 1:1,8 R : 1:9 Gearbox inspiration : @Sheepo Rubicon Jeep shifting system :http://www.sheepo.es/2016/06/jeep-wrangler-rubicon-instructions.html @ibessonov gearbox : https://rebrickable.com/mocs/MOC-5565/ibessonov/sequential-rc-4-speed-dual-clutch-gearbox-with-pf-servo-motor/#comments Other pictures : Hell yeah Enjoy pictures in HQ : https://flic.kr/s/aHsm9s9M7C And here is the video : I hope you'll like it ! I'm making instruction video for the DSG gearbox, see you soon !
-
What with a certain company ripping off my Koenigsegg One:1 and making a pretty bad job of it at that if you have seen some of their marketing photo's where the flex axles bend into strange shapes. Also due to the fact that my own Lego version started to look a bit shabby when parked next to the more recent Ultimatum GTR V10, i decided to do a major upgrade, basically start over, but this time without trying so hard to replicate the real Koenigsegg, but rather with the aim of making a Koenigsegg based car that is designed more with the aim of making it look good in Lego Technic (we will see how that turns out!) I will be aiming to replicate the Koenigsegg suspension, slight tweaks to my previous rear suspension and a major improvement to the previous front suspension to make it stiffer. I am looking at a combination of my previous 3+R (fake) paddle shift gear box from the Koenigsegg, and the Ultimatum's improved 5+N+R. I have already designed a compromise 4+N+R to fit under the 8 cylinder engine. I just have to work out the shifter mechanism. The engine will be 1 stud lower than the previous Koenigsegg The doors MUST use the same mechanism as the previous Koenigsegg, but I am looking to change the method to actuate them. The roof needs to be at least 1 stud lower than previous (that was my main issue with the bodywork of the previous Koenigsegg when standing it next to the Ultimatum) and here I may move slightly away from the real Koengsegg design, I will see where it all takes me. Again it will be 1:10 scale or thereabouts as I am not yet that inspired to work at 1:8 as I like the challenge of less space to work with. The back end is in progress, and while it looks similar to the previous Koenigsegg, virtually every part has been re-designed and I think significantly improved, so far, I am having fun.
-
Hi All, im currently in the throes of building a transverse fwd Lego moc. It’s in its early stages at the mo, it it has an ultra 4 speed gearbox, engine and differential all mounted transversely. Ive still to do a bit of work on the gear selector to make it a little easier, but here’s a small video of it in its current state if if you see bits of your Lego Design in this model, thanks for the inspiration
-
 The new parts in 42083 have opened the doors to some new gearbox designs. I saw that @Didumos69 and @Erik Leppen have started working out some potential designs, I think it would be good to have these new gearboxes collected in a single topic. @Jim or @Milan If you think this should be merged with a different topic, please do so. * * * Here is a design that makes it easy to visualize the gear ratios. It's far from compact, but the ratios are well spread out with only one overdrive gear. Yellow - control Green - input Red - output
 -
 The Fiat Panda is an Italian utility car created for all needs. It's known for its simplicity but above all for its ability to do almost everything. The 4x4 version, despite the 50 hp, is capable of climbing on various types of terrain, in fact it is also used for trials (just change the wheels). I wanted to create it in a small offroad version. The design is quite similar to the real model even if with some difference like the roof. I added a front bumper with 2 PF Lights, very useful for night rides, and a winch (you can see how it works at the end of the video). 1 PF L Motor for propulsion with a 2 speed gearbox and a 4x4 transmission without differential (I added a second reinforcement gear in the rear axle). The gearbox is compact and strong enough and the winch system is connected to it. The total gear ratio is: First Gear 1:3.33; Second Gear 1:1.67. Pendular suspension for good stability on rough terrain, even if the model is not high enough to work properly :(. The rear opening hatch and the small trailer are good for transporting small loads. The old model was very squarish and very low so I had to revise it more carefully.
 -
 The Gearbox I have been playing about with some sequential gearbox ideas over the last year trying to work out how to get more than 4 gears out of the 42056 style gear system, and more importantly with realistic ratios between the gears. I thought that I was getting somewhere and decided that it was finally time to build a new car around this new gearbox, however, the first iteration gearbox was not up to scratch, so I put it to one side, spent last summer working on my house, and came back to it in the autumn determined to make it work. The other key design aspect was that this all had to fit within a 1:10 scale model, with the engine not mounted ridiculously high. The solution I came up with has a lot of gears in it (mostly idlers) but it works well, and is geared so that 1st gear doesn't just lock up the rear wheels when the car is pushed along. This version has reverse, neutral and 5 forward gears. 1st-2nd - 1.667 step ratio 2nd-3rd - 1.333 step ratio 3rd-4th - 1.250 step ratio 4th-5th - 1.200 step ratio The Supercar This time I decided that it would be my own design, but there were a few ideas from a few real cars that influenced the outcome, the car also adapts and builds on some ideas presented in other recent MOCs such as the gear shift/selector by Didumos69, Here are some pictures.
 -
 This is my first WIP post on EuroBricks where I will show my progress on my newest build, an EV3-powered 1:8 replica of Lexus' newest flagship coupe, the LC500. The car will most likely be a combination of both the standard and the V6 hybrid LC, but it will have a V8. The body will also be orange. Here's a photo I found of an LC that looks a lot like the one I am shooting for. Features I'm planning to add: Four or six-speed paddle-shift transmission Retractable spoiler Detailed interior Fake V8 engine (but I would like to achieve moving pistons) Full independent suspension All I built so far was the rear axle for the LC. It's exactly like the one in the Porsche 911 GT3 RS set but more reinforced. I also made the V8 engine using Lego Digital Designer. I plan to build the paddle-shifting mechanism used in Didumos' Ultimately Playable Porsche 911 GT3 RS (the one with the tilted wheel) and pair it up with a gearbox. I currently am having trouble whether to motorize his gearbox with the EV3 motors or to pick a different one with less gears and friction. I also am having a little bit of trouble finding the right front axle, though I like the one that Didumos put his Porsche because of the fact that is has two shocks for each wheel. However, I find it very difficult to fit the V8 engine in the middle since the axle is made for a rear-engine car. Here's a poorly drawn render I made of what I'm trying to achieve with the front axle. And here's the chassis in the real LC and the measurements for the LC Lego model. Overall, I'm excited about the build. I would welcome some helpful comments about the V8 engine, axles, and the gearbox I planned to use before I order pieces on BL. Once I start working on the body and aesthetics, I would appreciate some input with that as well. I can also give you the download for the .lxf file of the engine if you'd like to check it out. I look forward to replying to your comments and sharing my progress. Thank you.
 -
 Hi! Two years ago, I did a motorizable cherry picker for a contest on the french forum TechLUG. So, I used the comments I had, and I decided to : - Use a more little scale - Better proportions - I did a better cab. In the first MOC, it was too heavy because of the battery box inside it. - The first cherry picker was motorizable by a M motor ; this one is only motorized, more simple and efficient. To summararise : Better proportions (I hope ^^) Only motorized I use inverted gearboxes for : - Outriggers - Arm - Turn table And the manual functions : - The steering (of course) - Extension of the arm So, here's the result: The simplest function is the steering. But there is the L motor over it. So, I used three 16t gears to turn the wheels directly by their axle of rotation. And now, the gearbox. It's an inverted gearbox : the "out gears" turn in the opposite sense. So, when you invert the position of the driving ring, you invert the rotation of a function. Here are screenshots: The outriggers can up the truck: the wheels don't touch the floor. To finish, the arm. It has a triple deformable quadrilateral. I needed so much time to do it, but it's nice to see in action. And the video :
 -
I'm back again with another gear grinding issue but this one is a bit less critical. The grinding only occurs when my 4x4 SUV chassis (with Sariel's 4-Speed Sequential Transmission) is in a certain gear. Here's some photos of the chassis. The transmission is shifted to the speed where the nonstop grinding occurs. When in this gear (I believe it may be 3rd) The car is supposed to move, but it does very slowly while clicking noises fire like a machine gun. This is the only time when the gears grind other than, say, if the chassis hits a wall. When the clicking begins, I hear the driving rings shake (which awfully reminds me of the somewhat gear clicking in the Mercedes-Benz Arocs set). I would love a response a soon as possible to address the clicking problem so I can finish the chassis once and for all.
-
Since a little moment, I wanted to make a Citroën DS for 2 reasons: This car has a very particular design and it had an innovative mecanic It has not prevously been made in Technic. So I can be the first! ^^ I wanted to reproduce all the features: Suspension Steering with the headlights moving with the wheels Height adjustment using pneumatic (Just up/down, not intermédiary) Gearbox (not defivitive yet, see below) Openable hood, trunk and doors Perhaps the body will be detachable (like the Nico71's 2CV) And a nice design! Actually, I did the chassis. It is not finished, but almost. And it was very complicated to make, this chassis! On the real car, almost all the macanic is in the front part of he car (under the hood). The problem is that it's not really possible in Lego, furthermore I wanted a chassis' height of 3 studs. So, I put the gearbox in the back of the chassis. That is working, but it's not realistic. So can you answer this question: do you like this construction, or do you perfer that I try to put a 2 speed gearbox just under the engine? Here, you can see the headlights moving with the wheels: It's simple, but we don't see that on supercars. There is not HOG yet. I don't know if it will be the steering wheel only, or if there will be one other on the dashboard. The chassis height adjustment allows almost put it down. The suspensions are soft. They give to the car a "boat" effect. And the gearbox: It is linked to the front wheels, but not actually to the engine. I wanted a DBG body, but the parts don't exist in this colour. So, it will be white. Tell me what you think about this begining!
-
 Hi, I'm looking for a reliable remote controllable 5+R sequential gearbox or ideas how to build one. If it would have a neutral as well it would be perfect. Please share your ideas and if you are aware of any kind of existing solution please share the link. Thanks, Zoltan
 -
 Hi everyone, I have already posted this gearbox in the Gearbox collection thread started by Didumos69, but now that I have finished the instructions (as promised@mocbuild101, here you are :-)) I thought it would be a good occasion to start a specific thread on this gearbox. I am currently working on a MOC which has this gearbox implemented (will start a topic for that one in the near future as well), for which I had some specific requirements: I wanted manual operation on standard LEGO 5+R configuration, but with a gearstick that would pivot in all directions from a single point (like in real car). Apart from that, I wanted a center console that was not more than 5 studs wide, so the gearbox had to be moved away from the gearstick. I took my inspiration by Thirdwigg's 6speed gearbox from his Cadillac ATS supersedan, Crowkillers 4speed gearbox from his Asassin X19 and the 5+R gearbox from Nathanaël Kuipers' Predator. I ended up mixing them all with some inspiration from the 42054 Claas steering mode selector as well. Note: the version in the instructions is using the new DGB driving rings and red clutch gears, they actually give a more solid build (when I shot below pic and vids I had already used mine in aforementioned MOC, so I converted it to the old rings and wheels. Works fine as well, just a bit less solid). Manually operated Direct operation special features: single pivot point for gearstick, linkage to gearbox, fits in 3studs wide center console number of gears: 5 forward, neutral and reverse Here's some vids (apologies for noob quality...) and the instructions: Gearbox in action Shifter linkage system in action Instructions PDF Enjoy and let me know what you think of it.
 -
This is my latest MOC: an Ariel Atom 500 in 1:9 scale! Technically it isn't a true scale model since I didn't use exact dimensions (I just build what I think looks best), but size-wise it's about 1:9. The real car is the fastest ever variant of the Ariel Atom, a street-legal car built for track racing. Released in 2008, the Atom 500 features a 3-litre transverse-mounted V8 made from two motorbike engines. It produces 500 horsepower (hence the name) and redlines at a rather insane 10,500 RPM. Other modifications include massive wings and the gold-painted exoskeleton. The car weighs only 550kg, giving it a power:weight ratio of over 900hp/tonne (higher than anything short of a Koenigsegg) - It recorded a 0-60mph time of just 2.3 seconds and could reach 200mph. It was the fastest road-legal car around the Top Gear Test Track for over two years. That record lap was on damp tarmac - had the track been dry, it would probably still be at the top. Only 25 of these cars were made, selling for around £200,000 each. My model features: Remote control drive and steering with Power Functions - 1 XL motor for drive and 1 M motor for steering 4-speed sequential gearbox operated with paddle-shifters Working steering wheel Full independent suspension with longitundinally-mounted shock absorbers Steering has zero scrub radius V8 engine replica with moving pistons The zero-scrub radius was a new idea for me. When playing around with suspension linkages, I discovered that mounting the links in a certain way would cause all four to move when turning (rather than just the steering link). The center of steering was further outwards, almost exactly in the middle of the wheels (I think it's where the suspension links would intersect when extended, but I'm not sure of this). The geometry I chose works almost perfectly for 68.8x36 ZR tyres on 56mm rims. Here's a picture of the steering links in their two extreme positions superimposed - the point where the wheel shafts intersect is the center of steering: The suspension is standard double-wishbone in the rear, but with a sideways lever converting the upwards motion of the suspension into longitudinal movement of the shock absorber: The transverse V8 was very difficult to fit in because it has even dimensions and the rest of the chassis has odd dimensions. It is connected directly to the XL motor The interior (or as close as you can get to an interior in an Atom) features two racing-style seats, a steering wheel and paddle shifters: The aesthetics were rather difficult at times. The framwork was very difficult even with the 42055 yellow parts (in fact, getting that set is the reason why I built this model), and at times I had to use some tricks. For example, the rear framework looks like it has two beams crossing in an X-formation when in fact the left and right halves of the "X" are two separate structures: I also replicated the exhaust pipes and gigantic rear wing. One of my favourite parts of the model is the side intake and its red stripe: The PF IR receiver is disguised as the air intake and roll hoop: For more pictures of the car, see my video below. Music is composed by me as well: [media]https://www.youtube.com/watch?v=RhmgbCIpHT0[/media] This project is also on LEGO Ideas! I know the success rate is extremely low for such projects, but it would be amazing if this set because a reality! Please support my project here. Any support is much appreciated.
-
 Lego compact gearbox - a super simple and compact mechanism! I originally built this lego technic gearbox for a robotic door lock. You can build this simple lego gearbox through the link below. Features a 1:8 gear ratio reduction using a worm gear. LDD / INSTRUCTIONS — https://www.dropbox.com/s/86hgsg48vijh2b7/Mechanism.lxf?dl=0 Inspired by a gearbox in Sariel's Unofficial LEGO Technic Builder's Guide: https://www.amazon.com/Unofficial-LEGO-Technic-Builders-Guide/dp/1593274343
 -
 just made a truck similar with Mr. Madoca's new moc work same function on differencial lock and 2 speed gearbox,but 6x6 -Weight: g -2 XL motors for propulsion,1 XL for 1st axle,1XL for 2nd、3rd axle -2 Servo motor for steering,1st & 3rd axle -M motor for 2 speed gearbox -M motor for locking rear differential,1st axle - 2nd、3rd axle -Portal axles for 1st、3rd axle in order to make a powerful crawler, I need different rotating speed of front and rear axle. For the reliability, I not use the weak center differential. I design 2 seperate XL motors for 1st axle and 2nd+3rd axle. But I add a lock, to lock the 2 XL motors together when necessary. That means there are 2x 2speed gearbox + 1 lock. And to make sure the enough power, I add 2 battery boxs.
 -
 After seeing Lego's 8860 modern version from 3 sets of 2017, I liked it alot, but I have no nostalgia otherwise for the 8860, while I do for the 8865. This was the first Lego "supercar" I build when I was about 8 years old. Alot of people find it ugly, but I can never hate on this model. So it felt perfect for my "tribute" to 40 years of Technic. I tried to copy as much functions from the original, I decided not to add any new functions that the original didn't have (wether I had room for that in the first place is another thing). The functions are: - 2 speed gearbox (first gear 2:1 and second gear is 1:1, of course like the original: linear) - Full independent suspension - 4 cylinder engine - Working steering wheel (sorry no HOG Lipko ) - Folding headlights - Adjustable seats Features I could not get into a model of this size were a neutral+third speed for the gearbox and a differential at the rear. I could have probably made a rear diff work, but it would mean I'd have to sacrifice the rear independent suspension and build a live axle. I decided the value of having independent suspension at the rear was of greater importance as a tribute to this model than a diff. LDD available for download here (Thanks @LvdH and @Didumos69 for the help on the LDD and the 9L liftarm in front of the model is for dash, supposed to be placed behind the steering wheel) A couple of more images: If you wonder why I didn't use the 2017 part of pinhoel with 2 axle ends on the driveshaft towards the gearbox. That was my intention, but I don't own the part yet and after mounting the gearbox on top I couldn't detect any play in that part anymore, so instead of breaking down the model to get that new part in there I decided to leave it as this. I tried to copy as many details of the engine as possible. A custom V4 engine worked best instead of the standard Lego engine parts, because I could mount the exhausts better and have the transparent red in the centre of the engine (4L lightsaber) where the original had 1x2 transparent red bricks. For the centre console I tried to mimic the original as well. I used a 3L blue liftarm as gearstick because his big brother has it too, same goes for the antenna being red for the headlights. The reason why that isn't simply an axle with a red bush is because from the front view that is visible above the dash and I don't like that. Also, when the headlights are up a bush in that position makes it harder to steer. While I can perfectly fit the mechanism on the passengers side, that felt out of place, so this looked best to me. Folding headlight, simple but effective Adjustable seat's maximum laid back position to keep a seat in its adjusted position I decided to use rubber 2L liftarms below the seats (behind the LBG bush). A little turn of that LBG bush and the seat won't move. Of course I made pictures with its big brother: Which brings me to a problem of this tribute: scale. I originally wanted to use 30.5mm tires, but that mean I'd have to make a suspension that was about 9 studs wide, 10 studs wide if I decide to ignore the fact the 30.5mm tires are far too wide to be in scale. However, I couldn't make a 10 stud wide front suspension that felt strong enough to mount the rest of the car to. While I managed a rear suspension in 10 studs, it looked very flimsy So I decided to slightly scale up my model with the use of these 37mm tires. The end result was a scale of 1 : 0.48 (sorry engineers for this crappy notation ). However where the 30.5mm were far too wide (2studs) for scale, these were a tad worse . To compensate for this I decided to make the suspension smaller in width, so that the total width with tires included would be in scale (edit: and this width is what I based the "1 : 0.48 scale" on, the tires actually needed to be 39mm to be in scale for that ratio and not 37mm, but those don't exist in any way from Lego, the next is 43mm which would be such a significant upscaling that I didn't want to do, 2mm is barely visible I think and allowed me to create a smaller model /end edit). That resulted in this 11 stud wide suspension, which was alot better to work with for mounting a body to it. Also the rear got some much needed inforcement to remove the flimsy look of the 10 stud wide suspension. So with having a scale that basically meant 2:1 it was easy to work with, for bigger sizes I used the 0.48 and for small stuff (4 studs or lower) I used 2:1. The engine is 1 stud too high in scale, but this I could not combine lower with the suspension. I am glad it it's still (just barely) under the "rear window". Thanks for your time looking at my little model.
 -
I'm building a SUV drivetrain for my Lexus GX EV3 project that has independent suspension, four-wheel-drive, and a four-speed gearbox with a medium EV3 motor that shifts the gears. Unfortunately, after testing the drivetrain, I found that when in 3rd or 4th gear, the gears make a clicking noise when moving forward and then straight to backward. However, this clicking somewhat occurs less when going from reverse to forward. This clicking really "grinds my gears" and I don't know what to do to stop the gears from clicking. My gearbox is a custom version of Sariel's four-speed sequential that is fit for the vehicle I am building. The input in the transmission is switched to provide more speed. Two large EV3 motors drive the input. I've noticed that when the vehicle stops, it goes the opposite direction for a little bit. Also, like I already said, this clicking only happens in 3rd or 4th gear, but mostly the 4th gear since it brings the most speed. I tried to solve this clicking with different gears and whatnot, but no matter what they still clicked when the vehicle moved forward to backward. The motors and the gearing also bring a lot of torque as much as it brings speed, and this might be one of the problems. Is there any way I can solve this issue so the gear clicking will stop in this situation (moving foward and then straight to backward) for now on? Here's a photo of the bottom of the drivetrain. Thank you in advance for any assistance that you may be able to provide!