Search the Community
Showing results for tags 'monorail'.
-
Hello, and welcome to our Monorail topic!!! --- Here's a list of notable contributors to this topic, as well as their Flickr pages, Youtube channels, etc. @Trekkie99 https://bricksafe.com/pages/LegoMonorailFan @djm https://bricksafe.com/pages/djm, https://www.youtube.com/channel/UCaiwT968-E48IHGE00ZnVWg @Asper https://www.youtube.com/user/MrAsperka @FiliusRucilo https://www.flickr.com/photos/filiusrucilo/ @Mark Bellis http://www.brickshelf.com/cgi-bin/gallery.cgi?m=mbellis @fred67 https://www.flickr.com/photos/54894071@N06/ @Paperinik77pk https://www.flickr.com/photos/138174786@N04/ @ronlmitchell https://www.flickr.com/photos/60322621@N05/ @sed6 https://www.flickr.com/photos/96675811@N02/, https://www.youtube.com/user/sed6 @MonsieurCaron https://www.flickr.com/photos/73552079@N05/ @Holodoc @Masao Hidaka https://www.youtube.com/user/MasaoHidaka @mrfuture @Hanso https://www.youtube.com/user/SiouxNETonTrack, https://siouxnetontrack.wordpress.com/ @XG BC https://www.flickr.com/photos/145736297@N05/ @tkf @Arefalalmani https://www.instagram.com/afob.arefalalmani/ @Buttermaker https://www.youtube.com/c/Buttermaker-Klemmbaustein-Messi @DoVoMonOgel https://www.flickr.com/photos/tolvvolt/ @zephyr1934 @Rijkvv https://www.flickr.com/photos/richie_v/
-
What would people like to see if LEGO did a suspended railway set? This could be anything that would work with the system
-
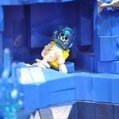
Hi everyone, I finished my latest build. This build is for the LowLUG collabration at Bricks am Meer in April. In the tower is the HQ of Alpha Team. After the attack of Ogel on their previous HQ, Alpha Team had to restart at a smaller location. Below the HQ is an cafe where people can buy some drinks and snack. This tower can be reached by monorail. For more pictures, please look into my Flickr album. Questions and feedback are appreciated.
-
Hello dear Lego fans, After having signed up here in the Eurobricks forums in 2011, I posted a new thread in the "Hello my name is..." section about my plans to create my own Lego City layout. Now almost 9 years later, I can finally show you some of the progress that has been made just at the beginning of the new decade :) Good things come to those who wait. Renovations on the attic are finally complete (apart from the lighting) and we now have around 110 m² to unleash our imagination. The current plans of the Lego city layout add up to around 60m² in size and they are, as you can see in the video, far from finished. However, I thought you might be interested in some of the things that my girlfriend and me were designing in the last couple of days. The name of the city is still unknown, but the overall design has started to take shape with a downtown area, which includes all the modulars, and shops, a residential area, an amusement park, a winter village, a train yard and a harbor/beach area. I would also like to add an airport to the city and some of the classic monorail tracks have been placed already. We are also getting into MOC a little bit and we will add our own creations to the layout as soon as they look nice! The commentary of the video is in German, but I am trying to add English subtitles into the system. Please let us know what you think here in the forums or in the comments section of YouTube. I will keep you posted on future updates if you like :) Note: All of the parts used in this layout are original Lego parts, except for some of the baseplates. I thought that lime green in the Hogwarts castle area might look cool, but I will probably exchange it for regular grass green baseplates in the near future. Thank you so much for taking a look! :) Christof
-
 Hi Everyone, This is an alt of Lego set 6990 Monorail Transport System. It has the monorail train, a station, outpost, and two small one-person space craft. Sadly I could not figure out how to deeplink images from flicker, even after reading and returning to the page on Eurobricks about it many times. Thankfully I CAN post a link to the pictures!!! So here is the link to them. Lego 6990 monorail station and outpost (alt) | Flickr I hope you all like it! And also, Happy New Year! GOD Bless you! Seatron Edit. I got it working so now you can see the pictures when you click on the link! also, some of the p[ictures have descriptions but you have to click on the image to so them.(at least on my device)
 -
This is my Futuron city created using only 90s existing pieces. Why Lego group never made a Futuron base with a Monorail track so you could add it to the 6990 monorail set? If you like this type of designs, please take a look at my White/Black/Trans-Dark Blue group. https://www.facebook.com/groups/1421271881962817 Enjoy it!
-
 Dear All, one of my favorite themes (in many regards) is Steam Punk. Steam-propelled futuristic technology, in shiny brass, gold and silver, leaning towards Jules Verne's "fiction". Not the dirty dark, maybe original punk. I am not sure whether the shiny stuff is Steam Punk at all; this genre has taken on so many forms and interpretations … Whatever, it may well be that my affection for Steam Punk comes from my admiration for Thermodynamics – in chemistry of course So guess what happened, when in late 2023 I became aware of the #85007 set “Steam Punk Railway Station” from Pantasy/China? Yes, I got sort of positively nervous. It quickly turned out that the title of the set is misleading: They use the railway station shown on the front of the box and the two instruction booklets simply to hide the Steam Punk locomotive along with one carriage. I almost freaked out, when I saw the train. And finally I passed out when I saw that the train is of the suspended monorail type … for more than two decades I was dreaming of a suspended LEGO monorail train – read more about that here: https://www.eurobricks.com/forum/index.php?/forums/topic/150261-wip-lego-monorails-custom-rail-systems-crs/&do=findComment&comment=3680627. With respect to the Dark Side: Pantasy is using GoBricks pieces (as per advertisement on the box) – and these have reached the 100%(+) LEGO quality level, no doubts. OK, as expected, has been discussed on EB. Very small injections points (barely visible), perfect colors, perfect clutch, same “softness” as the latest LEGO bricks and plates have, metal gold and silver pieces all over the place. On their website (https://pantasy.com/blogs/news), they talk about their approach, which is a quite nice read. Building that set was pure and utter fun. It was as if the Pantasy management said to the designers: “Folks, go Steam Punk nuts – no restrictions, just freak out and have fun. When you need more pieces to make it even more glitzy and punky – just do it”. 2723 pieces, BlueBrixx asks for €140, you can get it much cheaper – it is currently almost everywhere sold out, though. No surprise. This set is a blast in every regard. Motorization of the engine From day one, I wanted to motorize this model – it appears to be designed for display only. There are a couple of challenges to do so, though: For one, any propulsion system needs to turn the wheels on any of the four roller brackets the locomotive and the carriage are attached to. Second, available space is rather restricted, as the locomotive is essentially one “solid” piece of snotted ABS – except for the magic glass boiler: (At first, I thought: OK, TLG's well known color vomit coding here as well – but then was told that I was totally wrong: It is right here, where the Steam Punk magic generates the power to propel the locomotive: Inside the glass boiler. Attached is a 10 cylinder V-motor connected to the 8 blade pearl gold propeller on its back side – which actually propels the train. Well, there is no color coding at all in the entire set, except for the boiler brackets. So yes, these colors very well may represent the Steam Punk magic). Third, the elevated track Pantasy used is of the roller coaster type, JK Brickworks also employed for their suspended train (https://jkbrickworks.com/suspended-train/) and thus may be no good choice for motorizing a 700+ g heavy Steam Punk train; this will certainly will fail in roller coaster curves. The original (four individual) roller brackets look like this (Stud.io render) In conclusion, there wasn’t any space other than within the boiler for motorization, but I had no clue how to get any gears, axles, rubber bands to the wheels of the roller brackets. A medium PUp motor may fit in there, but the next challenge would have been PUp cabling and powering. The carriage also provides some space, but no LEGO hub fits in there, even after hefty modding, at least in the lower league I do my builds. But then I remembered a post not mentioning the elephant in the room, a thread @zephyr1934 created back in early 2021 on EB (https://www.eurobricks.com/forum/index.php?/forums/topic/184036-a-review-of-circuit-cubes-without-mentioning-the-elephant-in-the-room/), which deals – in addition to the Elephant in the room – also with the Circuit Cube BLE hub and Cubic motors from Tenka (https://circuitcubes.com/). Furthermore, @Asper reported on using these (@HoMa called “critters” ) for train automation of his four wide trains, whereas @Ts__ showed a prototype truck for train displays. I looked at the dimensions of the motors (the Cubic motor is 2x 2x4) and the hub (2x 4x4) – and … BOOM – brain currents got ballistic. Furthermore, the wiring between the motors and hub is done with Dupont connectors. Tenka uses 2-wire sockets receiving the corresponding two pins of the hub outputs and motor inputs; however, these sockets are too large to fit through a Technic hole. One can easily make single socket wire ends, which then do fit very well. After some tinkering, MLCad suggested: It may work. My plan was to a) motorize the 10 cylinder V-engine from “within” the boiler section, b) propel the entire train with a motor mounted on a 2-axle monorail bracket assembly, c) route the cables somehow to the hub, which is to be mounted in the carriage in a way that one can easily turn it on and off – and d) easily recharge the hub … so far, a) to c) have been accomplished; d) is on the to-do list, see below. Here we go: New roller brackets for the locomotive and the carriage, and the entire driving motor assembly (render and photographs below). I used two stacked 9V train wheels arranged in the same direction – this way, the (custom) rubber band on the driving wheel has good grip. The rubber O-ring on the powered axle for enhanced traction is one I found in the lab – the white LEGO O-rings do not provide sufficient grip, even on the 12V rails “with teeth”. Here is what I use as my monorail track (no Dark Side elements to be seen, all pure LEGO): https://www.eurobricks.com/forum/index.php?/forums/topic/150261-wip-lego-monorails-custom-rail-systems-crs/&do=findComment&comment=3680627. Photograph below: One Tenka Cubic motor “inside” the boiler, with an attached axle extending all the way to the front, rubber band connecting to the 10-cylinder motor driving axle. (Custom) cables attaching to the motor are routed through Technic holes in the boiler bracket and locomotive frame. They extend to the Circuit Cube hub mounted in the carriage. Pantasy designed the boiler essentially as an all-four-side-studded central structural element. All other parts attach to this element and, at the same time, the “side panels” secure the whole model from falling apart when lifted through snotted connections. You can remove the two large “side panels” - and are left with this when they are put together (and yes, good clutch power really shows): This is the entire engine … ... and the lightly modded carriage: The photographs below are showing the Pantasy railway station, designed as a terminal station. Some folks were complaining that the four platforms (labeled 2 to 5, prints of course - there are no stickers in this set) don’t make any sense, as the monorail runs perpendicularly to the apparent platforms. Of course this makes sense : Below are four tracks terminating at the station: (track 2) 4.5V track – coal delivery for steam locomotives on track 4 and maintenance; (track 3) 9V track – passenger and freight trains; (track 4) 9V track – real steam passenger trains; (track 5) 9V track – freight trains. The monorail is of course floating above all that; when the suspended train is leaving, all these tracks can be serviced ... duh. I thought this is the whole point … The Pantasy Railway Station … Station “unfolded”: Have a look inside: Ticket counter (right) and barista coffee stand (left) … when you push the 3-elements revolving door, the golden (Technic break) disc and the clock hands are spinning as well – this calls for additional motorization … Train 85-007 ready to depart … no surprise, should James Bond be on board … After arrival at the other terminal station: This is the Circuit Cube doing all the work; charging is from the top (see below, though), the on/off switch is easily accessible from the back of the car. To-Do list: I need to find a way of controlling the Circuit Cube hub with an ESP32. This has been demonstrated by @Asper; he has provided his code on GitHub (https://github.com/asperka/LEGORemoteCircuitCube). Steffen used a tiny M5Stack Atom and used the Visual Studio Code IDE with the Platform.IO extension described by him here: https://www.eurobricks.com/forum/index.php?/forums/topic/184878-controlling-two-circuit-cubes-with-one-lego-remote/. I’d like to use the same program I wrote for my Crocodile; this was done using the Arduino IDE and Cornelius Munz’ Legoino code (https://github.com/corneliusmunz/legoino). The reason is simple: It works with 4 optical sensors I want to use again for stopping at both terminals and acceleration/deceleration phases. We will see how that shakes out For charging the Circuit Cube, I need to make a custom USB cable (space … need a flat top USB-B plug). Make a longer video showing how powerful the Circuit Cube stuff really is. It is simply amazing. Video wise, I only have this less than 30 sec clip: First, the 10-cylinder engine fires up, then the train departs, totally loses focus, stops somewhere , V10 stops as well as it needs to kick into reverse (yes, the motor goes into reverse, this is a Steam Punk motor, no gear box here – you can see that by carefully looking at the pistons, they go down and up upon return, not up and down when it started), train reappears, totally out of focus, stops and gains focus, motor shuts down. I suck at taking videos, I know. https://bricksafe.com/files/Toastie/pantasy-steam-punk-railway-/Pantasy Steam Punk Train.mp4 (Updates will go into this thread) All the best, Thorsten
 -
Something I made a couple of years ago for a microscale set competition. The toughest part was getting the shape of the "domes" correct. Some bits on these pictures aren't connected (as it was for a competition and I didn't have time/nor was it necessary to make everything properly connected). Recently I had some time to fix these little issues and if you're interested in getting the instructions for this moc feel free to contact me at brickster.creations@gmail.com The moc is now quite sturdy but still not swooshable.
-
This one was built almost two years ago (I lag behind a bit with publishing...) for a small exhibition held in Warsaw. We have built a city that had two areas - one a regular city and the other a Classic Space Moon base. There was a "monorail" train (actually using standard rollercoaster track) running through the town and connecting it via portals located in the mountain range with a Moon base. This is the station to go to if you wanted to get to the Moon, hence the name. I have also spent considerable amount of time to design and created some stickers, the most important of those being the following advert for the train (It reads "we connect tomorrow with today" in Polish): The station was 3 baseplates long, had the platform quite high with outside stairs leading to it, a lift at the back operated with a crank as well as stairs in the building for those wet days: Here you can have a look at the back of the building with the lift located at the far end: The idea for this station started with angled glass (inspired by some Warsaw buildings from the Soviet occupation era). This angled glass is best viewed when both the track and a platform is removed: BTW, the Wawlugowo name seen here is the name of the city, after WAWLUG - the name of our local LUG :) There are some more pictures on my Bricksafe page. I hope you enjoy it :)
-
Hey guys, many of you know my monorail. i did a diorama a while back showing the japanese hitachi alweg innuyhama rhine Park monorail in a japanese setting. i now decided to plan to expand the diorama to cover all the major alweg monorails. expect things like seattle, turin, disneyland and ofcourse the original test site in köln-fühlingen. just thought this is better as its own topic. What was alweg? alweg was a company founded by Dr Werner Grenn to develop a new kind of railway, one without the traditional steel wheels and two rails. they built a test site in köln fühlingen (this area is now an artificial lake) in 1951, just a few years after ww2 ended, in a still war ravaged germany. the first smaller scale prototype was unveiled in 1952. this prototype ran on a narrow concrete beam through banked curves at incredible speeds. they even demonstrated stopping the train in the steeply banked curves and starting it again to wow the audience and demonstrate just how capable their system was. after that they shifted the concept from high speed long distance to urban, commuting stuff. the first full scale prototype was unveiled in 1957. it was this prototype that walt disney and his wife supposedly saw when they did a trip to germany. that was the inspiration for disney to want this exact system in disneyland. the next step in history is the expo italia 61 in turin where a short Demonstration line was built. it featured sleek, rounded trains (a Nightmare to get right in lego). next was the seattle system which some of you might know in 1962. to conclude these where the only 3 alweg systems ever built by alweg except the test track in köln fühlingen of course. Hitachi -Alweg the japanese company hitachi partnered with alweg to produce monorails of the alweg type. the first one they ever built was the innuyhama rhine Park monorail in 1962. in 1964 they built one of the biggest monorail systems ever: the tokio haneda line. in 1970 the osaka monorail was built. at this time the original alweg company was dead. they could never get the big projects for their system sadly. the hitachi engineers managed to eliminate one of the flaws of alwegs system: the protruding drive tires which didnt allow for a completely flat floor. Hitachi produces monorails with this system till today. The mocs (this will be updated as things are built) so the first one is older and exists irl: the hitachi innuyhama rhine Park monorail this is a 3-car monorail just like irl but my built version only has two cars to improve the way it drives as 3 are a traction issue especially through curves. also it is a little different due to changes in the design to facilitate auto reverse/stop and negotiating curves. this is what it currently looks like. next is the first module: japan here is the turin train (shape is a nightmare to get right) and here is seattle the diorama is planned to feature a single track running through japan at one end through seattle, turin, disneyland and ending at the test site in köln-fühlingen. thats the plan currently. hope you guys like this idea and will add more pics to the history tomorrow. today i added all the other modules (still empty and without any landscaping) the diorama is in order of year of construction so köln test track first then disney then turin then seattle and then we are in japan where hitachi essentially took over the alweg systme after the companys closure. japan isnt modelled after a specific one just generally as there are many of them operating there (for example tokio haneda osaka etc.) although the train is modelled after the first one they produced. had to do a bit of trickery as the monorail has issues with it getting stuck on an inclines on ramp (can handle the incline itself just fine but not the transition, not yet atleast...). the deviders are supposed to represent the sky and are there to smoothly devide the different parts. next progress: the original alweg test track in köln fühlingen. you can see the smaller beam of the scaled down test vehicle and the larger one of the full size prototype. this is around 1958 as walt disney and his wife are looking at the monorail beam. the control tower and shed has also been built as close as was possible because the pictures of it arent that great. did i say previously it was getting stuck on a ramp? well not anymore: now my monorail can climb slopes. it was getting stuck previously due to the switch car resting on the motor car and the motor car pushing the switch car down a bit when transitioning from flat to slope. now i have made the switches sides smaller (i use a 1x4 technic brick on either side now instead of the technic frame) and have moved the switch further towards the wheels of the switch car giving it more "ground clearance" so to speak. see for yourself: this is only a render but is built irl too. havent found the time yet to make a good irl picture. the other changes include a different structured roof to give back the rigidity i lost with the frame. essentially swapped the more rigid roof of the motor car to the switch car. changed the coupler of the switch car too as the newer style one is slightly less bulky giving more clearance. the buffers mounting has also been slightly altered and allows for more clearance now. i will change the other (currently digital only) models to this new undercarridge sooner or later. now its turins turn: i built the artificial lake the monorail beam ran through (the beam is still there on this part of the total system including the station). the building is the palavela or atleast part of it. it is rather difficult to recreate but you get the idea. and now there is a disneyland monorail. it is the mk1 monorail. i am currently not 100% happy with the canopy design and the transition to the passenger cabin. needs improvement for shure but everything else looks good. and here we have the köln fühlingen train that walt and his wife rode: now we go along to the disney layout: it contains the people mover and the submarine voyage incase anyone is wondering: yes the monorail track is supposed to be on the side of the submarine voyage with the platform for the subs being below the monorail station. i took some creative liberties. and now there is seattle atleast the current progress of that: it is modelled after the old now demolished station at pine street: not complete yet still needs roof and floor of the model. ...aaand done. roof was a nightmare to make. pretty happy with it, maybe will do a bit more detailing eventually adding other things like benches on the other side.
-
Just wanted to share this one. the rail system looks suspiciously lego monorail... https://youtu.be/ND3MegqYQFA?t=0h4m53s this video at 4:53 or click the link above. also super interesting system nontheless.
-
This will be the tread where i will share all my mils mocs. MILS is a standart where you have modules that follow a certain standart. For further info about MILS read here: https://www.abellon.net/MILS/ lets start with three mocs that have been converted to mils: hope you like these! more coming soon!
-
Hello, we love our lego monorail, so we mad an experimental moc. The inspiration for us was the crocodile. Have much fun.
-
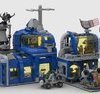
Hundreds of years in the future, a team of astronauts discovers a small moon orbiting a big ice planet. As they approach the surface, they discover wreckage of spaceships and large robots, some buried deep in the dust of the moon. Now, two years after the initial findings, the astronauts have built a base on the moon and are discovering more and more traces of an earlier battle as they excavate. Commander Chris Studstrong leads a team of scientists and engineers who have made it their goal to find out more about the earlier events on this moon. While some of the astronauts are on the moon's surface excavating, others are back at the base examining the discovered artifacts. If you like this model, you can support it on LEGO IDEAS: Classic Space Excavation Site on IDEAS Classic Space Excavation Site by Aldar Beedo, auf Flickr Let's have a look at the Protagonists: Classic Space Excavation Site by Aldar Beedo, auf Flickr Boris, Jenny and Lucas, as engineers, explore the wreckage and dismantle parts to be examined afterwards. Naomi, a chemist, researches the spacecraft's fuels and ensures that no dangerous reactions can occur while working on the wrecks. Ted, a scientist, and David, a geologist, study the lunar surface to find out more about the crashes and their causes. David's instruments have just made a very exciting find: a droid frozen in the ice under the dust! Gina works at the base and researches the technology and materials of the excavated objects in her laboratory. Jule, an engineer, makes sure the station's life support system is working properly and also keeps the spacesuits in good shape. There's nothing she can't fix! Bob, a reporter, accompanies the crew on their mission and documents all interesting objects and progress. An overhead railway is used to transport excavated parts and connect the base to the surrounding area. Pilots Phillipe and Cara can also use a crane to retrieve heavy debris. Classic Space Excavation Site by Aldar Beedo, auf Flickr Classic Space Excavation Site by Aldar Beedo, auf Flickr Classic Space Excavation Site by Aldar Beedo, auf Flickr To better cover long distances on the moon, the moon buggy is used. In addition, the friendly robot S.O.L.A.R.I.S. helps the team with the work on the wrecks and warns his team of potential hazards with the help of his sensors. Classic Space Excavation Site by Aldar Beedo, auf Flickr Classic Space Excavation Site by Aldar Beedo, auf Flickr Classic Space Excavation Site by Aldar Beedo, auf Flickr Classic Space Excavation Site by Aldar Beedo, auf Flickr Classic Space Excavation Site by Aldar Beedo, auf Flickr Classic Space Excavation Site by Aldar Beedo, auf Flickr This set consists of 2718 parts, including 12 minifigures, a robot, a space buggy and a lot of utensils for the excavations! By pulling or pushung the handle attached to the long part of the track, you can decide whether the railway should stay on the upper circle or go down. The track can easily be extended at the siding to explore new excavation sites. Classic Space Excavation Site by Aldar Beedo, auf Flickr Feel free to give feedback on my MOC! :) Best regards, Aldar Beedo
-
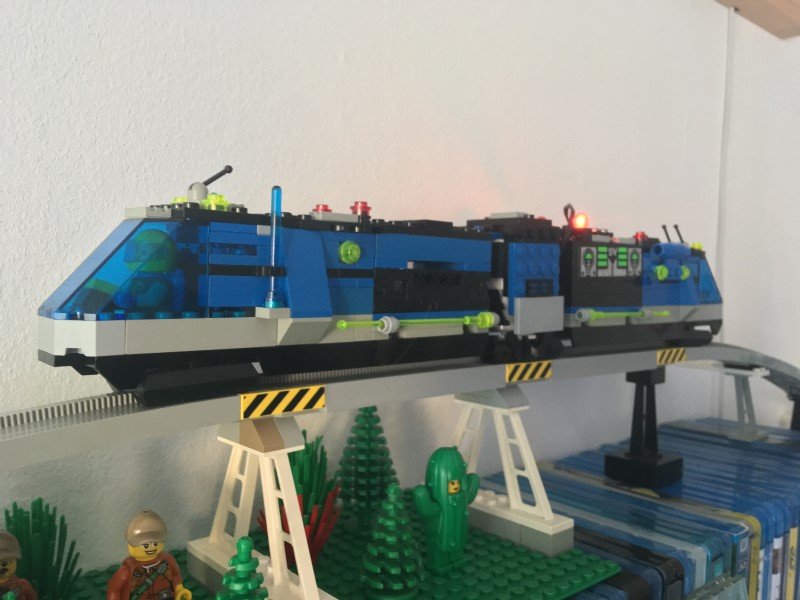
Hey, I haven’t seen a monorail here for some time ?.. I’ve built a Unitron-themed, because I like their colors and I think there was a way to little amount of sets ☹️.. I have also created a file with stud.io (mainly because I never used it before and wanted to test it), so if you want you could rebuild it. Here’s the link: https://rebrickable.com/mocs/MOC-19393/glx0711/unitron-monorail-train/ ?..
-
 One of the policies within Sioux.NET on Track, is to change a build every three years. In other words, when a build has been part of a Lego World demo for three years, it should be replaced by a new one. For example, loading the train was first done by the container crane, now it is done by the delta crane. The same applies for the train: the first years, we controlled the train by an NXT, now it is controlled by an EV3. For the new layout, I am thinking of replacing the train by a monorail (and thus renaming the group to "Sioux.NET on Monotrack" ;-). I always use Youtube as inspiration. To see how others solved the typical problems you run into when building something. But I haven't seen a Lego Mindstorms monorail yet. The Lego Technic monorail created by "Osi" (click here for an example) is most nearby for what I have in mind, but it is not using Mindstorms inside. In other words, I will have to use my own imagination. What a pity ;-) I started with creating the track. This was my first attempt: Although it looks good (I was aiming at an open, industrial look), the curve is not smooth enough for a train: So, I made a second attempt: That looks much better. It was not easy to get the curve smooth AND find a brick with the right distance. This is how I managed to get this curve: A simple train (only proof of concept until now), runs easy through the curve: The next days I will continue building a motorized train (proto). Let me know what you think so far Merry Christmas! Regards, Hans
 -
 This is a new project I just started. As most of my projects it will probably never get completed but will be a good showcase of some ideas for other projects. I usually don't do MOCs, just like to automate things and add some unusual effects. Last two years I've been collecting some monorail parts with the idea of making something monorail-based, with a few 4DBrix parts to control my budget and also to let me control the movement of the train. When LEGO launched the LEGO 75217 Imperial Conveyex Transport I had the idea of using it as a monorail but adding the new Powered Up hub so I can control it with a MINDSTORMS EV3. So this is the first proof of concept: the EV3 pikcs the Conveyex and make it move until an ultrasonic sensor detects it: To connect the monorail motor to the PUp hub I modded a PUp lights cable, soldering an old 9V plug to the power pins (1 and 2) of the cable: This makes the monorail motor be seen as a Light by the Powered Up (and BOOST) hub so it only works with apps that accept Lights but for me it doesn't matter since I intend to use my own bash/python script. But for manual control and my kids pleasure it also works fine with the PUp train handset: Roadmap: - add a micro-motor to the Conveyex to also control the linked chain track - use EV3 motors (or perhaps 4DBrix motors) to control the monorail Y's - sell a kidney to get a few more monorail parts - integrate the monorail circuit in a Star Wars diorama, with the help of a PLUG mate that is an expert in Star Wars universe The MINDSTORMS EV3 is running ev3dev (linux). This allows me to use a Bluetooth USB dongle to talk BLE with the Powered Up hub. And will also allow me to use some gadgets like NFC sensors to detect the train position or IRLink to control some Power Functions automations (like the AT-ST head). Questions and suggestions are welcome.
 -
Dear Community, please find below an update of my town layout (first time video). Thanks in advance for your fruitful comments and improvement feedback! Also, thanks to Rune for the additional monorail tracks! Main area of concern, how to best integrate an airport..??? My first thought is to add it behind the fairground area, using the monorail airport shuttle to liaise with the city.. Thanks in advance for your thoughts.. I usually take most of your valuable feedback into account - the more brains, the better ideas Wish you a nice day, night, evening, morning or afternoon!
-
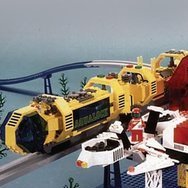
Another my own construction in the spirit of one of my favourites LEGO factions from childhood - the M: Tron. This time I built a space monorail, fragment of base, some rocky terrain and a mini fuel tank from the Blacktron II fraction. Read more » Bigger photos and full story here: LEGO Gallery - [MOC] M:tron monorail WIPs, Behind the scenes and other extras at my: Instagram | Facebook | Flickr
-
If Lego were to bring back the monorail as a new system, what would like to see from it? What features should it have? Also, what would it take to make a successful Lego monorail Ideas project? Two features I'd like to see which would work hand in hand, would be that the monorail could actually grab onto the track, that way allowing the system to work as a suspended monorail, all while using the same system. I forget who said it, but I remember hearing somewhere that Lego designers tested a monorail system idea with kids, but their reaction wasn't the highest on the "this is awesome!" scale. Whether or not the designers had a physical concept system or just drawings and concept art, it would be interesting to know what they may have had in mind for a new monorail system.
-
So here is my latest airport terminal. It's a custom modular. While it's custom, there are some obvious takes from the lego city airport set 7894, but not many. The inside is a full functioning terminal with a security check point, help desk, restrooms, gate area, bag check and bag claim, a lego store, a lounge and dining area and a observation area. It has its own monorail station which also has a bus stop and bike share station. I'm still working on rebuilding the jetways.
-
In the monorail system that I have been developing on and off since 2013 (from the Hidaka monorail that uses a City prototype of the Osaka monorail), I have built a Classic Space monorail train. The train has a new drive-train and is geared down 5:3 so that the heavier train will climb well. It is still based on a train motor but I stopped using belt drive. The average speed is up to 0.57m/s. The lights on the right-hand axle will flash when the train moves. This uses the other channel of the IR Receiver. The battery box (AAAs or LiPo) is behind the Space logo and is easy to change. There is a removable module system. The module on the train unfolds to become a scooter. There is a medical stretcher module and a power module on the ground. It has proven to be reliable on my loft layout. I will do a video in due course. I need to get the lighting right as it was too dark last time I did a video in the loft. As well as a second Classic Space train and a 2-motor goods train with extra wagons, I have prototypes for Futuron, Blacktron and M-Tron trains. More pics of the system here Mark
-
Dear All, my train layout is built “into/around” my home office, which is located in the attic. With the pitched roof area beginning at a height of about 60 cm (2,0 feet), there are not that many options for placing longer runs of LEGO track, as close to the walls in about 40 cm (1,3 feet) height. The floor area is 4,2 x 6,3 m2 (26,5 m2 = 285 square feet), whereas at 2 m height (6,6 feet) there is only a 40 cm (1,3 feet) width section … so beware of your head! Figure 1: Schematic views of my home office. Top: Room cross section. Bottom: Floor plan. All numbers in meters. [The most important question of course is: 2,3 feet? I simply used an online tool for the conversion – I am wondering, is the “,3” bit in the decimal system? Which would mean: 1 foot and 3 tens of a foot. That does not make much sense as there are 12 inches in one foot … and 2,54 cm in an inch. There are 30,5 cm in one foot (rounded) – so we have 3/10*30,5 + 30,5 cm = 39,7 cm which is close enough to 40 cm.] OK, I am just kidding – I lived for 4 years in the US – changed/added a good deal of things around and to the house and - it is absolutely no problem to adjust to the yard – feet – inch world. None what so ever. Because you have to; there are simply no “cm” or “m” in the US … Uhmmm – what did I want to show … sorry: Yes, bridges. When you live in an attic, there may be holes in the floor to get there via stairs. And maybe doors opening to another room. And furniture; certainly not only 60 cm high (I leave it in the metric world) … so you need to mount your track to the walls behind or even “through” furniture, under desks, and you need bridges – many. Essentially it is one large bridge - this post is about the brick- or semi-brick built sections on my train layout. Figure 2: Floorplan and track layout. Left: “Principal” track arrangement: Two main outer loops, two smaller independent loops around the chimney on the left and on the right. Right: Actual BlueBrick track layout. Note that there are two track levels. Red rectangles indicate bridges as referenced below. With respect to Figure 2, left: This was the principal idea: Two parallel main track sections going around the entire room (outer two red lines). Then one circle on the right and one around the chimney on the left. There are possible track levels, as indicated by the two stacked red lines in Figure 2, top left. Problem #1: The stairs (shown in green, top) to get up to my office; here only one section of track fits in between outer wall and hole in the floor. Solution #1: A long incline eventually allowing the two track sections to run “stacked”. Problem #2: The door (also in green, bottom) giving way to the next room stuffed with stuff that we regularly look for. Solution #2: A draw bridge, which is always in the “up” position when I am not playing. On the same image on the right, a BlueBrick generated track layout is overlaid. It actually consist of two “layers” – there is a good section of elevated track under my desk on the left and also behind some book shelves on the right. This is why the layout looks pretty congested in some areas. Most of the track running close to the walls is not visible (or is behind furniture) and is mounted on wooden supports which in turn are mounted to the wall. Some of these areas are rather complex modular constructions, as I need to get there from time to time. Then there are some regions covered with low-level “table” type areas (IKEA is your friend) – as well as supports mounted to furniture. The same is true for “tunnels” – they are all over the place as I have to run some track sections “through furniture”. Coming back to bridges: The red rectangles in Figure 2 on the right indicate the LEGO built bridge sections. I used all sorts of LEGO bricks: DUPLOs from my daughters (now 20 and 22 years old; asked for permission of course!) to swiftly gain elevation, combined with System bricks and plates to adjust to required heights/widths. And Technic stuff to secure things. Oh well and Monorail track … I guess Monorail enthusiast will not like that … BUT: This stuff is fantastic to structurally support bridges!!! Bridge 1 This one is lame – uses the Monorail straight tracks as main structural support – and DUPLO bricks mixed with System bricks and plates for the end-sections. Figure 3a: Bridge 1, location on layout cf. Figure 2. Figure 3b: Bridge 1. Bridge 2 This one is a little more complex. It is a fully automated draw bridge integrated into my PBrick control scheme (and here). The PBrick operating that thing is a Scout. It has its own ID address and understands 4 commands: “Up”, “Down”, “Stop”, and “Status”. Manual control is also possible; the switch to toggle the mode from “remote” to “manual” control is the light brick in combination with the built-in light sensor of the Scout. Further, there are two touch sensors to ensure that the Scout knows the status of the bridge. One detects the fully “up” and the other the fully “down” position. When both sensors are open, the bridge is somewhere in between. To make things a little more appealing, a slightly modified/extended #42042 crane is used as power source. I needed to extend and fix the boom to the ceiling as the load is fairly heavy. Furthermore, I used a pulley system apparently called “threefold purchase” (according to Fig. 6-21 on page 64 in Sariel’s extremely helpful “The unofficial technic builder’s guide” book (http://sariel.pl/2016/10/guide2/) to get a mechanical pulling power advantage of 6. This way the PF M motor used in #42042 manages to draw the bridge up from the fully down position, which requires the biggest drawing momentum, without hassle. Figure 4a: Bridge 2, location on layout cf. Figure 2. Figure 4b: Bridge 2, entire structure, “down” position. Top: Top view showing the track. Bottom: Side view with a “track lift” on the left, LEGO storage shelves on the right, and a door to the storage room, which remains clear in the “up” position. Figure 4c: Bridge 2, details of the sensor mounts (“up” sensor mounted to the book shelf, “down” sensor mounted to the underside of the bridge) and the pair of guide rollers. Figure 4d: Bridge 2, details of the Scout PBrick, the #42042 crane, and the pulley mechanism providing a mechanical advantage of 6 when drawing/releasing the bridge. This video shows a little more … Bridge 3 This bridge is fully LEGO brick-built and spans my entire “City” area. It also connects to the next bridge via a curved elevated segment, which was quite challenging (for me …) to give the supporting structure a “solid” appearance. Figure 5a: Bridge 3, location on the layout cf. Figure 2. Figure 5b: Bridge 3. Top: From the wooden shelf track support on the left an elevated two track segment travels behind the City buildings. Bottom: The two elevated tracks merge into a curved one-track segment. Figure 5c: Bridge 3. Bottom left: The curved one-track segment. Bottom right: There is a small pedestrian bridge providing access to the light house. Top: The curved segment continues with a longer straight stretch. A largely modified #10027 train shed (with an additional structure on top) serves (also) as track support. There is a small grating type secured elevated path, which allows the City train personnel to survey the City traffic situation and act properly … Bridge 4 This bridge is a semi-brick-built structure; however, as it spans the opening for the stairs to the story below my office, I wanted to be sure. There is a wall mounted main support which is “decorated” with a supporting structure consisting of Monorail curved track segments; on top though the long incline in the back as well as the elevated track segment connecting to Bridge 3 is entirely brick-built and self-supporting. Again with System and DUPLO bricks – there is even some DUPLO SNOT. With the addition of Technic beams, the pylons have become quite sturdy, so I may even replace the wooden “floor” sections with actual LEGO bricks and plates but that has to wait for a longer time, I guess … Figure 6a: Bridge 4, location on the layout cf. Figure 2. Figure 6b: Bridge 4. Bottom: Entire view of the bridge structure; on the right, the City bridge structure merges with the level 2 section of the outer loop (cf. Figure 2). Top left: In the front (barely noticeable) the inner main loop at level 1; in the back the long incline (sloped at 2 plates/ 9V track piece) of the outer loop main loop. The arrow points to the incline on both pictures. Top right: Last bridge section leading to a long stretch of track behind book shelves. Figure 6c: Bridge 4. View from the stairs giving access to the attic (cf. Figure 2), showing the curved Monorail tracks as supports along with the Technic cross bars. Figure 6d: Bridge 4. Some details of the Duplo-, Technic-, and System-bricks used for the support structure. Figure 6e: Bridge 4. Details of the last bridge section leading behind some book shelves using straight mono rail tracks and bridge support parts (#55767) as main structural elements. The pylons are made from Duplo and System bricks. Bottom right: Some Duplo SNOT on the main pylon. There are some more images on BrickShelf (http://www.brickshelf.com/cgi-bin/gallery.cgi?m=ThorstenB), just navigate to the “bridges” folder. These are pretty large in size though. Best regards, Thorsten
-
Let me introduce you to my new creation. PLAYING IN SPACE SINCE 1978 by Cristiano Grassi, su Flickr Have you ever wondered how our Spacemen Heroes could travel for almost 40 years through space without getting older or bored to death? Here’s your answer. For forty years our heroes have been playing with LEGO bricks! I was reorganizing some minifigs when I found a spaceman that I used to play with when I was a child, having him live the most amazing adventures. And I started wondering “He’ll be 40 in a little while, what’s his secret?” So, I imagined him, together with all his travelling companions, playing with a LEGO Space base for forty years. Maybe it’s true that playing with LEGO bricks keeps you young. What do you think about it? Do you find it new? Interesting? Creative? I had never seen something like this before and it's one of the reasons I've launched the project on LEGO Ideas. Another one is to see our beloved Classic Space minifig come back, or, why not, maybe even a few themed sets could come back. This project could act as a springboard. If you like, here's the link https://ideas.lego.com/projects/b21ccd00-a013-4509-9614-65cdab72ec82. Let me know what you think about it.
-
I have a standard 36 inch by 80 inch hollow core interior door on folding legs that serves many purposes in my hobby room. It constantly gets repurposed for any number of different hobbies I enjoy. Currently I have it set up for my trains and I've tried to cram as much track and functionality into it as possible. Right now my layout has: two complete loops, a crossover between the two loops, a reversing leg, five sidings, nine switches, a passenger platform with crossing, a cargo or maintenance terminal and room to park all my trains. My blue cargo train (60052) and white passenger train (60051) can run at the same time despite the zero clearance between the loops. The BNSF loco can navigate the entire layout but cannot pass another train on the curves because of it overhang. I know it might look a little jam packed to some but it provides me with endless switching and running possibilities. Hope you like! Newest update- Here's a video of my layout today with only my custom trains running.