Search the Community
Showing results for tags 'diy'.
Found 18 results
-
Hi all, I've started to use again the 3D printer after a big time it was unused (I had to re-align it and still has some work to do). Thinking about a model of @Evans (a large steamer in 12v style with old 12v medium size wheels - those of 7750 , but in black), I tried to recreate the original 12v medium wheels design and I also tried to go further, enlarging them to 37mm size. The new wheels feature 10 spokes as the original old wheels, angled at 36° each. I used Tinkercad since it is easy and more than sufficient for my projects. And this is the result ,printed both in black and red (red filament is new - I have to understand why there is black filament residual - I'm still a total noob on 3D printing ). I printed on a medium quality setting for the red ones. The black wheels were printed on draft setting. The filament I used is PLA - a medium cost one but it works fine. The red color is somewhat between the red one used for new Large wheels and the old red of the 80s. I think there are darker and lighter red filaments, but it's really difficult to tell if the printed result will be of the correct color (the raw filament color is quite the same as the original Lego wheels, but once printed...they are a bit brighter). I used a pair of normal red wheels (the ones used on wagons - like in 7720) I removed the original wheels, kept the "red axle" and used it with my 3d printed wheel. Then I locked again in place the red pin on the black wheel holder brick - and that's all. I'll post here all my experiments - there's a lot to improve! If you have any ideas or suggestions - feel free to comment! Ciao! Davide
-
Interchangeable Hat Wig. Got the idea from Captain Becker. He glued his together - I left mine separate so I can reuse it for different color combos. Wanton destruction aside, I think the prototype turned out pretty well. 1 down, 10 to go! UPDATE: Added some pics of Imperials
-
Redcoat officer. Hat from Hector Barbossa, wig from Revolutionary Soldier, arms from Toy Soldier, torso from Imperial Admiral, legs from Sushi Chef
-

Building Desk And Storage Shelves [Now Finished]
MxWinters posted a topic in General LEGO Discussion
The other day I posted a reply to the Stroage and Sorting LEGO thread showing my plans for a building desk and storage shelves for my LEGO collection. Considering that this is a big DIY project I thought I post a seperate topic showing my progress. Incase you didn't see my post in the other topic and due to some of the details in my other post having changed from my original plans, I figured I would repost the updated details in this thread. The desk will be made from 18mm plywood and will be 1650mm long, 533mm wide and 660mm high. The shelving will be made from 12mm ply and will have 28 shelves, each shelf will be 801mm long and 150mm wide. Total height of desk and shelving unit will be 2262mm. I am also going to build a wall unit to give me extra shelves which will be 825mm long, 150mm wide and 1120mm high. The main shelving unit on the desk will hold 168 plastic food containers and the wall unit will hold another 60 containers giving a total of 228. Each shelf on the desk and wall unit will be angled at roughly 15° and they have an edging strip to stop the containers sliding out. I have added a piece of offcut in the centre of the desk shelving unit at the top that sticks out to fit a worklight as this unit will be in the corner of my living room which isn't that well lite. My Dad had a spare LED batten light fixture that will be screwed to this bracket. I have also added a L-shaped section under the desk for my 1x1 storage bricks that I have all my Power Functions stuff in. This image shows the SketchUp drawing of what I'm building. Ignore the different coloured textures in this image, I have coloured them like this as the SketchUp file also contains a cutting plan of each sheet and the different colours help me to know which part is what. The desk, shelves and wall unit will be painted gloss white to match my computer and electronics desks. The image shows part of my LEGO collection stored in plastic food containers which will be placed on the shelves and wall unit. Still have loads of parts that still need sorting as you can see to the right of the photo. Hope you don't mind me creating a new topic but this is a big DIY job and I felt it should have it's own thread. Plenty more updates to come. -
Hello, I have been designing some custom LEGO stickers lately and I'm really enjoying it, I have found this place near me that prints good quality vynil stickers. The problem is that these stickers are quite thick, so they won't work for example for the legs, cause they come off when the leg bends. Same for the heads when putting on hair. Is there thinner vynil sticker paper that would work for the legs? What's your experience? I'm also considering waterslide decals, I've read the tutorials here on the forums. I couldn't find any recent example of custom minifigures made using this technique, can anybody share some hi res photos? Also, is there any way to print light colors on dark pieces with waterslide paper? Thanks! ;)
-
 Hello :D I have made a few decal design I'd like to print or get printed, but I am not sure about what is the best way to do it. Is it better to do it at home? Or is there services I can use? (I live in the UK, in case you have specific services to recommend) Most services online assume you want to print a large number of the same sticker, but it's not my case. I've seen also many people use the "laser printer" technique to print their own stickers at home. Do they turn out durable? Do they have good quality, is the dithering noticeable? In the past I had stickers printed on a PVC sticker sheet, but they were too think and didn't stick enough, so over a few hours they'd just come off round surfaces like minifigure heads. Also, they were very easily scratched, which is not great... If you don't mind sharing photos of your own custom decals, it'd be greatly appreciated! Thanks :)
 -
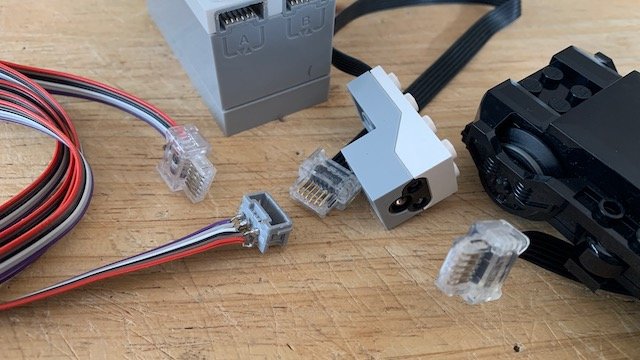
On the basis of a post I ordered the parts from AliExpress to make a Powered Up Extension Cable. I would like some advice. The photo shows my best efforts. When I plug in the light sensor - it lights up ( but I did not test beyond this) The train motor does not run. Without a crimping tool and rather basic soldering iron I was able to make a cable. I have tried to test the voltage and all seems OK, but I must admit I don’t really know what values I should be getting. I would also seek some advice on how to test the voltage values of the pins. I’ve used computer ribbon cable, is this OK? The extension cable that I made is about 100cm, it this too long? The size of the male plug from AliExpress had to be trimmed and reduced in size to fit into the LEGO HUB. I’m absolutely stumped. Any advice would be gratefully received.
-
 Hello everyone, I have been in contact with a few fellow eurobrickers and some of them have wanted a truck topic where we can all share different designs for our trucks and trailers. These designs could also include maybe some clever and effecient suggestions to show others how you made your amazing MOC! All forms of trucks are accepted tow trucks to mighty expedition trucks! Post your truck, or gain inspiration from others! For starters I will share mine: A sporty flatbed truck!
 -
Since my son is about 1.5 years old now, I have a very good reason to start playing with LEGO(/Duplo) again. :) Okay, we are still in the Duplo-phase (can't wait for mindstorms/robotics), we like to play with some custom cars. So this is a remix of a Citröen 2CV. The idea is using an existing 2x4 car base (like 12591c02) in such a way, minifigs are placed upon this car base. This will ensure a good LEGO connection, without too much printing tolerances issue's. In this case, you may notice a 3d printed car base. Although in general, from quality/price perspective I would recommend to buy standard LEGO/Duplo parts when ever possible. ps1: If you like more LEGO - 3d print combinations, we are happy to show more :) ps2. @MODs: Since I don't known, where to place this 3d printed MOC, feel free to move it somewhere else. ps3. When printed at 50%, it does NOT fit LEGO. (Duplo wheel axis are blow studs, while LEGO wheel axis are in between studs.)
-
Been wanting to try this for awhile. Not bad. :-D Real windshield on the left, dyed one on the right. Basically I boiled a cup of water, added a teaspoon of turmeric, and dropped the windshield in and stirred it every now and then. I did this a couple of times, each time taking the windshield out and reheating the turmeric water until it was boiling again, and repeated the process. Afterwards I let it cool and then rinsed it off under some cold water. When you look at it with your own eyes next to a real trans-yellow windshield, the color is pretty close, but I could see adding another half (maybe whole) teaspoon of turmeric to the mixture. Right now it's a little bit on the green side. Adding more turmeric would definitely be an improvement.
-
Myself, @jtlan, and @codefox421 bought a full loop of ME Models R56 metal curves way back when we still expected to get an all-metal rail design. As we all now know, the all-metal rail design proved a fantasy, and ME Models delivered Code 100 rail set in plastic holders. This track has proven extremely finicky when we've used it mainly because the Code 100 rail is not pre-bent before it is inserted into the plastic holder. This means that the "curved" track is constantly trying to straighten itself back out and subsequently alters the geometry of the plastic holder such that all the curves are too wide for the nominal radius of the curves. The then incorrect geometry makes assembling the curve very difficult as you have to force the parts into the proper curvature and they are very keen to come apart. The most visible symptom of this issue is the relatively sharp angle between the non-contiguous sections of Code 100. This wasn't too bad when the curves were new, but it has gotten worse over time. A circle of metal R56 when new The same parts almost a year later Straight metal track when removed from the holder So today, myself and jtlan decided to try to rectify the issue by doing exactly what ME Models failed to do: pre-bend the rails such that they aren't messing with the geometry of the plastic holders (or at least not as much). What we ended up doing after some trial and error was building a LEGO roll bender through which you can run the Code 100 rail. It's hard to show the rail in the rollers as someone needs to be pressing down on the assembly for it to not come apart while rolling, but this picture gives you a general idea of what's happening. You feed the rail through two of the rollers (the sides of the 3x3 disks fit somewhat nicely into the side of the Code 100 rail - do note that this will damage the disks if you roll enough track), and then it will deflect upward when it hits the third roller. This causes the rail to deform into a tighter radius than required, but it will spring back a bit due to physics. The way we determined how to space the rollers was simple trial and error. The final spacing we used is shown below. Here is a piece of rolled track next to the plastic holder. You can see that the roller spacing we chose actually makes the curves slightly too small, but we wanted to compensate a little for the fact that we can't bend the ends that well with this method. Either way the the forces distorting the plastic holders are much smaller than before, and it should make the track easier to assemble and less prone to blowing up. Here you can see that the connection between two pieces of rail is much smoother than before: We haven't rolled our whole batch of R56 yet, so there might be more to this saga, but so far this looks promising. Anyone else experienced similar issues with the ME Models metal track and/or have tried to fix it?
-
Hello fellow train heads, Today I have for your viewing pleasure a 9V system that's been adapted for Lego narrow gauge (4 stud wide) track: NG: 9V shunter (3) by Nick Jackson, on Flickr Here's the engine up close: NG: 9V shunter (1) by Nick Jackson, on Flickr And the underside: NG: 9V shunter (2) by Nick Jackson, on Flickr Now here's a video of it in operation: NG: 9V shunter (vid 1) by Nick Jackson, on Flickr It's pretty finicky in operation at the moment, so I'm looking for your input on ways that I can improve this system! The two main areas that need help are 1) the engine's traction and 2) the electrical pickups. Thanks in advance for your help! ~Nick J~
-
 I was wondering if it is possible to make custom technic pieces out of acrylic or something? For example, buying a sheet of acrylic the same thickness as a lego technic and then drilling the appropriate holes in it?
 -
.thumb.jpg.050f28ccd893f68d8416233f594d9f3d.jpg) Hey builders! Recently I made a LEGO power functions laser (topic can be found here), and it got me thinking... what els can I build? That's how I came to the idea of making a LEGO electromagnet! Making it was actually a whole lot easier than making the LEGO laser. The LEGO laser required a 9 volt to 5 volt converter and reversed -polarity protection. The electromagnet was already made for 9 volt and it does not care about polarity. I just got the motor out and unhooked the 2 wires, then connected those 2 wires to the electromagnet and... it worked! I'm amazed by the strength of this small thing, under good conditions (unpainted, flat metal) it can lift up to 6 kilo's! I have no specific idea of how to use it in MOC but I'm sure I'll think of a good application for it. All suggestions are welcome by the way Tell me what you think ------------------------------------------------------------------------------------------------------------------------------------------------------------ BUILDING LOG weight: 78 gramscapacity: 6 kilo+ To make one yourself you need: PARTS: - a 9 volt electromagnet (ebay is a good source, I bought mine for 5.46$). - some glue (I used hot glue) - soldering tin & shrink tube TOOLS: - flathead screwdriver or prying tool - soldering iron -lighter (for shrink tube) First you need to open up the PF XL motor housing, this is quite hard. I found the best way is to squeeze it just a bit in a vice so the outer shell becomes oval and you can stick a small thin screwdriver in the gap to open it(mind the position in the vice!). This is what you will find on the inside: Disconnect the 2 wires attached to the motor, put the top half of the casing is a vice and dremel out the center rougly to the size of you electromagnet: Then make everything perfectly round with a small file untill the electromagnet fit's snug in the housing: After pressing it in the housing, get 2 lego beams and attach them to the 2 forward facing holes. this way you can make the magnet perfectly flush when mounted in a MOC: Then seal the electromagnet firmly in place using glue (I used hot glue). Next you solder the 2 wires coming from your electromagnet to the 2 wires that were attached to the motor (the inner 2 strands of the 4 strand LEGO wire, polarity does not matter). Make sure you use shrink tube to isolate both wires! Then glue the motor plate (holding the LEGO wire) in place and test the magnet! If it works close it up and you're done!! I hope you enjoined this build log, if you have any questions just let me know!
Hey builders! Recently I made a LEGO power functions laser (topic can be found here), and it got me thinking... what els can I build? That's how I came to the idea of making a LEGO electromagnet! Making it was actually a whole lot easier than making the LEGO laser. The LEGO laser required a 9 volt to 5 volt converter and reversed -polarity protection. The electromagnet was already made for 9 volt and it does not care about polarity. I just got the motor out and unhooked the 2 wires, then connected those 2 wires to the electromagnet and... it worked! I'm amazed by the strength of this small thing, under good conditions (unpainted, flat metal) it can lift up to 6 kilo's! I have no specific idea of how to use it in MOC but I'm sure I'll think of a good application for it. All suggestions are welcome by the way Tell me what you think ------------------------------------------------------------------------------------------------------------------------------------------------------------ BUILDING LOG weight: 78 gramscapacity: 6 kilo+ To make one yourself you need: PARTS: - a 9 volt electromagnet (ebay is a good source, I bought mine for 5.46$). - some glue (I used hot glue) - soldering tin & shrink tube TOOLS: - flathead screwdriver or prying tool - soldering iron -lighter (for shrink tube) First you need to open up the PF XL motor housing, this is quite hard. I found the best way is to squeeze it just a bit in a vice so the outer shell becomes oval and you can stick a small thin screwdriver in the gap to open it(mind the position in the vice!). This is what you will find on the inside: Disconnect the 2 wires attached to the motor, put the top half of the casing is a vice and dremel out the center rougly to the size of you electromagnet: Then make everything perfectly round with a small file untill the electromagnet fit's snug in the housing: After pressing it in the housing, get 2 lego beams and attach them to the 2 forward facing holes. this way you can make the magnet perfectly flush when mounted in a MOC: Then seal the electromagnet firmly in place using glue (I used hot glue). Next you solder the 2 wires coming from your electromagnet to the 2 wires that were attached to the motor (the inner 2 strands of the 4 strand LEGO wire, polarity does not matter). Make sure you use shrink tube to isolate both wires! Then glue the motor plate (holding the LEGO wire) in place and test the magnet! If it works close it up and you're done!! I hope you enjoined this build log, if you have any questions just let me know! -
hey all, thought i'd share my latest build...our LEGO room! so about a year ago I built a lego play area in our basement, which looked something like this... It wasn't much, but it was a start. it was a mostly color sorted system, but still like half of the bins were type sorted. I think it's a good method for kids or casual building, since sorting is a lot easier/faster and at the time it was 100x better than digging through a huge bin...but I soon realized type sorting was the only way to go. Since we were still getting settled into a new house and had an extra bedroom that wasn't getting used, I decided to annex it in the name of Lego. Here's the workbench part of the room and the view you see when walking in. I'm using a 10mm lens so this room looks bigger than it is, it's roughly an 11x11 room. we had an empty room to play with and after a year of pondering what we'd do with it, we decided a LEGO room would be the best use :) The workspaces are for my daughter and I, and the yellow chair is for my wife so she can hang out with us. All the storage bins are IKEA Trofast and I custom build the work bench on a frame of 2x4s and plywood with large trofast bins on each side. I was a bit worried the 7ft span in the middle would be too much but since one end is supported on the wall directly to the studs and the top is pretty solid, it is actually really sturdy. Here's a bottom view of the work bench, I added some 3/4 melamine panels to the back of the bins to stop the bins from going too far back and for adding some extra support for the workbench. Since I hate painting 2x4's I decided to face the front edge using some cut up grey baseplates i had that were partially damaged. I just cut them on a table saw and epoxied them on. I used bricks between them so assure they would be properly spaced and i'm sure someday we'll decorate them, but even as grey plates it looks good. Close up view of the front edge surface... Next up was lighting. The room has crappy lighting so I replaced the fan/light combo with a large ikea light and was going to hang ikea work lamps above the work bench, but then I realized it would obstruct the wall and be generally annoying. so I decided to wire up some LED strips I had left over from another project. These are warm white 3-chip LED flexible strips from superbrightled.com that i just adhered to some aluminum L channel. Then I cut more baseplate strips and epoxied them on to the L channel and then covered the entire L channel face with 2x yellow plates (only the already damaged baseplates were kraggled). The lights are 12V LEDs and draw about 1.2amp, so I used an old 3amp 12V converter I had laying around in my pile of converters then wired them to a toggle switch that mounted to this LEGO case. Here you can see the view underneath, I had to cut up some of the edging strips so the light could stay flush which was a PITA. Had I planned to do the LEDs before installing the bin frames I could have done that a bit cleaner. Using some left over L channel, a few screws and some 3M double sided tape I made this little 2x shelf for some of our favorite minifigs (i may need to make this longer :) My little corner, the Simpsons house and the modular are in for repairs... The space man decal was in the plan from the beginning, hence the red wall. here's the first two layers on, the extra squares are for registration. Here's the final decal. I made the illustration myself and used to sell these on etsy in a single color, but even though it was original artwork, the LEGO lawyers still objected to it so it's no longer for sale. :( Some of the small bin labels, it's so nice having a vinyl cutter. Here's a detail of the labels I made, I used this funny shape at the top to help me position the decals easily using the plastic supports in the bin's lip for alignment, it worked out great. Some of the small bin labels. I was a bit concerned about my choices for organization, I agonized over it for a long time, but it worked out pretty well. I have a few changes I'm going to make and I may do another small trofast set in the closet to handle some oddball groups like nacelles, and vertical wing/stabilizers. The one big mistake I made was forgetting about modified plates larger than 1x2. Not sure where those are going yet, for now they're in a loose bin in the closet. Here's the opposite wall which is mostly just straight bricks/plates/tiles. The trick with this side was that I only had room for 6 large bin frames and the small bin frames didn't exactly fit on top of that, so I modified one small bin frame so it was only 2 bins wide then used the cut off scraps to fill the gaps. Then I just covered the tops with some black melamine to make the top nice and usable. Here you can see the modified small bin frame. I also added a backer piece of melamine to keep the bins or bricks from falling back. The bins in this pic still have their old labels on from our first sort which was mixed sort with color/type. You can see how I made spacers from the cut off pieces of the shortened frame to fill the gaps between them. Some of the brick bins are a bit crowded, I may sort some out, or stack em to save space. I had a few PAB cups of some colors I stashed in the closet to keep the bin more manageable, for now they are ok. if they get too full I may go thru them and retire some of the scratched up bricks. My wife's contribution to the room, this awesome embroidery of the girl robot minifig... The closet is a pretty good size too and has some room for bins as well, definitely going to pick some up next time I'm at ikea... The big re-sort was pretty brutal, but seemed to go a lot faster than the previous sort, no doubt because a lot of types had been separated out... sorting the types from previously sorted-by-color piles as pretty soothing to the old OCD though... anwyay, that's it, hope you've enjoyed the pics!
-
Hi guys, I want to have a tachometer to test my MOCs RPM and I am considering four options: Building it with LEGO (I have seen videos of LEGO tachometers (Nico71 is a great example) and they worked quite well but centrifugal tachometers are big and not really accurate, because you have to calibrate it yourself). Buying some sort of RC tachometer (I can't find any at a good price that could be attached to my MOCs. Buying the LEGO speed computer. Use gear ratio calculators and not buy or build anything (I will need to switch on the computer each time I want to know something, because I don't think there is any mobile app for Android to calculate LEGO gear ratios or at least I couldn't find it). What should I do? Any advice of which one to buy if you choose second option? Thank you in advance and sorry for my poor English, I hope you can understand it. EDIT: 5th option: Making it using Arduino but I think it's quite difficult/expensive to make it work as accurate as a "real" tachometer.
-
I have a folder on my computer comprised entirely of custom minifigure designs - (some I have made myself) So my questions are: Sizing - how do I size the templates to fit lego minifigures? Also I'm not overly technical on a computer Printing - where and how do I print the designs? What materials will I need? Application - what is the best way to apply the designs to my lego?
-
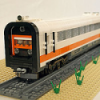
Hi all, I present my second train creation in bricks here An invented shunting engine to power my RENFE Bed-car 9600 Series This is not a nice, or real shunting engine, but works well and have enought torque to move the cars without problem. and work in all Lego train curves The motor is a 88002, that have more power that I thought, the tip is to put weight on it to prevent slippage of the wheels. Is full PF with a custom Li-Ion battery (2500mAh in this case) Detail of the custom PF Li-Ion Battery Pulling the Bed-car The No-Conventional coupling A Conventional Old-magnets coupling I hope you enjoy it