Search the Community
Showing results for tags 'control+'.
-
 BrickController2 is an Android and iOS application that allows you to control your Lego models using a compatible gamepad. It supports the following devices: - SBrick - BuWizz 1-2 - BuWizz 3 (basic support) - Lego Powered-Up devices: Boost, PUP HUB and Technic HUB (or Control+) - PF infrared (on Android devices having infrared emitter). Features: - Multiple profiles for a single creation - Multiple motor (or output) assignment to a single controller event - Different types of devices can be used at the same time - The same motor (or output) can be assigned to multiple controller events - Different joystick characteristic settings - Different button modes: normal button, simple toggle, ping-pong toggle, carousel toggle, ... - Train mode on joysticks - Normal and servo mode for the new Control+ motors - Sequences (like for flashing light) BrickController 2 on the Google Play Store: BrickController2 android BrickController 2 is also available on the Apple App Store. BrickController2 iOS Video tutorial created by @kbalage (many thanks for this): And another great video by @kbalage: Older versions: BrickController Android application. It lets you to control Lego creations via Lego infra-red, SBrick and BuWizz V1 and V2 using any Android compatible game controller: Current version: BrickController 0.6 User guide: BrickController User Guide Minimum system requirement: Android 4.4 and bluetooth low energy support on the phone (or tablet) Video on the older SBrickController application:
 -
 I already planned to open this topic back in March or April, but I got caught up in work and stuff. Recent discussions in the 42129 thread makes me feel that inow is the good time to start it. My vision for this thread is that it will be a directory that contains the PF conversion mods for all of the Control+ sets so far. I have created a few mods myself as well. And I'll try to keep the information organized by updating this first post. If you have any mods, feel free to contribute. This thread can also be the directory for Studio models for the C+ sets, so that anyone with a mod idea can give it a try. ------------------------------------------------------------------------------------------------------------------------------------------- 42099 Available PF mods on Rebrickable: https://rebrickable.com/mocs/MOC-28766/olivierz/4x4-x-treme-off-roader-42099-power-functions-base/#details ------------------------------------------------------------------------------------------------------------------------------------------- 42100 There is currently no PF conversion mod available on Rebrickable. I've designed two PF mods for this set in Studio, but I haven't published yet because I haven't made the mod instruction. They will be published later this year. The mods are: - Full RC PF conversion: This mod replaces two hubs with two PF battery boxes, replaces all motors with 7 L motors, and adds 4 RC receivers. - Motorized PF conversion: Because a big empty box with 7 motors engaged in direct transmission is boring, I want to add something more Technic-ish, more mechanically interesting. This mod removes all hubs and motors for the base, which makes slewing and driving manual, and add 1 PF battery box, 1 L-motor, and a gearbox with 4 multi-directional switches for the functions of the super structure. Thanks efferman for sharing the base 42100 Studio file. ------------------------------------------------------------------------------------------------------------------------------------------- 42109 My free mods: - L-motor steer: https://rebrickable.com/mocs/MOC-84883/nguyengiangoc/42109-pf-conversion-l-motor-steer/ - Servo-motor steer: https://rebrickable.com/mocs/MOC-84884/nguyengiangoc/42109-pf-conversion-servo-motor-steer/ ------------------------------------------------------------------------------------------------------------------------------------------- 42114 My free mod: https://rebrickable.com/mocs/MOC-85933/nguyengiangoc/42114-pf-conversion-servo-motor-steer/ ------------------------------------------------------------------------------------------------------------------------------------------- 42124 My free mods: - L-motor steer: https://rebrickable.com/mocs/MOC-84954/nguyengiangoc/42124-pf-conversion-l-motor-steer/ - Servo-motor steer: https://rebrickable.com/mocs/MOC-84955/nguyengiangoc/42124-pf-conversion-servo-motor-steer/ ------------------------------------------------------------------------------------------------------------------------------------------- 42129 My free mods: - L-motor steer: https://rebrickable.com/mocs/MOC-84984/nguyengiangoc/42129-pf-conversion-l-motor-steer/ - Servo-motor steer: https://rebrickable.com/mocs/MOC-85004/nguyengiangoc/42129-pf-conversion-servo-motor-steer/#details ------------------------------------------------------------------------------------------------------------------------------------------- 42131 My free mod: https://rebrickable.com/mocs/MOC-92919/nguyengiangoc/42131-pf-conversion/ ------------------------------------------------------------------------------------------------------------------------------------------- 42160 My free mod: https://rebrickable.com/mocs/MOC-161275/nguyengiangoc/42160-pf-conversion
 -
 There is a new thread detailing my latest version of the robotic arm: Update: Here is version 2 of the arm: Studio model available for free on Rebrickable: https://rebrickable.com/mocs/MOC-109607/glaysche/6-axis-robotic-arm-mk-2/#details Original post starting here: This is my first MOC and first time posting on Eurobricks. A few months ago, I got back into Technic by buying the Liebherr set (42100). I decided to design my own 6 degree of freedom robot. In doing research and experiments for this project, I was inspired by this post I found here on Eurobricks: I ended up making a lot of different choices in my model. Here is the big picture: I wanted to optimize for three things: It should work Maximum range of motion -- the wrist axes should be able to turn indefinitely and other axes should have as much range as is possible Built as compact as possible Here's the video with poor production values (and using a simple BuWizz profile to control it): https://www.flickr.com/photos/188456966@N07/49900167801/in/datetaken/ This was quite challenging to optimize it in this way. First of all, in order for the wrist joints to spin, they needed to be axle driven -- pneumatics won't work. In the example of the grabber at the end, I put an axle through the turntable to control the LA for the grabber. When the grabber turntable is spun, however, the grabber will open or close in an undesired way. To counter this, I used a differential and the correct gearing to compensate. Here's a picture of that: This is difficult to see in there. There is a new 2 piece differential (65413 / 65414) inside the turntable. The gears turn the differential at half the speed as the turntable which makes it so the grabber doesn't move when the turntable moves. The control for the turntable and grabber are axles on both sides that go through the next set of turntables seen here: The axle turns the perpendicular axle that goes through the turntable and is driven by another axle in the next stage. The stage has the same problem as the previous one where flexing the wrist will cause the grabber to turn and open or close. This is compensated with an additional two differentials and another set of gears. This one is particularly compact. Here's a picture of that stage: The lage gear there is a 28 tooth double bevel which is needed to get the correct gear ratio to the 28 tooth differentials. Pulling the side off of that, we see: There are three L motors (22169) here to control the grabber and first two degrees of freedom. I particularly like the gearing in the front of this section for the compensating differentials: As noted by Hanso in his series of posts, the end of this arm is actually quite heavy. I would have preferred to send all three functions though the next turntable but I could not find a solution that sturdy or compact enough. This weight caused trouble for the next turntable. To make this work, I used two turntables, one in compression and one in tension. There is a beam that goes through the center of the turntables that takes some of the load here. The next stage is a another stage that I would like to be able to turn forever so I don't want the wires to get twisted. In order to accomplish this, I also put the battery box on a turntable that turns with the rest of the arm. The wires go through this stage and don't get twisted. The humerus (in LBG) is very small (5x5) and it was a bit challenging to get the gears in there. The motors (XL 22172) for those next two axes very neatly attach there. The base has the last two degrees of freedom. The spin axis here uses a mechanism very similar to the Rough Terrain Crain (42082). The final axis uses worm gears to drive the turntables. There's a lot of force on this axis and I experimented with a variety of different gearing. The thing that worked best is displayed above. The center piece is driven and it gets geared down symmetrically to the axles that have the worm gears. Axle support was a bit tricky here: (Still waiting for the remaining black 7x11 frames to clean up the look here.) The 2nd battery box fits pretty nicely here: In conclusion, I think this works pretty well. I haven't explored the software at all yet -- just used BuWizz as a proof of concept. Many of the motors would work much better configured as servos. I wish Lego would release an SDK for Control+ so I could write an app similar to the Liebherr controls. My day job is actually a software developer so it would be pretty fun to build a full featured app to control this.
 -
 Control Lego Control+, Lego Powered Up, BuWizz 2.0, BuWizz 3.0 devices. You can create a profile for your MOC model on your smartphone or set up gamepad controls. Supported: - Lego Technic Hub, - Lego Boost Hub, - Lego Smart Hub, - BuWizz 2.0 (BuWizz extension pack), - BuWizz 3.0 Pro (BuWizz extension pack) Motors: - Powered Up, - Control+, - Mindstorm Robot Inventor, - Spike Prime, - Power Functions Get app: [AppStore] [Google Play]
 -
 This and last year we got interesting Control+ electrical system that gave wider RC possibilities. They have a lot of advantages and disadvantages that were discussed here a lot in the different topics. My input here it the thing that still bothers me: The sets with motor(s), usually with a single one, purposed to move some actuators, rotate some turntables, give some air pressure (42053, 42055, for instance) Or their "manual" brothers that have the same functions powered by a manual knob(s) with possibility to add a motor to them (42029) So, why I'm talking about them? Just because these set categories have the thing that is common for them and looks useless and pointless without PF-motorization (not RC-control for drive&steer): the distribution and/or direction gearbox. You have a single motor and many levers that turns on and off some machinery functions powered by this motor. Alternatively, they have a single knob (which not very nice for play - rotate and rotate it moving some LAs, ughhh) but just made to be replaced with a motor. Other "pure-manual" sets have a lot of knobs - each for each own function, outrigger, winch, etc. One function - one knob. It is great for play with no motors, so you can raise the crane arm and release the rope at the same time just by spinning two opposite knobs (42108). My concern is, if we have Control+ as a PF replacement and still got no affordable and compact "static power source" (LiPo or a battery box) for a single Control+ motor, does it mean that we may have no "motorized" set with gearboxes in further? Updated 2020-01-30: soon we will know if 42113 Bell Osprey have a "dummy" power unit, or something else... So far we only know that the infographic presented on PoweredUp overview may be still actual. Notice the central section with a simple hub:
 -
 Hello everyone! I'm glad to introduce you my tribute to 10187 set! Long story short: I'm a big fan of the ModelTeam series, and always wanted to build a MOC in this style, but I did not find inspiration. And a couple of weeks ago, I found xx1Andi's LDD file with PF modifications of the 10187 set on the Rebrickable. That MOC did not have a front suspension, complex steering system or any other technic features, but helps me a lot in understanding how all the electrics should be placed in the chassis. So I just started building the chassis with a new Control+ electrics, keeping in mind @Madoca 1977's offroader suspension and driveline setup The main goal was to preserve the maximum appearance of the original with the maximum count of functions inside. In the end I was able to completely save the interior, all interior and exterior details and leave a place for 3 motorised functions and manual one. I'm satisfied with final performance: model able to crawl in the forest and even on some rocks. With the help of the winch Beetle can move forward in almost every situation (within reason of course, it's not a lightweight crawler). On the high gear it's fun to see how suspension fulfills little bumps on the gravel road. Red color - dual driveline via 2x C+ XL motors that are not connected to one another, which allows car to simulate open differentials (or turn around like a tank). New planetary hubs can handle with heavy weight (2250 g), even using RC4WD tires for 62mm wheels with the excellent grip properties of rubber. Yellow - steering with a C+ L motor and common gear-rack setup, nothing special. Purple - winch with 20:1 ratio via C+ L motor, capable of lifting a vehicle’s weight on a steep slope or in the air. Winch motor placed between upper front suspension arms, leaving space for some scale details under the hood (like windshield washer reservoir) Blue - torsion bar suspension. 10L axles working like torsion bar with lower suspension arms and limiters firmly fixed on them. Suspension stiffness is adjusted by changing the distance between the arm and the limiter. It's the most simple and compact solution for this scale and weight. Green color - 2-speed gearbox (1:1 and 3:1 ratios) with manual (HOG) switching via small actuator placed between rear suspension arms and driveshafts. Simple and stupid solution - just gears in the frame, that pulls them along the driveshafts with a help of actuator. Nothing special. All these technic parts are connected only by technic bricks and system plates. Mainly by plates There was not so much free space for proper bracing, but some tests and crash-tests shows me that all these system plates are tough enough to handle some jumps. But the main headache was a new C+ hub. That was very hard to hide this enormous brick into the interior, so I was used to make holes in the backrest of the rear seat to fit the C+ hub's "ears". But otherwise I’m happy with the amount of details saved. I love final ModelTeam+Crator appearence Thank you for watching and feel free to leave comments below! Hope you like it! Also you can find more photos here
 -
 Soon after I've got my 42100, I decided to use it for making something epic and funny. So, after a month of work I've made this "movie" which tells a story about the last battle between old and new. Don't take it too serious, just have fun! P.S. Moral of the story is that the winner hasn't won at all. Cos' all the fallen gained an ability to be revived into different models and live forever, but the winner will stay useless and untouched. :)
 -
 Last year, korea did lego exhibition called "Brickorea 2019". And we had a race as a sub-event. Rule One car for one person Can possable use just lego set. not only moc. Any shape allowed If model can move forward. width is limited to max 30cm(circuit width is 50cm). no limit in length. If model use PF system, only 2 channel is allowed per car. Sbrick, Buwizz, and other none-lego motor or batterybox is not allowed. 9V buggy motor and other remote contol system before PF is not allowed. If model use PU or C+ as control method, driver can use brickcontroller2 for contol. Ranking method Racing(racing time) 50% design(voted by competition participant) 50% Circuit rayout. It was a round trip course. not normal racing circuit. All yellow cone is obstacle. That charactor in middle of course is not obstacle. Originally is obstacle but removed. All cone sticked use tape. Even fastiest car chash to cone with full speed it is safe. Car list 1st winner. msk6003(me!)'s 'Porterleghini Muerlcierlago' Original is Hyundai's porter truck. One picture is worth a thousand words. Type - PF Used - 2 Train motor, 1 Servo motor 2nd winner. Fried Kim(새우튀김무영 in korean)'s 'White gold' Type - Powered up Used - 2 PU M motor 3rd winner. Bluebox(파란상자 in korean)'s 'Ladybug chased by wasp' Wheel on front bumper is working as roller for following track wall. Type - Powered up Used - 2 PU M motor Design winner. Nomingi(노민기 in korean)'s 'Lizard' This model is 'walking' with 4 leg. Even can't moving properly but enough for attracting other people. Type - Control + Used - 2 C+ XL motor Crescent_cho(초월 in korean) This car is originally designed for soccer competition but it canceld. Type - Powered up Used - 2 PU M motor Byeolgom(별에서온곰돌 in korean)'s 'Slapdash' Type - Powered up Used - 2 PU M motor ParticleS's 'Two wheel' He bought 76112 batmobile but want to try something different. Type - Powered up Used - 2 PU M motor Ggureogi(꾸러기 in korean)'s 'Banggu-cha' This is 42070 which converted to old korean-style disinfection car. Smoke from car is mini humidifier. Type - PF Used - 1 XL motor, 1 M motor Rumix(루믹스 in korean) Type - PF Used - 1 L motor, 1 Servo motor. Olive(올리브 in korean)'s 'I like bath' This is pretty fast and very good-looking car. Type - PF Used - 1 L motor, 1 Servo motor Macgyver(맥가이버 in korean) Type - PF Used - 2 L motor Hyung Jun Jin(육포공장 in korean)'s 'Artist Jin's secret dietary life' He is korean lego community 'Brickinside' 's lego ambassador. Type - PF Used - 2 L motor Vant(반트 in korean) That QR coad is linked to his instagram. He is normally create lego art but doing first try to technic this time. Type - Control + Used - 1 C+ XL motor, 1 C+ L motor Car under this sentence is made by korea technic team 'DASAN'. First 3 car is body changed 42099. Onepeace(원피스 in korean) Type - Control+ Used - 2 C+ XL motor, 1 C+ L motor Kimkamza(신봉동찐감자 in korean)'s 'Kamza car' Type - Control+ Used - 2 C+ XL motor, 1 C+ L motor Love like spring rain(사랑봄비 in korean) Type - Control+ Used - 2 C+ XL motor, 1 C+ L motor Kwonsu Shin(소원희인아빠 in korean)'s 'Dumper' Type - PF Used - 1 XL motor, 1 Servo motor, 1 L motor for dump function Kwonsu Shin's junior Type - PF Used - 2 L motor ETC Picture with all participant and there own car. Top low(from left to right) Wani kim(competition host and main admin of Brickinside), Rumix, Macgyver, Olive, Vant, Crescent_cho, Onepeace, ParticleS, Love like spring rain, Kimkamza Bottom low(from left to right) Kwonsu Shin, Byeolgom, Ggureogi, Hyung Jun Jin, msk6003, Fried Kim, Bluebox, Nomingi Top 3 winner with there own car and aword. msk6003(1st), Fried Kim(2nd), Bluebox(3rd)
 -
 Inspired by Mahjqa's cute little Porsches, I wanted to build something in a similar scale with Control+. This is the result. The car can be controlled with the Top Gear app or with third party stuff like the Brickcontroller 2 app. Being RC is its only function. 20200311_172321 by Appie NL, on Flickr 20200311_172050 by Appie NL, on Flickr 20200311_172113 by Appie NL, on Flickr And all of them together on the 42098 set 2020-03-11_05-34-06 by Appie NL, on Flickr
 -
 Just been over to Brickset and images for the new CONTROL+ motors have been released. Looks like they'll be available individually like the current PF motors. 45061 Large Hub is the first: There's also 45062 Large Angular Motor: I'm thinking both will be featured in 42100.
 -
Good day, everyone. Nowadays, when everyone has to stay at home, I want to show you, how you can spend a lot of your free time with interest. As you know, all Lego sets with control+ system have special "achievements" in the app, which you gain for special actions with set. I've made this video as a tutorial, how to get all the achievements that I know about. Thanks for watching, stay at home! Your Cog In The Machine
-
 Hello everyone, I was trying to figure the below down on my own browsing forums, searching for answers, reading a lot of articles from last 2 years however I did not find strict answers to my questions. I am sorry if some answers were already posted here and I did not find them. As I am about to spend some serious money (for me personally as I am not rich) on Lego Technic and I want to be able to create custom machines later I feel like I HAVE TO decide between Power Functions and Powered Up. 1. Is (or will) Powered Up system be customizable using Lego official App or 3rd party app? Will I be able to use Power Up motors and customize them into different than original machine so it works? 2. Should I even be coinsidering Powered Up systems for future and creating custom machines? 3. Is Power Functions a better choice for now and for future for creating custom machines? Is it easier to customize controls? 4. Are there any news or leaks that Lego will allow to customize controls of new Powered Up motors? 5. Is Power Functions better for building custom machines than Powered Up? 6. Does BuWizz or Bricks going to support and customize Powered Up? I am sorry, it all feels so overwhelming as for a beginning person that has limited budget and needs to pick carefully and plan everything ahead.
 -
Good day, everyone! Each winter I hope to build some offroader to drive in snow, and each winter something goes off. Finally in 2022 I,ve finally built what I wanted - big orange snowmobile with control+ electrics and sprockets from Liebherr/ SNOWMOBILE "TRIDENT" Two main parts are the chassis and the body. Let's start with former. Front side - as it is snowmobile it is fitted with two steerable skis. Suspension consists of parallel levers with two big yellow shock absobers and two hard small shock absorbers between the levers. Suspension is strong enough to bear the weigh of control+ smart hub with 6 battries, body parts and optionally Darth Vader as the driver. Skis are 5M wide and each one has two small rubber wheels inside to add traction on smooth surfaces (with them you can steer even on smooth floor - without only on snow) front suspension has positive castor angle. Which looks cool, but required some tricky techniques to implement steering - for example - for steering I used Large Angular Motor (or simply LAM) it is in parallel with suspension levers, but connected to chassis and smarthub with angle. Next - rear part - all driving motors (2 XL) are inside the tracks. Reduction gear is 28:36 (or 1:1,29) - keeping motors inside the tracks reduces the weigh of body which is good for suspension travel. Long shock absorbers work for vertical movement of only rear part of vehicle, whereas short sh.a. are used for vertical movemnet of whole body (long sh.a. act as parallel levers) And finally - the bodywork. I think this is for now the best bodywork I've ever made for MOC - it is orange, it looks good and its reliable and rigid enough so you can grab this Snowmobile by most of it's orange sections and nothing will fall away. Furthermore, all panel are locked in places and don't wiggle at all. I've even used aquaman's trident from brickhead as mascot when I figured out that Snowmobile looks a lot like trident from above. For everything else that you need to know i invite you to watch the video: P.S. I wanted this snowmobile to look loke a fish. But it turned out to be closer to shrimp or prawn :)
-
 For all the C+ nerds out there, here is a quick demo for using the PoweredUp remote directly with the Control+ Technic Hub using PyBricks. This is the code I'm running on my motorised 42110 Land Rover but can be used with any model using 2 drive motors and 1 steering motor like the 42099 4X4 X-treme Off-Roader set. The code has two control modes: Bang Bang mode simply acts as an on/off controller similer to how the PowerFunctions remote worked in that it turns the drive motors on while the button is pressed and then turns them off when button is released, The steering motor also goes to full lock while the button is pressed and returns to centre when released. Precision Mode acts as a speed controller for the drive motors and provides 10 speed steps in either direction and increments to steering motor by 10° on each button press to give 8 angle steps. The red stop buttons act as emergency stop buttons and the green centre button is the control mode select. I have published the code to my Github account should you wish to download it and try it for yourself. Please make sure you configure the "User Definable Setting" and the " Initialize Motors" sections to suit your needs before running the code. This code is released under the MIT licence, so feel free to download, use, edit and share this code under the terms of the MIT licence, full licence details included in the repo. You can download the code here: https://github.com/MxWinters/PyBricks-Remote-Technic-Hub
 -
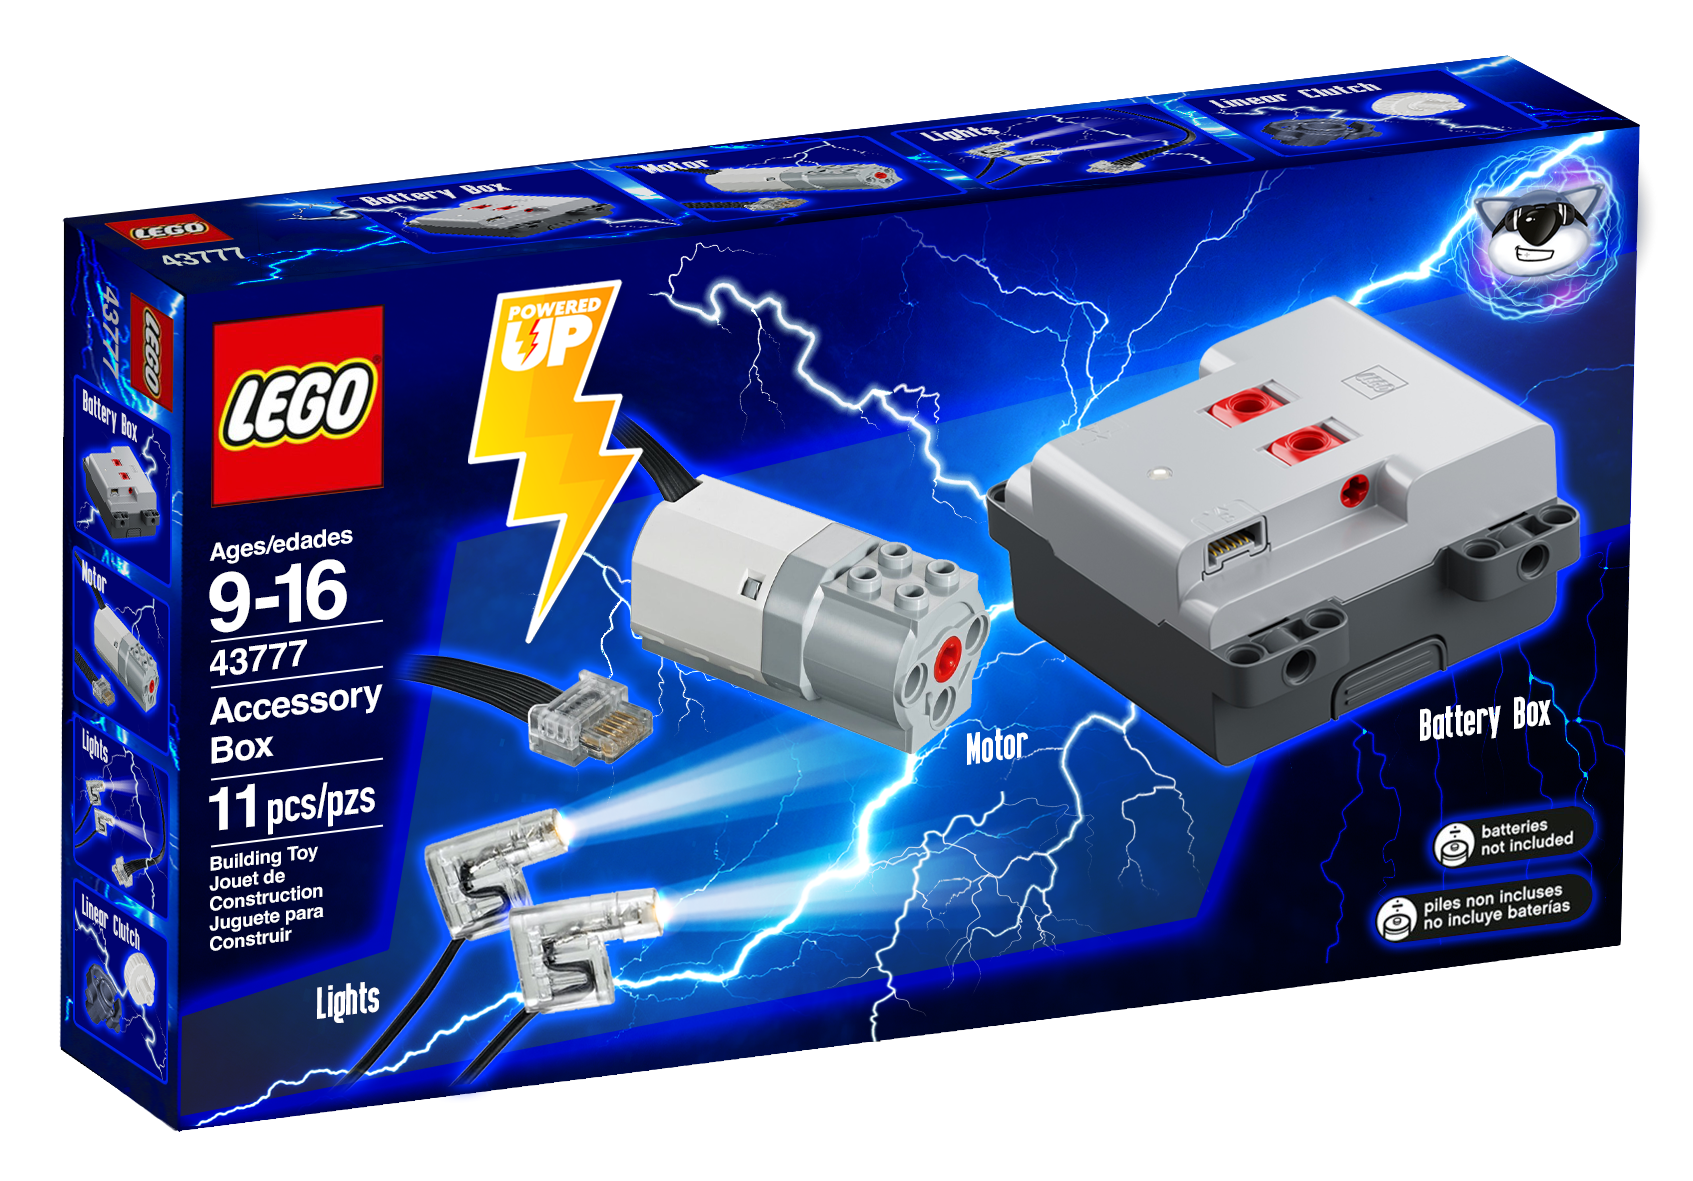
 I have designed a concept for the LEGO Powered Up Accessory Box. It is a successor to the 8293 Power Functions Motor set and it would be used to upgrade various technic sets. Please see the image below. My concept contains the basic powered up battery box, a medium motor, lights, the two piecs for the linear clutch, and a few pieces like axles, gears and universal joins just like in the previous power functions motor set Remember back when we could upgrade so many different cheap technic sets? For example, there would be so many technic sets sold for under $100-$150 that had a single knob and a distribution GEARBOX to control the different functions. Essentially, the motor would replace the manual knob and the functions would be controlled by the gearbox, as seen in many older technic sets like the 8294 excavator, the 8295 telehandler, the 8265 front loader, and so many more! Also manual pneumatics sets would be ready for the power functions accessory box, like the tractor with log loader as well as the ew160e. Using that motor set, you could easily add a motorized pneumatic compressor. My goal is to bring that same level of motor upgradeability to the new technic sets, as was seen in the power functions era. Also, keep in mind that back in the power functions era, we got many, many more manual sets with a distribution gearbox. These days fully manual sets completely lack a distribution gearbox, as seen with missed opportunities to put the distribution gearboxes in sets like the 42108 mobile crane, which could have EASILY included a distribution gearbox instead of multiple manual knobs that each control their own function. My point is, that the presence of the previous power functions motor set REQUIRED the designers to add a distribution gearbox to all of the mid-size to larger manual models, the reason why they had the distribution gearboxes, is BECAUSE they had to be motor upgradeable. The distribution gearbox was added so that the single motor in the power functions accessory box could control multiple functions. If we had a powered up accessory box, many of the modern manual models would include a distribution gearbox, BECAUSE they would need to be motor upgradeable due to the powered up motor set. Just the presence of the powered up motor set would automatically cause an increase in the complexity of technic models. These days, the only type of gearbox that modern manual sets get is the speed transmission gearbox, which is WAYYYYYY less fun to play with than a distribution gearbox, and transmissions in manual models are kinda rare in technic sets anyways. Remember that the All Terrain Vehicle is an exception, not the rule when it comes to technic sets. As a kid, I was extremely fascinated with distribution gearboxes, and I still am. But, as a kid, I didn't find speed transmission gearboxes in manual models to be that interesting. The speed of the fake engine slightly changes, so what. But when I played with a distribution gearbox, the same axle that I was spinning suddenly controlled something else! My mind was blown! For example, my concept could be used to upgrade the 42128 Heavy Duty Tow Truck. The motor could be used to power a pneumatic compressor, making all of the pneumatic functions much more fun to play with. The lights could also be used to upgrade the truck's headlights. Another way this set could be used is to upgrade the 42108 mobile crane, motorizing the functions of the crane! Also remember that if that set were made to be motor upgradeable, it would have contained a distribution gearbox. Many affordable technic sets could easily be motorized with the help of this accessory box. This set could also be an easy way for new fans to get into the Powered Up system. Personally, I greatly enjoyed the ability to upgrade many of my manually operated technic sets using the Power Functions motor set. They were so much more fun to play with after the upgrade. Please let me know what you think of my concept LEGO set. Also, I go into greater deal regarding my LEGO Powered Up Motor Set concept in my video here, starting at 0:24. If you are more interested in my concept, I strongly urge you to watch it.
-
 Dear all. Allow me to introduce my latest MOC which was in development long time now, its supposed to be scaled replica of CLAAS Torion 1914 wheel loader from CLAAS company in 1:17 Scale. The reason why i chose this moc was due to lack of other "colour" machinery in this segment and also being kind of specific wheeloader for agrocultural sphere which i love. Claas Torion 1914 is colaboration with Liebherr on joint wheelloader project, Liebherr version is L550 and up. Model is combination of technic chassis and functions with system easthetics. Over 2000 pieces and 4 motors of Control + type allows for good looks and good playability, althrought a bit limited by weaker PU motors compare to PF, i chose PU to get in new wave of tech + easier and cheaper accesibility on market as the PF functions are getting more expensive. Functions are provided by 3x L PU motor and 1x XL PU motor Driver 1x XL Steering 1x L Pneumatics #1 1x L Pneumatics #2 1x L Each L motor serves for pump and switch together by sariel pump/switch combo, but modified to suit my needs in this build. there are two 6L pumps connected to each motor without any air tank so the actions are not so snappy and responsive and it all depends on the power of motors and batteries. due to this i am seriosly considering upgrading to Buwizz 3.0 to see if it will make it perform better and faster. I don't usually know what more to type about the MOC so i will answer every question in comments section if i will be able. Enjoy the photos (video later today)
 -
 Hey everyone, for a couple of months I've been working on a lego technic camper module that fits on Lego 42129 easily! After a lot of designing, I have come up with a design. I've made a video for all to see and please let me know what you think of this model. This model doesn't affect the Zetros's ability to move in any way (however just to be safe please consider reinforcing the rear axle). It has the following features: Awning Interior with dedicated seating area, bedding and kitchen (kitchen has to be built with bricks haha) rear compartment storage along with a lock Openable windows for ventilation Flexible but sturdy structure for offroading openable door Additional step ladder that can be used to enter the unit Additional storage on the door side of the unit that has a separate compartment to the rear storage space for jerry cans Space for extra wheel
 -
 So many of us, myself included, find powered up/control+ to be problematic to say the least. Every great musical artist or band has a bad song or two in their set list, and control+/powered up is TLGs bad song! It pushes up the price of sets, which might be tolerable if it wasn't for it's downsides, namely no physical remote and it's reliance on apps and third party smart devices which removes all confidence in it's longevity. MOCability is also pretty poor, and set costs can be inflated due to components such as driver chips, tilt sensors and encoders being included in the hub and motors but not actually used by the model. However, it does have some advantages over previous systems, such as it's ability to do more complex things, being able to use motors as motors or as servos, being able to flip the controls when the transforming vehicle flips over, the inverse kinematics of the Leibherr excavator and so on. So what if we could design the next generation of electronics, how would we fix all the issues whilst retaining all of it's benefits? Firstly, I think it's best not to even try to retain ALL of it's benefits. Inverse kinematics is a fun novelty but it soon wears off, is set specific and just not worth the previously mentioned issues that comes with it, but I think it's possible to retain most of the other benefits. I would love to hear your ideas, maybe we can come up with the next great thing! To get the ball rolling, my current idea would look like this: EDIT: over the course of this topic I have listened to feedback and my ideas have evolved quite a bit since this first post. On with the topic.....end of edit. Possibly a 4 wire system, 2 for main power, and 2 more for PWM/data, with stackable plugs. It could possibly reuse the PF plugs for backwards compatibility. A large physical PlayStation style remote with lots of buttons, a couple d-pads, a couple of rotary knobs and two large fully proportional twin axis joysticks, each with a two way rocker switch. Bluetooth enabled, you can pair controllers to receivers by turning on each receiver and activating the controller you would like to control that receiver in turn. A basic battery box. Receiver. Has an input from a basic battery box, an output and a push button for pairing. It has a direct, unfused through path for main power but does not do any switching/pwm control of the main power rail as it doesn't contain a motor driver chip. It controls the data signal only. 3 motors. One is a POWAH motor, one is a regular motor and one is a micro servo motor. They contain their own motor driver chips so it can be better paired to the motor it is driving. There is no internal gear reduction or rotation sensing on the regular and power motors. Gear reduction box. Similar to the internal gearing included in the current motors, this is now a separate unit, allowing you to have as little or as much internal gearing as you want. These units can also be used in other places in the model. Rotation sensor/encoder. Convert the regular and power motors into servos by adding one of these. Can also be used as rotation sensors in other parts of the model. Force sensor. You can add more springs (shock absorbers or drive belts) to get the desired spring force (this would be the load sensor of the Liebherr) Speaker. This would come with a bunch of preloaded sounds (petrol and diesel engines at various RPMs, horns, sirens, helicopter sound, train sound etc) as well as a few spare slots in case a model designer wants to add a few set specific sounds (like for a merry-go-round or steam train or whatever). Different signal strengths would play different sounds. Can optionally be plugged into a computers USB port to load in your own sounds but not strictly required. Has a factory reset button to restore the original sounds. "Code" blocks. Instead of an app/smart device, you have physical blocks that are real life physical representations of them. Most of these affect the PWM signal only with through paths for main power. There would only be a couple to start with but more would be added over the years as sets require them. These could included a NO/NC relay switch, various logic gates, math bock (for multiplying/dividing/adding/subtracting of the PWM signal), servo controller, sensor reader block, delay timer with mode and time selector dials, ramp up/down block, etc. Sounds ambitious, but these blocks allow for much more complex control while eliminating the need for an app or a smart device. It is all "programmed" by the way you build and wire it all together. If the current system is "un-Lego like" will how much more like Lego can you can than physically building your "program" out of physical blocks?! I think that's plenty of options and controllability for any Technic set. It might remove some capabilities, you couldn't use inverse kinematics or control a CNC type machine or robot arm, but isn't that what Mindstorms was supposed to be for? Maybe much of the problem stems from unfortunately trying to make Technic into Mindstorms, resulting in control+ and killing off Mindstorms in the process! Sorry for the long read, but it's not an easy thing to get right and what I suggested might not even be feasible! I should have run it past my embedded systems expert buddy first! I would love to hear your thoughts, improvements, criticisms and ideas.
 -
Good day/night/whatever everyone! I want to share with you a little experiment of mine that got a bit out of control. I hope, you remember set 8284 and its really unique looking b-model. At least I do. Furthermore, it is one of my favourite b-models and I really wanted to pay tribute to it. Obviuos thought was, of course, to make it RC with the new Control+ elements. After half an hour I got something that could drive and steer. I even tested it in the local park, but... something was off. It just wasn't enough. However good looking this buggy is, its transmission wasn't created with electromotors and speedy driving in mind. Wheels tended to fall off. Gears in diff broke at least once. And offroading capabilities were...em... on the small side of expectations. And I got an idea! I decided not just to motorize this buggy, but completely redesign, reimagine it from technical point of view, keeping exterior close enough to what it was before. You know, like these like-oldtimer-outside-but-modern-inside tribute cars which car companies sometimes make. Also I wanted to make transformation function more interesting and useful. So, I started on the blueprints... And here it is! All modern all new Dune Buggy! With familiar face which got a facelift. Literally. New version of transformation not just shortens the car, but lifts all front section up While cockpit raises up, special levers make sure that headlights between wheels always stay horizontal. And not only that. Another special lever in the rear section locks the differential using new orange shifter. This way buggy becomes most offroad. And now - to the video! (With the new intro btw)
-
 Hello everyone, I want to share a new creation. This time it is an alternate build (B-model) for the Liebherr LR 13000 Crawler Crane set #42146. You can find instructions here to build the model by yourself. 100% made out from parts of donor set 42146 with no additional parts needed. 100% controllable with official Control+ Application. In order to all functions of that Liebherr HS 8300 Dragline Excavator, you get a complete overview in the following article on how to build, control and calibrate this alternate model. Summary of Functions & Features remote controlled tracks and 360° superstructure rotation remote controlled boom remote controlled independently hoist-rope and drag-rope controllable with official Control+ App for Smart Device using 6 motors and 2 hubs spinning radiator fans detailed cabin playful details like fire extinguisher, ladder, railings and exhaust pipes brick-built bucket 133 cm / 52 inch long 100 cm / 39 inch high high-quality premium PDF instructions includes guide how to calibrate the model Impressions Main control The Liebherr HS 8300 Dragline Excavator is designed to work 100% with official Control+ Application using the already known interface from its main set. Driving tracks and rotating the superstructure works exactly like the LR 13000 does with the original designed buttons on the app interface. Boom control The giant boom of this alternate model is controlled with the right app lever. It drives the longest rope (shown in blue) through pulley mechanism to raise and lower the boom. The highest and lowest position of the boom depends on the limitations of the app after proper calibration of the model. The boom stops automatically in the lowest position to always ensure a 360° rotation of the superstructure without colliding with the tracks. A linkage mechanism slightly moves the nose who is helding the drag-rope and ensures that the app can detect the highest boom position during calibration. As a nice addition, a spinning radiator fan is connected to the same motor that drives the rope for boom. The second fan spins freely. Hoist-Rope & Drag-Rope Controlling the bucket works like the real machine with an independently hoist-rope (shown in green) and drag-rope (shown in red). The hoist-rope is controlled either up or down with the left joysticks vertical movement. By horizontal movement with the same stick, the drag-rope goes in and out. Since this two ropes are controlled by just one joystick, combinations with both ropes are possible and also needed for proper playing. This requires a bit practice though, but makes it possible to control the bucket and two ropes together with just one (steady) finger. The length of the hoist-rope depends on the app limitations for that joystick movement, meaning that the hoist-rope can't go too long before the app stops the motor. On the highest position of the boom, the bucket can reach the ground with fully extended hoist-rope where boom and hoist-rope are in limited positions controlled by the app. During calibration the app also detects the most inner position of the drag-rope. Working under ground With lowered boom and extended hoist-rope, it is actually possible to dig something below the model. This makes fun by placing the model on a table for example. Calibration For a correct calibration by the Control+ app, it is required to separate the hoist-rope from the drag-rope. In the instructions there is a full guide included how to calibrate the model during building. Additionally there is an extra PDF guide included that explains how to calibrate the model at any time. Please make sure you have completed the calibration to ensure the best playing experience with this model. How to build Building the Dragline Excavator starts with the base from the LR 13000 main set. Make sure you build the undercarriage with book 1 until step 343 is completed. Before you continue building, check the tracks und turntable function. After the correct calibration with Control+ app, the instructions for the HS 8300 takes over to complete the alternate model. The premium instructions for this model comes with 338 pages of high-quality images and building steps to ensure a satisfying and slightly challenging building experience for a 18+ set. Make sure to test all functions and alignments of ropes through the building process. Happy people with sealed parts can open bags 3 to 5 to complete the build. Connecting ropes with spools and making nodes can be an annoying thing even for the main model. If you already have built the LR 13000 main set, you can let the spools with ropes connected. The alternate model starts with wound up spools during the building process. Controlling quick guide To become a real Dragline expert under the sun, here are some quick tips for controlling the model: 1) Place the model from the left to the right At the beginning, place your model driving from the left to the right to match the joystick interface for the Control+ app. 2) Sliding bucket over ground This is some basic control for Dragline Excavators. Slide the bucket over smooth surface by controlling the drag-rope winding inside simultanously with the hoist-rope slightly going down. 3) Moving bucket along the boom As advanced controlling, this requires a bit practice but also avoids loosing cargo when the bucket moves along the boom. The drag-rope should go out simultanously with the hoist-rope going up with a bit tension on both ropes. 4) Unload the bucket On a loose drag-rope, the bucket always hangs in the air on the hoist-rope. Simply give some length on the drag-rope to tilt and unload the bucket. 5) Keep watching the drag-rope The app itself cannot detect outer limitation for the drag-rope. In case the drag-rope goes out too far, it is possible that the rope slips over the spool. Treat the drag-rope always with a bit tension. 6) Avoid tension on same direction This case is also not detectable by the app. When the drag-rope goes in simultanously with the hoist-rope going up, there is too much tension at any point. As a result, the parts holding the bucket are going apart at the weakest pin connection. Giving some length on both ropes and connecting them together solves this. Final note Goal with this alternate model was to create something else from the hard discussed Liebherr LR 13000 Crawler Crane. Rebuild, re-calibrate and having fun is exactly the way how this model works. The app goes hand in hand with the design with a large learning curve on controlling the model. Let's find it out by yourself. Think out of the 42146 box and have fun with this replica of Liebherr HS 8300 Dragline Excavator. If you like the design and you even own the 42146 LR 13000, go for it on rebrickable and build your own.
 -
 Hi Everyone, Here I describe a method for measuring the efficiency of a gearbox using the Lego Technic Powered Up hub (Control+) and a motor to lift a weight. Gearbox efficiency is defined as the ratio of the output power to the input power and here I show how to measure each of these values to allow you to calculate the overall efficiency. Gearbox losses are due to friction within gears and axles rubbing on the liftarms. By measuring these losses gearbox designs can be tested and improved. Efficiency values are calculated and shown for several gearing combinations and for an automatic gearbox design.
 -
Hello everybody, To control my models with the new control+ motors I used the Buwizz app. Now that Buwizz app doesn't support the control+ system anymore, which app is the best to use now?
-
100% made out from parts of set 42114 - Volvo Articulated Hauler 100% controllable with official Control+ App This replica of Volvo N10 Truck is an alternate build (B-model) of the set 42114. This means if you own the Volvo Articulated Hauler, you can completely build this alternate model. Other parts from other sets or spare parts are not required. This model of Volvo N10 Truck is a massive biest. It is more than 58 cm long, 20 cm width and 21 cm height. With open bonnet, the model reaches a total length of 65 cm. This alternate model uses 2041 parts, which are more than 93% from the parts of set 42114 Volvo Articulated Hauler. Follow this link for more pictures and content. Visit rebrickable for building instructions. Impressions Doors of the cabin can be opened to access the detailed interior. The bonnet of the Truck is 90 degrees openable to reveal the V6-engine that is linked to the drivetrain. The model uses the gearbox and housing from the Volvo Articulated Hauler. After building step 85 of the Hauler, the instructions takes over to build the Volvo N10. Keep in mind if you disassemble the Hauler, you can leave the built from step 1 to step 85. use of 42114 sticker The alternate model is designed to use stickers from the main model for better look - especially for the front grill. Parts with stickers that show A60H were not used, but the model uses the 3x11 panels with A60H stickers that can be hidden inside the tipper bed. Those four parts with stickers are not required: Battery and Hub access Thanks to the gap between the cabin and the tipper bed, batteries of the hub are easily removable. This requires no disassembling of parts and is done very handy and quickly. The hub is accessable through the cabin, connecting the hub to the App is an easy task. Controllable with C+ App The model is designed for use with official Control+ App and the profile that controls the 42114 Volvo Articulated Hauler. If you are familar with the App and the Volvo, nothing is new here for you, but the alternate model needs a re-calibrating in the settings for steering. If you are new to Control+, you have to download this official App to control the Volvo N10 Truck. With each App interface, the model is completely controllable. Using a third party App to control is also possible. Instructions The instructions for this model are 325 pages long with high quality premium images and different camera angles and views for a satisfying building experience. The instructions will guide you how to connect wires properly and can be found on rebrickable. Here are four example pages of the instructions: The real Volvo N10 To replicate the caracteristic bonnet, cabin, front and headlights was a big challenge. More than 400 parts of the model are placed inside the bonnet. Here are some example pictures of the real Volvo N10 that matches the model most: What makes this model different from 42114? Honestly this model fullfilles with driving, steering, transmission gearbox and tipping the same tasks as the main model with the same App. The Volvo N10 alternate model is a nice looking truck in another scale and again its a Volvo with use of the same stickers. The licensed alternate model is something that you can expect at the back of the box of 42114. Have fun with this alternate build.
-
I started playing around with the idea of European style semi truck again. I built a prototype to test the chassis design with motors side by side. The core idea here is that both motors are oriented towards back so you can put the medium Technic frame on top of them as well as have cables managed up front. EDIT: final version of the semi: Instructions: https://rebrickable.com/mocs/MOC-90482 (RC Semi Tractor) https://rebrickable.com/mocs/MOC-90484 (Box Trailer) Update: https://rebrickable.com/mocs/MOC-152433 (Manual Semi Tractor) The first iteration/prototype: Prototype showcase: It'll take some time before I'll finish the whole semi truck build, but I prepared the instructions for the chassis so you can build it. Instructions are available for free on Rebrickable: https://rebrickable.com/mocs/MOC-86118 Sneak peek of the instructions:
-
Good day, everyone! This project has started as an idea of creating better a bodywork for 42099, but after some time in development it turned into undependent rc modification of Defender 42110. I took inspiration from Bowler WildCat and Bowler Nemesis which are extreme buggy-like offroaders based on Land Rover cars. So I pondered the question, What if... new Defender would be made into Bowler? In result - original defender has become lower, has got lower roof profile, bigger tires, front and rear pushbars, snorkel pipe, stronger footrests, two sets of additional lights and fog lights, antennas, front and rear mudguards, some chains ('cause chains are cool!). Engine was swapped from 6-inline to V8-supercharged! (After I made this model in spring, LR has announced that they will actually make a V8 Defender. Sadly, not supercharged :) Engine and cooling fan are connected to the front axle via chain links. (Yes, chains ARE cool. I had to buy whole Ducati set for this) And the most important - Control+ components. As this Bow-fender shares control profile with 42099, set of electrics is the same. One XL+ for each axle One L+ for steering SmartHub for SmartThings And then I found out that I am... well... not really good in making offroad chassis. At least it was my first try. So I tuned it as much as possible and made a note for future to learn more about lego offroading. (I think, I'll start with Zetros). Video of how this Bow-fender drives on everything it can is of course here: Watch till the very end! And Thanks for watching. Subscribe. P.S. This cat was walking nearby, while I was making video, so I asked him to participate. So there is A cat in the video now, instead of THE Cat - erpillar :)