Search the Community
Showing results for tags 'bridge'.
-
 A little less than a month or so ago, my brother designed me a 6-track long functional (I.E. weight bearing) single-track train bridge. This model was designed and built by him in less than a day after I expressed a need for another small-size bridge. I then added railings and recreated it digitally just in case I had any issues with it or wanted to modify it. This MOC is designed to be slung between two tables, and worked beautifully as a single track bridge. More recently, I decided to add a second track and as such two more sets of latitudinal supports were placed underneath to make it even stronger now that the load it has to carry has doubled. The longitudinal supports were also lengthened to support the larger bridge deck and the second track. This thing is built using many layers of overlapping plates and bricks and it is STRONG. Underneath, where all the structure's strength is. The bridge on my layout. It is SOLID, with only slight bending at the extreme ends due to the construction method used. Thanks again to my brother for designing such a beautiful bridge! Thoughts?
 -
Tall Black Tower WIP by Jip Kempers, on Flickr So yesterday I started uploading my latest WIP Project to its own Flickr Album I decided to upload every day or two depending how fast it progresses to get some feedback and tips while I build instead of having to alter a thousand things in the end. Which’ll probably still occur lol! I also decided to make a little guessing game of what it will be and to spice it up a bit I upped the ante by asking what the full title of the finalized project will be. (I have it in my head since brick one) Winner will get a nice memento once the project is finished, and the rules are in the descriptions of today’s upload and if you don’t have a Flickr account you can send me a pm here or on the LowLug forum. C&c welcome, wanted, needed!
-
Here is a WIP of my LGMS Module I been working on ...
-
Although mostly known as a sandpit (glad to be a part of it, haha!), some parts of Kaliphlin actually does contain water and some rather lush vegetation. The Arkbri river has quite a few smaller rivers and creeks running from it that are essential in supplying the otherwise barren landscape with water. Goats are well equipped in dealing with the harsh climate and although not too common (mainly because of the insane prices of goats in all of historica...), there are quite a few goat herders that call Kaliphlin their home. Some of them live a nomadic life, covering large distances while maintaining the well-being of their livestock. One of them is Mae'Iz, a somewhat grumpy man that prefers the company of goats over men any day of the week. He was particularly grumpy on this day as he had heard rumours about the current rise in population along some parts of the Arkbri river...Buildings had began to sprung up and a small community had even began to take shape as trade had increased in the region. So this is a little scene that I made to illustrate a bit of the surroundings north of Mophet, where the expansion is beginning to take shape... The bridge is made from a bunch of 4L bars with 1x1 plate with clips on each side. The whole thing is slightly bent to match the curve of the fence-pieces. Hope you like it
-
Where can I find pictures of suspension bridges built in Lego? Estimated length: approx. 1 meter.
-
This through-truss bridge design was originally downloaded by me (I don't remember the name of the original designer who created the bridge) from the LEGO Factory / Design By ME page in 2010-ish and was never built in real life due to questions about it's strength. I came across it again while looking at my MOCpage account's older files and made it into the version seen above using newer parts and a longer frame quite a while ago. (and as to those original questions about it's strength: It's built like a safe, yet I can pick it up with a single finger by the top.) More recently, I revised the deck where the track goes to be able to take the RC track up and be able to put down 9V down more easily. (We run 9V trains at shows in Gateway LUG.) In short, the track is now more easily removable to become 9V, 12V, or even a road bridge. The bridge fits any of my trains, and should fit all official LEGO trains except for double stack containers such as sets 10219 (Maersk Train) and 10170 (TTX Intermodal Double-Stack Car). Comments, questions, and complaints are always welcome! UPDATED 5/29/25: Sorry for the six-year bump, but this model has been torn apart to be made double track! Here we see how it will look when finished, as viewed in LDD. ...and here's the current progress on my double track revamp of my Western truss bridge. Most parts have arrived, but one of the orders is still out... not sure when that's gonna arrive. Thoughts on this new development? EDIT 6/29/25: Sadly, this project is dead. I tried to get it together and couldn't manage it (something was wrong with it), then I had to move and the box of parts got dropped outside. So this upgrade isn't happening. sorry everyone!
-
 *Your entry has earned 7 XP* Part 1: The Sound in the Streets (Surface Battle) "Aboard the Peace and Quiet", by journalist Gutat Lupak. Pre-Battle Briefing from Data Master Bey’wan Pwua’Tua About the Ship: Meet the Crew! Additional Pictures for Judging Huge thanks to the other CFS players, who are a consistent source of feedback and good company. To be concluded in Part 3.
 -
Based on a tip from his new Onondaga friends, Captain Brickleton and a squad of the 18th Hussars head inland into the interior of Lacryma in search of a waterfall that rains gold. At least that's how the Onondaga describe it. Deciding that if the waterfall really rained gold the riches would be too good to pass up, Captain Brickleton plans a day trip on horseback. As the group passes over a rickety bridge on foot, they reach the end of the Elizabethville road and the beginning of the Onondaga single-track that preceded it.
-
*Your entry has earned 13 XP* Some time later onboard the ISD Pandemonium... Lt. Traum [over the comms]: *Sir! We’ve detected shield signatures around the old capital, and ships are fleeing the system. Reaper Squad reports several natives fleeing into the highlands and to the former capital. Reaper Squad is bringing the Queen to you now. What are your orders?* Grand Prince Serion: The old capital is of no concern - leave it! Round up all capable survivors in the ruined region. If there’s any natives among them, clip their wings, and process them. No need to destroy a valuable workforce. Wipe out any agitators… Grand Prince Serion: Ah… The famous descendant of Kharys is here... A little less majestic I see… Queen Edi’kharys: *snnnifflles quitely* damn you… Grand Prince Serion: No reason to extend your peril… You will die knowing that your kind will be robbed of all freedom…Throw her out the nearest airlock! General Hathe, prepare your troops for a surface attack! /// I'm pretty happy with how building out in all directions turned out... This entry may be a tad bit grim, but then again... We are the bad guys...
-
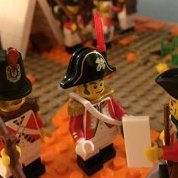
Terraversa, East of King's Port, August 620 "Thousands of feet march to the beat, it's an army on the march. Long way from home, paying the price in young men's lives." The first battle had been won, and several bridgeheads had been conquered all over the island. The losses had been relatively mild but, still, they were the highest suffered since the Juniper War. And that damned island was still largely to conquer. The first, rather obvious objective was the capital city, King's Port: the city had the largest harbor and was right in the middle of the excellent road system of western Terraversa. The capital city of the island also had a strong strategic and politic value: its capture marked the turning point between an island successfully resisting to the invasion and some minor strongholds still in enemy hands... and, for foreign nations, it could also make the difference between joining a war or supporting isolated pockets of resistance. Therefore, they had to conquer King's Port, and quickly! During the T-Day, the forts of the city had been shelled and stormed, and the vanguard of the army had entered the city from South and East. However, refraining from a brutal bombing with heavy artillery had had its cost, and the bluecoats were still fighting in the streets, with the local militia clinging to buildings and barricades. The troops landed West of the city, so North of the King's River, on the contrary, had successfully captured fortifications and batteries but were still too weak to attack the city and defend themselves by a counterattack from Pamu, so they had entrenched and were waiting for reinforcements. And the easiest way to bring those reinforcements was crossing the King's River from the South, building a proper bridge, and using it to bring soldiers, supplies and artillery between King's Port and Pamu, cutting the city off from the Kingshead district. The designated crossing point was a few miles East of the city, where the King's River was nothing more than a fast stream... quite easy to cross for a man, but an insuperable obstacle for a cannon. Combat engineers and common soldiers started working hard, reinforcing the riverbank by hammering long wooden poles in the sand. More poles were hammered directly into the bottom of the river, creating a robust anchorage for the pontoons... for sure a difficult and uncomfortable job. On the other side of the river, the bank was cleared from the bushes and the sand was leveled with shovels and spades. The next step was far more difficult, especially considering the fast flow of the river. Empty barrels were thrown in the water and secured to the poles, creating a sort of floating platform: the buoyancy of each barrel could barely sustain a single soldier, while the complete structure will hold men, horses and even cannons. While the privates worked, the officers planned the next moves with the chief engineer: according to him, the bridge could be completed in half a day, enough to let the column rest and to complete the siege before the evening, if they marched quickly enough. Soldiers and sailors followed the instructions of the combat engineers, trying to keep the barrels in position before they are dragged away... and trying not to be dragged away themselves while working in the deep water! The bridge quickly started to take shape, at first as a simple row of ropes and barrels... ...and then, when planks and earth were cast over the structure, as a robust floating platform. For sure not a bridge intended to last, but a fast solution to bring men and cannons onto the other side of the river. The soldiers marched forward, platoon after platoon, ready to face the enemy on the battlefield. Among them, the veterans of the Mardierian Legion. Several of those soldiers lived on Terraversa -or were even born on the island- before the "Terraversan patriots" forced them to flee with their families. Some were members of the garrison, others were simply political opponents of L'Olius or Oldis, who had ended up in proscription lists for a reason or the other. For them, the war was something far more personal... a chance come back to their land and to get their deliverance! -------------------------------------------------------------- A series of three builds I've done for the invasion liberation: the river banks remain the same, with the soldiers progressively clearing the bushes and building the bridge. Probably it would've been better using a larger river, this one doesn't really seem worth of a bridge... but I imagine that it would still be a problem for our cannons!
-
Hi everyone, I'm Alex. I'm starting to build up a train layout and wanted to add a signal bridge. I've seen this design (https://www.pinterest.com/pin/503910645807246353/) on Pinterest and really liked but have not been able to find the last two pages of the instructions. Does anyone have the same design built or the finished instructions?
-
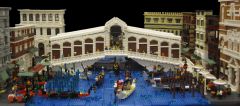
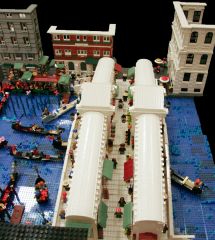
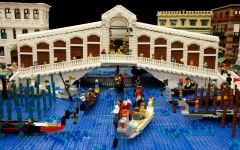
From the album: Rialto Bridge
Probably the most visited and most photographed bridge in Venice, (Ponte di Rialto) opened in 1591.Connecting the districts of San Polo and San Marco across the Grand Canal in the heart of the city, the Rialto Bridge has always been a busy crossing over the canal.The bridge is formed by two inclined ramps covered by a portico with shops on either side. This area has long been a market place for Venetians and Tourists.© Anu Pehrson
-
-
-
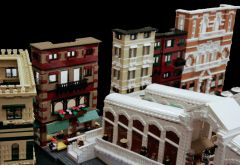
From the album: Rialto Bridge
Probably the most visited and most photographed bridge in Venice, (Ponte di Rialto) opened in 1591.Connecting the districts of San Polo and San Marco across the Grand Canal in the heart of the city, the Rialto Bridge has always been a busy crossing over the canal.The bridge is formed by two inclined ramps covered by a portico with shops on either side. This area has long been a market place for Venetians and Tourists.© Anu Pehrson
-
Introduction; I believe that many among us have made a MOC that they like, but think that something is missing and want to change it somehow to make it look better or emphasize in the story-telling. Among them, here I am! This MOC, follows my previous attempt and continues my story from where it was left! The Story; "...In a galaxy far, far away, somewhere in a corner of it, there is an unknown and isolated planet. Despite the initial disturbance from the clatter and thunder that unsettled the inhabitants of the planet on that festive day, the strange visitors became especially beloved by the local population. Our beloved C-3PO, despite speaking over 3 million languages and dialects, had a hard time getting in touch with them at first, but eventually succeeded and thus added another language to his database. The time was passing pleasantly as our 2 robots tried to find a way to repair their pod so they could continue their journey, enjoying their walks in the blossoming nature with the inhabitants of this isolated planet, until once again a bang and a thunder shocked the calm atmosphere that was prevailing..." I am looking forward for your comments! You can find additional pictures of my creation on my FlickR
-
This double track train trestle is finally finished! The bridge uses four girder parts from City set 7900 from 2006 that I've had laying around for 18 years without much luck at making a bridge (despite several attempts) - until now! The bridge is ~30 inches long, and is designed to hang between two tables with the parts under track off the end of the bridge proper serving as feet, holding the bridge level and on the table top. Looking up track through the centerline of the bridge. There are 16 bricks of space from top of the rail to the roof girders, which means it can take double-stack Maersk container cars with a plate to spare. To pick the bridge up, you can grab anywhere but the roof lattice - those plates aren't reinforced enough to take the weight. The underside has been reinforced since the initial design stage... It's a lot stronger now, and *should* be able to hang between two tables without breaking while trains run over it. (I've not been able to test this with motorized trains as I don't own any.) Thoughts, comments, questions? Feedback is appreciated! EDIT 7/6/24: Please pardon my messy layout! I've really got nowhere to go with most of this stuff, but nevertheless I just managed to rearrange it around, moving tables and adding my bridge to the mix. The bridge works beautifully and hasn't collapsed yet which I consider a major win for my design skills! A digital look at what the layout looks like without the stuff in the way.
-
I have not seen too many railway bridges on this forum, let alone bridges that move! This MOC is not quite a common type of moveable railway bridge either, it's a double-leaf drawbridge. More common would be a bascule bridge. The difference being that a bascule bridge has it's contraweight either directly below the (rail)road or above it, but then directly attached to the bridge deck. The double-leaf drawbridge has a contraweight attached to a 2nd structure above the road. The nice thing about this bridge is that it allows me to keep the track very low to the ground. My Lego railway simply lies directly on our flooring. The contraweight includes a 2 x 6 x 2 weight brick. Not entirely sure how well the bridge is balanced - a real build would have to prove.
-
Hello, This is my Medieval Border Bridge submission to the Bricklink Designer Program (Series 5). If you like it, you can vote for it here by clicking 'Love it': https://www.bricklink.com/v3/designer-program/series-5/1694/Medieval-Border-Bridge Thank you, Zol
-
Hi everyone! With this new year 2024 I want to start presenting you my latest work, the result of 3 months of work in autumn 2023. It represents a stone bridge with a stream, a dirt road, a couple of small waterfalls and a water mill. All set in medieval times. In 2018 I had built a Medieval Windmill and knew that one day I wanted to expand it. In 2023, however, I was inspired for a much larger and more ambitious project, namely creating a Medieval Village! The village has been divided into 6 modules (for the moment), the windmill therefore represents the first completed module, while today I present to you the second module. This latest moc is based on 4 32x32 baseplates and is made up of approximately 7500 pieces. The water mill also has movements operated by a lever or interchangeable with LEGO motors. The roof of the mill is divided into two opening sections which allow you to observe the internal details, such as the rotation mechanism of the blades and the grain mill. On the upper floor there is a fireplace with some chests and a sleeping room for the baker. On the dirt road I positioned a horse-drawn cart with two Black Falcon soldiers. The whole thing is completed by lush vegetation with a forestman on lookout on a large tree. I hope you enjoy my latest work and stay tuned soon for module #3! SDRnet Flickr Gallery: https://www.flickr.com/photos/sdrnet/albums/72177720314195257/
-
Oops, that bridge was just a little bit too narrow... While building the bridge, I found out that these medieval wheels on a 1x4 wheel holder are just a bit wider than 6 studs. That gave inspiration for this accident.
-
GRID H15 (old map) Our glorious recce forces are trying to cross the sea and set in the Eastern Arm. However, the bridge is crushed and unusable... There is also a secondary mission...retrieve a missing drone used by the former army of Soalon and later used by the BOS terrorists. Its information could be useful to direct surgical strikes to the BOS (a surgical strike in Erotema doctrine is more or less a carpet bombing with 2000-pound warheads). 20220129_105726 by green helmet spanish AFOL, en Flickr 20220129_105742 by green helmet spanish AFOL, en Flickr 20220129_110235 by green helmet spanish AFOL, en Flickr The vehicle is a Mine-resistant ambush protected vehicle (Противоминная защита Засада). A 6-wheel troop transport vehicle with a quad 7.62 mm machine gun suitable for urban combat. Enjoy!
-
The Sacred Bridge, leading to the Inari shrine. The Kitsune (https://en.wikipedia.org/wiki/Kitsune) is drinking by the river. And many animals are observing the traveling monk, while he walks on the sacred bridge leading to the shrine. The blue birds are supposed to be Red-flanked bluetails, and the other bird is a Japanese Crane (Red-crowned Crane). Inspiration for this build, is the various red Japanese bridges leading to a shrine or other sacred place, this one was based on the Shinkyo Bridge leading to the Futarasan Shrine in Nikko, which I visited in 2020. Build for the Summer Joust 2022 'Bridging the Gap' category. The Sacred Bridge by Ids de Jong, on Flickr
-
The fearsome First Order strikes again! This model occupies over two square feet of your average usable coffee table space at just under (an estimated) 2000 pieces. This behemoth took over two months to design - but I'm not done yet. Before the Christmas season, I hope to have instructions completed. This model is based on the First Order Resurgent-class Star Destroyer's bridge. The original model was a measly 8x12 inches: And used only around 700 pieces. The most difficult part of this stage was creating the curved portion of the front section. This took many iterations to get right. When I had time, I would plan the wings of the bridge. The wings use around 300 pieces for the left-wing (looking from the back) and 350 pieces for the right-wing. Finally, we get to the back extension. This alone uses around 650 pieces and expands the length of the model by 25%. I knew that this would be the last section for one crucial reason: I was running out of space at this point. I wanted to focus more on figure placement for this part, so I left it mainly open while emphasizing the diorama aesthetic. It took a while but I was able to obtain all of the black bricks I needed for the back of the bridge. I think it turned out well. @Monkeyulize, if I may ask for your help designing a UCS sticker for this model, here's that question. The 1x2 technic brick is designed to be used to anchor a figure stand (coming soon) - I know it's there, don't worry. At last, the finished product. A piece fell off during transport but I found it and it's back on. I'm very pleased with this but know it can be improved. If you have any questions or critiques, please don't hesitate to post. I have but one request: stay civil. I will update this post with more design changes and processes. The Flickr album link can be found here: https://flic.kr/s/aHBqjzSuaU
-
My entry for Summer Joust 2022 - Bridging the Gap category. Inspired by the assaults on Lothlorien during the war of the ring. The build is not depicting any particular scene from the books, but just trying to capture a mixture of Peter Jacksons darker style, mixed with the classic 1978 cartoon. Link to album: https://flic.kr/s/aHBqjzWvDn

.thumb.JPG.1493565333fc74a41021a3de1870838e.JPG)