
D3K
-
Posts
1,317 -
Joined
-
Last visited
Content Type
Profiles
Forums
Gallery
Everything posted by D3K
-
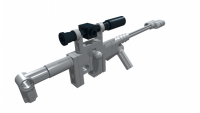
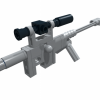 UPDATE: Rebrickable truck chassis Rebrickable dump bed attachment Truck chassis instructions Dump bed attachment instructions Hi! I want to present my latest MOC, a 6x6 Offroad type European style truck with PF. I have been working on this longer than any previous MOC, slowly improving and perfecting things here and there, and can finally say I am finished with the base model! Oh, and also, the instructions took quite a while to perfect! Firstly I want to say thank you to Alasdair Ryan, Efferman and Blakbird for reviewing my instructions and providing valuable feedback! Special thanks to Alasdair for helping me with some LPub issues I couldn't figure out on my own! So, a little introduction: The idea behind this MOC is to make a sturdy and powerful PF chassis with advanced drivetrain and suspension on all axles. Further I wanted it to be highly adaptable when it comes to equipment to be placed on the back of it, thereby providing people with a good chassis onto which they can mount their own MOCs, and allowing myself the time to develop and publish different implementations to the model in the future. The features of the model are: -6x6 drivetrain powered by two XL motors -Steering via a worm gear, powered by one M motor -Lockable central differential (manual) -Live axle suspension on all three axles -PF "Expansion Bay" to easily integrate up to two more remote controlled PF motors -Working V8 engine Non technical features: -Rack to mount a 9V/AAA/LiPo batterybox in the cabin (for lights, etc) -Openable doors -Lower steps for the crew pivot up if hitting an obstacle -Tiltable cabin -Semi-detailed interior (including gear stick, coffee cups and some instruments) -Manual winch in the front For a lot of WIP photos, renders and high res pictures of the finished model, please visit the appropriate BrickSafe folder Firstly I'll show you a couple of pictures of the internals: The final gear ration result in a fairly low speed, but tons of torque (maybe a little too much, as some U-joints have experienced). Due to the high torque, I saw myself forced to modify the central differential, as I wanted the truck to have some actual offroad capabilities. Let it be known though, that for driving on the floor (both wooden and carpet) this is not necessary at all. Then some more actual pictures of the physical model In the above picture you can see the small 9V batterybox I placed in the cabin to provide power for the blinking roof lights. Also some of the way too long wiring I had to use, as I don't have short ones. There are certain differences to my model compared to the one in the instructions, most notably the rear lights and the roof of the cabin. This is due to me lacking the proper pieces, so it looks a little bit off in the pictures. The obligatory underside shot. Here you can see most of the mechanical side of the drivetrain It's a bit difficult to get good pictures of the suspension working.. The PF Expansion Bay. As you can see the two channels are free, and there is room for a lot of wiring. You can also see the dual white clutch gears used for the steering. It makes it powerful and fast, while still preventing the M-motor from stalling. On the other side is the space taken by the lever to engage the diff lock. I originally had an RC function for this, but it turned out a little unreliable due to the M-motor driving itself back a little after stalling. Also, it took up unnecessary space. Shot of the driver's side interior of the cabin. The cabin tilts forward to allow access to the batterybox... Which can then easily be removed. Here you can also see the V8 and the "fake gearbox" with shift lever and cup holder A shot of the rear of the vehicle, meant to show the available space for additions. Okay, that about sums it up. A couple of notes: I initally wanted to have independent front suspension, but this, together with a lockable central diff took up way too much space. Designing the front axle was a real pain, as it had to be very low to not interfere with the engine. This meant the steering motor had to be placed on the chassis. I first tried to use the servo motor, but it took up too much room. The solution I ended up with is as good as it gets given the parameters I had to work with, although it does have a little slack But it works great! Like I said This is supposed to be a modular build, and I am in the process of developing said modules now. Firstly is a picture of three different LA systems that are all more or less "drop in" additions to the model (you need to remove some of the transverse 7L axles seen in the above picture). The one to the left is used for a side tipping bed, which you can see in the next picture. The other two are to be used with for example standard tipping beds or other modules This is a WIP side tipping bed, using the two small LA setup shown above. It is a bit short maybe, but that is to give room for a rear attachment, like a Palfinger style crane, or a material handler claw, like in the picture below: As you can probably see, this is just a modified version of the Unimog 8110 crane, but with a claw (a la 42006) and an extendable boom. It is manual. EDIT: Also; yay or nay regarding the stickers (from 42025) on the cabin in the above picture? I am also going to make a compressor unit that can fit underneath the bed at the cost of the tipping function. Lastly, here is a taste of the instructions, which you can download here It is currently pending approval at Rebrickable (posted last night, so should hopefully not be too long). In the mean time, here is the parts list And here is the LDD model for those interested (a couple of pieces couldn't be properly attached) So thanks for taking the time to read all this, I hope you like the model, and that some of you will be building it yourselves. If you do, please come back here and post your impressions, along with a picture or two of your build! As always, comments, criticism etc etc are very welcome EDIT 2: The truck is built in white in the instructions, so most white parts can be substituted for any other colour. Also, as I note in the introduction of the instructions, most LBG and DBG thin and normal liftarms are used in the chassis, and can be substituted for other colours. The colours are used to make the instructions as clear as possible
 -
Love the description Sure can feel that power!
-
1H2015 Video Reviews
D3K replied to Sariel's topic in LEGO Technic, Mindstorms, Model Team and Scale Modeling
Yeah, I read that, but seeing as this is EURObricks, and Sariel is from Poland...? Let's hope! -
[TC5] Foxy
D3K replied to Zerobricks's topic in LEGO Technic, Mindstorms, Model Team and Scale Modeling
Totally awesome and unique! One of my favorites so far!:-) -
Alternative parts
D3K replied to Dafgek81's topic in LEGO Technic, Mindstorms, Model Team and Scale Modeling
I know others do it, which is why I'm starting to get annoyed. We have "Technic and model team index topic" pinned on the very top of this forum. In this you will find links to other topics, such as "General parts discussion", "Technic General Discussion" (which' description reads ". Here you can post small questions or comments about Lego Technic which don't need a topic of their own.") and even one named "Finding parts for Technic MOCs" Also, see what I did there? I provided clickable links to the pages in question. And it's our forum, you are as much a part of it as me or anyone else -
Alternative parts
D3K replied to Dafgek81's topic in LEGO Technic, Mindstorms, Model Team and Scale Modeling
You don't like the parts, just leave them out! No offence, but this is a downright stupid question. If you don't like the parts in question, how are we to know what alternative you might actually do like? In this case, you will be way better off trying different solutions for yourself to find something you like, or as I said, leave them out EDIT: Also; try to make an effort to at least link to the model and part in question! EDIT 2: Sorry if this is coming off as harsh, but lately this forum has been filling up with so many useless and unnecessary topics, and it's rather annoying! -
[TC5] Road Roller
D3K replied to Tamas Juhasz's topic in LEGO Technic, Mindstorms, Model Team and Scale Modeling
Read the description, I'm sure you'll figure it out;-) Great entry, wanted to make an entry with this set myself, but was lacking the yellow wheels:-) -
1H2015 Video Reviews
D3K replied to Sariel's topic in LEGO Technic, Mindstorms, Model Team and Scale Modeling
Nice video review right there, and very "comfortable" voice of the reviewer, if you know what I mean! Most reviews on youtube aren't really critical reviews, just mute, shaky videos showing the functions. Then there are those who try, but fail due to a number of factors (one of them can be a really annoying voice). And on top you have guys like this JANGBRiCKS and also Sariel for that matter (although he relies on text and not voiceover). Might be my opinion alone though... -
Technic Hall of Fame Discussion
D3K replied to Jim's topic in LEGO Technic, Mindstorms, Model Team and Scale Modeling
Mostly I agree with what you said, but this topic is named "Technic Hall of Fame Discussion" -
Technic Hall of Fame Discussion
D3K replied to Jim's topic in LEGO Technic, Mindstorms, Model Team and Scale Modeling
I concur with Lipko. Take a look at some of these other Hall of Fame cars based off of real life cars: Ferrari 458 Spider by Brunojj Ford GT40 by Sariel Audi RS5 by Lipko And you have too see that your model is not quite there yet. Don't feel bad about it, it's just the way it is.. Keep working, try improving the design, maybe make a 2nd attempt, trying to improve the things Lipko pointed out (which I agree on), and come back with a revised model. Making a MOC with a universal WOW factor is not an easy achievement! -
General Part Discussion
D3K replied to Polo-Freak's topic in LEGO Technic, Mindstorms, Model Team and Scale Modeling
Maybe to keep the colour across the engine more consistent in regards to parts? So you don't see a blue 3L pin in the crack for example? -
I don't mean to sound like a dick, but is this topic really necessary? There are severeal topics on this model already, do we really need one just pointing out the value of this as a parts pack? Couldn't just write that in the 42029 discussion topic?
-
Sariel said in a comment on his youtube teaser for the 1H reviews that he heard a rumour of some kind of excavator, I think.. can't seem to find the comment now though..
-
Technic Parts You Never Use
D3K replied to DrJB's topic in LEGO Technic, Mindstorms, Model Team and Scale Modeling
Yeah, I too have a couple of those rubber band holders, never used them for anything=) Especially when I came back into Technic a couple years ago, and discovered bricklink, I bought a whole lot of parts that seemed useful/cool at the time, but I since never used once in a creation. For example: Steering Arm 6.5 - Not used, since the &L ones are more versatile This Dual Clip 1 x 3 Triangle The Technic Gearbox Half - Had a lot of ideas for this one, but they all turned out to be awkward and stupid I have several of these Rectangular Technic Bricks (in various sizes) - never used, but that's probably because I build almost exclusively in studless Also, although I bought a lot of the fairly new Technic I-Beam 3 x 5 parts, I have not once used them in a MOC -
Try it, then report back
-
I too do that, in my mind that makes them less likely to pop off.. although I have never experienced them popping off without applying external force in the wrong direction. This part isn't designed to have a force acting on it in that direction anyway, so both parts are probably equally good
-
Technic General Discussion
D3K replied to Jim's topic in LEGO Technic, Mindstorms, Model Team and Scale Modeling
Hi! I am looking for a couple of guys/gals to review the building instructions for my latest project (6x6 truck) before I release them publically. By review I don't mean do a written/video review of course, but rather look them over and give me some feedback on stepping, clarity and quality, as well as spotting of mistakes I might have overlooked. I am in the final stages of making the instructions now, so I'm thinking I'll export a .pdf directly from LPub for you to check out, and then make the proper instructions in PowerPoint or something, adding clearifying text and arrows, as well as some other tweaks to make it more understandable (some things will not make much sense - especially when attaching submodels (cabin for example) - without arrows and other viewing angles etc.. Again, I am looking to find technical oddities that might be off. I have the model built physically, and it works great, but I may have missed something when building it digitally. So if this sounds like something you might be able to help me out with, please shoot me a PM, and I'll send you a link to download the .pdf hopefully today or tomorrow! Thanks! -
Motion Simulator
D3K replied to Carsten Svendsen's topic in LEGO Technic, Mindstorms, Model Team and Scale Modeling
That's pretty awesome! To dot the I (i), there should definately be some kind of gyroscopically/accellerometerically (is that a word? ) oriented picture/video on the phone! -
1NXTmonster's solution looks very sturdy indeed, possibly the best one so far to meet all your requirements! I have however experienced U-joints breaking inside the torque tube parts, although that happened with a lot of torque, and no portal hubs/reduction after the u-joints, other than the 20:28 differential.
-
Offroad pickup (mini scale)
D3K replied to filsawgood's topic in LEGO Technic, Mindstorms, Model Team and Scale Modeling
Great looking little model! :thumbup: -
[TC5] Front Engine Buggy
D3K replied to Dalafik's topic in LEGO Technic, Mindstorms, Model Team and Scale Modeling
Hard to believe this is your first venture into Technic! Awesome model! -
Although the reviews for the sets won't come before December 1st, any chance for those who have already got the sets of posting some highres photos of the boxes? And by that I mean the rear of the boxes of course
-
LEGO Technic Airplane
D3K replied to Airplane's topic in LEGO Technic, Mindstorms, Model Team and Scale Modeling
An educational airplane model is a really good idea! Love it, looks great! -
Yay! Expecting a tag of some kind below my avatar Seriously though, the only reason I noticed was because I built the physical model as I was making the LDraw file, and I delivered it in "vertical flight" Looking very much forward to updates on your site!
-
Fantastic! When do you reckon the 1997 write-up will be ready for us mere mortals to view on Technicopedia? Also, the red axle/pin cross blocks on the 8434 tilt rotor aircraft rotate with the engines/propellers, so they are 90 degrees off after you turned the engines to horizontal flight mode