
D3K
-
Posts
1,317 -
Joined
-
Last visited
Content Type
Profiles
Forums
Gallery
Everything posted by D3K
-
Track links haven't arrived yet, so the tracked carrier is on hold for the time being.. Luckily, many other parts have indeed arrived, including new steering joints, fake engine cylinders, gears, connectors, liftarms and bricks, so I continued my quest towards vreating a better buggy-rod (I think that's what I'll refer to it as from now on). Here it is, more or less complete and in working condition! A lot of improvements, most notably to the aestethics and overall scale of the thing, but also vastly improved steering due to new ball joints, and stiffer shocks The only thing identical to the first version, is the actual hood, but here I've had to make a hole for the steering motor, which doubles as a fake supercharger of sorts... Also, a full V8 engine! Finally! View from the front. Finally found a place to use my PF lights! View of the interior. Seats are more or less in scale with the rest og=f the vehicle this time around. Went for a racing bucket style type Drivetrain and bottom Rear suspension and differential setup. Used bevel gears instead of universal joints this time to get through the turntabble. Not sure if it was necessary. THis is the main part that I think I'll have to redo, but it was getting late, and I needed to sleep! So what do you think?
-
That's brilliant! I remember seeing this jeep concept some years ago, and of course the steering stood out as something quite unique for a car! Didn't it also have one v8 motor for each axle?
-
Heh, I didn't really look for similar models, I just couldn't remember having seen them When I first looked at the driveline I too thought I mistakenly had put a drive on the rear sprockets of the front cab, but it's just coincidentally in line with them, as this is where the vertical axle from the motor comes down and onto the axle before it is split to go to the front and back. Have put this project on hold for the moment, as I am working on a new buggy-rod-tractor. Have got a lot of new pieces from bricklink, so I can implement some functions I couldn't earier. Will post pics later!
-
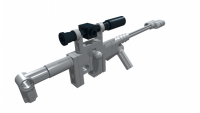
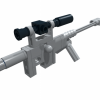
New MOC/WIP: I can't remember to have seen a BV206 or Viking type tracked vehicle made in Lego, except for the B-model of the snow groomer, so I thought I'd try to make one, motorized, and with realistic drive/steering. And this is my progress after a couple of hours intensive work this morning: As you can see, I need some more track links, and also a couple of more drive sprockets. It features drive on all four (three) tracks by one PF-XL motor, and steering via a PF-M motor and to small linear actuators. Haven't decided whether to have the battery box in the front or back yet, if it goes in the back, I'll probably reposition the XL motor to be able to implement seats and a more realistic driver's compartment. A close up of the steering: The real thing is steered in a similar way, with hydraulic actuators. I had to use a small turntable to get it to work properly, this function is also still a WIP, but at least it works as it is now! View of the underside with drivetrain
-
8853 Front Loader (Excavator)
D3K replied to DarkShadow73's topic in LEGO Technic, Mindstorms, Model Team and Scale Modeling
As far as I can recall, both functions go via worm drives.. This is a great little set, actually my very first Lego Technic set! Remember getting it while on vacation the summer of -89, me being only 4 at the time! Ahh, the memories:-D -
Done some minor reorganizing on the vehicle: As you can see I have relocated the battery box towards the rear, and added a differential to the rear axle. I have also added a small V4 engine (don't have any more cylinders yet ) Also, I found a way to make the front shocks twice as hard while awaiting new, hard shock absorbers: And lastly I implemented a simple 1+N gearbox, just to let the fake engine run while the actual vehicle doewn't! Looking at the thing now, I realize it's extremely wrongly scaled . I think I will dismantle the entire thing, and start more or less from scratch, to make something similar, but smaller, hopefully in the scale of the Technic Minifigs which I found a couple of!
-
TSATS: Technic Water Strider
D3K replied to Splat's topic in LEGO Technic, Mindstorms, Model Team and Scale Modeling
That looks pretty impressive! At first glance I thought it was an actual insect! -
Yeah, I remember seeing that episode of Top Gear, and you're right, there are definately some similarities! Maybe I'll use one of those Icelandic "formula offroad" cars! And thanks for the positive feedback!:-)
-
A Technic Mercedes G
D3K replied to efferman's topic in LEGO Technic, Mindstorms, Model Team and Scale Modeling
This is a pretty awesome model! Quite on par with Sheepo's Land Rover Defender, though not as complicated! Haveïng hit quite a few bumps (and almost a couple of IEDs) in various G-wagons, I kinda have a soft spot for this particular car! EDIT: Also, VFRacingTeam's DAF TurboTwin Dakar truck looks beautiful! -
As I've stated in other topics earlier, I recenty got back into Technic, and I'm finally starting to get enough pieces to make my own creations! I thought I'd make a thread where I can show off my stuff (hope that's okay), and hpefully get some feedback, critisism and tips on improvements from the EuroBricks Technic community. As I'm just starting to get used to the whole studless construction techniques, I hope you're not expecting miracles just yet, but hopefully we'll get there in due time! (btw love the lego emoticons!) So here it is; my very first MOC! (Still a very much work in progress) I'm not quite sure what kind of vehicle this would classify as, it's not a hot rod, and it's not a buggy, and definately not a tractor, but something inbetween! The features I've managed to implement are: -RC drive via two PF-M motors linked together via differential -RC steering via one PF-M motor (with working steering wheel) -Inpendent double wishbone front suspension -Pendular suspension + shock absorber on the rear axle -Opening hood View of the steering. Found out I'd add the steering wheel after I had already installed the battery box, so I had to do a somewhat intricate bypass solution there It works allright though! No self centering though.. yet! A view of the rear suspension setup, as well as axle. I only have one differential yet (actually got it by accident when I bought the 8043 secondhand), but more are on the way! I know the entire rear of the car/buggy/tractor/hotrod looks very empty, but as I said; a work in progress! View of the front suspension and temporary grille. The shocks here defiantely have to be of the harder type. On the way! The entire front can come off pretty easily to make modifications. Bottom view of the drivetrain, as well as the vertical placement of the motor for the steering. Overall I'm happy with the result so far! Things are working, and the structure seems solid enough! I just spent a couple hundred Euros on bricklink ordering new pieces, among them new differentials, harder shocks, bigger wishbones and wheel hubs for the front, an XL-motor ++ lots of other things that'll come in handy in the future! So what do you think?
-
Concept for new Technic parts
D3K replied to D3K's topic in LEGO Technic, Mindstorms, Model Team and Scale Modeling
I too could've used those parts on veveral occations! I suppose you mean something like what rumpletump rendered here: Damn, looks like somebody beat me too it! It's cool the 'Technic Pin Long with Friction and Center Pin Hole' (87082) now exists! Had a llok in his brickshelf folder, and there are definately some nice concepts there! But two stand out to me; 1. The 2L "tubes" that look like "Technic Pin Joiner Round with Slot" but with added "clutch" like on the old type 1/2 bushings. Brilliant way to transfer two rotational forces along one axle not using more than 1x1 of space, and having no delay like now (vertical axle through the turntable on 8043) 2. The ball joint (kogellink) arm where you can choose which way to mount the connectors. -
Technic 1h 2013
D3K replied to sama's topic in LEGO Technic, Mindstorms, Model Team and Scale Modeling
Hi! Just saw brickset.com lists several 2013 technic sets: 42000 Grand Prix Racer 42001 Hovercraft 42002 Mini Backhoe 42003 Action Racecar 42004 Action Race Buggy 42005 Motocross Bike 42006 Material Handler -
I was building some things yesterday, and I found myself wishing I had some pieces that I didn't have. Upon closer inspection, I don't even think they exist! So I made a couple of quick renders to get your opinions on these two concepts. Is it just me being difficult, or would you also find these useful? First is a piece That I could see many uses for: The thing I needed this for was as a way to guide axles along beams using a minimum of space, sort of like this: I'm sure there would be lots of other uses for that particular part. Second is something with probably a little more limited potential: I would use this to connect beams using thin liftarms, without having to use 3L axles with bushings on either side, like this: So, what do you think? Useful? Or just me being high maintenance? EDIT: Also; please post your own suggestions for non-existing parts! Not sure if I can do it myself, but maybe a moderator could change the name of the topic to something like "The new parts suggestions thread" or something something?
-
Lego 8043 C-model Bulldozer promotion
D3K replied to agrof's topic in LEGO Technic, Mindstorms, Model Team and Scale Modeling
I love when someone takes the time to create a proper C-model, and on top of that make instructions for it afterwards! I just finished building this one, and it features some pretty smart solutions! Instructions are not quite on par with the ones from TLG, and can be a bit unclear from time to time, but they are definately readable! Just use common sense, and you'll be just fine! There are some (very) minor flaws to the design, but overall it is very good! Seems to use more parts than the official B-model (Tracked Loader). Thanks for giving me even more pleasure from the 8043! -
Well, I had to try; I used the part you suggested (minus the attachment point for the actuator), and I must admit it looks kinda good, and gives that small added functionality! If you compare it to the outrigger arm on the left, you'll see some things have been removed to make room for the new setup, and also the yellow 9L vertical beam inbetween had to go. This makes the overall structural rigidity of both the crane part, and the actual outriggers severely reduced. Seeing as I wanted to keep the overall appearance of the original model, I would not go to steps to modify/rebuild this too much. I really appreciate the input though!
-
Ahh, I see! But I don's see the practical benefits. Both aestethically, not to mention more parts, needing at least three times the space (vertically and horizontally) compared to the U-joints. Besides; why would one extend them when the arms are retracted? Maybe for a wheel change!
-
What is a U-joint? But yeah, I have lots of those from the excavator, and I can see them being useful either at the end of the outriggers, or under the turntable somewhere! That is one of those parts, that I didn't even think to use! You probably remember in the early nineties, as far as I can remember, there was no piece even remotely similar to those new, more specialized pieces! By the way I just realized there's no cabin for the crane operator on this model! I remember taking it off because I needed some of the parts for something!
-
Correct, as noted below the number 5 image!
-
So I bought the 8053 Mobile Crane around six months ago, and was pretty stoked as this was my first larger Technic set in around 15 or more years (previous one was the Air Tech Claw Rig), and also the first big studless set for me. While I was blown away by the functions of this set (8 wheel steering, the gearbox for manipulation of the crane functions, and the clever outriggers), I felt some things could be better! Problem was, while I had a LOT of Lego and Technic bricks, gears, axles and stuff, I found it kinda hard to implement the older studded (EVEN, not odd) bricks and parts into this ODD, new studless design. I wanted to do something with the outriggers, and had a pretty good plan on how to do it, I just lacked the necessary parts!! So, a couple of weeks ago, I bought the 8043 Motorized Excavator (and also a Power Functions set on the side) second hand, and all of a sudden I had all the motors, gears, axles, bells and whistles to do exactly what i wanted! This is the result: As you can see from the above images, some things had to be done to make room for the functionality I wanted to implement. Most notably I suppose, is I had to elevate the entire crane part by a full two studs. Also, there is some wiring poking out of the drivers' cabin. This of course means I had to redesign the Crane/Chassis attachment a little. Here you can see the mechanism. It took me a lot of trial and error to come up with this working design. I probably was thinking a little too complicated in the beginning, using more bevel and double bevel gears from a lower position, and that caused a lot of slipping of the gears. The solution came to me as an epiphany to me last night, lying half-asleep in my bed And also the difference in height compared to the original model: You can also see the axles for deployment cannot turn unless the outriggers are OUT And a semi-close-up of the mechanism on the end of each outrigger I first tried with the smaller 8 tooth gears, but ended up using the small double bevel gears, as the 8 tooth gears would slip on the worm drive, as there was some slack. Here is an image of the outriggers deployed And finally a video of the action (deploying and redeploying) This has been bothering me for weeks and months, and now that I eventually made it, I can finally dismantle the Mobile Crane and built something else!
-
For the Model or the Parts ?
D3K replied to Phantom59's topic in LEGO Technic, Mindstorms, Model Team and Scale Modeling
When I was young I had about a metric ton of Legos, not sorted, and I used to build whatever came to mind. Now I recently bought the 8053 Mobile Crane, and really liked the look and functionality of that model. Even more recently, I bought the 8043 Motorized Excavator, built it, disassembled it, built the B-model, and then realized that I all of a sudden had a lot of interesting parts I could try to implement into the 8053, which I like better! I am currently putting motors into it to motorize both functions of the outriggers (a task a lot more difficult than I assumed it would be), and will try to post some pictures here when it's done. I'm still getting used to the studless construction, so the sets I've recently bought have helped me get a bette understanding for the new techniques used, but hopefully, parts wil start to pile up, I'll get them organized, and have some innovative dreations of my own in the not too distant future! -
Thanks for the welcome guys. I have some ideas, and hopefully they will be realized in not too long! Just need to get hold of more parts first!=)
-
Some of my MOCs :) new builder
D3K replied to LegoGBC's topic in LEGO Technic, Mindstorms, Model Team and Scale Modeling
Very nice! Are the two opposing pneumatic cylinders for telescoping the boom? Correction; three cylinders (?) -
Hi, I am D3K from Norway! When I was young, I had a great interest in Lego, and my parents always said I would one day become a structural engineer or something. Here I am, many years later, and after several years travelling and working in the Norwegian Army, I am actually (at the age of 27) studying to become an engineer! My passions for Lego was re-lit when I last semester bought the 9392 Quad Bike, to try to recreate as a functional 3D model using PRO/Engineer (a 3D modelling and FEM analysis program we use at school). And one thing lead to the other, and before you know it, I had dug out me LEGO Technic from a bygone era, and started putting together gears, beams, pneumatics and motors like never before. A lot has changed (in Technic) since the early nineties, both good and bad, but I feel the core idea is still the same! I became a member here mostly to look for inspiration, but also - hopefully - to share whatever I might create along the way! Thank you! -D3K