Search the Community
Showing results for tags 'track'.
-
 We have been working on a software to design and automate LEGO train and monorail layouts. The first BETA version of nControl is out and can be downloaded for free from the 4DBrix site. It has a track planner for train and monorail layouts and has the first elements of the automation simulation: track switches, traffic lights and sound effects. We also have 2 YouTube videos to get you started. Download link: https://www.4dbrix.com/downloads Getting started videos: https://youtu.be/wddnCAJZTlQ https://youtu.be/w2RDMXt1sgQ Let us know what you think; any feedback, suggestions or ideas for additional features are welcome! Lowa
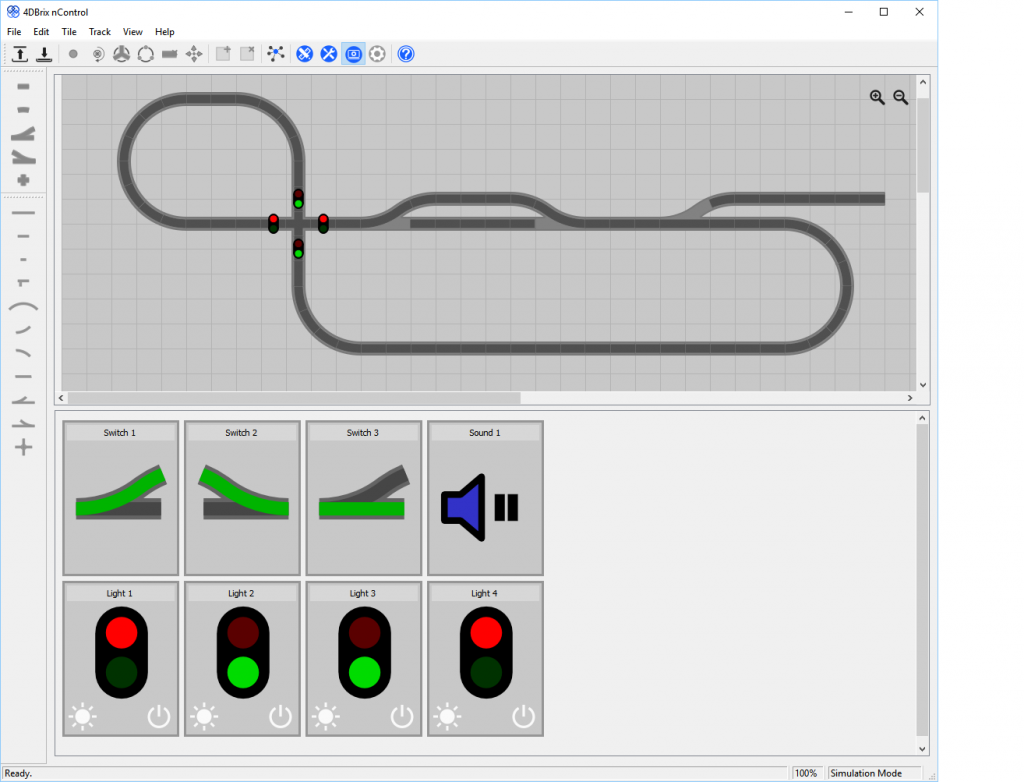
-
Hi everyone, I have created a small landscape based on the first novel of the Harry Potter series. The scene is the first time that Harry is in Gringotts with Hagrid by his side and they are escorted by Griphook through the caves. I wanted a few tracks in the built and one of the tracks needed a drop. I was glad that I had the right tubes to create the track. Here is a picture of the built. Here is the link to my Flickr album. https://www.flickr.com/photos/137652851@N07/albums/72157673161817395/with/29253037211/ The photo's are also on my brickshelf account. http://www.brickshelf.com/cgi-bin/gallery.cgi?f=564894 Questions and feedback are welcome. Sander
-
 Hi, I'm just getting the hang of LDD. It's very addictive! After a few basic models with simple bricks I have moved on to my first Technic model. I am having a go at the mini-bulldozer in Lego Technic set 8259. You can see the model has two tracks, formed of 23 x part #15379. I have created two strips of track but don't know how to connect the ends together to form a loop. How do you "pick up" one end and loop it round to connect to the other end? Can anyone help me out please? Many thanks! Stefan
 -
 Hi, my name is Victor and I've loved Lego since I was a little kid but haven't built something in like 17-18 years. This all changed when my girlfriend gifted me with the BMW R1200 (I also love riding bikes). After initially just wanting to get another Lego bike or two to put up for display, I realized that I wanted to build my own creations again. Bought 42065, and thought how to improve it, but so many things have changed that the learning process took a while. My goal was to create a tracked vehicle that would be somewhat fast, but also easy to control / maneuverable. I decided that 2 speeds would be enough. Also, to be able to switch gears by remote control, to have suspension and maybe a nice but ultimately not too heavy body. I now think of it as a kind of vehicle that would race in a fantasy version of the Dakar Rally (if tracked competitors would be a thing). Features: - 1x BuWizz - 2x L Motor for drive (skid steer) - 1x M Motor for gear change - 2x 2 Speed transmission (1:1 and 3:1 ratios, neutral) - Soft suspension with good travel - Detailed-ish body, with easy removal Photos taken by a friend. DSC_3813-edit by Victor T, on Flickr DSC_3815-edit by Victor T, on Flickr DSC_3818-edit by Victor T, on Flickr DSC_3820-edit by Victor T, on Flickr DSC_3822-edit by Victor T, on Flickr DSC_3823-edit by Victor T, on Flickr The gear changing mechanism: from and M Motor, via 2 clutch gears, move 2 changeover catches. DSC_3826-edit by Victor T, on Flickr Gearboxes: DSC_3829-edit by Victor T, on Flickr Here's a video of me trying to negotiate a simple obstacle course (4 times :) ) - climb over some books, change into 2nd gear, accelerate and show off :P I could have refined the design more, but I want to move on to other projects, the wheeled kind :) I will likely build a "trial" version of this in the future. Praise, but especially criticism is welcomed :) Nice to meet you, Victor
 -
Here is the result of spending a few restful days at the seaside with a handful of arctic sets: the Goliath, a heavy arctic snowcat. It is built from parts coming from the other arctic vehicles in order to combine some of their play features. Arctic team in action by Veynom, on Flickr The Goliath is great at crossing any kind of difficult landscape: Goliath in Action by Veynom, on Flickr Arctic Goliath Snowcat by Veynom, on Flickr The Goliath is packed with many features; - forward cab to host the driver and an additional passenger with room for some equipment as well; - large storage compartiment in the centre to put 2 crates; - fully equipped lab at the rear side; - tow cable; - Plenty of powerful lights to enlighten the arctic night; - remote camera on the roof; - Additional storage locations around the vehicle to clip many different tools; - radar and radio antennas. Rien de tel pour épauler l'équipe : Goliath deployed. by Veynom, on Flickr Here is the lab: Inside the Goliath by Veynom, on Flickr More pictures: Arctic Goliath Snowcat by Veynom, on Flickr Arctic Goliath Snowcat by Veynom, on Flickr Arctic team in action by Veynom, on Flickr I know making an arctic vehicle during summer and taking pictures on the beach is not perfect as background for the model, sadly, I can't change sand into snow. ;) Arctic team in action by Veynom, on Flickr Arctic Goliath by Veynom, on Flickr I love holidays. I hope you enjoy yours as well.
-
What if Lego created a line of road baseplates with train tracks embedded in them? What type of sections would everyone like to see? the ones I can think of now are: single track: straight segments curve segments Junctions crossings slopes. Double track: straight segments curve segments junction segments crossover segments crossings slopes. general: sections where track is are either red or green in color for public transport only sections where track is are same as rest of street for mixed traffic Sections where there is interlaced track should be included such as special points and other areas for such track there should also be areas where the tracks transition to normal LEGO rails as well
-
Hello, I want to share with you my first creation after 20 years in dark ages without lego Inspired by official lego model 42005 Monster Truckgreat color designoptimized for playabilityenhanced functions:* better steering radius (only front axle steering) new functions:* reel with hook* tilting trunk* openable gull-wing dooras any other tracked vehicle on hard floors it lacks, better play with it on carpetor as an alternative use big wheels (41896 43.2 x 26 Technic Racing wheel + 45982 Tyre 81.6 x 38 R Balloon) Side by side comparission with 42005 (with wheels and tyres) 130 pages of generated instructions for intermediate level builder (A4 landscape orientation) full gallery + instructions sample: https://bricksafe.com/pages/klimax/monster-truck-42005-alternate-42038-c-model moc details + instructions on https://rebrickable.com/mocs/MOC-19398/klimax/monster-truck
-
 Here is my XL turntable, which has 11 dead-end stall tracks and one outlet track. (though it can be reconfigured to be as many or as few tracks as needed). It is spread out over a 64 x 64 XL make-shift base plate size made up of of 4 regular (32 x 32) curved road plates with quite a bit of overhang due to the outlet tracks and tower. The re-purposed signal tower is now being used to control the turn table. This control building is modular, and has a roof and second floor that come off to reveal inside details. The studs on the sides of the building are supposed to spell out the the yard's name, but I haven't decided on a good name yet. If you have any suggestions for a name with 10 letters or less, please post a comment with it below! This table can handle a 4-track long engine (around 64 studs) with a bit of overhang at the ends, such as with my Frisco 1522 4-8-2 steam locomotive as seen above. Diesel A + B unit sets would have to be separated and moved independently, but that's okay and actually accurate for some real world locations / railroads. The basic workhorse of the turntable is this four track long framework you see here. The table's modular control tower features a lower floor that's empty except for the staircase. The upper floor features a machine to control the turn table, a wall clock, and a old-fashioned rotary telephone. The table easily glides on an raised outer ring of tiles, and turns on a central 2 x 2 pivot point. This whole thing can be mechanized, much more easily than a transfer table, but it still needs fine tuning to make it work right. The outer ring of tracks is only attached to the base plates at two certain points: every other spot is held on by gravity. (plates on tiles) This is basically a very much enlarged version of this model here. I was working on a seven-stall shed in the same style as the tower to connect to the turntable, but the angles and hinge bricks weren't working out due in LDD. I guess it will have to wait until the turn table is built in real life.... if it is ever built in the real world. Comments, questions, suggestions, and complaints are always welcome, as usual and thanks for stopping by!
 -
Hello everyone! :) This is a project begun in 2016, freely inspired by an athletics track in the north of Italy. It's populated by friends and people - some of them are ordinary, others are so odd - that used to train or work there. As now, the MOC is in a minifig scale. The track combines bricks in different orientations and some techniques (e.g. the numbers before the finish line) to make it detailed and realistic as much as possible. It's also modular to make it easy to transport and, above all, easy to continue. The current version consists of about 3700 bricks, but we're already designing the curved section. We hope this MOC can interest you and, in case you like it, keep updated following us on Flickr! FBros
-
At Brickworld 2011 in Chicago, OnDrew J. Hartigan made an interesting presentation about various types of modifications of standard LEGO tracks and switches (9V and RC). The following picture shows a modified switch with the switch throw on the opposite side to provide clearance for 8-wide and Longer rail cars. Unfortunately - and unlike most of the other modifications presented - there are no details on how to proceed. (According to Hartigan, this modification takes only 20 minutes). Can somebody provide details on how to proceed with this particular modification? (Copyright OnDrew J. Hartigan 2008 - 2011)
-
I am sure this has been done in various variations over the years after Lego ceased production of train track crossing (last produced in 1999 for 9v tracks). I only have PF train tracks so I made my own version. Below is a Bluerender rendered version I put together in LDD and below that are actual brick built. Note that the track requires to be raised as a result, by a brick, or at least 2 plates. Update: Here is the updated crossing only image that has a center tiled section to help with 2878c01 train wheels which have a narrower wheel spacing. Train Track Crossover Ver2 Crossing only by Miro Dudas, on Flickr https://drive.google.com/open?id=0B3ME1BfzxExrR3YtRVN5Vi1hUEE Miro
-
 Already two years ago, I got inspired at defeating steep hills with the LiteJeep. That could already beat 50 degrees, but because of its high riding height (good for offroading) and relatively heavy PF L motors, I reckoned there would be more irons to put into the hill-climbing fire. Very important things for hillclimbing are sufficient grip, huge power and a low weight. Weight ultimately gives more grip, but it also causes the vehicle to flip earlier when it is located above the center of gravity. With these factors into the equation, I decided to create a vehicle with loads of grip, so with 4 rubber tracks, and with articulated steering to make a sturdy connection between right and left possible, which is essential for climbing: when any vehicle is climbing, the suspension does unexpected things, so a stiff frame and suspension setup are required. Lightweight design requires a low complexity too, so that is why articulated steering is chosen. Having a front and rear part to let the vehicle adjust its shape to the terrain is an option I used several times in my rubber-tracked vehicles. This is the first vehicle in which I used the maximum footprint instead of the triangular form, again for maximum grip. Please note that, when you choose for the sturdyness and simplicity of articulated steering ánd want to let it adjust to the terrain, the middle joint becomes very complex as it contains joints in two axes! There is always a place where pain comes back. The Law of Conservation of Pain holds here.. In this case, all the trouble was in the difficult joint, which took about 5 hours alone. Then for the power: initially an XL motor was used in the front, but having a driveshaft through the already complex dual joint proved to be impossible. And then the idea came. Why not generate the power at the place where it is needed? Why not, if there are two separate parts, have some powerplant in both front and rear? But then there was a problem: I have a very large project in which all my three L motors are used. This pushed me in the direction of using M-motors, which proved out to be a very good forced choice. Combined with the lightness of the overall model, they proved to have ample torque left with a 3:1 gear ratio, having enough torque to keep the four tracks spinning all time when grip was lost. This is amazing, and you can see why Lego has put two M motors in their latest Tracked Racer. But the limits of that thing are way lower than the Quattrack's limit. Using two PF medium motors for drive and one for steering, this one of my very few (and maybe the last) Lego Technic MOC with only 2006 components. The Sbrick will throw all range headaches away and have much less delay than the stone-age PF IR remote it is replacing. Why did I use such standard power functions components? The new PF servo is slow and quirky, a medium motor allows for much more smoothness in steering. Moreover, if you are driving at steep slopes like this, it asks all your concentration to keep it on the move. If you cannot feel where the remote control knobs are (The intrinsic problem of the Sbrick) the vehicle will fall of before you've compensated. So the old system proved to be the best system in this situation. The articulated joint actually contains 3 joints, to have a suspension force on it in both directions: up and down. That is why there are rubber bands and one shock absorber. By the way, also the steering joint is included. Now, because the front and rear part of the Quattrack are relatively conventional (no steering nor differentials), all the pain of good and accurate steering is shifted to the design of this central joint. I dare to state that the success of this vehicle relies for a big part on this 2D joint. In the video, the operation is explained. On this photo, it looks as if the ground clearance is half a stud. This is not the case; in fact, it is over 1 stud. The underside is very smooth, which helps the low superstructure to glide over obstacles. Because of the weight saving, I designed it to have very clean looks. Styling means more weight. However, I managed to squeeze in some little details like fake cabin flashing lights, front lights, rear lights, cabin seats and a steering wheel. The reason why I did this, is that I wanted it to be a possible real-life vehicle as well, not just a scientific experiment. Adding weight is bad for climbing ability, so I tested the Quattrack also with the cabin removed and say what !!? The climbing angle was the same. This front look shows all that. The Quattrack contains everything, but nothing more. You do not need a zillion pieces of Lego to break records. Only 556 grams of it is sufficient in some cases. The video is the proof of all my theories... [media] I have not put all text and photo's on Eurobricks. More is to be found on Brickshelf and MocPages. If you like my video's, you might want to take a look on my YouTube channel.
 -
 Hi everyone, Here's an older MOC virtually no one has seen. It's my first fully RC model: Thanks! C&C PLEASE! BrickbyBrickTechnic
 -
 Hi there! my latest moc is a mini track loader. it has a funtioning front blade, tilt, lift, and a rear cabin door. This was built to be like a lego set, and use color vomit in areas. I may make a b model, to make it like a real set. My neighborhood is also getting repaved, and they were using one, so it works. enjoy, and comment thoughts. instructions and parts list uploading. here https://drive.google.com/drive/folders/0B-2NrU9MqJ-WSXpHR3VjY2p5R1k?usp=sharing
 -
One of the major problems of using my Eads bridge at shows is it's only one track wide.... so, I devised a western double-track wooden and iron structure using instructions from an old instruction I found on my hard-drive. (Originally from a defunct website / magazine called Railbricks and in a more modern concrete-looking format). This double structure is about 300 less parts than my single track Eads bridge and sits at the same height / length, so it can fit in the same spot. There are no bricks above track level at the beginning of the bridge so it works with even 10 wide trains or curves / switches immediately off the bridge! (This is unlike the Eads bridge, which cannot have turns right after it.) This trestle has about a track and a half of space between bridge end and truss section for an engine to straighten out on. The 10-wide BTTF time train fits easily though the bridge with room to spare! (time train not included in LDD file!) The new trestle is the same height and length as the Eads bridge, but with double the width for 300 less parts. The Eads bridge is also modular in construction, while the new one is not. (Eads bridge not included in LDD file!) LDD file for the wooden bridge (NO time train or Eads bridge in file!) is available at Brick-safe. Comments, Questions and complaints are always welcome!
-
 I have just came up with the idea of building a stage lighting gantry out of straight/curved roller coaster track (as seen on 70922 Joker Manor for example) https://brickset.com/parts/6210815/rail-13x13-1-4-circle-w-3-2-shaft I wonder if anything with a 'clip holder' (e.g. 4085 https://brickset.com/parts/design-4085) can attach to the central cross-members between the rails?
 -
Does you track need to be repaired after a major storm? Want to connect Point A to Point B with a brand new rail-line? Did the Flying Kipper have another accident on the main line? Or maybe you want to upgrade the signaling and double track the line at the same time? Call out the Maintenance Of Way (MOW) train to fix all these problems and more! This train consists of a late-1950's diesel locomotive, or a mid-1930's large eight-driving wheel steam engine and six specialty cars: - a (working!) crane car - depressed-center rail wagon - a (working!) ballast hopper - a tanker car - workman's tool car - caboose The 4-8-4 steam loco is new-to-me, and began life as a 2-8-4 Berkshire type built by Plastic_Goth and purchased from Rebrickable a seen here. To make this steamer, I upped the wheel count of @Plastic_Goth's locomotive by another leading axle, making it into a 4-8-4 Northern-type from the original 2-8-4 as built in the instructions. The new piston / wheel assembly is entirely my own work, as is the completely new 7-wide tender. The inside of the cab features two gauges and the firebox door. This model was originally a ALCO MRS-1 built by @SavaTheAggie, but has been so severely modified that it no longer looks like the prototype loco. So I went searching And found another ALCO locomotive, a RSD-12 that looks like my loco. Both my model and the prototype have the six wheels, and the same basic hood and cab design. The long hood of the loco has been designated the rear with a double red light. This car carries liquid weed killer for use after the track has been laid. This stream crane model was heavily inspired by Whoward69's instructions for a set of crane and match truck train cars. I modified the original model seen here. (sadly, it seems his Flickr profile and pictures has been deleted) I originally meant for the crane to have ropes to move the boom, but it got confusing on which rope went where so for now it's moved by the H.O.G. (Hand Of God) method. The crane can spin around in 360 degrees and lift anywhere up to 90 degrees straight up. (Their is a double set of pins keeping the boom from going too low, as well.) The heavy-duty depressed-center wagon has brick-built arms to secure the cargo of prefabricated railroad track in place. This model was inspired by a coal hopper on an older website called LGauge .com. I turned the old finger hinges into new pin-orientated ones and colored the car yellow to match the MOW paint scheme. The hopper's bottom doors open and can dump 1 x 1 round plates / bricks onto the tracks for ballast. This old passenger car carries the workmen and their tools. The caboose features two ladders (one per side) and more of those fancy printed 2 x 4 tiles. If you like what you see in this topic, check out the home base of the train and assorted other vehicles in this thread here! Thoughts? Comments, Suggestions, & Complaints always welcome!
-
I was fiddling around with an old car MOC found on Rebrickable (based on a vehicle from the LEGO City Undercover game), seeing what colors I could make it into when I discovered dark tan was possible. Me being me, I then turned the car into a rail mobile because I thought it would look cool on my railroad. Thus, it became Track Inspection Vehicle No. 4. It may sound odd, but during the 1970s, railroads in the US were cash-strapped, worn out and over-regulated - they were looking for cheap, quick fixes in every way in order to stay afloat, and this was a way to save a few bucks. If you are wondering why I chose this color - it is meant to be a dirty, ugly, strange color as the railroad isn't trying to impress anyone with this vehicle... and this kind of dark tan actually was a popular color in the 1970s! The rear of the vehicle. The car's roof comes off so one figure can sit at the wheel and the trunk opens. Thoughts?
-
The next project brewing in my head will be a place for my tube trains to call, two through tracks and side platforms. I would really like to be able to use 32 stud baseplates for this (four of them end to end). The question is, can I narrow the gap between long lengths of straight track, e.g four stud gap rather than eight, and easily bring them back to geometry at the ends, not necessarily using standard Lego curves/straights, and avoiding flexible track if possible?
-
Hi! I'm in the process of revamping my layout. One thing I wanted to change was to make the track bed look as realistic as possible. Namely, I wanted single spaced railroad ties instead of the Lego double spaced tie. Single spaced ties are easy to do on the straight sections but the curves present more of a challenge. I looked around the forum for design ideas and didn't see anything specific so set about to figure out the problem myself. Seeing some of the great layouts on here (Texas LUG, PennLUG) I knew it could be done which makes the battle a little easier. Here is what I came up with. DSC01329 by Scott Roys, on Flickr DSC01331 by Scott Roys, on Flickr
-
 10 minutes, it is very long, but I promise you that you will not be disappointed by this latest video of my little series. For those who are interested, they can see the "making off" of the full series here: http://www.eurobricks.com/forum/index.php?showtopic=119844
 -
Hi all, I've been hording a large amount of railway tracks: partly from my old Lego from the 90's and from the 60051 and 60052 sets. I usually try to be creative when I make a track for my son, but I kinda miss the overview when I do the layout. Do any of you know of a tool, or can you suggest a method, for planning the layout of your railway tracks before lying on your knees on the floor with a big stack of tracks? I'm open for any suggestion
-
Hello everyone, a spot has just opened up on my layout for one more lego train. I was wondering what everyone thinks is the best, and i already have the 7939 yellow cargo train, 7938 red passenger train, horizon express, hogwarts express that is motorized with power functions, one extra set of power functions and 2 4.5 volt trains from the blue track era. I was thinking in the maersk or emerald night but they are both expensive so i can only really get 1 with my budget for lego trains. So please give your feedback and thank you in advance:)
-
Now that ME Models is shipping its much anticipated alternative Lego train track components, I really wanted to see what sort of layouts could be built with these elements. Many of us use the superb BlueBrick software tool for designing layouts both for individual and collaborative use. BlueBrick does not have library support for ME track components and therefore, I decided to make a custom library add-on for BlueBrick to include ME track. I have created two BlueBrick compatible libraries to assist with train layout planning by expanding the range of elements available for design. ME Models Track Components - This can be used as an expansion pack for the existing BlueBrick Track parts library. Simply extract the downloaded archive into the pre-existing \parts\Track folder. Complete LEGO® Train System Schematic Elements - This is completely new library developed specifically for symbolic or schematic track planning. It is a complete library including track elements from LEGO®, ME-Models, as well as custom track elements such as stub-switches and crossovers. The library is freely available for download at my website at: www.brickdimensions.com/resources/trains ME-Models library: BlueBrick Library for ME Models Track by michaelgale, on Flickr New Schematic Track Planning Library: Universal Track Planning Library by michaelgale, on Flickr BlueBrick screenshot with schematic track planning components: Universal Track Planning for BlueBrick by michaelgale, on Flickr
-
Did anyone use all curve tracks included ME Models track? I just designed a loop layout that used all curve tracks! But I am very sad because I can't play it at my home:( My tables are shorter than 3m. Do you have any idea?