Search the Community
Showing results for tags 'ferrari'.
-
Well, well... It's almost half of the 2025! This year's Speed Champions was amazing! All F1 cars, F&F and also amazing summer's release! Just whoa! Let's start discussion about 2026 cars!
-
Well 2024 LEGO Speed Champions released 2 last cars (F40 & NASCAR) so came time to discuss about 2025. Somewhere in internet I read LEGO go all in F1 cars in 2025. What's your thoughts?
-
 Here's my new creation: Ferrari F40 1:8 Features 63x26x17 cm 2460 grams Opening doors, bonnet, trunk Independent suspension Realistic manual 4 speed gearbox Working V8 engine Working steering wheel HOG-steering Pop-up headlights Modular construction Video Instruction https://rebrickable.com/mocs/MOC-238327/paave/ferrarl-f40-18 Pictures
 -
 Hi! It's time to upgrade one more shelf model (the previous one was the Batmobile https://www.eurobricks.com/forum/index.php?/forums/topic/180543-mod-motorized-batmobile-76139/&tab=comments#comment-3302360). Ferrari 42125 has a lot of free space, so I've inserted four buggy-motors and a few BuWizz receivers. The chassis is very simple, I've removed suspension, V8, driver seat and steering wheel :) And the bodywork is the same as in the original LEGO set. Here is the result: Thanks for watching :)
 -
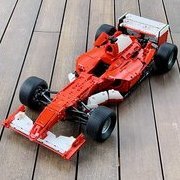 Hello everyone. I would like to share a MOC I have just completed: Ferrari F2004 F1 car It’s in 1:8 scale with 1700+ parts. Some features: working V10, pushrod suspensions, steering wheel, removable front wing, rear wing, headrest, and engine cover I have uploaded some pictures to bricksafe: F2004 Bricksafe Instruction is also available here: F2004 Instruction
 -
 Guess I should start building the car from the chassis. So here it is. I don't know what kind of body I want to build yet. But it should be something with an engine in the middle.
 -
Wasn't able to use the SC wheels because it would make the front too tall and also create collision between tyres and underside of the headlight area. Can't build in red too as the 36841 bracket doesn't exist in red yet. Due to the lockdown I ran short of cut slope pcs to build accurate side air intakes, and the rear diffuser needs some improvement that hopefully can happen once it's buildable in red. Thanks for viewing :) KMPMOCS
-
Hello I would like to share my first MOC Ferrari F1 SF90 in 1:8 scale. Making the MOC my main goal was display model so I decided to make it look as close as possible using all official Lego parts to real F1 car. But I wanted to have it all the basic features F1 car should have which are: - front and rear suspension - fake v6 engine (created by SuperKoala ) - removable front wing (I started all build from this element actually) - removable engine cover, - removable headrest system (this was added at the very end I didn't thought about this at all but it just came up naturally) - drs - steering The dimensions of the model : Dimensions 70 x 25 x 14 cm Weight 1,95 kg Pieces: 2186 My main donners at the very first stage were 42056 and 42000 which I already had and they had lots of elements I could use to try the concept. The first version was funny to watch as there were so many colors all over the place ;) I have used wheels and tires from 8674 as they are the best looking one and fit the best for design and don't have any labels on them (as unfortunately 8458 and 8461). The instruction has been done in Stud.io in PDF. Instruction build I also designed stickers sheet ready to print and I also will have printed version too. Hope you like it. Whole gallery Follow me: https://m.facebook.com/f1moc https://www.instagram.com/f1moc/
-
 I wanted to include full independent suspension, with positive caster and MacPherson strut in the front and rear trailing arms, a working front-mid placed 90° v8 engine, working steering wheel + HoG, convertible top, openable hood, doors and trunk. From now on I plan to do the convertible top mechanism and I consider it quite a challenge as I would like it to operate as close to the real thing (google it) and I'll keep you updated as the build progresses. I have worked on the chassis for a while now and this is what I came up with: And yes, I plan to change that background, coloured cardboard doesn't really do the trick, I promise this is the last time you'll see it.
 -
Let me start with a disclaimer: this is my first ever review of a LEGO set. On the one hand, this means the review may be missing a few things you would expect from a review, most notably pictures, as I only decided to do a review after I had already built it. On the other hand, it should tell you right away that the set impressed me enough to warrant a review in the first place. Anyway, let's get right to it! PRICE According to Brickset, the RRP (recommended retail price) for a 75890 would be £12.99 / $14.99 / 14.99€. I live in Moscow, Russia, and I was able to pick it up for 1499₽ / ~$24 at an official LEGO certified store. Surprisingly, for about the same money I could get a 60256 Racing Cars or a 60242 Police Highway Arrest, though both have a noticible higher RRP on Birckset – £17.99 / $29.99 / 19.99€. You could also find a better deal, but in my case 2/3 of the price (1000₽ / ~$16) were covered by a gift card, which was a present from a friend for my birthday. PARTS The set contains 198 parts. They come in 5 bags – 3 larger unnumbered bags for the majority of the parts and 2 smaller bags each containing 2 sets of 4 wheel covers – 18978 and 29117, both in Flat Silver. As a matter of fact, I bought the F40 as a parts pack for my MOCs, and the wheel covers were what made it a must-buy – this is by far the cheapest way to get this many of them, let alone in one set. Just look at this: Other parts worth mentioning: a nice variety of brackets – 10 (6 black + 4 red) 99780 Inverted 1x2, 3 white 99781 1x2 and 2 black 99207 Inverted 2x2; 6 relatively uncommon red 33909 Modified 2 x 2 with Studs on Edge; 5 (4 + 1 spare) black 20482 Round 1 x 1 with Bar and Pin Holder; 3 (2 + 1 spare) red 1x1 plates with a Ferrari emblem printed on the side, which only appears in 2 sets – this one and the recent 76895 Ferrari F8 Tributo; 3 (2 + 1 spare) black 1x1 plates with a red edge, which is unique to this set. BUILD As I mentioned, the set was bought as a parts pack for my MOCs. My MOCs are mostly 6-wide sports cars, so I expected there to be some similarities. Nevertheless, I was really surprised with just how densely built this set was. With City sets you often have cavities left in them, but 75890 was very reminiscent of my own MOCs in terms of density. The highlights of the build are a couple of SNOT sections. The bracket pieces I mentioned earlier are used to a great effect on the front, sides and rear. Their main purpose is to create a thin black brick-built stripe going around the car, as seen on the real-life prototype: The stripe could easily be done with stickers, so it being brick-built instead is a nice touch. The part of this assembly that made me think "Oh, that's cool, I should remember that" was this: An upside-down 4070 allows to get an odd-length half-plate black strip, and the 1x1 red tile lines up perfectly with the 33909 Modified 2 x 2 with Studs on Edge pieces attached to the bottom. The unique black 1x1 plates with a red edge are used under the rear turn signals to have that black backdrop for the transparent pieces, but at the same time keep the red on the rear quarter panels consistent. Another thing I appreciated was the NPU exhaust pipe assembly. The real F40 has triple exhausts, which is recreated in the set using 2 20482 Round 1 x 1 with Bar and Pin Holder pieces with a 35480 1 x 2 Rounded Plate attached to them: From the picture above it is also quite obvious that the proportions of the LEGO rendition of the car are off – the car looks too narrow. The move to 8-wide in 2020, then, starts to seem natural. There was one part of the build, though, where I felt that the order of the steps could be switched. Personally, I would put step 38 after step 48, but its probably just me, so I wouldn't go into much detail. Anyway, the finished set looks very Ferrari-like with its bright red exterior, and the shape is quite accurate, in part due the relatively simple shape of the source material. The set includes a little play feature that allows you to switch between the F40 Competizione and a regular F40 looks. This is achieved by taking off some of the parts and replacing them with the alternatives also included in the set. The parts that are changed are: the headlights; the front cover, which is not actually attached to any studs, but is kept securely in place by the windshield; the front splitter; the rear diffuser; the rear wing the wheel covers. OVERALL THOUGHTS This was the first SC set that I actually built, and I was really impressed by it. The techniques used in the set are on par with what you can see in MOCs, so I would say that SC sets are to City vehicles what Modular Buildings are to City and Creator buildings – larger and better versions of the same thing with some advanced building techniques used throughout. Now that SC car are 8-wide, I am not sure the set would be worth buying if you have only just started collecting them and plan to get more in the future. Being 6-wide, it feels more like a toy and may end up looking a little out of place. However, if you are a) OK with the scale difference, b) willing/ready to modify the set yourself, or c) a Ferrari fan, don't hesitate and pick it up. I hope you liked the review, comments and critique are welcome as always. If you have any questions for a persons who just built this set, ask away.
-
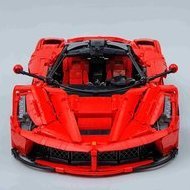 The LaFerrari represents Ferrari’s most ambitious project yet to push the boundaries of technology on a road car. Only 499 units were produced, and each cost more than 1 million US dollars since its release back in 2013. My replica had to be as authentic as possible to the real masterpiece when it comes to both functionality and aesthetics. Therefore I chose for the classis manual chassis rather than a remote controlled version instead. Off coarse I used Sariel’s model scaler to get all proportions right Specifications: -Length: 53 Studs (42 cm); Width 21 Studs (17 cm); height: 12.5 Studs (9.5 cm) -Weight: 1100 g -Parts count: 1566 pcs Features: -RWD -Front and rear independent suspension -Working fake mini V12 engine (by crowkillers) -Steering with HOG control and positive Caster angle -Working diffuser flaps which deploy when steered (Brunojj1’s idea) -Modular bodywork (easily detachable to reveal chassis) -Openable butterfly doors with HOG control -Openable engine bay with knee joint mechanism Considering it’s scale, the parameters I wanted to include were not easy to achieve at all, resulting in many headaches throughout the design process. The doors are a perfect example: their opening movement had as realistic as possible whilst not interfering with any of the other bodywork or front wheels, as they are part of the fender. When fully opened, the doors also needed to lock into place and they had to be operated using HOGs. The engine bay was a nightmare to design too. Very complicated curves had to be replicated with limited space for connectors to put the panels at the right angles. It Interfering with the chassis was a big bottleneck as well. I am quite satisfied with the result of my dream hypercar replication, therefore I took the opportunity to make high quality renders building instructions using Stud.io. Building instructions and parts list are available here: https://rebrickable.com/mocs/MOC-29075/T-Lego/ferrari-laferrari/#admin More pictures at my bricksafe: https://bricksafe.com/pages/T_Antonie/ferrari-laferrari Constructive critics, feedback and questions are as always appreciated! Enjoy your day
 -
The new 1x1 red brackets from the new F8 Tributo finally made this possible to be built in red. Thanks for viewing :) Regards, KMP
-
 Um..where should I start. Last year when I first join this group. Lachlan Cameron and Dugald Cameron bought me into the world of moc super car. While the Ferrari FXX is my first moc that I got from Rebrickable. Which I start the brick hunting and my supercars collection journey. And then I start building supercars like brunojj1 P1 and Cameron's brothers supercars. Half year later when I look at all these nice looking supercars. I realize that the FXX has some portion issue which can be better. So I start to learn how to mod / upgrade supercars to my liking. ... And two weeks ago i finally have enough guts to start my so call moc project base on someone's design and frame. Two weeks later. I present to you the new version of 2005 Ferrari FXX. This is a very unique project because I bend the best chassis of all time (Bruno Jeason P1 frame) and Lachlan's body work. And of course, brand new V12 engine. I can't thank the Cameron's brother enough for teach me a lot about moc. It's a step stone toward my future design. Also special thanks for brunojj1 for the beautiful P1 chassis. Cheers and enjoy.
 -
Hi all, As a big formula one and LEGO fan my dream is to build the formula one grid out of lego. The 2016 grid was the easiest because I had only to modify the speed champions f1 sets. This year I restarted the project, and I built 4 cars in 4 days. I am positively surprised about I didn't need to buy any piece for the Racing Point. I have only 1 pic at the moment but when possible I am posting others. Pls tell me what you think.
-
Hello Ferrari and Speed Champions fans, Ferrari Testarossa is a legendary supercar of 1980s. It is a two-door coupé from 1986 and it is the red version of the car from the TV series Miami Vice as the used Lego windscreen is not available with white decoration. Almost 10,000 Testarossas, 512 TRs, and F512 Ms were produced, making it one of the most-produced Ferrari models, despite its high price and exotic design. Building instructions are available on the following links: https://rebrickable.com/mocs/MOC-57875/_TLG_/ferrari-testarossa/ https://www.mocsmarket.com/lego-mocs/lego-instructions-ferrari-testarossa/ UPDATE: Oct, 2021 - This MOC is available as kit too :) : https://mocsmaker.com/product/custom-building-kit-tr-84/ It is a studless build in the new, 8 studs wide Speed Champions style. I wanted to create a sleek model which is as accurate as possible in this small scale. I minimized the use of stickers to keep the flexibility of the used parts in further builds. (Third picture shows the model without any stickers.) My intent was to keep the width-length-height ratio of the real car and this size makes it possible. The model contains lots of details: for example the emblematic side intakes with the bottom black stripe, the turn signal lights on the sides, the side-view mirrors, the front grill with the head lights, the iconic rear side with the vehicle registration plate. Maybe the most challenging one was the interior where the seat assemblies hold side panels too. I tried to fill every unecessary gaps and therefore some tricky build techniques are used. The model has space for two minifigures. I suggest to use small hairs. Without the seats minifigures with bigger hairs can be used too if they are leaned back. Thanks for visiting, _TLG_ FerrariTestarossa_byTLG_01 by László Torma, on Flickr FerrariTestarossa_byTLG_02 by László Torma, on Flickr FerrariTestarossa_byTLG_03 by László Torma, on Flickr FerrariTestarossa_byTLG_04 by László Torma, on Flickr FerrariTestarossa_byTLG_05 by László Torma, on Flickr FerrariTestarossa_byTLG_06 by László Torma, on Flickr FerrariTestarossa_byTLG_07 by László Torma, on Flickr FerrariTestarossa_byTLG_08 by László Torma, on Flickr
-
 The car definitely needs a topic like this to look more like the real thing and make it better overall. Here are some ideas: lower the car, fill all holes in the chassis and the bodywork, flip the small panels on top of the the doors around, get rid of all visible blue pins and coloured axles, different wheels, improve the interior by filling all gaps, make the side skirts out of some technic beams like on the 42096 instead of these stupid rotor blades, different steering wheel, ......
 -
 Hello everyone, I am really glad to present you my second MOC, a replica of the Ferrari Testarossa. This model is RC and has the following features: Rear wheel drive powered by a buggy-motor (this makes the car really fast (top speed around 11 - 12 kph (in ludicrous Mode))) Steering powered by a Servomotor Manual pop-up headlights Open able doors and detailed interior and exterior The car is powered by a Buwizz (I choose it, because Buwizz gives the buggy-motor enough power). Dimensions: length: 39 cm / width:15,5 cm / height: 10 cm / weight: 1,1 kg The door was one of the hardest parts to create, but then I saw Jeroen Ottens version of the Testarossa and how he created the doors. His version of the doors inspired me, when I decided to choose the Ninjago blades for the doors. So a really recommend you to take a look at his beautiful Testarossa version too https://www.eurobricks.com/forum/index.php?/forums/topic/163130-moc-ferrari-testarossa/ With open pop-up headlights You can find more Pictures at: https://bricksafe.com/pages/Lukes_Brick_Studio/ferrari-testarossa You can find the instructions at: https://rebrickable.com/mocs/MOC-60087/Lukes_Brick_Studio/ferrari-testarossa/#details (the instructions cost 10 €) Comments, suggestions and questions are always appreciated. I wish you all merry Christmas :) See you.
 -
 Here it is, the return of the Ferrari brand into Technic:
 -
My special rendition of Ferrari SF90 Mission Winnow. https://forum.brickset.com/discussion/24340/f1-custom-stickers-collection-2016-1990-2006#latest More to come..
-
Hello, feel the speed! It is my own hypercar concept inspired by real hyper and supercars. It is a 6 studs wide, studless model built from standard LEGO elements. The overall size is similar to the Speed Champions sets, but the wheels are from City sets as I wanted to keep the height to length ratio closer to the real sports cars. It can be combined with my other MOC Hybrid Truck which will be available on LEGO IDEAS soon too. If you like this car, please share and support the it on LEGO IDEAS: https://ideas.lego.com/projects/44e6dbbf-734f-4b38-84c7-2075b09495bb Many thanks! LEGO Hypercar concept1-02 by László Torma, on Flickr LEGO Hypercar concept1-01 by László Torma, on Flickr LEGO Hypercar concept1-03 by László Torma, on Flickr
-
This is my first try at making a tread and posting pictures, so I hope I do it right. It all started with me making a very oldschool 2015 Sauber car out of ancient lego I found in a tray in the basement. 20190310_161317 by Martin Hansen, on Flickr Later lego started making real versions of F1 cars and I remade my 2015 Sauber. 20190310_161340 by Martin Hansen, on Flickr 20190310_161434 by Martin Hansen, on Flickr Then during the 2018 season I started making all of the teams cars and I finally finished the project, right in time for the 2019 season to begin next week The cars were made with parts available to me and might not be the perfect match, but they are good enough for me. All 10 cars 20190310_161801 by Martin Hansen, on Flickr Mecedes. I made some changes mainly removing some green, which I feel are not "of the right shade" url=https://flic.kr/p/24vFQut][/url]20190310_161821 by Martin Hansen, on Flickr 20190310_161842 by Martin Hansen, on Flickr Ferrari. Is the official one, I think. 20190310_161900 by Martin Hansen, on Flickr 20190310_161913 by Martin Hansen, on Flickr Red bull 20190310_161944 by Martin Hansen, on Flickr 20190310_161957 by Martin Hansen, on Flickr Renault 20190310_162054 by Martin Hansen, on Flickr 20190310_162104 by Martin Hansen, on Flickr Haas 20190310_162117 by Martin Hansen, on Flickr 20190310_162126 by Martin Hansen, on Flickr Mclaren 20190310_162525 by Martin Hansen, on Flickr 20190310_162536 by Martin Hansen, on Flickr Force India 20190310_162756 by Martin Hansen, on Flickr 20190310_162810 by Martin Hansen, on Flickr Sauber 20190310_162819 by Martin Hansen, on Flickr 20190310_162831 by Martin Hansen, on Flickr Toro rosso 20190310_162851 by Martin Hansen, on Flickr 20190310_162910 by Martin Hansen, on Flickr Williams 20190310_162920 by Martin Hansen, on Flickr 20190310_162928 by Martin Hansen, on Flickr On the grid. 20190310_162039 by Martin Hansen, on Flickr 20190310_162617 by Martin Hansen, on Flickr 20190310_163022 by Martin Hansen, on Flickr All of them 20190310_163203 by Martin Hansen, on Flickr Some cars are a bit dusty, it was a long season and some was done way before others. I hope you will enjoy them.
-
Finally built it after getting it on launch day. Here is my video review. I think this is one of the best if not THE BEST speed champions set ever. THE GOOD: The look and what else you can say with only 198 pieces with such beauty. (This also keep the price down) Printed Ferrari logo piece You can also say this is a 2 in 1 build THE BAD: NONE! If you haven't buy this yet, I strongly recommend you go buy it! Don't hesitate just buy it =D
-
My 13th alternative for set 76914. This time i used parts included in this set to build the brand new Ferrari F80. FREE INSTRUCTIONS:
-
My 9TH alternative for set 76934. This time i used parts included in F40 set to build a Ferrari F80! FREE INSTRUCTIONS:
-
Hello Ferrari and Speed Champions fans, The Ferrari GTO (often referred to as Ferrari 288 GTO) (Type F114) is an exotic homologation version of the Ferrari 308 GTB produced from 1984 until 1987 in Ferrari's Maranello factory. It was designated GT for Gran Turismo and O for Omologata (homologated in Italian). Building instructions are available on the following lins: https://rebrickable.com/mocs/MOC-201540/_TLG_/ferrari-288-gto It is a studless build in 8 studs wide Speed Champions style, and it is some kind of update of my earlier 308 GTB model with some newly released parts, but it is a different car. I minimized the use of stickers to keep the flexibility of the used parts in further builds. My intent was to keep the width-length-height ratio of the real car and this size makes it possible. The model contains lots of details: for example the air vents on the hood, the front bumper with the turn signal lights, the tilted front grill, the turn signal lights on the front side, the black stripe on the sides, the side-view mirrors, the tiltable seats etc.. Maybe the most challenging one was the iconic rear side with the vehicle registration plate, here there is a half stud offset. I tried to fill every unnecessary gaps and therefore some tricky build techniques are used. The model has space for two minifigures. I suggest to use small hairs. Without the seats minifigures with bigger hairs can be used too if they are leaned back (in some cases the black 2x1 tiles have to be removed too). Thanks for visiting, _TLG_ Ferrari 288 GTO - Instructions 01 by László Torma, on Flickr Ferrari 288 GTO - Instructions 02 by László Torma, on Flickr Ferrari 288 GTO - Instructions 03 by László Torma, on Flickr Ferrari 288 GTO - Instructions 04 by László Torma, on Flickr Ferrari 288 GTO - Instructions 05 by László Torma, on Flickr Ferrari 288 GTO - Instructions 06 by László Torma, on Flickr Ferrari 288 GTO - Instructions 07 by László Torma, on Flickr