Search the Community
Showing results for tags 'SBrick'.
Found 22 results
-
 Hey, this is my first post on Eurobricks so if there is anything that I am doing incorrectly in this post, please let me know. I am presenting my Rock Crawler, or more specifically, my Carrot Crawler. Features: -Triangulated 4-link suspension using the Lego soft shock absorbers. -One PF XL motor per axle (a total of two), each geared down 1:2.779. -Custom portal hubs for each wheel. -Ackerman Steering with slight caster angle powered by PF M motor geared down 1:3.333 including a worm gear. -Rechargeable LiPo battery box as power source. -Controlled by a SBrick and an iPhone 6. -RC4WD 1.9" Super Swamper crawler tires. This has been a work in progress for a long time and I feel that it is finally polished enough to showcase on the Eurobricks community. My plans for fixing and editing this crawler (Some of which, I have already begun working on) include: -Building a better chassis (the angled pieces on top of it don't REALLY fit, but I made them fit! ) -Eliminate gear slippage caused by the perpendicular bevel gears. -Mount the XL motors parallel to the axles which would both eliminate gear slippage and provide more ground clearance. Here is a picture: And here is a video: Please give my any suggestions for my post and more importantly, my crawler! Thanks
 -
 Hello! I’m not particularly proud of this Technic horror I’ve created, but I’d like to share it with you rather than keep it to myself, possibly forever. Shortly after I learned about (and supported) SBrick and MiniZip in KickStarter, I started dreaming of building powerful, compact MOCs using a new combo: PP3 NiMh battery + MiniZip + SBrick + 5292 RC Buggy Motor. This is my first attempt at it, now that Android SBrick app (1.3+) is finally usable Functions Drive: 2x 5292 RC Buggy Motor, each connected to a separate SBrick, each powered by a separate PP3 NiMh 250 mAh battery using MiniZip. Steering: PF Servo. Front suspension: independent, soft, long travel, with “fake” positive caster Rear suspension: solid axle, dragged (didn’t figure out how to do four-link) 4x Lego LED Still haven’t applied myself to learning proper bodywork, so designing my own was out of the question. I went for an easy, fairly plain one. No openable doors, bonnet or anything. I worked with these two photos and scaled for 62.4mm tires. Full size (> 1024px): 1, 2. Photos were made really quick, during a baby siesta (indoor) and in short incursions (outdoors) no more than 20 meters from home. For now, I can only dream of having more time and freedom for this :D v0.99 without stickers: v1.0 with stickers based on video: Old school navigator refused to deal with GPS and computers, wanted just a compass (70001pb02) and a map with an X that marks the spot. Smart dude, run off with the loot. Very short of creativity and sleep, the only alternative I could think of to get rid of the demonic Monster logo and brand was a rather lame one: Music Energy. Example diff: I asked friends to vote in G+ and 3 out of 4 prefer Music, but the one who prefers Monster is my the only one into LEGO. I’m divided, will probably print them and try them on, but still not sure which ones to use for filming. I started with 1 battery, 1 SBrick, 2 motors. It seemed to run well. Adding an extra battery and Sbrick seems to make it run even stronger / faster, although SBrick developer Zsolt Majoros said it shouldn’t matter. The real reason I added the extra SBrick is that “2 ports 1 function” only works in Android app when those 2 ports are on separate SBricks. You may ask why use PP3 batteries instead of the acclaimed LiPo batteries… mainly because they are expensive, and a bit of a lottery with their thermal protection. MiniZip + PP3 NiMh 250 mAh wasn’t a whole lot cheaper, but the combo is certainly more compact, half the weight and doesn’t have any thermal protection. SBricks can draw as much current as the motors want, with just a small risk of overheating and possibly catching on fire… ah well, what could possibly go wrong? I haven’t actually managed to make the batteries warm up, they get warmer when charging. One likely reason for not achieving hotness is short life, according to this battery life calculator, they’d last 3.5 minutes at 3 A, 10 minutes at 1 A, 20 minutes at 500 mA. Can someone make a better-informed / estimation of a more realistic battery life? But there are more and worse problems, for which I sure can do with your advice! Caster angle is fake, isn’t? I mean, I just shifted the upper A arms a half stud backwards, but both A arms still move vertically. I think this is why big bumps will throw the truck’s front up rather than only the front wheel/s going up. When hitting a big bump with a front wheel, the wheel will thrust up and with it the whole car will roll to the opposite side. This results in a raised rear wheel taking all torque to just spin in the air, so the car stops until the raised wheel hits the ground again. Shifting the upper A arms a half stud backwards messed with the steering geometry, so now there’s a not-so-slight bump steering. I think this, combined with the twisting effect on the solid axle, is what’s causing the truck to steer to the left when accelerating. Too bad. Motors are hard coupled on their fast output and then geared down 20:12 twice, not including the 20-tooth to differential connection. Maybe I could / should gear down 20:12 only once, haven’t had a chance to try yet. I suppose integrating the motors in the rear axle and connecting wheels directly to them would help with the last couple of problems, but couldn’t figure out how to fit that in this body just yet. I’m also concerned that if one battery drains faster, the motor (no longer) powered by it will get damaged. With each rear wheel directly on one motor, that would result in the truck going in circles, but motors wouldn’t get damaged. How bad is this? Steering with SBrick (v1.3) as a significant latency, in the time it takes from the moment I slide my finger to a side (much or little) to the moment when the PF Servo starts moving, the truck is already going the wrong way. It’s really hard to drive straight. rm8, what’s your experience regarding this latency with your Double Trouble? If anyone has not seen rm8’s Double Trouble, I’ll put it as “my dream, properly done” Thank you for reading. If you were looking for a video... EDIT(25.05.2015): slightly better pics. EDIT(26.09.2015): I’m now a little more proud of my creation, at least the suspension seems right to me: it’s long travel and soft enough to reacts promptly to bumps, but the car doesn’t sink too much on it. I dare say it works better than most others, probably because it’s much harder to this the a bigger scale most others have been working with. The car is still not really fast, so I didn’t bother measuring its speed. I did try putting less reduction in the drivetrain, but that only resulted in lower speed due to lower torque, so I reverted back to my original setup. It’s still fast enough to be impossible to drive well, specially with the terrible latency in the SBrick. Latency is not a problem with the port tester, so it doesn’t look like a hardware limitation. Anyway, it’s fast enough to be fun. Thanks to Sir Wolf’s help and support, we finally have a somewhat decent video. Enjoy! :) And we learned many things the hard way: by failing. Fake caster angle is not good, you need real caster for off-road racing. I took the idea from someone’s supercar project here (sorry, couldn’t find it again) to displace the upper suspension arm by ½ stud backwards from the lower arm (see belly shot above). That gives you quite a bit of caster angle on the wheel (or snowmobile skies) but it does not help reacting promptly to the most serious bumps. It also screws the geometry in that the gear rack should ideally be ¼ stud backwards, but it’s either 0, ½ or 1. This results in notorious bump steering: front wheels are toes out when suspension is fully extended, and toes in when fully compressed. When this adds to the torsion exerted by the powerful motors on the live axle (see in the video how left front wheel jumps up when car starts). All in all: bad Idea. Portal hubs from 8070 are not good for off-road racing, I should have used the ones from the snowmobile 42021 (2015). They are also too expensive to go on dirt with them, so I didn’t. Differential slows down or even stops the car when one rear wheel take off. I knew this was a problem with crawlers, but never imagined how bad it’d be on a trophy truck. Damn it, I’ll never do this again. Just use one motor per wheel, and accept that if one motor runs out of battery or losses signal, you might take a sharp turn or find yourself driving in circles for a little, depending how the front wheels cope with the imbalance. MiniZip are great to get “buggy-motor-grade” power in a smaller size than LiPo batteries. PPA 9V batteries can fit a width of 3 studs, so a 5x11 panel makes for a perfect home. However, MiniZip’s lack of power switch in makes it a complete hassle to replace batteries. Should keep them very easily accessible.
 -
 Hello. This is about trains but I think it's more appropriate to post it here under Mindstorms theme. My LUG (PLUG, from Portugal) train fellows have been developing their own modular standard (MFL) for our exihibitions. Since it defines a 6-brick height above the table surface there is plenty of space under the tracks to hide motors, gears and gadgets. That idea attracted me so I decided to try MFL. First I rebuilt a motorized track switch I was already using with WeDO and then decided to also try a turntable and then... well, you know :) At this stage, this is my setup: - a Mindstorms EV3 running ev3dev (Debian linux) to control everything - a wi-fi USB dongle (not essential but allows me to use my laptop as a console, much more easier this way) - a bluetooth 4.0 USB dongle to control the SBrick-based trains - an EV3 ultrasonic sensor to sense when the train reaches the middle of the turntable - an EV3 touch sensor to sense each time the turntable completes a 180º turn - two Power Functions lights (with a NXT-9V adapter) to signal the movement of the turntable and the control of the train - one USB RFID reader to sense/identify the trains - one LEGO WeDO to control the two track switches (one Power Functions M motor under each) Each train has: - a SBrick (will try IR later) - a RFID tag The train is brought to the RFID sensor where the EV3 recognizes the train (green lights start blinking) and tries to establish a bluetooth BLE connection to the SBrick (green lights keep ON). Then the EV3 takes control and sends the trains to the turntable, using the ultrasonic sensor to prevent collision against the end of the turntable. When the turntable starts turning, the red lights blink (and a claxon sound plays, but its not used in the video). There is also a touch sensor under the end of the track that senses when the turntable completes each 180º turn. Then the EV3 sends the train back to the starting point, using the RFID sensor to detect the train. The bluetooth connection is dropped and now the train is available for manual control. The EV3 is ready for another train. For a near future I plan to give good use to the track switches (only one is motorized but the second will follow soon). I also want to try a method I saw here at Eurobricks to separate the train engine from the wagons. This way the train engine could drop the wagons, revert direction at the turntable, move along the left path and pick the wagons again. To be honest, the turntable still needs some adjustments - sucess rate is ~1/3, sometimes the train slips when moving in, sometimes when moving out.
 -
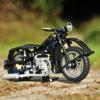
 Technic SBrick Contest - Results This contest warmed up a bit slowly and it seemed that a limited number of contestants would be competing for prizes and honor. However, closing in on the deadline date, one new entry after the other appeared, resulting in a whopping 43 entries! The overall quality of the builds is truly outstanding. Like some of the previous contests, the 1st and 2nd place where in a neck and neck race. Here are the results of the Eurobricks Jury! 1st Alfa Romeo 4C Spider by Jeroen Ottens Entry Topic - Discussion Topic Jeroen Ottens is the first to win two gold medals! His magnificent rendition of the Alfa Romeo 4C stayed ahead of the fierce competition. 2nd Secret Project by Omikron Entry Topic - Discussion Topic Can't tell much about this project....since it's secret What I can tell, is that it's an awesome Jet with great features. 3rd MAN Transport Truck by TeClem8 Entry Topic - Discussion Topic This might seem like and ordinary truck, but looking at the video reveals how well the crane operates. Outstanding functionality and playability! Bonus Prize I have used a random number generator (random.org) to raffle the bonus prize. And the winner is....#14 Congratulations to D3K A blast from the past will get a modern SBrick touch! Congratulations to all winners and thanks to everyone for joining this great contest I will contact the winners via PM to handle their prizes. CONTEST INFORMATION Name: Technic SBrick Contest Start Date: 19-12-2014 Entries: 43 Valid voters: 149 Total points: 3874 Members participating (building and/or voting): 162 WINNERS 1. Alfa Romeo 4C Spider - 480 Points (80 votes) Jeroen Ottens (entry 26) 2. Secret Project - 465 Points (82 votes) Omikron (entry 21) 3. MAN Transport Truck - 272 Points (45 votes) TeClem8 (entry 27) CONTEST RESULTS 1. Alfa Romeo 4C Spider - 480 Points (80 votes) Jeroen Ottens (entry 26) 2. Secret Project - 465 Points (82 votes) Omikron (entry 21) 3. MAN Transport Truck - 272 Points (45 votes) TeClem8 (entry 27) 4. Hyster 32-12 Heavy Forklift - 254 Points (53 votes) TheItalianBrick (entry 28) 5. Terrafugia Transition Street-legal Aircraft - 159 Points (36 votes) JamesJT (entry 38) 6. Hot Rod Wrecker - 153 Points (36 votes) Lipko (entry 16) 7. IS-2 Heavy Tank - 150 Points (36 votes) Tommy Styrvoky (entry 1) 8. Mercedes Econic Garbage Truck - 145 Points (32 votes) Eraman (entry 10) 9. Wall-E - 143 Points (43 votes) Appie (entry 33) 10. Fire Truck - 138 Points (33 votes) super-jaschka (entry 22) 11. TOYOTA Land Cruiser FJ45 with snow plow attachment - 132 Points (31 votes) rm8 (entry 41) 12. DT-54 Bulldozer - 125 Points (31 votes) falconluan (entry 6) 13. Katipo Spider - 120 Points (32 votes) BachAddict (entry 5) 14. Arctic Equalizer - 118 Points (32 votes) desert752 (entry 18) 15. Bin lifter-Satellite Waste Collection - 105 Points (28 votes) MrTekneex (entry 17) 16. Liebherr LR 634 - 99 Points (23 votes) Milan (entry 25) 17. CASE TR 270 - 96 Points (25 votes) dfs473 (entry 2) 18. Concrete Truck - 94 Points (23 votes) jono.rocky (entry 23) 19. Linde Inspired Forklift - 85 Points (24 votes) Nazgarot (entry 37) 20. Whirligig - 74 Points (24 votes) mdbz (entry 34) 21. Komatsu WA 600-6 - 68 Points (18 votes) jorgeopesi (entry 15) 22. '66 Chevy C-10 Custom - 45 Points (11 votes) Graydingo (entry 11) 23. Mead's Towing - 44 Points (12 votes) gmshades (entry 8) 24. ESL 19/21 Sideloader Forklift - 41 Points (11 votes) efferman (entry 7) 25. Extended Customized Pick-up Truck - 40 Points (10 votes) filsawgood (entry 12) 26. GV-106 Razorback - 34 Points (12 votes) Victor Kojenov (TFOL) (entry 43) 27. Mech Mini - 29 Points (11 votes) Fissl (entry 31) 28. Compact Motorized Forklift - 22 Points (10 votes) Zblj (entry 36) 29. Motorstorm Pacific Rift Truck - Molotov Baikal - 17 Points (5 votes) PKW (entry 29) 30. Ice Mole - 17 Points (4 votes) braker23 (entry 39) 31. Z-Van - 15 Points (5 votes) Ode (entry 3) 32. Dump Bed Pickup Truck - 14 Points (4 votes) lindr6 (entry 9) 33. Modernized 8868 B-model - 12 Points (4 votes) D3K (entry 14) 34. Modified Rough Terrain Transport - 10 Points (1 votes) deehtha (entry 13) 35. Dumptruck 8x4 - 10 Points (6 votes) Dave21 (entry 19) 36. The Wiggle Truck - 10 Points (3 votes) MikeTwo9398 (entry 32) 37. Lamborghini Huracan - 9 Points (4 votes) LeocornoProductions (entry 20) 38. Zis E134 Trial Truck - 8 Points (3 votes) Berghain89 (entry 30) 39. Radical RXC V8 - 8 Points (4 votes) Epic Technic (entry 35) 40. Civil Titan Tank Bridge Layer - 7 Points (4 votes) jeanska79 (entry 40) 41. Tractor - 5 Points (2 votes) Seasider (entry 24) 42. Automated Loader - 2 Points (1 votes) weavil (entry 42) 43. Speed off-road Buggy - 0 Points (0 votes) TheNextLegoDesinger (entry 4) Total Points: 3874 VALID VOTERS 1. 98267a (Joined: 10-03-2014) 2. 9v system (Joined: 06-10-2014) 3. a_h_adl (Joined: 08-10-2014) 4. AFOL1976 (Joined: 11-02-2015) 5. aminnich (Joined: 13-06-2013) 6. AndroTech (Joined: 08-06-2010) 7. aol000xw (Joined: 13-08-2013) 8. Appie (Joined: 21-04-2014) 9. Askan (Joined: 17-08-2014) 10. Auranapse (Joined: 30-09-2014) 11. AxelKang (Joined: 12-01-2014) 12. BachAddict (Joined: 20-06-2011) 13. Baelyrn (Joined: 24-08-2013) 14. bdouchy24 (Joined: 01-11-2014) 15. BiohazardRacer (Joined: 20-10-2013) 16. Blakbird (Joined: 09-11-2007) 17. bmollema (Joined: 16-09-2011) 18. Boulderer (Joined: 23-07-2014) 19. Boxerlego (Joined: 26-12-2012) 20. braker23 (Joined: 22-10-2014) 21. brunojj1 (Joined: 17-10-2012) 22. BusterHaus (Joined: 19-07-2014) 23. Cavey (Joined: 23-11-2009) 24. Chilly (Joined: 27-12-2012) 25. Chorduroy (Joined: 22-01-2011) 26. ChrisBT (Joined: 21-12-2008) 27. ComMix (Joined: 01-12-2010) 28. Coola1 (Joined: 06-02-2015) 29. Cypr-21 (Joined: 23-11-2010) 30. Dafgek81 (Joined: 17-09-2010) 31. Dalafik (Joined: 18-10-2014) 32. DamonMM2000 (Joined: 16-01-2015) 33. DanSto (Joined: 25-10-2011) 34. darksheep (Joined: 30-08-2009) 35. darsedz (Joined: 25-08-2013) 36. Dave21 (Joined: 06-07-2014) 37. desert752 (Joined: 12-07-2013) 38. Detzit (Joined: 14-03-2014) 39. dfs473 (Joined: 04-02-2012) 40. Doc_Brown (Joined: 14-02-2013) 41. dr_spock (Joined: 28-12-2009) 42. Epic Technic (Joined: 07-11-2014) 43. Eraman (Joined: 18-06-2014) 44. falconluan (Joined: 07-07-2013) 45. filsawgood (Joined: 13-05-2014) 46. Fissl (Joined: 29-01-2014) 47. Foton (Joined: 20-05-2012) 48. fourlord (Joined: 25-09-2011) 49. GaBika (Joined: 30-11-2014) 50. Geekphysique (Joined: 11-02-2015) 51. GI_Jack (Joined: 25-01-2015) 52. GmaBlu (Joined: 13-01-2014) 53. goggel (Joined: 28-11-2014) 54. Graydingo (Joined: 08-02-2014) 55. grum64 (Joined: 15-03-2011) 56. Horace T (Joined: 11-12-2012) 57. Hoth-Wampa (Joined: 12-05-2014) 58. IJsmuts (Joined: 16-10-2012) 59. imajor (Joined: 23-08-2010) 60. imurvai (Joined: 26-12-2012) 61. Infraredbrick (Joined: 15-11-2013) 62. Interceptor (Joined: 19-11-2012) 63. JamesJT (Joined: 14-10-2012) 64. JayDee96 (Joined: 23-08-2014) 65. jeanska79 (Joined: 27-11-2014) 66. JGW3000 (Joined: 17-11-2013) 67. jono.rocky (Joined: 08-06-2010) 68. jorgeopesi (Joined: 30-05-2010) 69. Kelkschiz (Joined: 24-04-2014) 70. kennywest (Joined: 03-05-2014) 71. kinggregus (Joined: 16-05-2011) 72. Krize (Joined: 25-10-2010) 73. Kronos (Joined: 16-08-2011) 74. Kumbbl (Joined: 20-01-2013) 75. legofrik (Joined: 07-12-2014) 76. legolijntje (Joined: 06-06-2010) 77. leksivalen (Joined: 10-08-2013) 78. leo593 (Joined: 16-04-2014) 79. LeocornoProductions (Joined: 15-11-2014) 80. Lipko (Joined: 30-10-2011) 81. Longeye (Joined: 19-11-2010) 82. Lucio Switch (Joined: 05-09-2014) 83. Ludo Visser (Joined: 29-12-2014) 84. MacKaiwer (Joined: 02-02-2015) 85. madsen1997 (Joined: 02-04-2014) 86. MajklSpajkl (Joined: 10-08-2014) 87. Mangetsu (Joined: 13-01-2015) 88. mdbz (Joined: 24-07-2014) 89. Meatman (Joined: 05-11-2008) 90. Mestari (Joined: 06-02-2014) 91. Mickael (Joined: 03-01-2015) 92. MikeTwo9398 (Joined: 02-08-2013) 93. Milan (Joined: 21-06-2009) 94. mostlytechnic (Joined: 20-08-2010) 95. MrTekneex (Joined: 19-08-2013) 96. ms09 (Joined: 06-05-2010) 97. mzoli (Joined: 25-01-2014) 98. nagybirek (Joined: 21-04-2014) 99. Nalyd997 (Joined: 15-07-2014) 100. Nazgarot (Joined: 07-06-2011) 101. NeuroMimetis (Joined: 31-05-2009) 102. NXT45 (Joined: 18-04-2013) 103. nxtstep101 (Joined: 14-11-2012) 104. Ode (Joined: 29-12-2014) 105. Omikron (Joined: 12-01-2012) 106. Only Sinner (Joined: 26-10-2011) 107. Pat-Ard (Joined: 22-01-2012) 108. paul_delahaye (Joined: 12-03-2006) 109. PeterF (Joined: 19-02-2015) 110. Peteris_Sprogis (Joined: 11-08-2014) 111. PeterZeppelin (Joined: 06-06-2014) 112. PETI00 (Joined: 30-11-2014) 113. Petter (Joined: 07-03-2013) 114. PG52 (Joined: 26-10-2013) 115. PKW (Joined: 25-12-2014) 116. Poochy (Joined: 30-04-2012) 117. Rainbow (Joined: 12-02-2015) 118. Renamed99 (Joined: 12-08-2014) 119. Rishab N (Joined: 27-12-2012) 120. rm8 (Joined: 20-08-2011) 121. Rockbrick (Joined: 21-08-2013) 122. rollermonkey (Joined: 10-05-2013) 123. rumpletump (Joined: 14-02-2012) 124. Saberwing40k (Joined: 06-12-2011) 125. Seasider (Joined: 25-04-2013) 126. SilenWin (Joined: 13-02-2014) 127. Skandinavc FH (Joined: 27-07-2014) 128. Splat (Joined: 20-08-2010) 129. talex (Joined: 30-06-2014) 130. technicfan (Joined: 16-01-2012) 131. Technic-Kobaltz (Joined: 05-12-2013) 132. TeClem8 (Joined: 30-12-2014) 133. TheItalianBrick (Joined: 20-05-2014) 134. TheNextLegoDesinger (Joined: 15-11-2014) 135. Thirdwigg (Joined: 18-04-2012) 136. thomol (Joined: 05-01-2012) 137. TinkerBrick (Joined: 13-08-2011) 138. Tomahawker (Joined: 09-10-2008) 139. Tomik (Joined: 02-06-2010) 140. Tommy Styrvoky (Joined: 09-05-2014) 141. veryrusty (Joined: 20-10-2014) 142. VFracingteam (Joined: 01-12-2011) 143. weavil (Joined: 30-09-2012) 144. Wiseman_2 (Joined: 16-07-2011) 145. XAxles (Joined: 21-05-2014) 146. Younge (Joined: 09-09-2009) 147. -Z- (Joined: 08-02-2015) 148. zux (Joined: 28-05-2013) 149. zzzxxxxzzz (Joined: 19-07-2011) INVALID VOTERS 1. GuiliuG - Did not allot all 26 points (Joined 20-08-2010) 2. SERVATOR - Did not allot all 26 points (Joined 15-01-2014) 3. Umbra-Manis - Did not allot all 26 points (Joined 24-12-2014) 4. Victor Kojenov (TFOL) - Voted for own entry (Joined 05-04-2011) Several voters didn't allot all the points. If they did, it wouldn't have affected the outcome. I also checked for members who joined after the start date, which also didn't affect the outcome.
 -
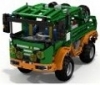
 The Wiggle Truck It's my first MOC using studless (technic) Lego. I always wanted to create a vehicle whose control is based on the tilt of the vehicle. Functions: The "Wiggle Truck" is equipped with 5 motors connected to a SBrick. 1 Servo steering (tilting the main body) 2 XL motors for propulsion 1L engine for lifting 1L motor for rotating The 2 XL motors are connected to 1 output of the SBrick and works perfect. The video Here are the Pictures Wiggetruck 01 by miketwo9398, on Flickr Wiggetruck 02 Inside by miketwo9398, on Flickr Wiggetruck 03 Steering neutral by miketwo9398, on Flickr Wiggetruck 04 Steering by miketwo9398, on Flickr Wiggetruck 05 lifted open door by miketwo9398, on Flickr Wiggetruck 06 lifted by miketwo9398, on Flickr Thanks @ Moderator: can someone add [TC6] to the topic
 -
 Hi guys! I came back, thank you all for your support. Probably helped fists from the Russian Far East. And so. I watched a bit of the models that were submitted for the contest (TC 6). A lot of good work, but I have not met one fire truck. And it was my choice fell on this model. -1 L for driving and outriggers (manual switching function) -1 S for steering -1 M for turntable -1 M for boom lift -1 PF lights -2 IR receivers Look what I got ... Finally a short video ...
 -
Technic SBrick Contest SBricks are shipping over the world as we speak. Say what?! You didn't join the Kickstarter project?! No worries! Here's your chance to win one or more SBricks For the few of you who don't know what an SBrick is, visit https://www.sbrick.com for more information. DESCRIPTION Build a Technic model with 4 Power Functions motors. The model should be prepared to replace the IR receivers with a single SBrick (or two if you like to maintain aesthetics). The models needs to have 4 powered motors, providing 4 functions. When using a gearbox, your model can have more than 4 functions (6 for example, like the 8043 Excavator). The model needs 2 PF IR Receivers which can be replaced by one or two SBricks. Using PF Lights is permitted. However, they don't count as functions. Functions are operated by a motor. DEADLINE Due to Holidays and possible issues with getting new parts from TLG this time of year I have given you two more weeks than usual. Deadline date is February 15th, 2015. Contest will be closed on Monday the 16th, so you will have the entire Sunday to build. CONTEST SPECIFIC RULES AND REGULATIONS You need to utilize 4 output ports of the IR Receivers/SBrick (not counting LEDs) This means you need to use 4 motors Exception 1: you can multiplex multiple motors on a single output (for driving for example, when you need more torque) Exception 2: a constantly running compressor Pneumatics are allowed, but only when controlled via motors (no manual switching levers, it is an SBrick contest, not a pneumatic contest) LEDs are allowed, but don't count as a function Other manual functions like opening doors are allowed Gearboxes are allowed, as long as the previous rules are met 3rd party strings and/or hoses are permitted If you already own an SBrick, you can use it (as long as you can demonstrate the functions) GENERAL RULES AND RESTRICTIONS The contest is open to all EB members (also new members). Members who joined EB after the start of the contest can be banned from voting (when vote rigging is suspected). Voting rules will be explained later in the voting topic. One entry per member. Entries need to be new (never posted anywhere previously). Only physical builds, so no LDD or other virtual entry. If you have any doubts about the suitability of your entry contact me. All entries are to include only real LEGO. No clone brands, 3rd party parts, or digital entries allowed. No cutting, sculpting or modifying parts. Entries are to be placed in the entry topic in this forum. Entries not in the entry topic are not eligible for voting. The entry post may be edited at any time up to the end of the contest, so feel free to make improvements if you wish. We reserve the right to disqualify any entry that does not follow these rules. These rules can be changed whenever we see fit to ensure that people follow the intent of the contest. Staff members are not eligible for winning prizes. WHAT DO I NEED TO ENTER? All participant need to create a discussion topic and create a post in the entry topic. DISCUSSION TOPIC A discussion topic starting with [TC6]. ENTRY POST The entry post in the entry topic should contain: Entry name Short summary of the functions. One or more images Video (mandatory) Link to the discussion topic PRIZES I'm proud to announce these great prizes we have for our top 3 contestants Special thanks to Lénárd Pásztor and the SBrick team for making this possible! 1st Prize 3 SBricks Personalized SBrick smart phone profile (with Gold Medal) 2nd Prize 2 SBricks Personalized SBrick smart phone profile (with Silver Medal) 3rd Prize 1 SBrick Personalized SBrick smart phone profile (with Bronze Medal) Bonus Prize And if that's not good enough....there will be an extra SBrick awarded to somebody.....for something.... So if you don't end up in the Top 3 you will still have a chance to win this great piece of electronics. Thanks again to the SBrick team for making this generous prize pool possible :thumbup:
-
 Hi, Final model: ========== The forklift is now done. I got the last order from bricklink and have finished off the final details like the dashboard and cabin floor. I actually completed it the 22nd, but haven't had time to take the photos before today. More pics in full resolution can be found here. A video will follow this weekend. My main focus for this model was making it realistic, and using a linear actuator along with chains to lift the carriage and forks. I have tried to keep the rest of the model as realistic as possible, even though the scale is not exact (a few studs to wide). The model is inspired by two different models of a Linde 3 ton forklift, but not an exact replica of either. As you can see the mast is taken from the first model, while the over all design is taken from the next. Pictures of the final MOC: From behind; max turning angle. forks in top position, lights off. Front view; forks in top position, lights off. Cabin interior; dashboard above the wheel, heater with 3 "buttons" below the wheel, speaker in silver to the left and right of the dashboard, and hydraulics control on the left. The seat can barely be seen in the lower middle of the pic. Detail shot from the rear; light on, with the seat dismantled (it was very hard to show it in any other shots) Interior shot; here the pedals are also clearly seen. Finer rear detail; notice the pressure gauge, gas connection and the towing hook; light on. Side profile The famed bottom shot shows very little, so I added some stripped side shots. Panels, interior and battery box removed; large motor for lift visible in the lower middle, and gear train for lift and tilt visible. M motor for tilt located under switch, similar to L on the other side. Notice servo under PF receivers and steering drive train with RTC spring to reduce play in steering. Side panels removed, all interior in place. Finally the seat is visible... The final model have these functions: PF functions: - Drive by XL motor. - Steering by Servo, and nontraditional design on steering system. - Mast tilt by M motor. - Fork lift by L motor. Manual functions: - Interchangeable carriages for equipment (different carriages with different forks or other equipment). - One Carriage with Adjustable interchangeable forks and towing hook. - Rear towing hook. - Removable LPG bottle. - Opening rear panels to allow access to remove counter weight (battery box). Fits both standard and LiPo/AAA box battery box. - Opening seat compartment to access technical functions (switch and PF recievers/Sbrick). Just like a real forklift where this gives access to motor or batteries. - Opening "hood" to switch battery box on/off Other functions: - Steering wheel that turns along with the servo. Achieved through flex axle from a Znap set. - Front light - Rear light - Work lights - All light controlled by a switch. Video: (Please excuse the music, it was to boring without, and I've never used music in a video before...) WIP: Last rebuild: ========== The last rebuild is done. I've made a new iteration of the front end of the forklift. The mast is the same, but has been moved three studs closer to the front axle, and I have rebuilt the drive train for the fork lift and mast tilt to place them lower and further back in the chassis. I had to make a second rebuild of the fork lift drive train in order to gear it properly, and this lead to a rebuild of the drivers cab as well. I am pleased with the end result, but there is still some details that need to be added. I'll have to wait for a Bricklink order to complete these changes, but they are all minor and only cosmetic. The model is working properly, has the right gearing (after the second rebuild of the front) and is basically finished in the over all design. I have uploaded 5 preliminary images that will be replaced after the Bricklink order arrives and I can take some good shots with my SLR camera. When starting this model I had set myself a few challenges in addition to those of the competition. First of all it should be based of the PF equipment of set 42030 Wheeled loader. This meant using the big AA battery box, and made the truck a couple of studs wider than it would otherwise have been (And a little to wide for it's scale). I also wanted it to bee as realistic as possible, and in order to achieve this it should only use a single linear actuator to lift the forks (This actually gives me 31 stud lifting height from ground to to position), and use chain links rather then the more common cord solutions. I also wanted it to be as easy as possible to rebuild for others, so no uncommon parts are used in the basic chassis except from these: There are however a few uncommon parts used in order to achieve it's looks, and extra functions. I set out to make the model look a lot like a Linde forklift, but never used a exact model for it. It's Linde inspired, especially by the older 3 ton Linde forklifts (around 1995-97). It is however not based on any specific model. The pictures below where a great inspiration, but the finished model differs from any Linde model both in color scheme and in proportions. This was necessary to keep it to the compact scale I wanted and at the same time include the 42030 PF parts. In order to rebuild the forklift I am making a LDD file for it. This will differ from the built model in two ways; it will not have any "illegal" techniques, whereas the buildt model has tow - the narrowing of the end as well as the LPG cranes. It will also be missing the moving steering wheel as this is achieved through this uncommon part: Here are a few pics. Remember the final finish is still lacking, but the general model is done. In the second pic you can also see the lights that are controlled by a switch beside the cabin. I also have to make a video of it, and will make an update when it's done. PS: I would also like your opinion of the white LPG bottle versus the black topped I made earlier. I think the withe single colored one is more realistic, bit it might be better if I use a flat silver "ring"... Your opinions? All other comments are also welcome. WIP: ==== For the first time in a long, long time I've actually had some time to build. By girlfriend took both our kids with her to visit her sister for the weekend, and celebrate the 5 year birthday of her oldest daughter. I became sic with some kind of virus, and was asked to stay home from work, so I just spent a couple of days of uninterrupted building.Earlier this week I started to test a modification to the new type thread links, and I found a prototype of the mast of a forklift I built a couple of years ago. It was a test to see if a large Linear Actuator could be used to build a forklift mast, but it became so large and bulky that i gave it up. New parts that I have gotten over the last couple of years has made it possible to build it much more compact than i could before, so I started testing to see how good I could make one. I especially find this part usefull: On Thursday I finished a proof of concept, but I still felt it was a bit bulky, so after my girlfriend and the kids left I sat down to redesign it. The proof of concept was a single action mast like you can see in the video linked below, but I wanted more of a challenge, so I set out to build a two stories mast that was more compact than the proof of concept. And I succeeded. (this is the type I have based my construction on). I have tried to stay as close to a real one as possible, and its all based around a single LA and chains. Back when I went to school I used to work as a mechanic at a local fish landing facility with several factories in my holidays. There I did among other things service forklifts from Linde. They made an impression on me even though it's 18 years since I last worked on one, so when I had made the mast I decided to make a 3 ton Linde forklift for the Sbrick competition. Today I have spent 15 hours on building and have gotten amazingly far. Much further than I had hoped, and hopefully I will have the model finished before my girlfriend and the kids get back home. I'll post pictures tomorrow, a bit to tired now... But here is what I'm going for: I haven't used a specific model, but based the MOC on my own memory of Linde forklifts. I haven't scaled it either, but I think I'm quite close to how a Linde used to look 18 years ago (the second picture is a lot closer to that)... I have looked at some pictures, most importantly this (a nice old model from a different manufacturer), to find what tires to use, and a general scale of the forklift. You will see my progress tomorrow. I have uploaded a .lxf of the mast to myBrickshelf. WIP Pictures: =========== Some pics from the build process of the first iteration. I'm not pleased with the rear corners and placement of the Mast relative to the front axle. I would also like to shorten the design with 1 stud to make the panels come closer to the rear wheels.In order to get the mast closer to the front wheels i will have to make a complete redesign, and as I also have a slight problem with grinding gears I will do so. That means to start from scratch and redesign the whole front end... Any opinions and tips are welcome as I will be changing this a lot. The tests of the new two section mast is complete and I have installed it on a basic frame. There is still a lot that is necessary to modify. (Don't look at the mess. It's creativeness not mess...) I had a lot of challenges with designing the steering mechanism and finding out where to place everything, but as the frame came along it was easier to see where it could all fit. It was a huge problem finding out how to mount the servo as I'm not using a standard steering setup. Because there is some tolerance in the gears the servo will have problem keeping the wheels centered, so I also worked a return to center spring into the mix. The steering setup is able to take a "unlimited" load of downward pressure, only limited by the breaking strength of the beams. In these pictures you can see the black and red body colors supplementing the gray frame. The black part of the body will be and integrated part of the frame, just like on the real Linde forklifts, while the red is simply paneling that can be removed. It's shaping up nicely. I had to make some bodywork in order to see how much space I had for placement for the last PF parts. The standard PF battery box will be integrated as a counter weight, but very easy to remove. I will get back to this once I've done the necessary redesigns on the next iteration. I also found no way to include the standard Linde step (to enter the forklift) in the body paneling, so I deviated from the Linde design and made a step outside of the paneling (gray 6 long thin liftarm in the picture). I will add another thin liftarm to make it more realistic in size compared to forklifts from other manufacturers who use this solution... You can also see the rear corner that I'm not very pleased with. As you can see from the images this will look like a LPG based forklift, as these are the once I have the most experience with. It will however not include a fake engine if I don't get a very good idea. You may notice that the motors I've elected is the same as the new "42030 Volvo L350F Wheel Loader". This is on purpose as many who are new to PF can get everything they need in that set. Update - LPG Bottle: I just finished the LPG bottle. I spent 2-3 hours looking for the parts (I have ore than 30 boxes with thousands of parts in each,as well as 10-15 assortment racks, and the regular Lego parts are not much used...), and 10 minutes to decide on the design. Building it was actually quite hard, even though I knew what design i wanted, because i needed to bend a rigid hose into a circle. In the beginning i couldn't make it round, but then I got an idea. I put a old flex cable into the hose, and suddenly it bent nicely and kept closed much more easily. I like the end result, but I don't know what color to make it in... i will have to order parts anyway as I don't have anything matching colors right now. A few of the parts will be a problem though, like the air tank that only exists in blue and white. I would love to have it in gray... But anyway, i was thinking to either make the top Gray, Chrome or white. If all else fails, it will stay as is. Flex cable and rigid hose makes for a nice circle. The LPG Bottle itself: And a real one for comparison: Redesigning the back end: As stated before I will have to redesign the whole front end of the forklift, and that is quite a job as this is the part that took me the longest to make. I didn't really wanna do that yet, so I started work on redesigning the rear end, and have now reached a level of refinement where I concluded it's good enough. You may not know this, but the Linde forklift range are design in cooperation with the Porsche Engineering design studio (see this link for more info). This is part of what made me want to recreate a Linde when I decided to make a forklift. Recreating the organic lines of Porsche in Lego is both a challenge and a great opportunity to make something that isn't all square and boring. I managed to narrow the rear with two studs, and at the same time allowing it to cone in towards the back as can be seen on the pic below. This was the change that really made it all come together. After i narrowed the rear the center upper rear end was pulled in half a stud, and it gave me room to do what I wanted with the towing hitch and solved the sharp corner problem. (The reare "axle" is disconnected in this pic...) As I was redesigning the rear it was like the forklift designed it self, like it was telling me what needed to be done, and everything fell into place like in a puzzle. I have managed to keep all technical solutions and motors (m motor is to fit beside XL when i redesign the front) below the 5 stud level, both keeping the center of gravity low, and giving me room to work on the design on the upper part. You may also note the (for Lego) extreme steering angle of the rear wheels. They do also have correct Ackermann geometry, and was one of the really big challenges. I'll show more of this in a later update. The area where the towing hitch is placed was a square 5 x 7 hole in the first iteration, and is now a nicely flowing area with a functioning tow hitch. I managed to redesign the corners so they have a round flowing line, and not the sharp edges from the first iteration. When starting the redesign process I kept in mind that most car designs (also Porsche) has the front and/or rear making a face with the light as eyes. In the pic below you can see how the red lights make out the eyes, the beam in the middle becomes the nose, and the towing hitch makes for an angry mouth. I think I captured this very well... It strays a bit from the real Linde forklifts (even though lights are pretty common on forklifts for road use) and reaches for the Porsche concept drawings for Linde. In this setting I think that is quite ok. You can also notice that I finished the mounting for the LPG flask. That finishes off the back end. Only a few tweaks left to the steering and I can start redesigning the front. Steering mechanism: I've done some final tweaking on the steering assembly after I finished the back ends bodywork and saw how much space was available. This i the result I probably will use. As you can see of the second picture the steering angle is quite good for being Lego. The ackerman angle is actually to sharp, but this is done because there is some slack in wheels. By making the angle this big both wheels will flex into the right angle when the model is driven, the inner wheel flex a little bit out and the outer wheel in. My primary goal making this was a very good steering angle and "unlimited" load capability. It's capable of taking a load that squeezes the tires off the rims without flexing! It is also very easy to remove (for service etc), as only two pins are holding it from falling down. Functions it will have is (Planned): =========================== PF functions: - Drive by XL motor. [OK] - Steering by Servo, and nontraditional design on steering system. [OK] - Mast tilt by M motor. [OK] - Fork lift by L motor. [OK] Manual functions: - Interchangeable carriages for equipment (different carriages with different forks or other equipment). [OK] - One Carriage with Adjustable interchangeable forks and towing hook. [OK] - Rear towing hook. [OK] - Removable LPG bottle. [OK] - Opening "hood" panel in the rear to remove counter weight (battery box). [OK] - Opening seat compartment to access technical functions (switch and PF recievers/Sbrick). Just like a real forklift where this gives access to motor or batteries. - ??? I'm happy to get more ideas. Other functions: - I hope to be able to include a steering wheel that turns along with the servo. - Front light (hopefully through a switch). - Rear light [OK] - Work lights Updates will follow as I progress into the second iteration of the forklift and the fourth of the mast... I'll also see about making a video to show off the functions. -ED- Post will be updated with WIP pictures as well as a few videos when I have gotten a bit of sleep. EDIT: Updated with WIP progres photos 10.01.2015 Updated with WIP progres photos 12.01.2015 Updated with WIP progres and .lxf 13.01.2015 Updated with WIP progres and photos 20.01.2015 Updated with final model photos 28.01.2015
 -
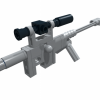 I've been wanting to make this since I got back into Lego roughly two years ago, and had just started playing around with a road wheel setup for it when [TC6] was announced! Firstly here are a couple pictures of the real vehicle in Norwegian service If you google CV9030 you'll find tons more Obviously building this in studless Technic is out of the question, so I am currently in the process of building my first studded MOC in around 20 years! It is also an all time first building a military tracked vehicle, as well as something studded based on a real vehicle, as well as building PF into a studded model. I want to make it fairly small, so small track links it is (I hope to one day make a properly detailed model of the same vehicle in larger scale using the new style tracks). Anyway, seeing as 99% of my studded brick collection has been sat in the same place collecting dust for the past 15-20 years, I'm rather handicapped both in parts selection as well as colour: As you can see, it's not ideal by any standards. Building studded is so different from studless, it feels almost like two completely different toys! I'm going to have to redesign the transmission, and possibly relocate the motors. The space inside between the suspension "rubber band arms" is only 4 studs. Although the real CV90 uses torsion bar suspension, using that at this small scale would be way too stiff, and thus not make any sense. I will much rather have functional, soft suspension, as you can see in the above picture. So, that's it for now, still quite a way to go as you can see I will do a lot of tinkering in LDD with regards to the turret design, and hopefully the final physical model will be either LBG or white (like the ones in UN service).
 -
Technic SBrick Contest Entry Topic DEADLINE Deadline date is February 15th, 2015. Contest will be closed on Monday the 16th, so you will have the entire Sunday to build. CONTEST INFORMATION More information about the contest can be found in the general discussion topic. WHAT DO I NEED TO ENTER? Please take a careful look at the rules before posting in this topic. Each participant is obliged to create a post in this entry topic. Posts need to follow the rules stated below. Posts not following the rules will be disqualified so please read them carefully. ENTRY POST The entry post in this topic should contain: Entry name Short summary of the functions. One or more images (max 5) Video (mandatory) Link to the discussion topic IMPORTANT This topic should be used for entries only, so commenting is prohibited. Please use the general discussion topic for comments on the entries.
-
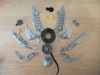 I'm sure most of you guys know of Vengit, the producers of the SBrick. I was thinking, since they already make the SBrick, a PF compatible element that Lego itself would never produce, maybe they could eventually expand their lineup to include more things? If they did so , what would you want them to make? I'd like to see some adapters, to connect various other batteries to the PF system, like a cable that would go from a common 7.2v RC batter to a PF plug, or a snap for a 9v battery, or even a system that plugs into the wall, like the old train speed regulator. Also good would be some small motors, and a proportional switch. Also along these lines, would it be a good thing if Lego endorsed this kind of thing, like they did for certain Mindstorms sensors?
 -
 EDIT: Building Instructions Available: HERE ________ I’m a big fan of Japanese cars, mostly because of its reliability. In the city I live in, there is a car factory which manufactures some models of Toyota and Mazda cars for the Chinese market. Among them is the Mazda 6 Atenza, the latest model of Mazda 6 series. (via Internet) I like this car a lot. A family sedan beautifully shaped like a supercar. Also you can choose hatchback or wagon configuration, but you don’t see a two-door race car model in this series. So I decided to build one out of LEGO. After a long winter, now I present you my latest MOC: A Mazda Race Car with SBrick. This project started with this iconic front grille. I don’t have a concept of the overall scale for this MOC, everything was decided by the scale of the grille. Ironically, I didn’t realize part 32192 in LBG is rare until the prototype is finished in LDD, and I don’t have a single one of it. Finally got my hands on it after quite a long time. Let’s have a look at a video first. (4K @ 30 FPS, watching in full screen is recommended) Weight: 1130g Dimensions: 350mm (L) x 160mm (W) x 127mm (H) Parts count: 1390 pcs Working headlights / taillights Servo motor cable has to go between the two seats due to length concerns, otherwise I can put more details in that area. A tiny fake engine for a tiny space. I must say I’m not a big fan of soft axles and I don’t use them too much. But they look great when used to shape wheel arches. The car is heavy towards the back, so rear suspension looks kind of weird. It gets the job done, though. Drivetrain is quite simple. Also you could find some inspirations from Madoca’s Supercar and Corvette. :thumbup: More photos: Building instructions is on the way. It will be available very soon. SBrick can be easily replaced by PF IR receiver. Enjoy and stay tuned!
 -
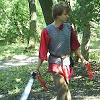 Previous tests with description of how SBrick should be mounter in trains and how it can be used from smart devices, please refer to this thread: http://www.eurobrick...howtopic=115885 After equipping my red Stadler FLIRT EMU (415-001) with SBrick and testing it on different events I decided to put the SmartBrick inside my blue (415-061) Stadler FLIRT EMU as well. The two 9V train motors had been removed and two PF train motors (each attached previously to a 9V one) remained in the trains. The basic idea from switching from 9V to SBrick was that the two Stadler FLIRT units with 8 train motors together needed a really high current to move, and after several tries with paralell speed regulators and more power supplies connected to 9V loops it became obvious for me that making 7 kg of trains consisting of two invidual EMUs run is not sustainable on longer time period, and I can't expect other LUG members to supply me with all those extra cables and custom 230V AC->10V DC adapters under their part of layouts. Other issue was that voltage in 9V tracks depended how far the 9V train motor from power supply was, so synchronising the speed of my two FLIRTs seemed impossible. The two PF-train motors driven from SBricks can deal with the 3.5 kg weight of each FLIRT train, however they really slowed down on sharp turns and points. Each train can run around 3 hours with 6 pieces of 2100 mAh VARTA AA rechargeable batteries. For synchronised run I needed to design a new SBrick profile on designer.sbrick.com, where a slider drived both trains' SBricks' driving output (actually output "D" in my MOCs). After setting up the right polarity (done in profile settings, the two EMUs started into opposite direction for first try) they started to run, the magnet couplers hold them together and there were no problems on straight track segments. Problems started to appear in curves, the rear train, running still on straights was faster than the first one slowed down in curves, so it simply pushed the first one through the coupling causing derailment of the last bogie of the first train. Unfortunately it seems that two PF train motors are not enough to keep up the speed in curves, however with careful driving and slowing down in time the derailment can be avoided. Also rechargeable batteries should be approx in the same condition, a train with fresh or stronger batteries will be faster, however they have approx. the same weight and number of train motors. These derailments and problems (I almost couldn't run coupled FLIRTS on points, the first train leaving the point become faster and decoupled from the rear one) are caused by the not satisfying number of train motors and maybe failures of my train couplings, I'm working on them by now :) , equipping FLIRTs with a third PF-train motor for less slow-downs and a stronger, technic-parts containing coupling system (but still keeping magnets for easy to play experience) Also I need to put EMUs front/tail lights for ends "A" and "B" to different outputs - I can't reach the small polarity reversal bricks to turn off lights between units (see Fig.1. for details). Fortunately SBrick has four outputs - now two for front/tail lights, one for driving and one for indoor lights are being used. Fig.1. Polarity reversal brick to turn off front/tail lights manually on my EMU when the end is connected to other EMU. Not very playable when the train is in the middle of they layout. And let see how the application worked for me. I used a HTC One M8 mobile with the latest application and latest firmwares on my SBricks. Problem 1.: You are not allowed since version 1.6 for Anroid to attach an SBrick port to more sliders or buttons. Therefore when I start to operate Stadler FLIRTS simultanously, I have to first exit from the profile wich allowed to run them separetely (with two driving sliders) then load a profile with one slider for synchron run. It's such a pity that only one slider or button can handle a function. Problem 2.: derived from problem one, application crashed when I tried to reconnect to the two SBricks with a new profile. I don't really now how informatics and programming works, but crashes happened only on the first day of exhibition (7th of April), for the remaining three days they magically disappeared. Problem 3.: Connection lost. It happened quite often, at least three-four times in 10 minutes time gap. When running two trains synchronised and the first stops due to disconnect,well, derailments and broken couplers were the results. Also while App tries to reconnect, the profile screen gets darkened (see Fig.2.) and while it is darkened, you can't handle your outputs - even while the other, connected train is running. The only way to stop if reconnect not happening in short period of time is to exit from the profile. I couldn't figure out the cause of these disconnects, they appeared both while trains were running together, trains were running separately or one or two of them were just staying somewhere with turned on lights only. Fig.2.: One Sbrick disconnected, but other working - and if set to run, still running. Photo is just illustration, taken of different phone and with second SBrick in my Bombardier Talent EMU previously. A short video of the FLIRTs running together with SBrick: Conclusions: Pros +Playability for first - I liked to have my trains run together, controlling both of them with the same slider, then decouple them and let them run on their own way. +Four outputs on one SBrick - I need them more then ever. Increases level of playability. +SBricks can be hidden - no visual contact needed and high range of control - a very needed advantage for bigger layouts. +Not SBricks's Pro, but my FLIRTs now can run on non-9V track as well, ME-models R102s really tempting for smoother run, while I spared 4 of 9V train motors for other MOCs. Cons: -Once it was available to drive an output from different buttons and sliders, it is needed when you need your train solo and synchron run as well. (Or a non-train application - turn sign of car can be driven separately, but when signing warn or get stucked you need to blink them synchronised.) -Still too many disconnect problems, when two SBricks connected to a profile, can't stop non-disconnecting one. (I know, disconnects vary with different type of phones and phone operation systems and it should be hard to write the code which works fine on every device.) -Slider's 80% still not moving a train - not only my heavy ones but any train driven with SBricks. Voltage output function for trains applications should be changed. Please note, this review was focused on the coupled run and my needs, previous review focused more on how to use SBricks. I hope you find useful informations here when you plan to run your locos, motor units together to pull a heavy freight train or carry more passangers in your LEGO-City! My experiences also had been sent to SBrick developer team.
 -
 Hello everyone! This is my latest creation. ICARUS Supercar Introduction The name comes from a man who desired to fly higher using his technology. Many times I have tried to realize the speed what supercar MOC should perform. I needed “wing” called buggy motor, but all I had is a bunch of PF motors. So I connected motors together using “wax” called SBrick. Like Icarus of Greek myth, higher speed and torque may be lethal for the model itself... The result is here in the video! Weight: 1760g Propulsion: 4x PF L motor for rear wheel drive Steering: PF Servo motor Front and rear lights: 2x PF light Powered by: 2x SBrick and 2x 8878 rechargeable battery box Features: independent suspension for all wheels working steering wheel manually adjustable rear spoiler opening doors, hood, engine cover, glove box Drivetrain You may think it is not fast enough, but for me it was a relatively success. Surprisingly, gears and CV joints have never damaged or popped out even at the time of maximum acceleration. Although I had designed its drivetrain carefully, I was not sure if small bevel gears in differential withstand the load. Two 20T bevel gears of each side divide the load from differential equally. In this setting differential doesn't move back and forth easily. That means differential and 20T bevel gears hardly ever disengage. So they keep rotating smoothly even under high load. In this MOC there are three L motors (and two SBricks, two battery boxes, bunch of wiring) on the supposed location of V8 engine. So if someone build manual version with gearbox, there would be enough room for it. Body design As expected, building 1:10 scale supercar was very hard. Especially the body work. I've built one three years ago, but it was primitive MOC in every way. New MOC is heavily inspired by modern McLaren supercars. I tried to build their curved shapes using rather technic panels than flex axles. Front and rear light section happened to become different from the original mainly because of the positon of LED. Though finished model is not a copy of P1, I am happy with the result of realizing proper mid-engine proportion. Building instructions: http://rebrickable.c...icarus-supercar I hope you like it!
 -
How to Motorize the Mars Rover I am looking for some suggestions. My daughter is building the Mars Rover set (go here for the details: http://www.eurobricks.com/forum/index.php?showtopic=98222) for a presentation at school and I told her I would help make it operate by remote control with one of the power function kits. Problem is that it is a lot more complex than I thought. (I have no experience at the expert level building. (No building the rover is not part of the project, she is doing it as an additional part of her presentation on Rovers). I think I can maybe get it moving with a remote, receiver and simple motor attached to one wheel, but I do not have any idea how to do the steering and don’t know how to move any of the other functions (camera, antenna, robotic arm). see So, to steer, I use a servo? How do I operate the other things, more servos? And to move things slowly, do I need complex gearing? (I was looking at the SBrick which might work. I saw a few designed steering racks and chassis on Ebay, some simple, some pretty complex. Would I be better off buying another set that has a chassis and steering and drive designed to work with motors and then build it and adapt the Rover to it? Any suggestions to help me figure out what I need to do and what to buy to easily make this work would be much appreciated. Thanks!
-
 "proof of concept" using one raspberry pi to control two LEGO trains: The trains are detected by reed switches. The Raspberry PI sends commands over bluetooth to the SBricks mounted on each train. The code on the raspberry PI is based on this code: https://github.com/J...ick-Stress-Test by GitHub user JorgePe. He also has details on the implementation in the SBrick wiki: https://social.sbric...client-scripts. The only cable-connections are from the raspberry PI to the USB power supply (white box) and to the reed switches. Even at this early stage, this can be helpful on small train layout at exhibitions by adding some random elements in the timing.
 -
Hi. While most people awaiting for their SBricks are planning to use them in big/strong/fast models with lots of Power Functions motors and batteries I am more interested in the control possibilities. This weekend me and my kids assembled a very small RC rover just for fun, RAT1NH0 ("little mouse" in portuguese). It was a sucess and I made a quick revision to be used on a table. Not 100% LEGO and some bad things were made to LEGO cables... but I'me sure you agree that it opens lot of possibilities A (few) more details at my blog.
-
SBrick - Smart way to control all your LEGO® Creations Once upon a time there was a group of LEGO fans that had a dream, namely the dream of not simply taking readily existing building blocks to create a new model, but rather to create something that would take the LEGO experience to an entirely new level. They started their journey half a year ago but in order to fully realize their dream they now need your support. Take a look at what they’ve achieved so far and play your part to help turn what was simply a dream six months ago into a reality today. Read all about it in the Technic Forum and show your support by Pledging this Kickstarter Project.

-
Greetings! After coming out of my Dark Ages and tackling both the excellent Ultimate 8043 & 42009 (see below) designed by Jurgen Krooshoop, I was hungry for another Lego Technic challenge. But I felt rather lost at this point: without a large collection of loose Technic pieces at my beck and call, motorized MOCs which weren't heavily based on existing Lego sets would require some hefty Bricklink investments from my part. Fortunately, a fifteen-percent-off-everything anniversary sale at a local toy store with an expansive Lego section made the choice for my next project a lot simpler: they had the 42043 Arocs set that had already been calling out to my wallet since way back in oh-fifteen. They also had a certain little gizmo called an SBrick in stock, which I had heard quite a few things about. My previous builds had involved standard PF receivers and remotes, so it seemed like an interesting new challenge to incorporate this new-fangled blue-toothed thing-a-ma-jig into my already-slightly-more-challenging attempt at "RC-afying" the Mercedes. I'm already a little way into the project, but I've already made a few false starts and moronic missteps, so I figured it might be educational for others to document my frantic flailing about experiences, so that they might avoid my (myriad) mistakes. The first thing I did, of course, was to order the necessary PF components: a Servo Motor, an L-Motor, an 20cm extension cable, and a couple of PF lights. In hindsight, this already turned out to be my first mistake: I hadn't done my research properly and hadn't realized that the SBrick requires an extension cable to be hooked up to a battery box. This meant I was probably going to be one cable short, since I didn't think the cable for the L-motor used for drive would reach. While I waited for these crucial parts to be delivered, I began preliminary work on the Arocs proper. After completing most of bags 1 to 3, I had three loosely connected main sections of the truck - the cabin housing the 6-cilinder engine and the L-motor that came with the set, the gearbox with the outriggers, and the rear section with the dumping bed and the differentials. In my mind, I could already see a problem arising: there was a drivetrain going from the rear wheels all the way to the engine in the front of the truck, which would obviously make the pistons move as you move the truck along. I already guessed I would be severing this connection by remove the driveshaft with the CV joint and attaching an L-motor in the center somewhere. Which would render the engine, the drivetrain, etc. utterly useless. This was not acceptable - not in the last place because my kids had unanimously decided that seeing the pistons in my 42009 mobile crane move was officially The Coolest Thing Ever™. So I fiddled about a bit before connection these three main sections, and eventually came up with this: Might be a bit hard to see, but... Basically, I placed an additional small gear directly in-between the L-motor and the gearbox, which allows it to power the axles and gears connected to the piston engine when in use. So, it wouldn't be connected to the drive anymore, but at least there could be some motorized eye-candy when one swung back the cabin and fired up the main engine. It wasn't long before my motors and such arrived, so the first I tried to accomplish was to connect the L-motor for the drive somewhere. One nifty solution I'd found involved replacing the engine in the front and using the long drive-train to power the rear wheels -- a technique I thoroughly rejected for several reasons: It seemed inefficient, and COOLEST. THING. EVER. So I figured I'd just bolt the bloody thing directly to the rear diff, as I'd also seen in this fascinating and classically scored tutorial vid by RC-master PPUNG daddy: It didn't sit right with me to just attach the motor with two pins like that though, so I have attempted to support it a little bit better without messing up the way the rear suspension works too much. Right now, it looks something like this: Not exactly perfect, but it seems to work well enough, even when I give the suspension a bit of a work-out. Next came the steering. My first attempt was based on this extremely helpful Youtube video by yu shine: Basically, this involved just connecting the Servo directly to the standard HOG steering mechanism for the Arocs, just below the two orange lights-slash-knobs at the top which you're supposed to turn. It seemed the most simple and elegant and -- being but a simple soul -- this naturally appealed to me greatly. It also didn't require the purchase of any additional parts, and left the mechanically unique way the steering on the Arocs model works intact. At this point I was able to put together a sort of prototype for the RC driving, by dangling the SBrick from the battery box and just hooking everything up in a makeshift manner. After installing the app, setting up the official 42043S profile, and playing around with my handiwork for a bit, I discovered the following issues: The L-motor was supplying quite a bit of power, making the truck actually pretty hard to control. Of course, there was a lot of weight left to be added at this point, so I was willing to reserve judgement for the time being, but given that my kids no doubt want to play around with this thing as well it'd be nice if I could prevent them from semi-accidentally ramming a massive Lego vehicle into, well, practically everything. Not sure how I could address though, other than from the software side. Placing the Servo motor where it was, behind the battery box, didn't actually fit all that well. The battery box itself actually pushed up against the servo when inserted, bending it back by at least a stud, which also frustrated my attempts to secure it in place a bit further. The steering was a bit... inadequate. The problems regarding the steering I recalled Sariel already mentioning in were only exacerbated here. It felt imprecise and rather unresponsive, and it didn't help that there was quite a bit of play in the wheels even with the Servo hooked up, meaning they weren't necessarily centered even when it was. So in the end, I stripped the away the steering mechanism and the wheels up front until I was left with this: After that, I decided to pony up and order the parts which -- after careful visual inspection of PPung's tutorial -- I figured I'd still need to mount the servo at the bottom, between the two sets of front wheels. So, mostly a set of gear racks and gears, in addition to some beams and various connectors used for bracing. This also gave me the chance to simultaneously order an extra extension cable from the same supplier, since it was pretty clear I was going to be needing it if I wanted to have any hope of hooking up the drive motor to the SBrick up front. And now, we wait... Although, to pass the time, I busied myself with rebuilding the back of the cabin, which I had previously taken apart to place the servo motor. I didn't need all the gears used for the steering mechanism, of course, and I figured I'd be better off trying to mount the SBrick in this space instead. For the moment, I came up with the following: I did notice the two black Technic pins still sticking out back there, and peeking ahead in the manual revealed that these will be used to help brace the pneumatic crane, once the time comes to attach that beast. As far as I can tell, that should still be possible even with the SBrick where it is, but no doubt I'll have screwed up somehow. We'll find out in the next update, hopefully! (Assuming, quite optimistically, that there is actual interest in such a thing. )
-
Dear all Train Tech guys, Thanks to the kindness of SBrick team I got two SBrick units for some testing - one of them was built into my LEGO MÁV Stadler FLIRT electric motor unit, another one into my LEGO MÁV Siemens Taurus electric locomotive. We tried as well to install SBrick between 9V Train Speed regulator and a loop of 9V track, where usual 9V-based trams were running. Fig.1. TFOL driving SBrick-controlled Stadler FLIRT on our layout. 1. SBrick installation For first, a quick overview for those, who don’t know, how SBrick works. If you are familiar with the smart brick, you surely can skip this chapter. To imagine SBrick it is the easiest to think about a normal LEGO Power Functions IR Receiver with four outputs, more channels and without the restriction of the infrared technology - with other words your smartphone or device doesn’t need “visual” contact to the receiver unit, thanks to the bluetooth connection. Also it works surely fine within the range of 50 metres, but by good circumstances it works from 100 metres as well. Other great advantage, that SBrick’s current limitation is 3 Ampers per output, while PF IR receiver has 800 mA - better choice if you want to run something heavier then avarage 6W trains. Fig.2. The SmartBrick unit. (Photo taken from sbrick.com.) SBrick could be powered with normal LEGO battery boxes or LiPo rechargeable battery with a Power Function extension cable. It is also possible to power SBrick from old 9V battery boxes or even a 9V Train Speed Regulator, using the 9V/PF end of the extension cable. In this case you should check, if the little green light on SBrick is on - depending on polarity the SBrick is enpowered, or nothing happens. You can plug on your train motors, lights, other PF motors on the SBrick’s four outputs. Next step is to design your remote control interface for your device. To do this, you need to be registered on social.sbrick.com, then go to designer.sbrick.com to create your profiles. The profile designer works in most of the web browsers properly, you can add sliders, joysticks and buttons to it. It is really advised to fill the “name” field in setting - later you need to know, which slider do what when configuring SBrick. Sliders work like old RC Train Remote control, joystick is an advanced slider, buttons works like turn on and off. For all controllers you can configure maximum output - if you want to limit your train’s maximum speed, quite easy to do, setting a value lower then 1 to maximum output. Also you can set up, if the controller will reset to zero or not, when you stop touching the screen of your device. You can set background for your controller, you can change the design of the sliders, joysticks and buttons - we have dozen of previously created ones, but you can use also own-designed images as well. Fig.3. My profiles designed for event TEMOFESZT 2015. Upper one manages three SBricks at the same time, a tram line with a slider, the ferris-wheel with a button (0.3 maximum output) and two other sliders my FLIRT train. Theoretically, if your screen is big enough, you can manage 16 SBricks and 64 funtions at the same time from the same device - perfect tool to operate a whole layout. After the profile is done, you should connect your MOC to your device. To do this, you need the SBrick application (or for quick play SBrick Tester application). Create a new Creation in SBrick application, turn on SBrick in your MOC, add SBrick to your creation and download your profile to your device. Then click connected SBrick (or SBricks) in your Creations menu, and pair sliders and buttons (if you named them before, it is easier :) ) to the outputs (A,B,C,D) of the SBrick in your MOC. After doing this, click the profile in the app you made for your MOC, and start playing :) 2. SBrick & Stadler FLIRT Surely most of you know this creation. It is my 8 stud wide electric motor unit, the original train manufactured by the swiss Stadler company. The LEGO train’s weight is around 3,5 kg-s, previously it was driven by two 9V train motors and two PF train motors, connected to 9V ones. The train also has front-tail lights (using modded PF leds, described in RailBricks #9) and interior lights - three functions to operate. Fig.4. Cables and cables - all of my train’s funtions connected to the SBrick unit. The bigger battery box (which never turns off) grants continiouos availability until the batteries die. As before, I sacrificed the toilette part of the interior to install electric parts - the big AA battery box powers the SBrick unit, and functions are mounted on the outputs. I had a small issue here with the design of the SBrick - if you plug more than one PF cables on the lower (C,D) outputs, it will be inpossible to plug any to A and B. So if you have to plug more than one on some output, you should put them on A and B, or if three output needs more than one plugs, you should insert an additional extension cable first to lower one C and D, and then plug your needed cable ends to the extension cable. In the train now boogie 2 and 4 are driven - 9V train motors are removed, and normal train wheels replaced them at boogie 1 and 5. The third (middle) boogie is unpowered as well. Operating the train is quite easy, if you learn, how to use your touchscreen properly. Since I have direction dependent front-tail lights, I named on my profile (refer to Fig.3) the two ends of my train “A” and “B”, just like the real thing. When starting, I always turn on lights for first, and later if I press the same direction of driving slider, the train will start into the direction of three white lights on it’s front. This could be especially important, when you have a layout where trains are running not only around on one loop, but they direction can be changed at wye-s, and you can’t exactly remember, which end is which on your fully symmetric train or loco. Fig.5. Wye-s designed by Bill Ward. Perfect way to get lost, where your train will depart when you touch the screen, or even turn the PF remote control around. Operation time was fine - the SBrick unit doesn’t take more power than the PF receiver unit, with the pack of AA rechargeable batteries I operated my train for a full day (exhibiton was opened between 10 am and 6 pm), the train was running for 2,5-3 hours before powered down, and it wasn’t turned off for all the day. Also I tested the train at home for continouos running - after 15-20 mins the PF-train motors got too hot and and train stopped, while SBricks temperature raised from 36-38 °C to 44-46 °C. (You can get voltage and temperature data using the SBrick tester application.) The SBrick unit works fine - I doubted it will manage my quite heavy train (compared to avarage trains built by AFOLs), but it served really good - the more problems I had with the software part. The SBrick application written for Android have several problems - not serious ones, but quite annoying. Connection problems Sometimes the application can’t reconnect to the SBrick. It happens when you exit from the driving screen from your smartphone or tablet (in this case the connection will be dropped automatically), and then you turn on again your controller - it starts to reconnect, then askes if SBrick is powered. This connection issue may happen if you connect your MOC from an another device while the first device is disconnected - until you are connected to the MOC with the second device, you can’t reconnect with the first one. The reconnection problem happened when the second device got disconnected as well. Also using the SBrick and SBrick tester applications from the same device can lead to this reconnection problem. Fortunately, all outputs of the SBrick are resetted to zero when you device loses connection with your train, so no accidents may happen. Fixing connection problems As I experienced, restarting SBrick application helps in most of the cases. If this doesn’t help, in your creation’s menu you should remove the SBrick, then add it again, reconfigure it, and it will work. Application crashes Smartbirck application crashed for dozen times during the three days - mostly when attempting to reconnect. Slider problem Basically I used “slider”-s to drive my trains. I don’t exactly know, how the software part of the sliders are written, but the first 80% of the length of the slider from zero (middle) point is quite useless in train operations. After reaching 80%, the train starts slowly moving, but it is really hard to set up the train speed properly on the remaining 20% length of the slider bar. As far as I know a totally new application for SBrick is under contruction, so the output function for the sliders and joysticks will be redesigned in the near future to avoid this problem, and hopefully previously mentioned connection problems and crashes will disappear as well. 3. SBrick & Siemens Taurus locomotive During the summer event of Kockajáték Club I installed one the SBricks to my Siemens Taurus locomotive. The loco works with two Power Function train motors, connected to the old RC train base - SBrick was placed on the output of the train base, so to turn it on for first I needed to give maximum power from the train base. Check this video of the locomotive pulling cars, and controlled from a distance. With this locomotive we made also some fun tests with the train guys hanging around - we put ten of our 8W, 58-64 stud long coaches on the locomotive to pull them. When the magnet coupling didn’t fail (with careful driving) the SBrick unit (and the two PF train motors) could pull all the cars, but the SmartBrick got really hot in less than 5 minutes - we reached the 90 °C temperature easily, and the SBrick got shut down by temperature protection. After couple of seconds it cooled down, and the smartphone reconnected to it. The whole weight of the pulled train was around 11 kilograms. 4. Controlling traditional 9V lines with SmartBrick Using an SBrick doesn’t mean you have to give up your 9V trains, tracks and motors. Get a 9V speed regulator, put SBrick on its output with a PF extension cable, and use the same cable to enpower the 9V loop, putting the dark bluish gray end on the Smartbrick and the light bluish gray end to the part you connect to the 9V tracks. Turn on speed regulator to maximum, put a 9V train on the loop - and now your 9V creation could be controlled from everywhere in a 50 metres radius circle, not just from the speed regulator. Putting more sliders connected to more loops will give you the oppourtunity to controll all your layout from the same place, while you don’t need tons of 9V extension cables to put every speed regulator at the same place. SBrick is even a powerful tool when you don’t have loops, just sections isolated from each other, like analogous model railway - every section could be controlled as described by loops. If you motorise switches with PF motors and connect them to SBrick, you can manage almost everything only using your touchscreen. 5. Conclusions SBrick is a powerful device to make your LEGO trains work with minor issues. The greatest advantage of SBrick that you need no vision to the receiver unit and you can controll your trains from a great distance - no more runaway trains thanks to the limitations of PF IR receiver. SBricks is also compatible with older 9V-based stuff - those who doesn’t want to switch to the newest LEGO train system can use it as well. The current limitation allows you to make really big and heavy trains to run - which is almost impossible when using original PF IR receiver. On the other hand - one SBrick unit is quite expensive, one brick costs £40 and taxes. However this price is not that high if you compare the possibilities to the possibilities what three PF IR receivers can give you for the same amount of money. Current SBrick application has minor issues as well, crashes and disconnects are quite annoying, and the application won’t work propely on all Android-based smart devices. For final words, I really advise to everyone who is into trains, especially at big shows to make a try with SmartBrick. Running only one train with your phone or controlling a whole layout with one screen - the decision is up to you. Video of the functions described above:
-
Hello! This was my Halloween MOC. It uses a SBrick to control 4 functions: - White light - Ultra-violet light - Fog - Minifigs rotation The white light uses a regular LEGO Power Functions Light pair. One LED is inside the pumpkin at front, the other one is bellow the floor, pointing up. The ultra-violet ("black") light uses 3 home made Power Functions UV pairs, with UV LEDs. I'm using a rectifier bridge and two 100 Ohm resistors to drive the LEDs, a circuit identical to LEGO PF Light pair. 2 pairs (4 LEDs) light 4 torches in the left and right walls. I put the LED inside a technic 1x1 brick with hole, behind the trans-neon-orange flame to hide it (black light sources are also blue light sources). Some UV passes trough, not much but I complete it with another pair (2 LEDs) bellow the floor, pointing up. There is a fifth torch in the back wall, without UV LED behind but still glowing a bit, like the spider in the left corner. The fog cames from an home made fog generator. It uses a kantal wire to heat glycerole/glyrecin, like the smoke generators used in in model trains as also most e-cigs. Has a silica wick that takes the glycerin from a small tank, enough for more than 30 minutes of work. The fog is not spreading allover the MOC as I intended. I might add a small fan later. Finally the minifigs rotation uses an old 9V micro-motor. No gears so it turns to fast :( Everything is powered from a LEGO Power Functions LiPo. You can see most of the electronics in this photo of the base while being assembled:
-
I just unboxed by first SBrick this weekend and this note provides a review of my experience thus far. First let me start with the background. I was fascinated by the development and release of the SBrick last year. It looked REALLY great, but I thought to myself, "while I'd love bluetooth controller, it looks great, but I don't think I could justify $60+ to replace IR if I only need one output." Of course there are a lot of people on this forum building their own homebrew bluetooth receivers, while they look incredible, these self-build receivers are way beyond the reach of my time resources right now. Yet, from long before the SBrick came out, I have been struggling with power issues in my two long passenger trains. The first train is my Superliner train with 7x 52 stud long cars, a dummy F40 and a powered F40 with a pair of PF train motors. The second train is my North Cost Limited with 8x 42 stud long cars, and an A-B-A set of locomotives (one powered with 2 PF train motors, the other two dummies). Examples of both trains taking standard lego curves can be found in this thread about a now aborted project to build wide radius curves. I made a 90° R88 right before ME announced their Kickstarter (man, that would have saved me a lot of time if I had known it was coming, but I'm still a happy man for the ME curves). Both trains predate the ME curves and I now have R88 and R105 curves (which both trains love and can take at full speed), both my permanent layout and my club's layout are both 9v, so I also want to be able to operate with the legacy R44 curves. I have had no power problems with the IR receiver powering a pair of XL motors and pulling VERY HEAVY trains (50+ cars in some cases), however, the combination of the train motors and these too heavy passenger trains taking multiple curves is just too much for the IR receiver. The original IR receiver can handle one 90° R44 curve without complaints for either train. Sometimes my club layout is large enough that I can use the full consist, but other times I have to set cars out if the straightaways are not long enough. As soon as the train is long enough to be in two curves the drag overpowers the IR receiver and it trips out for a few seconds... only to come back abruptly at full power and pull the magnets apart (in spite of the additional rare earth magnets). [Of course at this point in the review it is premature of me to say that it was the IR receiver that was tripping out, it could have also been the battery or the motors... but based on what I've found with the SBrick, it was the IR receiver. Anyways, back to the original timeline...] So for an upcoming show one of the other club members was talking about bringing 8 pf trains and letting the kids run them with IR controls. That is way cool and I think will be a huge hit with the crowd and the venue... but not so good for my running pf myself. For this show I don't want to do 9v (we are doing this one "just trains" and it will be our first show "on the floor"). So what's a man to do? Then I got to wondering about alternatives for IR in general, and higher power in particular. That was when I discovered that the SBrick can deliver up to 3A while the standard IR provides about 1A and I think the v2 provides up to 1.5A. I needed no further convincing and got one to give a try. I unboxed it two days ago. The first think that is clear, you need an account on the sbrick servers to configure your receiver. The SBrick folks have videos on line showing how to configure the software, but you first have to sign up for an account. This part was one of the things I did not like. Rather than simply offering a receiver, they are offering a social networking site that you have to pass through before you can get to your receiver. Not a huge deal, I just found the social networking a minor annoyance. It only took 5 min to turn off 20+ "share this" options, an equal number of "notify me when" options, and switch my profile to private. I'm sure many will find it a nice bonus, but for me I don't plan on spending much time on the SBrick site. I just want a plain vanilla train controller. This point could also be an issue in 5-10 years if they stop supporting the SBrick, but if it works it is worth the small risk for me. Once you have your account and the SBrick app you can go to the profile market... but none of the controls looked like the met my needs and what little documentation there was did not clarify things for me. So sooner than I had expected, I was off to design my own graphical user interface (GUI) on the Beta version of the designer site. First drawback is that it appears the site only works with Chrome or Safari browsers (not a problem if you already use one of those, but another minor nuisance if you don't... and here too, once I get my GUI working, I don't plan to spend much time on this site either). I was not able to find much documentation on the GUI design, so here's what I discovered: (1) I think you need an "exit" button to quit your control, at least the default GUI has one, it is a special object class and since it seems like a generally desirable feature I did not feel like exploring whether you can do away with it. (2) As I recall, there were three other types of objects- a 2D slider control, a 3D joystick control, and a push-botton. (3) While it was not apparent to this newbe, you do not define which specific output each control is set to (the SBrick has 4 outputs). Instead, you come up with a name for the particular output. I wound up using a single 2D slider and named it "throttle". (4) There are a lot of control settings you specify (or accept the defaults): min power, max power, default start position and power, "snap back to default start position when control released (like the non-train PF controller)" or "hold the last setting when released (like the PF train controller)". It takes some trial and error to get all of these settings to your liking. Each time you want to make a change you need to tweak the GUI layout in your browser, then download them to your device, then tweak the settings on your phone/tablet (more on that in a moment). It is nice that you can scale and position the various control elements where you like on the GUI layout. I think you can include multiple SBricks in the layout too, so a single controller could easily have room for 4+ trains on a tablet and 2+ on a phone. (5) It looks like the GUI is infinitely customizable, they offer 6-12 options for button styles, slider styles, background styles, etc. or you can upload your own artwork. (6) Unfortunately it looks like each GUI design is aspect ratio dependent, presumably to preserve custom artwork. So the GUI I designed for my phone was not available on my tablet and I had to redo it for the tablet at its aspect ratio. Here too, not a big deal given the simplicity of my controller. It's a bit like programming your microwave for the first time. It would be nice if they also had a "universal layout" option that could be used on many different platforms, by shrinking it to the most constrained dimension... maybe in the future. In the mean time, it would have been REALLY nice if they had an option to copy an existing GUI so that you could adjust it (if that option is there I couldn't find it). None of this is a deal breaker for me, just be prepared for a small learning curve as you get up to speed with their system. It took me an hour or two to get to a point that I was satisfied with. With your GUI designed or redesigned in your browser, you then go to an option on the SBrick app to go to the profile market to download a profile. Once downloaded the profiles are stored locally, so you could design a single throttle control in the GUI and then in the SBrick app make variants for several different locomotives, each with their own SBrick. Or as noted above, you probably could also make a single controller that controls multiple SBricks. One minor annoyance to me was that every time you went to the profile market it first insisted on loading all of the standard GUI options (none that I wanted) before it allowed you to get to your own GUI designs. Once the profile you want has been downloaded to your device, you then go to "my creations" to actually associate a GUI with an SBrick. I think you have to have the given SBrick(s) on initially so that your device can sync with the SBrick. Then you go to the configure page for the creation and this is where you tell it to associate the "throttle" in the GUI design controls with one or more specific output(s). I decided to use the Superliners as my test case since this train has more drag (heavier and longer cars). Since I have two motors I decided to put each on a different output from the SBrick. They were previously on a single output from the IR receiver. Not sure if this makes a difference on the SBrick, but it was easy enough to set the throttle to control two or more outputs. There are also virtual pole reverser switches similar to the little switch on the IR controller. Then you are ready to run your model... well... as they recommend, try it first to make sure you have the pole reversers set to the direction that you want. In my initial design I wanted a "kill switch" like the IR train controller in addition to the throttle. I could not see a way to associate two control elements to a single SBrick output, so away went the kill switch. Usually hitting the exit button will kill all motors, but not always (here too, more on emergency stop in a moment). I started with letting the throttle range from full reverse to full forward, but I found that getting it to stop at no power was very difficult. There was no "snapping" to zero. Since the Superliner and North Cost Limited are effectively one way trains, I made a second controller that is limited between zero and full power (no reverse beyond "hand of god"). So I can easily flick it to zero without worry. There might be away to fix this, but I haven't found it yet (remember, I'm a newbe at the SBrick). So I first had the model running with all of the PF innards exposed and it ran great. No problems pulling the entire train through two 90° curves and a small S-jog all at once. It ran for at least an hour with now power drops. So that's how I knew it was the IR receiver that was limiting me before, the IR receiver would not survive when the train was in the two 90° curves (R44). So at this point I stuffed all the PF wires inside the model and put the roof back on. Of course now it started misbehaving. !@#$% did I drain my battery so quickly with the heavy load? The IR would run for a few hours. Nope, that wasn't it. After some trouble shooting I realized that I had inadvertently knocked one of the connectors off when reinstalling the unit after testing. So only one motor was getting powered. As a result, the locomotive would stall once the train was in two curves. Apparenlt without intending to do so I discovered that the SBrick has a much nicer overload response than the IR receiver. The train sat there and the engine did not jet off at full speed, it did not move at all until I rezeroed the controller. In fact the single powered motor was strong enough to pull the train in a single curve with wheels spinning while pushing against the dead motor. Once fixed, I didn't even have problems starting in the most twisted part of my layout. That was when I decided to see how far I could push it. At the moment I have two single crossovers in my layout (I've been playing with the PF trains). So the train effectively went across two switches, through a 90° curve, then through two more switches back to the original track. It was as the locomotive was returning to the main track when it overpowered the rare earth magnets. So more than enough pull and something else failed before the SBrick was pushed to its limits. Now here's where I learned another important feature of the SBrick. Once I set the train running, I could go to blank screen on my device and the train would still run. Nice, you don't have to run down the batteries on your device to keep the trains running. My trains are in the basement and I went to get something upstairs. At one point in this trip there were two concrete walls between me and the train. When I returned the train was stopped. Did that stinking battery finally run out? Nope, it started right back up when I hit the SBrick controller. Okay, what happens when I turn off bluetooth on my device? Train stops. Cool. Lose contact with the controller and the SBrick stops. Turn bluetooth back on and the SBrick responds immediately to the next command. So there is a potential emergency stop if the exit button does not do it for you. So needless to say, I will be buying a second SBrick here in the near future for the North Coast Limited (hum... maybe I can build some of those other cars that I was forced to leave out for the IR receiver). For now I'm going to stop at two SBricks. It is nice to be able to completely hide the receiver, but probably not worth the extra $45 for me given the number of PF trains that I have. The extra power, however, is definitely worth it if you need it.

