Search the Community
Showing results for tags 'WIP'.
-
I'm hoping I've posted this in the most appropriate forum location. My son and I have been playing Garden Warfare quite a bit lately, and I've been a fan of PvZ for some time now, so I figured it was time to make some large scale lego versions of the characters. These are still a work in progress, and I've so far only built 4 out of the 8 playable classes (I'm just doing the base varients of each class, at least for now). So far I've built the Cactus and Sunflower for the plants, and the Foot Soldier and All Star for the zombies. I'm currently working on the Chomper plant. I will be re-doing the Footsoldier's gun as it's not very good. The Foot Soldier's body needs a bit of work also. Sunflower probably needs to be a little taller too. Zombie All-Star joins the PvZ team by Sam Wright, on Flickr Comments and suggestions are welcome. Thanks :-)
-
General MOC-Discussion Ahoy! Ever felt like there's not enough general talk going on here about what matters most in these waters - MOCs? Ever got frustrated over a certain issue with a WIP that you could need help with? Ever thought about posting a WIP but didn't think it would deserve its own thread? Ever wanted to announce a huge, mind boggling, or simply your next project and ask your fellow EB members what they think about that idea? Or have you ever just felt the urge to tease everyone with a blurred picture of your creation or some facts about it before releasing it for good? Well, hesitate no further, this is the place for you! Use this thread as a vessel for all the otherwise unmentioned MOC related talk, use it to discuss sail sizes and capstan designs, ask for ideas, help others with their MOC issues and tease your fellow mateys... with pics of your creations, of course
-
 For a while now, I'm working on a crawler crane. As discussed elsewhere, progress has stopped and this topic is an attempt to jump start the build again and finish it so it can join my collection. So here it goes: The project started with the launch of the 42042 Crawler crane and was a simple MOD at first, but quickly evolved into two MOCs. It didn't like the proportions of the body and cab of the 42042 and wanted to add some features like expandable or removable tracks. The first LDD sketches looked something like this: As some will probably notice, at this point I was still considering to make its larger brother the Liebherr LR1250 as well as a HS855HD. The LR1200 plan has been dropped, because it was simply a bigger version of the 8288 and brought nothing new. During my research, I found the HS855HD was more interesting, because it's a so-called duty cycle crane, a very versatile machine designed to do repetitive tasks efficiently, for example dragline work, soil compacting, (un)loading bulk materials etc. One of the consequences is the fact it has a free fall function on some of its winches, making it possible to drop the bucket or tool to either save time or to provide impact force (you can see this feature in and ). This seemed a nice function to try to implement in my MOC.After a few trial and errors, I came up with this internal mechanism: (The newest clutch parts are not used yet in this image) The controls are very similar as in the 42042: each winch has one switch with two positions: one for winding up the winch, one for winding it down. It is powered with the L motor of the 42042. My addition is the clutch system (in yellow) for the green and blue winch. Push the lever and the winches are simultaneously disconnected form the rest of the system and will unwind under the weight of the tool attached. Releasing the lever will allow the spring to re-engage the yellow clutches, linking them again to the drive. Meanwhile, I also wanted to capture the looks of this machine. It has linked manual expandable tracks, a tiltable cabine, and a inspection hatch. This is the current state of the tracks and body: At the moment, the bottleneck is the fact that the clutch system has too much back-lash or too much play to fully disconnect. I need to move the spring closer to the lever I think, which is rather challenging due to the compact build. Another issue to be solved is the expandable tracks which seem to snag on the chassis when under load. I would like to make my MOC as versatile as the real machine and design the parts to convert it in a dragline, double hook, clamshell bucket or foundation excavator configuration. To be continued ...
 -
I'm currently working on a Modular Hospital MOC in LDD. These are the results so far (rendered using BlueRender): Birds perspective: Front view: Inside view: About the model: The lower right wing will be a garage for an ambulance (hence the barrier on the sidewalk). On the opposite side, lower left, there is a gift shop with flowers, balloons and a teddy bear. Across the gift shop will be room for an elevator. At the main entrance (those are sliding doors) there is a reception/desk. The second floor contains a room with two hospital beds (one currently containing a patient). In the other wing an operation room is situated along with minifigs of a surgeon and a patient. The rest of the second floor I don't have planned yet! I'd like to hear your thoughts and comments Also, first post here! YAY!
-
 About 5 years ago, rumours were around hinting at a new supercar positioned between the 911 and 918 Spyder. Some dubbed it the "914.5", coming from the mean of the two model numbers. Unfortunately, such a car hasn't yet arrived, and I plan to solve that problem. This will be the true "Dream Porsche", taking features from both the 918 Spyder and the 911 Targa. It will combine the hybrid all-wheel drive and 4-wheel steering of the 918 with the iconic rear-mounted flat-6 engine and roof of the Targa. Here are my definite features: Flat-6 engine mounted in rear 8-speed paddle-shifting manual gearbox (connected to piston engine, driving rear) Fake electric motors "driving" the front and rear (as in the 918) Full independent suspension with camber angle, castor angle and adjustable ride-height (independent adjustment for each wheel). Not sure where the ride-height controls will be - probably under the front hood. 4-wheel steering (as in the 918) operated by the steering wheel. Opening hood and locking doors. 2 seats inside. Folding roof modelling the 911 Targa's mechanism. Here are features that I might add if I have enough space and parts: Brakes - not sure how these would be operated if they get added. A PF Large motor and battery box to drive the front axle. Like the 918, the front is single-speed. Unfortunately, the only RC stuff I have is MINDSTORMS, which would be too bulky for this. Opening rear revealing the engine. The car will be 1:10 scale - considerably smaller than the 911 GT3 RS from LEGO. I haven't started building yet - I still need to add a couple of finishing touches on my current build. However, most of the "technologies" (such as an 8-speed gearbox and adjustable suspension) already exist in my current build, so this will likely be finished by mid-July. UPDATE 1 (03/07/2016): Paddle-shifting mechanism and steering wheel mount Having dismantled my previous build, I have built this compact steering wheel mount with an integrated paddle shifter. The two levers on either side of the steering wheela are paddle-shifters. They shift when pushed inwards. Here is a side view: Each paddle makes a lever move downwards and hit the cross-shaped element. I initially used a knob wheel, but it was too small for the lever to make it advance far enough. When the lever extends, the cross rotates about 75 degrees before the lever blocks it from going any further. When the paddle is released, the lever retracts and allows the cross to rotate the final 15 degrees. The paddles have rubber bands to make them return to their original position when released. The part with the wedge-belt wheels can slide a short distance. It too has rubber bands - this makes the cross "snap" to the nearest 90 degrees and provides the turning force for the final 15 degrees of rotation. There is also a universal joint - this is connected to the steering wheel.
 -
Here I present to you my Grand Hotel Ocean View - work in progress. That is the outside facade is ready, but I still need to add the interior and the roof garden. Inspiration to this came from last years summer holiday. And then the friends hotel came, and I bought it and used many of its elements. But alas, to build a hotel is such an undertaking... The project plan got delayed. It is still WIP and the interior needs to be added. And now if I'm not careful these agents start sending the tourists already. I know some of you have been awaiting this, so here you go. Tipps for interior appreciated. The forefront can be nicely integrated into a Grand Esplanade. The palm shaded garden side invites to have breakfast outside. I'm not yet decided what shades to use for the rooftop. And of course the gardeners have lots to do still. The belle etage has lofty rooms with a balcony each and ocean view. Rooms are flooded with beautiful sun light. The impressive carpet for the Great Hall has been delivered, but the clerks are missing their desks. Of course the MOC is modular and can be integrated with other Lego City buildings. C&C welcome. Some more pictures and sizes can be found on Flickr.
-
With the recent release of The Force Awakens, the seventh installment to the Star Wars Franchise (If you haven't heard of TFA, I wouldn't be surprised, almost no advertising and no merchandise was made for the movie), fans have been in love with the newest droid, BB-8. The new look to the droid caused many Lego builders to desire their own, and HenrikLego did just that. Totaling at nearly 11K pieces, Henrik built an enormous droid for a local theater of his, and even included the local community of AFOLs with an LDD file for it. His original topic for this MOC is here: http://www.eurobricks.com/forum/index.php?showtopic=116949&st=0 After seeing it, I immediately wanted one of my own. After an incredibly long and difficult debate with my wallet, I decided to pursue my own BB-8. Using the LDD File, I generated a parts list for bricklink totaling 10,909 pieces. I looked over the parts needed for this and took note of some of the nuisances. White Brick 2 x 4 (1184 needed) - The part itself is not all that rare, but getting it in new condition (Getting White Bricks in used condition is a nightmare) in that quantity was a challenge. It ultimately ended up costing me 25 cents per brick. White Plate 1 x 2 (1385 needed) - Also very difficult to get in large quantities, but I managed to find it for about 10 cents per piece. White Plate 1 x 3 (527 needed) - It always seems like 1 x 3 plates are a pain to obtain, this was the case here. About 15 cents per piece. Orange Plate 1 x 8 (25 needed) - I did not imagine this piece being very rare, but I ended up placing about 5 orders for it, despite it being cheap. About 10 cents per piece. White Plate 4 x 10 (24 needed) - The large quantity drove the price way up. 48 cents per piece. White Plate 2 x 2 Corner (374 needed) - Once again a hard to find piece that I never would picture as rare. About 12.5 cents per piece. That rounds out the worst bricks and pieces for me, the rest are not very difficult to find, but prepare yourself for about 11 cents per piece, I optimized smaller amount of orders over saving a few cents per piece because shipping charges really drive up the final price. To date I am glad to say that I have ordered all 10,909 pieces, just waiting for them to arrive. However, I have not started designing a desert base for BB-8, I need to work on this ASAP. Once the pieces come in, I of course will have to count them (I am not looking forward to this at all, but more and more it seems that bricklink sellers don't have the ability to count) and check off that everything is in my possession, including parts for a base. I hope to keep you guys updated as much as possible throughout this process, but for now I need to explain to my wallet why an enormous chunk was taken out of it.
-
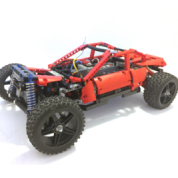
 I have always wanted to build a 8x8 or 6x6, I recently acquired 10 62.4x20 tires, so now I can get to building a multi-axle vehicle. I also purchased a Sbrick, this will allow me to control my models at a greater distance outside. So I wanted my first model with a Sbrick to be special. The M8 Greyhound is a light armored car, that is mainly for scouting roles and mounts a 37 mm gun for supporting fire. When designing the drivetrain, I wanted a functional suspension system, and differentials. I attempted to replicate the real setup with staggered differentials, but this failed as there wasn't enough space, so I was forced to use a similar axle setup of the Arocs, as this is rather compact, but because of the height of lego springs, this made it very difficult to mound more than one L motor. I initially wanted this to be powered by two L motors, with a 1:1 ratio between the driveshaft and the differentials. Because of the height of the suspension, the roof of the engine deck will be very close to the top of where the shock absorbers are mounted. This has created a very interesting challenge, The low profile of the vehicle severely limits the area where I can mount power function elements. My progress over my short easter break is shown in the images below, I won't be able to continue progress on this model until the end of April, as that is when college is finished. Real vehicle Lego M8 Greyhound 6x6 Armored car WIP (RC) by Tommy Styrvoky, on Flickr Lego M8 Greyhound 6x6 Armored car WIP (RC) by Tommy Styrvoky, on Flickr Lego M8 Greyhound 6x6 Armored car WIP (RC) by Tommy Styrvoky, on Flickr Lego M8 Greyhound 6x6 Armored car WIP (RC) by Tommy Styrvoky, on Flickr Lego M8 Greyhound 6x6 Armored car WIP (RC) by Tommy Styrvoky, on Flickr Lego M8 Greyhound 6x6 Armored car WIP (RC) by Tommy Styrvoky, on Flickr Lego M8 Greyhound 6x6 Armored car WIP (RC) by Tommy Styrvoky, on Flickr
 -
 Hello, and welcome to my minifig-scale bottled city of Kandor! This is the first MOC I've posted on EB, so be gentle. Or harsh. Or honest. EDIT: I may update this later, as I keep building, or take better photos This is part of a much larger Fortress of Solitude project I've been working on since forever (hence WIP, or work-in-progress). Please excuse the dust, dog hair, bad lighting, bad photos, etc, etc, ad infinitum. I'm only posting because someone asked how I did it, and because I really like some of the work I've done and am keen to share it, even if I'm not in a position to take decent photos. Or dust thoroughly beforehand. Seriously, my dog sheds a lot. It's a problem. On with the show. Here's some shots of the city, still bottled. Each shot is a 90 degree rotation clockwise from the previous shot. And here it is out of it's bottle. As you can see, the city is built on a 2x3 plate for a base, and fitted into a 4x4 (round) space, offset using two jumper plates. This is pretty tricky. The top of the cylinder, when assembled, only has a 2x4 opening, so you can't simply put the city inside the bottle. The opening at the bottom is the same 2x4, so you can't attach the 2x3 city then add the half-cylinders because the city overhangs on at least two sides. The easiest way to assemble it all is to add the two 1x2 jumpers to the bottom of the city's 2x3 base, then hold the cylinders around the city, so that the cylinders grip the jumper plates and form an even surface. Then attach the assembly to a 4x4 (round, or not), making sure to apply pressure to the half-cylinders AND the city itself. This can be frustrating, especially if the city isn't stable enough to withstand the pressure put on top. For mine, that longest spire is a perfect place to apply pressure and ensure solid clutch-power on the bottom. As for the city itself, well, you have tons of options. I went for the white color-scheme, to match the general aesthetic of the 70's movie version of Krypton, but plenty of depictions of Kandor/Krypton have color, so it all depends on what you want. For my project, I just started grabbing all of the tiny white pieces I could find in my collection and started throwing them together, finding pleasing arrangements, hoping to suggest micro-scale alien architecture. This is the fourth version or so that I came up with (though I think I liked the second version better, it is lost to me now). Here's some shots without the bottle, each one turned 90 degrees clockwise, as before. As you can see, there's all sorts of tiny bits in there, lightsaber hilts (attached vertically using a 1x1 round w/ pin), a lever-base, cheese slopes, a skeleton arm, some minifig hands, and lots of SNOT building on a 1x1 brick with studs on 4 sides. There are so many ways you can configure this stuff, it's nuts. I actually just acquired some white minifig skis that I'm hoping to incorporate soon. The only restrictions are to the inside of the cylinder, which leaves some room to build past the 2x3 plate-edge on the short sides, making the city more rounded in appearance. Spires also need to be position to fit through the centered 2x4 gap at the top. That's it, really. If anyone has any questions, please let me know! Now that that's out of the way, here's some shots of the Fortress itself (very much a WIP), and a couple of other goodies. A wide shot of the base and half of the outer Fortress, with Kandor sitting in front for size-reference: Pictured are four spires, individual constructed and attached at the base. The spires are built using a core of standard bricks and technic bricks, strategically placed so that the outside can be plated and tiled in various places, adding to the crystalline look I'm going for. Here's where the spires attach, using some technic pieces, so that the spires are able to swing open, allowing access to the interior (which is fairly non-existent at this point ) The spires are built with some overlap, so that, if you raise the first one, it catches the second, and so on. When closing it up, the last one catches the next-to-last, and so on. Aaaand, this is the point at which I stalled out on the project. I want to incorporate some gears so that the entire structure can be opened and closed using one crank/gear. But I'm not a Technic guy. I came up with a simple enough lift system, but the spires are too heavy for it to work smoothly, or well, or at all really. I thought about redesigning the spires to be more hollow, thus lighter, and I thought about changing the way in which the spires interlock, and I thought about changing.....etc. So yeah. That's why there's a year's worth of dust on this monster. I should get back to work soon. Again, criticism, thoughts, and ideas are all welcome. Here's a case of kryptonite that would go somewhere inside, though I'm not entirely happy with it, simply because glass isn't enough to save Superman. It'll have to go behind lead, but then we couldn't see inside, so I'll probably add a vault for it to go in. Eventually. And last but not least, my Phantom Zone projector. I styled it largely based on the Superman: The Animated Series version. It is able to tilt up and down on the stand, or detach completely so that Superman can fly around with it and zap anyway who annoys him. Like Jimmy Olsen. Damn that Turtle Boy! A picture here would be good. #FAIL Phew, I'm tired of writing this post, so I guess that's it. Thanks for checking it out!
 -
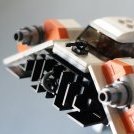
The Imperial Speeder Transport (not sure if it really has a name but this sounded good) from the Heir to the Empire comic book has always been one of my favorite speeder designs. Here is my take on it. Next step is to work on the underside and then flesh out the interior and controls. The front wind vanes are the one part I am not happy with so far. looking into other designs. imperial-speeder-front-quarter by James Eilers, on Flickr imperial-speeder-profile by James Eilers, on Flickr imperial-speeder-rear-quarter by James Eilers, on Flickr And the reference images from the comic

-
I finally have some time on my hands to continue my WIPs but I am confronted with a huge amount of unfinished work. My MOC list contains dozens of Technic projects, ranging from nearly finished to just an idea. I heard the saying here that MOC is never truly finished, but I have some difficulty in reaching a satisfactory result in my projects: I typically grind to a halt when bumping into a problem I can’t immediately solve. I put the project aside at this point in search for inspiration, but this small delay often turns into weeks and months (in some case even years). In other words, I’m a great starter of Technic projects, not so great at actually completing them. When this happens in my professional life, there is always external pressure in the form of a project leader or deadline to push me over the bump. In MOCing however, it is just me. This leads me to my questions to you, fellow MOCers: Do you recognize the lack of motivation/energy to finish a MOC? If so, do you have tricks, methods, deadlines, etc to continue and actually finish? (related to B) Do you find that the community helps you in continuing your build process, for example with a WIP thread on a forum? Very curious about your experiences and tips.
-
One of the several projects and great MOCs to come, which I have been designing recently in LDD—the AT-ST walker. In brief, this project was initiated after I was inspired by the original design of the waist by anothergol for his articulated AT-ST. Specifically, I was impressed with his subtle utilization of paint brushes and mudguards to easily recreate some of distinct details and features on this region. In addition, I as well, implemented the 5 x 5 scala dishes as the mounts for the support cannons. Then interestingly, I did not notice this until recently, but structure of the feet are designed similarly, with significant use of bracket elements—what a coincidence! However, mine will most likely not accommodate minifigures. Since there are different models of the AT-ST used in the movies and many illustrations of the AT-ST, the principal image I reference is the blueprints of the walker from ROTJ, which was a hybrid of the model actual seen in that movie with a boxy head and the one featured in ESB that had elongated legs. Regarding the design, I took quite a bit of liberty with some of the proportions and details. Specifically, the legs are thicker than should be for a minifigure scale AT-ST, which is lightly attributed to the available elements, but to also an exceptionally sturdy design—it is sophisticated yet simultaneously subtle. Likewise, the waist significantly thinner as compared to the legs and head importantly. This is reason to the length of the mudguard used as the carapace being 2 x 4 rather than conveniently being 2 x 6. Besides the absent connections in the head, as I have yet to design that, the fragmented legs is because those elements are not available in LDD. Lastly, since I could not utilize BlueRender, because I happen to not know how to operate it on Macs, even though I read the tips, I alternatively made an LDD photo box that is comprised of 48 x 48 base plates, hinge plates, and curved bricks :-) Forward view: Rightward view: Rearward view: Leftward view: Downward view: Dramatic view: If you notice for the main cannon, I used the flexible bars, which are hollowed at the ends. Leg details: Brackets are the fundamental element for durable legs. Foot details: Waist details: Brackets are also fundamental here.
-
Its been a looong time...
-
 Hi all. I am starting this thread in order to have all never finished MOCs, or of lower quality creations that are not that what they were planned to be, cars without bodies, trucks without arms, weird things without more weird things, etc., and my other Technic-themed activity in one topic. In the initial post I'll add a link to my Flickr Photostream - there are all my creations and Lego themed photos - finished or unfinished MOCs, technic, space, and some drawings of non-lego cars (for more drawings from me plase visit this link (dA)) _________________________________________________ _________________________________________________. The first image section is my second attempt (my firs one: https://flic.kr/s/aHsk5RN6rp) in creating 3axle truck with red panels. Direct inspiration to build this one is the 42043 MB Arocs. This truck is the similar scale as the TLG's attempt, it uses nearly the same rear axle, very similar steering rod, and the same cabin-tilting geometry. What's more, it's engine is also I6. On the other hand, my 3RedAxles 2 is 6×6 (unfortunatelly, not enough reliable), and all functions are controlled manualy from separate knobwheels - wait, this is more con than pro... Next that could have been better is the crane arm - it is horrible here, but it works - and I wanted just to try to build something that could be folded like the real thing - to test the geometry. Well, the only thing I am satisfied with, are the headlights, and look of the cabin (that is very inspired by 8258 Cranetruck. More photos: https://flic.kr/s/aHskmtVNb2 Hope you like it ;)
 -
Im hate mixing those anime eyes with normal lego eyes and I know others do, Ahsoka Tano Hondo Ohnaka Aayla Secura Ki-Adi-Mundi Shaak-Ti more to come
-
Yes, I'm starting another WIP. This time, I'm working on the humongous snake that was the focus of Ninjago's second plot arc. And as with the Tiger Widow, I'm trying to make it show-accurate. The eye. I'm trying to keep this simple but effective. I'm not entirely satisfied with the pupil, however. Any ideas on how to approximate the fang-like curve better? Here's the fang, with a minifig for scale. It's a big snake . Since I'm not going for buildability and instead trying to pretty much make a LDD puppet, it's going to have joints everywhere, mouth, frill and incredibly long and noodle-y body. Expect 35+ points of articulation . Comments and criticism appreciated! Gallery
-
Like most people I was pretty excited when 75137 Carbon Freezing chamber was first announced. Like most people, I was also pretty disappointed to see the 'finished' set, which looks decidedly unfinished to me. After getting the official set, I started playing around with a few modifications with the bricks I had to hand with a view to extending the set to at least half the octagon. Although this added to the scene, it was still well below par in my eyes. I was lucky enough to find an eBay seller with two sets available without minifigures. They saving a postage meant that I managed to get the sets for £6.50 each so I was pretty pleased with the bricks I now had to work from... 3 complete sets. My first effort kept the original (and pointless) lowering mechanism in place, which meant that two hinged sections had to be included. I made the folding sections the segments with the control panel on. I also ditched the lift immediately. With the two control panel segments, it was possible to flip them out and lower Han, but the segments did not sit totally flush when closed, so I decided they had to go! From the pictures I found, the chamber does have dual control panels, and I also picked up another cheap Ugnaught, so the panels stayed. The completed octagon now does not open but is massively more sturdy because of it. Completing the octagon drew almost exclusively from pieces included in the 3 x original set, with only a couple of additional pieces (namely a few smaller plates, tiles and a couple of 6054852s). I decided to include a rising staircase - famous as the starting point for the Father-revealing duel - but also included 2 additional staircases as this is one part of the original set that actually looked pretty good. Some pictures... Of course I had to check it out with a few of the OT faces filling the platform (biggest problem here... no Lando or Bespin guards, but at least the advent calendar should help with that problem). The next issue was the fact that the freezing platform no longer worked via the original mechanism and I now had limited room inside to rework it. After all manner of lever systems and rack and pinion set ups, i finally just decided on a simple sliding trapdoor style mechanism. By simply pulling on the original shaft, the platform (which is on a tall pedestal) simply drops down through 2 steps. You have to raise it again by hand, but it enables perfect poisitioning for recreating the scene with what could be described as a 'play feature'. My final issue with the set is the lack of the clamping claw that brings the carbonite block up. This section is still a WIP but I thought I'd share my progress so far. I didn't want the roof and claw section to actually be attached to the set as I felt it would hamper access a bit, so I designed it to be free-standing. The main issue is that it's extremely top heavy, but I've finally got a stand with a Y-shaped base that works, it just needs a bit of tidying up. The top section folds up to allow access when it is in position, the clamps open and close and the whole thing also spins. I'll update photos when it's done and does require the hand to hold it in place! Best of all, from the original sets, I still have all this left over! All comments and suggestion happily received! Thanks for looking!
-
 Well, I've got a bunch of ideas and other random things, as I am building more often, so rather than make a dedicated thread for every off the cuff thing or proof of concept I turn out, I'm just going to compile it here. The first item is a proof of concept chassis for a Gottwald crane, which I meant to be an AK-912, but there are many different models that have a similar chassis, including the AMK-1000, and the AK-680. It's a WIP, but I have other projects I want to finish first, so I made this, and am currently working on an LDD file. Once that file is finished, this thing will be taken apart, so I can use the pieces for other projects, and once I am ready to give this my all, I will use the LDD file to rebuild it. Gottwald AK-912 chassis. by Saberwing007, on Flickr The model is meant to be like an official set, like 42043, meaning one motor, and no RC. The chassi has a V-12 engine, like the real thing, and 8 wheel drive, with a single middle differential. I found that given how far apart the axles are, a differential is required between the 2 sets of driven axles. The different angle between the steering axles is achieved by a diagonal beam, which is very effective. There is almost no backlash, and the axles are in sync automatically. Also, due to how it works, the axles are set to the correct angle relative to each other automatically, due to how it is built, without any calculations. Another picture of the front unit: Gottwald AK-912 chassis. by Saberwing007, on Flickr In addition, the chassis can be separated into three parts, like the real thing. Seperate by Saberwing007, on Flickr Although the steering on the front and rear units works well, it's connecting the two that has proven problematic. I blame lack of stiffness in the middle reversing linkage, and using friction pins for every steering connection. But, for now, this is finished. I will get back to it later, I don't know how much later, though.
 -
I was fiddling about a week or so ago and decided to build a mini Imperial Class Star Destroyer and Victory Class Star Destroyer. They both feature in my exciting Shadow of Nal Eurbrikka introductory build that you can check out here if you so wish: Sacking of Clak'dor VII Back to the starships. I had a lot of difficult getting the triangular section beneath the engines without breaking the perpendicular line between both upper and bottom hulls. I decided the upper back triangle and engines were more important. If anyone had any suggestions please I would love them. I plan on also building an interdictor class and tartan patrol vessel to scale with these two. As usual all comments, critiques, and suggestions are welcome. If you wish to see more MOCS somewhat like these feel free to visit my Flickr Photostream Thanks for viewing
-
 Greetings! After coming out of my Dark Ages and tackling both the excellent Ultimate 8043 & 42009 (see below) designed by Jurgen Krooshoop, I was hungry for another Lego Technic challenge. But I felt rather lost at this point: without a large collection of loose Technic pieces at my beck and call, motorized MOCs which weren't heavily based on existing Lego sets would require some hefty Bricklink investments from my part. Fortunately, a fifteen-percent-off-everything anniversary sale at a local toy store with an expansive Lego section made the choice for my next project a lot simpler: they had the 42043 Arocs set that had already been calling out to my wallet since way back in oh-fifteen. They also had a certain little gizmo called an SBrick in stock, which I had heard quite a few things about. My previous builds had involved standard PF receivers and remotes, so it seemed like an interesting new challenge to incorporate this new-fangled blue-toothed thing-a-ma-jig into my already-slightly-more-challenging attempt at "RC-afying" the Mercedes. I'm already a little way into the project, but I've already made a few false starts and moronic missteps, so I figured it might be educational for others to document my frantic flailing about experiences, so that they might avoid my (myriad) mistakes. The first thing I did, of course, was to order the necessary PF components: a Servo Motor, an L-Motor, an 20cm extension cable, and a couple of PF lights. In hindsight, this already turned out to be my first mistake: I hadn't done my research properly and hadn't realized that the SBrick requires an extension cable to be hooked up to a battery box. This meant I was probably going to be one cable short, since I didn't think the cable for the L-motor used for drive would reach. While I waited for these crucial parts to be delivered, I began preliminary work on the Arocs proper. After completing most of bags 1 to 3, I had three loosely connected main sections of the truck - the cabin housing the 6-cilinder engine and the L-motor that came with the set, the gearbox with the outriggers, and the rear section with the dumping bed and the differentials. In my mind, I could already see a problem arising: there was a drivetrain going from the rear wheels all the way to the engine in the front of the truck, which would obviously make the pistons move as you move the truck along. I already guessed I would be severing this connection by remove the driveshaft with the CV joint and attaching an L-motor in the center somewhere. Which would render the engine, the drivetrain, etc. utterly useless. This was not acceptable - not in the last place because my kids had unanimously decided that seeing the pistons in my 42009 mobile crane move was officially The Coolest Thing Ever™. So I fiddled about a bit before connection these three main sections, and eventually came up with this: Might be a bit hard to see, but... Basically, I placed an additional small gear directly in-between the L-motor and the gearbox, which allows it to power the axles and gears connected to the piston engine when in use. So, it wouldn't be connected to the drive anymore, but at least there could be some motorized eye-candy when one swung back the cabin and fired up the main engine. It wasn't long before my motors and such arrived, so the first I tried to accomplish was to connect the L-motor for the drive somewhere. One nifty solution I'd found involved replacing the engine in the front and using the long drive-train to power the rear wheels -- a technique I thoroughly rejected for several reasons: It seemed inefficient, and COOLEST. THING. EVER. So I figured I'd just bolt the bloody thing directly to the rear diff, as I'd also seen in this fascinating and classically scored tutorial vid by RC-master PPUNG daddy: It didn't sit right with me to just attach the motor with two pins like that though, so I have attempted to support it a little bit better without messing up the way the rear suspension works too much. Right now, it looks something like this: Not exactly perfect, but it seems to work well enough, even when I give the suspension a bit of a work-out. Next came the steering. My first attempt was based on this extremely helpful Youtube video by yu shine: Basically, this involved just connecting the Servo directly to the standard HOG steering mechanism for the Arocs, just below the two orange lights-slash-knobs at the top which you're supposed to turn. It seemed the most simple and elegant and -- being but a simple soul -- this naturally appealed to me greatly. It also didn't require the purchase of any additional parts, and left the mechanically unique way the steering on the Arocs model works intact. At this point I was able to put together a sort of prototype for the RC driving, by dangling the SBrick from the battery box and just hooking everything up in a makeshift manner. After installing the app, setting up the official 42043S profile, and playing around with my handiwork for a bit, I discovered the following issues: The L-motor was supplying quite a bit of power, making the truck actually pretty hard to control. Of course, there was a lot of weight left to be added at this point, so I was willing to reserve judgement for the time being, but given that my kids no doubt want to play around with this thing as well it'd be nice if I could prevent them from semi-accidentally ramming a massive Lego vehicle into, well, practically everything. Not sure how I could address though, other than from the software side. Placing the Servo motor where it was, behind the battery box, didn't actually fit all that well. The battery box itself actually pushed up against the servo when inserted, bending it back by at least a stud, which also frustrated my attempts to secure it in place a bit further. The steering was a bit... inadequate. The problems regarding the steering I recalled Sariel already mentioning in were only exacerbated here. It felt imprecise and rather unresponsive, and it didn't help that there was quite a bit of play in the wheels even with the Servo hooked up, meaning they weren't necessarily centered even when it was. So in the end, I stripped the away the steering mechanism and the wheels up front until I was left with this: After that, I decided to pony up and order the parts which -- after careful visual inspection of PPung's tutorial -- I figured I'd still need to mount the servo at the bottom, between the two sets of front wheels. So, mostly a set of gear racks and gears, in addition to some beams and various connectors used for bracing. This also gave me the chance to simultaneously order an extra extension cable from the same supplier, since it was pretty clear I was going to be needing it if I wanted to have any hope of hooking up the drive motor to the SBrick up front. And now, we wait... Although, to pass the time, I busied myself with rebuilding the back of the cabin, which I had previously taken apart to place the servo motor. I didn't need all the gears used for the steering mechanism, of course, and I figured I'd be better off trying to mount the SBrick in this space instead. For the moment, I came up with the following: I did notice the two black Technic pins still sticking out back there, and peeking ahead in the manual revealed that these will be used to help brace the pneumatic crane, once the time comes to attach that beast. As far as I can tell, that should still be possible even with the SBrick where it is, but no doubt I'll have screwed up somehow. We'll find out in the next update, hopefully! (Assuming, quite optimistically, that there is actual interest in such a thing. )
 -
At the moment, this is just an idea - since I have two cars currently half-build, I will finish them before doing this. Expect this sometime in October (knowing me, near the end of it ). This will be about 1:10 scale with 68.8x36ZR tyres. As with all my cars, this won't be a strict scale model - I just want the car to be recognisable, functional and fast. These are my plans: Power will come from my entire EV3 arsenal - 3 EV3 Large motors and one EV3 Medium motor. These will be connected in a very strange way. The Large motor and Medium motor (geared down 5:3) are combined with an adder. This output will go into a second differential with one Large motor on each side. Each side will then be geared up (hopefully 1:9) before going to the wheels. I haven't tested this setup - I really hope the diffs are strong enough . I might need to gear up the motors 1:3 before the diff and 1:3 after the diff, but I'd rather avoid this if I can since it would mean more sets of gears. When turning, the Large/Medium combo (representing the ICE) will have to slow down a little bit, as will the Large motor on the inside of the turn. Steering will not be motorised - my plan is for the front wheels to be able to steer freely (maybe with a rubber band to provide a little self-centering) but have a high castor angle. When the motors on each side of the diff turn at different speeds, the front wheels will steer automatically. Essentially the fastest castorbot ever! Suspension is still undecided. Depending on the layout of the drivetrain and my chosen width (the math says 26 studs - I have a choice of 25 or 27), the rear suspension may either be independent or an independent trailing-arm type. Whatever I go for, I would like something that replicates the triplex suspension in the real car. Front will be regular independent, with the wheels free to pivot. Making the ride height adjustable would be a bonus. I'm also hoping to make proper Koenigsegg doors and have some space for a cabin.
-
Good afternoon everybody! Ah, Slizers. One of Bionicle's two predecessors from the late 90s. A gaggle of diminutive, poseable robots who could throw disks and combine with each-other, on a world separated into 8 elementally themed factions. Certainly an interesting line, but sadly very short lived - two waves of toys, and it was gone. One other sad fact is that not much is known of the Slizers story. Many older fans have theorised as to the true story, and I'm sure countless kids have figured out their own stories for their Throwbots to engage in... But otherwise, the presence of story material for Slizers is indubitably scant. Now, I'm a quite the fan of the Slizers in regards to their design and concept, and have always wondered what a fully fledged Slizers story could look like. I always liked the idea that the Slizers were planted on the planet in an act of experimental panspermia, and the asteroid that came later on was simply a freak of nature that corrupted said scientific endeavour. So, I wanted to tell that story, but from a 1st person perspective. And this is where Tremor comes in. This humble little 'bot was to be the main focus of an adventure on the world of Slizeron, meeting 'bots both familiar and fresh, trying to discover his identity and place on this new, mysterious world, after crash-landing in a most unfortunate manner. I began writing Tremor's story a couple of years ago on my phone, only to leave it abandoned for quite some time. Eventually, I transferred it to my computer, and it now sits in my Google Drive. Since then, I have added two short chapters, and I intend to in future add more. To start your adventure with Tremor, click here. I've set it up so that, if you have a Google account, you can leave comments on the document itself. If I make further updates to the story (which I intend to), I shall notify you all in this thread. Thank you for your interest. Enjoy!
-
 Hello EuroBrickers! I am working on a Offroad Suv (NEEDS NAME!) Here are some WIP Pictures, sorry for the flash, it was at night! Here is a better picture, TMNT Cup for scale Still needs batterybox and a better roof. AND A NAME! I will accept name suggestions! More updates soon!
 -
 Hello all: For this project I want make a car-truck that has good off road capability but is at a very small scale. Enough "talking" here are the pictures. I have the basic chassis done as of yet, and I plan to use a L-Motor for drive, a M-motor for steering, and a old 9v BB for power. Yes I know that PF parts dont work with 9v parts but I plan to use this method where you bridge the two metal parts with tiny pieces of aluminum foil. I am not happy with the front suspension because I needed to use some gears to center the drive chain The suspension is going to be live axle and probably only have one spring each. I do not know what bodywork I am going to put on it but ALL suggestions are appreciated. Expect more updates soon!
 -
 Hey all, This is the crane I'm making for the TC8 competition, a Liebherr LTF 1045 truck mounted crane, mounted to an 8x4 Scania P380 chassis. The Liebherr LTF 1045 is a crane which is factory fitted to either an 8x4 MAN, Scania, Mercedes or Volvo chassis with the crane fitted on a Kenworth T800 in the USA. It has a lifting capability of 45 tonne and a 52m boom height when fully extended. My MOC is in scale 1/16.5 and will be fully RC. The crane's boom will be approximately 1.5 metres long when all two stages are fully extended. The RC functions are: Drive: one XL motor Steering: Servo motor Stabilizers folding/unfolding: M motor Stabilizers extending/retracting: M motor Superstructure rotation: M motor Boom elevation: L or XL motor depending on space Boom extension: L motor Hook raising/lowering: M motor Other functions: Stabilizers lowering/raising: Independently controlled using pneumatics Opening cab doors Tilting cab (probably) Straight six engine Full suspension Enough chat, time for some progress photos: Chassis with the stabilizers retracted And stabilizers extended and lowered A closeup of the stabilizer setup The main boom at its full length of 71 studs, with two stages going inside of it \ What I have of the first stage so far, not the actual design but just an indication of the extension length from just one of the stages. That is my progress so far and I am currently working on improving the stabilizer design because at the moment they are too high and bulky. I will start making better progress once I get the parts I need this weekend. I'll update this thread regularly with my progress as it comes along. As always feedback is appreciated, Cheers


.thumb.JPG.3c74c0d405dc1afb04b2fa216ebc79e6.JPG)