Search the Community
Showing results for tags 'Mini'.
-
A big thanks to Jason who took notice and contacted me for this to potentially become a product at their store. When redesigning it I had to make it stable and strong enough as well as making it aerodynamic, the original design was too blocky. I'm quite confident that is is the best outcome for a mini Milano spaceship design. I hope you enjoy it too. I really hope you enjoyed this MOC and plan to purchase one; feedback and criticism is much appreciated. Available to purchase at: TheBrickShowShop.com Adeel
-
Continuing my habit of making displays for my poybags, here is my display for my Mini X-Wing Fighter As you can see, it holds it up quite well And let me try out a new way of making a space background I hope you like it! And, remember, comments are always appreciated!
-
This is my MOC displaying my mini AT-AT and Snowspeeder I am currently going through my collection of polybags Deciding which ones are worth keeping, and making displays for them. This was also a way to test uneven floor patterns, and use my extra black vine I got for Venom I hope you enjoy! And if you do, remember to comment!
-
 A long, long time ago, back when the [MINI] Technic contest was being run, I decided to build an entry, which would have been a replica of the Lampson International LTL-2600 crane, which was, for a time, the largest mobile crane in the world. My model was actually more inspired by it, and is not a straightforward replica. The primary reason why I did not enter this was due to the fact that, at least according to LDD, I had 230 pieces in it, even though I myself counted only 200. This model also had some major construction flaws, which will be detailed later. This thing's been sitting around forever, and I just want to post it so that I can take it apart. So, without further ado, here it is. Lego Lampson LTL-2600 by Saberwing007, on Flickr Eagle eyed viewers may note that it is not blue, but red. Well, the truss pieces are only available in black, gray, and red, and I only had them in red, so that dictated the color scheme. I guess that would make it more like a Manitowoc crane, but I digress. The crane features, like the real thing, luffing of the main boom, hoist, 2 independent crawler units, 3 cabs, and a large counter weight. My model also has a feature that I don't think the real crane has, but many similar ones do, and that is adjustable radius, which will be shown below. Front Cabs by Saberwing007, on Flickr Rear Cabs by Saberwing007, on Flickr My model, as mentioned above, has 3 cabs, 2 for driving, and one for the crane operations. Even though this thing would be very slow, maybe topping out at 2 miles per hour, having two people driving could be an absolute nightmare. There's probably a good reason for this configuration, but I cannot think of it. The pictures show how the radius can be adjusted, although the real crane can not do this. Minimum Radius by Saberwing007, on Flickr Maximum Radius by Saberwing007, on Flickr The last two pictures show how the winces are configured, and how far down the crane can luff. Winches by Saberwing007, on Flickr Maximum Reach by Saberwing007, on Flickr Finally, the major structural flaw I alluded to earlier: Some connection in the turntables is not that sturdy, so the crane lists pathetically to one side or the other. Leaning by Saberwing007, on Flickr As a last thing, here is an LDD render of what this machine would look like in blue, if the parts existed. Ltl2600blue by Saberwing007, on Flickr And finally, the LXF file: Link
 -
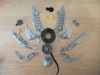
This Is my Custom/Purist Arnim Zola and a hydra stand with logo Zola is composed of Orange Legs, MODOK's Body, a Nixel Head, and a brick built camera/head thing The hydra logo is simple, as I wanted something colorful for him to stand behind. Enjoy!
-
 Just start this topic with a picture, it is full of hint about how I want To build my MOC (and I hope i success) What are them? :D
 -
 Being new around here, I'm not sure if I should post too much of my back catalogue, but here's a big model of a small car from a couple of years ago. Maxi Mini by TechnicNick, on Flickr Like all my large vehicle models, the chassis is studded Technic and I've included several functions under the System body. Studless Technic has proved very handy for the trickier stuff... Maxi Mini by TechnicNick, on Flickr That engine uses the old square 2x2 pistons and features every moving part of the real thing (wish the video on Flickr still worked!) It has crankshaft and pistons, chain driven camshaft, pushrods, rockers, valves, fan and auxiliary drive, even a shaft off the cam for the distributor with whirling rotor arm. It uses an M motor as a starter, operated from the 'ignition' switch inside the car. It drives the front wheels through a simple forward / reverse transmission. The starter can be disengaged. There's independent suspension, working steering (HOG via exhaust or by my odd choice of steering wheel), pneumatic brakes on the rear wheels, a working handbrake, seats that tilt, adjust and lock in place realistically and everything opens. The doors will latch closed, operable from inside or out. Maxi Mini by TechnicNick, on Flickr Maxi Mini by TechnicNick, on Flickr Maxi Mini by TechnicNick, on Flickr
 -
I'm putting a Planet Series mobile back together for a Spring LUG event and decided to update my previous Y-Wing and add an ISB to the mix. There's a lot of inspiration from other builders in the Y-wing especially (from Miro Dudas in particular X-wing Y-Wing Redux by Miro78, on Flickr)I hope y'all like them. Please leave suggestions for improvements. Mini-Y-Wing by goatman461, on Flickr Mini-ISD by goatman461, on Flickr
-
To cerebrate LEGO's unveiling of 'The S.H.I.E.L.D. Helicarrier' #76042 designed by Marcos Bessa, I decided to design a smaller model of the Helicarrier (It only contains 58 pieces.) My other LEGO S.H.I.E.L.D. Helicarrier can be found here: https://www.flickr.c...N03/14723171585 LEGO Mini S.H.I.E.L.D. Helicarrier by Adeel Zubair, on Flickr Adeel
-
 For the TECHNIC Mini contest at Eurobricks last summer, I’ve made a KOMATSU 931.1 harvester with exactly 200 parts. The harvester have some functions. One of them, you can rotate the cabin by turning the exhaust pipe. The functions are described in the picture below: 09_KOMATSU_931.1_technical_description by LegoMathijs, on Flickr I haven't broke down the model, so I’ve made a forest display for the KOMATSU 931.1. The harvester in action, cutting down some trees. Pictures: overview pictures: 01_KOMATSU_931.1_display_overview by LegoMathijs, on Flickr 02_KOMATSU_931.1_display_overview by LegoMathijs, on Flickr Detailed pictures of the KOMATSU 931.1: 05_KOMATSU_931.1_cutting_a_tree by LegoMathijs, on Flickr 07_KOMATSU_931.1_backside_view by LegoMathijs, on Flickr Backside view of the KOMATSU 931.1 06_KOMATSU_931.1_cutting_a_tree by LegoMathijs, on Flickr More pictures at Flickr: https://www.flickr.com/photos/mathijslegofan/sets/72157647848583223/ (The display isn't made with Technic parts, but the KOMATSU is the most important part of the display and is a Technic model, that's why I post this moc in the Technic forum). I hope you like the display
 -
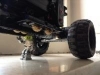
 I need help making a mini 6X6 trial truck, most of it is done but I need help on the front steering. I need one with drive and perpendicular suspension with no springs.
 -
The visual language is inspired by the '30446 - The Batmobile' ploybag. Mini Batwing by Adeel Zubair, on Flickr Feedback and criticism is much appreciated. Adeel
-
Hi all just want to share my LEGO ideas British coast line MOC
-
Hi, this is my entry to the MiddleEarth Contest. It is an affordable version of Barad-dûr (including a Nazgul). It is probably too small for a set... I hope you like it nevertheless. Best wishes ArchitecureFan
-
 I wasn't happy with the way my MINI airplane was turning out, so I decided to start over. I wanted to build something which was a bit more unusual. While searching for something to build, I came across the Bell XV-15, an experimental tilt rotor aircraft, which combines the advantages of a winged aircraft with those of a helicopter. More info about the real thing can be found here: http://en.wikipedia.org/wiki/XV-15 This is the progress so far: - Tilting rotors, controlled by turning knob (not yet visible on the photo's below) - Automatic retracting landing gear, linked to the tilting mechanism - Free spining rotors - Opening rear hatch, manually operated - Part count: 181, but need some part for the control mechanism once I found a suitable spot. - Bonus: very swoosable I'm not satisfied with the cockpit section yet and as said, the controls are not completed at this point. What do you think?
 -
This is my entry for the mini contest. The main function of this model is given by the two manual operated helices. It has an openable cabin too. I have modeled it on LDD and it uses 200 pieces that mostly came from a 9394 set with a few from 42006, 42022 and 42020. This is a LDD screenshot so you can see how it looks And this is the LDD file https://dl.dropboxus...chnic/Plane.lxf Following these links you will find some more photos of the real thing (sorry for the quality of them): https://dl.dropboxus...26-42_photo.jpg (lateral image) https://dl.dropboxus...-27-35_deco.jpg (above image) https://dl.dropboxus...-28-15_deco.jpg (front image) https://dl.dropboxus...-28-53_deco.jpg (bottom image) I hope you like it PD: I know it has some oddities like the steering wheel (the sports one should look _much_ better ) or the colors of some pieces but, unfortunately, this is the model I'm able to construct
-
REVIEW - 10242 - MINI COOPER Mk VII INTRODUCTION After the 10187 - Volkswagen Beetle in 2008 and the 10220 - Volkswagen T1 Camper Van in 2011 LEGO has released another brick built version of an iconic car. Now it's MINI's turn to be immortalized in the form of a LEGO Creator set. The model has been designed by British senior designer Andy Hugh Seenan, who allegedly can't work without coffee. He has been designing toys for LEGO since 2007 and joined the LEGO Creator department in 2011. He also designed the 31010 - LEGO Creator Tree House and 10525 - DUPLO Big Farm, which is his favorite self-designed model. We can judge by the Tree House that Andy is very creative in both implementing various features and maintaining aesthetics. Let's see if his creativity has founds it's way to the MINI. Review images can be clicked for hi-res versions. FROM LEGO PRESS RELEASE Take this MINI Cooper for a nostalgic drive down memory lane! Experience the iconic MINI Cooper first hand, with its classic lines, detailed interior and fun picnic theme. Take the iconic MINI Cooper for a drive! This beautifully crafted LEGO brick replica of the classic MINI Cooper Mk VII is full of authentic details, from the classic green and white color scheme with white wing mirrors and racing stripes, to the opening doors, hood and trunk, sporty fog lights, detailed engine and separate spare tire compartment. You can even remove the roof to access a tan colored interior with patterned seats, veneer-style dashboard, turning steering wheel, and moving gearshift and handbrake. And of course, no MINI Cooper would be complete without a picnic basket and blanket, the perfect accessories for a cozy day in the countryside! Features opening doors, bonnet and boot, spare wheel in separate compartment, detailed engine and 2 fog lights. Accessories include a picnic basket, bottle and blanket for nostalgic picnic theme. Authentic replica of the MINI Cooper Mk VII. Classic green and white color theme with white wing mirrors and racing stripes. Lift the bonnet to reveal the detailed engine. Remove the roof and access the detailed interior. Go on a countryside picnic with this iconic classic! MINI Cooper measures over 4” (11cm) high, 9” (25cm) long and 5” (14cm) wide. Available for VIPs from July 18th. SET INFORMATION Number: 10242 Title: Mini Cooper Theme: Creator (Expert) Released: July/August 2014 Part Count: 1.077 Box Weight: 1330 gr Box Dimensions: 37,2 x 35,0 x 8,9 cm (WxHxD) Set Price (MSRP): US $99.99 / CA $119.99 / AU $149.99 / DE 89.99€ / UK £74.99 / DK 799.00 DKK Price per Part: US $0.093 / CA $0.111 / AU $0.139 / DE 0.084€ / UK £0.070 / DK 0.742 DKK THE BOX The almost square box measures 37,2 x 35,0 x 8,9 cm and feels like it is filled with lots of parts. Holding the box and looking at the images, I immediately got the feeling that this will make a great present for young and old. The box is slightly smaller than the box of the VW Van which does have more parts. FRONT SIDE The front of the box shows the model in a countryside picknick scene. The age recommendation is 16+ which is a bit high in my opinion. The upper right corner shows the detachable roof. The box also states this model belongs to the Creator theme, Expert series. BACK SIDE The back side shows a variety of different smaller pictures, explaining most of the neat features. By the number of pictures we can see that there's a lot going on in this set. SIDES One of the sides shows a comparison between the model and it's real life counterpart. Most noticeable is the difference in the number of fog lights. And the rear of the real MINI is more curved than the LEGO version. The next side shows the front, side and back of the model. The front view is my favorite view. The combination of the grill, head lights and fog lights is well executed. The third side shows the part list, which is common for LEGO creator sets. What I like about the part list on the box is that you can see the variety of parts included in the box. Like most Creator sets, this set has a vast array of different colored bricks, which are very appealing to potential buyers. I would recommend including such an image on every larger box. CONTENTS OF THE BOX Since the box is not overly big, it feels like it's filled to the brim. It contains: 8 Numbered Bags (1, 2 and 3) 2 Booklets 2 Sticker Sheets 1 Brick Separator BAGS The set includes 8 numbered (1, 2 and 3) bags in varying sizes. The larger bags contain some smaller bag with smaller parts. The set also contains a brick separator. BOOKLETS The set contains two booklets with 64 and 51 pages for instructions, adding up to 76 steps. The booklets are almost identical. The only difference is the sequence number. STICKER SHEETS Not one, but two sticker sheets are included in this set. Two sticker sheets while there are a lot of printed parts?! One of the sheets has four stickers with metallic look. The other sticker sheet contains five different types of license plates to choose from. HIGHLIGHTED PARTS There are a lot of dark green parts in this set and some of them hadn't been released in this color before. Especially the first two common parts are very welcome in dark green! 1 x 1 PLATE Believe it or not, but this plate wasn't available in dark green before. 1 x 1 MODIFIED BRICK WITH STUD ON ONE SIDE Also a new part in dark green and a very useful one. 2 x 2 ROUND TILE & 3 x 2 PLATE WITH HOLE The round tile is new in dark green and the plate with hole hasn't been used since 2005. 3 x 4 x 2/3 PLATE WITH BOW WITH NOPS Not a very commonly used part, but from now on, it's available in dark green. 3 x 6 x 1 CURVED WINDSCREEN Like the previous one this part has a very specific use and is available in dark green for the first time. 1 x 4 x 1 1/3 MODIFIED BRICK WITH CURVED TOP This part is also new in dark green. It comes in two variants, one with and one without striped pattern. The stripes are printed on the part, so no hassle with applying stickers. 2 x 1 CURVED SLOPE A new flat silver curved slope. Introduced this year (2014) but not unique to this set. It has been used in several other sets. MINIFIGURE SKATE As we can see in the image below, the minifigure skate is a very versatile part! PART LIST Here's the complete list for all 1077 parts. BUILDING EXPERIENCE The set contains bags numbered 1, 2 and 3, which means the build consists of 3 stages. Each stage requires opening the corresponding bags. So let's start with the first stage! STAGE #1: CHASSIS The first stage requires opening the two bags numbered #1 which results in using the following parts. The chassis pretty symmetrical when it comes to the wheel base. Being a Creator set some oddly colored parts are used, like the blue Technic bricks. At the rear we can see the single fog light mounted on the right side of the fender. Here we can see the Neck Bracket with Technic Pin cleverly used as the exhaust pipe. The middle bottom section of the vehicle is where the front seats and rear couch will be mounted. The mounting points are already visible. The side skirts make sure the MINI gets it's sporty Cooper look. The shift stick is very simple and very well-thought-out at the same time. The base consists of a Modified 2 x 3 Tile with 2 Clips and a Technic Axle Towball, which results in a freely moveable stick. The floor of the trunk can be lifted to reveal the spare tire. Using the 1 x 6 x 5 Panel results in having room for the tire AND the entire picknick basket, which is quite an accomplishment for a model this size. At the end of stage #1 the chassis is complete. It already has the shift stick and trunk with spare tire. It's about 30 studs long and measures around 25 cm. STAGE #2: INTERIOR AND REAR BODYWORK During the next stage you will add the following parts to the model. A Curved 3 x 6 x 1 Windscreen is used as exterior wheel hump. The checkered upholstery looks fantastic and it's not even finished. The handbrake is one of the many great details! At the rear you see one of the stickers (MINI badge) you need to apply. funny enough, you need to apply this sticker to a part which has printed stripes on it. It's for the first time LEGO has printed a curved part like this. The dainty picknick basket is so cute! The details are remarkable. It even has two different types of cheese! Probably Gouda cheese The blanket is an actual piece of cloth, not plastic. The bottle and baguette are the icing on the cake. Being a right driven model, I have chosen the British registration. The MINI has an R registration, which means the year of registration is 1997/1998. Could this possibly be Andy's old registration number?! The boot is very efficient. It holds the spare tire and entire picknick set! STAGE #3: ENGINE BAY, FRONT BODYWORK AND ROOF During the final stage you will finish the front of the car and the roof. Lots of dark green parts will be added to the car. Under the hood the twin-carburetor 1,275 cc engine is mounted. I love the use of the Small Barb (Helmet Horn) as spark plug cables (or high tension leads). The dashboard is pretty detailed, with a glove compartment and several printed gauges. The steering wheel is a bit big, but the old MINI's did have a big steering wheel. Although the Cooper has a smaller sports steering wheel, I still think this one suits best. The seats and neck rests can be adjusted to a certain degree. The checkered upholstery looks amazing, much like the rest of the car. The door handles are actually Minifigure Iceskates. FINISHED MODEL It took me approximately 3 hours to build this model, one hour per stage. FRONT VIEW After finishing the model I really felt a WOW! Just WOW! Granted, the rear section should be a little more curved to resemble the real MINI better. In my opinion this is just a minor detail, since the model captures the overall look of it's real life counterpart very well! The front of the car with the grill, fog lights and bonnet, screams MINI Cooper! The white striping, mirrors and roof give this model it's iconic Cooper look. The sloping bonnet is very well designed. REAR VIEW The trunk lid with embedded license plate is another nice detail which adds to the recognizable MINI design. The tank filler cap is on the left side. Small details like this make the MINI an outstanding model. BOTTOM VIEW The bottom view shows the chassis of the car and in the front you can see the towball construction used for the shift stick. PARTS LEFT Most of the smaller parts have a spare one in every stage, so you end up with quite a few extra 1 x 1 plates and tiles. FEATURES This model some dainty details and exquisite features: Opening hood Opening bonnet Opening doors Detachable roof Storable spare tire Filled picknick basket with bottle Cooper-ish wheel covers Moveable steer Moveable shift stick Adjustable seats Should LEGO have gone the extra mile and include parts to turn this MINI into a convertible, like Dirk1313 did over here?! There's probably a good reason LEGO didn't, but it would have been a nice addition. On the other hand; you can easily do this yourself. SUMMARY Since the MINI has quite a few great details, building it is never boring. After every step it's getting better and better. When you have finished the model, you really get that WOW! feeling. Choosing dark green for the bodywork gives this model the characteristic British Racing Green look. Although it could have been blue or red, I think LEGO made the right choice with dark green. The model lacks a bit of playability when it comes to driving. Without actual steering it's hard to turn the car. Driving back and forth gets a little boring after a while. But then again; this model is probably not meant to play with. Maybe that's one of the reasons it has 16+ as an age recommendation. As a display model, this is one of the best cars LEGO has created...ever! Quite a few people will be having a hard time believing that this actually is a LEGO model. Andy has a great job capturing the essence of the real MINI in this LEGO Creator set. PROS Astonishing model Lots of dainty details Lots of features Lots of (new) parts in dark green Some silver/chrome parts Most of the decals are printed CONS Lack of steering Rear is a bit too square SCORE Design 9: The model screams MINI Cooper. Build 8: Fun build, never a dull moment. Features 9: Lots of nice features. Playability 8: Lack of steering diminishes playability. Parts 9: Great parts pack, if you like dark green. Value for Money 9: Iconic MINI Cooper for a reasonable price. 8,7 Instant classic! MEDIA I have included some extra content for your viewing pleasure! DESIGNER VIDEO PREVIEW VIDEOS Hope you enjoyed it! Thanks for reading and please rate this set at the top of this topic!
-
Hi all, I would like to present my WIP of my entry for the MINI contest. The model is an aircraft loosly based on the iconic Cessna 172. It has two functions: working ailerons controlled by the stick and a one-cylinder fake engine. Other nice features are the micro seat and a bunch of recent new parts. As said, it is a work in progress, I'm still working on the following points: - Less dense structure without compromising the rigidity - Reduce the part count (205 pieces at the moment) - Find a nice colour scheme which can be build, might need to order some parts for this. - Attempt at a less cramped cockpit - Try to include the iconic wing supports of the real aircraft. I'm very pleased with the results so far and it looks fantastic next to the 42025.
-
 MINI BUILD ENTRY TOPIC This is the entry topic for the Technic Mini Build Contest. DESCRIPTION Build a LEGO Technic model with a maximum of 200 LEGO parts! Imagine your set being sold as an official LEGO set. DEADLINE Contest closes on August 1st, 2014. CONTEST INFORMATION More information about the contest can be found in the general discussion topic. WHAT DO I NEED TO ENTER? Please take a careful look at the rules before posting in this topic. Each participant should create a post in this entry topic. Posts need to follow the rules stated below. Posts not following the rules will be disqualified so please read them carefully. ENTRY POST The entry post should contain: Entry name Part count Short summary of the functions Promotional image (this one should kick megablocks!) Parts image (a picture of all the parts used, spread out on a surface) Video's are not allowed in the entry post (they are allowed in your WIP topic) The promotional image needs to be clear and crisp image, which really shows the model in it's best way. Think of it as the image on the box. Building a great MOC is one thing, but a decent presentation really helps you to get more votes. It's allowed to do some photoshopping to enhance the quality of your image. It's even allowed to compose a single promotional image with a main picture and several subviews (example), as long as your image doesn't exceed the maximum width of 1024 pixels. So this is allowed and even encouraged: The part image needs to show ALL the parts used in the model. That way we can clearly see which, and how many, parts have been used. For example: IMPORTANT This topic should be used for entries only, so commenting is prohibited. Please use the general discussion topic for comments on the entries.
 -
 Hi, This is my entry for the Mini Model Competitions 2014, this is my first MOC on heavy eauipment model. Feature : - Total 164 parts. - Modern design in a simple way. - Smooth track movement - 1 functions : movable plow (up/down) Please vote if you like the model. Thank You. Part List The MOC
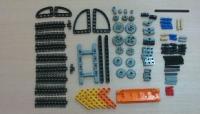


-
 Here is my (WIP) entry. Not much subtlety here - one very simple function! Basically it is a pull-back motor and two "devastator" wheels, with three boat weights for balance. Plus I decided to blow about two-thirds of the parts on some rather unusual styling. Just under 200 parts at the moment - details of styling might change slightly. Video coming soon...
 -
Hi Folks, I modified the new Mini Cooper into a convertible. Lego Scala Figures fit well to the scale of the model: Mini side by side with VW T1 bus, unfortunately not an exact match of scale: And together with my Eriba Puck camping trailer, the Lego Belville children fit well with the scale:
-
A new contest with fantastic prizes has been started in the Technic Forum! Build a LEGO Technic model with no more than 200 LEGO parts. Click on the image below to find out what it's all about and how you can join.
-
MINI BUILD I promised we would do more contests this year, so I'm sorry for the delay, but here it is.....a new contest. DESCRIPTION Build a LEGO Technic model with a maximum of 200 LEGO parts! Imagine your set being sold as an official LEGO set. DEADLINE Contest closes on August 1st, 2014. CONTEST SPECIFIC RULES AND REGULATIONS Maximum of 200 parts. 199 or less is okay, 200 is okay, 201 is NOT okay. Chain links and tracks DO count toward the part limit. Every part counts (mini turntable is two parts, just like in a real set) NO Electronics (PF, Mindstorms, etc) are allowed. Only official LEGO parts. No chrome unless it's official LEGO (see previous rule) Ropes/Strings, rubber bands and pneumatic tubing need to be official LEGO parts. Set must have at least one, preferably more, functions. Aesthetics do count. NO Model Team. Imagine your set being sold as an official LEGO set (also see previous two rules). GENERAL RULES AND RESTRICTIONS The contest is open to all EB members (also new members). Voting is only allowed for existing members (which means member date before start date of contest) If there's a tie my vote and Blakbird's will count twice. If there's still a tie, Staff members will decide who wins. One entry per member. Entries need to be new (never posted anywhere previously). Only physical builds, so no LDD or other virtual entry. If you have any doubts about the suitability of your entry contact me. All entries are to include only real LEGO. No clone brands, 3rd party parts, or digital entries allowed. Decals (stickers) will be allowed if you've made them yourself, but no cutting, sculpting or modifying parts. Entries are to be placed in the entry topic in this forum. Entries not in the entry topic are not eligible for voting. The entry post may be edited at any time up to the end of the contest, so feel free to make improvements if you wish. We reserve the right to disqualify any entry that does not follow these rules. These rules can be changed whenever we see fit to ensure that people follow the intent of the contest. Staff members are not eligible for winning prizes. WHAT DO I NEED TO ENTER? All participant need to create a WIP topic for discussion purposes and create a post in the entry topic. WIP TOPIC A WIP topic beginning with [MINI]. ENTRY POST The entry post (in the soon to be created entry topic) should contain: Entry name Part count Short summary of the functions. Promotional image (this one should kick megablocks!) Parts image (a picture of all the parts used, spread out on a surface) The part image needs to show all the parts used in the model. I need a picture showing all the separate parts! That way we can clearly see which, and how many, parts have been used. The promotional image needs to be clear and crisp image, which really shows the model in it's best way. Think of it as the image on the box. Building a great MOC is one thing, but a decent presentation really helps you to get more votes. PRIZES The prize winners may choose between selected prizes. 1st PRIZE The winner can choose between 42006, 42023, 42024 and 42028 (if available). (or choose a smaller set of choice) 2nd PRIZE The runner-up can choose between 42007 and 42022. (or choose a smaller set of choice) 3rd PRIZE The bronze medalist can choose between 42026, 42027 and 42012. (or choose another set with a maximum of 25 euro) Special thanks to TLG's Community Support Team for providing these awesome prizes!
-
[Review] 30247 ARC-170 Starfighter (mini) Details: Ages 6-12 RRP: N/A Parts: 58 (approx) Introduction: There are lots of disadvantages about living in the UK; the climate, the weather, winter and endless congestion to name just a few, but just occasionally it’s all worthwhile. For some reason we seem to get a free Lego promotion a couple of times a year via one of the national newspapers. And yes, you’ve guessed it, this week we have another selection including the new ARC-170 Starfighter. This is the second Star Wars polybag that’s included in the promotion; I’ve already made a review of 30246 (Imperial Shuttle) which you can see here. The bag: Standard size polybag, with the new slightly scary looking Darth Vader. Personally I prefer it to the previous (Yoda) version, and seems to compliment most of the sets I’ve seen. The Starfighter is flying over an unknown planet and, as you’d expect, is firing at an unseen foe. I like the colours and it’s just as good as the Imperial Shuttle. Part selection: A total of 58 (ish) including around 3-4 spares. A nice selection of parts which I’m sure would be appreciated by most builders. As with the shuttle there are lots of smaller parts, but it includes a few dark-red and black bits which I’m sure I can find a use for. Instructions: Standard format for polybags, it’s a bit smaller than A4 and double-sided. The model is built in 19 separate sections and is quite fun considering the small size, a maximum of 5 minutes effort. It’s a little more complicated than the shuttle, but most adults should be able to cope! I’ve included both sides just incase you wanted to replicate it via your parts bin. The result: It’s a nice little model and a good replica of the original. However, it’s very nose heavy and I had to hastily construct a stand for the photo. It’s a bit of a shame really, I can see younger fans being upset by this; to be honest the min X-Wing we had a few years ago was far superior. Apart from that I can’t really fault it, especially considering the price point... I got this for 60p, including a nice paper to line my recycling bin with. Summary: Cost: 5/5 – A total bargain Parts: 4/5 – A nice selection of parts, including some dark-red and black Build: 4/5 – Moderately interesting, although a bit fiddly at times Model: 3/5 – Instantly recognisable, surprisingly detailed for such a small set Balance: 1/5 – Good fun to swish, but very nose heavy. Overall 17/25 or 68% if you prefer.