Search the Community
Showing results for tags 'AT-AT'.
Found 19 results
-
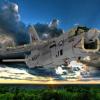
This is my MOC displaying my mini AT-AT and Snowspeeder I am currently going through my collection of polybags Deciding which ones are worth keeping, and making displays for them. This was also a way to test uneven floor patterns, and use my extra black vine I got for Venom I hope you enjoy! And if you do, remember to comment!
-
This was built for a contest at our local star wars LUG, we had to builds something coming up in Episode VII. I have choosen a concept picture of a rotten AT-AT at a desert planet. The sand technique was my first try on studless sand, I mostly used parts of the actual Wookie Gunship. So please enjoy the pictures: Greets Disco
-
Hey guys, Now it`s done and my Apoca AT-AT from EPVII cocept art ist finished! It`s my first AT in minifig scale and the next step ist to build that he can stand All photos you can watch on Flickr and here are the WIP-Thread. Thanks for watching and hope you like it? cya markus
-
First time posting a mod. Let's see how this goes... When I bought the 2014 AT-AT, I thought it was a really good set. It's technic frame makes it really stable despite the high centre of gravity, and for a system-scale set it is impressively large. It is very posable. It has it's problems though. In essence, it's a technic set with some plates tacked on to it. That usually makes for a set with a lot of gaps if you don't get the angles exactly right. It was also very studdy, whereas the "real" AT-AT is relatively smooth. Some of the colour choices seemed very inconsistent (a lot of stray DBL bricks everywhere). And, of course, the cockpit. The sides angled inwards too much, and it could fit only one pilot. Also: it lacked the red view port. So I decided to try to remedy all that, and basically turned a large pile of plates into a large pile of tiles. In the proces I found out that lighting is really important when trying to take pictures of LEGO. Sorry if it's hard to make out some of the details... You can find more pictures in this album.
-
A long time ago in a galaxy far, far away, there was an AT-AT pilot with a tiny AT-AT. Now, let's find out if he will get accepted into the Empire. First Impressions: 8/10 The box is small, very small. The AT-AT looked kind of cute, and my only disappointment was that the micro in Microfighters was further emphasised by the fact that there was only 88 pieces! Minifigures: 6/10 The AT-AT pilot is the sole minifigure, but its torso design is very nice and detailed. Shame he didn't come with Veers or Snowtroopers, but well, it's a microfighters set after all. The AT-AT pilot came with a short blaster. The Build: 6/10 It's a relatively fast build and only took me ten minutes to complete. Along the way, the AT-AT starts to take its famous shape. End Product: 7/10 The AT-AT is small but very posable. I think it may or may not look good on your shelf, but it worked fine for me. Overall: 7/10 A great set for a Microfighters set.
-
Edit: "Problem" solved
-
Virtual Movie Scene “Snowspeeder vs AT-AT” from Star Wars Episode V “Battle on Hoth”: Wedge Luke fights an AT-AT. Scenery and models (75049 Snowspeeder and 75054 AT-AT) virtually built with SR3D Builder. String (Rope) built with MLCad/LSynth. Povray render. Povray-file generated with LDView. Pure Render. Hope you like it! Edit October 16th: Now it is Wedge's "orange" Snowspeeder!
-
 I have always had a fondness for the AT-AT, and even after three attempts by LEGO to release oneI've still been left unsatisfied. Hence, my AT-AT MOC. It features a fully detailed interior with a cockpit holding 2 drivers, a commander with periscope, and room for 2 more figures, seating for 18 troops in a double decker main body, detailed drive section, storage for 2 speeder bikes in the lower vehicle bay, opening side access hatches and a lower hatch fro recreating Luke's lightsaber and grenade attack on a walker from ESB. The cheek guns rotate, and the legs are fully poseablewith articulated upper and lower hip joints, knees, ankles with 2 dimensions of range of motion, and toe flaps. The exterior,interior, and underside are highly detailed, having used photos of the movie models and the book Star Wars Complete Cross Sections to design and build the MOC. Any feedback is appreciated! http://mocpages.com/moc.php/379645
 -
Hi people! Long time since I have uploaded anything... But seeing as I got my wish that TLG were making a microfighter AT-AT, I couldn't wait to see it. When I did, I was slightly disappointed with it. It jsut didn't seem quite so... detailed... as I'd have imagined it to be. (Yes, I know it's a microfighter!) So anyways, I finally got round to trying to design my own yesterday, and finished it just a few moments ago. Sorry it is only on LDD but I dont have all the parts, and won't have the money to place an order until October :( It is designed to be built in real life with gravity and stuff considered :P So, here he is! C&C welcomed With pilot Moc Microfighter AT-AT with pilot by Daft Vader1, on Flickr Without pilot Moc Microfighter AT-AT without pilot by Daft Vader1, on Flickr Underbelly with the leg motors! Moc Microfighter AT-AT underside by Daft Vader1, on Flickr Showing the rear Moc Microfighter AT-AT rear by Daft Vader1, on Flickr
-
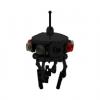
Soooo, being a huge fan of AT-ATs but not mad enough to try and make Rocco's/Cavegod's creations, i thought i would have a go at something that was accurate, almost as big and not kill your bank account buying all the pieces. As of now its just an LDD design, must give a massive shout out to the lego gods Rocco and Cavegod for inspiration, i followed many design cues but tried to scale down and put my own spin on it. Also a shout out to rx79gez8gundam and his AT-AT design, i hadn't clocked his work till id almost finished mine and noticed how similar the legs were, total coincidence but seeing as he posted his way before mine im giving props to him and his great work. So as it stands it still needs some work to the frame and neck joint but its designed to hold the head strong. Im hoping it will be strong enough AND have space inside for troops but thats still to be figured out. At the moment its about 3800 pieces but i'll wager it will hover around 4000 when all is said and done. I'm sure someone could streamline it and maybe get it to 3500, im not a Lego genius like some on here :D Anyway here she is.... ps:pics are a bit small and blurry, no idea whats happening there, site is resizing them?
-
[SoNE Ep. IV] Sector A - Every shot makes two victims
BEAVeR posted a topic in Nar Eurbrikka Archive
Sullust. At least it isn’t as cold as Hoth. But the volcanic smoke has made a lot of patrolling missions a whole lot more difficult. Take KQ-351, now restoring in the sick bay after almost suffocating due to a minor failure in his ventilation system. Am I glad this base isn’t built near to any major streams of lava. That would be excellent for defence, but highly impractical… On the other side, this base doesn’t seem to be built to keep anyone out in the first place. Sure, the solid rock walls, the few but strong gates and the narrow entrances are good to keep people inside, but there isn’t much protection from attackers. [soNE Ep. IV] Eye on the skies by Bert.VR, on Flickr It was built when just the thought of attacking the Empire would have made everybody laugh. It was built when there was no real Rebellion trying to crack into it. When everything was peaceful… The main services got a place on the roof. Good for communications. Bad for protection. Cannons? Nowhere to see… So it’s up to us to defend the base. The pilots will have to save the day. The AT-AT pilots on the ground, the TIE pilots in the air. We’ll keep the forces of the Rebellion off, while our friends on the inside will stop the infiltrators. My rank got me this position at the main gate. Destroy everything that tries to get in, they said, until the backup arrives. So my eyes are scanning the air, in the hope of seeing reinforcements, in the expectation of seeing a horde of Rebel fighters. [soNE Ep. IV] Ground reinforcements by Bert.VR, on Flickr At least I’m not alone to stop that filth of the galaxy. Every pilot has been summoned. So I’m not the only one to stand up against this brutal Rebel attack. It will be a lonely battle though. In this atmosphere communication is hard, and in fear of abuse by the Rebel infiltrators, all communication has been abandoned after the distress call to our fleet. Look, there’s one of my colleagues in his TIE flying by, from the other side of the cliff where the hangar bay is. He’s heading for… the sky? Why isn’t he on his post in the first place? It could be a reconnaissance mission, but why? We have our detection equipment right here. We already know the place. And why doesn’t a take our usual routes? Why is he flying like a wampa anyway? Whoever it is, I… It might be a Rebel… And I pull the trigger. My instinct is a good shooter. Smoke coming from the crucial wing section, the TIE goes down. It disappears behind the rocks, where it will most certainly perish in the lava. [soNE Ep. IV] Every shot makes two victims by Bert.VR, on Flickr It might have been a friend… No… the thought petrifies me. But how? How could it have been a friend? That’s impossible. Why would he abandon his post? Why would he fly like that… No, it can not… may not… have been a friend. Surely, I have done what was best. There might be hundreds of explanations. A reconnaissance mission because our equipment failed, an emergency evacuation, some kind of special mission… or just a foolish act of heroism by a rookie. Is there another explanation? Couldn’t ir really have been a Rebel. Who somehow got past all security. But how? Who somehow managed to get away with a TIE fighter. Impossible, isn’t it? Aren’t all TIE fighters in the air? Except… KQ-351’s. Hope. Despair. I’m a hero I’m a murderer . I’ll never know. The wreckage will never be found. People will go missing today. Fighters will perish today. Who knows what chaos the upcoming battle brings. And what chaos might follow. I’ll never know if I did the right thing. Nobody’ll ever know. Nobody even saw it happen. Nobody goes through the same hell as I. No one to talk to. I’m alone with a killer. [soNE Ep. IV] What have I done? by Bert.VR, on Flickr Only now I see what this war is taking. I’ve killed before, but only now I realize I remember every single deadly shot I fired. Twelve. I already took the life of twelve people. People just like me. Friend or foe, I killed twelve people. I’ve killed myself twelve times. What’s left of me? I’m only a human. And humans are not made to kill. Whether I just shot down a Rebel or an Imperial, I’m still a murderer. And I can’t undo that. That’s what this war has turned me into. Not into a hero. Into a murderer. There are no heroes. Not in battle. I won’t claim a medal for what I’ve done. All I can do, is go on. Go on and end this war. I need to do the best I can to stop this war. Even if I’ll have to kill again. This war has to be stopped. And if battle is what it takes, so be it. I hope that one day, this war ends with throwing away weapons. That not the Rebellion, not the Empire wins, but peace. But that’s a thing for heroes. I’m just a simple pilot. All I can do is choose the lesser evil. Either way, I’ll have to kill again. I’ll have to kill others. I’ll have to kill myself again. But that’s the only way. Now that I’ve took this road, I can’t go back. I can only go on to be the victim of my own shots. _________________ OoC: LDD file here One more picture of the gate available on my Flickr Not everything is connected, bacause that's (nearly) impossible in LDD. Those Technic axles in the rock pillars aren't connected to each other, but in real life a (LEGO) grey rubber band should do the trick. Trust me, I tried it out. Same goes for the smallest tires in the smoke, that just hang on the bar. Also, I'm not entirely sure about the rigidity of the rock wall. I did add in some Technic support, but in LDD it's really hard to work with all those angled surfaces. Also, I used a couple of 2x2 dark tan plates, that never appeared in a Lego set, but are available on bricklink. I hope these aren't any major issues, and that you still can enjoy the build. -
[LDD][MOC] DF.9 Turret (Star Wars: Battlefront)
LegoStarWarsLDDShop posted a topic in LEGO Star Wars
This weapon is another one of my favorites from the original trilogy and Star Wars: Battlefront. I was very disappointed, though, with the design included in both 75138 and 75098. It doesn't do the original cannon justice at all. Given that, I decided to try my hand at creating one, and I think it turned out really well. http://www.moc-pages.com/moc.php/428616 Please let me know what you think in the comments. God bless. -
This weapon is one of my favorites from the original trilogy. I'm very happy it also made it into the Battlefront game and allowed me to operate it. I was very disappointed, though, with the cannon design in 75098. It doesn't look anywhere close to the original cannon, so I set out to make one myself. I am very happy with the end result. http://www.moc-pages.../moc.php/428860 Please let me know what you think in the comments. God bless.
-
The Head - No, it is not the understated as just another AT-AT, because it won’t be, but for the matter of this topic, it is, momentarily, just a head. Though merely a head, it makes a rather astonishing display piece by itself. Aside from the towering height and lumbering movement of this terrifying machine, the head is quite formidable in appearance, resembling that of a fearsome beast. - In the course to build my original creation of the greatly revered imperial walker of the grand army of the empire, I amass a wealth of reference material concerning studio models, replicas, on-screen images, artwork, etc., to meticulously build the perfect LEGO incarnation that is indubitably authentic to the movies. I have been building this minifigure-scale AT-AT for quite some time—I recall since 2012 with the start of the body section. However, as of recently, since early 2015, I have built the head for this admirable tool of destruction. - Furthermore recently, I have been constructing the infrastructure of the body, acquiring additional parts & correct colors, making considerable amount of alterations, but I have postponed most of this to venture off and design my original minifigure-scale T-47 Airspeeder (Snowspeeder) in LDD, which turned out into a successful MOC and will be a great companion. I planned after that to resume progress with the AT-AT, but after I was inspired by anothergol’s innovative use of paint rollers and mudguards for the waist of his articulated AT-ST, I was just motivated to jump ahead and create my own creation of the imposing “chicken walker” beforehand. Mine, which will implement those techniques of his that I mentioned early, but also the 5 x 5 Scala dish. Interestingly, my own creation first turned out MF-scale, then evolved into UCS scale, then separated into two projects: a MF-scale and UCS scale! A considerable amount of progress has been completed on both projects, with the MF-scale almost finished and the UCS scale having feet and the waist finished. However, for concern of the UCS model, I have postponed its progress to focus on the MF-scele—to complete that and finally resume progress with the MF-scale AT-AT walker. - Regarding this MOC of the AT-AT head, you should notice that I deliberately took some liberty in the greebling located at the bottom. This was a compromise due to the thickness of some elements and from the lack of elements that could properly represent those tiny details, in this scale, authentically. I was as well tight on space for building the main cannons. I originally wanted to attribute a sliding action to them, as if they were in action, but this was unfortunately omitted due to a number of things, which includes: space, structure, scale, parts, etc., which also brought them closer together than intended. Along with other things, like the lack of other small details on the face and others things, that is practically as far as inaccuracies go for it. Nevertheless, one extra detail I have included, which I have not seen previously before represented, are the light fixtures atop the medium support blasters mounted on the cheeks. Then among other characteristics, I can grasp the head by the neck and jerk it around without any parts coming undone, with exception to the roof because it is not fixed together (kinda like other @@ heads I know of ). That rigid likability is attributed to the infrastructure constructed exclusively with Technic & modified plates (w) Technic elements, which also clutches the sides securely in place and almost seamlessly with other aspects. For this fact of such a packed, robust, complex infrastructure, there is no interior, likewise for the whole body—I never had intentions to include such luxuries anyway, but I congratulate those who did. - To determine the dimensions of a MF-scale AT-AT walker, I first acquired theorized dimensions of the actual walker from an in depth survey of its structural components, capabilities, practical role, and tactical uses: here. Wookieepedia is informative in some areas, but it claims the walker is taller than it is longer, which it is clearly not. Besides the overall dimension of the walker’s height and length, this technical commentary also provides a reasonable measurement of its width, diameter of the footpads, and other aspects like the height of boarding hatch. I also found this useful: here. To find the MF-scale, it took some little conversion of average human being height, minifigure height, dividing, multiplying, then more multiplying, but it came out to be around 20in/50cm. Some time on, I took the actual height of my model from toe to the main section of the body and acquired the measurements around 21in/53.34cm, then rework some steps back to get the plausible measurements of 85ft/26m. For the footpads, each are 12 studs in diameter and its height a few measures above a minifigure's chin. So the model is rather on scale for minifigures’ height, as well other aspects in general scaling, as according to the probable height of an actual AT-AT walker. - If there is any misconception about the visor of the command viewport being transparent red, I have some valid reasons to put those to rest. At first, if you notice the moment when five imperial walkers are advancing towards echo base, only the lead walker exhibits a red visor. During the scene, where General Maximilian Veers oversees the battlefield through the viewport the visor is transparent clear. Logically, if the visor was transparent red it could not beam as so bright as it did in a cloudy, snow filled day—not even in a sunny day. Though it appears black this is due to the overcasting shadow from the outside portion of the viewport. Therefore, the red lighting is believably a system for operations in low light periods or environments, to preserve the crews vision in these circumstances, while still being able to function about in the walker. - Well, if you are still reading, I am done for expressing this MOC, for I believe I have covered everything concerning the model and relating to it that was on my mind to say. So, you can finally enjoy the photos and express your own thoughts, criticisms, questions, etc. below. However, bear in mind that I will not be giving out any form of direction that will describe or depict how it is built—I appreciate that this is understood in advance of your comments. Much appreciated, LiLmeFromDaFuture
-
Hello all, I have decided to resurrect this project from my archive of many unfinished builds. The only problem with this unfinished build is that I do not have any, and I mean any of the pieces ready to start this project. After a failed attempt last winter, I sold my pieces and as I thought back then, I would one day regret that. Today is that day. After the destruction of 6200 pieces all over my floor, I impulsively sold the pieces, as I was frustrated and did not want to rebuild every part of the AT-AT that took me weeks to make. This feeling of not satisfying my crave to build this AT-AT has recently emerged up again, and I am ready to tackle this project once again. Of course this time, I am better prepared. This time around, I must mention that I will use the updated body rather than the original for obvious cost reasons. As for my bricklink process, I am not going to follow the generic style of ordering all pieces and building once I have them all. In fact, what I am going to do this time around is order all the parts for one section (neck, body, or legs, etc.) and build that section once those pieces are in. Now why this may seem like a bad way to minimize cost, which it is, the reason I am doing this is because if I encounter any issues with the build of one section, I can immediately make modifications and focus purely on that section alone while my wallet restocks itself for the next section. I believe that this method will have its benefits that will cancel out its cons, and thus give me a stabler product. Another reason why I am choosing to do this is just in case Cavegod modifies one of his sections. A while back, around February-ish, he stated on the brick set forums (at least I think brickset), that he will be modifying the legs to make them sturdier. Now whether he did this or not is unknown, so I reached out to him and am awaiting his response. As of right now, there are no pieces in my hand that I can use for this MOC. However, I just placed a total of 7 bricklink orders totaling a bit over 700 pieces that will cover all pieces needed for the beast's head. I have decided to start with this because from what I've both heard and experienced, it is the trickiest to get right. This way I have plenty of time to make any adjustments if I notice a weakness that seems repairable, or even just a detail to the head that I want to be included, although there doesn't seem to be anything missing detail wise, credit to Cavegod! I will update as often as possible, mainly when I reach a breakthrough with the process, or when I place orders. I plan on this project taking quite some time to complete as I am going to try, and likely fail, to simply add this to my collection without giving up a current UCS set, although my Imperial Shuttle is a tempting sell for what it's worth! That being said, I am going to put a lot more effort into the AT-AT this time around as I now know that it will be much harder than just looking at LDD and putting the sections together.
-
Okay, finally done! Here are some pictures of my version of the 75054 MOD. Many thanks to Maus for the inspiration and detailed pictures to make this possible. I couldn't be more satisfied. Why TLG doesn't produce a more detailed version like these is beyond me, but I'm glad there are plenty of Lego enthusiasts to make this happen (and plenty of light bley parts on Bricklink). 75054 MOD by Shawn Minkey, on Flickr 75054 MOD by Shawn Minkey, on Flickr 75054 MOD by Shawn Minkey, on Flickr 75054 MOD by Shawn Minkey, on Flickr 75054 MOD by Shawn Minkey, on Flickr 75054 MOD by Shawn Minkey, on Flickr 75054 MOD by Shawn Minkey, on Flickr 75054 MOD by Shawn Minkey, on Flickr 75054 MOD by Shawn Minkey, on Flickr 75054 MOD by Shawn Minkey, on Flickr 75054 MOD by Shawn Minkey, on Flickr 75054 MOD by Shawn Minkey, on Flickr 75054 MOD by Shawn Minkey, on Flickr 75054 MOD by Shawn Minkey, on Flickr 75054 MOD by Shawn Minkey, on Flickr 75054 MOD by Shawn Minkey, on Flickr IMG_3040 by Shawn Minkey, on Flickr 75054 MOD by Shawn Minkey, on Flickr 75054 MOD by Shawn Minkey, on Flickr 75054 MOD by Shawn Minkey, on Flickr
-
Hello For a contest on Imperium der Steine i mixed up the iconic AT-AT Walker with my Avatar, the Legopard. Enjoy all the details on MOCpages. May the force be with you! Jonas
-
i have made a 10178 mod with working steering system. maybe someone want build it , so i have a lxf file for you please note that the middle section of the hull is one stud longer than at 10178. the roof is modified too to fit better to the movie AT-AT hope you like it and it works satisfying for you
-
OK, so I have been working for months and months on and off on this AT-AT (since last December to be precise). You may or may not remember me making a topic about designing an AT-AT in LDD. Well, The LDD design was pretty much complete and so I wanted to get cracking with teh real thing! Aims: I wanted it to represent as many details as possible while allowing certain parts to be movable. Full and complete interior details! Posable legs/feet, with ability to stand up by itself with no support. Head to fit at least 5 minifigs; 2 drivers, the commander and room for 2 random troopers in the rear part of the head. Make the head like no other way I have seen before, include the head hump, chin guns, cheek anti personnel guns, viewport and easy access to head interior through its roof. Head/Neck to be hinged so the head can turn sideways a decent amount while having NO droop. Fit 40 seated minifigs comfortably. Have storage for 5 speeder bikes. Represent the atmospheric filtration system in the upper rear compartment. Neck to have a walkway to fit a minifig all the way through while showing the 'ribbed' exterior detail of the neck. Show the greebles on the rear of the body as best and as accurate as possible. Opening/closing troop bay door. Remove studs where possible but not get too anal about it, ruining detail to achieve it. Source material used/credit to: Incredible Cross Sections (for decision on layout), AT-AT studio model, Digital Recreation by Jas Hodge (unknowingly, but huge thanks to this guy for all the work he did digitally recreating it showing many interior and exterior details in so many angles that I was able to pick out.), Cavegod for his endless criticisms on the many roof designs until I managed to perfect it (to my satisfaction), as well as his (excellent) part usage suggestion for the neck and various other criticisms. Also Brickplumber, for initial inspiration making me decide to take this project on, and for the connection of the feet to the legs. Warning: Sorry for the wall of text... If you would just like to look at the pics, please scroll to the bottom and click the link! I had originally attempted to make the head have a vertical movement as well as horizontal but that failed, which meant I had to change the neck connection, thus changing the rear of the head, and so having to change the connection for the side walls and the roof... bah! I had only just started and was needing to change so much already! While that was going on (for ages might I add!), I started building the legs. Orders were mediocre and I was slowly building it part by part. First 2 feet, then the third foot, then the fourth foot. Then came the legs. All four legs were built and needed to be connected, so I then built the front and rear leg drive motors. Now for the part that I had been desperate to build... the body! Piecing everything together, I started building the platform for the body. Everything was looking excellent and going to plan! A couple of small changes happened to improve it, like decreasing the gap between the front and rear drive motors to bring them closer together, increasing the height of the gap for the troop bay door by 1 plate (surprisingly makes a hell lot of difference with the perceived look). At this point, I was still playing about with the neck design and its ability to turn and so the connecting wall on the body was also being rather annoying in trying to finalise a design for it. Eventually I came to a conclusion and finalised a design for it which included using four of the 2x2 plate turntables (2 on each end, 1 on top, 1 on bottom), and so carried on the build. I built the head into the neck, and was amazed at how solid the connection was for it and how there was absolutely no 'brewers droop' on the head whatsoever! Once the side armour wall was made, I was then able to adjust the width of the rear roof section to meet the wall at the best angle I could achieve. LDD wouldn't allow me to cut the pneumatic flex hose pipe for the upper level interior ceiling detail, but now I had done it in real life, it looked brilliant! I hoped it added just that little bit more detail... Finally! I completed it! well, nearly... It was stood up in all its glory! But I was unhappy with the lack of ribbed flex hose right in front of the body on the neck... so I decided to try something... I went right at it, getting carried away, pushed the part in place thinking how pleased with how good it was looking and it was like time slowed down to milliseconds... The whole thing tilted away from me and all I could do was look on in horror! What seemed like 10 seconds but was only about 2 seconds, the next thing I knew was it was in hundreds of pieces on the floor in front of me as I was still holding this piece I had been trying to attach I had previously said that I was going to be exhibiting this at the Great Western Lego Show (in England) and this created a problem for me. Admittedly, it didn't have the feet 'pistons' that joined the feet to the ankle (I later realised how important these were to its ability to stand by itself)... but was worried about the fact if it was on exhibit and this unstable, I couldn't risk it. I had to think of something. Sat there on the floor, I looked on... and the answer was right in front of me! An AT-AT got tripped up in the film and ended up down on its front knees... my AT-AT had posable leg joints, could it be posed in the exact same pose as in the film?! I tried... It could! And so started the build for the snow scenario, and born was the idea of it being displayed as 'crashed'. (yes, it actually crashed to pieces first before giving me the idea of displaying it crashed ) Time was not on my side, the event weekend was coming up and I had never built anything like this before, let alone on this scale! Why oh why was this happening! Any way, many frantic hurrying messages and orders later, I received my final important order of snow pieces and finally finished the display on the very Friday of the event setup day itself. I set it up for the first time, and dam... it did look good, but having built the snow in a 'just been crashed into' perception myself, I was unsure it recreated the correct feeling, or if it just looked like a bunch of white lego portraying nothing. But thankfully, many very kind comments later, I was left satisfied knowing I had achieved something even better than I could have originally hoped for. I did also set it up (with the feet/ankle 'pistons' in place), and it was quite stable, but I did not want to risk it being that was its first time complete and I had not fully tested its stability, hence some pictures show it stood up with legs posed in a walking position. The intention of the one exposed side was that the people coming to view the exhibits could see the full interior details of the AT-AT from one side, while the other side showed the fully enclosed side with only exterior details visible. So I will delay you no longer, and are the pics of my AT-AT, enjoy! http://www.flickr.co.../in/photostream Forgot to say, criticism welcomed!


.thumb.JPG.3c74c0d405dc1afb04b2fa216ebc79e6.JPG)

.thumb.jpg.2335d10c31c9ffa7029728589340e12f.jpg)