

drakmin
-
Posts
201 -
Joined
-
Last visited
Content Type
Profiles
Forums
Gallery
Everything posted by drakmin
-
 Nice curves! I like the colour coding underneath making it easier to understand the functions!
 -
Work in progress: engine exhaust nozzles. Btw I decided to create an Instagram account for easier update posting in the future https://www.instagram.com/drakmin/ I will first post mainly old images trying to establish somewhat chronological order :D
-
Snowspeeder trying to give new wings scale :)
-
[WIP] Supercar in 1:8 scale
drakmin replied to Erik Leppen's topic in LEGO Technic, Mindstorms, Model Team and Scale Modeling
I like this for its originality. Bodywork is not clean enough at this moment. For my eye the flex axles on the front pop out too much and feel unnecessary. Have you considered sculpting the front without flex axles? I think the whole model would be more consistent that way. With enough design iterations this will be a classic :D -
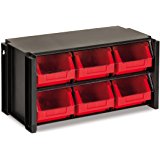
If you look at the larger product photo on the amazon page you can see the optional transparent acryl sheets as dust covers. If you leave those sheets in place there will be no dust problem. On the other hand then you need to pull atleast one drawer outwards to have acces to all parts on that row.
-
I prefer this kind of storage system with "open" containers. You can decide to remove the transparent acryl covers to be able to pick parts directly from the drawers. I personally dislike storage systems where each drawer must be opened before picking parts. https://www.amazon.co.uk/TAYG-309007-Tayg-Shelf-9-Drawer/dp/B006FEW1TI


-
I have managed to make a slimmer wing construction. Thickness is now from 2.5 studs down to 1.5 studs. According to my blueprints this detail is finally correct :D Next it's time to fit the engines and landing gears on the redesigned wings.
-
Best use of orange panels I've ever seen! They form mainly a single surface from which I cannot point out single panels too easily. Great job!
-
I upgraded to this kind of storage system with "open" containers. I removed the transparent acryl covers. I can now pick parts directly from the drawers because they have open front edge. https://www.amazon.co.uk/TAYG-309007-Tayg-Shelf-9-Drawer/dp/B006FEW1TI
-
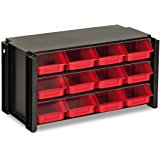
Here are my blueprints on scale. I placed 6 and 4 studs for scale on the both ends of a wing. It seems that absolutely correct wing would be 2,5 studs tapered down to 1,75. These figures are quite impossible and my current wings are 3 studs tapered down to 2. I have about half a stud too thick wings. Currently I'm not sure if I should still experiment to get the exactly correct wing thickness. I think I like this 3 to 2 stud wing more than 2 to 1 stud. Here is the current tapering method which is possible with 3 to 2 stud wings. One wing is 67 studs long from the center of the ship. Full wingspan is 133 studs. As a last photo: latest iteration of wing mechanism. Now it feels stable enough. On the backround you can see a glimpse of my new storage system :)
-
Blue and DBG for me! They both look balanced with the model and they both make sense "historically" (original technic set seat colour & Kuipers car as inspiration) If this was my own design I still might use tan seats to represent leather. If I've understood your design philosophy correctly then then the leather is no option here :D Anyway here's a quick photoshopped leather version, hope you don't mind :) (not sure if the parts even exist in tan) Thanks for entertaining thread!
-
Looks great! I agree with Jeroen on the seats though. I would love to see tan, blue or maybe even white seats! Overall really fresh supercar.
-
YES to all three landing gear questions! Atleast for the time being. Also landing gear hatch is operated by pneumatic cylinders. I might need to reinforce things if my current weight estimate is not enough. About the wings I will of course try to do them to a correct dimension. At the moment I'm not 100% sure if the correct width at the end is 1 1,5 or 2 studs :) I think each one of those is doable. My first ever gif! Here you can see the landing gear range of motion. Basically the landing gears are "wedged" in their place via wormscrews. Most of the weight is going vertically into wing structure. Cellphone photos of the same thing with engine outer shape in it's place.
-
A bit too small head if it's 4 studs wide. 5 studs would be correct diameter for R2 in this case :D I will possibly need to build the R2 also.
-
Small update, a cellphone picture :) At last I have solved the landing gears. At the moment they can support whole ship and they can still fit inside the hull and engines when retracted. If they still hold the completed ship I will post details about their structure and design. I am now doing the front cone as you may be able to see from the drawing on my desk. There are also two front cone prototypes on the desk, try to spot them :D I will have to redo the wings one more time. At first I thought I'll remove one detail of the original ship and do flat underside for wings. I have now decided to add the detail of engines visible to the inner side of wings. This might become quite a problem since there is only a thin area left to be used as structure for the wing. One wing is 450mm in length so avoiding bending and sagging will be a challenge :D
-
Loving this "minimal use of panels" -theme! You've pulled it off really good! (I've had a panelles Technic car on my design queue for years. Your take will speed up my current project to get started sooner with the car design) Your design is so good that I couldn't help but roughly photoshop some ideas on top of it :) Hope you don't mind me posting this image. For my eye the front end could be even more interesting if it didn't have fully connected red areas (horizontally whole car width). The rear is already like this. I also think that your design might benefit from having slimmer tires on front and thicker on the back. Lets say 2 motorcycle tires on front on 3 on back. Of course it might not be possible to find correct tire and rim combination to achieve this. Good luck with the final details and thanks for this thread!
-
I like especially the front with smile :) Beautiful paneling work!
-
[MOC] Aston Martin DB11
drakmin replied to Jeroen Ottens's topic in LEGO Technic, Mindstorms, Model Team and Scale Modeling
Looks really promising! I would consider adding a flex axle right behind front tire and also experiment on making the roof curved from front view. For my eyes the panels curved in only one axis exaggerate the flatness along other axis. -
Jurassic Park Jeep
drakmin replied to Silvavasil's topic in LEGO Technic, Mindstorms, Model Team and Scale Modeling
Great model and colour combination. I like you backround choice in the more simplified images since the scratches and imperfections fit the model. Welcome to Eurobricks! -
Hi and thanks! I've used this thread and images as one reference. For me this seemed the best made material as a reference! http://resinilluminati.com/showthread.php?t=4065&page=2 I don't remember where I found the picture I have printed on the wall. I thought it was in that resinilluminati thread I linked but it doesn't seem so.
-
Hi again. I have now finished my school and graduated as an architect. I will now continue on this build. I already sketched the engines a bit more and it seems that my topic is misleading. Correct topic should be 140cm X-wing ;D
-
I like your Chieftain a lot! It has a lot of interesting three dimensional shapes. I also like your part usage: front grille and steering wheel to name some.
-
Very interesting model, keep it up!
-
42056 - Porsche Speculation
drakmin replied to Jim's topic in LEGO Technic, Mindstorms, Model Team and Scale Modeling
Might be auto white balance setting on cameras when comparing outdoor photos with indoor ones. Red and orange surely look different if you switch lighting from 6500 Kelvin to 3000 for example which is pretty much what bad auto white balance might do. (i came to this conclusion since when you google porsche lava orange it seems to look more orange in indoor photos on general) -
[MOC] LaFerrari hypercar 1:9
drakmin replied to brunojj1's topic in LEGO Technic, Mindstorms, Model Team and Scale Modeling
Ah yes fenders not benders, my bad :D (i'm from finland) Would it have looked strange if the build was exactly as it is but those 3 flex axles next to each other were "covered" with 3l liftarms? Only downside I can think of is that the fourth inner soft axle which is curved on two axis might look isolated. It looks like on the fenders there already is one 3l liftarm where the soft axles start. I've used that method succesfully on some projects, I think it might work with red parts as the soft axles are the same colour. Hehe PF-purist conversation was maybe more about the Porsche set or generally for official sets. (for kids to learn :D) But future kids will have Tesla and other electric cars so they wont need to know about combustion engine cars drivetrain :D Your moc is near perfect even with the PF parts!